SpinetiX HMP100 User manual

Hyper Media Player
HMP100
User Guide v2.0

© 2009 SpinetiX S.A. All rights reserved.
2
DISCLAIMER
TH SP CIFICATIONS AND INFORMATION R GARDING TH PRODUCTS IN THIS MANUAL
AR SUBJ CT TO CHANG WITHOUT NOTIC . ALL STAT M NTS, INFORMATION, AND
R COMM NDATIONS IN THIS MANUAL AR B LI V D TO B ACCURAT BUT AR
PR S NT D WITHOUT WARRANTY OF ANY KIND, XPR SS OR IMPLI D. US RS MUST
TAK FULL R SPONSIBILITY FOR TH IR APPLICATION OF ANY PRODUCTS. TH
SOFTWAR LIC NS AND LIMIT D WARRANTY FOR TH ACCOMPANYING PRODUCT AR
S T FORTH IN TH INFORMATION PACK T THAT IS SHIPP D WITH TH PRODUCT AND
AR INCORPORAT D H R IN BY THIS R F R NC . IF YOU AR UNABL TO LOCAT TH
SOFTWAR LIC NS OR LIMIT D WARRANTY, CONTACT YOUR SPIN TIX
R PR S NTATIV FOR A COPY.
NOTWITHSTANDING ANY OTH R WARRANTY H R IN, ALL DOCUM NT FIL S AND
SOFTWAR OF TH S SUPPLI RS AR PROVID D “AS IS” WITH ALL FAULTS. SPIN TIX
DISCLAIMS ALL WARRANTI S, XPR SS D OR IMPLI D, INCLUDING, WITHOUT
LIMITATION, THOS OF M RCHANTABILITY, FITN SS FOR A PARTICULAR PURPOS AND
NONINFRING M NT OR ARISING FROM A COURS OF D ALING, USAG , OR TRAD
PRACTIC .
IN NO V NT SHALL SPIN TIX OR ITS SUPPLI RS B LIABL FOR ANY INDIR CT,
SP CIAL, CONS QU NTIAL, OR INCID NTAL DAMAG S, INCLUDING, WITHOUT
LIMITATION, LOST PROFITS OR LOSS OR DAMAG TO DATA ARISING OUT OF TH US
OR INABILITY TO US THIS MANUAL, V N IF SPIN TIX OR ITS SUPPLI RS HAV B N
ADVIS D OF TH POSSIBILITY OF SUCH DAMAG S.
Hyper Media Player HMP100 User Manual v2.0
©2009 SpinetiX S.A. All rights reserved.
"SpinetiX" and “HMP Hyper Media Player” are registered trademarks, and all logo and graphic designs
are trademarks of SpinetiX S.A. Other product and company names appearing in SpinetiX S.A.
products and materials are used for identification purposes only and may be trademarks or registered
trademarks of their respective companies. Registered and unregistered trademarks used in any
SpinetiX S.A. products and materials are the exclusive property of their respective owners
SpinetiX S.A.
Rue des Terreaux 17
1003 Lausanne
Switzerland
www.spinetix.com

HMP100 User Guide v2.0
3
INTRODUCTION
SpinetiX HMP100 is the first networked Hyper Media Player appliance dedicated to the
professional digital signage industry. In this field it represents for final users, integrators
and service providers a better alternative of choice to personal and industrial computers
and proprietary dedicated software.
HMP100 offers a standard and simplified way to schedule, combine, update, animate,
stream and display video, audio, vector graphics, pictures and text with low acquisition
and operational costs. The rich set of functionalities offered by HMP100 simplifies the
implementation, management and maintenance of effective and modern audio/visual
communication solutions.
HMP100 is not a simple media player, but an Hyper Media player. It combines in an
embedded solution all the display functionalities of a PC.
What is Hyper Media? As defined by Wikipedia, Hyper Media “is used as a logical
extension of the term hypertext in which graphics, audio, video, plain text and hyperlinks
intertwine to create a generally non-linear medium of information.”
A movie or a video clip is a typical linear content: you watch it from the beginning to the
end. The content in a W B page is a typical example of non linear content: multiple
media elements are dynamically and interactively consumed. Servers use PHP scripts and
databases to retrieve live content and allow the browser to display the latest information
in an interactive and dynamic way.
The HMP100 allows you to obtain the same result on any digital screen or projector and
display true Hyper Media content exactly as you can do with a PC-based solution.
Thanks to its compact form factor, robust and dedicated hardware, HMP100 turns any
digital display into a network device.
In this short manual we collect the information published on the W B on HMP100. Read
this information to quickly get started with HMP100 units.

© 2009 SpinetiX S.A. All rights reserved.
4
HMP100
HMP100 can be ordered in the followinig versions:
Starter Pack
Content:
1 unit of HMP100
1 voucher to download a single node, multi users license of the HMD software
Professional Pack
Content:
10 units of HMP100
1 voucher to download a single node, multi-users license of the HMD software

HMP100 User Guide v2.0
5
TABLE OF CONTENT
Disclaimer ............................................................................................................ 2
Introduction .......................................................................................................... 3
HMP100 ............................................................................................................... 4
Starter Pack ...................................................................................................... 4
Professional Pack ............................................................................................... 4
Table of Content .................................................................................................... 5
How it works? ....................................................................................................... 6
The first Hyper Media Player ................................................................................... 7
asy to install and maintain .................................................................................... 8
Plug & Play ........................................................................................................ 8
Top reliability ..................................................................................................... 8
Smallest form factor! .......................................................................................... 9
Remote Monitoring ............................................................................................. 9
Updates and upgrades ........................................................................................ 9
Full Connectivity ...................................................................................................10
Installing HMP100 .................................................................................................12
Learn HMP100 connectors ..................................................................................12
HMP100 Front panel connectors .......................................................................12
HMP100 Back panel connectors .......................................................................12
Power up HMP100 .............................................................................................13
Reset HMP100 to its factory default settings .........................................................14
Updating firmware .............................................................................................14
Check for updates ..........................................................................................15
Updating HMP100 firmware .............................................................................16
Automatic update ..........................................................................................16
Get Connected .....................................................................................................18
Requirements: ...............................................................................................18
Guide: ..........................................................................................................18
Troubleshooting .............................................................................................19
How to connect to the HMP100 from Mac OS X without HMD ..................................20
Requirements: ...............................................................................................20
Finding the HMP100 on the network: ................................................................20
Connecting to the HMP100 content: .................................................................22
Automatic DHCP configuration ............................................................................23
Troubleshooting .............................................................................................24
Fixed IP configuration ........................................................................................25
Troubleshooting .............................................................................................26
Configure the network connection of your PC ........................................................27
HMP100 HTTP server .............................................................................................29
Set Display settings ...........................................................................................30
Use an USB drives with HMP100..........................................................................31
Control user rights ............................................................................................32
Configuration guide: .......................................................................................32
Configure network credentials for remote servers ..................................................33
Using a network server with HMP100 ...................................................................34
Content access modes .......................................................................................35
The Pull mode ...............................................................................................36
How to configure HMP100 to use serial port ..........................................................37
nabling RS232 .............................................................................................37
Configuring RS232 .........................................................................................38
Technical specification ...........................................................................................39
SPIN TIX HARDWAR LIMIT D WARRANTY AGR M NT ...........................................41
SPIN TIX nd-User Software License Agreement ......................................................42

© 2009
SpinetiX S.A. All rights reserved.
6
HOW IT WORKS?
SpinetiX HMP100
simplifies the publishing and maintenance of your digital signage
project.
Connected to digital displays through HDMI and VGA, HMP100 is capable of rendering
combinations of media elements from a rich set of formats: audio, video, vector graphics,
pictur
es and text. HMP100 natively implements the open standards required to schedule,
update, stream, and animate each supported media. Distributing content from a central
location onto a specific display is as easy as publishing a web page.
As a network appli
ance HMP100 offers plug & play functionalities that simplifies
installation, remote maintenance and monitoring. From anywhere, your network of digital
displays is under control.
SpinetiX S.A. All rights reserved.
HOW IT WORKS?
simplifies the publishing and maintenance of your digital signage
Connected to digital displays through HDMI and VGA, HMP100 is capable of rendering
combinations of media elements from a rich set of formats: audio, video, vector graphics,
es and text. HMP100 natively implements the open standards required to schedule,
update, stream, and animate each supported media. Distributing content from a central
location onto a specific display is as easy as publishing a web page.
ance HMP100 offers plug & play functionalities that simplifies
installation, remote maintenance and monitoring. From anywhere, your network of digital
simplifies the publishing and maintenance of your digital signage
Connected to digital displays through HDMI and VGA, HMP100 is capable of rendering
combinations of media elements from a rich set of formats: audio, video, vector graphics,
es and text. HMP100 natively implements the open standards required to schedule,
update, stream, and animate each supported media. Distributing content from a central
ance HMP100 offers plug & play functionalities that simplifies
installation, remote maintenance and monitoring. From anywhere, your network of digital

THE FIRST H PER MEDI
Only your imagination is the limit because HMP
player.
HMP 100 enriches digital signage projects with high quality video, audio, images,
animations and text... all these media can be retrieved by HMP100 from local or network
resources and can be combined and rendered
specific graphical layouts and time schedules.
HMP100 extends the basic functionalities of state of the art media players supporting
Hyper Media content. The term hypermedia is used as a logical extension of the t
hypertext, in which graphics, audio, video, plain text and hyperlinks intertwine to create
a generally non-
linear medium of information. HMP100 brings hypermedia content on
digital displays in several ways. For example it is possible to:
access public
or private databases and display contextual selected content with
predefined graphical layouts;
aggregate and display RSS news based on key words;
connect to public or private audio/video streaming servers and display live
events, news and entertainment co
retrieve from network disks images and videos satisfying specific constraints;
enable all sorts of network interactive services;
schedule which content to display when and where;
stream live audio/video source (IP cam, video servers...)
With all
these functionalities brought by HMP100 it has never been so simple to create,
customize, keep up to date and schedule content for your digital signage network!
HMP100 User
THE FIRST H PER MEDI
A PLA ER
Only your imagination is the limit because HMP
100 is even more than a multi media
HMP 100 enriches digital signage projects with high quality video, audio, images,
animations and text... all these media can be retrieved by HMP100 from local or network
resources and can be combined and rendered
on any type of digital displays following
specific graphical layouts and time schedules.
HMP100 extends the basic functionalities of state of the art media players supporting
Hyper Media content. The term hypermedia is used as a logical extension of the t
hypertext, in which graphics, audio, video, plain text and hyperlinks intertwine to create
linear medium of information. HMP100 brings hypermedia content on
digital displays in several ways. For example it is possible to:
or private databases and display contextual selected content with
predefined graphical layouts;
aggregate and display RSS news based on key words;
connect to public or private audio/video streaming servers and display live
events, news and entertainment co
ntents;
retrieve from network disks images and videos satisfying specific constraints;
enable all sorts of network interactive services;
schedule which content to display when and where;
stream live audio/video source (IP cam, video servers...)
these functionalities brought by HMP100 it has never been so simple to create,
customize, keep up to date and schedule content for your digital signage network!
HMP100 User
Guide v2.0
7
100 is even more than a multi media
HMP 100 enriches digital signage projects with high quality video, audio, images,
animations and text... all these media can be retrieved by HMP100 from local or network
on any type of digital displays following
HMP100 extends the basic functionalities of state of the art media players supporting
Hyper Media content. The term hypermedia is used as a logical extension of the t
erm
hypertext, in which graphics, audio, video, plain text and hyperlinks intertwine to create
linear medium of information. HMP100 brings hypermedia content on
or private databases and display contextual selected content with
connect to public or private audio/video streaming servers and display live
retrieve from network disks images and videos satisfying specific constraints;
these functionalities brought by HMP100 it has never been so simple to create,
customize, keep up to date and schedule content for your digital signage network!

© 2009 SpinetiX S.A. All rights reserved.
8
EAS TO INSTALL AND MAINTAIN
When working with personal computers, everyone has experienced installation and
maintenance troubles. In professional environments, when service must be guaranteed
on a 24/7 basis, installing PC and maintaining them updated, upgraded and in correct
working status is the job of IT specialists and require the on-site intervention of
technicians. This job represents consistent and recurrent expenses that prevent today
the wide adoption of distributed network of digital signs.
HMP100 has been designed to simplify both the installation and the maintenance tasks
by offering:
•Plug & Play
•Top reliability
•Smallest form factor
•Remote monitoring
•Updates and upgrades
Plug & Play
HMP100 is a dedicated appliance and thus truly “plug and play”.
You start a HMP100 by plugging in two cables: the power line and the video cable (HDMI
and/or VGA) to the digital display. As soon as it is connected to the power line, HMP100
boots in a few seconds and automatically selects the resolution supported by the
associated digital display so as to start rendering content in less than 1 minute.
When connected to a local network through the RJ45 connector, HMP100 automatically
detects and configures the right parameters without the need of IT specialists. Whether
you choose to activate the DHCP support to automatically configure the network or
specify the IP address and network properties manually, HMP100 minimizes the costs of
setting up networked digital signage projects. When custom configurations are required,
HMP100 offers an intuitive web interface that allows through any web browser to choose
different network and display options.
Top reliability
HMP100 has been designed to satisfy the reliability constraints of nonstop 24/7 display
service and minimize the costs of maintenance that represent today with state of the art
technology more than 40% of the operative costs in digital signage projects.
To achieve this goal, HMP100 hardware design does not include any mechanical parts
such as fans or hard drives. These parts suffer from reliability and limited life-time issues
which become critical when the environment is dusty or without correct air circulation.
Moreover, HMP100 integrates electronics which are designed for the automotive industry
with the top quality and reliability standards and is protected by a solid and compact
aluminum case that reduces the risks of damage when transported and installed.
Finally, HMP100 runs a Linux OS and software applications designed for the HMP100
hardware architecture.

HMP100 User Guide v2.0
9
Smallest form factor!
HMP100: 200g of high technology concentrate.
HMP100 is the smallest digital signage hyper media player on the market. With only
10.5x9x2.5 cm and 200g, HMP100 simplifies your logistic and installation process.
Whether you integrate it behind your screens, behind your technical floor or under the
roof, HMP100 does not suffer from dust or heat. Its aluminum case guarantees
robustness and protection in tough environments.
Remote Monitoring
The management of a distributed network of HMP100 devices is simplified by the native
support of the SNMP protocol. Through this standard protocol HMP100 devices can
publish all their vital parameters such as storage level and CPU status. There are several
network management software tools that support SNMP protocol. These tools offer
professional graphical frameworks to remote monitoring the status of an individual
HMP100 unit or a complex network of units. It is possible to set threshold on the
monitored variables and associate alarm events to prevent failures and schedule an
efficient maintenance.
In addition to SNMP protocol, HMP100 implements an intuitive web interface. By
connecting to the IP address of a specific HMP100 unit with any web browser, the user
can monitor the status of the unit and even configure specific parameters.
Updates and upgrades
HMP100 can update and upgrade its functionalities. This guarantees a reactive customer
service and the possibility to support new media formats and video standards, new
devices such as touch screens, and new extensions such as wireless network
connectivity. Updates and upgrades are automatically installed on HMP100 from a local
or remote PC using the software packages distributed by SpinetiX. The entire process
limits the downtime of the unit to about 1 minute.

© 2009
SpinetiX S.A. All rights reserved.
10
FULL CONNECTIVIT
HMP100 offers full connectivity ca
HMP100 connects to digital displays through onboard HDMI and VGA connectors. Through
the HDMI output it is possible to support DVI displays as well, but in this case the digital
audio is lost.
Both connectors are simultaneously active so a
of additional splitters. HDMI is a digital audio/video connector widely adopted by most
digital displays. VGA is an analogue computer video connector also supported by the
majority of digital displays. VGA connector
reason, an analogue audio connector is provided by the HMP100.
HMP100 is a high-
definition ready
device: it can render content on
digital displays with resolution up to
1280x720 at 60Hz (720p resolution)
The Maximum resolution supported
by HMP100 is:
•1280x720 (16:9)
•1024x640 (16:10)
•1024x768 (4:3)
HMP100 connects to the network through an onboard RJ
ach HMP100 unit has a unique MAC address that allows to identify the
unit and thus the associated display.
HMP100 supports 10/100BAS
to connect
to network file systems and retrieve media elements.
In particular:
•
thernet 10/100 Mbit/s,
•
IPv4, DHCP or fixed address
•
HTTP configuration server, password protected
•
HTTP client for web content retrieval
•
WebDAV server, password protected
•SNMPv1/v2c,
•NTP
HMP100 supports USB2.0 Hi
-
1
Video standards supported 480p, 576p, 720p, 50 or 60 fps
SpinetiX S.A. All rights reserved.
FULL CONNECTIVIT
HMP100 offers full connectivity ca
pabilities.
HMP100 connects to digital displays through onboard HDMI and VGA connectors. Through
the HDMI output it is possible to support DVI displays as well, but in this case the digital
Both connectors are simultaneously active so a
s to drive two monitors without the need
of additional splitters. HDMI is a digital audio/video connector widely adopted by most
digital displays. VGA is an analogue computer video connector also supported by the
majority of digital displays. VGA connector
does not carry audio information: for this
reason, an analogue audio connector is provided by the HMP100.
definition ready
device: it can render content on
digital displays with resolution up to
1280x720 at 60Hz (720p resolution)
1
.
The Maximum resolution supported
HMP100 connects to the network through an onboard RJ
-
45 connector.
ach HMP100 unit has a unique MAC address that allows to identify the
unit and thus the associated display.
HMP100 supports 10/100BAS
-
T thernet and all the required protocols
to network file systems and retrieve media elements.
thernet 10/100 Mbit/s,
IPv4, DHCP or fixed address
HTTP configuration server, password protected
HTTP client for web content retrieval
WebDAV server, password protected
-
Speed with a bandwidth up to 10 Mbyte/s.
Video standards supported 480p, 576p, 720p, 50 or 60 fps
HMP100 connects to digital displays through onboard HDMI and VGA connectors. Through
the HDMI output it is possible to support DVI displays as well, but in this case the digital
s to drive two monitors without the need
of additional splitters. HDMI is a digital audio/video connector widely adopted by most
digital displays. VGA is an analogue computer video connector also supported by the
does not carry audio information: for this
45 connector.
ach HMP100 unit has a unique MAC address that allows to identify the
T thernet and all the required protocols
Speed with a bandwidth up to 10 Mbyte/s.

USB interface can be used to extend the local storage through memory sticks or hard
drives. The same interface can support external devices such as touch screen controllers.
W
hen professional displays are connected to HMP100, the standard RS
232 connector lets you control the behavior of the monitor: On/off,
volume, sources, image properties.
It is possible to upload multiple protocols to support different display
models. The r
equired cable can be purchased from SpinetiX
HMP100 User
USB interface can be used to extend the local storage through memory sticks or hard
drives. The same interface can support external devices such as touch screen controllers.
hen professional displays are connected to HMP100, the standard RS
232 connector lets you control the behavior of the monitor: On/off,
volume, sources, image properties.
It is possible to upload multiple protocols to support different display
equired cable can be purchased from SpinetiX
HMP100 User
Guide v2.0
11
USB interface can be used to extend the local storage through memory sticks or hard
drives. The same interface can support external devices such as touch screen controllers.
hen professional displays are connected to HMP100, the standard RS
-
232 connector lets you control the behavior of the monitor: On/off,
It is possible to upload multiple protocols to support different display

© 2009
SpinetiX S.A. All rights reserved.
12
INSTALLING HMP100
Installing HMP100 is a relatively simple task.
Integrators and electricians appreciate the limited number of cables required to connect
the HMP100 unit and its light form factor: a Velcro str
any position you like.
Since the unit does not heat and does not contain mechanical parts, it can be installed
indoor almost everywhere: just be careful of water and humidity infiltrations!
Once installed, getting started
sections we show how to connect one or more units onto your network and how to
publish content from the Hyper Media Director software to specific displays.
Learn HMP100 connectors
HMP100 exposes seve
ral I/O connectors identified by small icons. In this guide we will
only use those required to test that your HMP100 unit is functional.
HMP100 Front panel connectors
RS232 interface: the serial port
is used in development mode
only
thernet RJ45:
plug the thernet
cable in this socket
USB 2.0 supports an USB
memory device
L Ds The green/red L D gives an
indication on the state of the
system.
Push-
button: this push
used to manually reboot the
HMP100 unit. Keep it pressed fro
few
seconds.
HMP100 Back panel connectors
5V-
DC input: power socket
where the power adapter DC
output jack is to be plugged.
Digital Video out. Standard
High Definition Media
Interface (HDMI) available on
most recent digital displays. It
also
carries digital audio.
Analog Audio out: This stereo
audio output can be used to
drive amplified audio
speakers.
Analog Video out: Standard
Video Graphics Array (VGA)
supported by most LCD
SpinetiX S.A. All rights reserved.
INSTALLING HMP100
Installing HMP100 is a relatively simple task.
Integrators and electricians appreciate the limited number of cables required to connect
the HMP100 unit and its light form factor: a Velcro str
ipe can be used secure HMP100 in
Since the unit does not heat and does not contain mechanical parts, it can be installed
indoor almost everywhere: just be careful of water and humidity infiltrations!
Once installed, getting started
with HMP100 is a matter of few steps. In the following
sections we show how to connect one or more units onto your network and how to
publish content from the Hyper Media Director software to specific displays.
Learn HMP100 connectors
ral I/O connectors identified by small icons. In this guide we will
only use those required to test that your HMP100 unit is functional.
HMP100 Front panel connectors
RS232 interface: the serial port
is used in development mode
plug the thernet
cable in this socket
USB 2.0 supports an USB
memory device
L Ds The green/red L D gives an
indication on the state of the
system.
button: this push
-button is
used to manually reboot the
HMP100 unit. Keep it pressed fro
seconds.
HMP100 Back panel connectors
DC input: power socket
where the power adapter DC
output jack is to be plugged.
Digital Video out. Standard
High Definition Media
Interface (HDMI) available on
most recent digital displays. It
carries digital audio.
Analog Audio out: This stereo
audio output can be used to
drive amplified audio
speakers.
Analog Video out: Standard
Video Graphics Array (VGA)
supported by most LCD
Integrators and electricians appreciate the limited number of cables required to connect
ipe can be used secure HMP100 in
Since the unit does not heat and does not contain mechanical parts, it can be installed
indoor almost everywhere: just be careful of water and humidity infiltrations!
with HMP100 is a matter of few steps. In the following
sections we show how to connect one or more units onto your network and how to
publish content from the Hyper Media Director software to specific displays.
ral I/O connectors identified by small icons. In this guide we will

screens.
Power up HMP100
1. Check your digital
display. HMP100 can drive a digital display through HDMI or VGA
connections: make sure that your display supports at least one of the two.
2. Get the correct video cable. HMP100 is not delivered with HDMI or VGA cables: these
are often provided with the d
your display make sure to get the right video cable.
3. Connect HMP100 to the display. Simply plug the HDMI or the VGA cable between the
corresponding video out connector on the front panel of
video in connector of your display.
4. Power up the display. Make sure to select the right video input.
5. Power up HMP100. Use the cables and the power converter provided in the HMP100
package. Simply plug the power converte
other to the back panel DC jack.
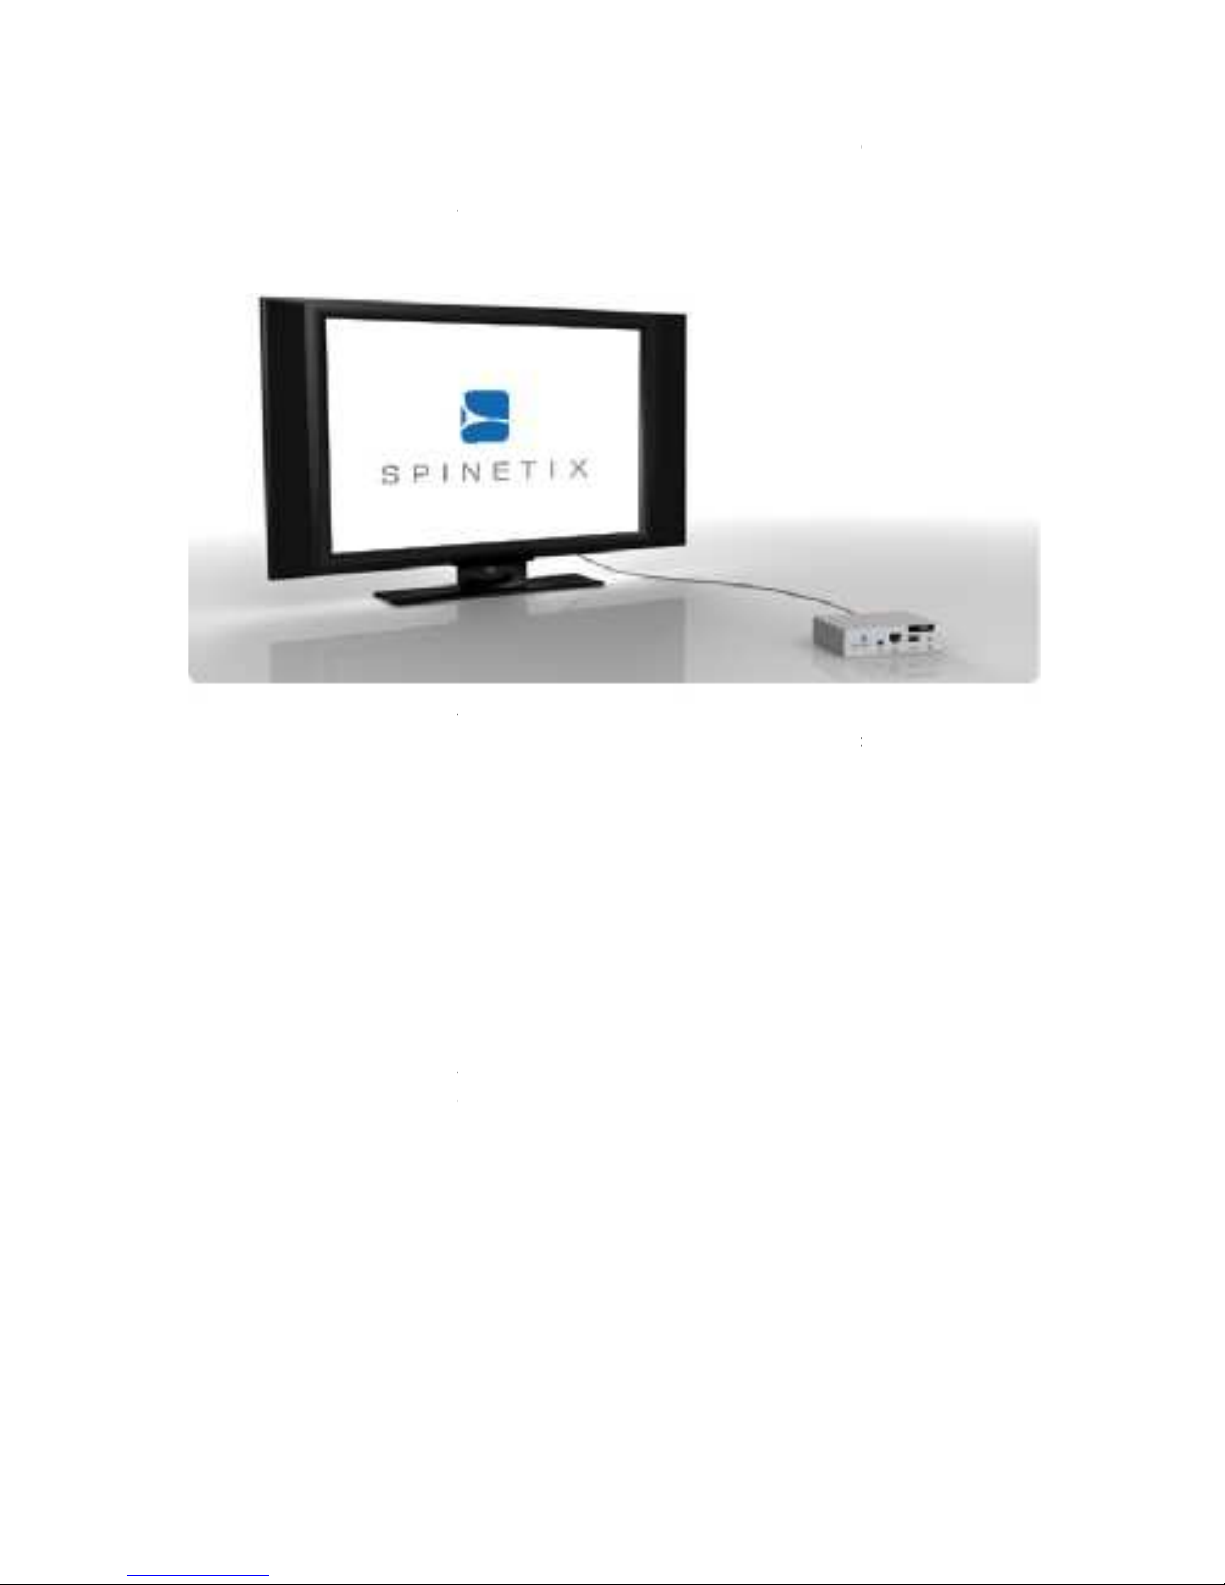
Shortly after power up, the screen displays the SpinetiX splash screen as displayed in the
Figure.
The first time HMP100 boots, the automatic configuration procedure takes ab
minute. The process will be reduced to less than 50 seconds when you will reboot the
HMP100 User
screens.
display. HMP100 can drive a digital display through HDMI or VGA
connections: make sure that your display supports at least one of the two.
2. Get the correct video cable. HMP100 is not delivered with HDMI or VGA cables: these
are often provided with the d
isplay or can be found in specialized shops. According to
your display make sure to get the right video cable.
3. Connect HMP100 to the display. Simply plug the HDMI or the VGA cable between the
corresponding video out connector on the front panel of
HMP100 and the corresponding
video in connector of your display.
4. Power up the display. Make sure to select the right video input.
5. Power up HMP100. Use the cables and the power converter provided in the HMP100
package. Simply plug the power converte
r on one side to a 110-
220V outlet and on the
other to the back panel DC jack.
Shortly after power up, the screen displays the SpinetiX splash screen as displayed in the
The first time HMP100 boots, the automatic configuration procedure takes ab
minute. The process will be reduced to less than 50 seconds when you will reboot the
HMP100 User
Guide v2.0
13
display. HMP100 can drive a digital display through HDMI or VGA
connections: make sure that your display supports at least one of the two.
2. Get the correct video cable. HMP100 is not delivered with HDMI or VGA cables: these
isplay or can be found in specialized shops. According to
3. Connect HMP100 to the display. Simply plug the HDMI or the VGA cable between the
HMP100 and the corresponding
5. Power up HMP100. Use the cables and the power converter provided in the HMP100
220V outlet and on the
Shortly after power up, the screen displays the SpinetiX splash screen as displayed in the
The first time HMP100 boots, the automatic configuration procedure takes ab
out 1½
minute. The process will be reduced to less than 50 seconds when you will reboot the
© 2009
SpinetiX S.A. All rights reserved.
14
HMP100 again. During this booting process the front panel L D shows green and red
activity.
At the end of the booting process, the screen will start displaying the
logo. This is the default content. At this time, the green L D blinks regularly on and off
every second to notify the correct behavior of HMP100.
If your system did not have the behavior described above you may have a defective unit.
Before contacting SpinetiX, make sure that the digital displays are functional and that the
right input has been selected (some displays have multiple inputs and you may need to
manually select the right one). Also check that the push button is not pressed
elements. If the set-
up appears correct, try to power down and up the HMP100 unit by
unplugging and plugging again the power. If this does not correct the errors send a
message describing what you observe to support@spinetix.com
Reset HMP100
to its factory default settings
WARNING:
The following procedure will delete all the content and configurations on the
HMP100 unit.
To reinitialize the HMP100 unit to its factory default settings do the following:
a)
Unplug the unit from the power.
b) Push the
blue button and keep it pressed.
c)
Power up again the HMP100 unit.
d)
Wait with the push button pressed at least 8 seconds.
e)
Release the push button.
f)
The HMP100 unit will now boot in the factory default mode and will have the
default IP address.
Updating firmware
SpinetiX regularly publishes new firmware versions for HMP100. These new versions are
free to all customers and improve the performances and reliability of your product.
SpinetiX S.A. All rights reserved.
HMP100 again. During this booting process the front panel L D shows green and red
At the end of the booting process, the screen will start displaying the
logo. This is the default content. At this time, the green L D blinks regularly on and off
every second to notify the correct behavior of HMP100.
If your system did not have the behavior described above you may have a defective unit.
Before contacting SpinetiX, make sure that the digital displays are functional and that the
right input has been selected (some displays have multiple inputs and you may need to
manually select the right one). Also check that the push button is not pressed
up appears correct, try to power down and up the HMP100 unit by
unplugging and plugging again the power. If this does not correct the errors send a
message describing what you observe to support@spinetix.com
to its factory default settings
The following procedure will delete all the content and configurations on the
To reinitialize the HMP100 unit to its factory default settings do the following:
Unplug the unit from the power.
blue button and keep it pressed.
Power up again the HMP100 unit.
Wait with the push button pressed at least 8 seconds.
Release the push button.
The HMP100 unit will now boot in the factory default mode and will have the
SpinetiX regularly publishes new firmware versions for HMP100. These new versions are
free to all customers and improve the performances and reliability of your product.
HMP100 again. During this booting process the front panel L D shows green and red
animated SpinetiX
logo. This is the default content. At this time, the green L D blinks regularly on and off
If your system did not have the behavior described above you may have a defective unit.
Before contacting SpinetiX, make sure that the digital displays are functional and that the
right input has been selected (some displays have multiple inputs and you may need to
manually select the right one). Also check that the push button is not pressed
by external
up appears correct, try to power down and up the HMP100 unit by
unplugging and plugging again the power. If this does not correct the errors send a
The following procedure will delete all the content and configurations on the
To reinitialize the HMP100 unit to its factory default settings do the following:
The HMP100 unit will now boot in the factory default mode and will have the
SpinetiX regularly publishes new firmware versions for HMP100. These new versions are
free to all customers and improve the performances and reliability of your product.

HMP100 User Guide v2.0
15
Check for updates
To check if a new version of the firmware is available for your unit, follow the simple
steps below:
1. With your preferred web browser, connect to the HTTP server of your unit.
2. Click on Firmware Update under the dministration menu on your left.
3. Check that the field Server URI is equal to:
“http://download.spinetix.com/hmp100/updates/”. (If this is not the case, click
the Reset to Default button)
4. In the section Manual Update, select the update source “From server” and click
the Check for Update button.
A new page will open. At the end of the check, the page reports the current update
status of your HMP100 unit. Three cases are possible:
•No updates are available. Check Figure 1 to see how the page looks like in this
case.
•Updates are ready to install. See the section 'Updating HMP100 firmware'
section to learn how to process with the update.
•Update failed: Check Figure 2 to see how the page looks like in this case.
The most probable source of this error is that your HMP100 couldn't contact the
update server. It is recommended to check your internet connection and your
network configuration. Make sure that a Gateway and a DNS server are
configured.
If the HMP100 is not connected to the internet, you need to contact
support@spinetix.com to check which update procedure is best suited to your
configuration. Please, specify in your message if your HMP100 unit(s) are in a
location where you can easily plug an USB key or if they have local network
connectivity.
•Fatal Error: If the update process reports a fatal error, please contact
support@spinetix.com to find how to restore the firmware of your HMP100.
Figure 1: No update available

© 2009
SpinetiX S.A. All rights reserved.
16
Updating HMP100 firmware
If the check for updates procedure reported that updates are available for your HMP100,
an Update Now
button appears in the
process.
Important
do not power down the unit during the whole update process.
The HMP100 will restart automatically once the update process is over. It is possible that
the web page displays a time
on the update process itself.
At the end of this process, by refreshing your web browser the new firmware version will
be reported under section
Current Versions
again, the page will report that no updates are available.
It is possible that the HMP100 performed only a partial update of the firmware. In this
case you need to update the firmware a second time.
Automatic update
If your HMP100 is configured
Internet, it will update its firmware in an automatic and transparent manner as soon as a
firmware is available. The update will take place at 3:00 AM and will not modify the
content played by the HMP100
To enable automatic update:
1.
Check the " nable automatic updates" check box
2.
Select the update time.
3.
Press Apply to validate your changes.
SpinetiX S.A. All rights reserved.
Figure 2: Update failed
Updating HMP100 firmware
If the check for updates procedure reported that updates are available for your HMP100,
button appears in the
page. Simply click this button to start the update
do not power down the unit during the whole update process.
The HMP100 will restart automatically once the update process is over. It is possible that
the web page displays a time
-
out error during the update. However, this has no influence
At the end of this process, by refreshing your web browser the new firmware version will
Current Versions
. If you click the
Check for Update
again, the page will report that no updates are available.
It is possible that the HMP100 performed only a partial update of the firmware. In this
case you need to update the firmware a second time.
If your HMP100 is configured
to use automatic update and has direct access to the
Internet, it will update its firmware in an automatic and transparent manner as soon as a
firmware is available. The update will take place at 3:00 AM and will not modify the
content played by the HMP100
nor its display and networks settings.
To enable automatic update:
Check the " nable automatic updates" check box
Select the update time.
Press Apply to validate your changes.
If the check for updates procedure reported that updates are available for your HMP100,
page. Simply click this button to start the update
do not power down the unit during the whole update process.
The HMP100 will restart automatically once the update process is over. It is possible that
out error during the update. However, this has no influence
At the end of this process, by refreshing your web browser the new firmware version will
Check for Update
button
It is possible that the HMP100 performed only a partial update of the firmware. In this
to use automatic update and has direct access to the
Internet, it will update its firmware in an automatic and transparent manner as soon as a
firmware is available. The update will take place at 3:00 AM and will not modify the

HMP100 User Guide v2.0
17

© 2009
SpinetiX S.A. All rights reserved.
18
GET CONNECTED
This tutorial explains how to access for the first time an
using the RJ-
45 Ethernet interface. This step is required to access the HM 100
administration HTT server or to publish content on a HM 100 unit.
Note
that this procedure applies only if you have not modified the default network
conf
iguration of the HMP100 unit. See
your HMP100 has the default network configuration.
Requirements:
•
One of the following configurations
oPC with RJ-
45 10/100/1000 thernet interface
oPC with RJ-
45 10/100 thernet interface and an thernet crossover cable.
oPC with RJ-
45 10/100 thernet interface, a switch and 2 thernet cables.
•One HMP100 unit
Guide:
1. Connect the PC
, through the switch depending on the chosen
HMP100 unit following one of the above schemes.
2. Power up the PC
and switch (if applicable).
3.
Power up the HMP100 unit.
connected to a display: allow about 1mn to HMP100 to boot up, you will see the
green light blinking once per second).
4. Configure
the network on your PC.
You need to configure your PC to have the following netw
a.
IP address: 192.168.1.9 (or any other free address in the 192.168.1.1
192.168.255.254 range, except 192.168.1.10).
SpinetiX S.A. All rights reserved.
GET CONNECTED
This tutorial explains how to access for the first time an
HM 100 unit from a C
45 Ethernet interface. This step is required to access the HM 100
administration HTT server or to publish content on a HM 100 unit.
that this procedure applies only if you have not modified the default network
iguration of the HMP100 unit. See
Reset to Factory default
your HMP100 has the default network configuration.
One of the following configurations
45 10/100/1000 thernet interface
and an thernet cable.
45 10/100 thernet interface and an thernet crossover cable.
45 10/100 thernet interface, a switch and 2 thernet cables.
, through the switch depending on the chosen
setup, to the
HMP100 unit following one of the above schemes.
and switch (if applicable).
Power up the HMP100 unit.
(Note that the HMP100 unit does not need to be
connected to a display: allow about 1mn to HMP100 to boot up, you will see the
green light blinking once per second).
the network on your PC.
You need to configure your PC to have the following netw
ork configuration:
IP address: 192.168.1.9 (or any other free address in the 192.168.1.1
192.168.255.254 range, except 192.168.1.10).
HM 100 unit from a C
45 Ethernet interface. This step is required to access the HM 100
administration HTT server or to publish content on a HM 100 unit.
that this procedure applies only if you have not modified the default network
to make sure that
and an thernet cable.
45 10/100 thernet interface and an thernet crossover cable.
45 10/100 thernet interface, a switch and 2 thernet cables.
setup, to the
(Note that the HMP100 unit does not need to be
connected to a display: allow about 1mn to HMP100 to boot up, you will see the
ork configuration:
IP address: 192.168.1.9 (or any other free address in the 192.168.1.1
-

HMP100 User Guide v2.0
19
b. Sub net mask: 255.255.0.0
c. Default gateway: none
d. DNS server: none
5. Validate that the above steps are successful:
a. Make sure that HMP100 has completed the booting phase: allow about 1 minute
from the HMP100 power up. If you have connected HMP100 to a display you
should see the default animated logo.
b. Check that the L D is blinking green once per second. If this is not the case go to
the troubleshooting section at the end of this guide.
c. Open a Web Browser (e.g. Internet xplorer, Firefox...) and type
http://192.168.1.10 in the location bar at the top.
The browser should connect to the HMP100 HTTP server and display the following page.
Congratulations. ou can now explore the HTTP server of your HMP100 unit.
Through this web interface you can administrate the unit and in particular
configure its network properties and video resolutions.
Troubleshooting
If you have not been able to connect to your HMP100 unit, please read the following
suggestions before contacting the SpinetiX support team.
1. Double check that you have correctly written the right address on your web
browser. It should be: http://192.168.1.10
2. Check the L D on you HMP100 unit.

© 2009
SpinetiX S.A. All rights reserved.
20
a.
If the led is blinking from orange to red once per second: the IP address
of your HMP100 unit has already been assigned on the network. Check
your network co
is not taken by another device.
b.
If the led is blinking fast (several times per second) from green to red.
Your HMP100 is in recovery mode. In this case, unplug and power up again
the HMP100 unit. Wa
recovery mode contact support.
3.
It may happen that your HMP100 unit has already been configured and does not
have the default IP address. In this case you should reinitialize the unit to its
factory default.
Note that all the content stored on the HMP100 unit will be
deleted. Follow the instructions reported in
4.
Double check the connectivity in your setup (cables, connectors, switches...).
5. Check the
network configuration of your PC.
6.
Verify that the web browser does not have a proxy configured.
If you have checked all the above and the HMP100 HTTP server still cannot be accessed,
contact the support at
support@
How to connect to the HMP100 from Mac OS X without HMD
This tutorial explains how to connect to your HMP100 unit from Mac OS X without Hyper
Media Director.
First we explain how to locate the HMP100 unit on the network and then how to access
a
nd upload connect to the HMP100.
Requirements:
•One HMP100 unit.
•
A Mac computer running Mac OS X version 10.2 or later.
Finding the HMP100 on the network:
This section explains how to find the network address of an HMP100 unit connected to
the same local ar
ea network (LAN) as the Mac computer, or directly to the Mac computer.
This is particularly useful when the HMP100 unit has been configured to use DHCP or
when the static IP address that was configured has been lost.
1.
Verify that the HMP100 is powered on an
once per second.
2.
Verify that the HMP100 has network connectivity: the red L D should not be
brightly on.
3.
Open the Terminal program, which you'll find in the Applications Utilities folder.
The Terminal program presents
typed.
4. Type the command
ping -
c 3 224.0.0.1
and press Return. You will see multiple responses from all computers and/or
devices on the network.
SpinetiX S.A. All rights reserved.
If the led is blinking from orange to red once per second: the IP address
of your HMP100 unit has already been assigned on the network. Check
your network co
nfiguration and make sure that the address 192.168.1.10
is not taken by another device.
If the led is blinking fast (several times per second) from green to red.
Your HMP100 is in recovery mode. In this case, unplug and power up again
the HMP100 unit. Wa
it about 1 minute. If the HMP100 unit remains in
recovery mode contact support.
It may happen that your HMP100 unit has already been configured and does not
have the default IP address. In this case you should reinitialize the unit to its
Note that all the content stored on the HMP100 unit will be
deleted. Follow the instructions reported in
Reset to Factory default
Double check the connectivity in your setup (cables, connectors, switches...).
network configuration of your PC.
Verify that the web browser does not have a proxy configured.
If you have checked all the above and the HMP100 HTTP server still cannot be accessed,
support@
spinetix.com
How to connect to the HMP100 from Mac OS X without HMD
This tutorial explains how to connect to your HMP100 unit from Mac OS X without Hyper
First we explain how to locate the HMP100 unit on the network and then how to access
nd upload connect to the HMP100.
A Mac computer running Mac OS X version 10.2 or later.
Finding the HMP100 on the network:
This section explains how to find the network address of an HMP100 unit connected to
ea network (LAN) as the Mac computer, or directly to the Mac computer.
This is particularly useful when the HMP100 unit has been configured to use DHCP or
when the static IP address that was configured has been lost.
Verify that the HMP100 is powered on an
d running: the green L D should blink
Verify that the HMP100 has network connectivity: the red L D should not be
Open the Terminal program, which you'll find in the Applications Utilities folder.
The Terminal program presents
a text based terminal where commands can be
c 3 224.0.0.1
and press Return. You will see multiple responses from all computers and/or
devices on the network.
If the led is blinking from orange to red once per second: the IP address
of your HMP100 unit has already been assigned on the network. Check
nfiguration and make sure that the address 192.168.1.10
If the led is blinking fast (several times per second) from green to red.
Your HMP100 is in recovery mode. In this case, unplug and power up again
it about 1 minute. If the HMP100 unit remains in
It may happen that your HMP100 unit has already been configured and does not
have the default IP address. In this case you should reinitialize the unit to its
Note that all the content stored on the HMP100 unit will be
Reset to Factory default
.
Double check the connectivity in your setup (cables, connectors, switches...).
If you have checked all the above and the HMP100 HTTP server still cannot be accessed,
How to connect to the HMP100 from Mac OS X without HMD
This tutorial explains how to connect to your HMP100 unit from Mac OS X without Hyper
First we explain how to locate the HMP100 unit on the network and then how to access
This section explains how to find the network address of an HMP100 unit connected to
ea network (LAN) as the Mac computer, or directly to the Mac computer.
This is particularly useful when the HMP100 unit has been configured to use DHCP or
d running: the green L D should blink
Verify that the HMP100 has network connectivity: the red L D should not be
Open the Terminal program, which you'll find in the Applications Utilities folder.
a text based terminal where commands can be
and press Return. You will see multiple responses from all computers and/or
Other manuals for HMP100
4
Table of contents
Other SpinetiX Media Player manuals

SpinetiX
SpinetiX HMP100 Guide

SpinetiX
SpinetiX Diva User manual

SpinetiX
SpinetiX HMP100 User manual

SpinetiX
SpinetiX HMP series User manual

SpinetiX
SpinetiX HMP100 User manual

SpinetiX
SpinetiX HMP130 User manual

SpinetiX
SpinetiX HMP series Guide

SpinetiX
SpinetiX HMP400 User manual

SpinetiX
SpinetiX HMP series Guide

SpinetiX
SpinetiX Hyper Media Player User manual


