spinflo INTEGRILL 5500-4BG Operating instructions

BUILD IN GRILLING
OVEN
FOR USE WITH LIQUID PETROLIUM GAS
INTEGRILL MODEL 5500-4BG
User and Installation Instructions
PLEASE READ THOROUGHLY and keep for future
reference.
FOR USE IN AUSTRALIA
SPINFLO LIMITED, 4-10 Welland Close, Parkwood Industrial
Estate, Rutland Road, Sheffield S3 9QY, ENGLAND.
TEL: + 44 114 273 8157 FAX: + 44 114 275 3094
PCC1278Z – Issue 1
WARNING
•Only use this appliance in a well ventilated area.
•Read the instructions before use.
•This appliance must be installed by an
authorised person.
More information https://www.caravansplus.com.au

BUILD IN GRILLING OVEN
INTEGRILL MODEL 5500-4BG
INSTALLATION INSTRUCTIONS
This appliance shall be installed in accordance with the manufacturer's installation
instructions, local gas fitting regulations, municipal building codes, AG601 and any
other relevant statutory regulations.
DATA LABEL.
The data label is located on the right hand side wall, next to the hotplate burners, on the
outside. A duplicate data label is supplied to adhere to an accessible area next to the
appliance. Ensure that the gas supply is Propane. This appliance is designed for use
with Propane gas and should not be converted for use with any other gas.
VENTILATION
Ventilation must be in accordance with AG601 installation code. In general, the
appliance should have adequate ventilation for complete combustion of gas, proper
flushing and maintaining temperatures of the immediate surroundings within safe limits.
LOCATION
Choose a location free of draughts, open doors and clear of combustible materials and
other fire hazards. The location should ensure convenience of operation and service.
Any adjoining wall surface situated within 200mm from the edge of any hob burner must
be made from a suitable non-combustible material for a height of 150mm for the entire
length of the hotplate.
INSTALLATION
A cut-out should be prepared in the worktop and the front cupboard as shown below.
FITTING.
Place the appliance into the worktop/cupboard cut-out and connect to the gas supply as
detailed below.
CONNECTION
An 8mm gas inlet connection is provided on the underside of the appliance. Refer to
the "Dimensions" section following for the location of the gas inlet. It is recommended
that the appliance is connected by copper tubing using a 6mm male iron (1/4” BSP) to
an 8mm copper union.
MAINTENANCE
This appliance needs little maintenance other than cleaning. All parts should be
cleaned using warm soapy water. Do not use abrasive cleaners, steel wool or
cleansing powders. When cleaning the burner ring it is essential to ensure that the
holes do not become blocked. The control knobs are a push fit and can be removed for
cleaning. They are interchangeable without affecting the sense of operation.
THIS APPLIANCE MUST NOT BE MODIFIED OR ADJUSTED UNLESS
AUTHORISED AND CARRIED OUT BY THE MANUFACTURER OR HIS
REPRESENTATIVE. NO PARTS OTHER THAN THOSE SUPPLIED BY THE
MANUFACTURER SHOULD BE USED ON THIS APPLIANCE.
ABNORMAL OPERATION
Any of the following are considered to be abnormal operation and may require
servicing.
Yellow tipping of burner flame. Sooting of cooking utensils.
Burners not igniting properly. Burners failing to remain alight.
Burners extinguished by cupboard doors. Gas valves that are difficult to turn.
WHO TO CONTACT
For service, please contact your authorised local Service agent giving full details of the
model, serial number and date of purchase
THIS UNIT IS SOLD AND SERVICED BY:-
DOMETIC PTY. LTD.
6 TREFOREST DRIVE
CLAYTON VICTORIA 3168
Tel (03) 9545-5655
496mm
455mm
448mm
Cupboard Cutout Worktop Cutout
Front of bench
Top of bench
More information https://www.caravansplus.com.au

COOKING SHELF POSITION DISH
Fast grilling 1 Conventional grilled food only!
Slow grilling/fast baking 2 Pastries, dough
Slow baking 3 Convenience foods, re-heating
Always ensure the food is piping hot prior to serving. Food must be rotated and turned
over where possible, to ensure that it is heated thoroughly. As with the use of
microwaves, standing time will also aid the equalisation of heat distribution. When
roasting with aluminium foil care must be taken that the foil does not impair heat
circulation. It should also be noted that due to the heat being radiant, the use of
aluminium foil will considerably increase the cooking time. These guidelines have been
prepared only to assist cooking; the best results will be obtained with experimentation.
WARNINGS
DO NOT store or use gasoline or other flammable vapours, liquids or items in the
vicinity of this or any other appliance.
DO NOT spray aerosols in the vicinity of this appliance whilst it is in operation.
Where this appliance is installed in marine craft or in caravans, it shall not be
used as a space heater.
NEVER check for leaks with an open flame.
SAFETY
It is important that ordinary safety precautions are observed in the use of this appliance.
1) When cooking keep children away from the vicinity. Turn pan handles inwards so
that they can not be caught accidentally.
2) Never leave fat or oil unattended on the hotplate.
3) When finished, check that all the controls are in the off position.
4) This appliance must not in any circumstances be used as a space heater.
5) If fitted in a touring caravan or motorvan, all burners should be extinguished when
the vehicle in which that appliance is installed is moving. It is preferred that the
cylinder valve on the appliance is turned off.
LEAKS
If a smell of gas becomes apparent, the supply should be turned off at the cylinder
IMMEDIATELY.
Extinguish naked lights including cigarettes and pipes. Do not operate electrical
switches. Open all doors and windows to disperse any gas escape.
Propane gas is heavier than air and any escaping gas will therefore collect at a low
level. The strong unpleasant smell of gas will enable the general area of the leak to be
detected. Check that the gas is not escaping from an unlit appliance.
Never check for leaks with a naked flame; leak investigation should be carried out using
a leak detector spray or soapy solution.
A rubber connection must not be used
After connection the appliance must be tested for soundness
This appliance is suitable for use on
PROPANE GAS ONLY 2.75Kpa.
It is important that the regulator should be set to the correct pressure for the type of gas
being used. Excessive pressure must not be permitted.
If the flame on either the top burners or the grill should show a tendency to lift, it is
possible that the line pressure is too great. Should there be excessive yellow tips
(resulting in sooting) then it is possible that the line pressure is too low. In either case
the burners should not be used until the line pressure has been checked out.
The appliance is fitted with the following injectors
Burners: 0.62mm 5.0MJ/h
Grill 0.65mm 5.4MJ/h
The burners on this appliance have fixed aeration and no adjustment is necessary.
DIMENSIONS
OPERATION
Ensure the gas cylinder is turned on.
In the event of a gas smell, turn off the cylinder and contact the supplier.
BEFORE LEAVING
The pipe connections should be checked for leaks
with soap and water. DO NOT use a naked flame
for detecting leaks.
Test all burners on high and low flame for flame
stability. When satisfied with the appliance, please
instruct the user on the correct method of
operation. If the appliance fails to operate
correctly after all the checks have been made,
refer to the authorised service provider in your
area.
10
445
200 130
10
490
200 145
10
Test Point
25
6mm (1/4" BSP)
Female iron ga s conn ection.
365
430
160
More information https://www.caravansplus.com.au
HOTPLATE BURNER
CAUTION: GLASS LIDS MAY SHATTER WHEN HEATED. TURN OFF ALL
BURNERS AND GRILL BEFORE SHUTTING THE LID.
Each burner is controlled individually and may be monitored by a flame supervision
device. In the event of the burner flames being accidentally extinguished, turn off the
burner control and do not attempt to re-ignite the burner for at least one minute. The
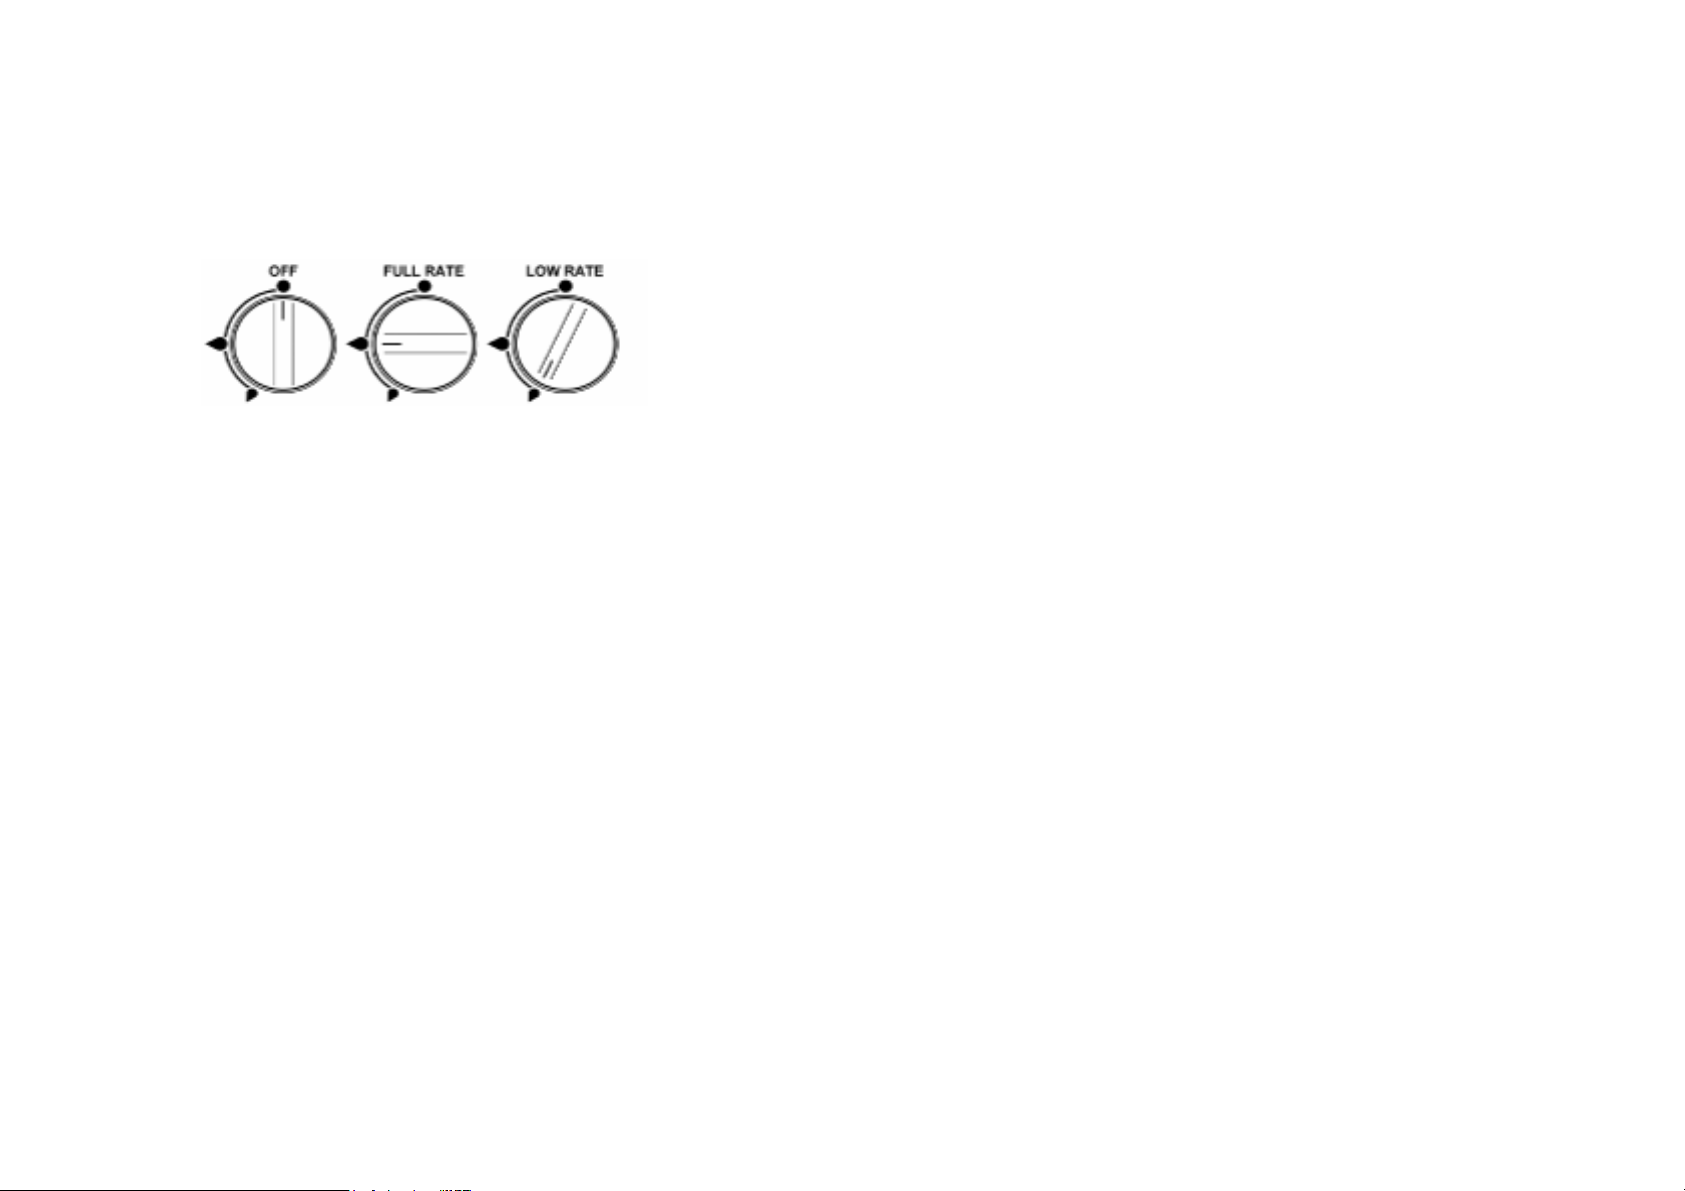
respective knob positions are show in Fig 1.
Fig 1.
To light the burner, press in and turn the knob anti-clockwise to the full rate position and
apply a light to the burner or press the ignition button if fitted. It is necessary to hold the
knob depressed during ignition and for approximately fifteen seconds after the burner
has lit to allow the probe to reach temperature. Should the flame go out when the knob
is released, the procedure should be repeated holding the knob depressed for slightly
longer.
For simmering, turn the knob further anticlockwise to the low rate position. To turn the
burner off, rotate knob fully clockwise until the dot on the knob lines up with the dot on
the control panel.
When using Propane the flames of the burners should burn quietly with a blue/green
colour and there should be no sign of yellow tips.
Although each burner will support pans from 10 to 22cm, care should be taken not to
overload the appliance as reduced performance may result.
When using small pans, the flames should not spread beyond the base of the pan, as
this will reduce the efficiency of the burner.
CAUTION: TO PREVENT DAMAGE TO BENCH TOPS DO NOT USE PAN SIZES
GREATER THAN 22CM AND LOCATE PAN CENTRALLY OVER THE
BURNER, SO THAT IT IS STABLE AND DOES NOT OVERHANG THE
APPLIANCE.
GRILLING OVEN
CAUTION: ACCESSIBLE PARTS MAY BECOME HOT WHEN THE GRILL IS
USED! YOUNG CHILDREN SHOULD BE KEPT AWAY.
CAUTION: GLASS LIDS MAY SHATTER WHEN HEATED. TURN OFF ALL
BURNERS AND GRILL BEFORE SHUTTING THE LID.
The grill burner is situated in the roof of the grilling oven, and can be used as either a
conventional grill, or as a radiant burner for the oven. It should noted that when the grill
pan is used the door must be left open to ensure the handle does not overheat. The
cooker is fitted with a flame supervision device, so if for any reason the flame goes out,
the gas supply to the grill burner will be shut off. In the event of the burner flames being
accidentally extinguished, turn off the burner control and do not attempt to re-ignite the
burner for at least one minute.
1) Ensure gas cylinder is connected and turned on. In the event of a gas smell turn
off at cylinder and contact supplier.
2) Remove all accessories and packing materials that may be in the grilling oven and
clean the interior before using it for the first time. Use soap and water and rinse
carefully.
3) To light: open door, push in the control knob and turn to full rate. Hold a lighted
match or taper to the burner and push the control knob in and hold. The burner
should ignite and the control knob should be held in for 10-15 seconds before
release. For models fitted with spark ignition the procedure is similar except that
the burner can be ignited by depressing the ignition button located on the control
panel. It should only be carried out with the door fully open. If the burner goes out,
repeat procedure holding control knob in for slightly longer.
4) Heat the grilling oven on full rate for about 20 minutes to eliminate any residual
factory lubricants that might impart unpleasant smells to the meals being cooked.
5) To turn off, turn the control knob clockwise until the dot on the control knob is
aligned with the dot on the control panel.
6) Grilling oven shelf: to set the required shelf position, pull forward until it stops, raise
at front, remove and insert at the required position.
It is normal for the flames on this burner to develop yellow tips as it heats up.
The grill pan trivet can be reversed to give a choice of grilling height.
DO'S AND DON'TS
DO read the user instructions carefully before using the appliance for the first time.
DO allow the grilling oven to heat before using for the first time, in order to expel
any smells before the introduction of food.
DO clean the appliance regularly.
DO remove spills as soon as they occur.
DO always use oven gloves when removing food shelves and trays from the
grilling oven.
DO check that controls are in the off position when finished.
DO NOT allow children near the cooker when in use. Turn pan handles away from the
front so that they cannot be caught accidentally.
DO NOT allow fats or oils to build up in the oven trays or base.
DO NOT use abrasive cleaners or powders that will scratch the surfaces of the hot
plate and grilling oven.
DO NOT under any circumstances use the grilling oven as a space heater.
COOKING GUIDELINES
The grilling oven works using radiant heat from the grill situated in the roof of the grilling
oven, at all times this should be noted, and food positioned accordingly. Best results
will be obtained by following the shelf positions in this guide. Care should be taken not
to overload the grilling oven, adequate spacing being used to allow free circulation for
heat. The baking tray and roasting tin provided are the largest that should be used in
this size grilling oven. Larger items may well affect the circulation and heat distribution.
It is not necessary to preheat the grill, however the oven must be heated for 10-15
minutes prior to use. Shelf positions are from the top down.
More information https://www.caravansplus.com.au
Other spinflo Oven manuals


