SPINFX LED SMART LYRA User manual


Important Notes
Service and support can be found at www.spin-fx.com or email us info@spin-
fx.com
This manual has information for casual and advanced users, plus troubleshooting
and repair information. We recommend at least reading the first section to
familiarize yourself with the basics.
SpinFX LED Smart Lyras are now powered by Gen 3 Hyperion Controller
Boards.
Your hoop comes pre-loaded with more than a thousand patterns and is ready to
use, but please read this section first!
Batteries come partially charged. You can use them right away but they might
not last long until they’ve been fully charged. NOTE: the power button MUST
be turned “on” (pressed in) in order for the battery to charge. If you plug the
controller into a hoop, you will see a yellow light as it charges that will turn green
when fully charged. Please know, the battery charges faster when disconnected
from the hoop.
About this Manual
We will refer to the aerial hoop / lyra as "hoop" in this manual.
Don’t be intimidated by the size of the manual or the number of buttons on the
controls – you can get started by just turning on the hoop and experimenting. It’s
safe to press any button on the remote to see what happens. All of the functions
that have lasting effects require a button to be held down. Everything else can
be undone by turning the hoop off and back on again.
Software updates for the hoop can add and change features and the functions of
the remote controls. This manual applies to the latest software version at the
time it was printed. If you install software updates, you should check the SpinFX
website (spin-fx.com) for updated instructions.
Turning on the Hoop
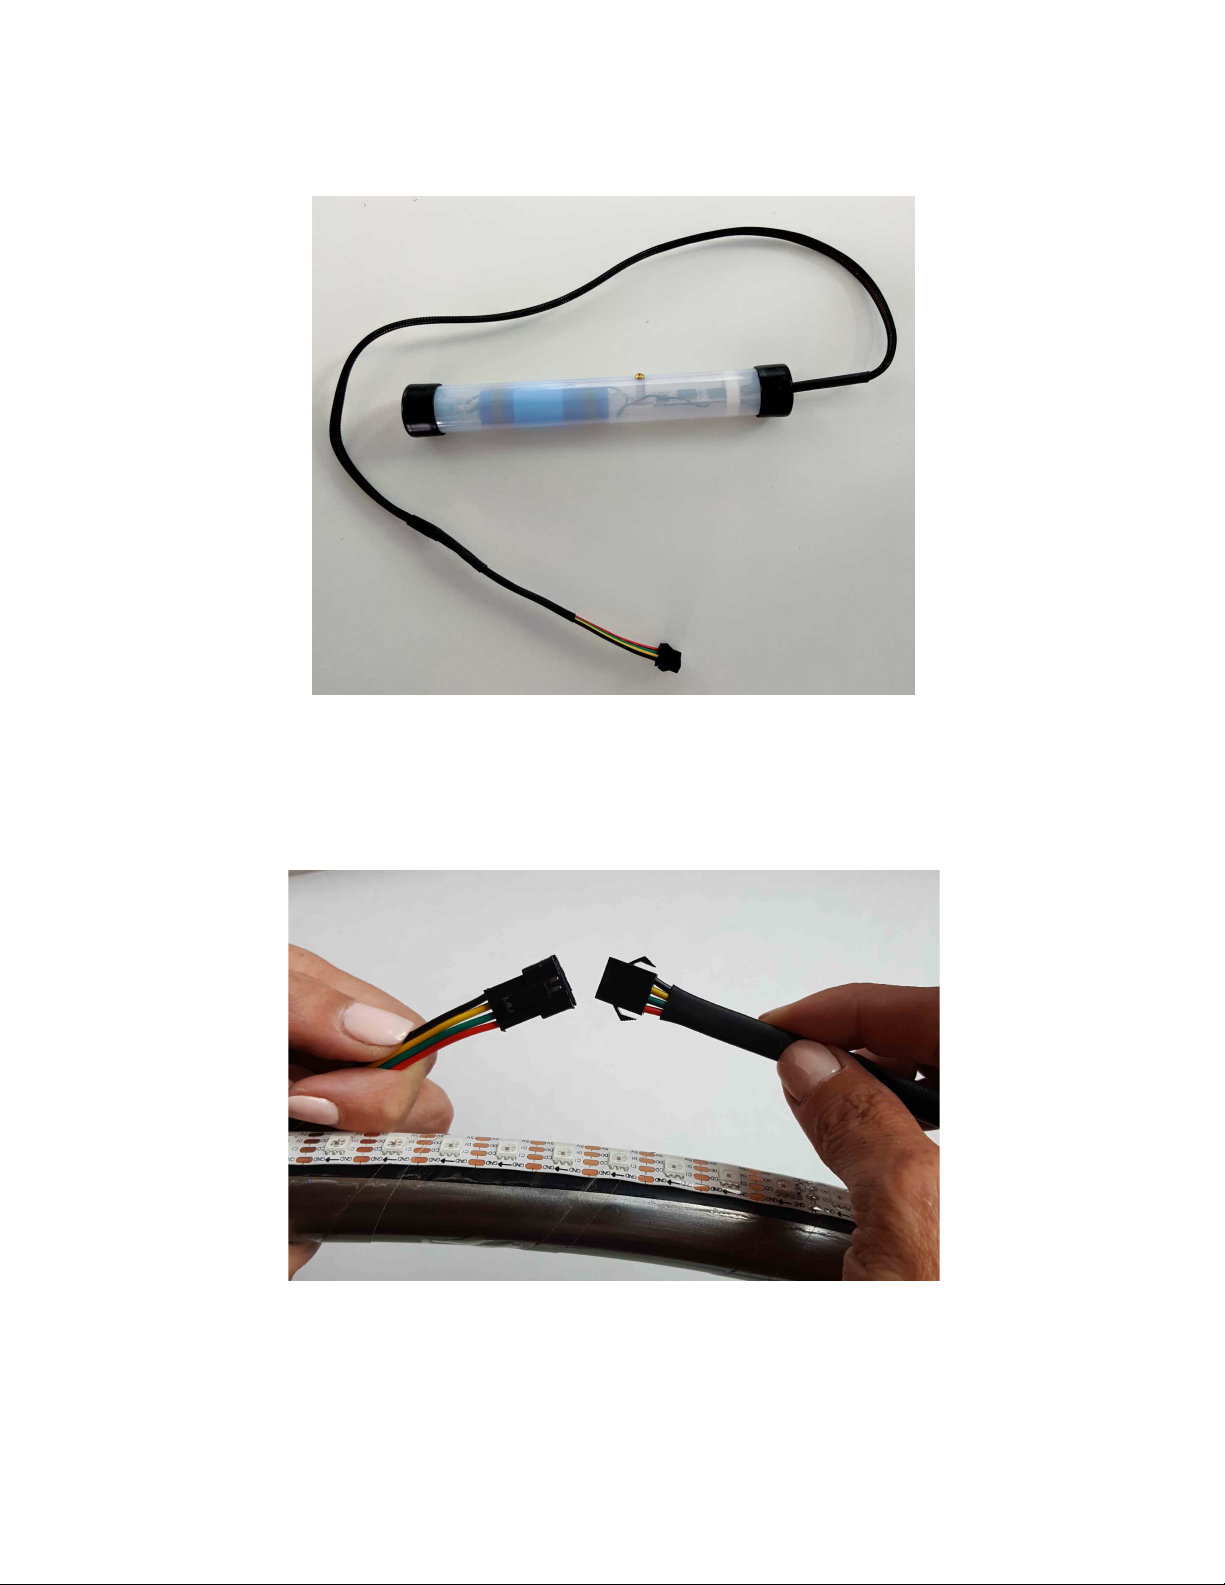
First, locate the controller unit (Image 1). Then, connect the male and female
cable ends of hoop and controller together (Image 2). Next, press the large
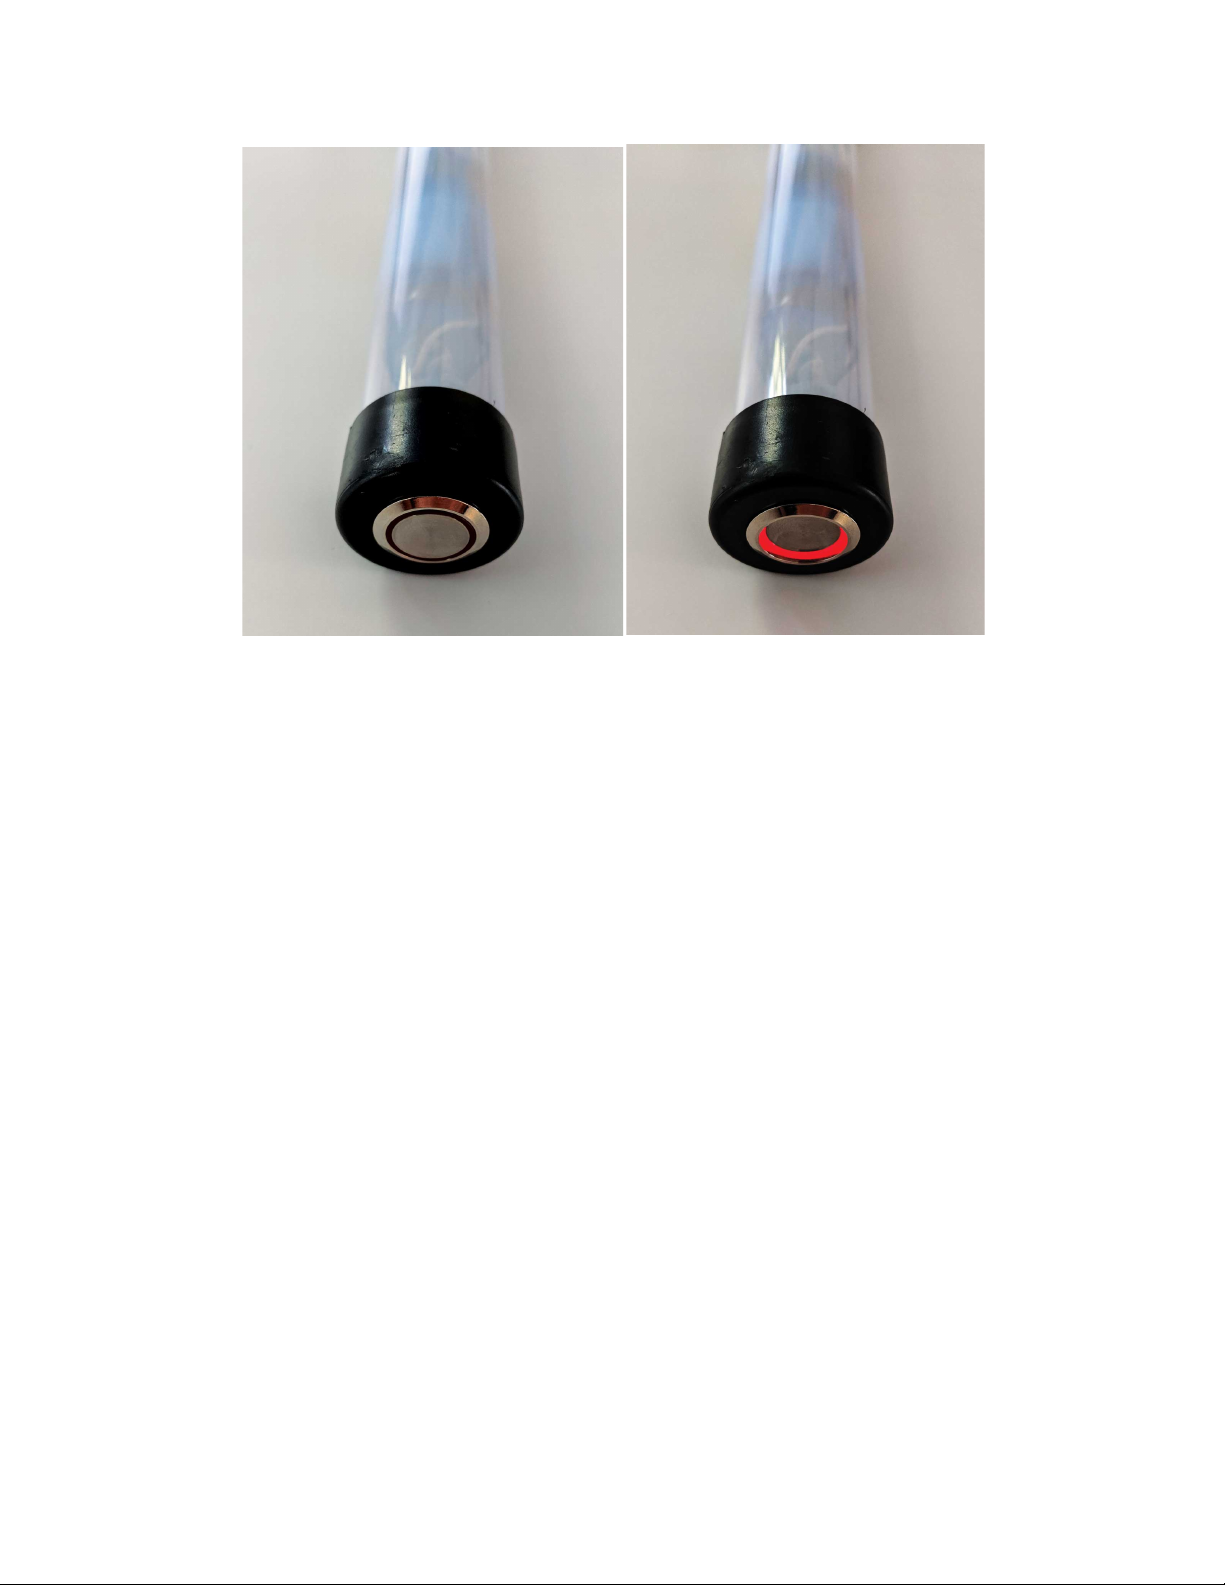
power button located at the bottom of the controller unit to turn on (Image 3 & 4).
Now, the hoop should begin to light.
2
Image 1 – Controller Unit
Image 2 – Wire Connection
3
Image 3 – Power Button “Off” Image 4 – Power Button “On”
Startup
The hoop will always display a short startup pattern to indicate it’s starting and to
test all of the LEDs. The first LED will light red and then all of the LEDs will light
green in a quick succession. If you don’t see the red LED or if any of the other
LEDs fail to light, follow the troubleshooting information found later in this
manual.
Out of the box, your hoop is set to shuffle mode and will change to a random
pattern every 10 seconds. The default brightness is about 75%.
Changing Patterns and Modes
Most of the hoop’s functions are controlled by the 44-key remote control. This
large remote has more options and buttons than the previous remote to jump
directly to favorite patterns and folders.
The patterns that come loaded on the hoop are organized into 16 folders. The
hoop will start out playing patterns from every folder. You can access a specific
folder by pressing one of the 16 unlabeled color buttons on the big remote. The
first button, in the upper left, corresponds to the first folder, with the folders
arranged in alphabetical order. This manual won’t list the details of the pattern
folders because they’re frequently being updated and occasionally reorganized.
Generally each folder sticks to a theme, like rainbows or characters and logos.
If you press a folder button, the hoop will only play patterns from that folder until
you choose another folder or press the ‘next folder’ button to exit folder mode.
4
To make the hoop stay on the current pattern, press the play/pause button or
hold the button. To resume cycling through patterns, press the button again.
When its battery runs low, the hoop will start dimming the LEDs to squeeze a few
more minutes out of the battery. Once the battery is too low to keep the hoop
running, it will switch to showing a single blinking red LED.
In some cases the hoop might die before giving a low battery warning,
particularly if you put in a battery that was already almost dead. If this happens,
the pattern will freeze and will usually appear red or orange. Charge the dead
battery promptly; leaving a battery to run down until it’s completely dead will
shorten its life.
Charging
Your hoop controller battery must be charged via USB. Simply plug your
controller unit in to any USB power source with the provided cable, or any Micro-
USB cable with an extended 8mm prong. *IMPORTANT: the power button
MUST be turned “on” (pressed in) in order for the battery to charge. If you
plug the controller into a hoop as it is charging, you will see a yellow light that will
turn green when fully charged. However, please know, the battery charges faster
when disconnected from the hoop.
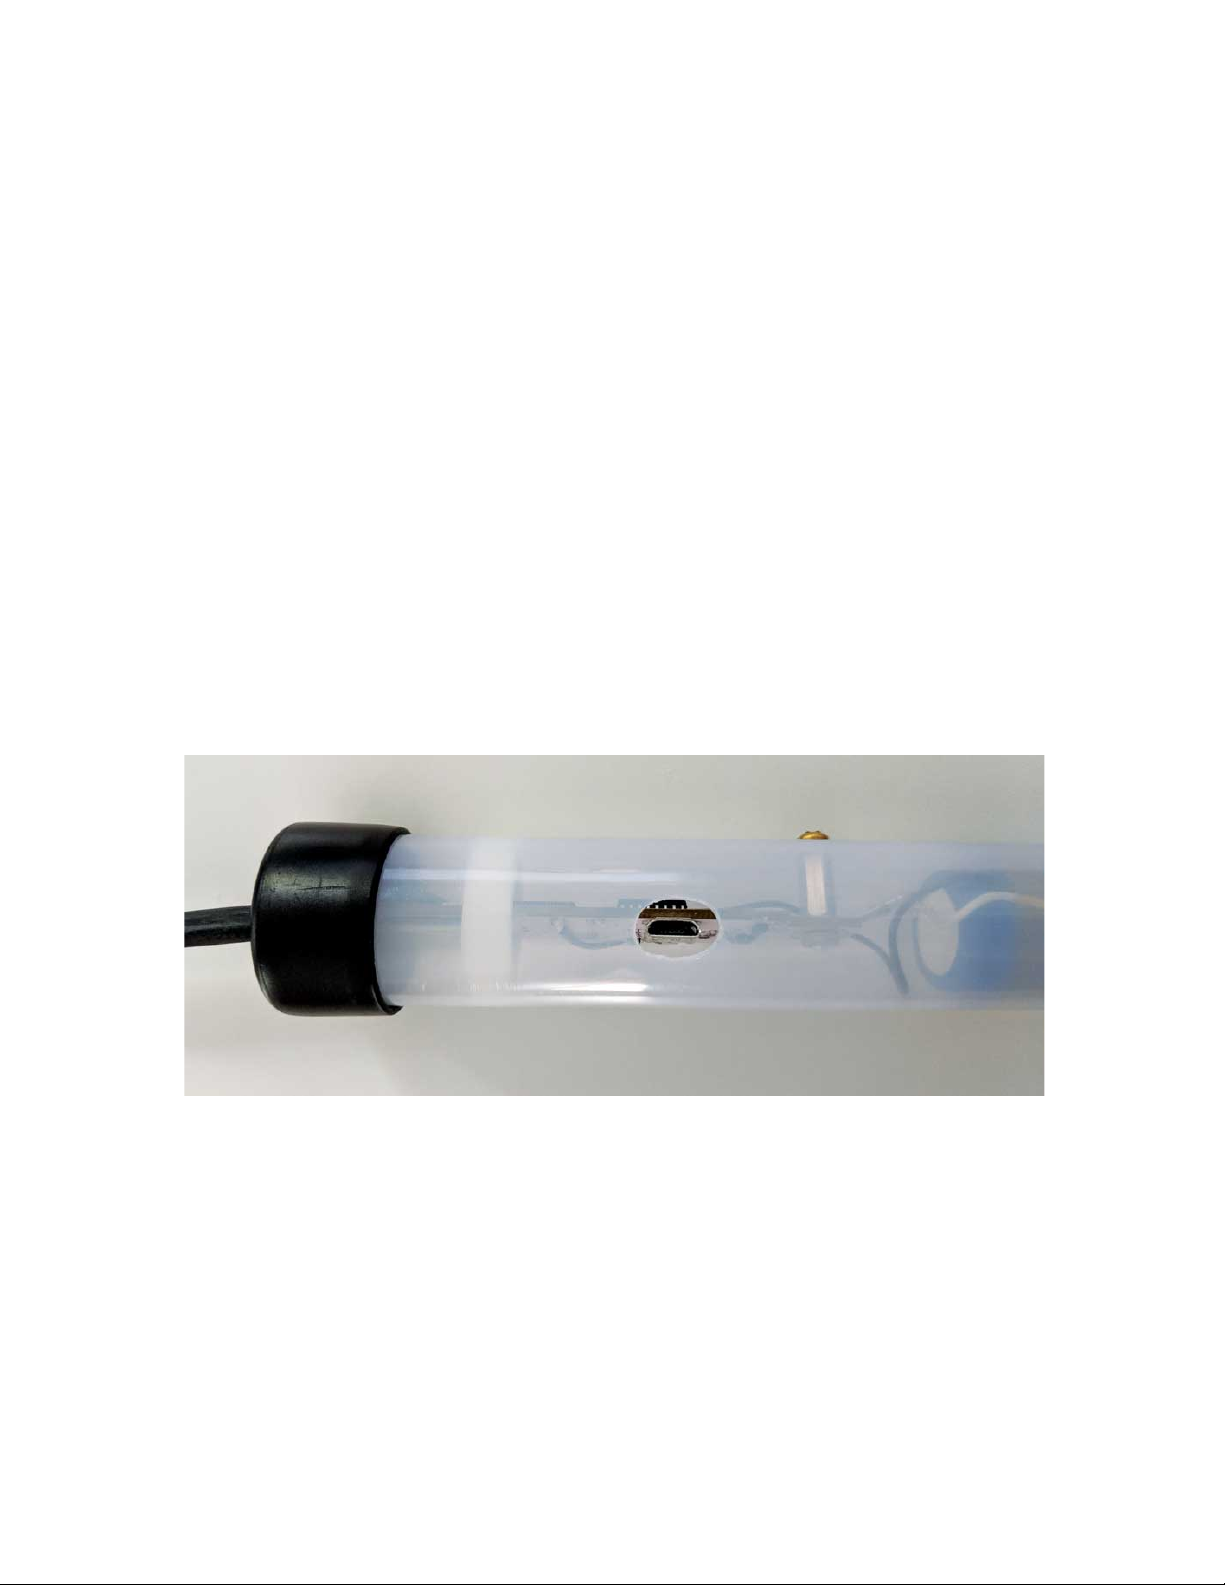
USB Port
What To Do When Something Goes Wrong
If you have trouble with your hoop, please jump to the troubleshooting section of
this manual for things to check and fixes for common problems.
What's in the box?
Your hoop comes with an accessory pack that contains several items. The kit
includes:
5
• 44-key remote control
• USB cable. A micro USB cable with extended 8mm prong. You can use this
both to charge the battery and to connect the hoop to a computer to
change patterns and settings.
• Wall unit for charging. You can use either port but 2.1A charges faster.
• Zip ties for attaching the controller unit to the spanset
Grip
Your hoop ships with 3M polyurethane tape covering the entire hoop. There is
also 1” silicone self-fusing tape called “Rescue Tape” (found on Amazon) for
additional grip on the top third of the hoop where the LEDs take the most
pressure. This tape will wear over time and may need to be replaced from time
to time depending on level of use.
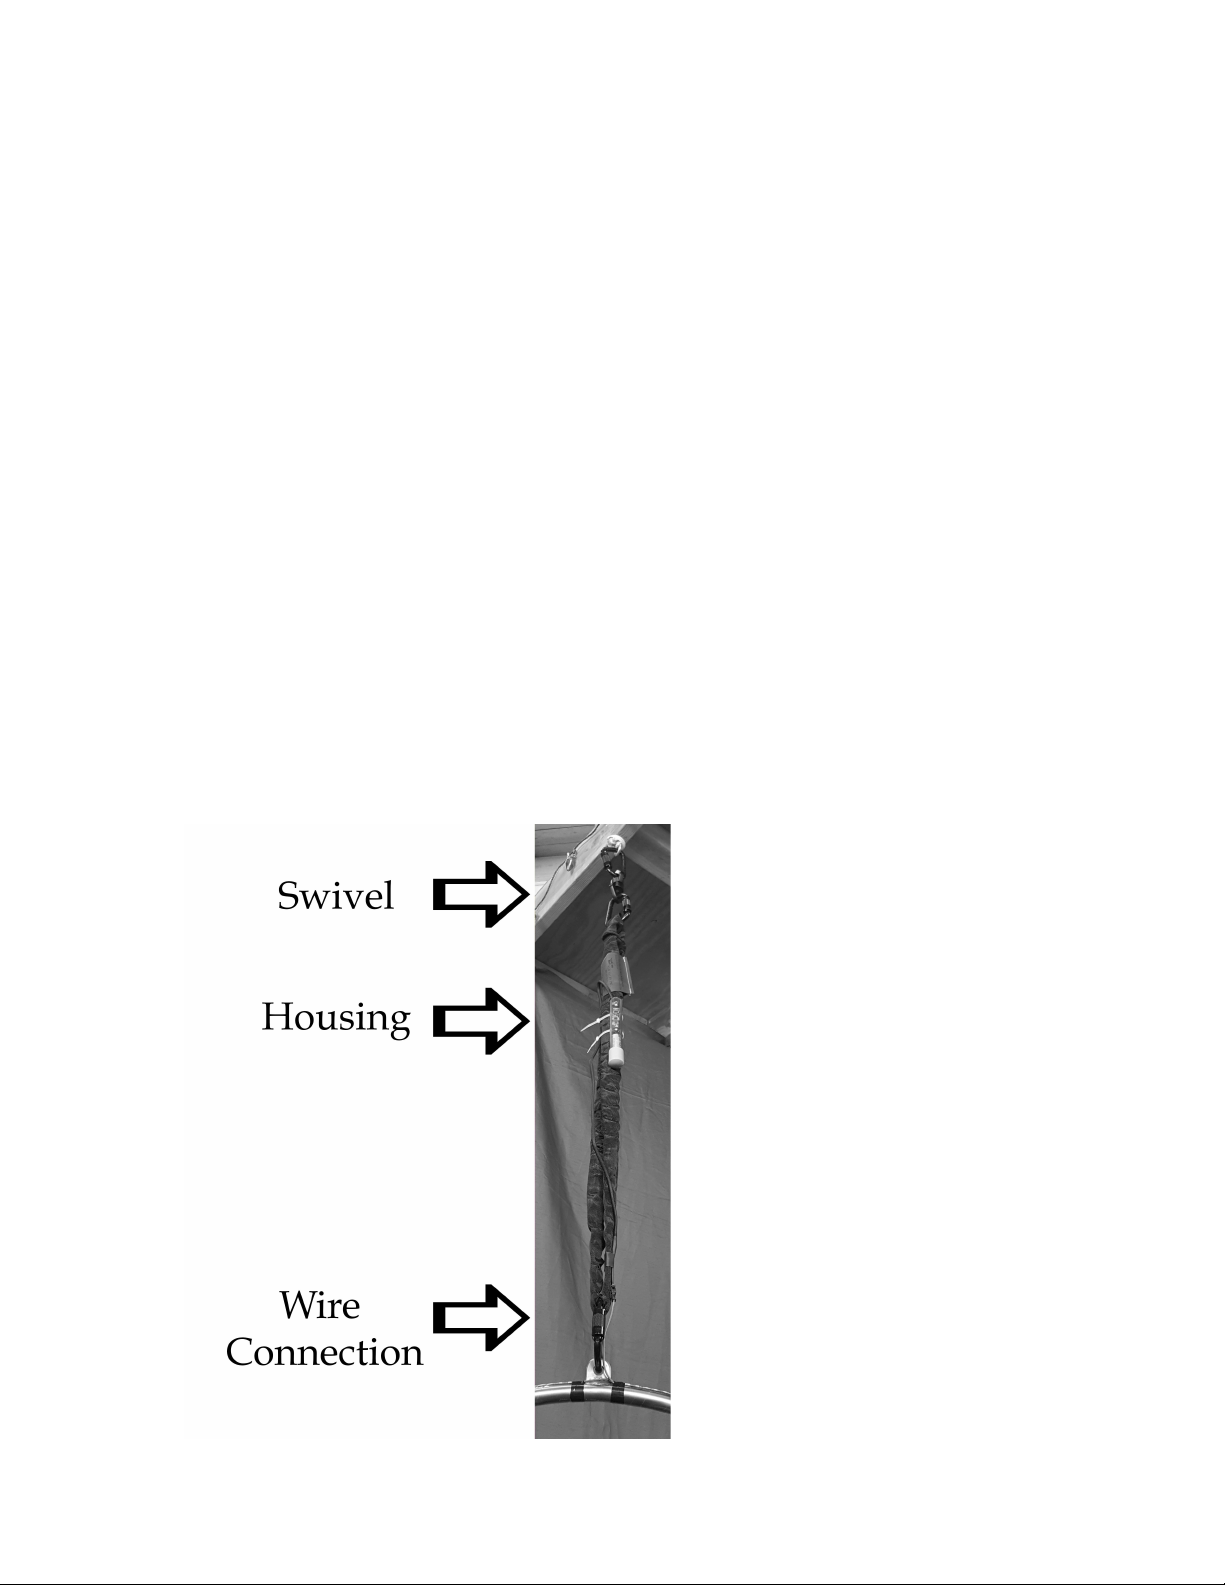
Rigging
When rigging, use zip ties to secure the controller housing a few feet above the
hoop on the span set. We also suggest using black gaffer tape to secure the
wire to the span set so it is not torn during use. Be sure that if you are using a
swivel it is located above where you place the controller or else when you spin,
the wire will twist up and can be damaged.
6
Remote Control Functions
Your hoop comes with a 44-key remote with tons of functions and presets.
The instructions here are for the current versions of the remote.
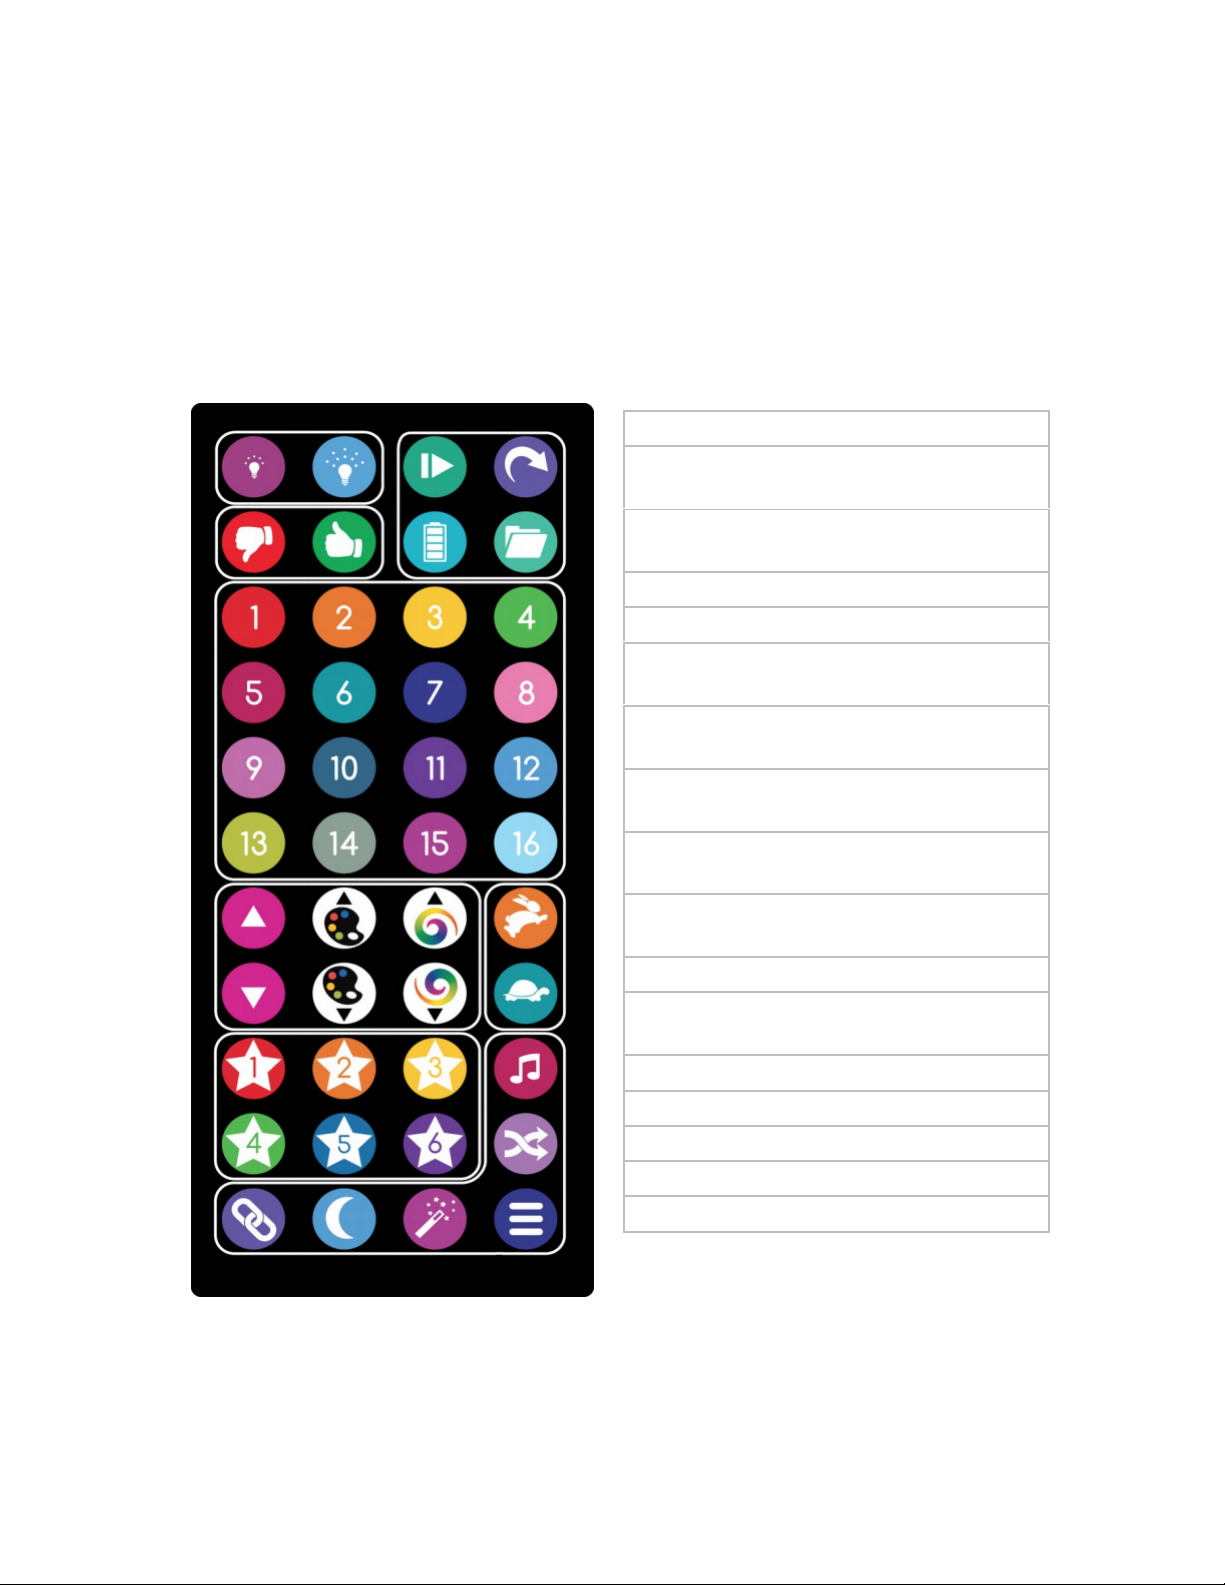
44-Key remote functions (from upper left to lower right)
For best results, aim the remote control directly at the receiver in the controller
unit.
Brightness up/down
Hold current pattern or resume auto-
play
Thumbs up / down – see playlist
management
Show battery level
Next folder
Jump to folder 1-16 (numbered
buttons)
Next / previous pattern (purple arrow
buttons)
Next / previous palette (painter’s
palette icon)
Change motion mode (color swirl
icon)
Faster / slower auto-play time (rabbit
and turtle)
Saved favorite patterns (stars 1-6)
Sync to music tempo (music note
icon)
Shuffle on / off (twisted arrows icon)
Wireless link control
Sleep
Special functions
Menu (reserved for future use)

7
Any 44-key remote will work with any hoop. If you’re using multiple hoops close
together, you can disable the hoop’s remote receiver temporarily to avoid
interference during a performance. To disable the remote receiver, press
brightness up – down –up – down. The hoop will briefly flash yellow, and the
remote control will be disabled until the next time the hoop is powered on. You
can also disable the remote in the configuration file.
About Pattern Files, Chasers, and Motion Modes
In its most basic mode, the hoop plays repeating light patterns at a constant rate.
Simple patterns, like fine texture patterns, may repeat faster than 100 times a
second. Slower color fading patterns might take several seconds to repeat, and
some patterns are constant. More than a thousand patterns come pre-loaded on
your hoop. More information about creating and managing patterns can be found
later in this manual.
Some modes use only a single pattern file to create a pattern. Others use
combinations of overlay or palette files as well to create more complex effects.
Each pattern file can optionally have a configuration file (with the same name as
the pattern file but with a .ini file type) that tells the hoop how to combine the files
and what effects to apply.
Overlays are special single-line patterns, stored in their own folder, which the
hoop can display on top of regular patterns. Most often they are relatively
simple, consisting of points of light. Overlays can be set to move independently
of the pattern. They work best with dark or sparse patterns. Bright, dense
patterns will tend to wash out the overlays and make them hard to see.
Palettes are also image files, but instead of defining a pattern, they provide a set
of colors that are applied to other pattern files. Not all patterns are designed to
work with palettes.
Several motion modes control how the chasers and patterns move. You can use
the motion mode buttons on the 44-key remote to select modes. Some of the
modes will rotate the pattern or chasers at a fixed rate and some will cause them
to react to the motion of the hoop. Try rotating the hoop on each axis to get a
feel for how the different motion modes work.
Customizing your Hoop
You can add, remove, and reorganize patterns on your hoop, change its
configuration, and edit playlists from almost any computer without special
software.
To access the hoop, connect it using a micro USB cable. The port is located on
the side of the controller. The hoop shows up as a mass storage device, like a
USB flash drive and should have the name “SFX LYRA”. You can change the
name if you’d like by right clicking and selecting “rename.”

8
All hoop settings can be found in the file “config.ini”
Patterns are stored as BMP image files. See below for detailed instructions on
creating and editing patterns. The pre-loaded patterns are grouped into folders,
and the ‘next folder’ remote button will skip from one folder to another. You can
create new folders or reorganize the existing ones to change the grouping. Note
that only one level of folders is read by the hoop; sub-folders will be ignored.
If you hold the red thumbs down button while a pattern is playing, the pattern will
be marked as skipped and will no longer auto-play.
The file ‘config.ini’ contains the hoop’s configuration, including the startup pattern
and all of the timing options. It can be edited with a text editor like Notepad
(Windows) or TextEdit (Mac). The file itself contains detailed instructions on all
of the settings.
All of the pattern files can be downloaded from the SpinFX website at
http://www.spin-fx.com, so don’t worry if you delete pattern files and change your
mind later.
Creating Patterns
Patterns (as well as overlays and palettes) are stored as BMP image files on the
hoop’s internal drive. Patterns are played one line at a time, at a default rate of
240 lines per second.
Any image-editing program that supports saving BMPs can be used to create
patterns. The hoop supports bit depths of 1, 4, 8, 16, 24, and 32 bits per pixel.
Not all image editors will let you choose the bit depth. If you do have the option,
using the lowest bit depth available will save space on the hoop. Patterns with
more colors will require higher bit depths.
Patterns with a 1-bit depth are a special case. Normally these would be black
and white images, but the hoop applies a rainbow effect to the foreground color
for 1-bit images.
Patterns smaller than half the size of the hoop will be repeated around the
circumference of the hoop. Larger patterns will be scaled up or down smoothly
to fit. For example, if your hoop has 160 LEDs, a 20 pixel wide pattern will be
repeated 8 times around the hoop. An 80 pixel wide pattern will be scaled up to
160 pixels. The hoop will read files up to 256 pixels wide.
WiFi Connectivity
Gen 3 hoops are equipped with WiFi connectivity, which can be a little more
complicated to set up, but is faster and much more flexible, and allows a large
number of hoops to be synced up and controlled at the same time and configured
from a web browser.

9
You don’t need an existing WiFi network to use the WiFi features. If there isn’t
an access point available, a hoop can be set up to act as an access point on its
own. Of course, an isolated hoop won’t have an Internet connection, but other
hoops can connect to it, along with mobile devices.
WiFi hoops support three network modes: WiFi Direct, Access Point (AP), and
Client (STA). In Client mode, the hoops can connect to a 2.4 GHz (802.11b/g/n)
WiFi network. In AP and Direct modes, they create their own network, which you
can join with a PC or mobile device for setup and control.
WiFi Direct Mode
Out of the box, your hoop is set up to use WiFi Direct, also known as WiFi Peer-
to-Peer. WiFi Direct is a special WiFi mode that doesn't require a router. The
hoop will create a WiFi Direct network that other devices can join. The WiFi
channel is selected automatically.
Some devices, particularly newer Android devices, are able to connect to a WiFi
Direct network without disconnecting from their regular WiFi network – for
example, your phone can be connected to your home WiFi and to the hoop at the
same time. See below for instructions on connecting an Android device in WiFi
Direct mode.
Apple iOS devices don't support WiFi Direct. However, the WiFi Direct group will
still show up like a legacy WiFi network that almost any WiFi device can connect
to; you just won't be able to connect to more than one network at a time. The
network name will start with ‘DIRECT-’ in your list of available networks.
Access Point Mode
The hoop can also be set up as a conventional WiFi access point. There's not
much difference between access point (AP) mode and WiFi Direct mode if you
don't need to connect to two networks at once; AP mode is included mostly
because WiFi Direct is a relatively new standard and some devices have odd
quirks in Direct mode.
Client Mode
In client mode (technically ‘station’ mode, or STA for short), the hoop connects to
an existing WiFi network. To connect, you'll need to let the hoop know which
network to join and what the password is, if the network is secure.
If you have the hoop scan for open (unsecured) networks, it will connect to the
open network with the strongest signal. Once it’s connected, it will remember the
network name and try to connect automatically when it sees that network again.
If your network is secured, you have a few options for setting up the hoop. The
simplest is to use WiFi Protected Setup (WPS) push button mode, sometimes

10
called “WiFi Simple Config”, “Push 'n Connect”, “PBC”, or “Quick Secure Setup”.
To use WPS, select the WPS scan option from the hoop's link menu, described
in the remote control section below. The scan will run for two minutes. While it's
scanning, press the WPS button on your router. On some routers, this button
might be a soft button in the router's web interface rather than a physical button.
If all goes well, the hoop should find the router, obtain the password, and connect
automatically.
WPS doesn't always work, and not all routers support WPS. If WPS is not an
option, you can either use a WiFi-capable device to connect to the hoop's WiFi
Direct network and change the networking settings through the web interface, or
you can connect the hoop to a computer via USB and enter the network
information in the config.ini file.
Setting up Multiple Devices
Once you have one hoop configured to use or create a network, it can share its
network setup with other hoops using its short-range infrared (IR) link.
The IR link is very short-range – while connected to the hoops, the hoop
controllers need to be held together, not more than a few inches apart, to
exchange data. A hoop that is already connected to a network will share its login
information with one waiting to connect. The hoop receiving the login information
will flash red briefly and then attempt to connect to the network.
The hoop doesn't send IR signals while it’s in motion, so make sure you hold it
still until you see the flash.
Choosing a Mode
WiFi Direct and AP modes are useful for connecting a few hoops at the same
time and will work even if you're not in range of an existing WiFi network. Both
modes require one device to act as a central hub and don't automatically pick a
new group owner if that hub device isn't present. This means that if the group
owner is off or its battery fails, the whole group will lose the ability to
communicate until they're reconfigured. The hub device can also handle only a
limited number of connections.
Client mode allows a very large number of devices to be connected at the same
time and typically has better reliability at long range, and also makes access to
your hoop easy for other devices on the network. If you're using your hoop at
home or on stage where you have a fixed network to connect to, this is the mode
you'll usually want it in.
Your hoop remembers the last few WiFi networks it connected to. If the hoop
configured to be group owner finds a network it knows when it starts up, it'll
connect to that network as a client. If no known networks are in range, it will start

11
its own network. For example, if you normally use the hoop on a venue network
but sometimes use it for practice at the gym, it will still create its own network
when it doesn’t find your venue network.
WiFi Link Menu
To check the hoop's link status, press the ‘link’ button on the 44-key remote
(lower left corner). The middle three lights indicate the link status:
●●● ○○○ ●●●(White) Not connected / WiFi disabled
●●● ●●● ●●●(Green) Connected to network as client
●●● ●●● ●●●(Yellow) Couldn't find network
●●● ●●● ●●●(Violet) Hosting network in access point mode
●●● ●●● ●●●(Red) Hosting network in WiFi Direct mode
To change link modes, hold down the link button until the display begins to flash.
Press the link button to cycle through the available options. After a few seconds
of inactivity, the device will exit the menu and change modes. The link options
are:
●●● ○○○ ●●●(White) Turn WiFi off
●●● ●●● ●●●(Green) Connect to network
●●● ●●● ●●●(Violet) Switch to access point mode
●●● ●●● ●●●(Red) Switch to WiFi Direct mode
●●● ●●● ●●●(Cyan) Start WPS push button scan
●●● ●●● ●●●(Orange) Scan for open (unsecured) networks
●●● ●●●●●●(Red/Yellow/Green) Check for software updates
While the link menu is active, you can hold down the link button for two seconds
to forget the current network connection. The saved password will be deleted
and the device will not automatically reconnect to that network again.
The software update option only works if the device is connected to a network
with an Internet connection. If a software update is found, it'll be downloaded
and installed immediately. The update process typically takes less than a
minute. If no updates are available, the hoop will go back to playing patterns.
You can also hold the magic wand button while the link menu is active to wipe

12
out and reload all of the pattern files. This process takes about 10-20 minutes.
Be sure you do not have a low battery before using this option. Stopping the
transfer may result in corrupted files, but this can be fixed by simply repeating the
process and letting it finish.
Accessing the Web Interface (WiFi)
Each hoop has its own built-in web server. Out of the box, the hoop is configured
to create its own WiFi network, with the network name 'spinfx' and password
'spinfx'. You can connect to this network using a PC or mobile device. The hoop
can be reached at http://192.168.1.101. Other hoops and poi on the network
can be found in the 'Group' menu.
If the hoop is connected to a network with Internet access, you can find it by
going to http://my.hyperionhoop.com. The site will display any SpinFX |
Hyperion devices that have registered themselves on your network.
The web app is mostly self-explanatory and has its own help system. For up-to-
date information on using the web app, please see
http://www.hyperionhoop.com.
Art-Net™ Support
Art-Net is a network protocol for carrying DMX512 lighting data. Art-Net support
is enabled by default on your WiFi-equipped hoop. With it, you can use any
modern lighting control console or lighting design software to control it.
The DMX512 universe number and start address can be configured in the
config.ini file or through the web interface. The defaults are universe 0 and slot
1. Presently only a single profile is defined, and the slots are assigned as
follows:
1 Master brightness (0 = off, 255= max)
2 Pattern rotation rate (0 = ignore, 1 = max left, 128 = none, 255 = max
right)
3 Overlay rotation rate (0 = ignore, 1 = max left, 128 = none, 255 = max
right)
4 Pattern folder select (0 = ignore selection)
5 Pattern number selection within folder (0 = ignore selection)
6 Palette line number (0 = ignore)
7 Pattern line number (0 = ignore)
8 Mapped pattern selection (0 = ignore)
9-11 R/G/B values for palette substitution slot 1
…
54-56 R/G/B values for palette substitution slot 16
Settings in every slot except for master brightness are ignored if set to 0. The
rotation rates for the pattern and overlay layers are both centered at 128 (50%)

13
for easy control with a single knob or fader.
Patterns can be selected using the combination of slot 4 (folder select) and slot 5
(pattern select). This is a simple way to access all of the patterns loaded on the
device. To directly access specific patterns, you can also use slot 8 to choose a
pattern from a prepared list. To use this feature, create a file on the hoop called
'dmx.ini' and add a line for each pattern in the form 'pattern<n>=<filename.bmp>'.
For example:
pattern1=my_first_pattern.bmp
pattern2=my_second_pattern.bmp
Slots 6 and 7 control the palette and pattern playback line number, respectively.
In normal operation the hoop will step through each line of the palette and pattern
in sequence, but these slots allow direct control of which lines are displayed.
See the section on advanced pattern customization for more information on how
these can be used.
The rest of the slots represent the red, green, and blue intensity values for 16
color substitution slots. These colors replace placeholder colors in the pattern.
Choreographing Patterns to Music
You can program your hoop to change patterns in sync with a song using the
free audio editor Audacity, available from http://audacity.sourceforge.net. Load
the song in Audacity and place pattern changes by hitting control-B to insert
labels with the names of pattern files to be played. Drag the handles of the label
to set the duration of the pattern.
If you create a label with a duration of 0, the hoop will keep playing that pattern
until it reaches the next label. A label with a duration that's not 0 will play for only
that length of time, and then the hoop will switch back to the previous pattern.
You can use this feature to have the hoop play one pattern and easily punctuate
parts of the song with other patterns.
In the example below, the script begins with a pattern called black.bmp. This is a
completely black pattern so that the hoop starts the performance blacked out.
The @ symbol at the second label tells the hoop to stop the script and wait there
until motion is detected. The performer might walk on stage during the blackout
section and then wait in position until the appropriate music cue. As the
performer starts hooping, the script resumes and plays first_pattern.bmp. *Note:
the @ feature works best with hula hoops, not lyras as there is not as defined
controller motion.
Since first_pattern.bmp has no duration, this is now the default pattern for the
script. It plays until the script reaches second_pattern.bmp, and then the hoop

14
switches patterns for the duration of that label. When it's over, it switches back to
first_pattern.bmp and stays there until the script reaches third_pattern.bmp.
When you’re done creating a script, save the project file on your computer. The
Audacity project will include a file ending in .AUP and a set of audio files. Only
the .AUP file is needed for the timing information; simply copy it to the hoop to
use it as a playlist. The .AUP file should be stored in the top level folder (not in a
sub-folder), and you can launch it by making it a preset on the remote. For
example:
favorite1=daftpunk.aup
This launches daftpunk.aup when you press the DIY1 button on the remote.
You’ll need a way to make sure the music starts at the proper time. There are
two ways to accomplish this:
1. Manually - simply press the button on the remote when the music reaches the
first label.
2. Start a label with ‘!’. The hoop will give a quick visual count-in so you can start
the music at the right moment.
If you begin the label with #, the contents of the label will be displayed as

15
persistence-of-vision text on the hoop.
LED signals
Your hoop uses various color patterns to show its status and settings:
USB Connection Status
Single blue
Connected to computer
Single yellow
Charging
Single green
Finished charging
Single red
(flashing)
Low battery – replace battery or turn off hoop
Red-yellow-green
Updating software – don’t turn off
Single red chaser
Files have changed – scanning and sorting
At Startup
White chaser
Normal startup, with one red LED at one end and blue at
the other
Green chaser
Software is a beta or special debugging version
Every 3rd red, 2
flashes
Security lock is enabled and a code must be entered to
start
Green-green-
green-green
Security code prompt – one LED will turn off with each
button press
Responses to Commands
Alternating
red/yellow
Pattern will be excluded from auto-play
All red
Changed chaser mode
All green
Changed chaser motion mode

16
At startup, the hoop will briefly show a red light at one end, with two green lights
racing around from opposite ends. This lets you easily check that all of the LEDs
are working.
All blue
Changed pattern motion mode
Every 3rd yellow
Remote control locked
Every 3rd blue
Hoop is now in sequential mode
Every 3rd red
Hoop is now in shuffle (random) mode
All greens on
Rotate mode off (pause / stay on current pattern)
Every 10th green
Slow rotate mode
Every 5th green
Medium rotate mode
Every 3rd green
Fast rotate mode
Blue-blue
(repeating
Reformatting file system
Green dot with
blue trail
File download is in progress – blue portion shows
progress
Errors (See Troubleshooting Section)
Blue-blue-blue
No patterns found or unable to start a particular pattern
Blue-blue-blue-red
Drive not formatted, or incorrect format
Red-red-green
Flash memory failure
Red-red-red-yellow
Internal error – please let us know what you were doing
when this happened
Red-red-blue
Error measuring battery voltage
Red-red-red
Motion sensor self-test failure

17
If the files on the hoop have changed since it was last started, the hoop will show
a single red light that will move around the hoop as the files are scanned and
sorted. This should only take a few seconds.
Transportation, Storage, and Shipping
We recommend storing your hoop with the foam insulation tubing provided.
Always lay your hoop flat to store so there is no pressure on the LEDs. Always
transport the hoops in their foam protection tubing and handle them gently,
especially if setting them on the ground. LEDs are sensitive and can be damaged
if dropped or too much force is exerted on them.
Cleaning and Maintenance
Your hoop may accumulate dirt, scuffs, and scratches through normal use.
Surface dirt can be cleaned with a cloth, water, and dish soap. If the silicone
tape on the top of the hoop becomes too worn, you can purchase replacement
tape on Amazon. It can be found as “clear 1 inch Rescue Tape.”
Be sure to keep water out of the controller unit. If there’s dust or dirt in the USB
port or battery compartment, blow it out with compressed air or ‘canned air’
duster spray.
Updating Hoop Software
New software (also called firmware when installed in a device like this) is
periodically released for the hoop to add new features and fix any bugs that
might turn up. You can download the latest update from http://www.spin-fx.com.
The update takes the form of a single file named 'fw____.bin', with a series of
numbers in the name indicating the version.
Turn on the hoop, connect it to a computer, and copy the latest firmware file to
the hoop’s root folder – the top level, where you’ll find all of the pattern folders
and the config.ini file. Unplug the USB cable and the hoop will display a red-
yellow-green pattern and begin loading the update. Do not turn off the hoop until
the update completes and the hoop restarts. The update process should take no
more than 10 seconds.
Once the update is complete, it’s safe to remove the firmware file. If the file is an
older version than the software currently running on the hoop, it will be ignored.
WiFi-capable hoops can also download their updates directly from the network.
See the WiFi networking section for more details.
Troubleshooting
We hope your hoop will work flawlessly for you every time you use it, but in case
something does go wrong, here are some things to check:

18
Hoop won’t turn on
First, make sure the power button is pressed inward on the bottom of the
controller unit. Is it lighting up?
If not, make sure the battery is charged. If you have a voltmeter, a freshly
charged battery should read at least 4 volts.
If the hoop still won’t turn on, plug it in to a computer. If no lights turn on and the
computer doesn’t respond, contact customer service for assistance.
Single green or yellow LED stays lit
A single green LED normally indicates that the hoop is powered through the USB
port, and a single yellow LED indicates that it’s charging. If these LEDs are on
when the hoop is not plugged in, it may be getting a false signal from the charger
chip. Try holding down the purple arrow button in top right corner of the remote
for a few seconds. This will tell the hoop to temporarily ignore the charger signal.
Setting ‘disable_charger=true’ in config.ini will disable the charger status check
entirely, but the charger will still function.
Hoop acts like it’s running but not responding to any commands
Try turning power off and on.
Hoop pauses between patterns
Several things can cause pauses, or the appearance of pauses, between
patterns.
Watch the hoop carefully to see if it displays two chasers just before the pause.
This is the startup signal and indicates that the hoop reset. If it does this while
the hoop is standing still, contact customer service. If the reset happens while
the hoop is in use, see the section below about resets.
If the pause lasts the length of one normal pattern change, the hoop may be
displaying a pattern that is all black (not loaded by default but commonly used in
scripts) or possibly invalid or corrupted.
Hoop resets while using
If the hoop resets while it’s in use, there may be a loose connection or a break in
the LED circuit. The hoop likely has a bad connection internally and will require
repair.
Hoop shows three blue LEDs
The hoop will briefly show three blue LEDs if it tries to start a pattern and isn’t
able, for example if a named favorite preset doesn’t exist, or if the file is

19
corrupted and can’t be read. The hoop should resume playing other patterns
after a moment, or when you press the purple arrow button in top right corner of
the remote.
If the hoop always shows three blue LEDs, this indicates that it was not able to
find any patterns to play. If this persists when you restart the hoop, make sure
the battery is fully charged and connect it to a computer and see if you can
access the pattern files. If the drive is blank or appears corrupted, see the
section on reformatting your hoop.
Part of hoop is always dark or stuck displaying a constant pattern
The LED strip may be damaged. Signals are passed from one LED to another,
starting from the end with the USB port. A damaged LED can make all of the
remaining LEDs after it malfunction, and the hoop will need to be returned for
repair.
Hoop doesn’t respond to remote control
If the hoop works with another remote, the problem is in the remote control. To
check if the remote is functioning, try aiming it at a digital camera (the one on
your phone or tablet works well for this) while you hold one of the buttons. You
should be able to see the IR LED at the end of the remote flickering on the
screen. If the remote isn’t working, replace the battery (CR2025 type). If the
remote still doesn’t function, it will need to be replaced.
The hoop’s remote receiver is located on the inside edge of the circuit board near
the USB port. Try aiming the remote directly at this spot, and make sure it isn’t
covered by tape.
Hoop freezes on orange, pink, or red pattern
Each LED in the hoop has separate emitters for red, green, and blue. The blue
ones require the highest voltage, followed by green. If the voltage from the
battery drops too low, blues will fade first and then greens, leaving the hoop with
a sunset color palette – oranges, pinks, and reds. The hoop will normally try to
detect a dying battery and shut itself off before it reaches that stage, but if the
battery is old or in poor condition the voltage may drop too fast and leave the
hoop’s controller temporarily frozen.
Advanced Configuration Options
The config.ini file can take several options, which may be useful for
troubleshooting or dealing with hardware malfunctions and special situations.
gamma_correction=true/false – The hoop normally has gamma correction
enabled (γ= 2.2). This helps keep images from looking washed out and makes
them more closely match what you see on the screen. You can disable gamma
Other manuals for LED SMART LYRA
1
Table of contents
Popular Dj Equipment manuals by other brands

Chauvet Professional
Chauvet Professional Colorado 1 Solo user manual

PIONEER DJ
PIONEER DJ DJM-S3 operating instructions

Peecker Sound
Peecker Sound Double Array Series Rigging instructions

Elumen8
Elumen8 Kudos 350ZS user manual

Tong-Da
Tong-Da INDIGO 2000 user manual

thomann
thomann SePar QUAD LED RGB UV IR user manual


