SPINZALL BDX SP-501 Quick guide
USER MANUAL and RECIPE BOOK
BDX SP-501
Culinary Centrifuge
Please read these instructions carefully before using this machine.
Please retain these instructions for your future reference.
(HEY! GOOD NEWS:
you can see a video
version of this book
at www.spinzall.com)

2
TABLE OF CONTENTS
WHAT’S IN THE BOX
1 Assembled Spinzall centrifuge consisting of:
1 Motor Base with assembled Pump, Pump Inner-Tube Assembly, and Bowl Gasket
1 Bowl
1 Lid Assembly with silicone rubber Chute Extender
1 Lid Cap (with silicone rubber Gasket installed)
1 Rotor with 3 installed Fins
1 Feeder Assembly (1 Feeder Base, 1 Feeder Gasket, 1 Feeder Lid, 3 silicone rubber
Feeder Extenders)
1 90 cm long/4mm inner diameter/8mm outer diameter silicone rubber Pump Inlet Tube
1 42 cm long/4mm inner diameter/8mm outer diameter silicone rubber Pump Outlet Tube
1 User Manual and Recipe Book
1 Limited Warranty
1 Spinzall Cheat Sheet
Extras (Spares): 3 Rotor Fins, 3 Tube Extenders, 1 Feeder Gasket,1 Pump Inner-Tube Assembly
What’s In the Box
Introduction
Expectations
Important Safety Instructions
The Parts Of Your Spinzall
Spinzall Safety Mechanisms
Before First Use
Taking Your Spinzall Apart
How To Run Your Spinzall In Batch Mode
How To Run Your Spinzall In Continuous Mode
After The Spin: Opening And Cleaning Your Spinzall
How Continuous Mode Works: Feeder Magic
How To Open A Locked Spinzall With No Power
How To Replace The Pump Inner Tube Assembly
Troubleshooting Your Spinzall
Recipes
Where to Go for More Recipes
Electrical Specifications
2
3
3
4-5
6-7
8
8
9-10
10-13
13-14
15-16
16-17
17-18
18
19
20-29
30
30

3
Thank you for purchasing the Spinzall, the first centrifuge designed exclusively for the
kitchen and bar. With your Spinzall you can clarify juices, separate liquids from solids,
purify oils, make butter, make quick cold-brew coffee, and conjure up a host of other
culinary wonders.
You must read and understand the instructions in this manual. While the
Spinzall is easy to operate, you have a lot to learn and this manual may seem
overwhelming at times. Stick with it, and after you’ve finished, check out the
video version at spinzall.com.
The Spinzall, like all centrifuges, separates products based on density differences.
The rotor spins rapidly, subjecting what’s inside to a force many times that of gravity.
Heavier particles or liquids are forced to the outside of the rotor; lighter products are
forced towards the inside.
The Spinzall, unlike other centrifuges, is designed to be simple and friendly. The
Spinzall is self-balancing. Its special rotor shape allows you to clarify at speeds that
are lower and safer than the speeds required by larger centrifuges. The Spinzall
motor gently oscillates between 4000 rpm and 3650 rpm; this oscillation aids the
clarification process. When the Spinzall motor turns off, an electronic brake gently
slows and stops the rotor, bringing it to a stop within about a minute.
Your Spinzall runs in two modes: Batch and Continuous.
In Batch Mode the Spinzall will process 480 ml of product at a time. Batch Mode
produces the clearest products. A typical batch takes from 5 to 15 minutes to process,
depending on the recipe.
In Continuous Mode the amount of liquid you can process without stopping depends
on the solids content of your liquid. You are limited by two volumes: the volume of
the rotor, and the volume of the tube feeder cup (see “How Continuous Mode Works:
Feeder Magic” page 16). For example, you can process several gallons of orange juice,
but only a couple of liters of fruit puree, before you’ll need to stop the Spinzall and
clean out the rotor. In Continuous Mode the Spinzall pumps liquid through the top
of the lid into the feeder tube, which in turn injects liquid into the interior of the rotor.
Particles fling to the outside of the rotor, while clearer and lighter liquids move to the
inside of the rotor. After the rotor is full of liquid, clear liquid spills out of the rotor into
the bowl of the Spinzall, and then out of the spout.
INTRODUCTION
EXPECTATIONS
The Spinzall can accomplish anything a $10,000, two-hundred-pound, three-liter
centrifuge can—just not as quickly. Expect one liter every 10-20 minutes in Continuous
Mode. In Batch Mode expect 480 milliliters to take about 5 and 10 minutes of
spinning with one minute of deceleration per cycle. Many of the recipes for the
Spinzall require pre-treatment with an enzyme, or with an enzyme plus a wine fining
agent. (The $10,000 models require this same pre-treatment, by the way.) All of these
products are available for reasonable rates at ModernistPantry.com.

4
IMPORTANT SAFETY INSTRUCTIONS
CAUTION
The Spinzall is a centrifuge, and centrifuges are inherently hazardous. Failure to
comply with these warnings and instructions may result in a catastrophic mechani-
cal failure that may cause property damage, serious personal injury, or death.
The spinning rotor of a centrifuge stores energy. The main dangers of this or any
other centrifuge are:
• High energy rotor failures caused by a loss of dynamic balance or
catastrophic structural failure
• Mechanical damage to body parts if they come into contact with spinning
parts
Read and comply with the instructions in this manual and familiarize yourself
with the Spinzall BEFORE using. Review instructions and warnings periodically
to maintain awareness. Failure to follow these instructions will VOID your limited
warranty.
Treat the Spinzall as you would any fine tool or instrument; do not drop it, throw it,
or abuse it.
Do not attempt to operate the Spinzall before reading instructions. Specifications of
the Spinzall are subject to change and revision at the manufacturer’s discretion.
Owners should always review the enclosed Limited Warranty which contains
important information.
Keep the Spinzall out of the reach of children, and do not allow anyone who has not
read and understood the operating instructions to use it.
NEVER force open a locked lid. Doing so will break the interlock and VOID your
limited warranty. Read the instructions for opening a locked lid.
NEVER alter the rotor, bowl, lid, motor base, motor, or safety mechanisms of the
Spinzall in any way.
NEVER attempt to disassemble or unscrew the rotor from the rotor core. They are
balanced as a unit.
NEVER use the rotor of the Spinzall in any other machine or for any purpose not
indicated in these instructions.
NEVER alter the rotational speed of the Spinzall.
NEVER use a non-approved rotor, or any non-approved accessories, in the Spinzall.
NEVER exceed the weight capacity of the rotor—catastrophic failure leading to injury
or death may occur if you do.

5
CAUTION
NEVER exceed the maximum density for product added to the rotor of 1.23 grams/
cc —catastrophic failure leading to injury or death may occur if you do. For reference,
this is the density of 1:1 simple syrup. Maple syrup is too dense at 1.33 grams/cc.
Most purees are thick, but not dense, and are OK.
NEVER run the Spinzall without the fins properly installed in the rotor.
NEVER attempt to defeat the safety mechanisms of the Spinzall or run the machine
without safety mechanisms in place.
NEVER attempt to stop a spinning centrifuge rotor by hand.
NEVER operate the Spinzall if the rotor, casing, or safety mechanisms appear
damaged, cracked, corroded, or otherwise compromised.
NEVER use flammable or hazardous materials in the Spinzall—a fire or explosion
may result (for the definitions of flammability for alcoholic mixtures, see
instructions).
NEVER attempt to use the Spinzall in an unbalanced configuration.
NEVER run the Spinzall unattended.
NEVER operate the Spinzall less than 300 mm (approximately one foot) from the
edge of a table or countertop (to prevent falling).
NEVER use the Spinzall as a laboratory centrifuge.
NEVER place bio-hazardous materials into the Spinzall.
ALWAYS inspect the rotor, case, and safety mechanism of the Spinzall before every
use to ensure they are in proper condition.
ALWAYS run the Spinzall on a flat, level, non-slippery surface.
ALWAYS maintain a 300mm (approximately one foot) safety zone around the
Spinzall, free from hazardous or breakable materials.
ALWAYS keep your and anybody else’s body outside of the 300mm (approximately
one foot) safety zone, except to perform necessary operations on the centrifuge
while it is running.
ALWAYS be aware of the sounds and sights of the Spinzall; if anything seems
wrong, immediately shut off the power and wait for the rotor to come to a complete
stop before diagnosing problem.
SAVE these instructions.
QUESTIONS? Go to www.spinzall.com

6
Lid
Assembly
Feeder
Assembly
Rotor
Assembly
Motor
Base
Bowl
Pump Outlet Tube:You can pump liquids
into the Spinzall automatically during operation
through this tube.
Lid Cap
Lid Cap Gasket
Inlet Chute: Products are added to the Spinzall
through this chute.
Inlet Chute Extender: Controls splashing in
rotor. Use is optional.
Feeder Lid: Prevents evaporation in the rotor
and forms the top of the feeder cup.
Feeder Gasket: Prevents cloudy liquid from
spilling out of feeder before entering the rotor.
Feeder Cup: injects liquid into rotor and holds
floating products that would ruin clarification.
Feeder Extenders: inject liquid closer to outer
wall of the rotor to help clarification.
Fins: Balance products in the rotor and make
them behave as a single unit rather than a
scouring tornado. Note their orientation.
Rotor: Holds 486 milliliters
Bowl
Spout: liquids pour out of this spout during
Continuous Mode
Shaft
Shaft Coupling
Bowl Gasket: Prevents leaking between the
motor base and the bowl during continuous
operation.
Motor Base
Note: all food contact parts are made from food-
grade silicone, clear BPA-free Tritan resin, FDA
compliant polypropylene, and stainless steel.
Pump: Consistently pumps liquid into the
Spinzall during use in Continuous Mode.
THE PARTS OF YOUR SPINZALL
Note: Actual Spinzall
may differ from pictures
in this manual.
7
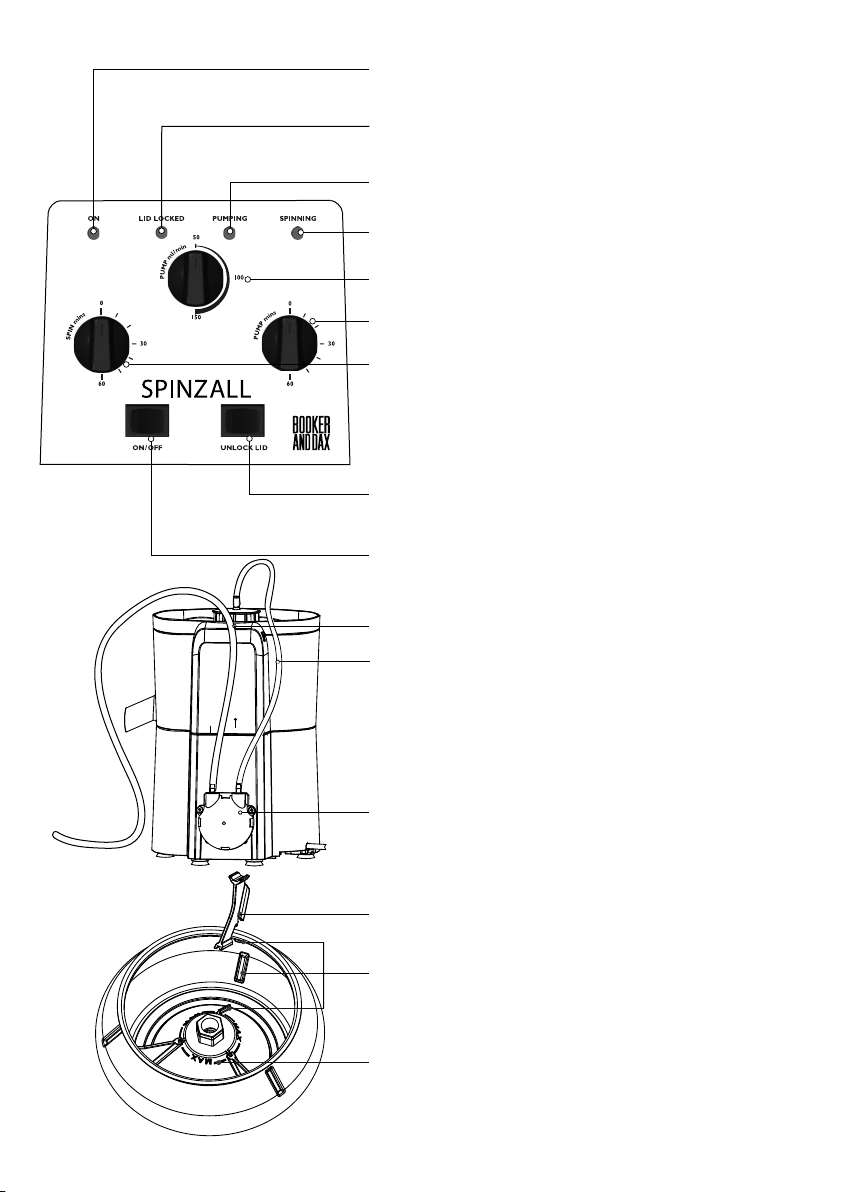
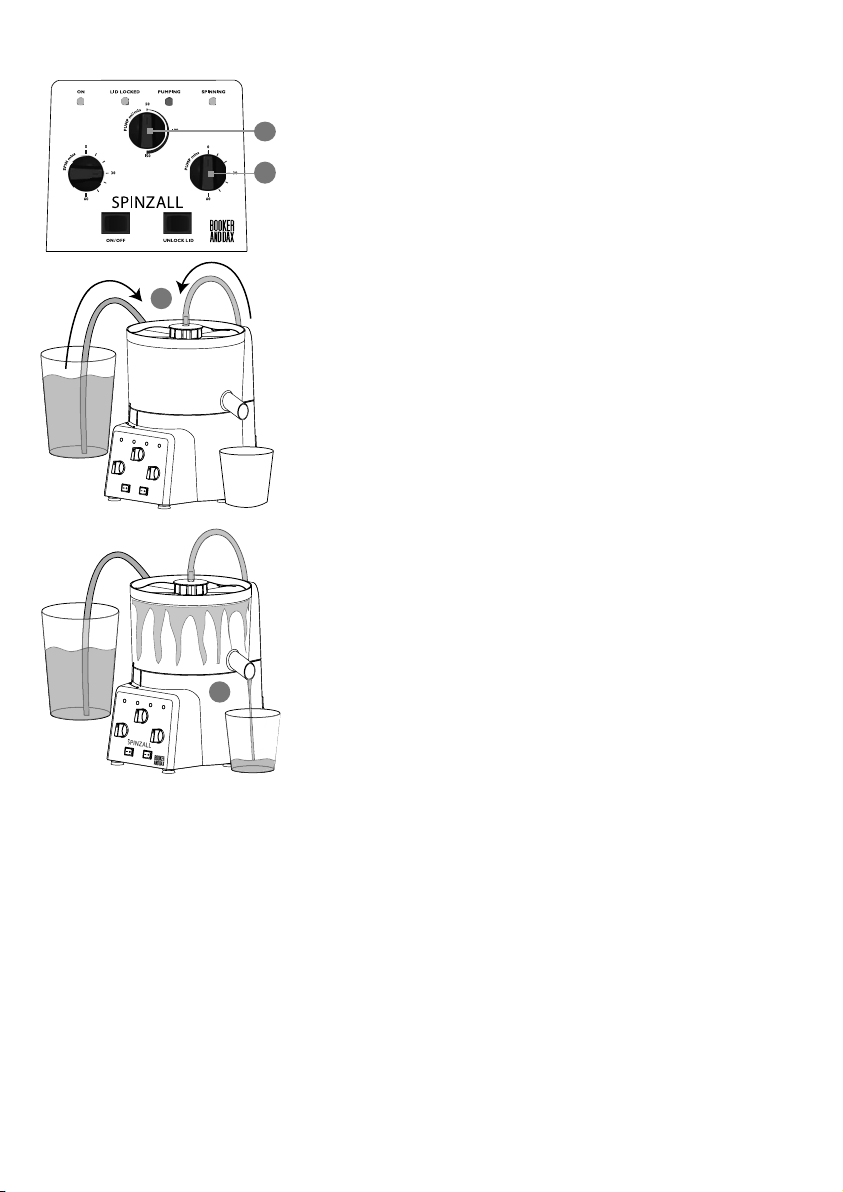
Power LED: Light is on when the Spinzall is plugged in and
the Power Switch is “On.”
Lid Locked LED: Light is on when the lid is locked shut.
The light is solid when the lid can be unlocked, and is
flashing when the rotor is spinning faster than 100 rpm and
cannot be unlocked.
Pumping LED: Light is on when the pump is running.
Spinning LED: Light is on when the motor is on and the
Spinzall is actively spinning. Note: all LEDs flashing indicates
an error.
Power Switch: Turns on the power.
Unlock Lid Switch: Activates a solenoid that unlocks the lid
for 4 seconds. The switch only works if the Lid Locked LED is
on and solid—not flashing. If you do not open the lid within 4
seconds the lid will lock again and you will need to press the
switch again. If you need to unlock the lid without power, see
“How To Open A Locked Spinzall With No Power” on page 17.
Pump Speed Selector: Sets the rate of the pump from
roughly 50- to roughly 150 milliliters per minute.
Pump Timer: Turns on the pump for the selected amount
of time, between 0 and 60 minutes.
Motor Timer: Turns on the motor for the selected amount
of time, between 0 and 60 minutes. Note: When setting the
timers to less than 30 minutes you must turn the dials PAST
30 and then back to the time you desire to guarantee they
will time properly.
Fin: Note the position of the fin. The part of the fin with the
“bite” out of it points towards the bottom of the rotor.
Fin Location Grooves: Hold the fin in place. The fins slide
smoothly in and out of the grooves. The fins must be located
properly in their grooves or the rotor will become unstable.
Max Fill Line: You may fill the rotor up to this line without it
overflowing as the Spinzall is running. The volume of the rotor
up to the Max Fill line is 480 ml.
IN
OUT
Pump: Consistently pumps liquid into the Spinzall when
using Continuous Mode. It prevents you from adding liquid
to the rotor too fast, which would cause your product to be
cloudy. It can pump gallons without intervention. This pump
has no moving parts that touch your food, so it is very sanitary.
Pump also has an Inner Tube Assembly; this is the only part
of the pump that actually touches your food. It is removable
and replaceable, but is usually cleaned in place. Maximum
temperature for liquids is 85°C/185°F.
Pump Inlet Tube: ~90 cm long. Sucks product into pump.
Pump Outlet Tube: ~42 cm long. Pumps product into
the Spinzall. Both tubes are 4 mm ID, 8mm OD food grade
silicone rubber.
8
BEFORE FIRST USE
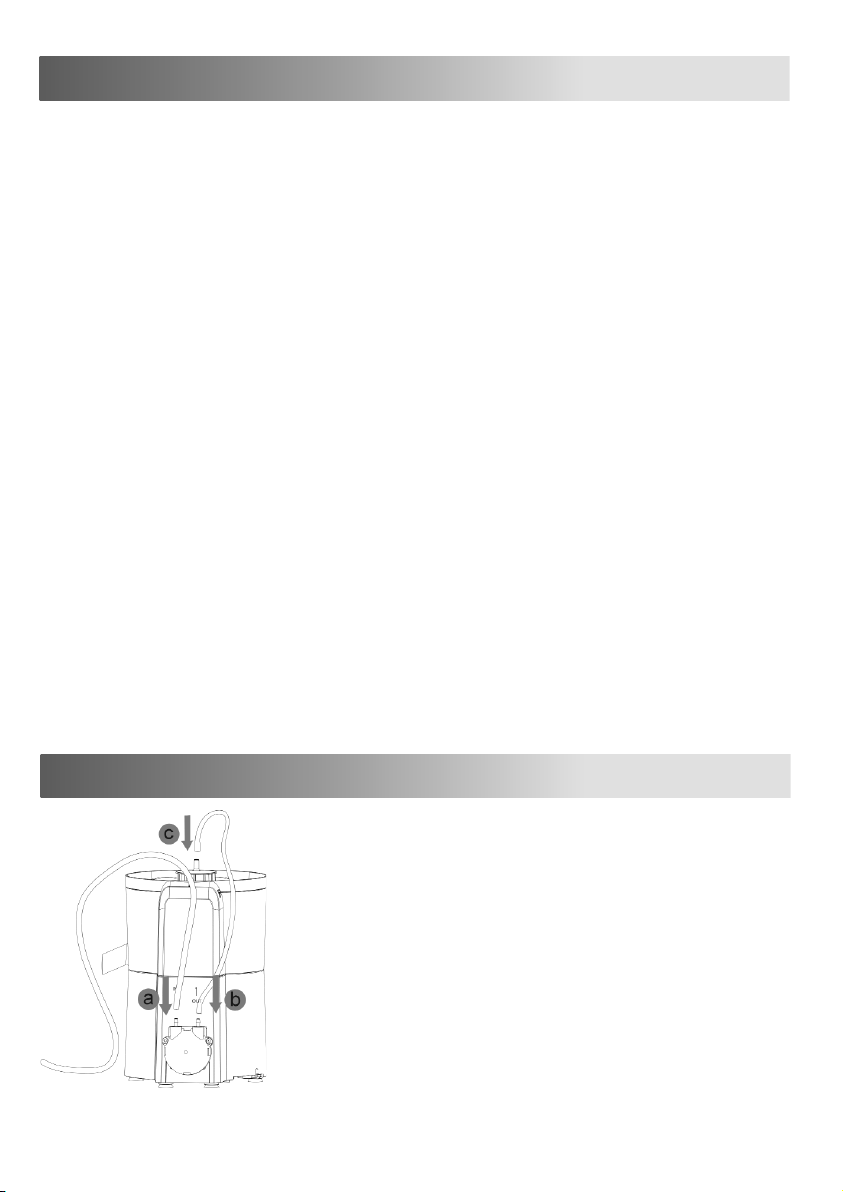
1. First, install the pump tubing: Insert the Pump Inlet Tube
(90 cm long, the longer of the two pump tubes) over the
Pump Inlet Port on the back of the Spinzall labeled “IN” (a).
Insert the Pump Outlet Tube (42 cm long, the shorter of the
two pump tubes) over the Pump Outlet Port on the back
of the Spinzall labeled “OUT” (b). Insert the other end of the
Pump Outlet Tube over the Lid Cap hose barb (c). It will be
tight; wetting the tube may make this operation easier.
2. The Spinzall arrives assembled. Before first use you must
disassemble and thoroughly clean the rotor assembly, tube
feeder, bowl and lid. Instructions for taking the Spinzall
apart are on the next page. For cleaning instructions, see
“After The Spin: Opening And Cleaning Your Spinzall,” steps
9-10, page 16.
The Spinzall is designed with your safety in mind:
• The Spinzall has a Lid Interlock System. Once the lid is locked it cannot be opened again
without pressing the Unlock Lid Switch. This switch only operates when the rotor is spinning
under 100 rpm and the power is on. The interlock system makes it impossible for your body
to come into contact with a spinning rotor. In the event that you’ve locked your Spinzall
when it’s off and unconnected to power, you’ll need to use the Manual Override to open it.
• The Lid has a secondary safety switch wired directly to the motor; it turns off the motor
when the Lid isn’t fully closed, even if the Interlock is altered or damaged. Also, if the
Spinzall vibrates excessively, the lid will rotate slightly to disengage this switch and turn off
the motor while the Lid stays locked.
• The Spinzall has an imbalance sensor. If the machine tips over during use the machine will
shut itself off and warn the user by flashing all of its LEDs. The Spinzall must be switched off
and back on to reset it.
• The Bowl of the Spinzall is made of super-tough, shatter-resistant Tritan resin.
• The feeder chute on the Lid is designed so that large particles that may damage or
unbalance the machine cannot accidentally drop into the rotor while it is spinning.
• The spout on the Bowl is designed to prevent your fingers from reaching inside.
• The Rotor is manufactured from two different materials: Tritan resin and stainless steel.
In the extremely unlikely event of a rotor failure, the joint between the plastic and metal
parts of the rotor will fail first, causing liquid to leak, reducing the stress on the rotor and
preventing catastrophic failure.
• The motor on the Spinzall has low torque. This low-torque, long-life motor is more durable
and more energy-ecient than a more powerful motor, and much safer, because it is not
powerful enough to accelerate an imbalanced rotor to full speed.
• If, for any reason, the Spinzall cannot verify the rotor speed, it will shut down and warn the
user by flashing all of its LEDs. The machine must be switched off and back on to reset it.
SPINZALL SAFETY MECHANISMS
9
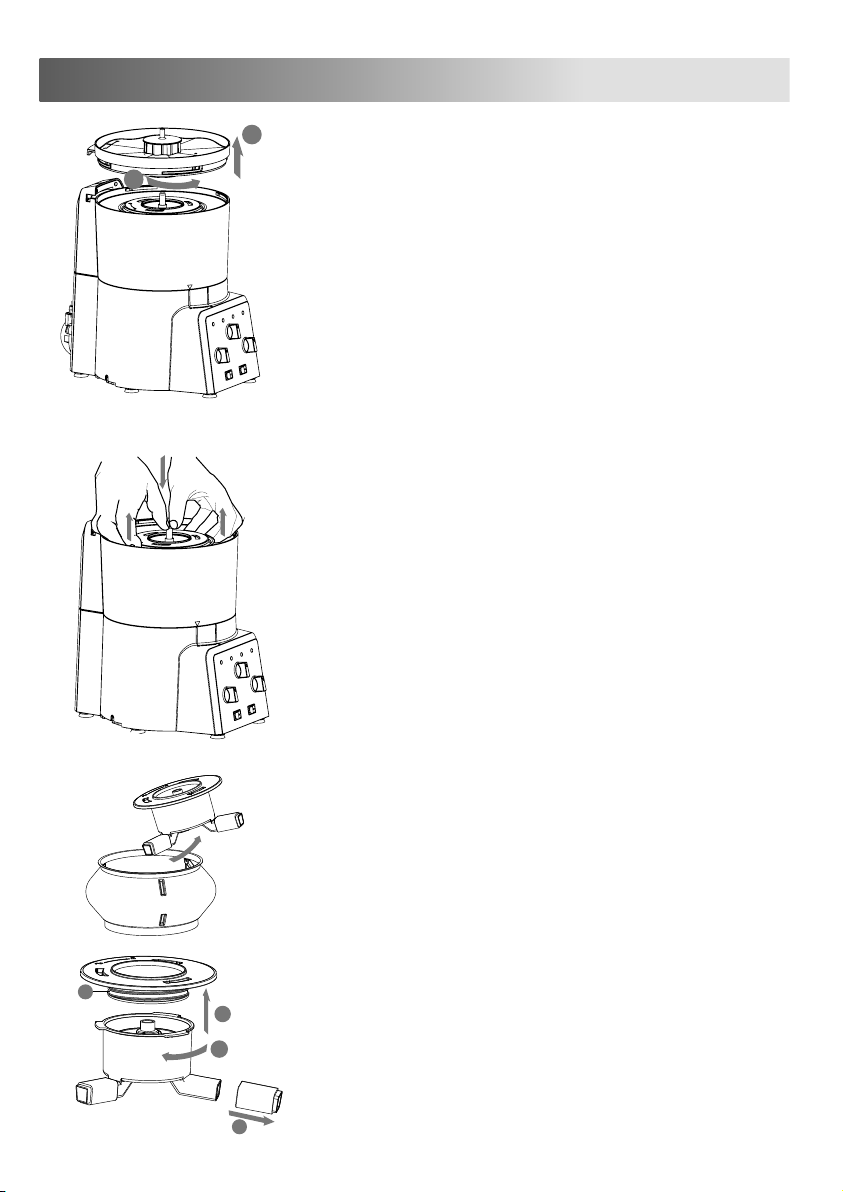
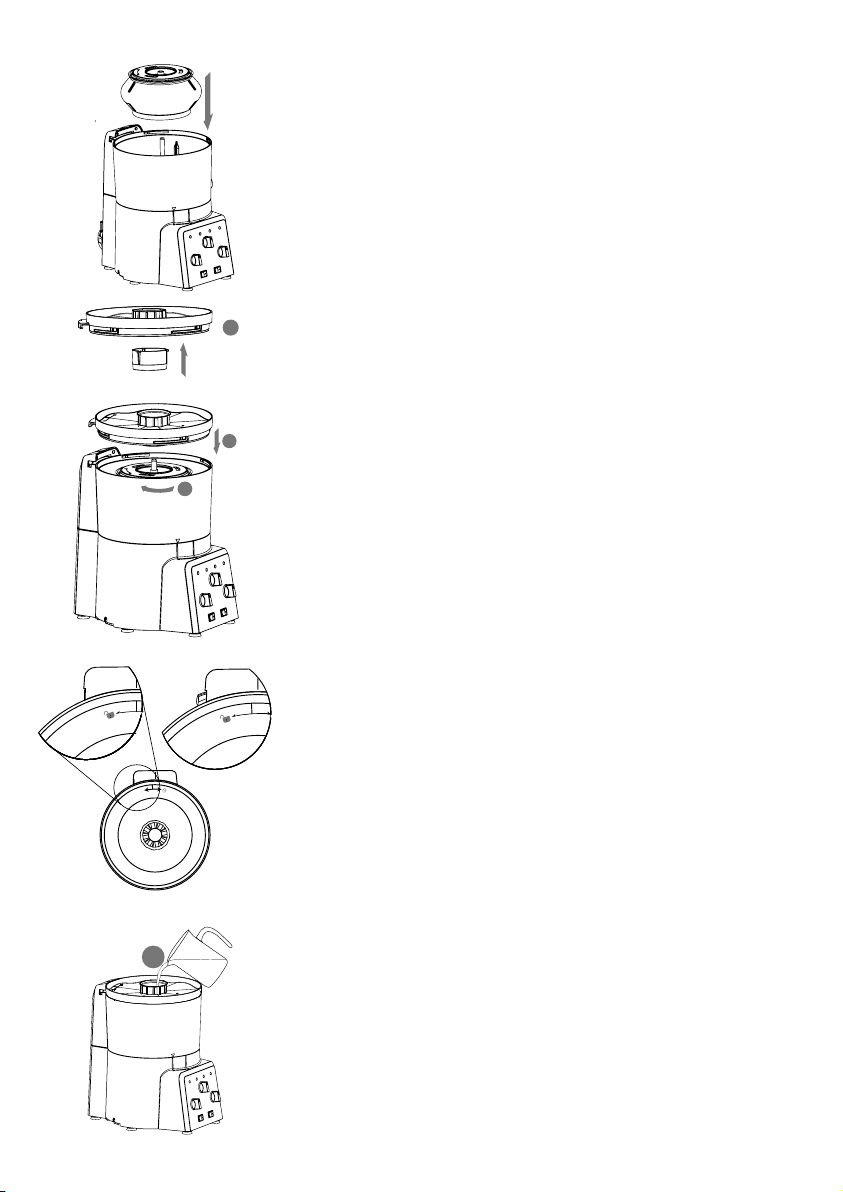
1. Remove the Lid by rotating it counterclockwise (a) and
then lifting it off the shaft (b). Optionally remove the silicone
Chute Extender and Lid Cap from the Lid (operation not
shown). CAUTION: If the Lid is locked (which it automatically
will be whenever it is fully closed) you CANNOT remove it
without using the “Unlock Lid” Switch (see instruction 2 on
this page). If you force open a locked lid you will VOID your
limited warranty and you may break your Spinzall.
2. If the lid is locked first verify that the Spinzall Motor timer is
fully off, plug the Spinzall in, and turn the Power Switch “ON.”
Rotate the lid FULLY clockwise to completely close it and
verify that the “LID LOCKED” light is illuminated and solid (not
flashing). Press the “Unlock Lid” momentary switch and turn
the Lid counterclockwise to disengage the locking mechanism
and lift the lid off the shaft.
3. The Unlock Lid switch unlocks the Lid for approximately
four seconds. The “Lid Locked” LED will turn off while the Lid
is unlocked. If you do not open the lid within four seconds the
lid will automatically lock again and the “Lid Locked” LED will
turn on. Remember: You MUST have the Spinzall plugged
in and powered on to unlock the lid. This is a safety feature.
If you do not have access to power see the “How To Open A
Locked Spinzall With No Power” on page 17.
4. Remove the Rotor and Feeder Assembly from the shaft.
They must be removed as a unit; you CANNOT remove the
feeder assembly by itself. The Rotor and Feeder are very snug
on the shaft and may be dicult to remove. To remove the
Rotor and Feeder put both thumbs on the shaft as shown, curl
your fingers under the rim of the rotor, and pull up with your
fingers as you push with your thumbs. This movement will pull
the rotor and feeder smoothly off the shaft (see picture at left).
5. Remove the Feeder Assembly from the Rotor. You
CANNOT pull the Feeder straight out of the Rotor. You must
use a circular and swinging motion (see picture). Optionally
remove the three black fins inside the rotor. Do not lose the
fins, as the Spinzall will not work without them.
6. If you wish to disassemble the Feeder Assembly to clean
it, hold the lower part of the Feeder stationary and grasp the
Feeder Lid; rotate the lid clockwise to disengage the tabs on
the Feeder Cup (a) and then lift the Lid free of the Cup (b).
Note the Feeder Gasket (c). You may remove the Gasket for
cleaning, but you must make sure not to damage or lose it.
The Feeder WILL NOT work properly without the Gasket, and
your products will stay cloudy. If desired you can now remove
the Feeder Extenders by pulling them off (d).
b
a
TAKING YOUR SPINZALL APART
a
b
c
d

10
1. Inspect the rotor for dents or cracks. If it is damaged,
DO NOT USE. Make sure all three Fins are inserted into the
rotor and are firmly seated in their slots. The “bite” out of
the fin points down (see the picture for proper orientation).
WARNING: If the fins are not installed properly or are missing,
the rotor CANNOT balance itself and the Spinzall will not
operate properly and may get damaged or cause injury.
2. Optionally fill the Rotor up to the “Max Fill” line on the
interior of the Rotor. If you do not fill the Rotor now, you may
fill it when the Rotor is spinning. If you add more than the
“Max Fill” you may prevent the Rotor from spinning, or you
may spill cloudy liquid into the bowl. Although the Spinzall
will balance itself, try to fill the three sections of the Rotor
equally. NOTE: When spinning very thick products the Spinzall
may wobble as it begins to spin. It should settle out as it
speeds up. If it does not stop wobbling, turn off the machine
and let it stop. WARNING: do not fill the Rotor with liquids
weighing more than 1.23 grams per milliliter (the density of
1:1 simple syrup). WARNING: do not fill the Rotor with warm
alcohol or with any alcoholic beverage greater than 40% ABV
or warmer than 25°C, or any other flammable or explosive
product. There is risk of severe injury or death if you do.
480 ml
Max!
HOW TO RUN YOUR SPINZALL IN BATCH MODE
Batch Mode is best when you have less than 480 ml of product or when you are making solids,
like no-churn butter or Greek yogurt. Batch Mode also usually produces the clearest results
and is the fastest technique
per milliliter
. In Batch Mode you simply fill the assembled rotor
with your product up to the “Max Fill” line (480 ml) or below, and spin it for the desired time.
If you are clarifying a liquid, solids will be flung to the outer part of the rotor, where they will
stick to each other and form a “puck.” When the cycle is done the Spinzall will gently slow
itself to a stop over the course of a minute. You may then press the Unlock Lid switch, open the
machine, and recover the product. Be gentle with the rotor during recovery: sudden or violent
movements can re-suspend cloudy particles from the puck, ruining your result. Liquids can be
poured out of the rotor. Often you will find a few floating particles in the liquid that you can
easily filter out with a fine mesh strainer (untreated, finely woven cotton kitchen towels make
ideal strainers.) These floating particles will not affect product clarity. To harvest solids out of
the rotor, gently slide out the fins for easier access. The rotor, bowl, and lid can now be washed
by hand or in a dishwasher. The downside of Batch Mode is you must open, clean, fill, and
close the Spinzall quite often when making a large amount of product. For this reason, there
is Continuous Mode. In Continuous Mode you pump product through the Spinzall while it is
running, so you can clarify much more than 480 ml at a time (see “How To Run Your Spinzall In
Continuous Mode” page 13). To see a video of the Batch Mode procedure, visit spinzall.com.
“bite”
7. Remove the Bowl by twisting it counterclockwise on the
Motor Base and lifting up. The Bowl may be tight on the
Motor Base and require a good bit of force to twist open. The
easiest way to apply the necessary force is to grab the Motor
Base with your hand and use your thumb to push the Bowl
counterclockwise as shown in the picture.

11
a
b
c
d
3. Make sure the Feeder Assembly is properly assembled. To
assemble the Feeder, make sure the Feeder Gasket is in the
proper position on the Feeder Lid (a), then align the slots in
the Feeder Lid with the tabs on the Feeder, push down (b)
and, holding the body of the Feeder stationary, twist the lid
counter-clockwise to lock it in place (c). NOTE: if the Feeder
Gasket is missing or leaks, cloudy liquid will spill out of the
Feeder during Continuous Mode, rendering your product
cloudy. Optionally place the Feeder Extenders over the ends
of the tubes, making sure to engage the rectangular cutouts
in the extenders with the tabs on the undersides of the tubes
(d). Wetting the Extenders may make them easier to assemble.
NOTE: If you do not use the Extenders recipes may not clarify
as well. You must use all three extenders, not just one or two.
4. Insert the Feeder Assembly into the Rotor. You must
insert the Feeder using a sweeping motion (see picture).
It intentionally cannot fit into the Rotor directly. Once the
Feeder Assembly is inside the Rotor make sure it is seated
properly on the Rotor’s hexagonal spindle. NOTE: You MUST
insert the Feeder BEFORE you place the Rotor on the motor
shaft. You CANNOT fit the Feeder into the Rotor while it is
in the Spinzall. Also, you must remove the Rotor from the
Spinzall to remove the Feeder. NOTE: You MAY operate the
Spinzall in Batch Mode without the Feeder, but the lid on the
Feeder prevents evaporation during spinning. See recipes for
details.
5. Make sure the Bowl Sealing Gasket (a) is installed properly
on the Motor Base. Push firmly on the triangular portions of
the gasket that lock it into place. If the gasket is not firmly
in place, it will cause friction that will prevent the rotor from
spinning. If the gasket is damaged, missing, or not properly
installed, the Bowl may leak during continuous operation.
Align the Bowl with the marks on the Motor Base; push down
and rotate clockwise to lock the Bowl into place (see (b) and
(c)). Note: It may take a little force to lock the Bowl into place,
but the locking triangle on the Bowl MUST line up with the
lock symbol on the Motor Base for the Spinzall to run.
6. The easiest way to lock a tight bowl into place is to put your
thumb on the motor base as shown and use your fingers to
rotate the bowl into the locked position.
a
b
c
12
a
a
b
7. Place the assembled Rotor and Feeder on the Motor Shaft
and push down until it is firmly seated on the rubber shaft
coupling (see picture). If the rotor is not firmly seated friction
will prevent the rotor from spinning.
8. Assemble the Inlet Chute Extender onto the bottom of
the chute on the Lid (a). Make sure the Extender is lined up
properly on the ribs of the Chute, or friction will prevent the
rotor from spinning. NOTE: You may run the Spinzall without
the Chute Extender, but product may splash out of the Feeder
if you do. Inspect the ball bearing in underside of the Lid.
Make sure it operates smoothly. If necessary, clean any sticky
residue to ensure smooth operation. If it is sticky the Spinzall
will be very loud and you will prematurely wear out the
bearing.
9. Make sure the Motor Timer and Pump Timer are set to
zero, then plug the Spinzall in and turn the Power Switch
to “ON.” The Power LED should light, but all the other LEDs
should be off. Align the Lid with the shaft and Bowl as shown,
then push down and rotate clockwise as shown to close the
lid (see aand b). Closing the Lid automatically locks it and
turns on the “Lid Locked” LED. WARNING: Do not attempt to
open a locked lid without using the “Unlock Lid” switch or the
Manual Override (see “How To Open A Locked Spinzall With
No Power” page 17). Doing so could break your Spinzall.
10. NOTE: Make sure the Lid is COMPLETELY closed like the
detail on left. Be careful not to inadvertently rotate the lid
counterclockwise after you have closed it (detail on right).
If you do, the lid will still be locked (and the Lid Locked LED
light will be on), but the Spinzall will not spin because the
secondary safety switch will be disengaged (see “Spinzall
Safety Mechanisms”). If you turn on the Motor Timer with
the lid in this incorrect position the Spinzall will go into error
mode in 5 seconds. All LEDs will flash, and the machine must
be switched off and back on to reset it.
11. If you have not filled the Rotor yet, you may fill it now with
up to 480 milliliters of product (a), or you may start spinning
with an empty rotor and fill it with the pump (see the recipe
section for which technique you should use). Place the Lid Cap
in place on the top of the Lid, making sure gasket is in place
on cap (operation not shown). NOTE: The cap is not necessary
in Batch Mode, but you should always use it because it
reduces noise and evaporation.
NO!
YES!
480 ml
Max!
a
Top view Spinzall Lid
Detail

13
HOW TO RUN YOUR SPINZALL IN CONTINUOUS MODE
In Continuous Mode you pump product into the Spinzall while it is running. Cloudy product
is pumped in; clarified product spills out. Continuous Mode is made possible by the Feeder
Assembly. To understand WHY the Feeder works see the section “How Continuous Mode
Works: Feeder Magic.” To just figure out how to run in Continuous Mode, read below.
The main decisions you will make in Continuous Mode are:
• Whether to start with a full rotor or an empty rotor. In general, if a product has airy
cloudy particles that tend to float in the rotor, start with an empty rotor so the Feeder tube
can filter them out. If your product does not have particles that float in the rotor, start with
a full rotor to save time.
• How fast to run the pump. The faster you pump product through the rotor, the faster
you are done—but if you pump too fast, you exceed the capabilities of the Spinzall and your
product will go cloudy. See the recipes for how fast you should run a particular product.
• How big a batch to process before you stop the Spinzall and clean it out. Maximum
batch size is determined by the solids contained in your product. Generally, the Spinzall
should be cleaned out after processing 300-350 grams of SOLIDS. See recipes for details.
To see a video of this procedure, visit spinzall.com.
Continuous Mode starts out the same way Batch Mode does, so to begin follow the
instructions in “How To Run Your Spinzall In Batch Mode,” and then:
12. Turn the Motor Timer (the knob on the lower left of the
front panel) to the desired number of minutes (operation
not shown). Note: When setting the timer to less than 30
minutes you must turn the dial PAST 30 then back to the time
you desire to guarantee it will time properly. The “Spinning”
LED will illuminate, and after the Rotor reaches 100 rpm,
the “Lid Locked” LED will start flashing, indicating that the
Lid cannot be unlocked. If the rotor does not reach 100 rpm
within 5 seconds the Spinzall will go into error mode. All
LEDs will flash and the machine must be switched off and
back on to reset it. The Rotor should slowly accelerate up
to 4100 rpm. After it reaches its maximum rpm it will slow
down to 3600 rpm and then cycle between these two speeds.
This cycling helps clarification. If the rotor does not spin,
see “Troubleshooting,” page 19. When the Spin is over the
Spinzall will gently apply an electronic brake, stopping the
rotor in about a minute without disturbing the clarity of your
product. Follow the instructions in “After The Spin: Opening
And Cleaning Your Spinzall” starting at step 2, page 15.
1. Make sure the Spinzall is spinning at full speed (you will
hear the motor speed oscillating instead of just speeding
up) and that the Lid Cap is in place and the Pump Tubing is
installed correctly. If you are starting with an empty rotor, you
may begin pumping right away, If you are starting with a full
rotor, you should allow the unit to run for 30 seconds after
reaching full speed. NOTE: If you overfill the rotor and liquid
spills into the bowl BEFORE the Spinzall reaches full speed,
stop the Spinzall, clean it out, and start again.
2. Make sure to place a receiving vessel under the Spout (a).
Place the Pump Inlet Tube into whatever product you wish to
pump (b). Note: The pump can pump fruit purees, nut milks,
and very finely blended herbs mixed with liquids or oils. It
a
b
14
d
e
f
c
cannot pump large solids or solids that compact in the tube,
such as coffee grounds. If the tubes clog, you may remove
them and clean them with a piece of wire.
3. Set the Pump Speed knob (c) to the desired pumping
rate. Almost any product that will clarify in the Spinzall will
clarify at 50 ml/minute. Many products will clarify at higher
rates—100 or even 150 ml/min. If you run the pump faster
than the Spinzall can clarify a particular product, the liquid
that comes out of the rotor will start turning cloudy. If this
happens, slow the pump down.
4. If you are starting with an empty rotor, pump at 150 ml/
min for 3 minutes, then turn down the pump speed to the
proper speed for your recipe (this will save you some time).
Rotor should begin overflowing within one minute.
5. To start the Pump, turn the Pump Timer to the desired
number of minutes (d). Note: When setting the timer to less
than 30 minutes you must turn the dial PAST 30 then back
to the time you desire to guarantee it will time properly.
The “Pumping” LED will illuminate and the pump will begin
to pump liquid into the rotor (e). Note: The Pump Timer is
independent from the Motor Timer. If the Motor Timer turns
off, the Pump Timer will continue to run if it has time left.
6. After the rotor is full, liquid will begin to spill out of the
rotor into the bowl and out of the spout (f). Liquid that is
thrown out of the rotor will have small air bubbles. This is
normal and will make your product LOOK cloudy at first but
will not affect final clarity. Tip: Keep an eye on the bowl. If you
see that the liquid in the bowl suddenly looks different, switch
the vessel under the spout immediately and clean out the
rotor. You have probably exceeded the solids capacity of the
Rotor or the Feeder.
7. After you have finished pumping your liquid you may wait
for the Motor Timer to finish or you may turn the knob to zero
when you are done. The Timer will “ding” and the Spinzall
will gently apply an electronic brake that will slow down
the rotor in about a minute without disturbing the clarity of
your product. Note: It is advisable to continue spinning for
several minutes after you are finished pumping to fully clarify
the product left in the rotor. Note: DO NOT TURN the Power
Switch “OFF”. The electronic brake will not operate and the
rotor will take 2 minutes or more to stop.
8. Proceed to “After The Spin: Opening And Cleaning Your
Spinzall.”
15
AFTER THE SPIN: OPENING AND CLEANING YOUR SPINZALL
To see a video of this procedure, visit spinzall.com.
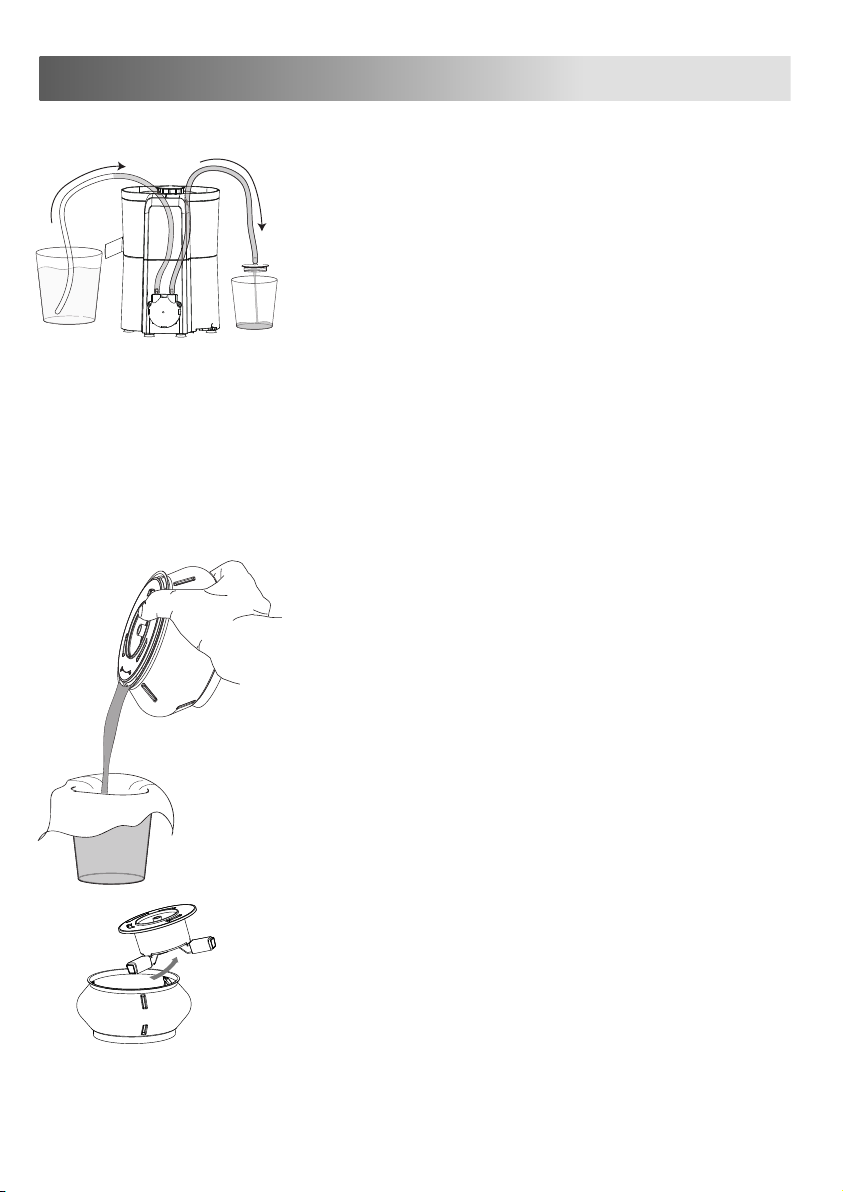
1. When you are done pumping liquids through the pump
you should immediately clean the pump. You may do this
while the rotor is still spinning. Remove the Lid Cap from the
Lid and place it in an empty vessel. Set the Pump Speed knob
to 150 ml/min, then pump hot water (less than 85°C/185°F)
through the tubing until it is clean. The hot water may be
followed with a sanitizer if you wish. After the tubing is clean,
continue to pump all of the water and/or sanitizer out of the
tube until it is dry. For stubborn cleaning problems, the tubing
may be removed from the pump, cleaned, and replaced. It is
also possible to remove the tubing on the inside of the Pump
itself (see “Replacing the Inner Tube Assembly of the Pump”).
2. When the rotor speed drops below 100 rpm, the “Lid
Locked” LED will stop flashing and turn solid. This indicates
that it is possible to unlock the Lid.
3. Press the “Unlock Lid” switch and turn the Lid
counterclockwise to disengage the locking mechanism and
lift the lid off the shaft.
4. The “Unlock Lid” switch unlocks the Lid for approximately
4 seconds. The “Lid Locked” LED will turn off while the Lid is
unlocked. If you do not open the lid within 4 seconds the lid
will automatically lock again and the “Lid Locked” LED will
turn on. Remember: You MUST have the Spinzall plugged in
and turned on to unlock the lid (see “Taking Your Spinzall
Apart,” steps 2-3 page 9).
5. Lift the rotor off the motor shaft along with the Feeder.
Remember: You CANNOT remove the Feeder from the Rotor
until you first lift the motor off the shaft! Also, the rotor will
be tight on the shaft (see “Taking Your Spinzall Apart,” step 4
page 9).
6. Pour the liquid out of the rotor as shown. Leaving the
Feeder in place prevents the Fins from falling out. Note: you
may need to pour the liquid through a fine strainer to remove
any particles from the liquid (untreated, finely woven cotton
kitchen towels make ideal strainers). They should not affect
clarity.
7. Remove the Feeder from the Rotor with an upward
sweeping motion (reverse of installation). If you are using the
solids, be careful not to disturb the puck too much while you
are removing the Feeder. You may disassemble the Feeder
assembly for cleaning; it is dishwasher safe. Take care not to
lose or damage the gasket.
8. If you are harvesting the solids out of the rotor, gently pull
the fins out of the rotor and gather the solids using a spoon.
Both the rotor and the fins are dishwasher safe. Make sure the
fins are properly reinstalled before using the Spinzall again.
16
HOW CONTINUOUS MODE WORKS: FEEDER MAGIC
To get the most out of your Spinzall you should understand
how the Feeder Assembly allows for Continuous Mode
operation.
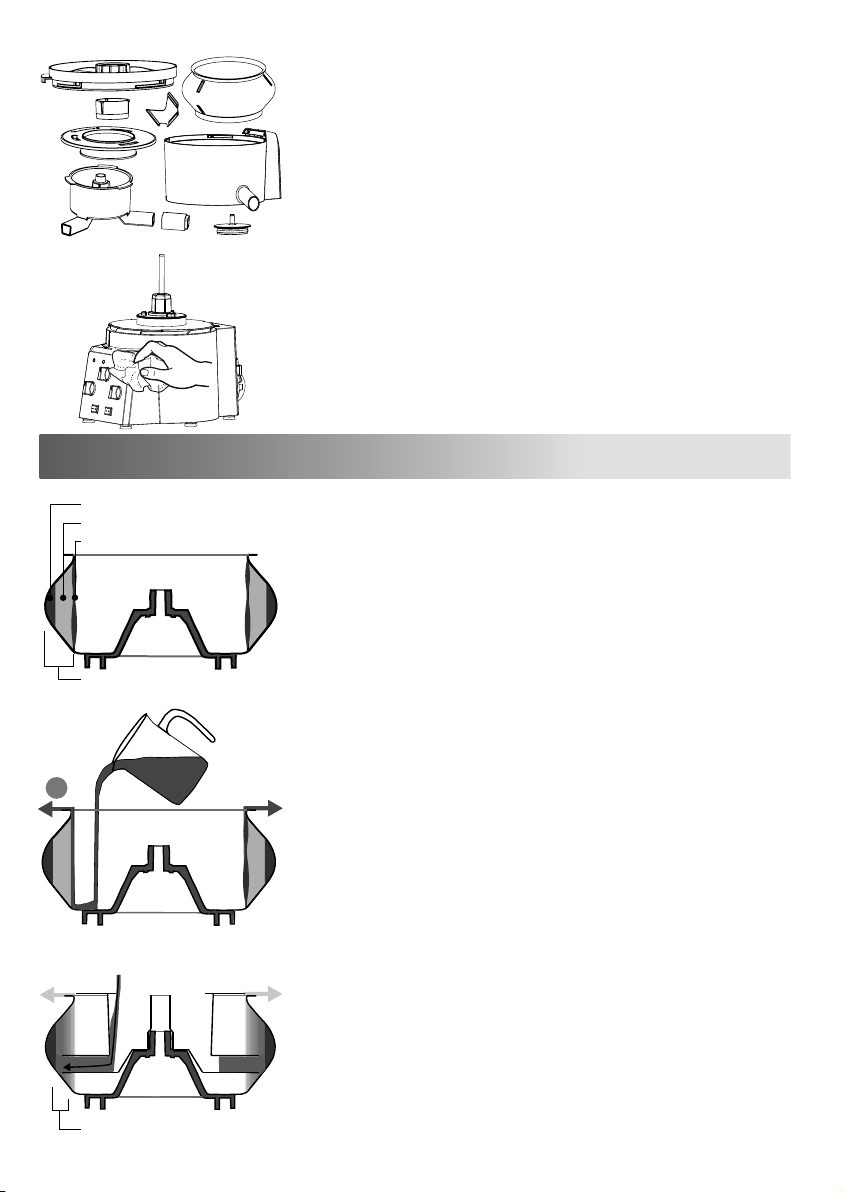
When the Rotor is full of liquid and spinning, the liquid
inside forms a doughnut shape. The outside of that doughnut
contains the heavy, cloudy, and solid parts of the product,
and the inside of that doughnut contains the lighter, clearer
product. On the very inside surface of the doughnut are the
floating particles. These are solid particles that are filled with
air and will never sink to the outside of the Rotor.
If you were to pour liquid directly into the Rotor while it was
spinning it would hit the inside wall of the spinning “liquid
doughnut” and cloudy liquid would immediately spill out over
the lip of the Rotor. The liquid would not clarify (a).
The three tubes on the Feeder Assembly inject cloudy liquid
on the INSIDE of the “liquid doughnut”, giving the liquid
time to clarify before it spins out. A “clearing zone” is created
under the surface of the liquid. The closer the cloudy liquid is
injected to the outside of the Rotor, the less chance there is
that cloudy liquid will make it out of the Rotor.
Liquid doughnut
Heavy solids
Clear liquid
Airy floating particles
a
Clearing zone
Cloudy
Clear Clear
9. All the food-contact portions of the Spinzall shown at left
may be cleaned in a residential dishwasher (we have not
tested commercial dishwashers). NOTE: While dishwashing
may reduce the lifespan of the ball bearing in the Lid, we have
tested it for 100 dishwashing cycles with no degradation.
NEVER clean any part of the Spinzall with a sharp object and
NEVER use an abrasive cleaner or scouring pad. Carefully
clean everything with running water. Pay special attention to
the Feeder assembly. If the tubes on the Feeder get clogged,
wash them with a small bottle brush. Be careful not to
misplace any gaskets or fins and follow the instructions in
“Assembling and Running the Spinzall” to reassemble the
Spinzall.
10. Do not wash the Motor Base with water or immerse it in
water. Wipe it clean with a soft dry cloth. Make sure all parts
of the Spinzall are dry, and store in a clean ventilated place.
Please clean the Spinzall directly after using or dry residue will
adhere to parts, affecting disassembly and performance.

17
Different products have different clearing rates. The clearing
rate is the rate at which you can add product to the Spinzall
and achieve good results. If you try to pump too quickly, you
will add cloudy liquid to the rotor faster than it can clarify, and
your result will not be clear. The Pump Speed knob allows you
to adjust the pump rate. Slower rates often provide clearer
results. Use trial and error to find the fastest rate that stays
clear.
When you have airy, floating particles in the spinning rotor
(as you will have with many recipes), adding liquid will cause
these particles to fly out of the Rotor at high speed, potentially
clouding your product. The Feeder is designed to fix this
problem. The inside of the Feeder forms a cup. The walls of
the cup are fashioned at an angle that actually floats light
particles up so they never enter the Rotor. This cup must
always be sealed with the included gasket, or cloudy product
will spill out of the Rotor. TIP: If you are clarifying a product
with a lot of these airy particles you should start your Rotor
EMPTY, and pump the Rotor full using the Spinzall’s Pump.
This will allow your Feeder to float the light particles away
from your product. If your product does not have floating
particles you should start the Rotor full.
In addition to forming the top of the Feeder “cup,” the
Feeder Lid acts as a Rotor cover to prevent evaporation while
spinning.
The quantity of liquid that you can process in Continuous
Mode depends on the solids content of the liquid and how
well the particles within it compact. In general, there are two
considerations:
1. Once the Rotor fills with solids, these solids will start
spilling out of the rotor and ruin the clarification.
2. Once the Feeder “cup” fills with floating particles,
cloudy liquid will spill out of the Feeder and ruin the
clarification.
The amount of product you can process at once varies very
widely. For example it is possible to do three gallons of citrus
juice without stopping, but you may be able to do only a liter
of a puree that has a lot of floating particles in it.
Floating cloudy particles
No floating particles
HOW TO OPEN A LOCKED SPINZALL WITH NO POWER
1. In the event that you need to unlock the lid and you do not
have access to power, there is a Manual Interlock Override.
Warning: NEVER override the interlock while the Spinzall is
spinning. The override technique can take a while to master so
you should practice with an EMPTY Spinzall BEFORE you need
to do it for real! First unplug the Spinzall, then rotate the Lid
slightly counterclockwise until it will not rotate any more (see
picture). The lid must be in this position to manually override
the interlock.
Lid must be
like this
Spinzall top view
Detail
To see a video of this procedure, visit spinzall.com.

18
HOW TO REPLACE THE PUMP INNER TUBE ASSEMBLY
After several hundred hours of pumping it may become
necessary to replace the inner tube assembly on the pump.
The replacement procedure:
Remove the two screws on the pump housing (at (a) in
picture). Rotate the pump housing counter-clockwise to
unlock it (b) and remove the pump head from the Motor Base.
Before you remove the tubing assembly (c) from the pump,
take note of how it fits into the pump. Take a picture for
your reference. Remove the old tube and replace with a
new one. Note that the polypropylene hose barbs MUST be
properly engaged in the pump housing and the tube MUST be
engaged under the rollers. To engage the tube with the rollers
it may be necessary to turn the rollers by hand. Reinstall the
pump by aligning the tabs on the pump with the slots on the
Motor Base and twist clockwise to lock the pump in place.
Replace the screws.
IN
OUT
a
b
c
b
c
a
Spinzall bottom view
Pump
area
Spinzall rear view
To see a video of this procedure, visit spinzall.com.
2. Keeping the Spinzall in an upright position, place the
pump area of the Spinzall over the edge of a table (not
shown).
3. Locate the Interlock Access Hole (a) on the bottom of the
motor base (see picture). Note: this bottom view picture is
for reference only, you should keep the Spinzall upright with
the pump area over the edge of a table. Turning the Spinzall
on its side with a full rotor will cause a mess!
4. There is a lever inside the unit that you must push to
unlock the lid. When you push the lever you will hear a
faint click and the lid will unlock. You will need a wooden
chopstick, long thin screwdriver, or similar implement. There
are two techniques you can use. Experiment to see which
one works for you:
1. Looking at the back of the Spinzall, insert your stick
all the way into the Interlock Access Hole at an angle so
it looks like the stick in position (b). When the stick is in
the Interlock Access Hole as far as it can go, swing the
stick into position (c). The tip of the stick should depress
the interlock override lever.
2. Looking at the back of the Spinzall, place the tip of the
stick JUST inside the Interlock Access Hole with the tip
of the stick pushing against the inside wall of the hole
like the stick in position (c). Keep pushing the tip of the
stick against the inside of the hole and slide the stick
upwards. The tip of the stick should depress the interlock
override lever.
option
option

19
TROUBLESHOOTING YOUR SPINZALL
Problem Cause Solution
Nothing works and all the
LEDs are flashing
The imbalance sensor has been
tripped.
Turn the Power Switch off, wait for
the lights to go out, and then turn
back on.
The Lid is closed, the
Power is “ON” but the LID
LOCKED LED is not lit.
There is a problem with the
interlock or the lid and bowl
are not properly engaged.
Unlock the lid and bowl, turn the
Power Switch off, wait for the lights
to go out, and then turn back on,
lock the bowl and lid. If problem
The Lid is LOCKED and
cannot be opened
The Spinzall needs to be
plugged in and turned “ON” to
unlock the lid.
Plug the Spinzall in, then turn it “ON”
and press the “LID UNLOCK” switch.
The rotor is spinning faster than
100 rpm.
Wait for the rotor to slow down. The
LID LOCKED LED will change from
flashing to solid.
The LID LOCKED LED and
the SPINNING LED were
Illuminated but the rotor
did not spin when the
MOTOR TIMER was turned
on. After 5 seconds all the
LEDs started flashing and
then nothing worked.
There is friction on the rotor or
an overloaded bowl so the rotor
could not spin (you may hear a
faint hum).
Turn the Power Switch off, wait for
the lights to go out, and then turn
back on. Open the lid and make sure
the rotor is clear to spin without
friction. If this fails, remove Inlet
Chute Extender and try again.
The Lid is locked but not fully
closed, so the motor safety
switch is disengaged and the
rotor can not spin.
Make sure the lid is closed 100% (see
page 12, step 10). Turn the Power
Switch off, wait for the lights to go
out, and then turn back on.
Spinzall is very loud
(it properly operates
at 70dBA; you should
be able to have a
conversation next to it).
Rotor imbalance Clean rotor and try again. Make sure
fins are properly installed. If rotor is
damaged, email
Ball bearing in lid is sticky or
frozen (will not turn).
Clean ball bearing and try again. If
problem persists email
Rotor is overflowing solids Check to see if one of the three rotor
sections has reached capacity (you
will see solids all the way up to the
lip of the rotor).
Spinzall doesn’t clarify
properly
Recipe wasn’t followed, or
improper enzymes or wine
fining agents were used. For
recipes not in this manual, visit
spinzall.com.
Check recipe and try again.
Remember, if the liquid hasn’t
broken and doesn’t show clear areas,
it probably won’t clarify.
You have set the pump speed
too high.
Set the pump to a lower speed.
You have exceeded the solids
capacity of the rotor or the
feeder.
Don’t do that.
There is too much vibration. Empty the rotor and try again.

20
RECIPES
Recipe
General Recipe Notes
Clarifying Aids: Fruits, Veggies, and the Pectinex Test
“Two-Fifteen” Master Recipe For Clarifying Agents
Clarifying Citrus Juice
Clarifying Thicker Juices, such as Apple
Clarifying Tomatoes
Clarifying Strawberry and Most Other Fruit Purees
Herb Oils
No-Churn Butter
Greek Yogurt and Labneh
Cold-Brew Coffee
Where to Go for More Recipes
Page
20-21
21-22
22
23
24
25
25
26-27
27-28
28
29
30
General Recipe Notes
Remember:
In order for the Spinzall to work properly, most liquids will require pre-treatment with
Clarifying Aids.
Many Spinzall recipes require the enzyme Pectinex Ultra SP-L. Using the exact amount of
Pectinex Ultra SP-L called for in a recipe is not critical. A little more is better than a little
less. Generic “Pectinase” enzymes are NOT a substitute.
Many recipes also require the wine fining agents Kieselsol and Chitosan, both of which
require accurate measurements! We recommend using a pipette.
If you don’t use the products called for, or if you use them improperly, these recipes will
not work AT ALL. The clarifying aids are required, not optional, if they are listed. All of
these products are available at modernistpantry.com
See the individual recipes for specifics.
Alcoholic Products WARNING: Warm alcoholic vapor is
extremely flammable. Although warm liquids added to a
Spinzall will rapidly cool to ambient room temperature due
to evaporative cooling, it is unsafe to add warm alcohol to
the Spinzall. NEVER add alcohol that is higher than 40%
ABV or that is warmer than 25 degrees Celsius (77F) to the
Spinzall, and never operate the Spinzall with alcohol in an
ambient temperature greater than 25 degrees Celsius (77F). If
the temperature of a 40% ABV liquid rises above 26 degrees
Celsius (79F), its vapor will sustain a flame if ignited. This is
called its “flash point.” The danger of a fire in this situation
is very, very real. For reference, the flash point of 30% ABV is
slightly higher at 29 degrees Celsius (84F), but the flash point
for 50% ABV is only 24 degrees Celsius (75F).
Table of contents


