Spirit Halloween JACK STRAW User manual

1
2
M
O
I
N
G
C
E
F
D
L
K
J
H
B
A
JACK STRAW
Installation and Operating Instructions
Keep all plastic and wire parts away from children.
WARNING: DO NOT TURN ON THE PROP UNTIL FULLY ASSEMBLED. STAY CLEAR OF THE PROP WHILE OPERATING.
PARTS:
A: Wood base
B: Pants
C: Pole with mechanism
D: Springs
E: Knee form with foam (2x)
F: Zip ties
G: Support Pole
H: Head with shoulderform
I: Screws
J: Coat with IR sensor
K: Right Arm
L: Left Arm
M: Control Box
N: Sand Bag
O: Adapter
Assembly:
1. Place the pants (Part B) on the base (Part A) with thepole
support mount going through the rope. See Fig. 1.
2. Fully extend pole with mechanism (Part C). See Fig. 2.
3. Attach springs (Part D) to the pole with mechanism
(Part C). See Fig. 3.
4. Attach the pole with mechanism (Part C) to the base
(Part A), match A to A, by going through the opening in
the back of the pants (Part B). Spring pin will lock
in place. See Fig. 4.
5. Attach knee form with foam (Part E) to the pole with
mechanism (Part C) by inserting the metal into the hole in
the plastic piece located on the pole with mechanism
(Part C). Secure on both sides with the zip ties provided
(Part F). See Fig. 5a and 5b.
6. Attach loops on the pants (Part B) to the plastic hooks on
the pole with mechanism (Part C). See Fig. 6.
7. Attach support pole (Part G) to pole with mechanism
(Part C). Spring pin will lock in place. See Fig. 7.
8. Attach the head with shoulder form (Part H) to the support
pole (Part G), matching C to C. See Fig. 8.
9. Secure the head with shoulder form (Part H) to thesupport
pole (Part G) using the screws (Part I) provided.
See Fig. 9.
3
4
5b
5a
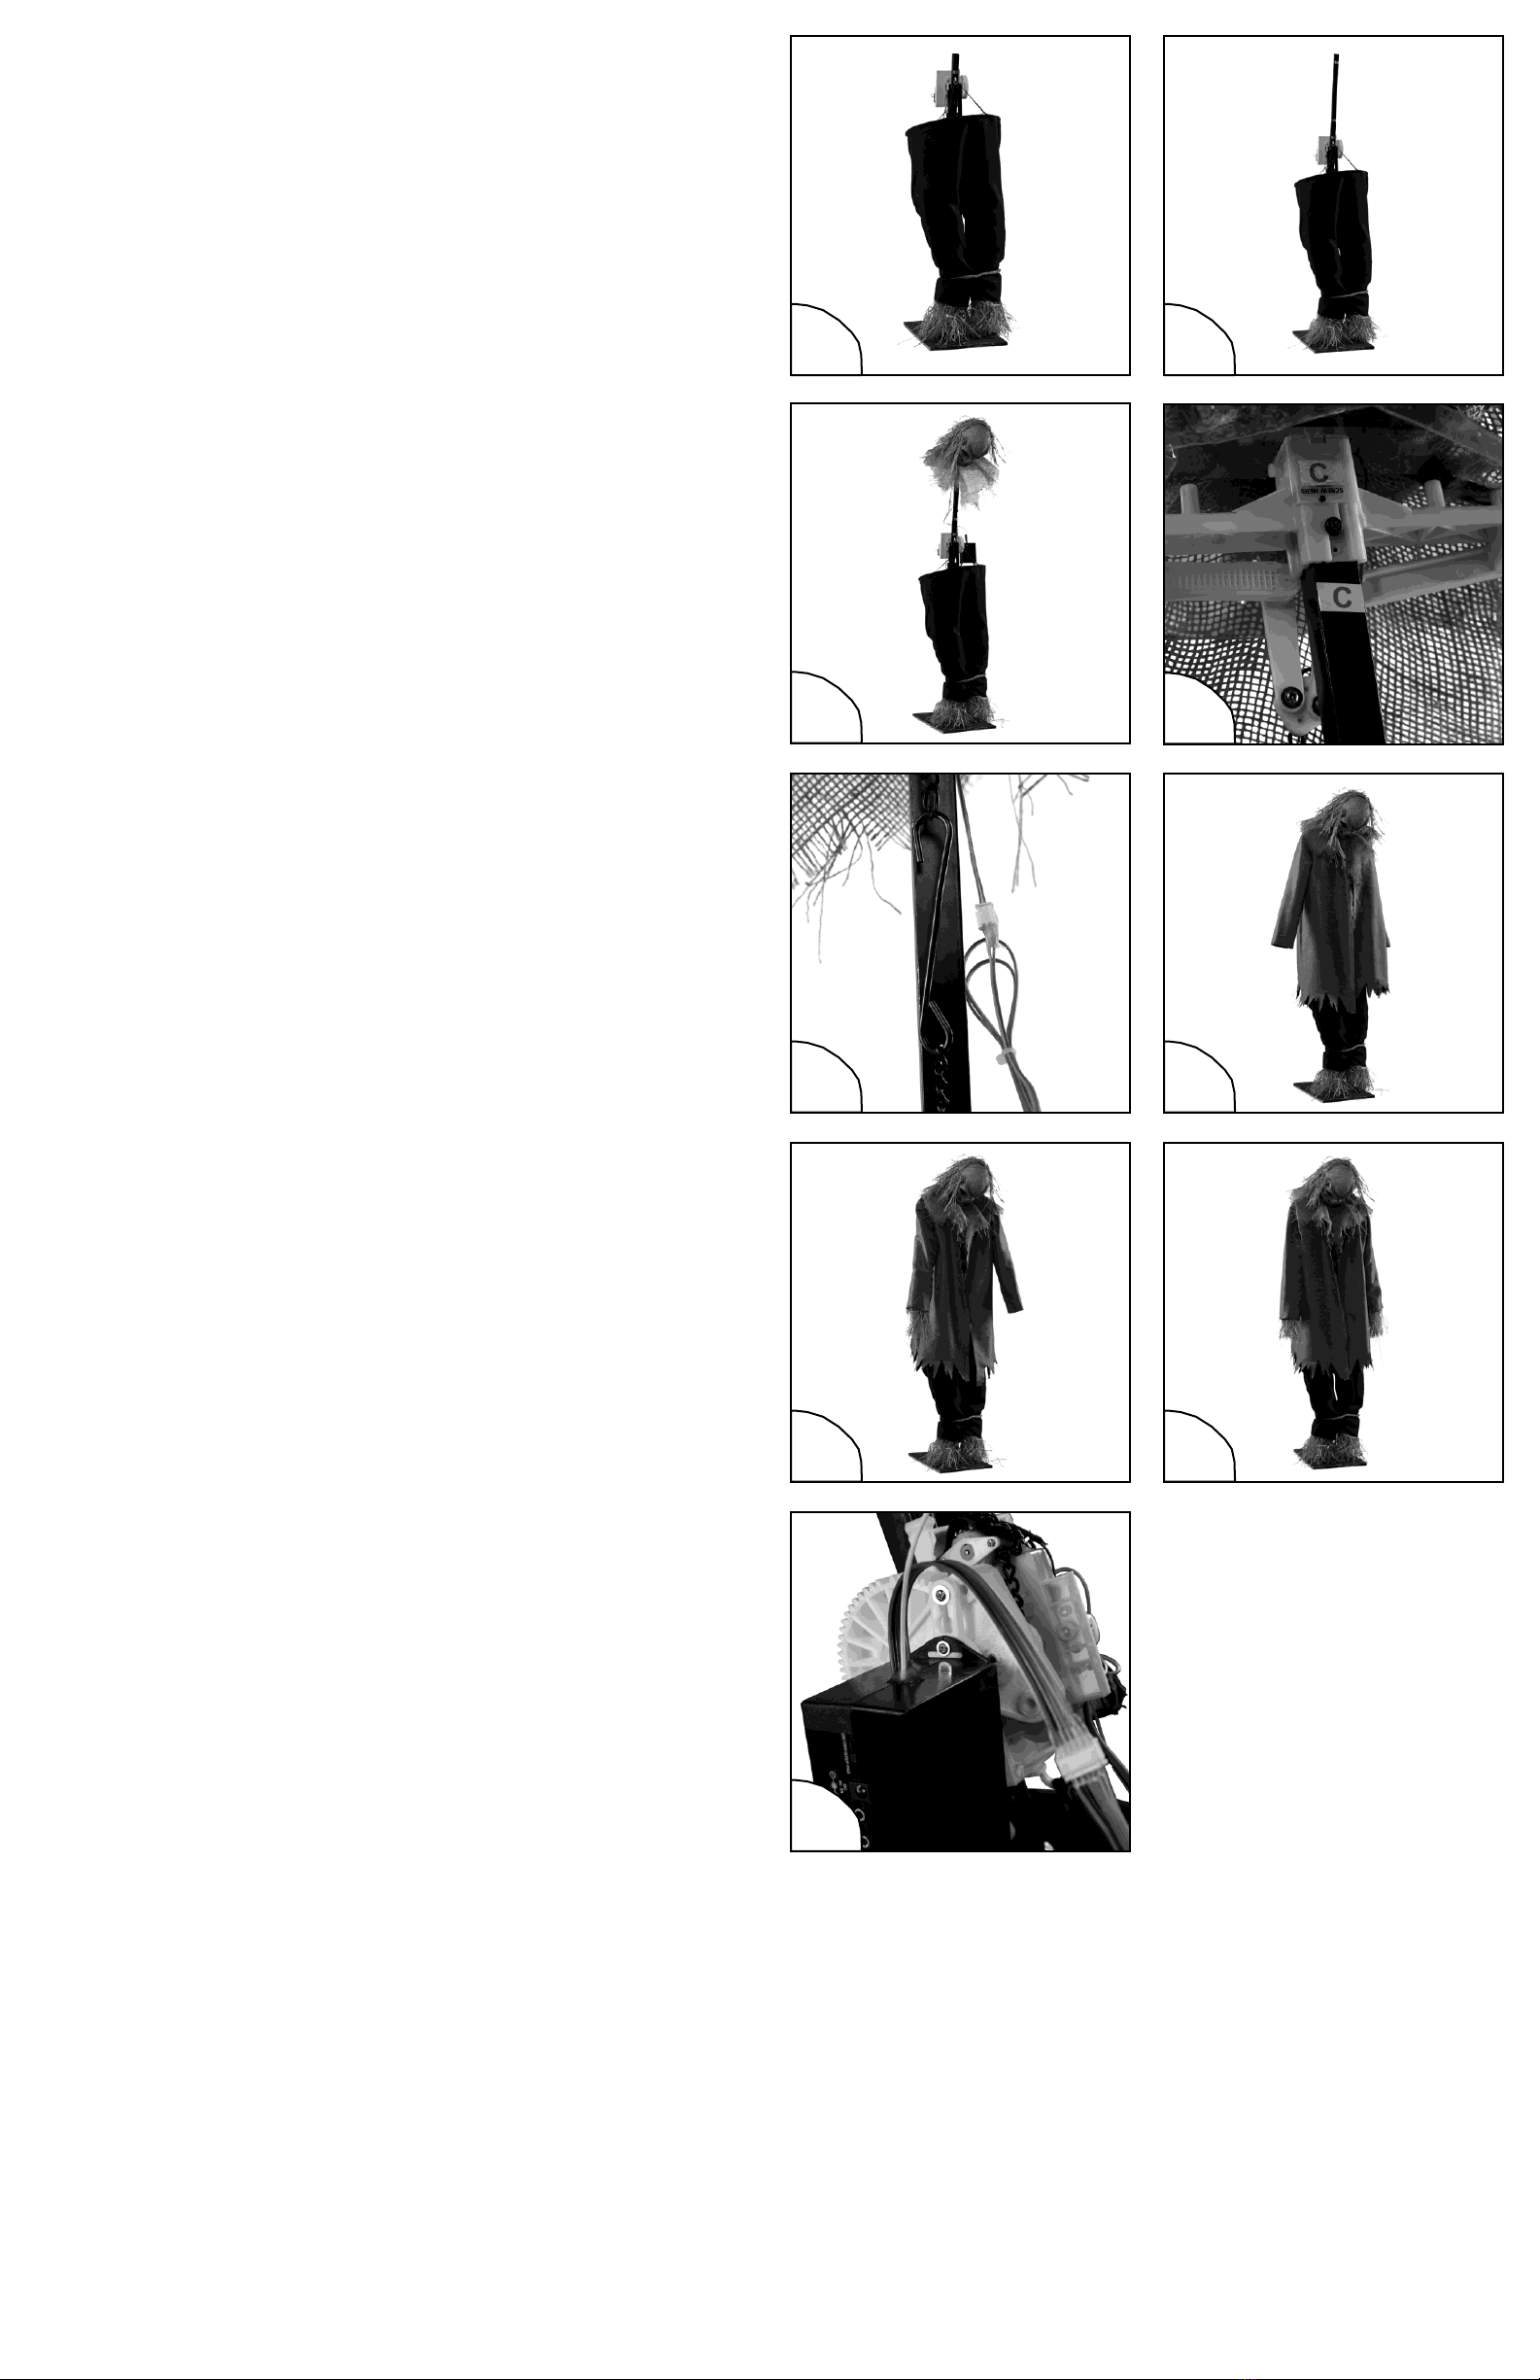
10. Connect metal chain from the back of the head with shoulder
form (Part H) to the chain from the pole with mechanism
(Part C) using the provided hook and loop on the chains.
See Fig. 10.
11. Put the coat with IR sensor (Part I) on the shoulder form
(Part H) and secure by aligning the Velcro on the shoulder
form (Part H) to the Velcro on plaid fabric of the coat with
IR sensor (Part J). See Fig. 11.
12. Thread the right arm (Part K) through the sleeve of the coat
with IR sensor (Part J) and insert the metal end of the arm
into the plastic bar under the head with shoulder form
(Part G). Make sure it is embedded into the slot in the
plastic bar and secure the arm in place with the zip tie
(Part F) provided. See Fig. 12.
13. Thread the left arm (Part L) through the sleeve of the coat
with IR sensor (Part J) and insert the metal end of the arm
into the plastic bar under the head with shoulder form
(Part H). Make sure it is embedded into the slot in the
plastic bar and secure the arm in place with the zip tie
(Part F) provided. See Fig. 13.
14. Hang control box (Part M) from the hook on the side of the
pole with mechanism (Part C). See Fig. 14.
15. Connect the wires from pole with mechanism (Part C) and
head with shoulder form (Part H) to the matching wire from
the control box (Part M) and connect the IR sensor wire to
the IR sensor jack.
16.(Optional) Fill the provided sand bag (Part N) and
place on base (Part A) to add weight for more stability.
IMPORTANT INFORMATION:
1. The infrared sensor distance and ambient temperature
are directly related. When the body temperature(98.6°
F) is different to the ambient air temperature, the
infrared sensor distance will be farther. When the body
temperature (98.6° F) is close to the ambient air
temperature, the infrared sensor distance will be shorter.
2. Do not use this item in an environment where air
currents are caused by a window, air conditioning,
or air outlet.
3. Do not have the infrared sensor face a directsource
of heat such as a heater.
9
8
6
7
11
12
13
10
14
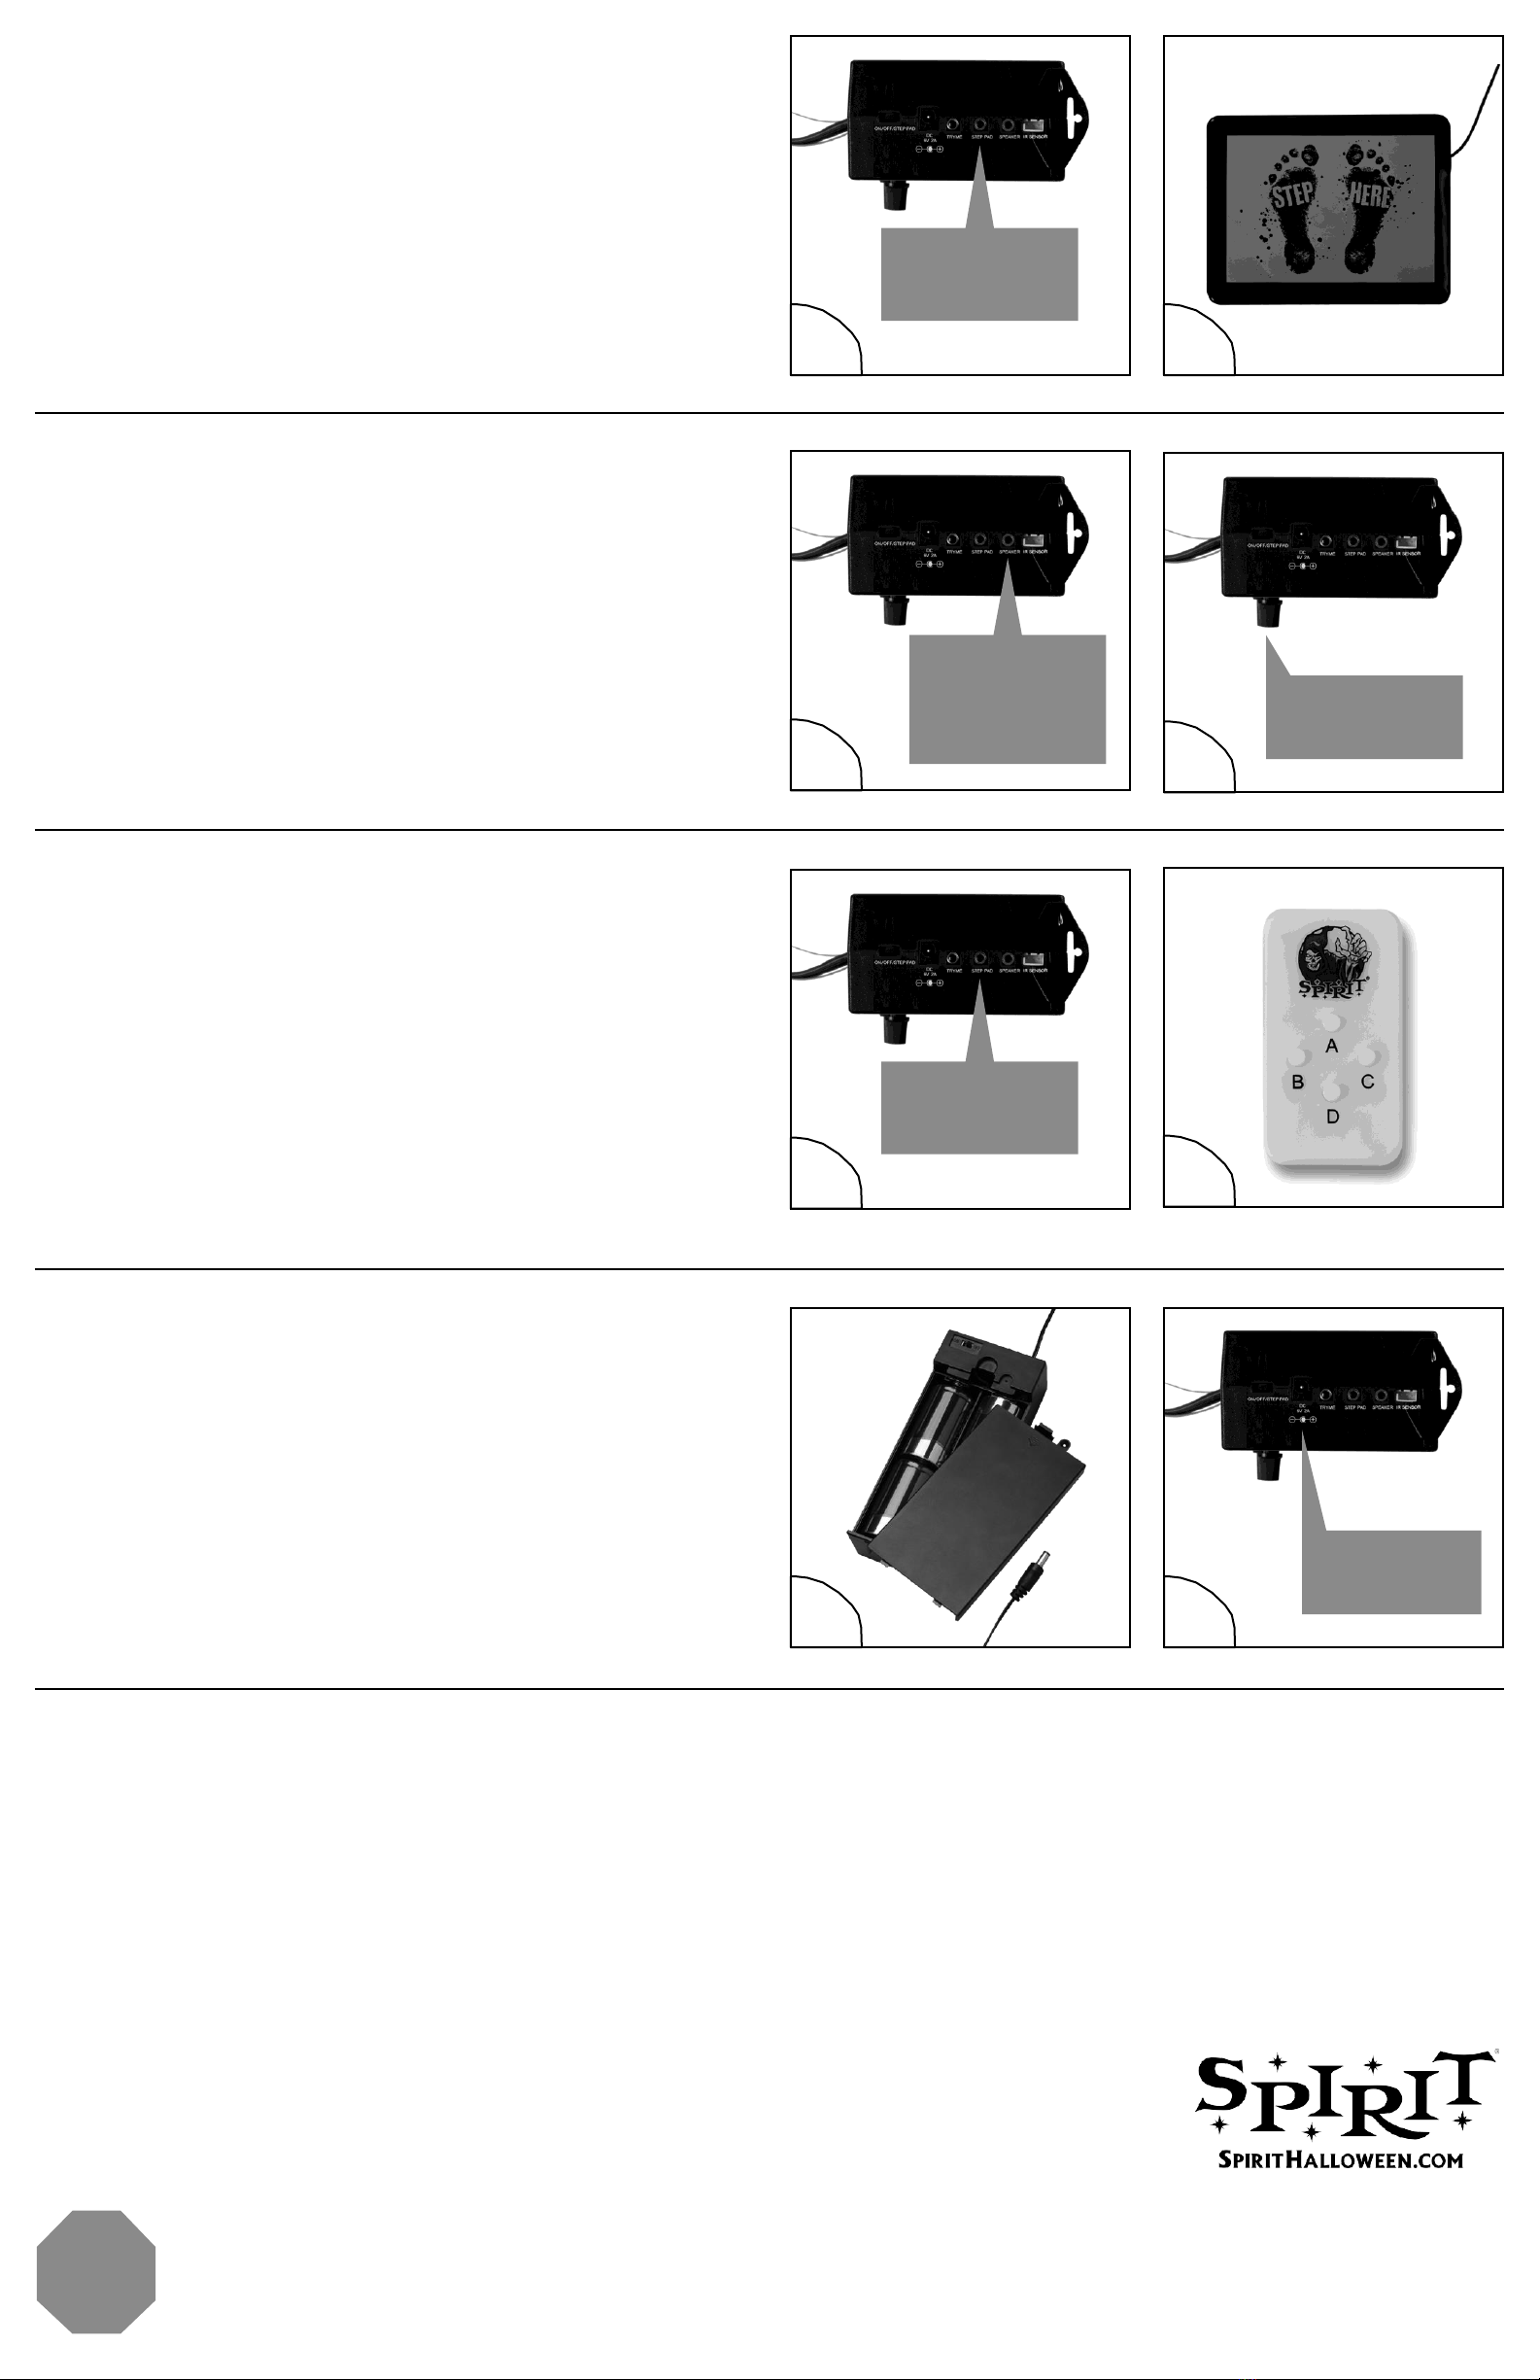
OPTIONAL STEP PAD SETUP
Follow steps 1 through 16 on the installation
instructions first, then:
1. Connect the wire from the optional Step Pad to the jack
labeled “STEP PAD” on the control box. See Fig. 17.
2. Step on the Step Pad to activate the prop. See Fig. 18.
Step Pad (SKU #01181288) is sold separately and can be
purchased in-store and online at www.SpiritHalloween.com
OPTIONAL EXTERNAL SPEAKER SETUP
This prop can be played through an external speaker
(sold separately). To use this feature, follow steps 1 through 16
on the installation instructions first, then:
1. Connect the wire from your external speaker to the jack
labeled “SPEAKER” on the control box. See Fig. 19.
2. Adjust the volume level to suit. See Fig. 20.
Note: Use external speakers with an impedance of 8 ohms only.
OPTIONAL MULTI-PROP REMOTE SETUP
Follow steps 1 through 16 on the installation
instructions first, then:
1. Connect one of the transponders to the prop by inserting the
wire of the transponder into either the Try Me or Step Pad
jack as labeled on the control box. See Fig. 21.
2. Flip the switch on the transponder to the ON position.
3. Click the button on the Multi-Prop Remote that matches
letter on the transponder to activate the prop.
See Fig. 22.
OPTIONAL BATTERY ADAPTER SETUP
Follow steps 1 through 16 on the installation
instructions first, then:
1. Install 4 D Batteries into Spirit Battery Adapter. See Fig.24.
2. Connect wire from Spirit Battery Adapter to the6V2A
adapter port on the control box. See Fig. 24.
3. Turn switch on Battery Adapter to the ONposition
to power the prop.
BATTERY INSTALLATION
Battery installation should be performed by an adult.
•Use only batteries recommended in the instructions.
•Do not mix old and new batteries.
•Do not mix alkaline, rechargeable, standard,
or different types of batteries.
•Be mindful to insert batteries with correct polarity as indicated.
•Remove all exhausted batteries.
•Rechargeable batteries are only to be charged
under adult supervision.
•Rechargeable batteries are to be removed from toy
before being charged.
•Non-rechargeable batteries are not to be recharged.
•The supply terminals are not to be short-circuited.
DO NOT RETURN THIS ITEM TO THE STORE!
If experiencing technical difficulties, please email:
DrZombie@spirithalloween.com, or call
WARNINGS:
•This product is designed for indoor orcovered
porch use only, and should not be placed
outdoors subject to the weather.
•This item is not a toy. For decoration only.
•Choking hazard due to small parts.
•Keep all plastic and wire parts away from children.
•This product is intended for use
by persons 15 years of age and
older. Not intended for use by
children ages 14 and under.
Distributed by
Spirit Halloween
6826 Black Horse Pike
Egg Harbor Township,NJ
08234-4197
1-866-586-0155 or go to SpiritHalloween.com for assistance. MADE IN CHINA
STEP PAD
INPUT
17
STOP
18
EXTERNAL
SPEAKER
JACK
19
VOLUME
CONTROL
20
STEP PAD
INPUT
21
23
ADAPTER
INPUT
24
22
Other Spirit Halloween Toy manuals


Popular Toy manuals by other brands

Eduard
Eduard MiG-21R quick start guide

Mantua Model Group
Mantua Model Group President 792 Assembly instructions

Eduard
Eduard P-3 Orion bomb bay quick start guide

Phoenix Model
Phoenix Model P40 KITTY HAWK instruction manual

Global Services
Global Services Extreme-Flyers X350 Series Quick-start and flying guide

Eduard
Eduard Weekend Edition Spitfire Mk. VIII manual


