SPL SANELA HUSA Installation and operating instructions

Installation
& maintenance
instructions.
HUSA - MAINS POWER

2
splwashrooms.co.nz
General Information
• Designed for indoor use only. Do not expose to elements of nature.
• All plumbing and electrical connection must be made in accordance with
AUS / NZ standards.
Warnings
• Read all instructions before attempting to install this system. It is
•
assembly. Solenoid components are susceptible to debris and require
• Consideration should be given to any regulations relating to an air gap,

3
splwashrooms.co.nz
Operating Instructions and Parts Manual
Please read carefully before attempting to assemble, install, operate or maintain
the product described. Protect yourself and others by observing all safety
information. Failure to comply with instructions could result in personal injury and/
or property damage. Retain instructions for future reference.
Sanela Husa Sensor Tap
Sensor activated tapware for cold and pre-mixed water. High quality electronics
combined with elegant aesthetics.
Finish
Water Temperature
Power Supply
Control
Operating Voltage
Active Range
Recommended Pressure
Rate of Flow
Water Inlet
Dimensions
Warranty
Chrome
For cold or premixed water (thermostatic mixing valve
available)
24V DC (230V AC into power supply)
Infra-red sensor
24V DC, 7W
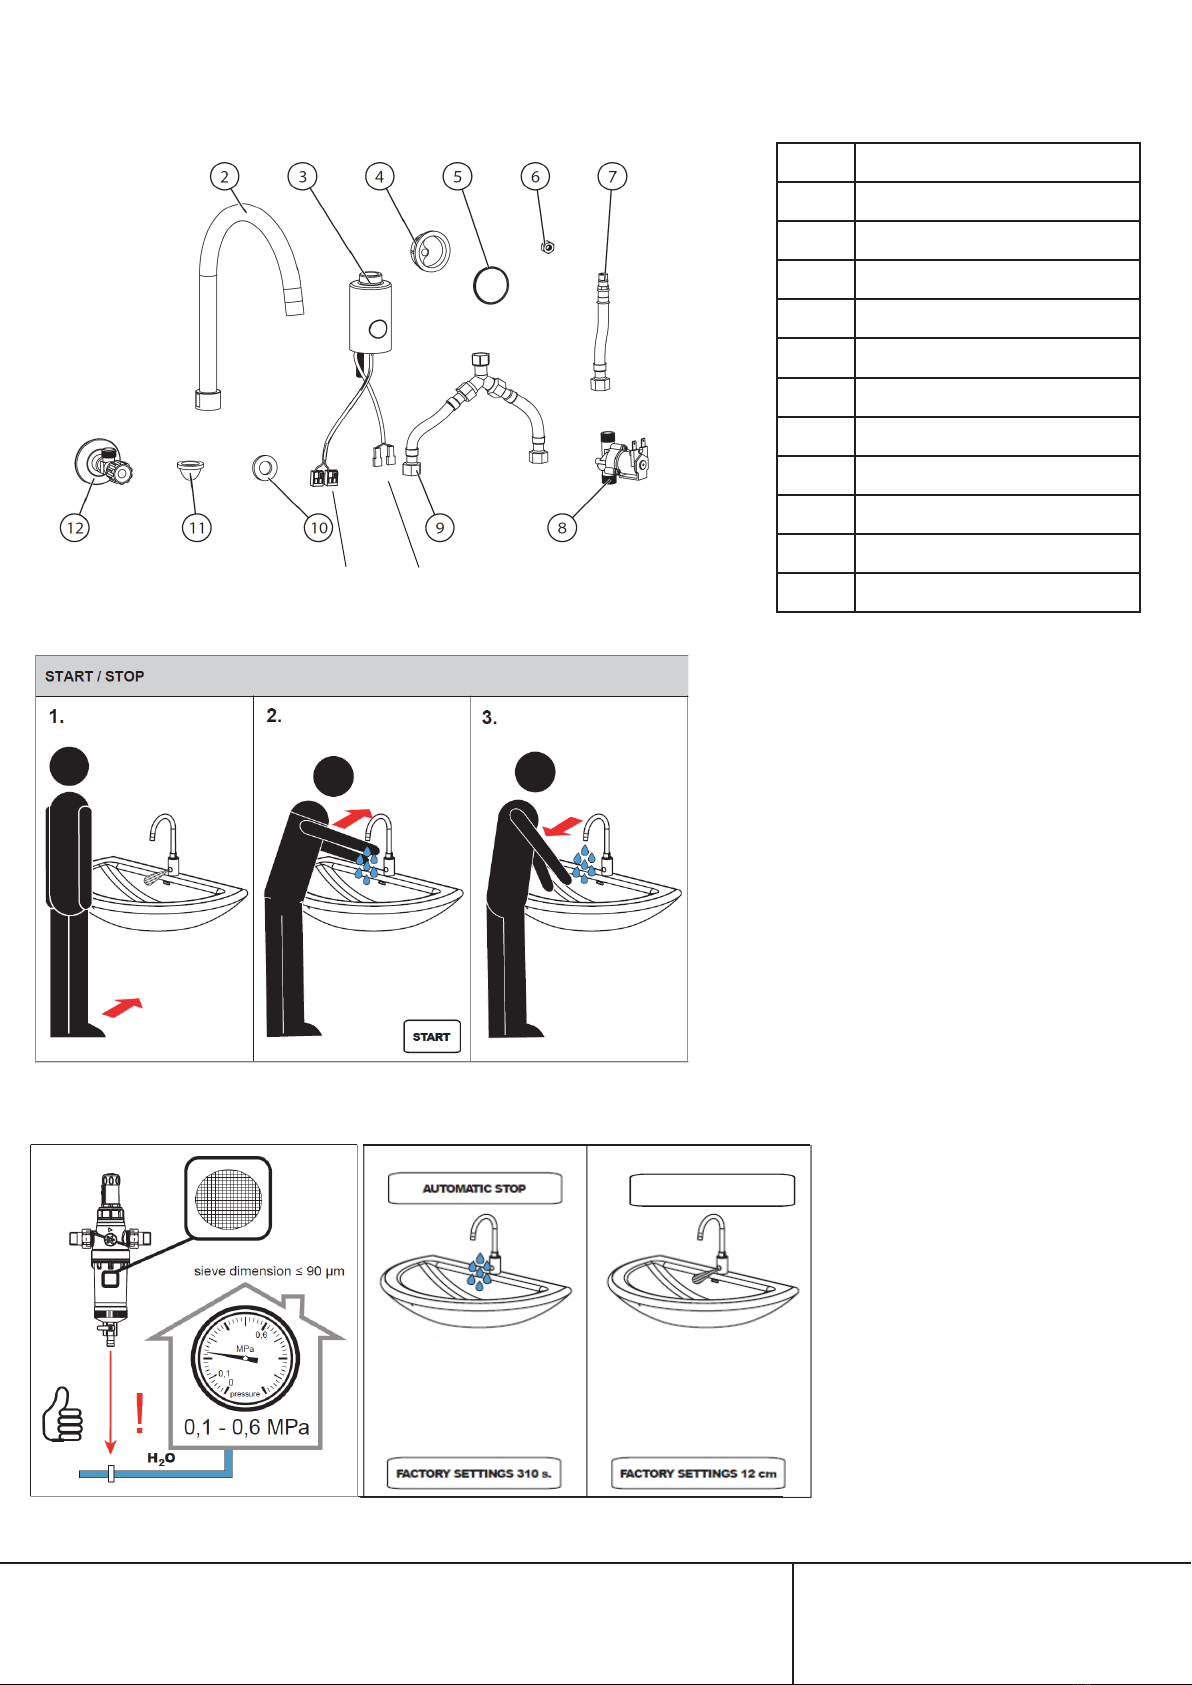
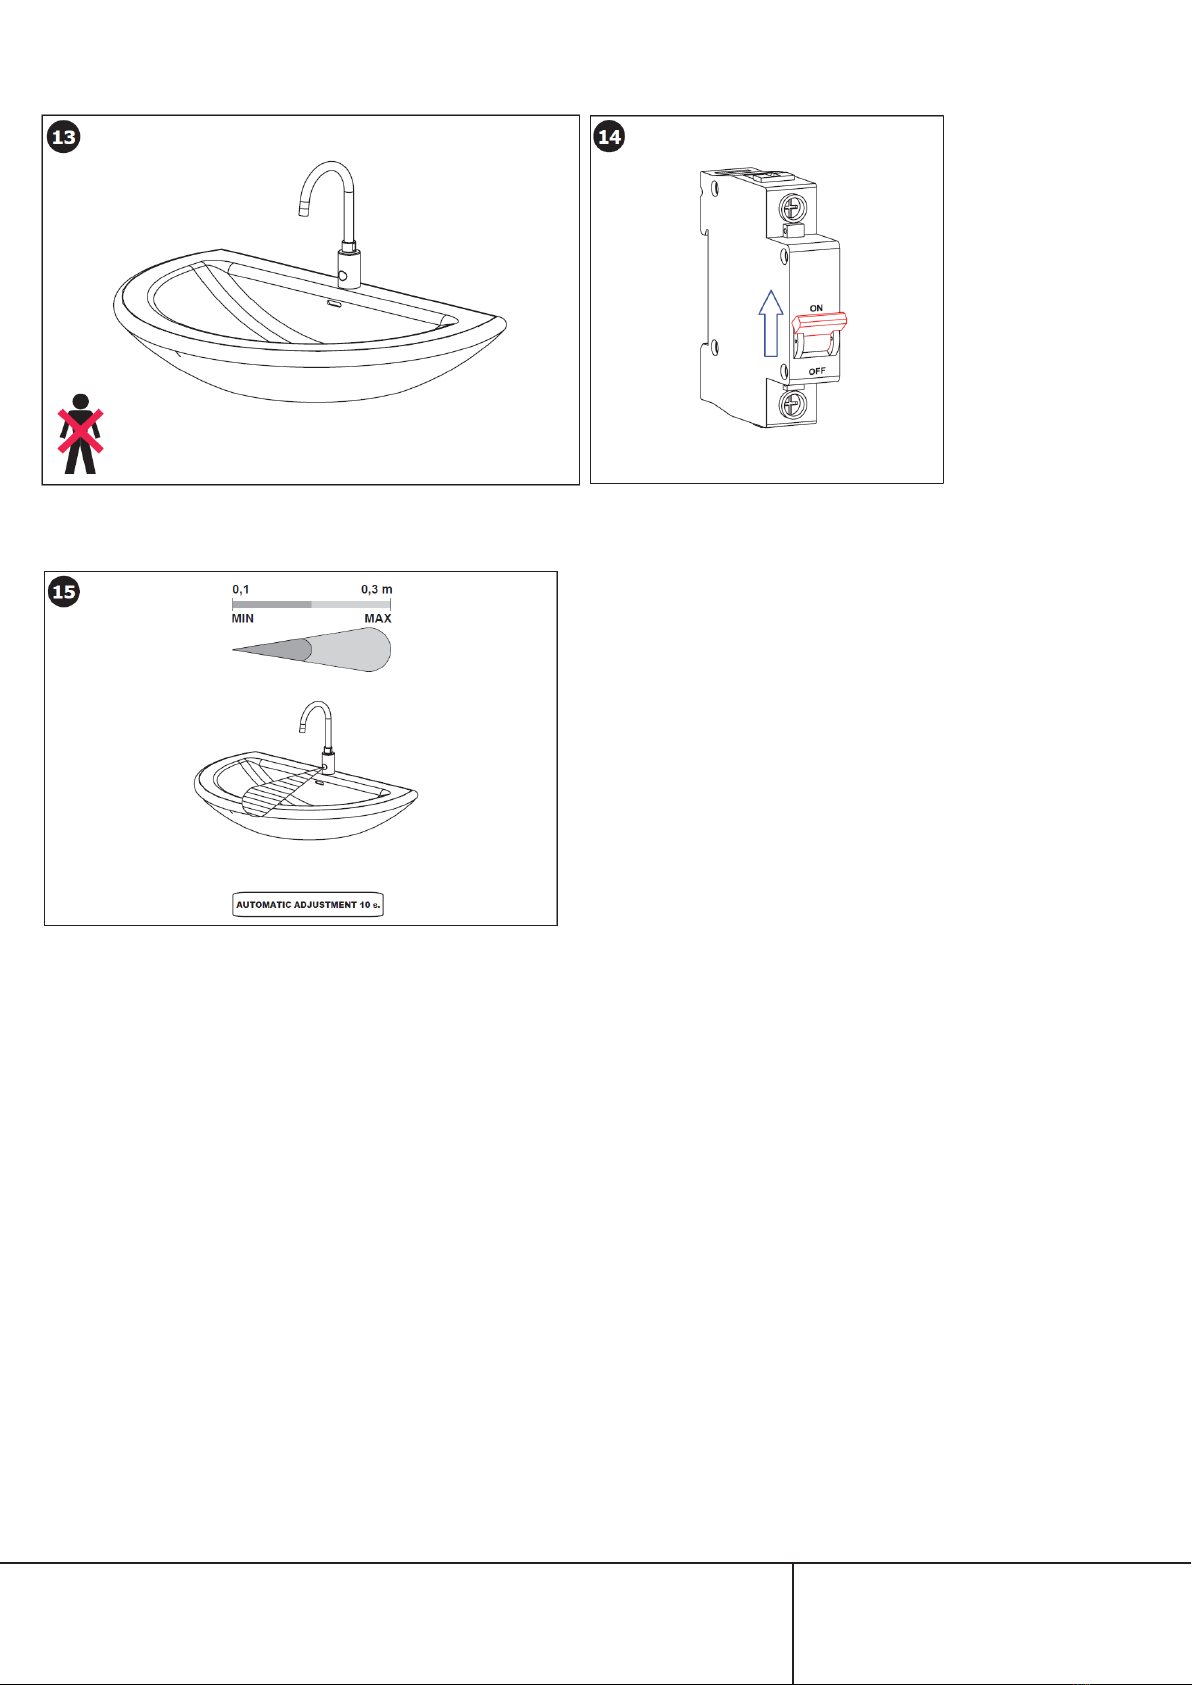
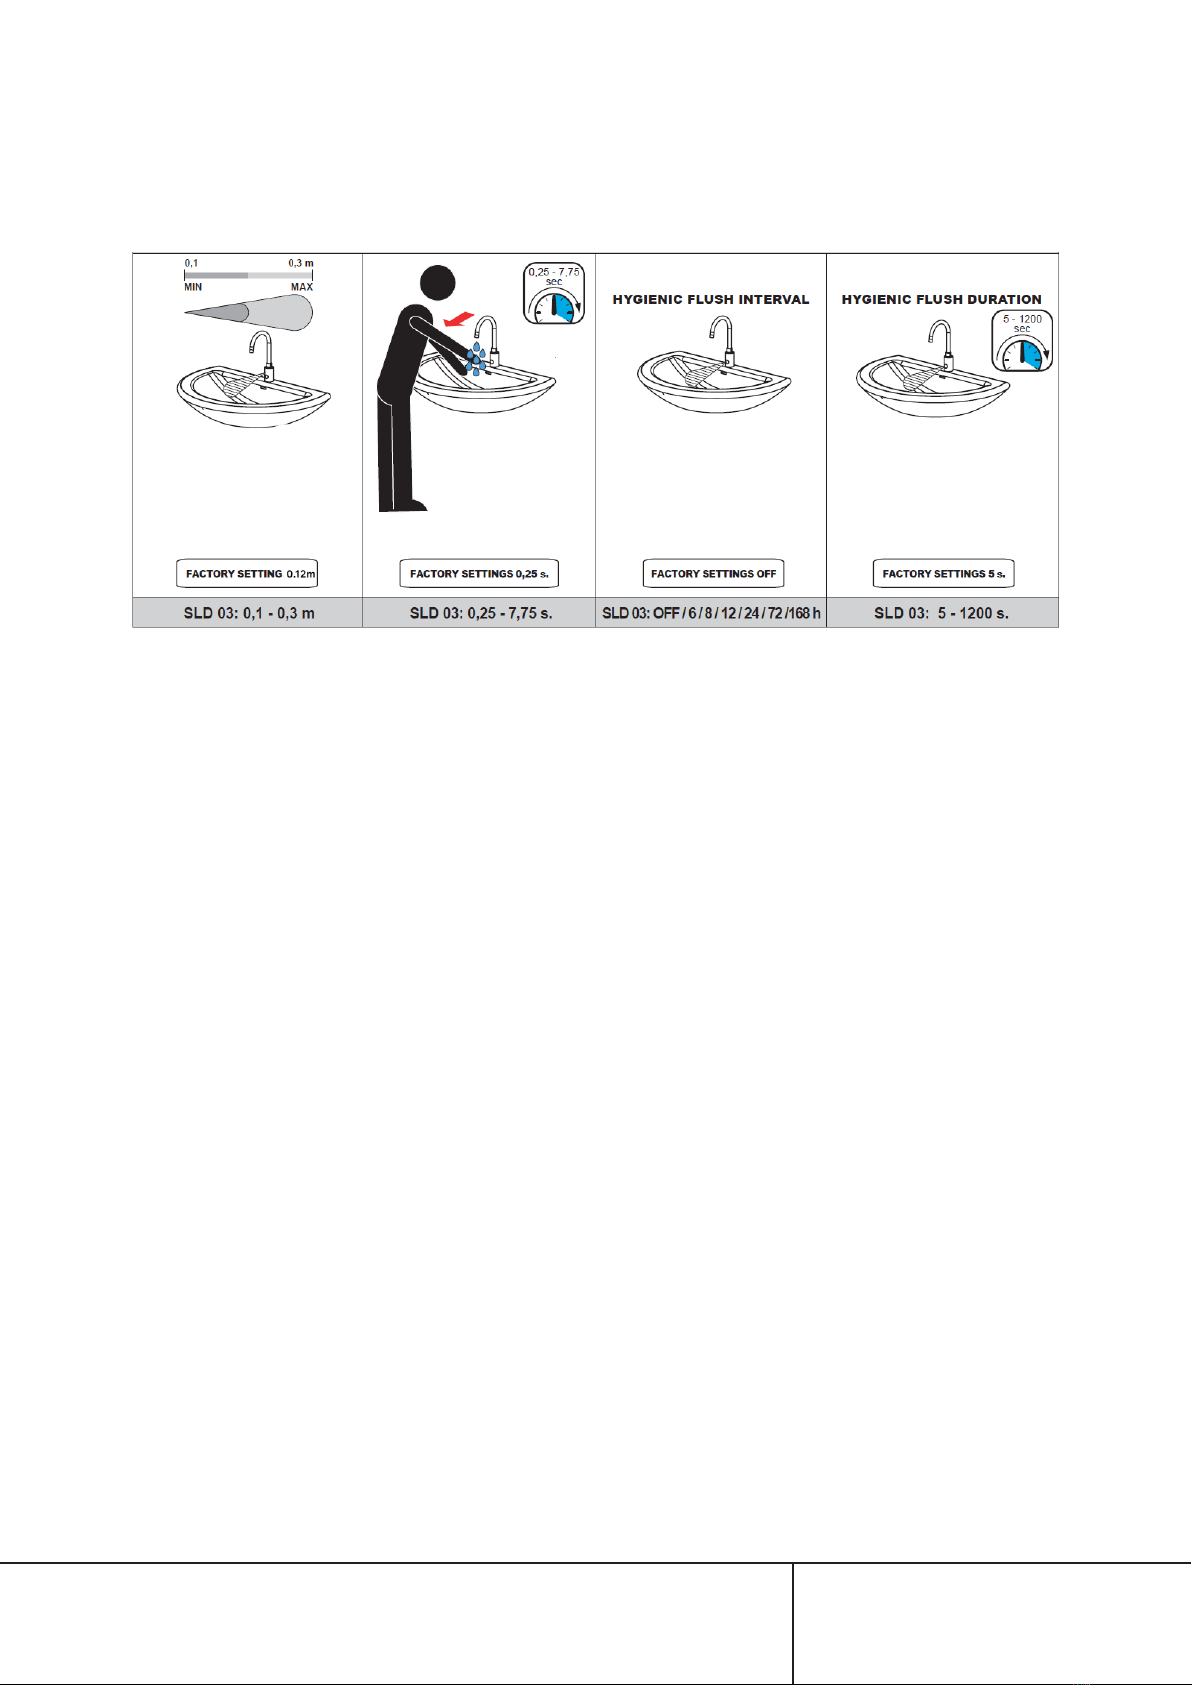
Standard 0.13 - 0.19 m, START/STOP program 0.05 - 0.15 m
0.1 - 0.6 Mpa (1-6 Bar)
3.8 l/min (6 l/min or 1.9L/m avaiable on request)
Male thread G 1/2”
Height 346mm, Depth 210mm, Tap Diameter Ø 54,
Hole Ø 35mm, Nosing 190mm, Discharge Height 230mm
24 Months
Planning
• Ensure an appropriate piping design (sizing etc). This will eliminate issues arising from
•
pressure reducing valves (recommended pressure 1 to 6 bar). This will minimise future
maintenance.
• Install the angel valve to enable ease of future maintenance.
Tempered Water
• An appropriate thermostatic mixing valve (TMV3) should be installed to ensure a safe
regulated water temperature. These are available from SPL – SST THERMO VALVE

4
splwashrooms.co.nz
Standard Functions
1
2 Faucet spout
3 Faucet base
4 Mounting plate
5 Gasket
6 Hex nut
7 Connection hose
8 Solenoid valve
9 Connection hoses
10 Washer
11 Filter
12 Angel valves (x2)
Components
to solenoid valve
wago connectors to external
power supply adapter
Operating pressure range
Hands within active
Hands removed from
active range, water stops
After 5 mins of use
water will stop
SENSING RANGE

5
splwashrooms.co.nz
External Power Supply Installation
Input 230V / 50 Hz
Output 24 V DC
IP rating IP 55
Operating
temperature
5°C - 40°C
Rated power 10W
Important
To be installed in accordance with all NZ electrical regulations. It must be carried out
1. Moisture ingress due to plumbing fault
2. Ongoing maintenance and accessibility
The mounting box can be surface mounted or within the service or ceiling cavity.
Mark mounting point(s) on surface
24V output (to faucet)230V input

6
splwashrooms.co.nz
Drill and insert appropriate wall anchors if required Remove cover from mounting box
Fix mounting box to wall Pass mains (230V) power supply into mounting box
via grommet and terminate accordingly
Reinstall cover of mouting box and ensure sealed.
Tighten grommet to ensure snug around cables
Note: Power supply should be secured via current
breaker before the external supply (not included)

7
splwashrooms.co.nz
Faucet Installation
Install
Flush lines thoroughly Connect faucet, spout and base together and insert
mounting bracket
From external power supply
Pass mounting screw, hose and electrical
connections through vanity
Fit connection hose into base of faucet

8
splwashrooms.co.nz
Connect external power (24V outlet) supply to wago
white to white).
Turn angel valve on and check all connections
Fit remaining connection hose and solenoid.
Connect faucet to solenoid valve
Fit remaining gasket, mounting plate and hex nut

9
splwashrooms.co.nz
It is necessary, for the
proper function,
to keep the unit under
constant voltage
(don´t connect the
power supply unit
behind the switch into
the light circuit)
Do not come within active range Turn power supply on
Once power turned on, faucet
will automatically adjust sensing
The LED on sensor will
active range during this time.
Important
•
• The senor of the faucet must not be obstructed.
•
cause false activation i.e. mirrors opposite faucet. With wall mounted faucets pay
particular attention to the distance between the bottom of the basin and the faucet
(minimum of 300mm) and the location and material of the basin waste (avoid mounting
•
accordance with applicable codes and regulations.

10
splwashrooms.co.nz
Maintenance
•
foreign debris and cleaned annually (more frequently if necessary)
• Clean faucet regularly using soapy water and a soft cloth or wet sponge
• DO NOT clean faucet with any abrasive material or chlorine/acid based
Note: If you require to modify any of the factory settings please request the
Sanela remote SLD03.
Activation Range Time Delay Hygienic Flush

11
splwashrooms.co.nz
Symptom Possible Cause Corrective Action
is LED on sensor
hands are within
active range?
a. Water supply
b. Water connections
c. Filter is clogged
d. Faucet to solenoid power
connection
e. Faulty solenoid
a. Ensure water at source
b. Ensure connections
c.
and solenoid)
d. Reconnect plugs from
faucet to solenoid valve
e. Replace solenoid
LED on sensor
when hands are
within active
range.
a. Power supply
b. Power connectors to faucet
(wago connectors)
c. IR sensor damaged
d. Faulty IR sensor
a. Ensure power at
source
b. Check all connections
and polarity
c.
d. Replace IR sensor
Water doesn’t
a. Dirty IR sensor
b. Obstruction in detection
zone
c. Water drop on sensor eye
d. Ghost sensing due to
a. Clean IR sensor
b. Remove obstruction
c. Wipe sensor
d.
surface or reposition
a. Filter clogged
b. Aerator clogged
c. Water supply
a.
b. Clean aerator
c.
at source
Troubleshooting

splwashrooms.co.nz
Supreme Comprehensive Warranty
Your Supreme sensor tap is fully guaranteed against defective materials and
faulty workmanship commencing from the date of sale (according to SPL’s
records), subject to it being installed and maintained in accordance with the
manufacturer’s instructions.
SPL (2021) Limited warrants that should any part of the sensor tap fail within the
given warranty period (24 months), it will be remedied by SPL. The tap should
be returned to SPL (2021) Limited for all warranty claims. The cost of cartage will
be payable by the customer.
•
installation guidelines supplied
• Failure to follow manufacturer’s maintenance instructions
•
- the use of non-authorised parts
- authorised parts not installed in accordance with the manufacturer’s
instructions
- accidental damage, negligent use, misuse, vandalism, neglect
- damage caused either directly or indirectly by external sources (incorrect
power supply, natural disaster, or insect infestation)
•
• Negligent cleaning practices (water ingress, harmful chemical etc)
The above includes consequential damage to any other goods, furnishings, or
property.
• Normal wear and tear and consumable parts (batteries etc)
• This warranty does not displace any statutory warranty in relation to the
dispenser but any liability of SPL (2021) Limited under any statutory warranty
will be limited to a replacement or repair of the dispenser or payment of
the cost of such replacement or repair at the sole discretion of SPL (2021)
Limited
• Warranty only extends to products purchased and installed in New Zealand.
• Contamination or poor water quality is not covered by product warranty.
•
is not covered by the product warranty.
SPL Limited
PO Box 437, Cambridge 3450
New Zealand
p. +64 7 823 5790
Table of contents
Popular Plumbing Product manuals by other brands

Haws
Haws 1109FR Installation, operation & maintenance instructions

Hans Grohe
Hans Grohe Talis M52 220 2jet 73863 Series Assembly instructions

Gessi
Gessi VIA TORTONA 18603 Bath Mixing Program

American Standard
American Standard Green Tea Deck-Mount Bath Filler 7010.900 installation instructions

Elkay
Elkay LKD2223 Specifications

Santec
Santec LIZA 5166LZ installation instructions

Moen
Moen L4700 Series installation instructions

Franke
Franke DVS Aquari-Save quick start guide

THG PARIS
THG PARIS G00.219D installation instructions

Decolav
Decolav 1112T Series Product description

Omnires
Omnires Y1238/KRONI Installation and Maintenance

Blanco
Blanco BlancoRondo 511-630 Specification sheet