Spoldi Masoko User manual
Masoko
Scheda di montaggio / Installation guide
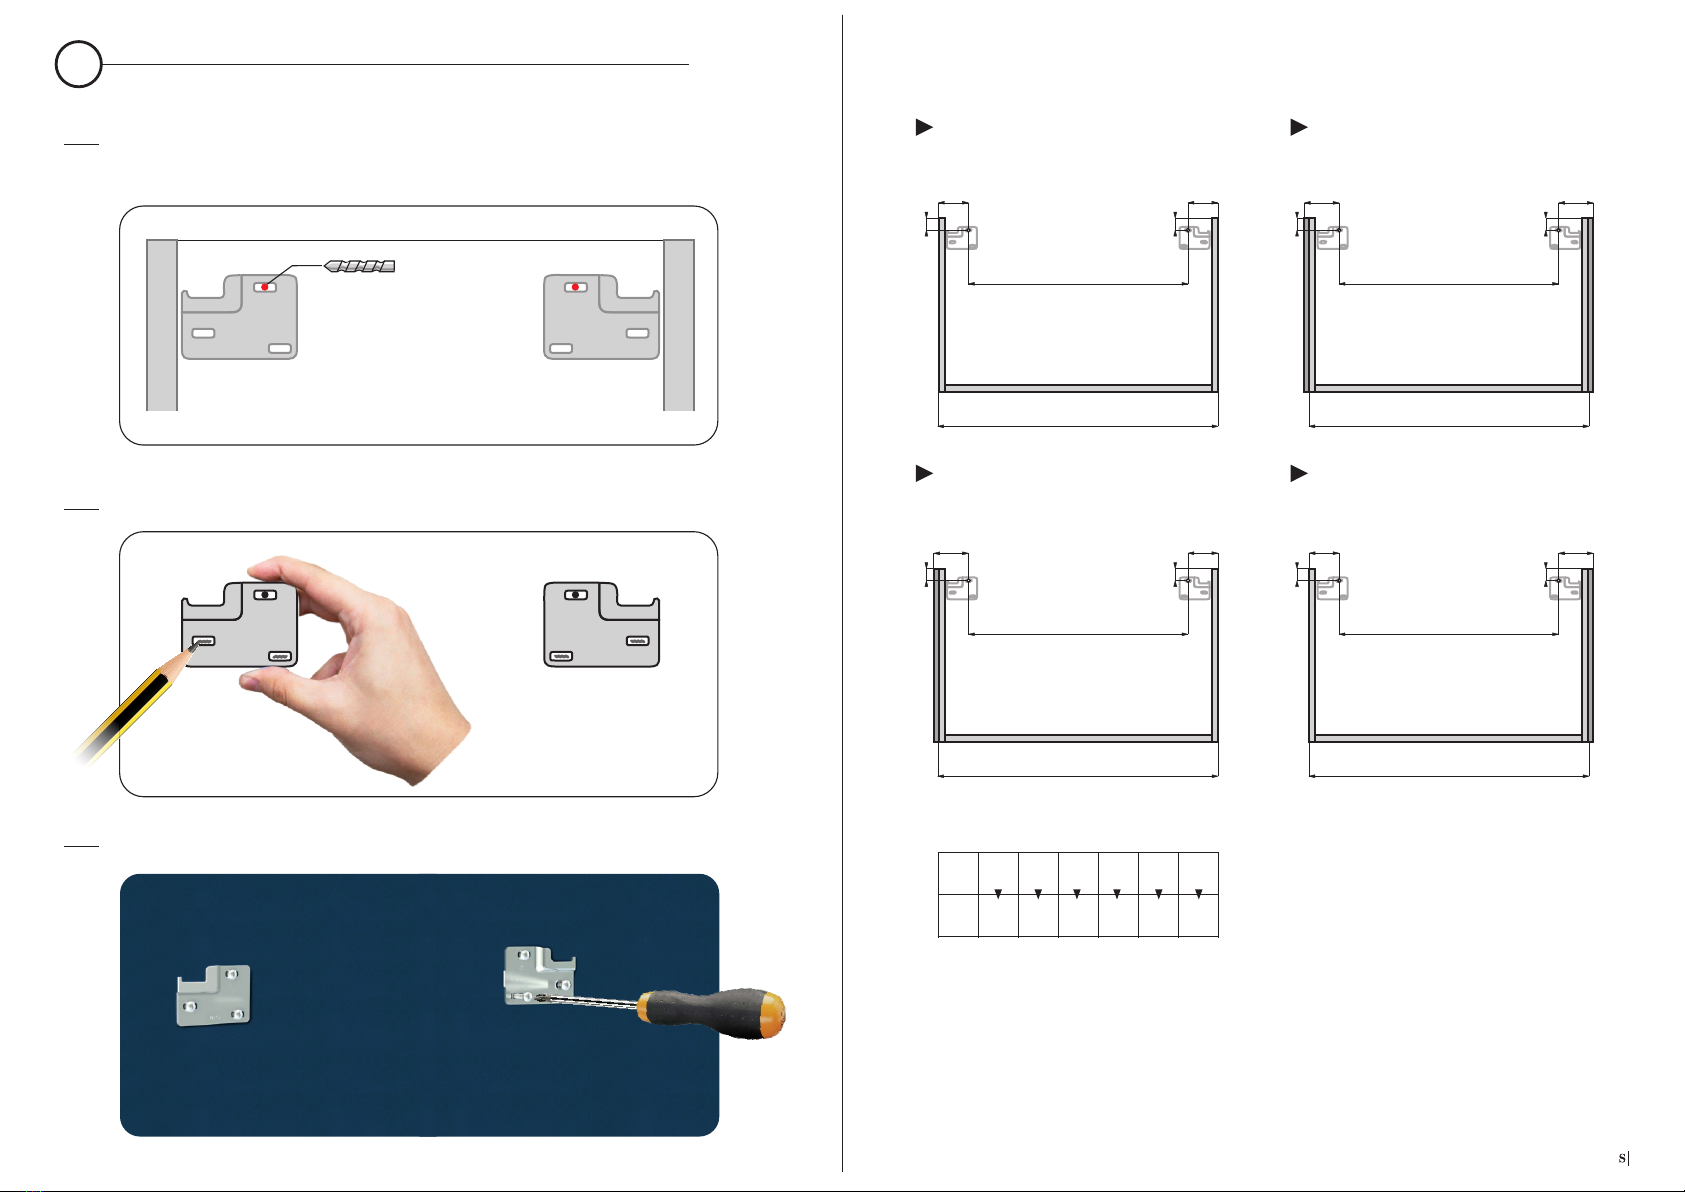
Stabilire l’altezza del mobile da terra e praticare i 2 fori A e B seguendo le indicazioni
riportate nello schema corrispondente alla vostra base. Vedi pagina a lato.
BA
Segnare i restanti fori inferiori utilizzando come riferimento la piastra stessa.
ø8mm
Fissare le piastre a parete serrando le 6 viti in dotazione.
30
30
30
30
75
30
30
30
30
X
L
X
X X
L500
350
700
550
800
650
900
750
1000
850
1200
1050
L
L L
x
87
75 87
87 75 75 87
02
Establish the height of the cabinet from the ground and drill the 2 holes A and B following
the instructions shown in the diagram corresponding to your base. See page to the side.
Mark the remaining lower holes using the plate itself as a reference.
Fix the plates to the wall by tightening the 6 screws supplied.
Fissaggio ganci a parete per base porta lavabo
1Fixing hooks to wall for washbasin base
1.1
1.3
1.2
Base portalavabo senza fianchi a finire Base portalavabo con fianchi a finire
Quote dei fori superiori A e B per il fissaggio delle piastre a parete
Dimensions of the upper holes A and B for fixing the wall plates
Washbasin base without finishing sides Washbasin base with finishing sides
Base portalavabo con fianco a finire sinistro Base portalavabo con fianco a finire destro
Washbasin base with left side panel Washbasin base with right side panel
Quote espresse
in millimetri
Larghezza della base
Width of the base
Interasse fori A e B
Distance between
centers A and B
L:
X:
Dimensions
expressed in
millimeters
03
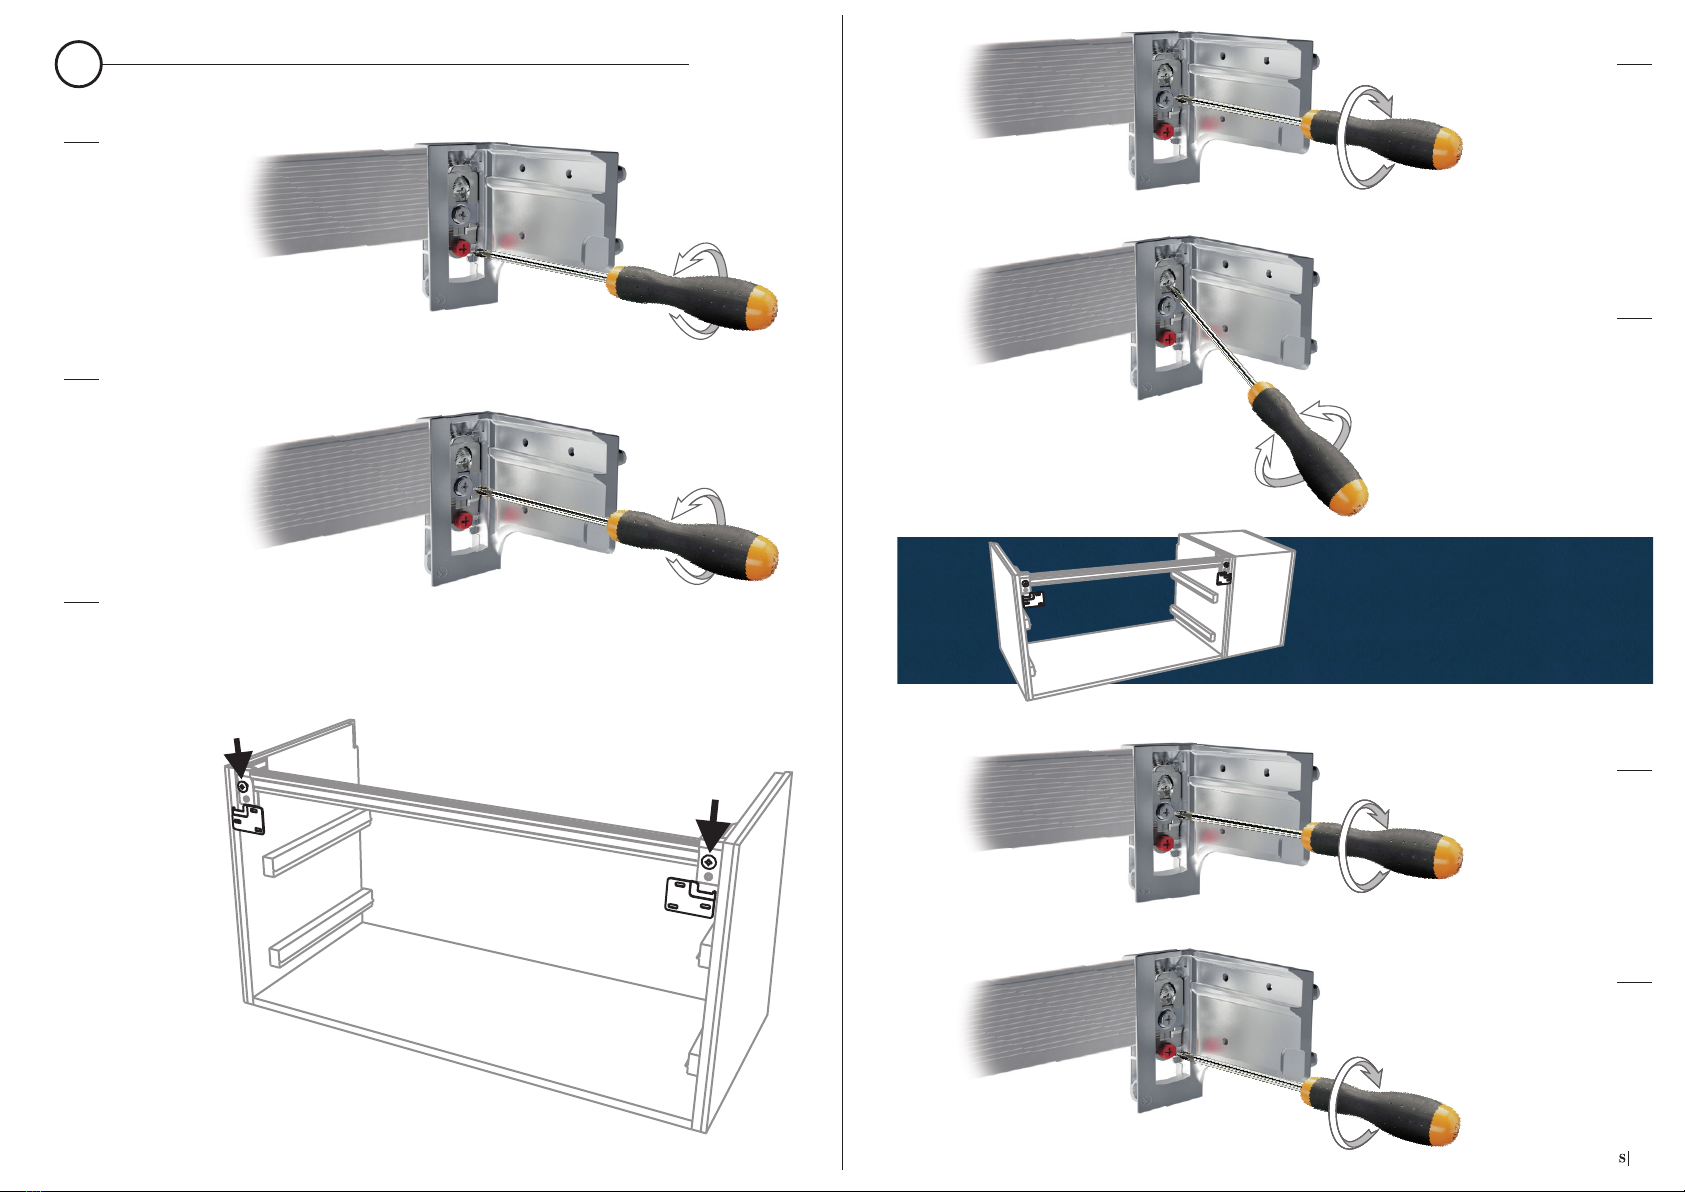
Fissaggio e regolazione base porta lavabo
2Fixing and adjustment for washbasin base
Svitare la vite rossa
antisganciamento
Allentare la vite centrale
di fissaggio alla piastra
Fissare la base porta lavabo
a parete inserendo la testa
delle viti sul retro alle piastre
a parete.
Avvitare la vita centrale
senza serrarla del tutto
per avvicinare il mobile
a parete.
Agire sulla vite inclinata
per alzare o abbassare il
mobile fino a raggiungere
la messa in bolla.
Prima di proseguire con i punti 2.6 e 2.7
fissare le eventuali basi laterali. Vedi la
pagina successiva.
Avvitare la vite centrale fino
ad aderire alla parete
Avvitare la vite inferiore per
evitare lo sganciamento
2.1
2.2
2.3
2.4
2.5
2.6
2.7
Unscrew the red screw
anti-release
Loosen the fixing central
screw to the plate
Fix the washbasin base on the
wall inserting the head of the
screws on the back of the
wall plates
wall
is achieved.
Act on the inclined screw
to raise or lower the
furniture until the leveling
Before continuing with points 2.6 and 2.7
fix any lateral bases. See the next page.
Screw the central screw up
to adhere to the wall
Tighten the lower screw for
avoid uncoupling
Tighten the central
screw without close
it completely to bring
the furniture to the
62
50
L L
L L
7272
7272
50
72
62
72
62
72
50
72
X X
X X
Base laterale senza fianchi a finire
Base laterale con fianco a finire sinistro Base laterale con fianco a finire destro
L250
150
300
200
400
300
450
350
500
400
700
600
x
Quote espresse
in millimetri
Base laterale con fianchi a finire
62
50
800
700
900
800
1000
900
1200
1100
600
500
* * *
: Vani a giorno
*
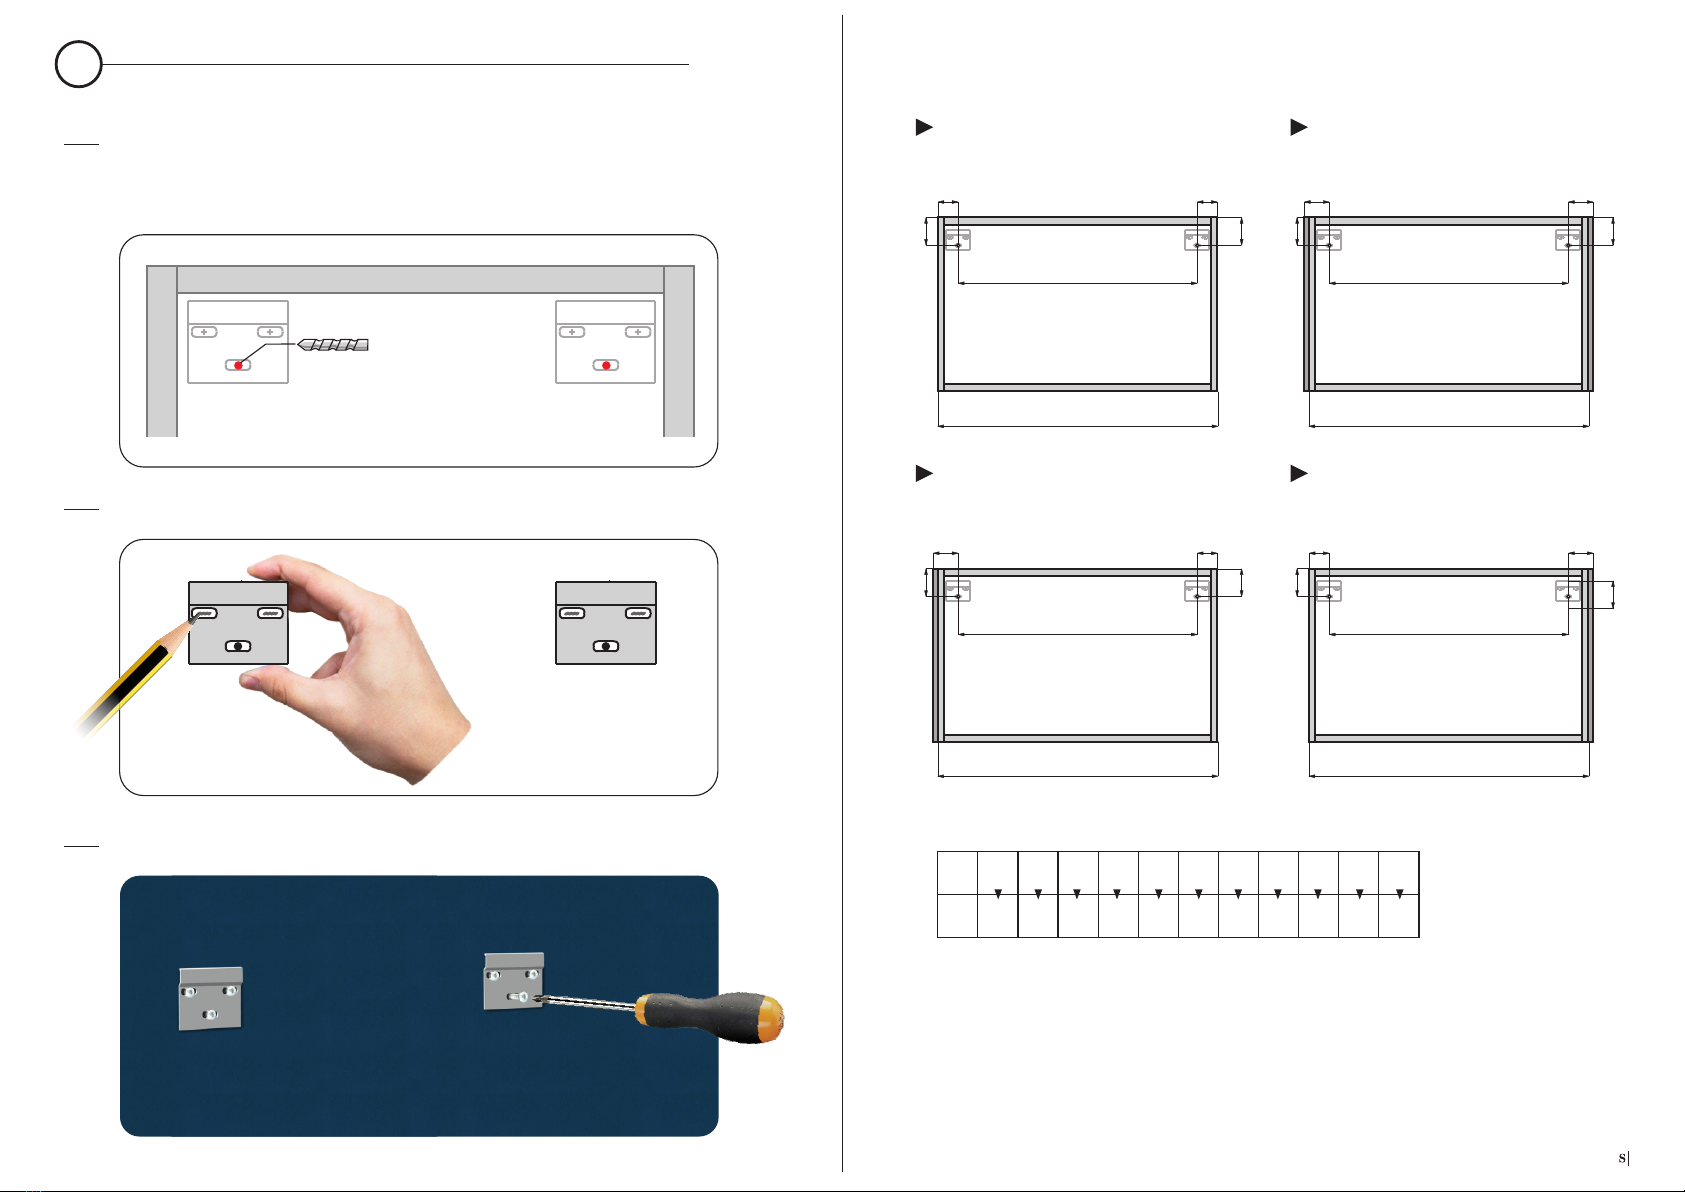
Fissaggio ganci a parete per base laterale
3
ø8mm
A B
Quote dei fori superiori A e B per il fissaggio delle piastre a parete
04
3.1
3.2
3.3
Segnare i restanti fori inferiori utilizzando come riferimento la piastra stessa.
Fissare le piastre a parete serrando le 6 viti in dotazione.
Mark the remaining lower holes using the plate itself as a reference.
Fix the plates to the wall by tightening the 6 screws supplied.
Utilizzare come riferimento l’altezza della base porta lavabo già installata e praticare
i 2 fori A e B seguendo le indicazioni dello schema corrispondente alla vostra base.
Vedi pagina a lato.
Use as reference the height of the washbasin base already installed and drill the 2 holes
A and B following the indications of the diagram corresponding to your base. See page
to the side.
Dimensions of the upper holes A and B for fixing the wall plates
Side base without finishing sides Side base with finishing sides
Side base with left side panel Side base with right side panel
Larghezza della base
Width of the base
Interasse fori A e B
Distance between
centers A and B
L:
X:
Open cabinet
Fixing hooks to the wall for lateral base
Dimensions
expressed in
millimeters

4.1
4.2
4.3
05
Fissaggio e regolazione base laterale
4Fixing and side base adjustment
Svitare la vite inferiore per
consentire la fuoriuscita
del perno
Avvitare la vite inferiore senza
serrarla totalmente, quanto
basta per avvicinare la
base a parete.
Agganciare la base ai
due ganci a parete.
Agire sulla vite superiore
per alzare o abbassare il
mobile fino a raggiungere
la messa in bolla.
Fissare all’altra
base attraverso
i tiranti.
Avvitare la vite inferiore fino
ad aderire completamente
alla parete.
4.4
4.6
4.5
Unscrew the lower screw
to allow the spillage of
the pin
Screw the lower screw without
tighten it totally, just enough
to approach the wall base.
Hook the base to
the two wall hooks.
Screw the lower screw up
to adhere completely
to the wall.
is achieved
Act on the upper screw
to raise or lower the
furniture until the leveling
Attach to the other
base through
the rods.
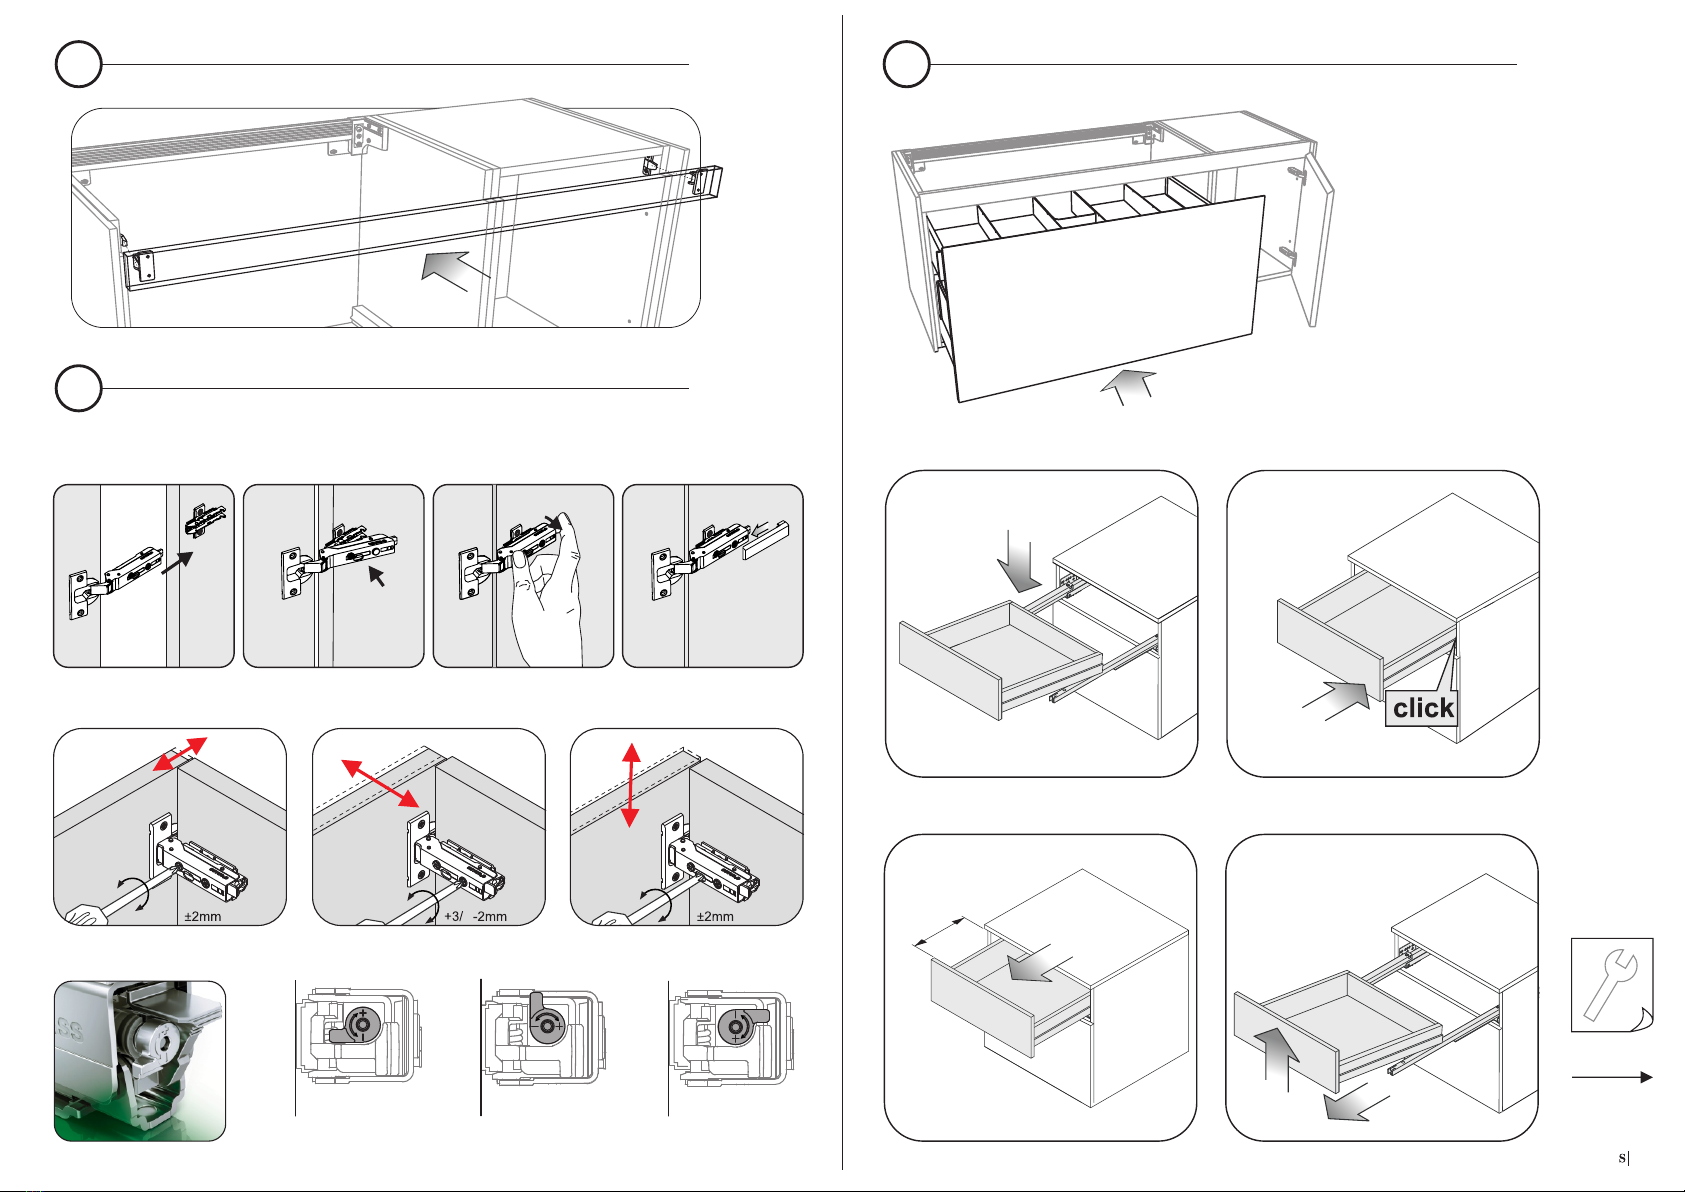
Regolazione laterale Regolazione profondità Regolazione altezza
Regolazione ammortizzatore
Soft Medio Forte
Regolazione
cassetti
Drawers
setting
50%
06
Fissaggio fascia di copertura gola
5Fixing throat cover band
Fissaggio e regolazione anta e cerniere
6Fixing and adjustment of the door and hinges
Shock absorber adjustment
Lateral adjustment Depth adjustment Height adjustment
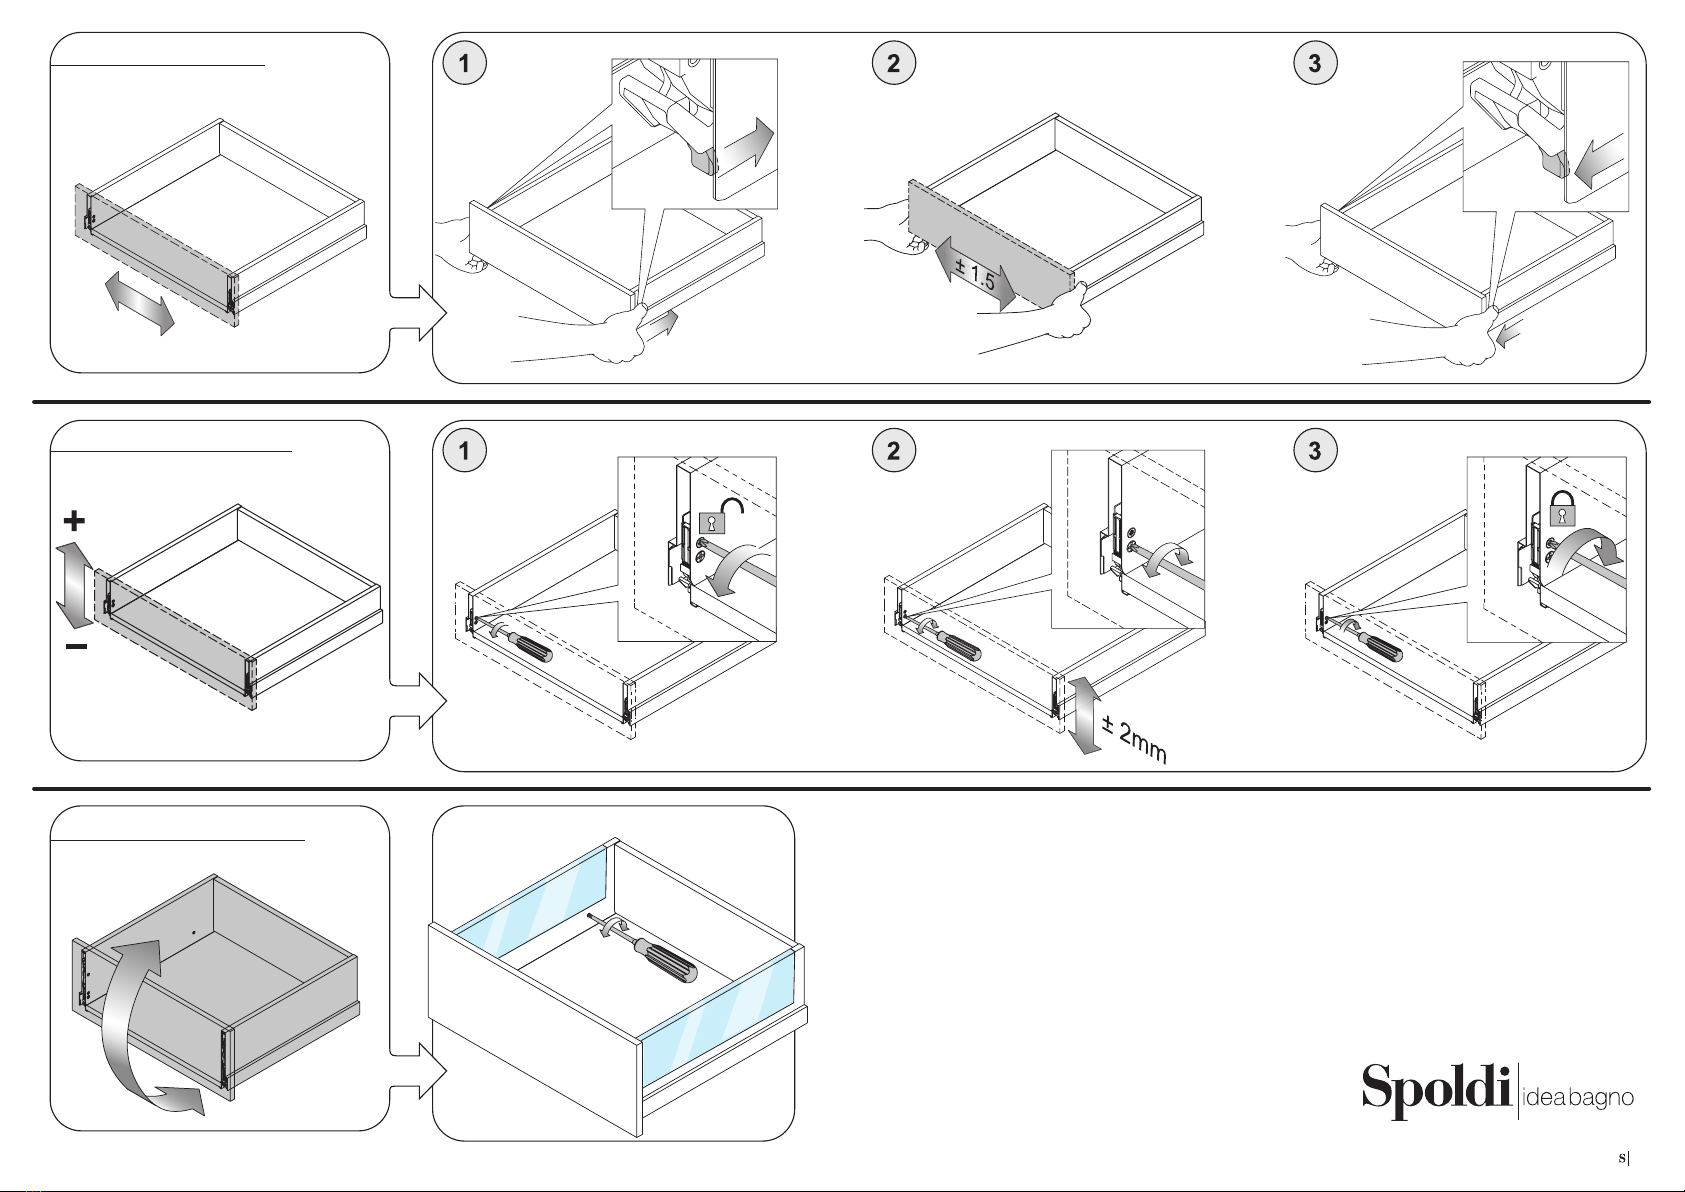
Fissaggio e regolazione cassetti
7Drawers fixing and adjustment
Aggancio del cassetto
Sgancio del cassetto
Drawer coupling
Drawer release
Soft Medium Strong
Spoldi
Fissaggio
Fixing
07
Regolazione up & down
Regolazione inclinazione
Up & down adjustment
Tilt adjustment
Regolazione laterale
Lateral adjustment
SX
L
R
DX
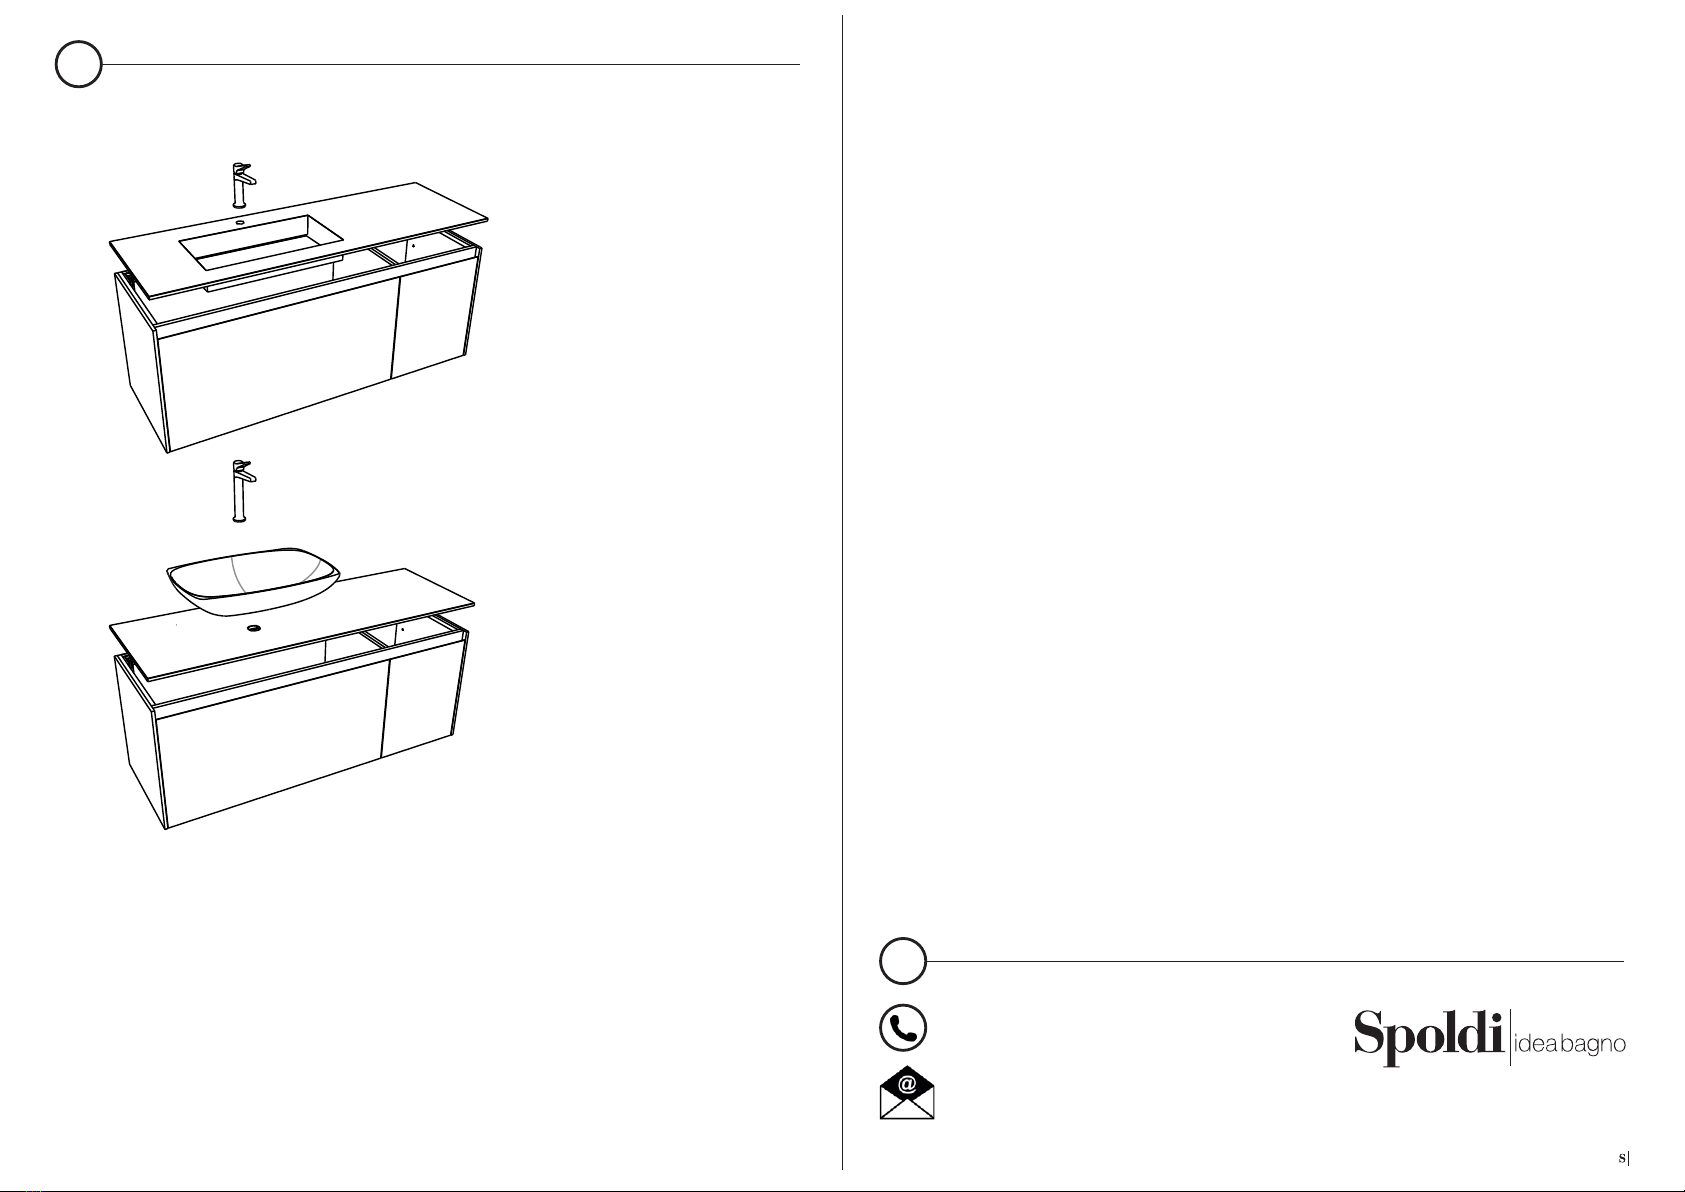
Fissaggio top e lavabo
8Top and sink fixing
Per qualsiasi informazione
For any information
+39 02 5470694
info@spoldi.it
!
Via Liberazione 63/19 20068 Peschiera Borromeo (MI)
tel. 02 5470694 fax 02 5475571 www.spoldi.it [email protected]
materiale idoneo
Appoggiate il piano con
attenzione e fissatelo
con del silicone o altro
Put the top carefully and
fix it with silicon or other
suitable material
08

Via Liberazione 63/19 20068 Peschiera Borromeo (MI)
tel. 02 5470694 fax 02 5475571 www.spoldi.it [email protected]
Other Spoldi Indoor Furnishing manuals

Popular Indoor Furnishing manuals by other brands


Riverside Furniture
Riverside Furniture Maisie 50237 Assembly instructions

Coaster
Coaster 400961T Assembly instructions

Jahnke
Jahnke CHILLAX Dream 33A55 quick start guide

Multimo
Multimo A 212 CASTELLO manual

Article
Article ENVELO Assembly instructions

Cooper Lighting
Cooper Lighting Lumark HB Specification sheet