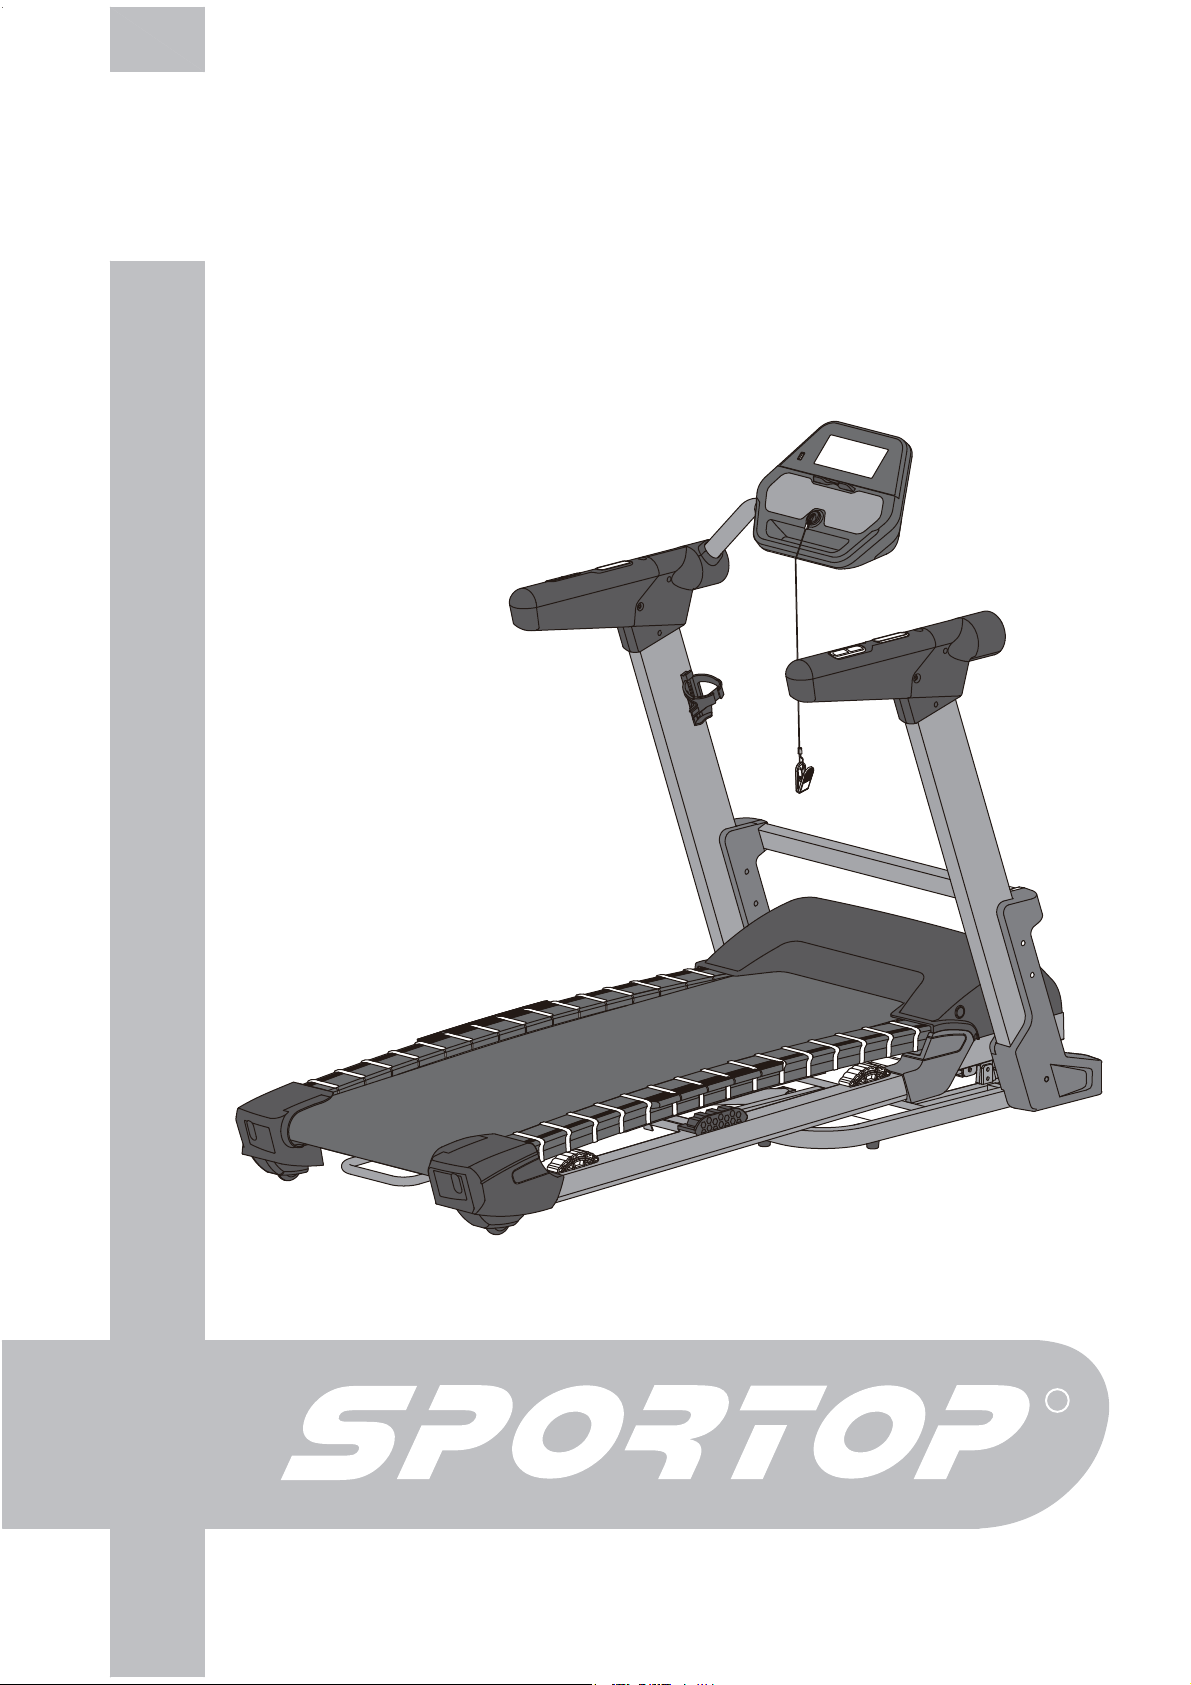
Sportop T5 Operation manual
IMPORTANT!
Please read the manual carefully. It is important for you to assemble and use the treadmill
correctly, also always keep this manual with you.
R
Owner’s Operating Manual ENGLISH
MODEL: T5
WAVE DECK TREADMILL

Important Safety Information
We thank you for choosing our product. To guarantee your safety and health, please use
this equipment correctly, Please read the information as below carefully before using this
equipment.
1. It is important to read this entire manual before assembling and using the equipment.
Safe and effective use can only be achieved if the equipment is assembled,
maintained and used properly.
2. Before starting any exercise program you should consult your doctor to determine if you
have any medical or physical conditions that could put your health and safety at risk, or
prevent you from using the equipment properly. Your doctor’s advice is essential if you
are taking medication that affects your heart rate, blood pressure or cholesterol level.
3. Be aware of your body’s signals. Incorrect or excessive exercise can damage your
health. Stop exercising if you experience any of the following symptoms: pain, tightness
in your chest, irregular heartbeat, extreme shortness of breath, lightheadedness,
dizziness or feelings of nausea. If you do experience any of these conditions you should
consult your doctor before continuing with your exercise program.
4. Keep children and pets away from the equipment. The equipment is designed for adult
use only.
5. Keep children and pets away from the equipment. The equipment is designed for adult
use only. Use the equipment on a solid, flat level surface with a protective cover for your
floor or carpet. To ensure safety, the equipment should have at least 0.6 meters of free
space all around it, and should have enough free space when users get on and off the
equipment.
6. Before using the equipment, check that the nuts and bolts are securely tightened.
Always use the equipment as indicated. If you find any defective components while
assembling or checking the equipment, or if you hear any unusual noises coming from
the equipment during use, stop immediately. Do not use the equipment until the
problem has been rectified.
7. There are many functions of the computer, which value will show when using the
equipment according the amount of exercise ,here warmly remind you that the value
of heart pulse just give you some reference.
8. Wear suitable clothing while using the equipment. Avoid wearing loose clothing that
may get caught in the equipment or that may restrict or prevent movement.
9. This equipment is designed for indoor and family use only. Maximum weight of user:
110KG.
10.Care must be taken when lifting or moving the equipment so as not to injure your back.
11.The equipment is not suitable for therapeutic use.
12.Please save this manual and assembling tools well.
1
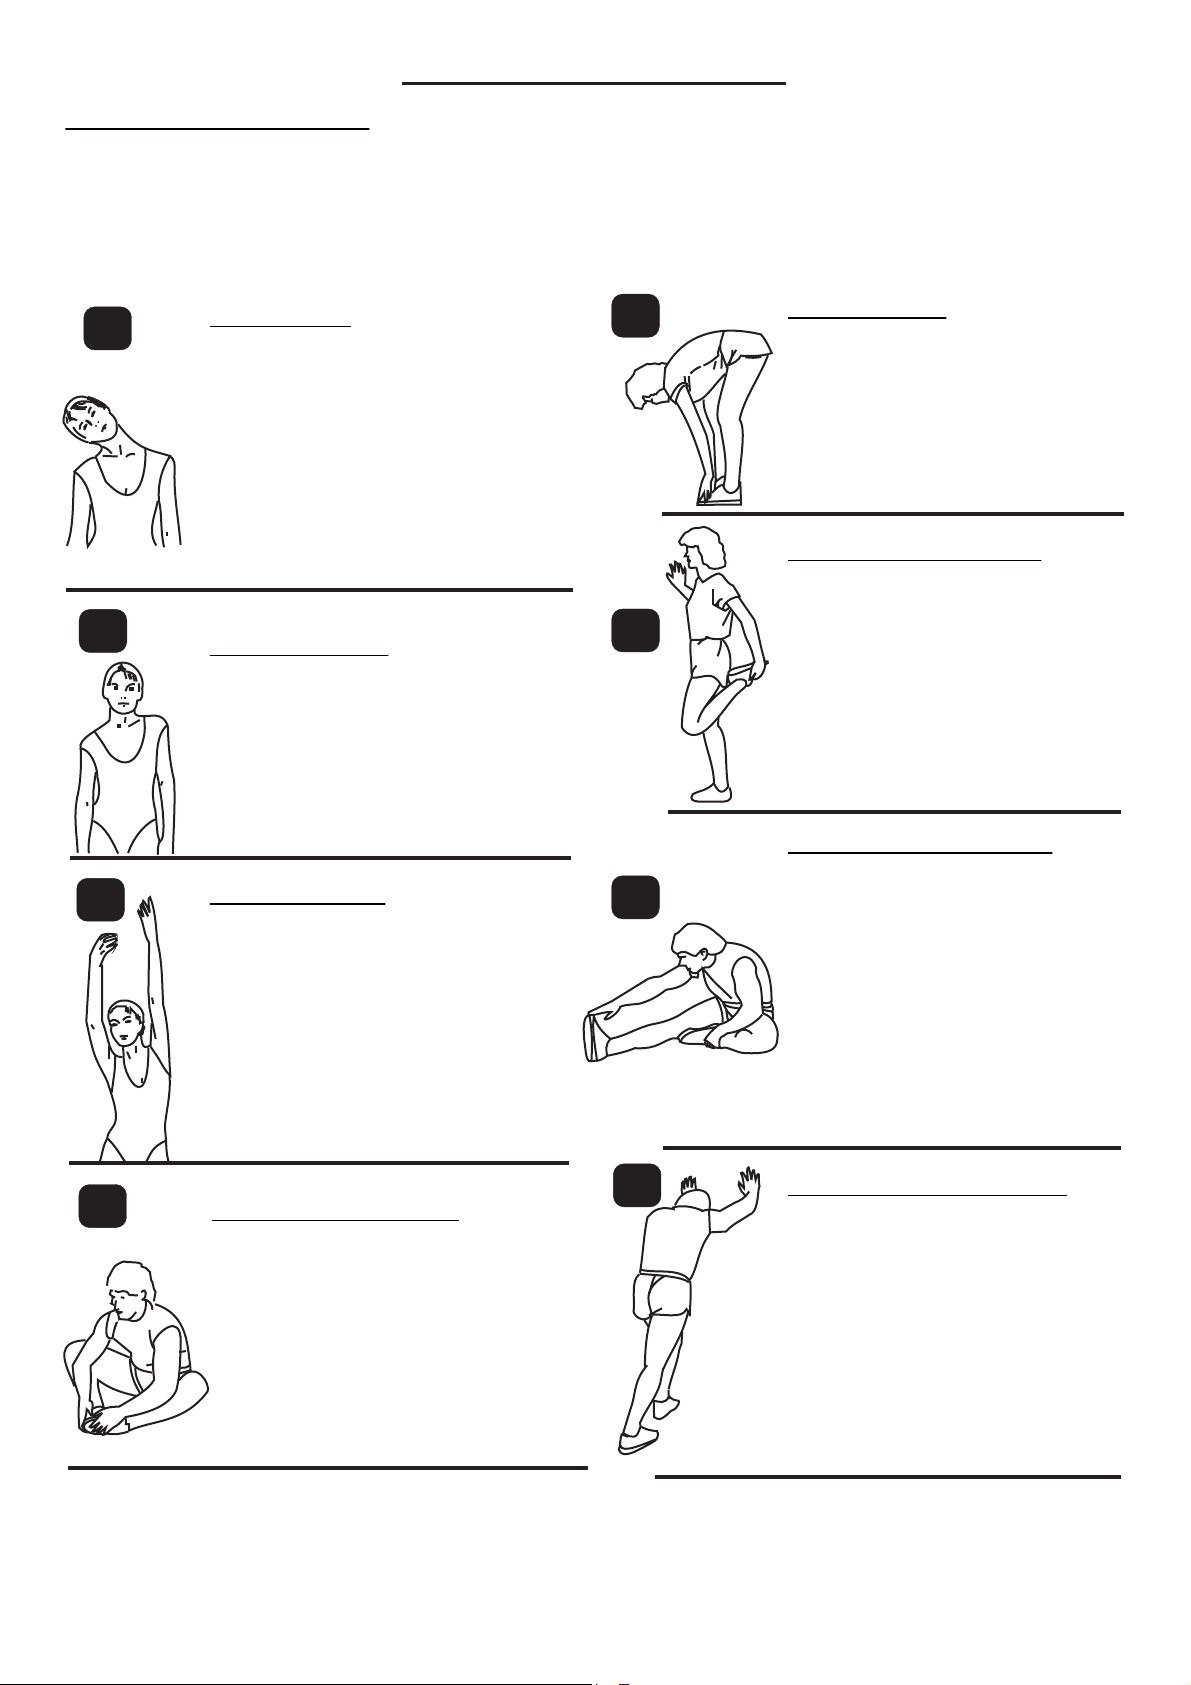
A successful exercise program consists of a warm up, aerobic exercise, and a cool down.
Warming up is an important part of your workout, and should begin every session. It prepares your
body for more strenuous exercise by heating up and stretching out your muscles. At the end of
your workout, repeat these exercises to reduce sore muscle problems. We suggest the following
warm-up and cool-down exercises:
Rotate your head to the right for one
count, feeling the stretch up the left
side of your neck. Next rotate your
head back for one count, stretching
your chin to the ceiling and letting your
mouth open. Rotate your head to the
left for one count, and finally, drop
your head to your chest for one count.
Lift your right shoulder up toward
your ear for one count. Then lift
your left shoulder up for one
count as you lower your right
shoulder.
Open your arms to the side and
continue lifting them until they are
over your head. Reach your right
arm as far upward toward the
ceiling as you can for one count.
Feel the stretch up your right side.
Repeat this action with your left
arm.
With one hand against a wall
for balance, reach behind you
and pull your right foot up.
Bring your heel as close to your
buttocks as possible. Hold for
15 counts and repeat with left
foot up.
Sit with the soles of your feet
together with your knees
pointing outward. Pull your feet
as close into your groin as
possible. Gently push your
knees toward the floor. Hold for
15 counts.
Slowly bend forward from your
waist, letting your back and
shoulder relax as you stretch
toward your toes. Reach down
as far as you can and hold for
15 seconds.
Lean against a wall with your
left leg in front of the right and
your arms forward. Keep your
right leg straight and the left
foot on the floor; then bend the
left leg and lean forward by
moving your hips toward the
wall. Hold, then repeat on the
other side for 15 seconds.
Lean against a wall with your
left leg in front of the right and
your arms forward. Keep your
right leg straight and the left
foot on the floor; then bend the
left leg and lean forward by
moving your hips toward the
wall. Hold, then repeat on the
other side for 15 seconds.
1
2
3
4
5
6
8
7
-WARM UP & COOL DOWN-
WARM UP & COOL DOWN
HEAD ROLLS TOE TOUCHES
QUADRICEPS STRETCH
HAMSTRING STRETCHES
CALF/ACHILLES STRETCH
SHOULDER LIFTS
SIDE STRETCHES
INNER THIGH STRETCH
2
IV-A
IV-B13
TOOL
13
14
6
15
IV-B21Water Bottle Holder
IV-B22 IV-B25
IV-C14
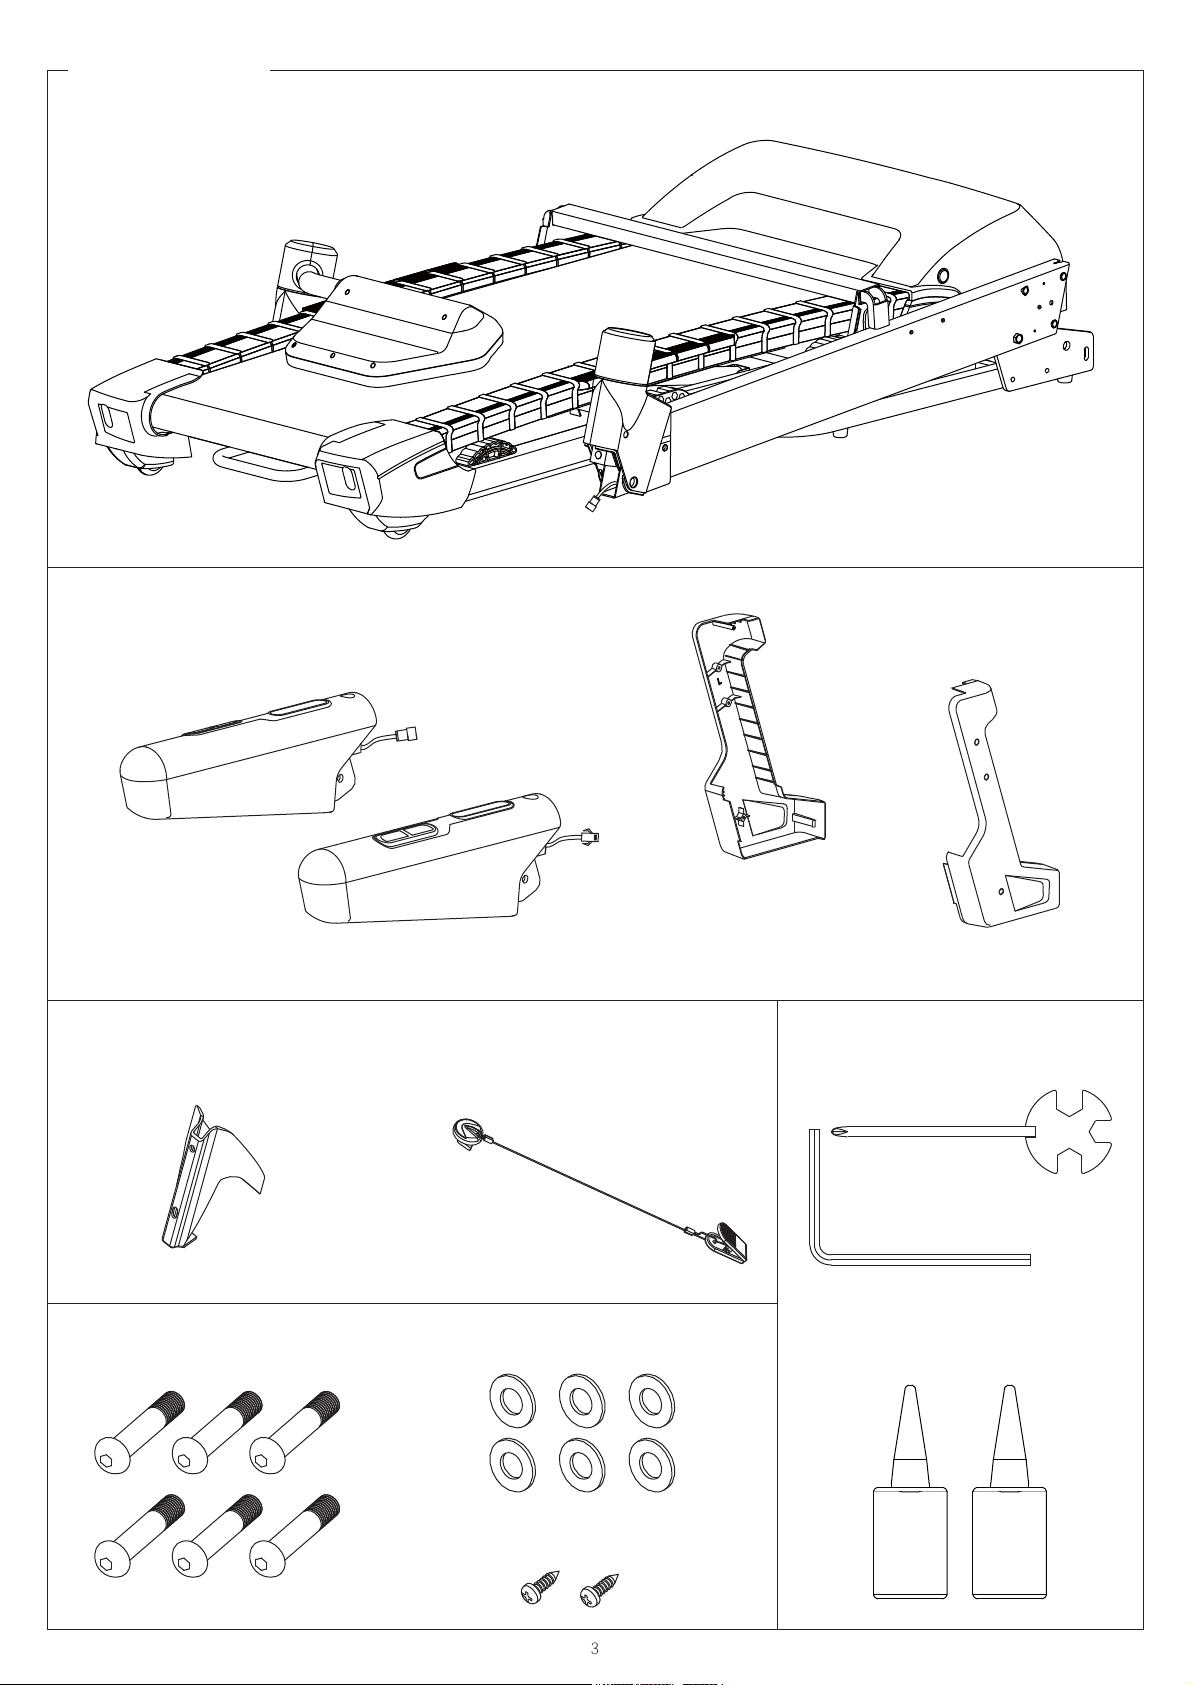
PARTS LIST
Safety Key
Silicon Oil BottleWasher (D10) x 6
Bolt (M10 x 50) x 6
IV-B26
Bolt (ST3.9 x 14) x 2
20ml 20ml
UPRIGHT POST (L)
IV-B14 UPRIGHT POST (R)
MAIN FRAME
IV-B4 UPRIGHT POST
COVER OUTER (R)
IV-B3 UPRIGHT POST
COVER OUTER (L)

FIGURE 1
IV-B22
IV-B25
IV-B25
IV-B22
IV-B1
IV-B2
USE TOOL IV-B22
M10 X 50 mm x 6 pcs
IV-B25
D10 x 6 pcs
FIGURE 1 - ASSEMBLY FOR LEFT AND RIGHT SIDE SUPPORTING TUBE
Uplift the side supporting tube (IV-B1) & (IV-B2) steadily. (Be careful not to
damage the wire during the assembly.) Then, slide it to the L & R support bracket,
tighten with the bolt (IV-B22) and washer (IV-B25). After that, tighten all the bolts
with the T Wrench. Please make sure that the bolt (IV-B22) and T Wrench have
been tighten very well.

FIGURE 2
IV-B4
IV-B26
IV-B26
IV-B3
IV-B2
IV-B1
IV-B26
Place the Front Cover (IV-B3)&(IV-B4) on the bottom frame and tighten with Screw
(IV-B26) by Cross Wrench.
USE TOOL IV-B26
ST3.9 X 14 mm x 8 pcs
REVOCTSOPTHGIRPUROFYLBMESSA-2ERUGIF

USE TOOL IV-A41
M8 X 16 mm x 6 pcs
IV-B28
M5 X 16 mm x 2 pcs
IV-A113
D8 x 6 pcs
FIGURE 3
IV-C
IV-C14
IV-B33
IV-B34
IV-B35
IV-B2
IV-A41
IV-B36
IV-A113
IV-A41
IV-A113
IV-A41
IV-A113
IV-A41
IV-A113
IV-B14
IV-B28
IV-B21
IV-B13
IV-B1
FIGURE 3 - ASSEMBLY FOR RIGHT & LEFT SIDE SUPPORTING TUBE
Step 1. Remove the pre-mounted bolt (IV-A41) and spacer (IV-A113) from right & left side
support tube (IV-B1/IV-B2) and also upright post (IV-B13 & IV-B14).
Step 2.
Connect the wire (IV-B33) with (IV-B35) firstly and then tighten left upright (tsop IV-B13)
with left side supporting tube (IV-B1) by using bolt (IV-A41) and spacer (IV-A113).
Step 3.
Connect the wire (IV-B34) with (IV-B36) firstly and then tighten right upright post (IV-B14)
with right side supporting tube (IV-B2) by using bolt (IV-A41) and spacer (IV-A113).
Step 4. Fix water bottle holder (IV-B21) onto side supporting tube by using bolts (IV-B28).
Step 5. Insert Safety key onto console slot.

FIGURE 4
B
A
FIGURE 4 - HOW TO FO
VIEW A VIEW B
LD UP THE TREADMILL
The treadmill is foldable to save the space when it’s stored.
Warning:
zDo not try to fold up the treadmill while it’s operating.
zDo not connect the power supply while it’s folded.
zThe incline must be adjusted to the lowest level as VIEW A.
zVIEW B is not acceptable for folding machine.
OK NO
Hold the rear bar at rear part of machine (As below B Shown)
and lift up the rear bar to fold it up till hear “click” sound.
Slightly pull backward the deck to check if the lock mechanism
is secured.

FIGURE 5
HOW TO MOVE THE TREADMILL
Hold the rear part of mainframe (as below picture B) firmly, press it till the
transportation wheel at the bottom touch the ground, and adjust the mainframe to
suitable angle for moving ( as below picture A), then release the front part of
mainframe back to the ground slowly and stably after move it to the desired place.
FIGURE 5 -
B
A
8

FIGURE 6
B
A
FIGURE 6 - HOW TO UNFOLD THE TREADMILL
Warning:
zMake sure there is enough space to place the treadmill while it’s unfolded.
zMake sure there is nothing surrounding the treadmill that makes the treadmill
impossible to unfold.
Step 1: Stand behind the treadmill and hold the rear bar of machine. Use your
foot to release the locking system.
Step 2: The hydraulic brake will slowly lower independently till touch to the ground.
9

FIGURE 7
FIGURE 7 - HOW TO ADJUST THE RUNNING BELT
rear part of mainframe
L&R adjusting screw
spanner
B
The treadmill has been adjusted to the best condition before delivery, but some
changes may occur after transportation. Therefore please put it power on and work
for some minutes before use it, and center the running belt through adjusting the
adjustable bolt of rear roller if the running belt deflects to one side.
Adjusting tool: T-shape spanner
Position of screw to adjust:as shown on picture B
How to adjust:
1) Rotate the left bolt clockwise if the running belt deflects to the left side (Do not
rotate too much, do it slowly till the running belt is centered.)
2) Rotate the right bolt clockwise if the running belt deflects to the right side.
3) The running belt will be a little loose and need to be adjusted if its speed is too low
or slipping occurs after long time using.
4) To avoid running belt deflecting, remember to run on the center of running belt
when exercising, do not run at the end or focus on only one side.
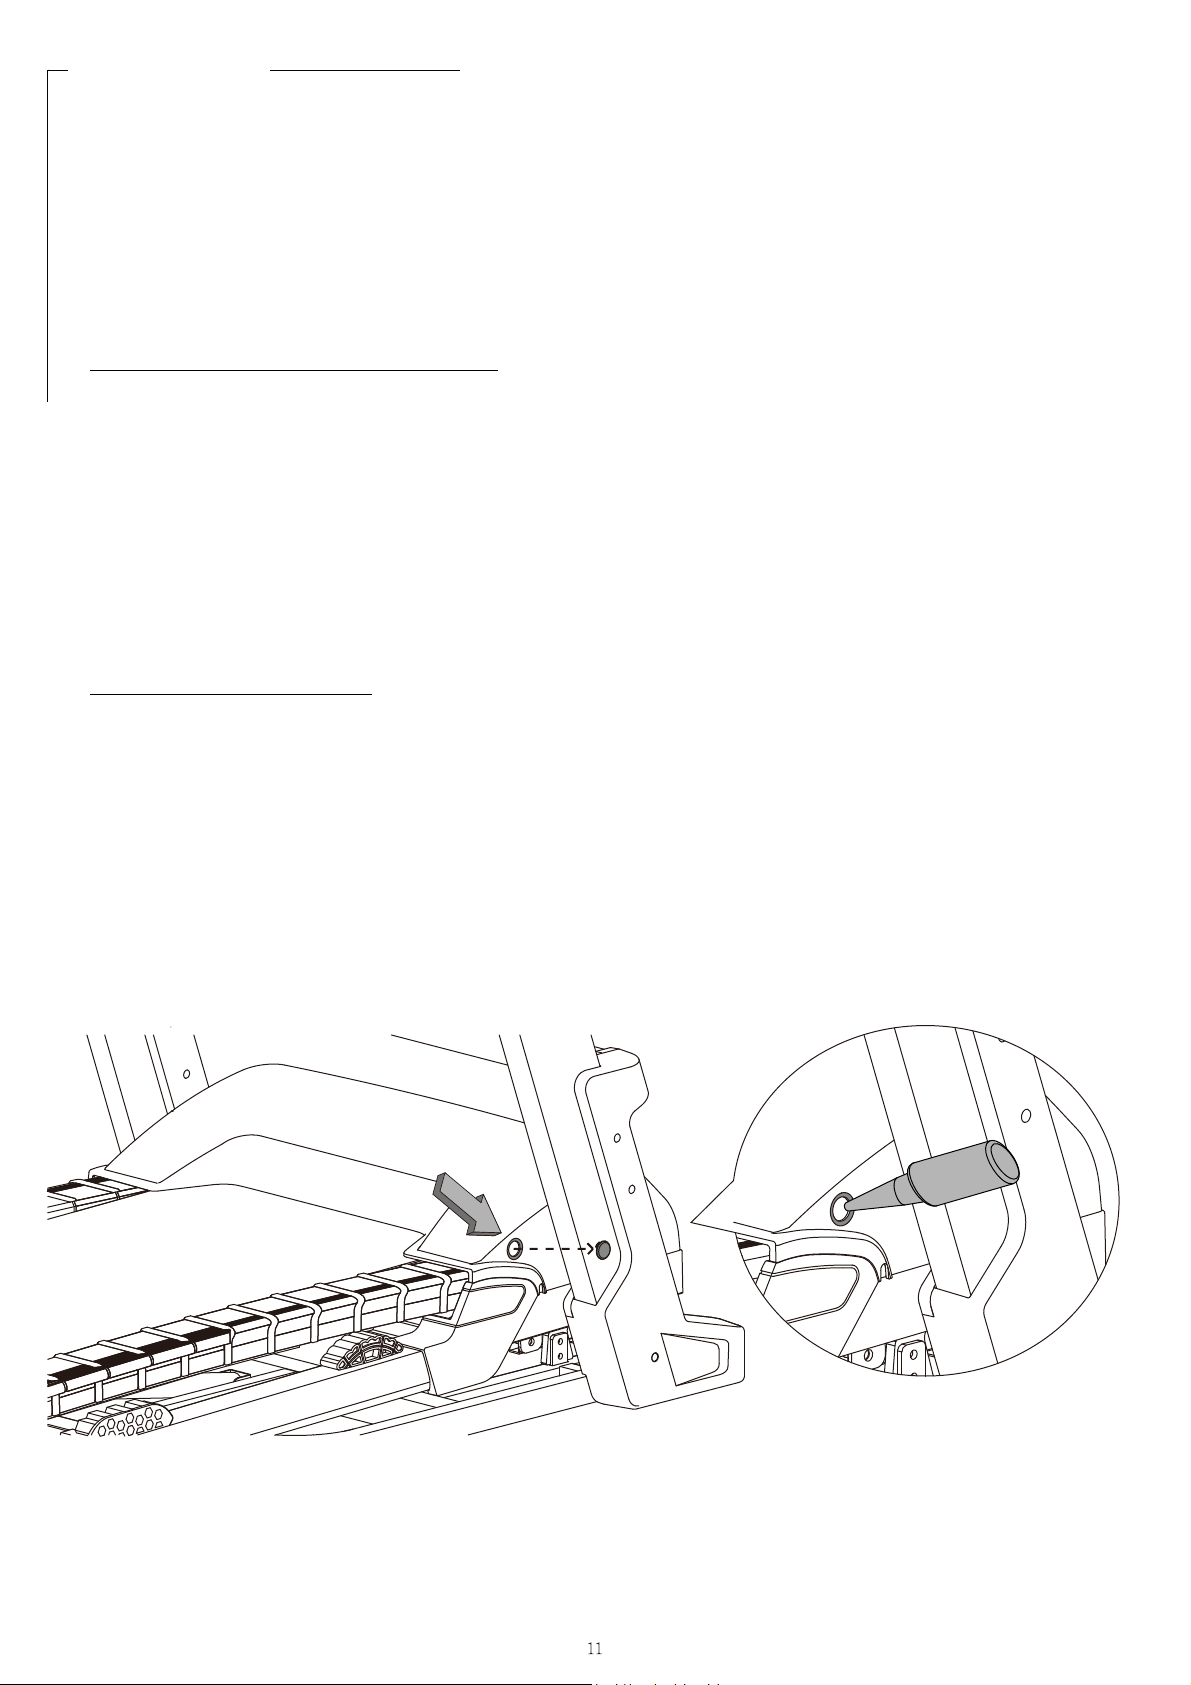
FIGURE 8
FIGURE 8 - LUBRICANT OILING USAGE INSTRUCTION
The running belt of treadmill has been sprayed appropriate lubricant before
packaged. However, the treadmill shall be maintenance by refueling in order to
ensure the normal use and reduce the abrasion of components. Please follow the
below refueling indication.
Step 1: How to refuel the lubricant?
Remove the end cap from motor cover (as arrow shown) and fill lubricant into the
oil filling pipe through the oil hole. To let lubricant adhere evenly to the running
belt, it’s suggested to start the treadmill at low speed running (under 3 KM/H) for
5~10 minutes during the refuel. After oil filling is finished, replace the end cap.
Attention: Please do not fold up the treadmill until 30 minutes after refueling to
avoid the lubricant flow out.
Step 2: How often to oil?
zWhen the distance of treadmill reaches to 100KM, there is an “OIL” flash from
display to remind you. Please add oil with 20ml.
zWhen the treadmill is used less than 10KM every day, it’s necessary to add with
15ml lubricant every three months.
Each treadmill is equipped with one bottle lubricant in the box. If it’s used up, you
have to contact with your distributors to purchase a new one.

The over current protector can automatically protect the machine by power off
when the current exceed its scope .The round button which in the circle of this
protector will be popup .When the current problem have been solved, press this
round button back, the machine can return to work,
FIGURE 9
FIGURE 10 - OVER CURRENT PROTECTOR INSTRUCTION
STOP USAGE INSTRUCTION
FIGURE 9 -
FIGURE 10
If you want to stop while exercising, you can press “stop” key on the console and
then the treadmill will be slower and slower until it stops. If you feelunfit to catch the
belt speed and the emergency stop is needed, pull out the safety key (,9C14) and
then treadmill will stop soon within 10 sec
onds.
,9C14
12

,9B27
,9C5
UNSCREW
,9&13
TIGHTEN
13
USE TOOL
FIGURE 11
FIGURE 11 - CONSOLE ASSEMBLY
zThe console angle view is adjustable.
zIf you find the console is not fixed tightly,
loosen the screw (,9B27) and remove
therear cover of console (,9C5), then
tightenor unscrew the bolt(,9C13).
13
CO162/( OPREATION MANUAL
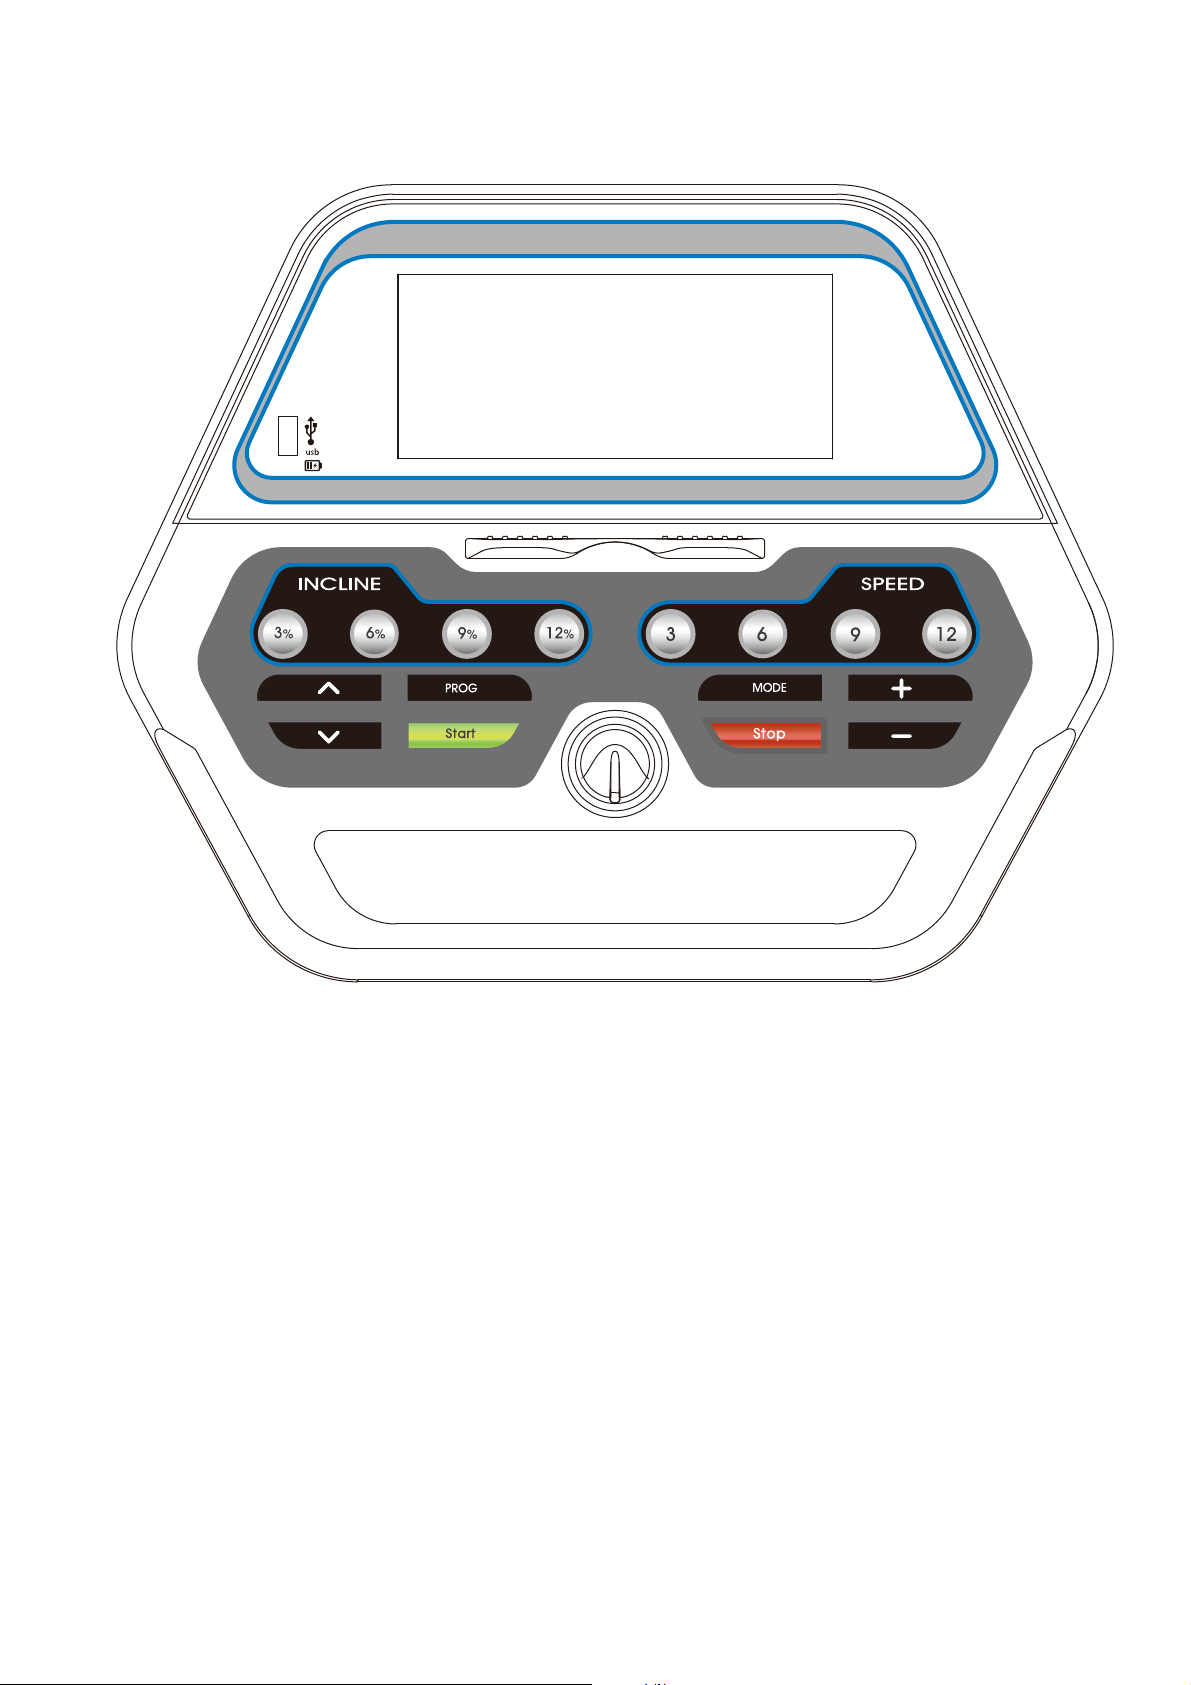
(1)CONSOLE DISPLAYS AND BUTTON FUNCTIONS
1. LCD WINDOWS DISPLAY FUNCTION:
A.Speed:Displays the current speed .Speed range is 1~18Km/H.
B.Distance/Calories/Inclination:Distance range is 0.00-99.9Km, you can
manually enter your desired distance, when you are about to reach
your preset distance ,the treadmill will gradually stop by itself. Calories
range is 0.0~999.After setting your desired calories , Press STAR button,
the treadmill will start to run accordingly until reach your preset calories.
Inclination range is 0%~15% , you can manually set your desired incline
level .
C.Time/H.R.P.:Time range is 0:00-99:59, it displays your total workout
time. H.R.C shows your heart rate while putting your hands on the
Handle bar.
It is a reference data, can’t be used as a medical data.
2. FUNCTION BUTTONS:
START,STOP,PROG,MODE,SPEED(+) OR(-),INDECLINE(+)OR(-) , QUICK
SPEED BUTTON(3、6、9、12)KM/H,QUICK INCLINATION BUTTON (3、6、9、
12)%.
14

3. FUNCTION BUTTONS INSTRUCTION:
A. PROG:At outage state, manually press PROG button to choose
recycle programs. Manual programs
(P01-P02-…-P15-U01-U02-U03-HP1-HP2-FAT).
B. MODE:At outage stage, manually press MODE button to choose
Manual mode(Normal Mode): Time countdown-Distance
countdown -Calories countdown .
C. START:At outage or stopped stage, manually press START button to
start the motor.
D. STOP:Press the “STOP” button to stop the motor working
E. SPEED(+)or(-):In the setup status,press the SPEED(+)or(-)
button until the desired speed show on the display. In the motor
working status,increase or decrease speed by pressing the
SPEED(+)or(-)button.
F. INCLINE(+)or(-):In the standby status,press the INCLINE(+)or(-)
button until the desired incline degree show on the display. In the
motor working status,increase or decrease incline degree by
pressing the INCLINE(+)or(-)button
G. SPEED Shortcut key:3、6、9、12KM/H,in the motor working status,
the motor speed will be directly changed to speed value by pressing
the 3、6、9、12 speed shortcut key accordingly .
H. INCLINE Shortcut:3、6、9、12 degree,in the motor working status,
the incline motor will be directly changed to incline degree by
pressing the 3、6、9、12 incline shortcut key accordingly.
J.
(2)User-setting Programs/Starting Introductions:
1. Programs Introductions:
A. 1 user-setting mode,including Normal Mode, Countdown Timer,
Countdown Calories、Countdown Distance.
B. 20 preprogrammed workouts:P01,P02,…,P20.
C. 3 user-setting programs:U01,U02,U03。
D. 2 speed control of heart rate programs:HP1、HP2。
E. 1 Body Fat measurement program:FAT
2.Starting Introductions:
A. The safety key is inserted to designated position on the console
surface.
B. Press “START” key,window speed show:3-2-1,the motor will start
working after 3 continuous “Bi-Bi-Bi” sound.
I. In the standby status,keep pressing “SPEED +” , “SPEED -” for 3
seconds to enter into ODO,and keep pressing ”STOP” for 3 seconds
to clear ODO.
Lubricating Oiling Reminder System:when the distance of the
treadmill reaches every 100KM, the screen will flash "OIL" for 10
seconds under standby mode, at the same time a short sound
occurred every second,and repeat every 10 seconds;the reminder
system would maintain even outage. For clearing the reminder
system,please press the "STOP" button for 3 seconds under standby
mode.
15

(3)Manual Mode
1. How to enter Manual Mode
A. Opening the Switch, the system will enter the normal mode of the
Manual mode.
B. Pressing the Mode button can enter into the normal mode of the
Manual mode under the standby mode.
2. The manual mode have three setting function: Time/Distance/Calorie
A. When begin to enter the manual mode, the time widow will display
“0:00”
B. Pressing the Mode button in the manual mode, the time will enter
the countdown mode. The time window will display “15:00” with
twinkle, Pressing the “SPEED+- or Incline +-”button can adjust the
time. The scope of time setting is 5:00-9:00
C. In the time countdown mode, pressing the mode button can enter
the distance countdown mode, the distance window display 1.00
km, pressing the “SPEED+- or Incline +-” button can adjust the
distance, the scope of the distance setting is 0.50-99.9km, increase
or decrease from 0.1km
D. In the Calorie countdown mode, pressing the mode button can
enter the calorie countdown mode. The calorie window display 50.0
kcal, pressing the “SPEED+- or Incline +-”button can adjust the
calorie; the scope of the calorie setting is 10.0-999 kcal, increase or
decrease from 1kcal.
3. Manual mode Operation
A. Pressing the “START” button, the motor will begin operation in the
speed of 1.0kmh after 3 seconds count wards.
B. Pressing the “Speed + -”can adjust the speed
C. Pressing the “incline+-”can adjust the incline.
D. Pressing the speed quick button can quickly adjust to the speed
which the button shows.
E. Pressing the incline quick button can adjust the incline which the
button show.
F. Pressing the “Stop” button, the motor will stop from operation.
G. When the setting time /calorie or distance descending to zero ,the
system will alarm in short ”BI-BI-BI” alarm sound , the speed will slow
down to stop, when the system alarm in long “BI-BI-BI” alarm sound,
the distance window display “END”, the system will return to standby
mode and the system will alarm in long “BI-BI”.
H. The unsetting parameter sum up and reset when exceeding the
biggest display scope. The machine will stop when the total time
over 99.59(100 minute) in manual mode
(4)Fixed program mode
1. The initial time setting are 10 minutes, in this mode , you can only set the
time , the scope is 5:00-99:00,pressting the “Speed+-/Incline +-”to adjust.
2. Pressing the “START” button, the motor begin the running, the speed
increase to the first level of speed in Auto mode (See the program
form)
16

3. Pressing the “Speed+-” to adjust the speed.
4. Pressing the “Incline+-”to adjust the incline.
5. Pressing the speed quick button can quickly adjust to the speed which
the button show.
6. Pressing the incline quick button can adjust the incline which the button
show.
7. Each program have 20 levels, the operation time is setting time per
level.
8. The system will alarm in “BI-BI-BI” when changing the level.
9. When the setting time descending to zero, the speed will slow down ,
the system will alarm in short “BI-BI-BI ”, When the speed slow down to
stop, the system alarm in long “BI-BI-BI” alarm sound , the speed window
display “END ”.The system return to standby mode after 5 seconds with
long “BI-BI” alarm sounds.
(5)Fixed program data:
Time Zone
Options
Set time /20 = Each segment of the running time
1 2 3 4 5 6 7 8 9 10 11 12 13 14 15 16 17 18 19 20
P01
SPEED 3 4 5 5 6 5 5 4 5 5 6 5 5 4 5 5 6 5 5 3
INCLINE 2 2 3 2 3 2 3 2 3 3 2 2 3 3 2 2 3 3 2 2
P02
SPEED 3 5 6 7 7 6 6 7 7 6 6 7 7 6 6 7 7 6 5 3
INCLINE 3 4 5 5 4 4 3 3 4 4 5 5 4 4 3 3 4 4 2 2
P03
SPEED 5 10 6 11 7 12 8 12 9 6 10 7 11 8 12 7 11 9 6 3
INCLINE 3 4 5 6 5 4 5 6 5 4 5 6 5 4 5 6 5 4 3 2
P04
SPEED 5 7 8 9 9 9 8 8 9 9 9 8 8 9 9 9 8 8 6 5
INCLINE 2 2 3 3 4 4 3 3 4 4 3 3 4 4 3 3 4 4 3 2
P05
SPEED 5 8 10 11 11 10 10 9 9 10 10 11 11 10 10 11 11 8 6 5
INCLINE 3 3 4 4 5 5 4 4 5 5 4 4 5 5 4 4 5 5 3 2
P06
SPEED 4 6 7 8 9 10 10 9 9 10 10 10 9 9 10 10 10 8 6 3
INCLINE 0 0 1 1 1 2 2 2 1 1 1 0 0 1 1 2 2 1 1 0
P07
SPEED 4 7 8 8 9 9 10 8 8 9 9 10 9 8 9 9 8 8 5 3
INCLINE 2 5 1 4 2 6 4 6 3 0 1 5 2 6 3 0 2 5 3 1
P08
SPEED 4 6 8 9 9 8 8 9 9 9 8 8 8 9 9 9 8 7 5 3
INCLINE 6 8 12 6 11 8 10 6 8 10 12 10 8 12 7 10 10 8 6 2
P09
SPEED 5 7 10 11 12 11 11 10 9 10 11 11 12 11 11 10 10 9 8 4
INCLINE 2 3 4 5 6 6 5 5 4 4 5 5 6 6 5 5 4 4 3 2
P10
SPEED 6 8 10 11 12 12 11 9 10 11 12 11 10 11 12 10 12 8 8 4
INCLINE 4 5 6 7 6 5 6 7 6 5 6 7 6 5 6 7 6 7 5 2
P11
SPEED 6 9 11 12 12 12 11 11 10 11 12 12 11 12 12 11 11 10 9 5
INCLINE 2 4 6 8 7 6 7 8 7 6 7 8 7 6 7 8 7 6 3 2
17

P12
SPEED 3 6 8 8 8 9 9 8 8 8 9 9 8 8 8 9 9 7 5 3
INCLINE 2 2 3 3 3 2 2 3 3 3 2 2 3 3 3 2 2 3 3 2
P13
SPEED 5 7 9 10 10 11 11 12 11 11 10 10 11 11 12 11 11 9 7 3
INCLINE 3 3 4 4 5 4 4 3 4 4 5 5 4 4 3 4 4 5 4 3
P14
SPEED 5 8 9 9 9 10 10 9 9 9 10 10 9 9 9 10 10 8 5 3
INCLINE 2 3 4 4 4 3 3 4 4 4 3 3 4 4 4 3 3 4 3 2
P15
SPEED 5 6 7 8 8 8 9 9 9 8 8 8 9 9 9 8 8 8 5 3
INCLINE 1 1 2 3 3 3 2 2 2 3 3 3 2 2 2 3 3 3 2 1
P16
SPEED 4 5 6 6 7 7 7 8 7 7 6 6 7 7 7 8 7 7 6 3
INCLINE 0 0 1 1 1 1 1 0 1 1 1 1 1 1 1 0 1 1 0 0
P17
SPEED 5 8 9 10 10 10 10 10 10 10 10 10 10 10 10 10 10 10 8 5
INCLINE 0 0 0 0 0 0 0 0 0 0 0 0 0 0 0 0 0 0 0 0
P18
SPEED 5 9 11 11 12 12 13 13 12 12 13 13 12 12 13 13 12 10 7 5
INCLINE 0 0 0 0 0 0 0 0 0 0 0 0 0 0 0 0 0 0 0 0
P19
SPEED 5 10 12 12 13 13 14 14 13 13 14 14 13 13 12 12 11 11 8 5
INCLINE 0 0 0 0 0 0 0 0 0 0 0 0 0 0 0 0 0 0 0 0
P20
SPEED 5 10 12 12 14 14 15 15 14 14 15 15 14 14 15 15 12 12 8 5
INCLINE 0 0 0 0 0 0 0 0 0 0 0 0 0 0 0 0 0 0 0 0
(6)USER PROFILE PROGRAMS:
There are 3 user profile programs(U01,U02 and U03) to allow the user
Set up besides 20 built-in programs,
a) Setup of user programs:
In the standby status, keep pressing PROG” to select the user profile
programs U01 to U03, then press “MODE” to confirm your choice and
enter into the first time setting window. Press “SPEED +” , “SPEED -” or
Speed accelerator key to set up the desired speed and press
“INCLINE+”, “INCLINE -” to set up the desired incline, then press “MODE”
to confirm the setup of first setting window and enter into the second
time setting window until all of the 20 times completely set. If this is set,
even interruption of power supply cannot delete the data until you
reset it next time
b) Start of user programs:
i. In the standby status, keep pressing PROG” to select the user profile
programs U01 to U03, press “START” after finished set up of exercising
time.
ii. Press “START” to start after finished the setup of user programs and
exercising time.
18

c) Setup instructions of user programs:
Every programs has 20 exercising times on average, you have to finish
all the setup of speed, incline and exercising time for all 20 times , finally
you can press “START” to start the treadmill.
(7)HEART RATE CONTROL(HRC) PROGRAM:
In the standby status, press “PROG” to select HP1 or HP2, then press
“MODE” to set up your age or target heart rate, the adjusting range as
following table.
Age Heart Rate Age Heart Rate Age
Default
Heart Rate
Min Default Max Min Default Min Max Default Min
15 123 123 195
37 110 110 174 59 97 97 153
16 122 122 194
38 109 109 173 60 96 96 152
17 122 122 193
39 109 109 172 61 95 95 151
18 121 121 192
40 108 108 171 62 95 95 150
19 121 121 191
41 107 107 170 63 94 94 149
20 120 120 190
42 107 107 169 64 94 94 148
21 119 119 189
43 106 106 168 65 93 93 147
22 119 119 188
44 106 106 167 66 92 92 146
23 118 118 187
45 105 105 166 67 92 92 145
24 118 118 186
46 104 104 165 68 91 91 144
25 117 117 185
47 103 103 164 69 91 91 143
26 116 116 184
48 103 103 163 70 90 90 143
27 116 116 183
49 103 103 162 71 89 90 142
28 115 115 182
50 102 102 162 72 89 90 141
29 115 115 181
51 101 101 161 73 88 90 140
30 114 114 181 52 101 101 160 74 88 90 139
31 113 113 180 53 100 100 159 75 87 90 138
32 113 113 179 54 100 100 158 76 86 90 137
33 112 112 178 55 99 99 157 77 86 90 136
34 112 112 177 56 98 98 156 78 85 90 135
35 111 111 176 57 98 98 155 79 85 90 134
36 110 110 175 58 97 97 154 80 84 90 133
1. Under HRC program control mode,the treadmill will start with the
lowest speed and zero incline.
2. The first 1 minute of the program will be warm-up,you could manually
adjust speed and incline.
3. After warm-up,the difference of hand pulse is calculated as the
formula(target hand pulse-hand pulse of user):
A. When (target hand pulse-hand pulse of user)>0,the speed would
19
Table of contents


