Sportsman ALBLFT User manual

ITEM # ALBLFT
ALUMINUM BIKE LIFT
DO NOT OVERLOAD! Max Weight Capacity is 44 lbs.
WARNING
IF THERE IS ANY QUESTION ABOUT A CONDITION BEING SAFE OR
UNSAFE, DO NOT USE THIS PRODUCT!
If you experience a problem, have questions or need parts for this product,
call Customer Service at 1-636-532-9888, Monday - Friday, 8 AM - 4 PM
Central Time. A copy of the sales receipt is required. KEEP THIS MANUAL,
SALES RECEIPT & APPLICABLE WARRANTY FOR FUTURE
REFERENCE.
B1
B2
ASSEMBLY INSTRUCTIONS
The proper use of this product is dependent on your compliance with the instruction in the installation
and owner’s Manual such as, but not limited to, installation, utilization, loading and care. Failure to
comply strictly with those instructions will void this limited warranty in its entirety.
Manufacturer is not responsible for injury or damage that results from faulty installation, overloading beyond the
weight restriction and/or improper use.
1. Locate ceiling studs. The rail can be mounted on one stud parallel or across two or three studs perpendicular. There
are pre-drilled holes in the rail with 16" or 24' on center spacing for perpendicular installation across studs. Do not install
in the path of the garage door.
2. Secure the rail to the studs with deck screws provided. A minimum of 2 screws is required. Use 3 screws if possible.
If mounting parallel on one stud, place one screw towards each end of the rail and a third in the middle.
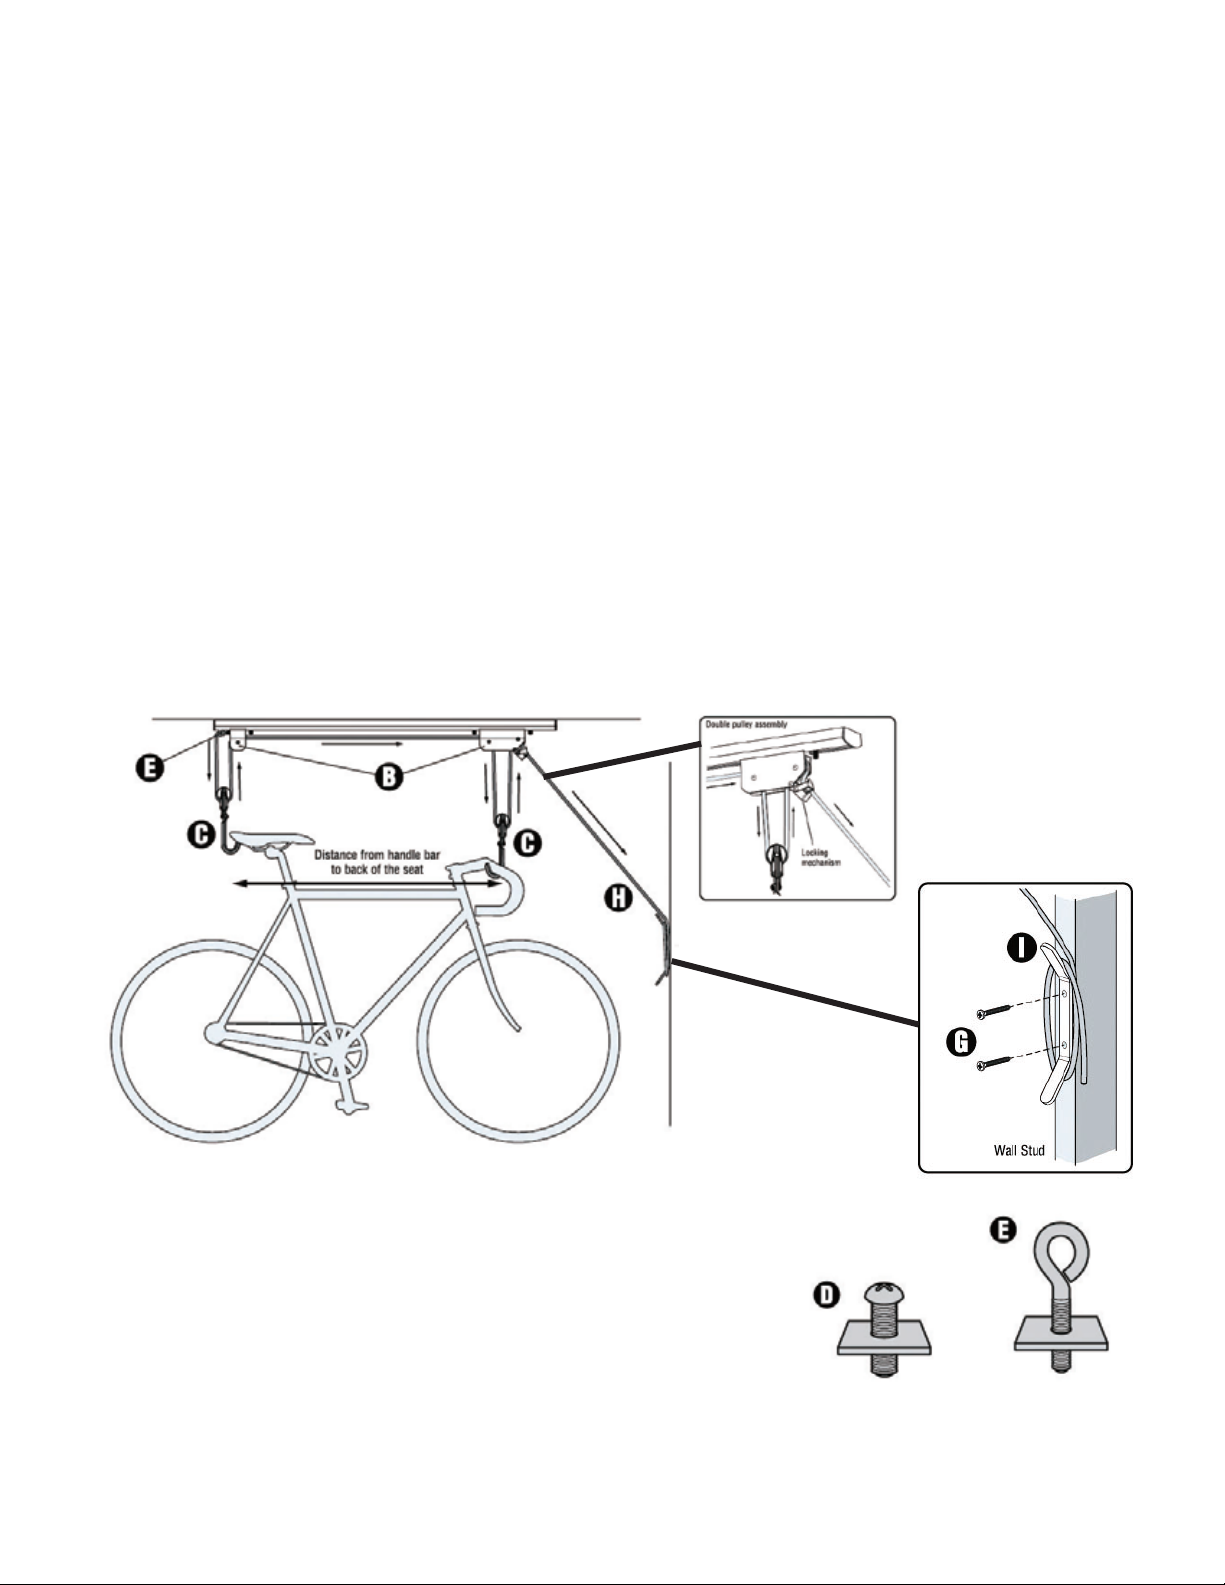
3. Slide two pu lley stop blocks (D) onto the rail.
4. Slide each pulley assembly (B) onto the rail from opposite sides as shown. Mount the locking mechanism facing
towards end of rail as shown.
5. Slide the two remaining pulley stop blocks onto each end. Slide the pulley stop block with loop (E) onto the side with
the single pulley.
6. Attach the end caps to the rail.
7. Tie one end of the rope (H) to the stop block with loop (E). Thread the rope through the hooks (C) and pulley
assemblies (B) as shown.
Be sure to thread the rope down through both sections of the locking mechanism on the double pulley assembly.
8. Measure the distance from the bike's handle bar to the back of the seat. Use this measurement to approximate
the distance between the hooks.
9. Position the pulley assemblies so that the distance between the hooks is approximately
the same as the distance between the bike's handle bar and back of the seat.
10. Once the pulley assemblies are in correct position, tighten all four
stop blocks to prevent movement of the pulley assemblies.
11. Attach the rope cleat (I) to the wall with the deck screws (G)
provided. Store excess rope on the cleat. DO NOT CUT THE EXCESS ROPE.
12. Attach the hooks to the bike handle bars and behind the seat.
13. Raise bike by pulling the rope.
14. To lower the bike, pu ll the rope back towards the center of the bike
then slowly let the rope out while maintaining tension on it.
Table of contents
Popular Lifting System manuals by other brands


probst
probst AKZ-UNI-H operating instructions

Savaria
Savaria V1504 owner's manual

Challenger Lifts
Challenger Lifts EnviroLift EW1020 Installation, operation & maintenance manual

TMG
TMG ALPHA 3.5 Instructions and operating manual

Handicare
Handicare SystemRoMedic BariVest XXXL manual

Roughneck
Roughneck 1000-LB owner's manual