SPORTSPOWER MSC-3788-5S-BM User manual

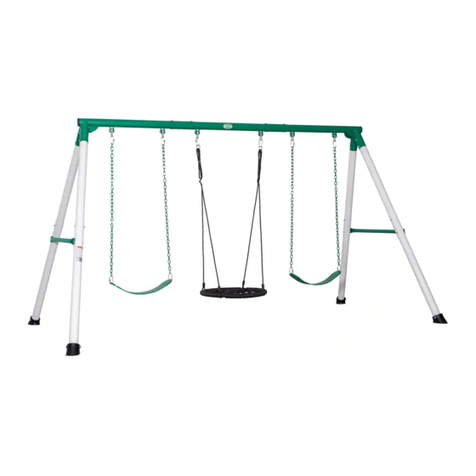
6 STATION SWING SET
MODEL # MSC-3788-5S-BM
OWNER’S MANUAL
ASSEMBLY INSTRUCTION, CARE, MAINTENANCE AND USER’S GUIDE
FOR RESIDENTIALUSEONLY
For Customer Serv ce, please call 1-866-370-2131 or v s t www.sportspowerltd.net
Monday – Fr day 9:00 AM – 5:00 PM Eastern T me
Sportspower Ltd.
Leve 20, Parkview Centre, 7 Lau Li Street, Causeway Bay, Hong Kong
Corporate Office 1-800-497-6106
WARNI
NG
This product is designed to be used simu taneous y by up to 6 chi dren between the ages 3 to 8.
Maximum weight of each user is 100 bs(45kg). Combined weight of a users must not exceed
600 bs(272kg).
Carefu y read this entire instruction manua before you start to assemb e or use this swing set.
You must fo ow a instructions and warnings whi e using this equipment.
Constant adu t supervision is required during use.
Do not use this swing set on hard packed soi , concrete, or any kind of hard surface.
This equipment must be anchored (anchors not inc uded). You shou d consu t your oca
contractor regarding the best way to anchor the product in your ocation of insta ation.
Assemb y requires at east two adu ts.
Save th s nstruct on manual for future reference

2
INTRODUCTION
Dear Va ued Customer,
Congratu ations on your Sportspower p ay set purchase! P ease read and comp ete y understand the
contents of this owner’s manua . This manua contains specific instructions and warnings that must be
fo owed to prevent injuries.
This p ay set is for residentia use on y. This p ay set is NOT intended for pub ic or commercia use.
The warranty wi be voided if the p ay set is used in a commercia app ication.
The product is designed for chi dren between ages 3 to 8. Chi dren must NOT p ay on this set unti it is
proper y assemb ed and inspected by an adu t. Adu t supervision is required at a times whi e chi dren are
p aying on the equipment. Do not a ow chi dren under six (6) years o d to be near during the assemb y of
this product due to choking hazards of sma parts.
The equipment must be insta ed on eve ground. Uneven ground must be eve ed prior to insta ation.
Insta ation on s oping or uneven ground wi put stress on the joints, causing the unit to become oose and
unstab e which may resu t in serious injuries. You must ensure there are no obstructions or structures (e.g.
e ectrica wires, branches, house, fence, garage, etc) within six (6) feet from the equipment.
The Consumer Product Safety Commission’s Outdoor Home P ayground Safety Handbook recommend to
insta and maintain the p ayground equipment over at east 9 inches of wood chips, mu ch or shredded
rubber (for equipment up to 8 feet high) or sand or pea grave (for equipment no more than 5 feet high) as
shock absorbing materia . Dirt and grass, which are the most preva ent surfaces under home p ayground
equipment, do not adequate y protect chi dren from serious head injuries. Insta protective surfacing at
east six feet in a directions from p ay equipment. For swings, the surface shou d extend, in back and front,
twice the height of the suspending bar. Do not insta your p ay set over hard surface, e.g. aspha t, concrete,
packed earth, ti e or brick f oor. We recommend that you refer to the CONSUMER PRODUCT SAFETY
COMMISSION’S OUTDOOR HOME PLAYGROUND SAFETY HANDBOOK, extracts of which are
contained in this manua for reference.
Do not a ow chi dren to use the product during windy or wet weather conditions. You shou d consu t a
oca icensed contractor about ways to anchor the product in your ocation.
The equipment must be checked before each use and maintained regu ar y. This inc udes, but is not
imited to inspecting the p ay set for cracks, excess wear, missing parts, oose connections and for overa
integrity. When the equipment shows any signs of weakness or damage, you must stop using the p ay set
immediate y, proper y store away the set or restrict access by users unti the condition is reso ved.
Sportspower warrants ts products aga nst defects n mater al and workmansh p. Extended
warranty s also offered to those customers reg ster ng the r products at www.sportspowerltd.net
w th n 14 days from the date of purchase. Please refer to our warranty pol cy at the back of th s
manual for deta ls.
DO NOT RETURN PRODUCT TO THE STORE. FOR CUSTOMER SERVICE OR REPLACEMENT
PARTS, PLEASE CALL 1-866-370-2131 or VISIT WWW.SPORTSPOWERLTD.NET.
3
TABLE OF CONTENTS
IMPORTANT INSTRUCTIONS AND WARNINGS ................................................................................................................ 4
IMPORTANT CONSUMER INFORMATION SHEET ............................................................................................................ 8
ANCHORING............................................................................................................................................................................ 9
CARE AND MAINTENANCE CHECKLIST ......................................................................................................................... 11
TOOLS NEEDED ................................................................................................................................................................... 12
PARTS LIST ........................................................................................................................................................................... 13
ASSEMBLY AND INSTALLATION INSTRUCTIONS ........................................................................................................ 18
AREA
OF
INSTALLATION
-
SWING
SET
TOP
BAR ........................................................................................................... 18
AREA
OF
INSTALLATION
-
UPPER
SIDE
LEGS ................................................................................................................ 19
AREA
OF
INSTALLATION
-
LOWER
SIDE
LEGS............................................................................................................... 20
AREA
OF
INSTALLATION
-
CROSS
BARS ......................................................................................................................... 21
AREA
OF
INSTALLATION
–
SWING
SEAT ......................................................................................................................... 22
AREA
OF
INSTALLATION
-
TRAPEZE ................................................................................................................................. 23
AREA
OF
INSTALLATION
-
GLIDE
RIDE ............................................................................................................................. 24
AREA
OF
INSTALLATION
-
SLIDE ....................................................................................................................................... 27
MANUFACTURER’S LIMITED WARRANTY ...................................................................................................................... 33

4
IMPORTANT INSTRUCTIONS AND WARNINGS
WARNING
READ ALL INSTRUCTIONS BEFORE ASSEMBLING OR USING THIS EQUIPMENT
AGE LIMIT
This product is designed to be used by up to six(6) chi dren between the ages of 3 to 8. Maximum user
weight is 100 pounds (45kg). Combined maximum weight is 600 pounds (272kg).
The p ay set is designed for chi dren over three (3) years o d. Use by sma er chi dren can resu t in
entrapment.
On-site adu t supervision is required at a times for chi dren of a ages.
Do not a ow use by chi dren with any physica condition that may affect his/her abi ity to use this
equipment safe y.
BEFORE YOU BEGIN
Carefu y read a instructions in this manua before assemb ing and using this product.
The unit must be assemb ed by at east 2 adu ts. Heavy duty working g oves must be worn to avoid
injuries during assemb y.
Chi dren must not use the equipment unti it is proper y assemb ed and anchored.
Adu t supervision is required during the use of this equipment at a times.
Unpack a parts. Take a comp ete inventory of a parts and hardware using the parts and hardware ists
in the fo owing pages. If any parts are missing, do not return to the store. P ease ca customer service
to -free number isted on the cover page for assistance. Store the product back in the origina box and
do not begin to insta unti a parts are obtained.
LOCATION OF PLAY SET
The equipment must be p aced more than six(6) feet(1.8 meter) from any structures or obstructions,
inc uding but not imited to bui dings, fence, garage, trees, aundry ines, e ectrica wires. Chi dren can be
serious y injured running or swinging into obstac es.
The p ay set must be insta ed on eve ground. Uneven ground must be eve ed prior to insta ation.
Insta ation on s oping or uneven ground wi put stress on the joints, causing the unit to become oose
and unstab e which may resu t in serious injuries.
Remove any tripping hazards from the safe p ay area, such as roots, tree stumps, rocks, andscaping,
sprink er heads, rai road ties, p umbing and e ectrica connections.

5
Do not nstall your play set over hard surface, e.g. asphalt, concrete, packed earth, t le or br ck
floor. A fall onto a hard surface can result n ser ous njury or death to the user. The fo owing is a
ist of recommended ground covers from the Consumer Product Safety Commission:
SUGGESTED MATERIAL
Doub e Shredded Bark Mu ch
Uniform Wood Chips
Fine Grave
Fine Sand
UNCOMPRESSED DEPTH
9”
12”
12”
12”
The Consumer Product Safety Commission’s Outdoor Home P ayground Safety Handbook recommend to
insta and maintain the p ayground equipment over at east 9 inches of wood chips, mu ch or shredded
rubber (for equipment up to 8 feet high) or sand or pea grave (for equipment no more than 5 feet high) as
shock absorbing materia . Dirt and grass, which are the most preva ent surfaces under home p ayground
equipment, do not adequate y protect chi dren from serious head injuries. Insta protective surfacing at east
six feet in a directions from p ay equipment. For swings, the surface shou d extend, in back and front, twice
the height of the suspending bar. You shou d consu t a oca contractor about ways to secure the product in
your ocation. Do not insta your p ay set over hard surface, e.g. aspha t, concrete, packed earth, ti e or brick
f oor. P ease refer to the CONSUMER PRODUCT SAFETY COMMISSION’S OUTDOOR HOME
PLAYGROUND SAFETY HANDBOOK for detai ed guide ines to prevent injuries from fa s and other
hazards on pub ic and home p aygrounds.
WARNINGS ON ANCHORING
It is high y recommended the product be anchored into the ground to prevent movement and to make the
swing set more stab e during use.
Some consumers want an anchoring system that a ows the product to be moved to different ocations.
Other consumers want to keep their swing set in a permanent ocation.
There are different types and different methods of anchoring this product. Sportspower does not make a
specific anchoring recommendation as each consumer’s need and conditions can vary.
It is high y recommended that you seek the opinion from a oca icensed contractor on the best way to
secure the swing set in your ocation. The best way to anchor a product is to create a concrete footing and
use that as a base for an anchor. Whatever method you prefer for your ocation, an anchoring system for this
product shou d be used at a times.
WEATHER CONDITIONS
DO NOT use this equipment if the swing seat, s ide or other parts are wet. Use the p ay set on y when
the parts are c ean and dry. If the equipment is wet, the user cou d s ip and suffer injuries.
P ease be aware of weather conditions when using the equipment. If it is too windy, users cou d ose
contro and suffer injuries. The p ayground equipment must be proper y anchored, stored away or
restricted from use during inc ement weather such as heavy winds or severe weather storms. You
shou d consu t a oca contractor about ways to anchor the product in your ocation.

6
PLAY SUPERVISION
Observing the fo owing statements and warnings reduces the ike ihood of serious or fata injury.
DO NOT a ow more than one chi d to p ay on the individua swing, trapeze or s ide component at the
same time. The maximum user imit for the g ide ride is two persons.
DO NOT a ow chi dren to stand on any of the seats or rides.
DO NOT a ow chi dren to wa k too c ose to moving parts. ALWAYS keep a safe distance to avoid being
struck by other chi dren whi e p aying on swings, s ides, etc.
DO NOT a ow chi dren to twist the swing chains or ropes, or oop them over the top support bar as this
may reduce the strength of the chain or rope. The owner must verify that suspended c imbing ropes,
chain, or cab e cannot be ooped back on itse f.
DO NOT swing empty seats as this may cause injuries.
ALWAYS guide chi dren to sit in the center of swinging parts, with their fu weight p aced in the seat
center and ho ding on to the swing chains.
DO NOT a ow chi dren to jump off the equipment whi e it is in motion. ALWAYS come to a fu stop
before dismounting.
ALWAYS dress chi dren appropriate y for proper p ay, e.g. wear we -fitted rubber so e shoes, and
remove oose or sharp items such as jewe ry, hair accessories, scarves which may become entang ed in
the equipment or cause injuries.
ALWAYS make sure chi dren remove their bike or other sports he mets before p aying on the
p ayground.
DO NOT a ow chi dren to s ide down the s ide head first.
DO NOT a ow chi dren to c imb onto swing or jump to/from different p ay areas of the equipment.
ALWAYS return safe y to the ground before approaching another p ay area.
DO NOT a ow chi dren to c imb on structura parts (e.g. egs, top bar). These are structura components
and are not designed for p ay.
ALWAYS check the s ide or other parts exposed to the body for extreme heat from the sun before
a owing chi dren to use the equipment.
ALWAYS prevent access and secure from any unauthorized use when there is no adu t supervision.
DO NOT a ow pets or other anima s near the equipment to prevent damage or injuries.
DO NOT a ow chi dren to p ay or jump on the product when it is windy or during tornado season or
warning. Wind can ift up this equipment and cause serious injury or death.

7
INSPECTION PRIOR TO EACH USE OR DAILY INSPECTION
DO NOT use the equipment if any bo ts or nuts are missing or oose. ALWAYS check to ensure the
equipment and a parts are we secured and stab e before each use.
ALWAYS c ear the p ay area of any rocks, sharp objects, or any materia s that cou d be potentia y
hazardous to users.
DO NOT attach items to the equipment that are not specifica y designed for use with the equipment,
inc uding, but not imited to, jump ropes, c othes ine, pet eashes, cab es and chains as they may cause
choke hazards.
The stee and p astic parts used in your product are subject to norma wear. Gradua deterioration of
the materia wi occur, the speed of which wi depend on the eve of exposure to UV rays, airborne
po ution, outdoor weather conditions such as rain and wind and the amount of use. You must inspect
the equipment prior to every use. This inc udes, but is not imited to inspecting the set for cracks,
excess wear, missing parts, oose connections, and for overa integrity. When the set shows any signs
of weakness, you must stop using the p ay set immediate y, proper y store the set or restrict access by
users unti the condition is reso ved.
Verify that the suspended c imbing ropes, chain or cab e are secured at both ends and tightened, so that
there is no oose ropes, chain or cab e hanging that can resu t in choking hazard.
When conduct ng nspect ons, t s recommended that you use the Suggested General Ma ntenance
Checkl st and Rout ne Inspect on and Ma ntenance Issues checkl sts prov ded by the US Consumer
Product Safety Comm ss on, cop es of wh ch are conta ned n the user manual.
CARE AND MAINTENANCE INSTRUCTIONS
Inspect a nuts and bo ts twice month y during the usage season for tightness and tighten as required. It
is particu ar y important that this procedure is fo owed at the beginning of each season.
Oi a meta ic moving parts month y during the usage period.
Sand rusted areas on meta tubing and repaint using a non ead-based paint meeting the requirements
of Tit e 16 CFR Part 1303.
Check swing seats, ropes, cab es and chains month y during usage season for deterioration.
Rep acements shou d be made in accordance with the manufacturer’s instructions.
Check a coverings for bo ts and sharp edges twice month y during usage season to be certain that they
are in p ace and rep ace when necessary. It is especia y important to do this at the beginning of each
new season.
Do not use when the temperature drops be ow 32 degrees F (0 degrees C); remove and store the
p astic swing seats and s ides indoors.
Owners sha be responsib e for maintaining the egibi ity of the warning abe s.

8
IMPORTANT CONSUMER INFORMATION SHEET
The Consumer Product Safety Commission estimates there are more than 200,000 p ayground re ated
injuries invo ving chi dren each year. Injuries invo ving this hazard pattern tend to be among the most
serious of a p ayground injuries and have the potentia to be fata , particu ar y when the injury is to the head.
The surface under and around p ayground equipment can be a major factor in determining the injury-causing
potentia of a fa . It is se f evident that a fa onto a shock absorbing surface is ess ike y to cause a serious
injury than a fa onto a hard surface. P ayground equipment shou d never be p aced on hard surfaces such
as concrete or aspha t and whi e grass may appear to be acceptab e it may quick y turn to hard packed earth
in areas of high traffic. Shredded bark, mu ch, wood chips, fine sand or fine grave are considered to be
acceptab e shock absorbing surface when insta ed and maintained at a sufficient depth under and around
p ayground equipment.
Tab e be ow ists the maximum height from which a chi d wou d not be expected to sustain a ife-threatening
head injury in a fa onto four different oose-fi surfacing materia s if they are insta ed and maintained at
depths of 6” (15.25CM), 9” (22.9CM), and 12” (30.5CM).
However,it shou d be recognized that a injuries due to fa s cannot be prevented no matter what surfacing
materia is used.
We recommend that a shock absorbing materia shou d extend a minimum of 6ft in a directions from the
perimeter of stationary equipment such as c imbers and s ides. However, because chi dren may
de iberate y jump from a moving swing, the shock absorbing materia shou d extend in the front and rear of a
swing a minimum distance of 2 times the height of the pivot point measured from a point direct y beneath the
pivot on the supporting structure.
This information is intended to assist in comparing the re ative shock-absorbing properties of various
materia s. No particu ar materia is recommended over another. However, each materia is on y effective
when Proper y maintained. Materia s shou d be checked periodica y and rep enished to maintain correct
depth as determined necessary for your equipment. The choice of a materia depends on the type and
height of the p ayground equipment, the avai abi ity of the materia in your area and its cost.
Note: The maximum fa height for this product is 6 feet. The minimum ground C earance between the
bottom of the suspended p ays and the p aying or ground service must be 8 inches.
This information has been extracted from the CPSC pub ication on" P ayground Safety". You can obtain
more information by sending a postcard to the: Office of pub ic Affairs, U.S. Consumer Product Safety
Commission, Washington, D.C.20207
8

9
ANCHORING
(NOTE: ANCHORS NOT INCLUDED - MUST BE PURCHASED SEPARATELY)
There are different ways of anchoring the equipment, depending on the type of ground on which the
equipment is to be insta ed. Make sure that a anchors are be ow ground eve to prevent tripping.
You shou d consu t your oca icensed contractor to decide the most appropriate way to anchor the
equipment in your ocation.
The follow ng anchor ng opt ons may be cons dered:
Corkscrew Anchoring (Anchors not inc uded)
If your soi is hard (c ay, etc.), the corkscrew method may be suitab e.
Be sure that the swing set is ocated on eve ground.
Twist the corkscrew anchor into the ground unti on y the end with the hook is above the ground and
next to the eg. Insert the hook into the bottom opening of the eg.
Ensure that the hook is secured onto the eg opening.
Concrete Anchoring (Materia s not inc uded)
If the swing set is set up on grounds with sandy soi (soft) condition, it must be anchored with concrete
footing
Be sure that the swing set is assemb ed and p aced on eve ground
Dig ho es around swing eg tube, as shown in drawing in the next page. As you dig deeper, en arge the
diameter of the ho e to fix the cement
P ace 2 inches of brick or grave underneath the eg, as shown in drawing in the next page
Use about 45 bs. of concrete per eg
Cover the concrete with dirt and protective surface materia
A ow 6-7 days for the concrete to dry proper y.
The above nformat on s prov ded for reference only and s not necessar ly the best way to anchor
for your part cular locat on. You should consult your local l censed contractor to dec de the most
appropr ate way to anchor the equ pment n your locat on.

10
Note: The max mum fall he ght for th s product s 6 feet. The m n mum ground
clearance between the bottom of the suspended plays and the play ng or
ground surface must be 8 nches.
You must ma nta n a m n mum of 8 nches of ground clearance.
WARNING
Please properly anchor the sw ng set to m n m ze the r sk of njury or death.
If the sw ng set s used w thout proper anchor ng, t may be dangerous and
may t lt over.
A5
FRAME LEG
CONCERETE
BRICK OR GRAVEL BED
2”
12-5/8”
5”

11
CARE AND MAINTENANCE CHECKLIST
AT THE BEGINNING OF EACH PLAY SEASON:
Tighten a hardware.
Lubricate a meta ic moving parts per manufacturer’s instructions.
Check a protective coverings on bo ts, pipes, edges, and corners. Rep ace if they are oose, cracked,
or missing.
Check a moving parts inc uding swing seats, ropes, cab es and chains for wear, rust or other
deterioration. Rep ace as needed.
Check meta parts for rust. If found, sand and repaint using a non- ead paint meeting the requirements
of 16 CFR 1303.
Reinsta any p astic parts, such as swing seats or any other items that were removed for the co d
season.
Rake and check depth of oose fi protective surfacing materia s to prevent compaction and to maintain
appropriate depth. Rep ace as needed.
TWICE A MONTH DURING PLAY SEASON:
Tighten a hardware.
Check a protective coverings on bo ts, pipes, edges and corners. Rep ace if they are oose, cracked or
missing.
Rake and check depth of oose fi protective surfacing materia s to prevent compaction and to
maintain appropriate depth. Rep ace as needed.
ONCE A MONTH DURING PLAY SEASON:
Lubricate a meta ic moving parts per manufacturer’s instructions.
Check a moving parts inc uding swing seats, ropes, cab es and chains for wear, rust or other
deterioration. Rep ace as needed.
Rake and check depth of oose fi protective surfacing materia s to prevent compaction and to maintain
appropriate depth. Rep ace as needed.
AT THE END OF EACH PLAY SEASON:
At the end of each p ay season or when the temperature drops be ow 32 degrees F (0 degrees C).
Remove p astic swing seats and other items as specified by the manufacturer and take indoors or do not
use.
Rake and check depth of oose fi protective surfacing materia s to prevent compaction and to maintain
appropriate depth. Rep ace as needed.
As a genera ru e, maintenance shou d be performed at any time it is deemed necessary.
DISPOSAL INSTRUCTIONS
P ease use care when disassemb ing the equipment, when it is no onger in operationa condition. Wear
heavy duty working g oves to avoid injuries.
Fu y disassemb e the entire swing and s ide sets before disposa . Do not eave partia y disassemb ed
parts in areas accessib e by chi dren.
Shou d you wish to recyc e the stee tubing, p ease take the frame to your oca recyc ing center.
A p astic parts can be recyc ed, take it to your oca recyc ing center. Do not et chi dren p ay with any
disassemb ed parts meant for disposa , such as chains, s ide, tubing, bo ts, nuts, screws, etc.

12
A rusted parts, bo ts must be proper y disposed of in trash bin. Do not reuse.
TOOLS NEEDED
Please prepare the follow ng tools pr or to assembl ng th s equ pment.
Hammer
(May be needed for insta ing anchor)
(Not inc uded)
Wrench (Inc uded)
Big A en wrench (Inc uded)
Wrench (inc uded)
Sma A en wrench (Inc uded)
Specia So
cket Wrench (I
nc uded)
T
ape Measure (
Not inc uded)
F at head and Phi ips head screwdriver
(Not inc uded)

13
PARTS LIST
Parts L st for Ma n Frame
Hardware used for Ma n Frame
Parts L st for Trapeze
Part No.
P cture Descr pt on Quant ty
A1 TOP BAR - SHORT 1
A2 TOP BAR - MIDDLE 1
A3 TOP BAR - LONG 1
C2 END CAP (PRE-ASSEMBLED) 2
A4 UPPER LEG 4
A5 LOWER LEG 4
A6 CROSS BAR 1
A7 CROSS BAR– WITH TWO HOLES FOR
CONNECTING SLIDE 1
Part No.
P cture Descr pt on Quant ty
B1 BOLT5/16" x 2.52" (8mm x 64mm) 20
B3 NYLON NUT 5/16’’ (8mm) 20
B4 PLASTIC CAP (WITH ARC WASHER) 20
B5 ARC WASHER 5/16’’ (8mm) 16
B6 WASHER 5/16’’ (8mm) 4
Part No.
P cture Descr pt on Quant ty
P1
TRAPEZE 1
P2 EYE- BOLT (PRE-ASSEMBLED) 2
P3 RUBBER CAP (PRE-ASSEMBLED) 2
P4 NYLON NUT 5/16" (8mm) 2

14
Parts L st for Sw ng Seat
Hardware used for Sw ng Seat
Parts L st for Gl de R de
P5
PLASTIC CAP
(CURVED FOR ARC WASHER) 2
Part No.
P cture Descr pt on Quant ty
J1 SWING CHAIN 4
J2
EYE-BOLT
(PRE-ASSEMBLED TO SWING CHAIN)
8
J3 SWING SEAT 2
Part No.
P cture Descr pt on Quant ty
J4 NYLON NUT 5/16" (8mm) 8
J5 LARGE WASHER 4
J6
PLASTIC CAP
(CURVED FOR ARC WASHER) 4
J7
PLASTIC CAP
(FLAT FOR LARGE WASHER) 4
Part No.
P cture Descr pt on Quant ty
L1-N TOP SECTION HANGER 2
L2-N GLIDE SEAT SUPPORT 2
M1 TUBE CAP (PRE-ASSEMBLED) 2
M2 SMALL NYLON BEARING
(PRE-ASSEMBLED) 2
M3 LARGE BEARING 4
M4 GLIDE SEAT 2
M5 FOOTREST 2
L3 BRACKET 1
L4 BRACKET CLAMP 1
L5 REINFORCING STEEL SPACER 2

15
Hardware used for Gl de R de
Parts used for Sl de
N3 BOLT 5/16" x 1" (8mm x 25mm) 2
N10 NYLON NUT 5/16" (8mm) 2
N1 BOLT 1/4" x 1.46" (6mm x 37mm) 4
N2 BOLT 1/4"x 1.7" (6mm x 43mm) 2
N4 SCREW 1/4" x 0.73" (5.4mm x 18.5mm)
4
N5
J-BOLT 2
N6 SPRING WASHER (MEDIUM) 4
N7 NUT 1/4" (6mm) 2
N8 CAP BOLT 1/4" x 0.55" (6mm x 14mm)
2
N9 CAP NUT 1/4" (6mm) 4
N11 SPRING WASHER (LARGE) 2
N12 WASHER (SMALL) 4
Part No.
P cture Descr pt on Quant ty
X1-N SLIDE SUPPORT (WITH OPENING) 1
X2-N SLIDE SUPPORT 1
X3-N SLIDE LEG TUBE 2
X4-N SLIDE TOP SUPPORT BAR 1
X5-N SLIDE FRONT SUPPORT 1
X6
SLIDE LADDER STEPS 2
Y2
SLIDE 1

16
Hardware used for Sl de
Part No.
P cture Descr pt on Quant ty
Y1 PLASTIC CONNECTOR 2
Z1 BOLT 1/4"x38mm 2
Z2 BOLT 1/4"x115mm 2
Z3 SPRING WASHER(LARGE) 4
Z4 CAP NUT 1/4" 10
Z5 CAP BOLT 1/4"x14mm 4
Z6 SPRING WASHER (MEDIUM) 20
Z7 BOLT 1/4"x75mm 2
Z8 BOLT 1/4"x35mm 4
Z9 BOLT 1/4"x60mm 4

17
ASSEMBLY INSTRUCTIONS
Place the playground equ pment on level ground and not less than 6ft(1.8m) from any
structure or obstruct on such as a fence, garage, house, overhang ng branches,
laundry l ne, or electr cal w res.
Do not nstall the playground equ pment over concrete, asphalt, packed earth, or any
other hard surface; a fall onto a hard surface can result n ser ous njury or death to
the equ pment user.
TIGHTENING NUTS & BOLTS
For ease of nstallat on, do not over-t ghten the nuts and bolts n t ally when you are
start ng to assemble the equ pment. Th s w ll allow for adjustments dur ng nstallat on.
After you have f n shed assembl ng the ma n components of the play set, go back and
fully t ghten all nuts and bolts and close all plast c caps. Check the ent re un t and
make sure all parts are properly assembled before allow ng ch ldren to use the
playground equ pment.

18
ASSEMBLY AND INSTALLATION INSTRUCTIONS
AREA OF INSTALLATION- SWING SET TOP BAR
Step 1– Assemble the top bar frame of the sw ng set
Connect Top Bars A1, A2 and A3 together and secure with B1, B5, B4 and B3 as shown in the
en arged diagram. On A2, make sure the round ho e is facing up and concave ho e is facing
down.
NOTE: For eas er assembly, do not t ghten the bolts all the way n t ally to allow room for
adjustment. You must go back and fully t ghten all bolts and close the plast c caps after the
ent re sw ng set s assembled.

19
AREA OF INSTALLATION- UPPER SIDE LEGS
Step 2– Assemble the support legs of sw ng set
Insert A4 into the sockets on A1. A ign ho es and secure with B1, B5, B4 and B3 as shown in the
en arged diagram. Repeat in the same manner for A3A.

20
AREA OF INSTALLATION- LOWER SIDE LEGS
Step 3– Assemble the support legs of sw ng set
Connect A5 to A4. A ign ho es and secure with B1, B5, B4 and B3 as shown.
Table of contents
Other SPORTSPOWER Swing Set manuals
Popular Swing Set manuals by other brands

Cedar Summit
Cedar Summit F25668 Installation and operating instructions

Elvox
Elvox RS07 Installation and operation manual

Trigano
Trigano TOPWOOD Series Assembling instructions

Huck
Huck Honeycomb nest Assembly instructions

Weka
Weka 816.2002.00.00 ASSEMBLY, USER AND MAINTENANCE INSTRUCTIONS

Backyard Discovery
Backyard Discovery 55006 owner's manual