Springs Window Fashions RTS Motorized Shade User manual
Owner’s Manual
RTS Motorized Shades

2
Table of Contents
About Your Motorized Shade .............................................................................................3
Basic Shade Control..................................................................................................3
Control Features .......................................................................................................4
Shade Adjustments ............................................................................................................. 5
Adjusting Your Shade’s Default Upper Limit ............................................................5
Adjusting Your Shade’s Default Lower Limit ............................................................6
Adjusting Your Shade’s “MY” Position ..................................................................... 7
Adding Additional Controls ................................................................................................8
The Copy & Paste Sequence .................................................................................... 8
Adding a Control or Channel....................................................................................9
Deleting a Control or Channel................................................................................ 10
Creating Group Control.......................................................................................... 11
Pair a New Remote to Simple Motorized Shade .............................................................. 12
Rechargeable Motor Sleep Mode..................................................................................... 13
Activating and Deactivating Sleep Mode...............................................................13
Shade Adjustments on Rechargeable Motor....................................................................14
Adjusting Your Shade’s Default Upper Limit ..........................................................15
Adjusting Your Shade’s Default Lower Limit ..........................................................16
Adjusting Your Shade’s “MY” Position ................................................................... 16
Rechargeable Motor Control Options .............................................................................. 17
Adding a Control or Channel..................................................................................17
Deleting a Control or Channel................................................................................ 18
Creating Group Control.......................................................................................... 19
Helpful Tips and FAQs ................................................................................................ 20–22
Contact Information .......................................................................................................... 23
Your controls have been programmed by Springs Window Fashions to control your shade. The
upper and lower limits and “MY” position have already been set. If you are not satised with
any default upper, lower, or “MY” position of your shade, see steps in the following sections of
this manual.
!

3
About Your Motorized Shade
Motorized shades offer a convenient solution to everyday challenges. They provide
instant privacy, glare reduction, and eliminate the need to manually adjust shades.
Motorized shades also eliminate dangerous cords and create a comfortable and
energy-efcient environment. What’s more is that you will get more enjoyment from
your home because motorized control of your shades is so effortless and features
Radio Technology Somfy® (RTS). RTS is omnidirectional and operates within a range of
65 feet, which eliminates the need to point or aim the remote at the motorized shades.
RTS also offers a wide range of controls and accessories that are designed to work
together, so you can always mix and match to create the perfect setting. Explore the
information within this guide to make the most of your motorized shades.
The term “shade” will be used throughout this manual to refer to your motorized
window covering, either a motorized blind or shade.
NOTE: Motorized horizontal blinds have motorized tilt for the slats only. Raising and
lowering the blinds is manual with cord lift.
NOTE: Rechargeable motor setup information can be found on page 14.
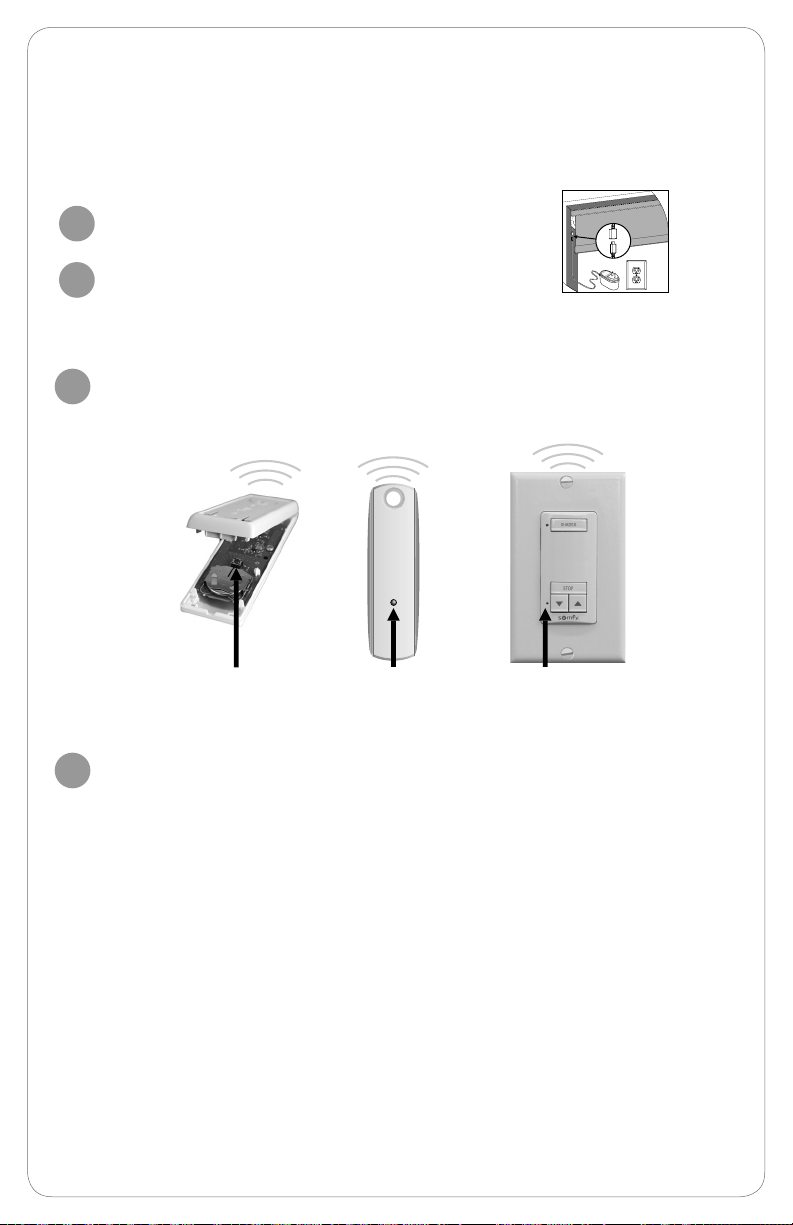
Please be sure to read and remove the securing tape and label before operating your motorized shade.
Press and release the
UP button to fully open
the motorized shade.
Press and release the
DOWN button to fully
close the motorized shade.
Press the “MY” button to send the
shade to the favorite programmed
position. See page 4 for “MY”
programming instructions.
For initial unpacking of the
rechargeable motor, wake up
the motor by briey pressing
the motor head programming
button or plugging in the
charger. The product briey
moves up and down to conrm
activation.
Basic Shade Control
Motor Head
Programming
Button

4
Operate your shade with your handheld remote or wireless wall switch control.
Your controls have been programmed by Springs Window Fashions to control your shade. The
upper and lower limits and “MY” position have already been set. If you are not satised with
any default upper, lower, or “MY” position of your shade, see steps in the following sections of
this manual.
!
“MY” button: Acts as a “STOP” button while shade is in motion. It can also be
programmed as a quick way to bring shades to your preferred intermediate position.
UP Button
DOWN Button
Channel Selector Button: All four lights will illuminate
when fth channel is activated.
Channel selected by pressing individual or multiple
channel buttons. LED will illuminate when selected.
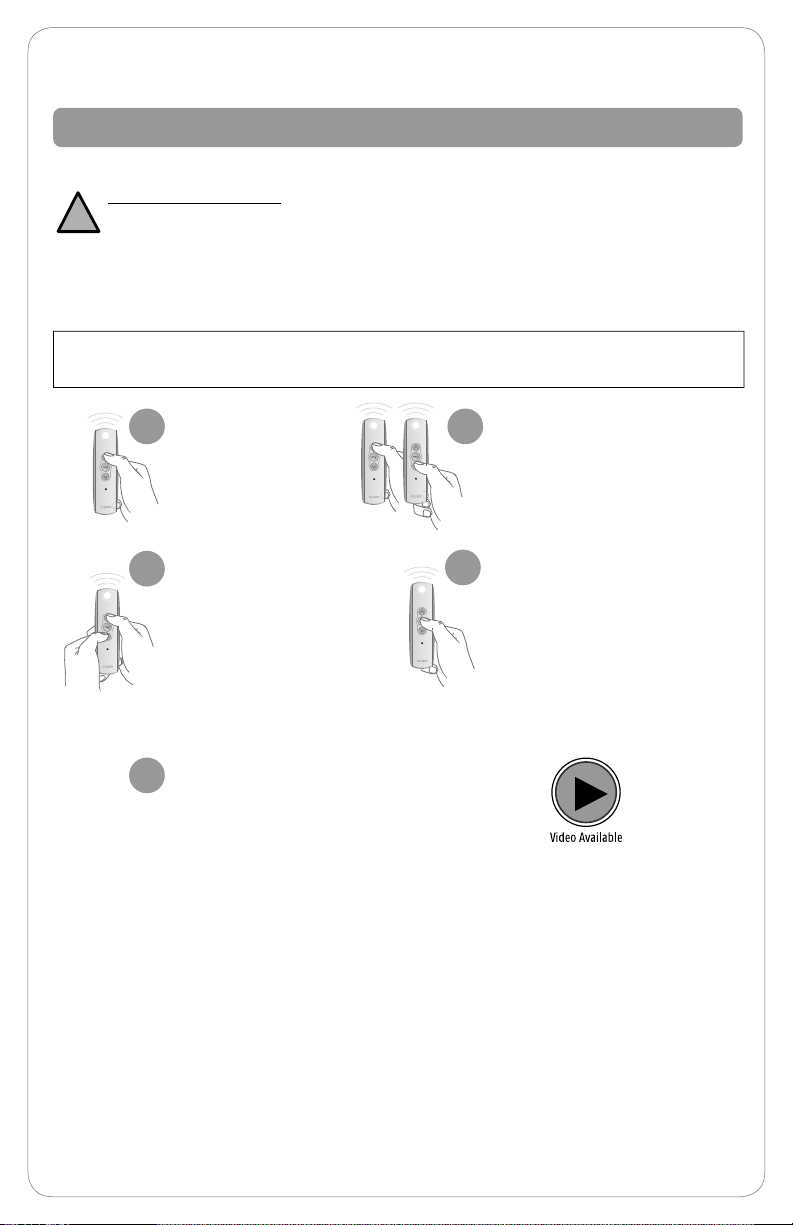
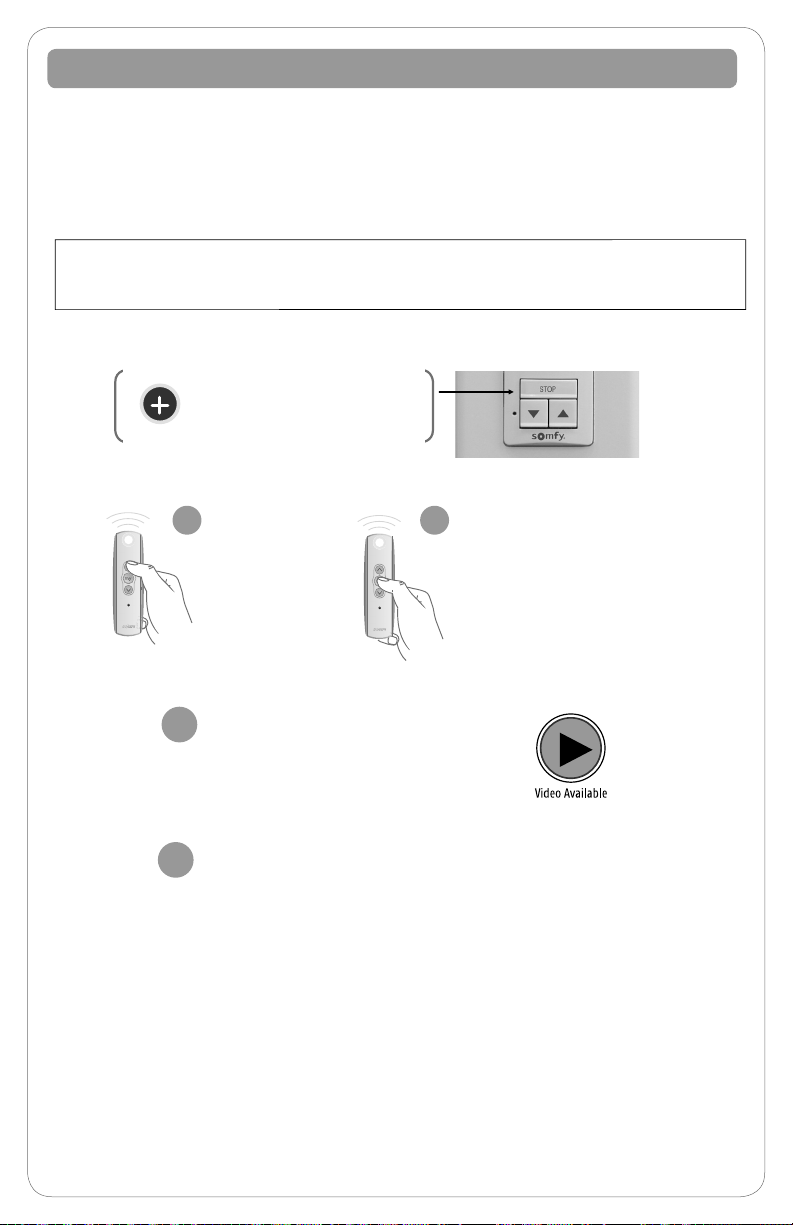
Pushing “MY” while
your shade is at rest will
bring your shade to your
“MY” position.
1Pushing “MY” while the
shade is in motion will
simply STOP the shade.
2
1
2
3
4
“MY”/STOP Button
5
1
2
4
5
1
2
3
5
1
2
5
Individual control of same shade with multiple controls
NOTE: Pushing the “MY” button too long, if your shade is not in motion, will change
your preferred intermediate position.
Control Features
5
Before you start. If your remote currently operates a group of shades, you rst need to
disconnect power to all other shades to prevent unwanted adjustments.
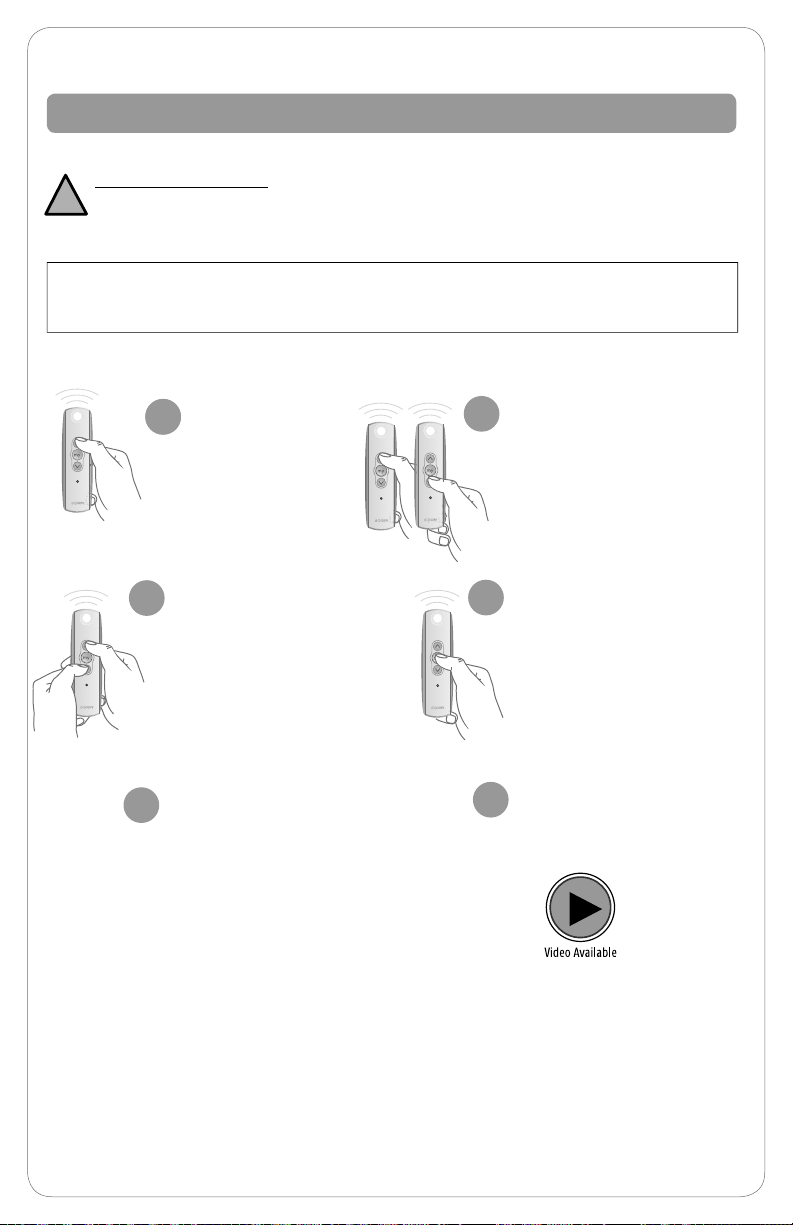
Adjusting Your Shade’s Default Upper Limit (OPTIONAL)
If you would like to adjust your shade’s default upper limit
Adjust your upper limit by using
UP or DOWN to move your shade
to your new desired upper limit.*
The shade will only move while UP
or DOWN is being pressed while
in this adjustment mode.
3
1
Once the shade stops, press
and hold UP and DOWN at the
same time for approximately
5 seconds. When the shade
jogs, release both buttons.
A jog is a brief up and down
movement of the shade. This
means you’ve put the shade
into programming mode.
If you need to adjust another
shade’s upper limit, go back to
the Before You Start section and
repeat the steps for
each shade.
2
5
When the shade is stopped
at your new desired upper
limit, press and hold “MY”
for approximately 3 seconds.
When the shade jogs,
release the “MY” button.
You have now saved your
new upper limit.
4
*PRODUCT SAFETY NOTE:
• For Cellular, Pleated, Roman, and Natural Shades - Adjusting the motor too
tight can cause the motor to fail and/or break/fray the internal cording.
• For Solar and Roller Shades - Be sure the hembar does not lift into the fascia or cassette,
this could cause the hembar to get stuck and/or damage the fabric.
• For Sheer and Layered Shades -Make sure the bottomrail does not lift into the cassette.
• If your shade will not raise to your desired upper limit, contact a customer service agent for assistance.
Shade Adjustments
!
Briey press UP
and release. Allow
the shade to
reach its default
upper limit.

6
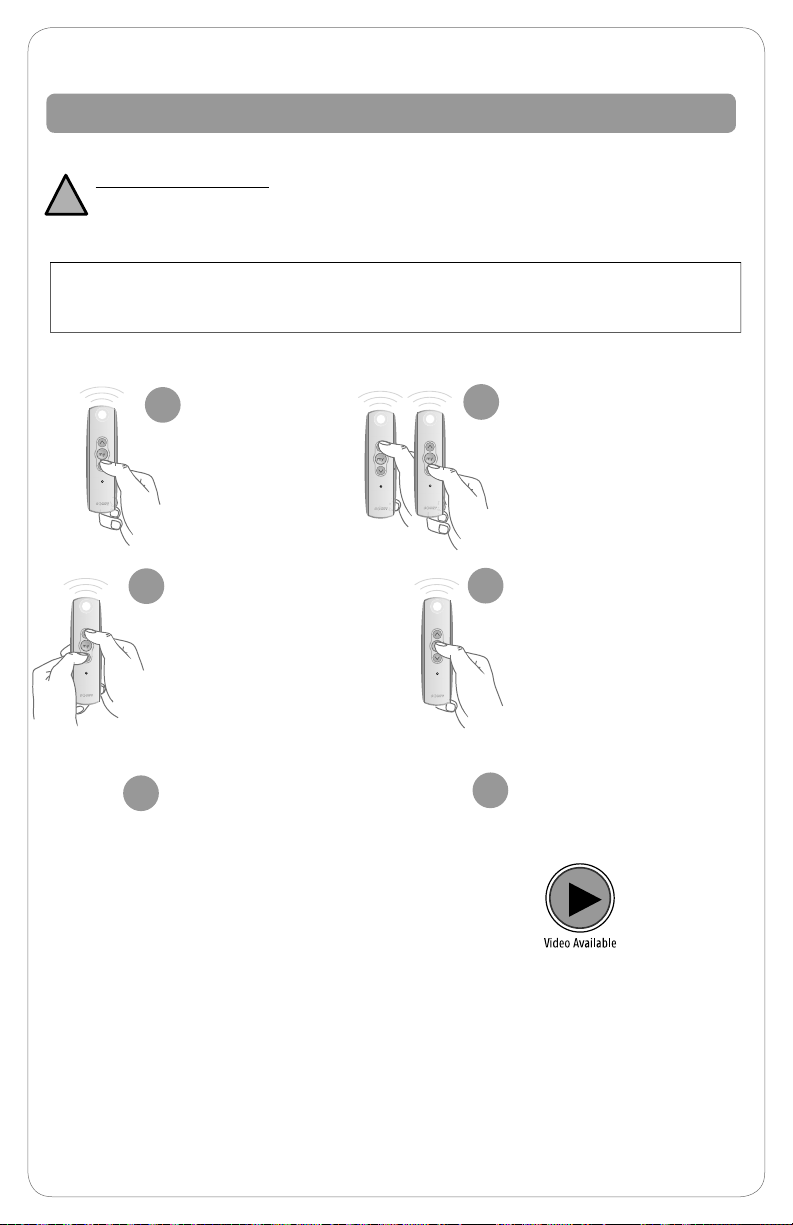
Adjusting Your Shade’s Default Lower Limit (OPTIONAL)
If you would like to adjust your shade’s default lower limit
*PRODUCT SAFETY NOTE:
• For Cellular, Pleated, Roman, Roman and Natural Shades - Extending the shade beyond the ordered
limits can cause shade damage.
• For Sheer and Layered Shades - Changing the lower limits will change the “MY” position for the
shade. See following page to adjust “MY” position.
• If your shade will not lower to your desired lower limit, contact a customer service agent for assistance.
Briey press
DOWN and
release. Allow the
shade to reach its
default lower limit.
1Adjust your lower limit by
using UP or DOWN to
move your shade to your
new desired lower limit.*
The shade will only move
while UP or DOWN is
being pressed while in
this adjustment mode.
3
2 4
!
Before you start. If your remote currently operates a group of shades, you rst need to
disconnect power to all other shades to prevent unwanted adjustments.
Once the shade stops, press
and hold UP and DOWN at the
same time for approximately
5 seconds. When the shade
jogs, release both buttons.
A jog is a brief up and down
movement of the shade. This
means you’ve put the shade
into programming mode.
When the shade is stopped
at your new desired lower
limit, press and hold “MY”
for approximately 3 seconds.
When the shade jogs,
release the “MY” button.
You have now saved your
new upper limit.
If you need to adjust another
shade’s lower limit, go back to
the Before You Start section
and repeat the steps for
each shade.
5

7
Adjusting Your Shade’s “MY” Position (OPTIONAL)
Using UP or
DOWN, put your
shade in motion.
When it reaches
your desired “MY”
position, press and
release “MY”
to stop the shade.
When the shade is
stopped at your new
desired “MY” position,
press and hold “MY” for
approximately 5 seconds.
When the shade jogs,
release the “MY” button.
You have now saved your
new “MY” position.
12
On the DecoFlex WireFree™ RTS
Wall Switch, the STOP button
functions and programs the same
as the “MY” button.
s
o
m
f
y
Your control has been programmed by Springs Window Fashions to control
your shade. The “MY” position has been set, and you may choose to adjust this
setting. When adjusting the “MY” position on your product sharing a channel,
it is important to adjust each individually. Disconnect the power to all products
that share a channel to avoid unwanted programming. After adjustments are
made, reconnect power to begin operation.
Sheer Shades - The default home position is preset to shade lowered and vanes closed.
Layered Shades - The default home position is preset to shade lowered and vanes open.
To change or adjust the home position, use the UP or DOWN button to reach the
desired position and then press and hold the “MY” until the shade jogs.
Before you start. If your remote currently operates a group of shades, you rst need to
disconnect power to all other shades to prevent unwanted adjustments.
If you need to adjust another
shade’s “MY” position, go
back to the Before You Start
section and repeat the steps
for each shade.
3
8
The Copy & Paste Sequence
The basic sequence of copy and paste allows you to add new remotes to your shade
and to create groups of shades that will operate together.
In this sequence, you may copy and paste from one control to another control or
from one channel on a control to any other channel either on the same control or
on a new control.
s
o
m
f
y
A channel is used to operate motorized shades with
controls. A channel is either associated with a single
motorized shade covering or group of motorized shades.
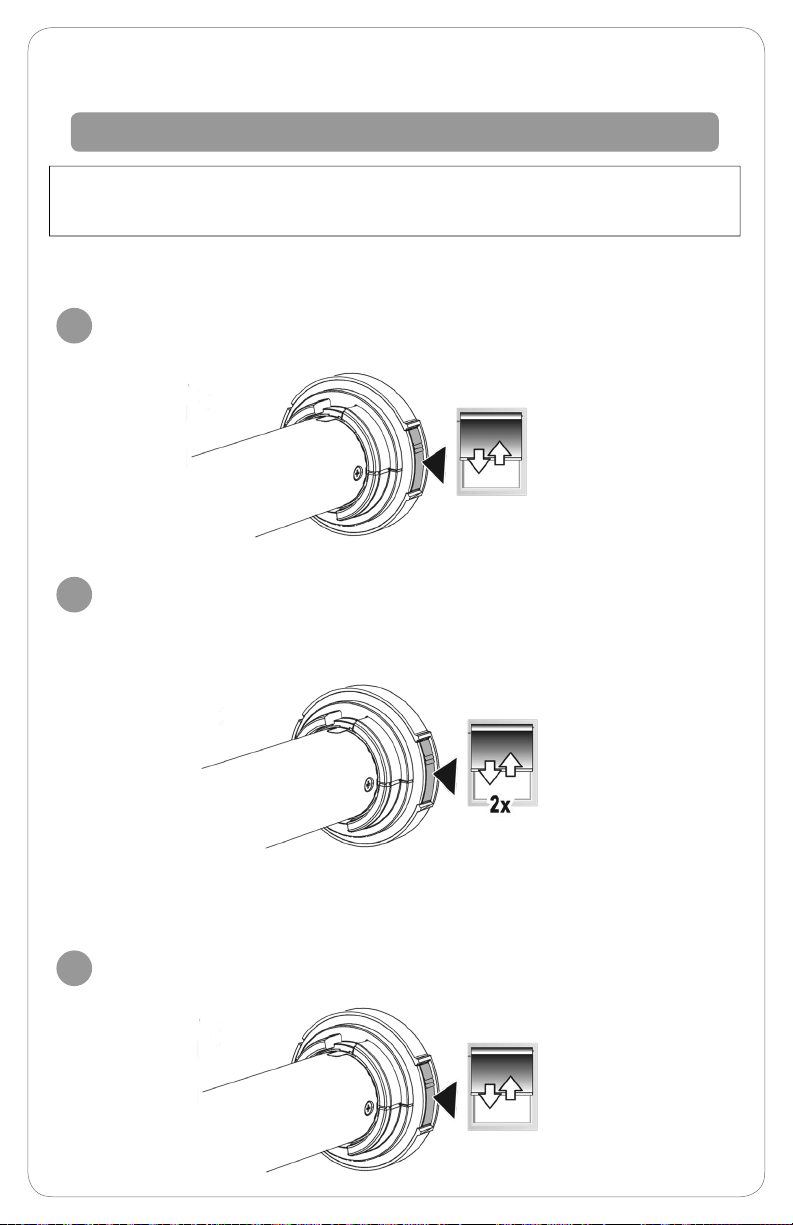
Adding Additional Controls

9
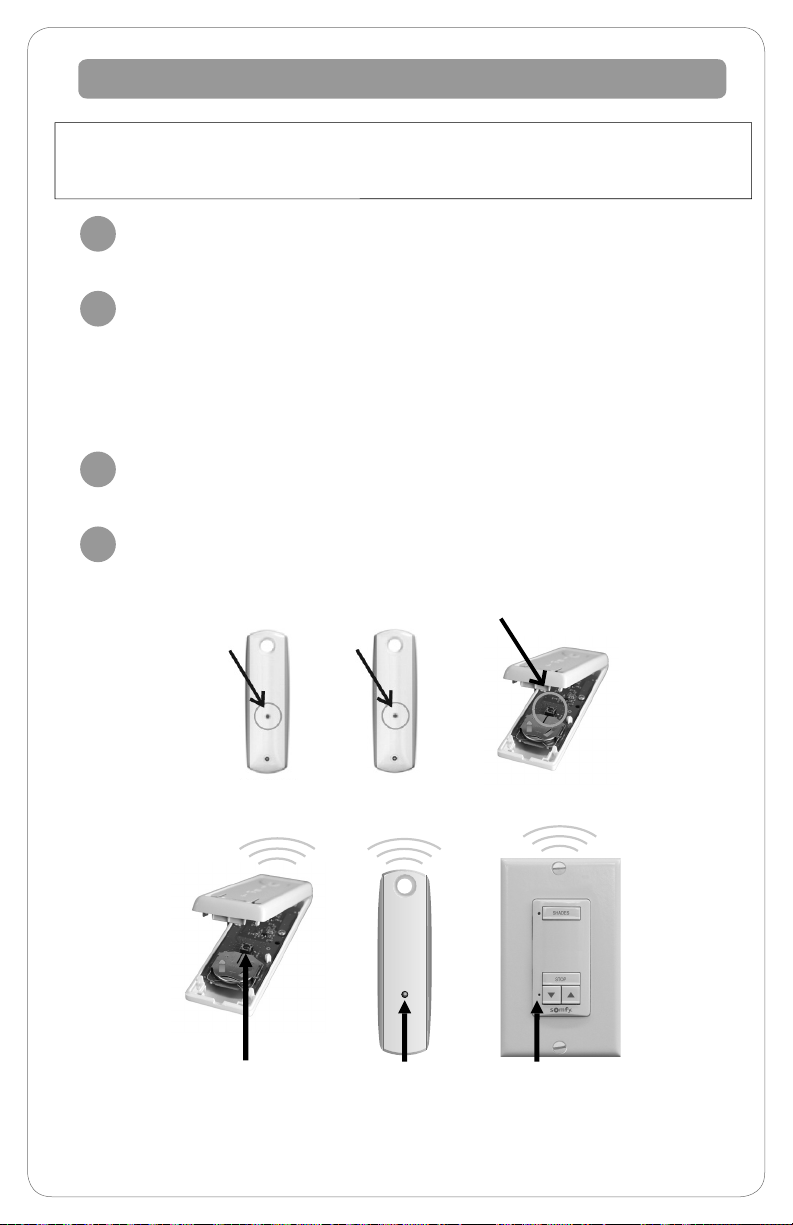
Programming
Button Programming
Button Programming
Button
Start with the control or channel that currently operates the shade.
TO COPY: Using a paperclip or similar item, press and hold the
programming button (shown above) for approximately 5 seconds.
When the shade jogs, release the programming button.
1
2
OR
Select the new control or desired channel to add to the shade.
TO PASTE: Using a paperclip or similar item, press and release the
programming button (shown above) for less than 2 seconds.
The control/channel is now added to the shade’s memory. Both the
original and new control will operate the same shade.
3
4
Adding a Control or Channel
Do not press the programming button outside of this sequence unless
otherwise instructed by a Customer Service Agent.
Note: If the wrong shade jogs, you have selected the wrong channel. Press the
programming button you just pressed and release. The wrong shade will jog again.
Select the correct channel and start again from step 1.
!
Remote must be open to
access programming button
OR
Before you start, decide which remote you want to control the shade. If your remote
currently operates a group of shades, you rst need to disconnect power to all other shades
to prevent unwanted channel/remote assignments. You will need a paperclip or similar item.
If you need to add another control or another channel for
another shade, go back to the Before You Start section and
repeat the steps for each shade.
5
10
Deleting a Control or Channel
Start with the control or channel that you intend to keep and currently
operates the shade.
TO COPY: Using a paperclip or similar item, press and hold the
programming button (shown below) for approximately 5 seconds. When
the shade jogs, release the programming button.
Select the control or desired channel to delete from the shade.
TO PASTE: Using a paperclip or similar item, press and release
the programming button (shown below) for less than 2 seconds.
The control/channel is removed from the shade’s memory. The
control/channel will not operate the shade.
1
3
2
4
Programmed
Remote Remote to Add
or Delete
OR
OR
OR
Before you start, decide which remote you want to remove from the shade’s memory. If your
remote currently operates a group of shades, you rst need to disconnect power to all other shades
to prevent unwanted channel/remote assignments. You will need a paperclip or similar item.
Note: If the wrong shade jogs, you have selected the wrong channel. Press the
programming button you just pressed and release. The wrong shade will jog again. Select
the correct channel and start again from step 1.
Programming
Button Programming
Button Programming
Button

11
NOTE: Use the programming sequence below to control multiple shades with
one control, also known as “creating a group.” Be sure to review and understand
“Adding a Control” before moving on to this programming sequence. You can
also review the online video “Copy and Paste Part 1 and Part 2” or call your Customer
Service Agent for additional assistance. To prevent unwanted channel/remote
assignments, ALL PROGRAMMED SHADES should be on their own channel. If shades
share a channel UNPLUG the shade power source until the programming is complete.
Group Control of Multiple Shades with the Same Control
4
Creating Group Control
2
3
Assigning Specic Channels to Shade (Multi-Channel Remotes Only)
TO COPY: Using a paperclip or similar item, press and hold the
programming button for approximately 5 seconds. When the
shade jogs, release the programming button.
Select the remote or desired channel to be assigned
by momentarily pressing the channel selector button
on the remote.
TO PASTE: Using a paperclip or similar item, press and
release the programming button for less than 2 seconds.
The new remote/control is now added to the shade’s memory,
and both channels can be used to operate the shades.
After all groups are complete, reconnect power to
begin operation.
If you need to add a shade to another remote or channel, go
back to the Before You Start section and repeat the steps for
each shade. To remove a shade from a channel or group, follow
the “Deleting a Control or Channel” steps outlined on page 10.
Repeat steps for each shade you want to add to your group. To delete a channel,
follow the “deleting a control steps” outlined on the page 10.
When creating groups, it is important to program each shade individually.
!
1
5
Before you start, decide which remote you want to remove from the
shade’s memory. If your remote currently operates a group of shades,
you rst need to disconnect power to all other shades to prevent
unwanted channel/remote assignments. You will need a paperclip
or similar item.
12
You might need to do this if you bought a new simple motor shade after your initial
purchase or replacing a lost/broken remote used with the simple motor shade.
Disconnect power to shade for a maximum of 2 minutes.
Connect power to shade; shade will jog when correct
power supplied.
a. If shade does not jog, disconnect power for additional 2 minutes.
b. If shade does not jog on third attempt, check the power source.
Using a paper clip or similar item, immediately press and release program button
on controller for less than 2 seconds, shade will jog conrming pair. The control is
now added to the shade's memory. The control will now operate the shade.
1
2
3
OR
OR
If you need to add controller to another simple motor shade, go back to step 1
and repeat the steps for each shade.
4
Pair a New Remote to the
Simple Motorized Shade
Programming
Button Programming
Button Programming
Button
13
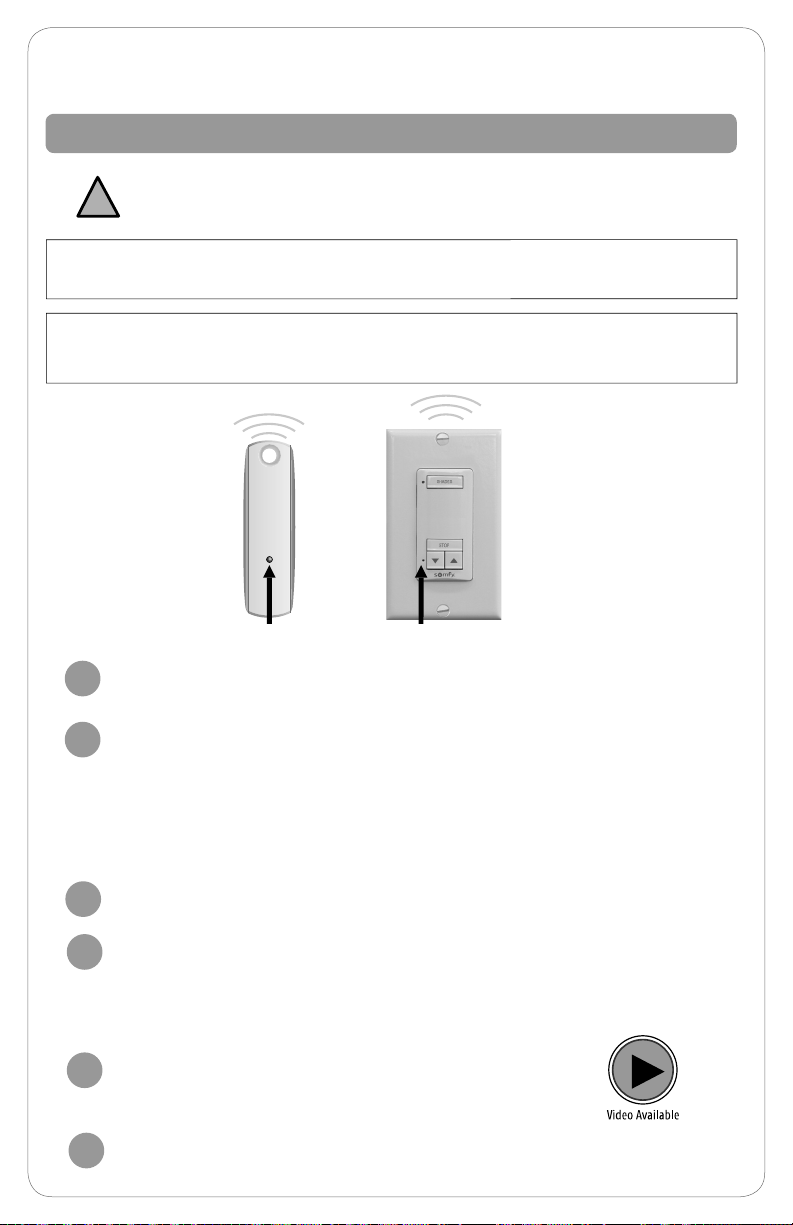
Before you start. If your remote currently operates a group of rechargeable motorized
shades on the same channel, you rst need to put all other shades into sleep mode to
prevent unwanted adjustments.
Activating Sleep Mode
Briey press and hold the motor head program button until the shade jogs
once, approximately 3 seconds.
1
Briey press and hold the motor head program button until the shade
jogs two (2) more times, approximately 6 seconds. The motor is now in
sleep mode. You will need to repeat for each motor on the group channel/
remote before making any adjustments.
2
Deactivating Sleep Mode
After all adjustments are complete, you must deactivate sleep mode.
To exit sleep mode; press and hold the motor head until the shade jogs once,
approximately 3 seconds.
3
Activating and Deactivating Sleep Mode
Rechargeable Motor Sleep Mode
14
Adjusting Your Shade’s Default Upper Limit (OPTIONAL)
If you would like to adjust your shade’s default upper limit
*PRODUCT SAFETY NOTE:
• For Solar and Roller Shades - Be sure the hembar does not lift into the fascia or cassette; this could
cause the hembar to get stuck and/or damage the fabric.
• If your shade will not raise to your desired upper limit, contact a customer service agent for assistance.
Briey press UP
and release. Allow
the shade to
reach its default
upper limit.
1Adjust your lower limit by
using UP or DOWN to
move your shade to your
new desired lower limit.*
The shade will only move
while UP or DOWN is
being pressed while in
this adjustment mode.
3
2 4
!
Once the shade stops, press
and hold UP and DOWN at the
same time for approximately
5 seconds. When the shade
jogs, release both buttons.
A jog is a brief up and down
movement of the shade. This
means you've put the shade
into programming mode. LED
will be solid green.
When the shade is
stopped at your
new desired upper limit, press
and hold "MY" for approximately
3 seconds. When the shade
jogs, release the "MY" button.
You have now saved your new
upper limit. LED light will go out.
If you need to adjust another
shade’s lower limit, go back to
the Before You Start section
and repeat the steps for
each shade.
5
Shade Adjustments on Rechargeable Motor
1
Before you start. If your remote currently operates a group of rechargeable motorized
shades on the same channel, you rst need to put all other shades into sleep mode to
prevent unwanted adjustments. See page 13 for sleep mode instructions.
6After all adjustments are
complete, deactivate sleep
mode. See page 13 for
deactivation instructions.
15
*PRODUCT SAFETY NOTE:
• If your shade will not lower to your desired lower limit, contact a customer service agent for assistance.
!
Adjusting Your Shade’s Default Lower Limit (OPTIONAL)
If you would like to adjust your shade’s default lower limit
Briey press
DOWN and
release. Allow the
shade to reach its
default lower limit.
1Adjust your lower limit by
using UP or DOWN to
move your shade to your
new desired lower limit.*
The shade will only move
while UP or DOWN is
being pressed while in
this adjustment mode.
3
2 4
Once the shade stops, press
and hold UP and DOWN at the
same time for approximately
5 seconds. When the shade
jogs, release both buttons.
A jog is a brief up and down
movement of the shade. This
means you’ve put the shade
into programming mode. LED
will blink green slowly.
When the shade is stopped
at your new desired lower
limit, press and hold “MY”
for approximately 3 seconds.
When the shade jogs,
release the “MY” button.
You have now saved your new
upper limit. LED light will go out.
If you need to adjust another
shade’s lower limit, go back to
the Before You Start section
and repeat the steps for
each shade.
5
Before you start. If your remote currently operates a group of rechargeable motorized
shades on the same channel, you rst need to put all other shades into sleep mode to
prevent unwanted adjustments. See page 13 for sleep mode instructions.
6After all adjustments are
complete, deactivate sleep
mode. See page 13 for
deactivation instructions.
16
Adjusting Your Shade’s “MY” Position (OPTIONAL)
Using UP or
DOWN, put your
shade in motion.
When it reaches
your desired “MY”
position, press and
release “MY”
to stop the shade.
When the shade is
stopped at your new
desired “MY” position,
press and hold “MY” for
approximately 5 seconds.
When the shade jogs,
release the “MY” button.
You have now saved your
new “MY” position.
12
On the DecoFlex WireFree™ RTS
Wall Switch, the STOP button
functions and programs the same
as the “MY” button.
s
o
m
f
y
Your control has been programmed by Springs Window Fashions to control
your shade. The “MY” position has been set, and you may choose to adjust this
setting. When adjusting the “MY” position on your product sharing a channel,
it is important to adjust each individually.
If you need to adjust another
shade’s “MY” position, go
back to the Before You Start
section and repeat the steps
for each shade.
3
Before you start. If your remote currently operates a group of rechargeable motorized
shades on the same channel, you rst need to put all other shades into sleep mode to
prevent unwanted adjustments. See page 13 for sleep mode instructions.
4After all adjustments are
complete, deactivate sleep
mode. See page 13 for
deactivation instructions.
17
Programming
Button Programming
Button
Start with the control or channel that currently operates the shade.
TO COPY: Using a paperclip or similar item, press and hold the
programming button (listed above) for approximately 5 seconds. When the
shade jogs, release the programming button. Green LED will blink fast.
1
2
OR
Select the new control or desired channel to add to the shade.
TO PASTE: Using a paperclip or similar item, press and release the
programming button (listed above) for less than 2 seconds.
The control/channel is now added to the shade’s memory. Both the
original and new control will operate the same shade.
3
4
Adding a Control or Channel
Do not press the programming button outside of this sequence unless
otherwise instructed by a Customer Service Agent.
Note: If the wrong shade jogs, you have selected the wrong channel. Press the
programming button you just pressed and release. The wrong shade will jog again.
Select the correct channel and start again from step 1.
!
Before you start, decide which remote you want to control the shade. If your remote
currently operates a group of shades, you rst need a paperclip or similar item.
If you need to add another control or another channel for
another shade, go back to the Before You Start section and
repeat the steps for each shade.
5
Rechargeable Motor Control Options
Before you start. If your remote currently operates a group of rechargeable motorized
shades on the same channel, you rst need to put all other shades into sleep mode to
prevent unwanted adjustments. See page 13 for sleep mode instructions.
6After all adjustments are complete, deactivate sleep
mode. See page 13 for deactivation instructions.

18
Deleting a Control or Channel
Start with the control or channel that you intend to keep and currently
operates the shade.
Using a paperclip or similar item, press and hold the programming button
(listed below) for approximately 5 seconds. When the shade jogs, release the
programming button. Green LED will blink fast.
Select the control or desired channel to delete from the shade.
Using a paperclip or similar item, press and release
the programming button (seen below) for less than 2 seconds.
The control/channel is removed from the shade’s memory. The
control/channel will not operate the shade.
1
3
2
4
Programmed
Remote Remote to Add
or Delete
OR
Before you start, decide which remote you want to remove from the shade’s memory. If your
remote currently operates a group of shades, you rst need a paperclip or similar item.
Note: If the wrong shade jogs, you have selected the wrong channel. Press the
programming button you just pressed and release. The wrong shade will jog again. Select
the correct channel and start again from step 1.
Programming
Button Programming
Button
Before you start. If your remote currently operates a group of rechargeable motorized
shades on the same channel, you rst need to put all other shades into sleep mode to
prevent unwanted adjustments. See page 13 for sleep mode instructions.
5After all adjustments are complete, deactivate sleep
mode. See page 13 for deactivation instructions.

19
NOTE: Use the programming sequence below to control multiple shades with
one control, also known as “creating a group.” Be sure to review and understand
“Adding a Control” before moving on to this programming sequence. Call your
Customer Service Agent if you need additional assistance.
Group Control of Multiple Shades with the Same Control
4
Creating Group Control
2
3
Assigning Specic Channels to Shade (Multi-Channel Remotes Only)
TO COPY: Using a paperclip or similar item, press and hold the
programming button for approximately 5 seconds. When the
shade jogs, release the programming button.
Select the remote or desired channel to be assigned
by momentarily pressing the channel selector button
on the remote.
TO PASTE: Using a paperclip or similar item, press and
release the programming button for less than 2 seconds.
The new remote/control is now added to the shade’s memory,
and both channels can be used to operate the shades.
After all groups are complete, deactivate sleep mode by
pressing and holding the motor head approximatley 3 seconds,
until the shade jogs once.
If you need to add a shade to another remote or channel, go
back to the Before You Start section and repeat the steps for
each shade.
Repeat steps for each shade you want to add to your group. To delete a channel,
follow the “deleting a control steps” outlined on the page 18.
!
1
5
Before you start. If your remote currently operates a group of rechargeable motorized
shades on the same channel, you rst need to put all other shades into sleep mode to
prevent unwanted adjustments. See page 13 for sleep mode instructions.
When creating groups, it is important to program each shade individually.

20
Helpful Tips and FAQs
For video tutorials and the most up-to-date troubleshooting information,
visit our Motorization Knowledge Base at www.motorization.support.
Our customer service team is available at 1-800-221-6352,
Monday through Friday from 8:30 a.m. to 7:00 p.m. Eastern.
You can also email us at [email protected].
• Verify that the motor antenna is exposed and not altered, obstructed, or concealed
within headrail.
• Verify that the control has power by checking that the light on the remote or wall
switch illuminates when pressed. If the control no longer illuminates when pressing
a button, the battery needs to be replaced.
• If using a multi-channel remote, be sure the proper channel has been selected.
• Verify that the control or wall switch is within the recommended operating range
(approx. 65 feet).
• Verify that the command button (UP or DOWN) is pressed for at least 1 second.
Verify that the motor is powered.
• For battery applications — check battery connection and orientation and replace
batteries if necessary. To replace batteries simply unscrew the end of the tube and
remove batteries. Insert new AA batteries in the correct orientation and screw on the
end of the tube.
• For plug-in transformer applications — check plug-in transformer connection, verify
outlet power by using a known working outlet. Check that all cables and wires are
securely connected. A volt meter can also be used to verify power at the connector.
24 volt motors: conrm that the wires are attached with the correct polarity.
• For solar power kit applications — conrm proper connection of both the solar
panel and rechargeable battery tube. 10 NiMH batteries are included and in
some instances the batteries may have lost charge and are not able to recover.
A battery charger can be used to recharge batteries.
• Conrm LED light on motor is not blinking red before or after shade movement. If
blinking red then the battery will need charged. A battery charger can be used to
recharge motor.
FAQ: My shade does not respond to my controller (remote or wall switch).
FAQ: When I activate the “MY” button, the shade does not travel to my
preferred position.
• The “MY” position may need to be programmed. Please reference adjusting
your shade’s “MY” position found on page 7.
• The motorized shade must not be in motion when attempting to activate the
“MY” position.
> Stop shade rst and then activate the “MY” button.
Table of contents
Popular Indoor Furnishing manuals by other brands


Kettal
Kettal Park Life Side table 50 x 50 Assembly instructions

Accentrics Home
Accentrics Home DS-D419-002A manual

Steelcase
Steelcase 2 Series Removal and Installation Instructions

Next
Next MALVERN 284262 Assembly instructions

EHF
EHF Double Door Floor Cabinet Assembly instructions

Politorno
Politorno 2323 Assembly instruction