squarespace DFI-0452-WH User manual

Model: DFI-0452-WH Motion Security Light
Quick Start Guide
QUICK TIPS
Here are a few good things to know about your new light!
Mount light 7.5 feet
above the ground.
Mount light 7.5 feet
above the ground.
Point face of Solar Panel
at mid-day sun.
Point face of Solar Panel
at mid-day sun.
3-Minute Test Mode
1st Minute
Lamps stay ON
2nd and 3rd Minute
Lamps ON for 30 sec. when motion detected.
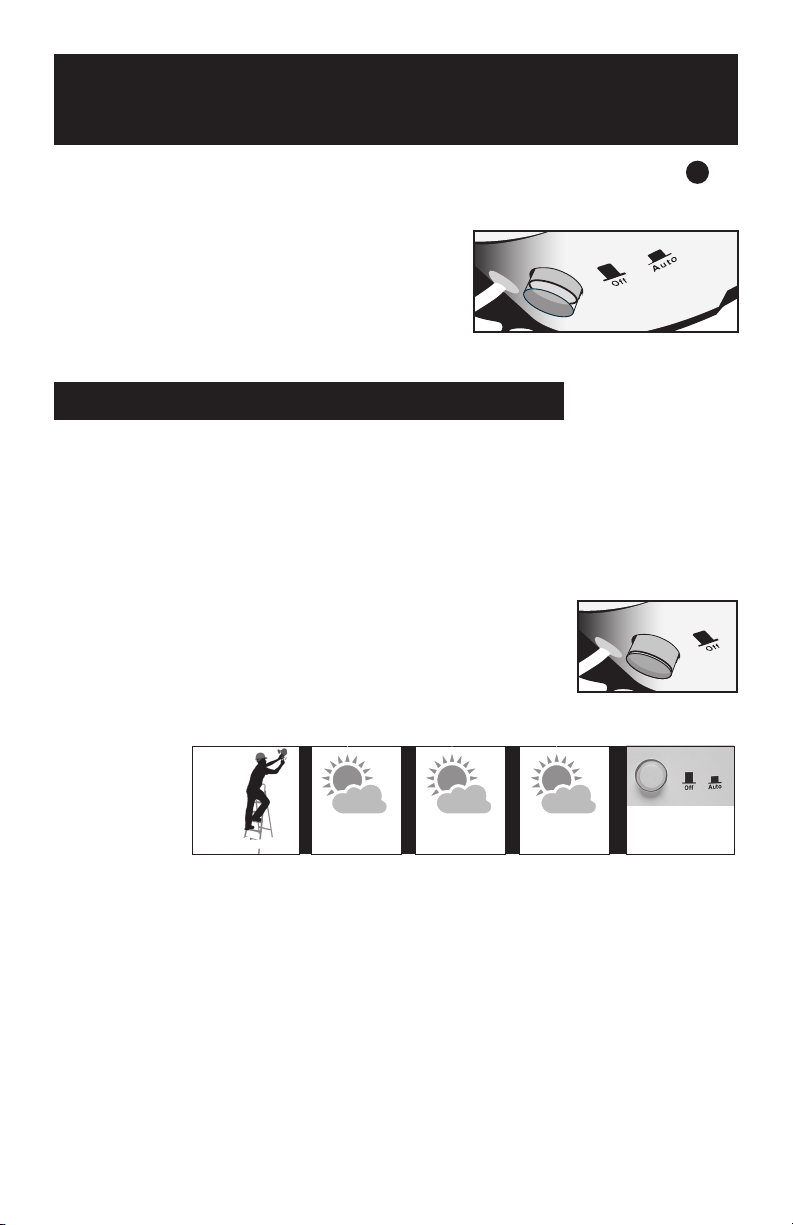
Press
Power Button
to Auto
Need a longer cord between the Light
and the Solar Panel?
A 30’ Extension Cord is available. Contact
Home Depot Customer Service for details.
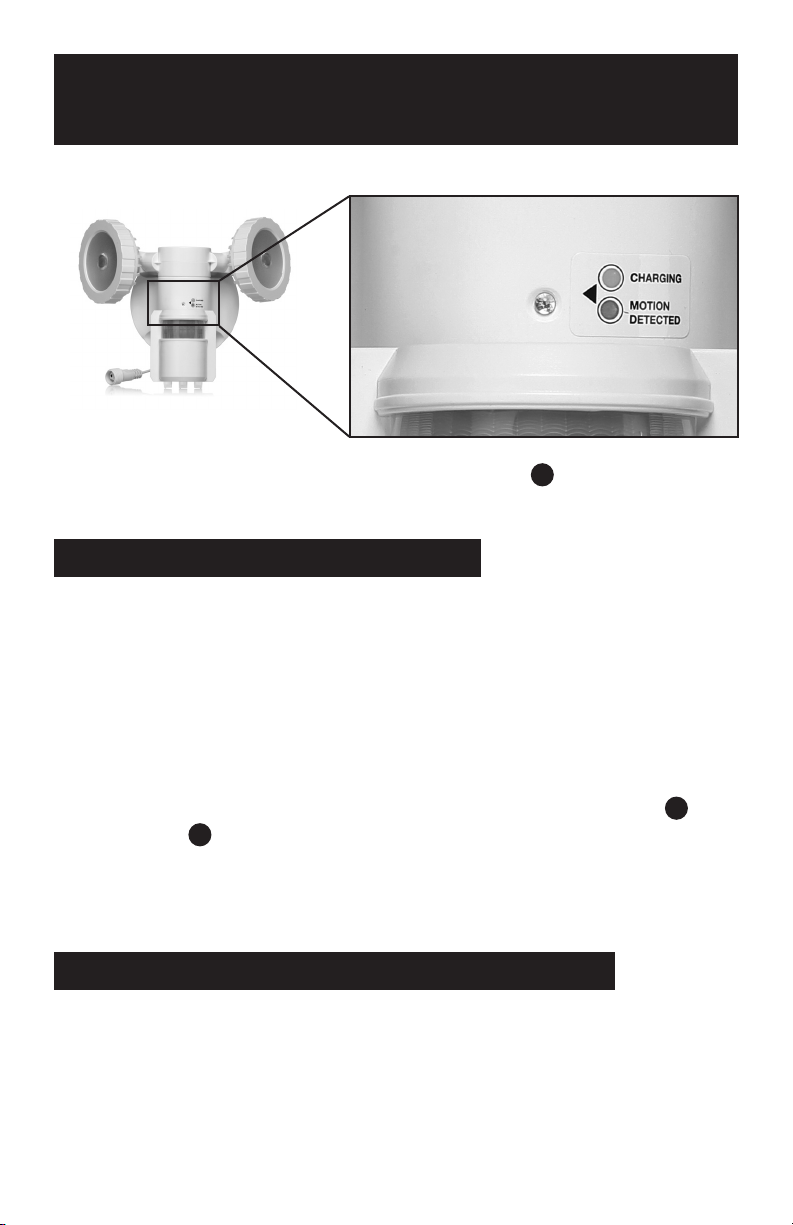
Flashing Indicator Lights:
Blue Light = Charging
Green Light = Motion Detected
Whenever the light is turned ON (Auto),
it will go into a 3-minute Test mode.

2
Set of Screws
and Wall Anchors
for Mounting Bracket and Cradle
Use and Care Guide
Mounting Bracket
(May be attached to the back of
the Motion Security Light.)
Motion Security Light
Rechargeable Lithium-Ion Battery
included and installed.
Solar Panel Cradle
Solar Panel
What’s in the Box
Everything you need to install and operate the light is in the box.

3
Parts of the DFI-O452-WH
Motion Security Light
A B C D E F G H I J K L
Adjustable LED Lamp Heads
A B C D E F G H I J K L
Indicator Light ( Green | Blue )
A B C D E F G H I J K L
Adjustable Motion Sensor Head
A B C D E F G H I J K L
Power Cord to Solar Panel
A B C D E F G H I J K L
TIMER / SENS / LUX dials
A B C D E F G H I J K L
Light Fixture Base
A B C D E F G H I J K L
Power Button ( OFF | Auto )
A B C D E F G H I J K L
Solar Panel with Cradle attached
A B C D E F G H I J K L
Power Cord to Light Fixture
A B C D E F G H I J K L
A B C D E F G H I J K L
A B C D E F G H I J K L
A B C D E F G H I J K L
A B C D E F G H I J K L
A B C D E F G H I J K L
A B C D E F G H I J K L
A B C D E F G H I J K L
A B C D E F G H I J K L

4
The Motion Security Light includes a 2000mAh 3.7V rechargeable
Lithium-Ion battery. It is already installed in the unit, and may have
a small charge for testing.
During the day, the battery is charged by solar energy; it take about
6 hours in clear, direct sunlight for the battery to charge to full
capacity.
In the evening, when the light switches over to motion-sensing, the
battery discharges whenever the light is triggered. It will discharge
for a total of about 2 hours before being depleted. Once the
battery is depleted, the light will stop working until it is charged again
the next day.
The battery is exclusively for use in the Deant DFI-0452-WH, and
replacement batteries are available. Contact Home Depot Customer
Service at 1-866-308-3976 for details.
Battery is installed,
and may have a starting charge.
About the Rechargeable Battery
Specications and Usage

5
During the Day...
• Sunlight is converted to energy by Solar Panel
A B C D E F G H I J K L
, and stored in
the on-board lithium-ion battery.
• The light will not turn ON, unless LUX is set to High.
• When charging, the Indicator light
A B C D E F G H I J K L
will ash BLUE
every 4-6 seconds.
In the Evening...
• The Lamp Heads
A B C D E F G H I J K L
turn ON whenever motion
is detected by the Motion Sensor
A B C D E F G H I J K L
.
• The light will operate until the lithium-ion battery charge is depleted.
• When the battery runs low, the light will appear dimmer than
normal. This is the ECO mode, which allows the light to run
longer by reducing brightness.
• The Indicator light
will ash GREEN when motion is detected.
ELECTRICITY FROM BATTERY TO LIGHT
ELECTRICITY FROM BATTERY TO LIGHT
How the Light Works
Charge by Day, Light by Night

6
Mount at least 7.5 feet above the ground
You can install the light almost anywhere in an outdoor setting,
so long as it can be connected to the Solar Panel
A B C D E F G H I J K L
.
The light works best mounted
7.5 feet above the ground.
Mount on Wall or Eave
WALL
WALL
Mount
EAVE
Mount
DO NOT MOUNT
INVERTED
Placement of the Light
for Optimal Operation

7
Leave 3 inches of clearance for the Mounting Bracket
When installing the Mounting Bracket, make sure it has at least
3 inches of clearance from the top of the bracket, to the bottom of
any edge, overhang or rain-gutter that may impede installation.
Adjust the PIR Motion Sensor Head
Adjust the Motion Sensor Head
A B C D E F G H I J K L
based on the distance you prefer to
detect motion. Adjust SENS
A B C D E F G H I J K L
accordingly.
Sensor Head Angle: 15º
Coverage Distance: 13 - 50ft.
Sensor Head Angle: 15º
Coverage Distance: 10 - 39ft.
Sensor Head Angle: 30º
Coverage Distance: 6.5 - 26ft.
Sensor Head Angle: 45º
Coverage Distance: 1.5 - 16ft.
No Tilt 15º Tilt 30º Tilt 45º Tilt
Minimum
3-inch clearance
Motion Sensor is
Straight Ahead
Motion Sensor tilted
15º down
Motion Sensor tilted
30º down
Motion Sensor tilted
45º down

8
The LED Lamp Heads
A B C D E F G H I J K L
can be adjusted independantly, and up to
45º from the front-facing position.
Horizontally, the LED Lamp Heads can be independantly adjusted
about 135º, as shown.
The Motion Sensor
A B C D E F G H I J K L
can be adjusted in a side-to-side arch of about
160º, and can be angled 90º downward.
Lamp Heads, Broad OpenLamp Heads, Front-facing
Lamp Heads at maximum up-facing Lamp Heads at maximum down-facing
Adjusting Lamp and Motion Sensor Heads

9
Your Motion Security Light
has 3 basic settings, TIME,
LUX and SENS.
TIME adjusts the amount of time the light will stay
ON when triggered by motion. It can be adjusted
from 1 to 5 minutes.
SENS adjusts how “sensitive” the PIR is to motion.
LUX adjusts the level of light that has to be reached
before the light will activate when motion is
detected. The following settings will activate the light:
Automatically turns ON
when it’s dark.
Automatically turns ON
just after sunset.
Automatically turns ON
late in the day.
SENS
H (High)
Detect motion up to 50’ away.
Good for large yards, open areas.
High energy usage.
M (Medium)
Good for small yards,
garages, and patios.
L (Low)
Least sensitive setting.
Good for stairs, door coverage.
Low energy usage.
Adjusting TIMER, LUX and SENS Settings

10
The Solar Panel
A B C D E F G H I J K L
should be placed in an area that allows for the
maximum amount of sunlight exposure per day.
• Solar Panel is best when
placed on the southern-facing
portion, or the highest point, of
a structure.
• The panel should not be placed where shade or shadow is cast
upon it by trees, buildings, telephone poles, or other obstructions.
• The Solar Panel has a 15-foot cord for attachment to the
Light Fixture. A 30-foot extension cable is available from
shopNovolink.com. You can use up to 2 extension cables,
giving you an additional 60 feet distance between the Solar Panel
and the Light.
Tree blocks sunlight from Solar Panel.
Poor postion for
Solar Panel
Good postion for
Solar Panel
Solar Panels
face South
No obstruction - Solar Panel receieves full sunlight.
Where to Place the Solar Panel
for Optimal Exposure to the Sun
Click Here to go directly to the
extension cable online at
shopNovolink.com.

11
Once installed, the Solar Panel
should be angled towards the
southern sky, so that the face of the panel is exposed to as much
sunlight as possible during the day. (Generally, an upward angle of
45º should be sucient for exposure.)
W
i
n
t
e
r
p
a
t
h
o
f
t
h
e
s
u
n
-
L
o
w
i
n
t
h
e
s
o
u
t
h
e
r
n
s
k
y
S
u
m
m
e
r
p
a
t
h
o
f
t
h
e
s
u
n
-
H
i
g
h
i
n
t
h
e
s
o
u
t
h
e
r
n
s
k
y
Helpful Tip:
At high noon, adjust the Solar Panel so that
it faces the sun. During any time of year, this
adjustment will provide optimal positioning for
collecting solar energy.
You can also angle the panel up by 45º,
which should provide for adequate exposure.
12
1. Make sure the light is properly installed, with the Solar Panel
A B C D E F G H I J K L
securely connected to the Light.
2. Place the POWER button in the
Auto (ON) position. The light
will proceed to the 3-Minute Test
mode.
OPTIONAL - Charging with the Power OFF
If the light does not immediately go into the 3-minute Test Mode, or if
the weather will not permit for charging with full sunlight, you can let
the light charge with the Power button in the OFF position.
This may allow the battery to charge slightly faster, as power is not
being drawn by the motion sensor when the light is o.
3. Place the POWER button in the OFF position.
4. You will leave the light OFF for 2-3 days,
depending on weather conditions.
5. When ready, place the POWER button in the Auto (ON)
position. It will go into a 3-minute test phase.
It is not necessary for you to interact with the light during the
3-minute test; the light will go through this cycle automatically, and
be ready for regular operation when complete.
Day of
Installation
Day of
Installation
Day of
Installation
Day of
Installation
Day 3
Press POWER
button to Auto
Day 1
Charging
Day 2
Charging
Day 1
Charging
Day 2
Charging
Day 3
Charging
Sunny Days
Cloudy &
Overcast
Days Day 3
Press POWER
button to Auto
Turning the Light ON
for the First Time

13
If you have already adjusted the dials, light heads and sensor,
you do not have to be present to observe the test.
For the 1st Minute...
The light will stay ON, so you can point the LED Lamp Heads
A B C D E F G H I J K L
in the
direction you prefer. When the 1st minute is over, the light will turn OFF.
For the 2nd and 3rd Minute...
The light will turn ON for 30-second intervals whenever it’s
triggered by motion. Use this time to adjust the Motion Sensor
Head
A B C D E F G H I J K L
in the direction you want it to detect motion. Here is a
step-by-step process that’s ecient for testing the motion sensor.
1. When the light turns OFF, move to the rst position
X1 X2
.
The light should turn ON when you move, and the
Indicator Light
A B C D E F G H I J K L
ash GREEN.
2. After 30 seconds, the light will turn OFF again, move the to second
position
X1 X2
. If the light does not turn ON when you move, adjust
the Motion Sensor Head or increase SENS.
3. Repeat this by moving to the 3rd
X1 X2
and 4th
X1 X2
positions,
waiting to see the light turn ON, and the Indicator Light ash
GREEN.
After the 3rd minute, the light will revert to its AUTO mode, and
only activate when the motion sensor is triggered, at the LUX level
you have selected (or when it is dusk/dark.) You can continue to
make adjustements to the Lamp Heads, Motion Sensor Head,
LUX, TIMER and SENS.
Area where sensor will detect motion.
About the 3-Minute Test
( Test starts anytime you Power the light ON. )
14
Your Motion Security Light has an Indicator light
A B C D E F G H I J K L
that will help you
understand what the unit is doing at any given time.
BLUE Indicator Light, “CHARGING”
• Flashes every 4-6 seconds when unit is charging.
• Indicates that the connection between Solar Panel and
Rechargeable Battery is intact.
• Demonstrates battery is functioning properly.
If you do not see the ashing blue light during the day, the battery
may be completely charged. If, however, the light does not turn ON
in the evening, check the connection between the Solar Panel
A B C D E F G H I J K L
and
the Light unit
A B C D E F G H I J K L
.
You will not see the Blue indicator light ON at night.
GREEN Indicator Light, “DETECTING MOTION”
• Flashes/Stays ON when motion is detected.
• Flashes during the daylight or at night.
• Indicates that the motion sensor is working, and the battery is
charged.
About the Indicator Light
( Blue = Charging • Green = Motion )

15
Light won’t turn ON in the evening
oLook for the Indicator Light during the day to see if it’s ashing Blue
about every 6 seconds. If so, the solar panel connection and battery are
OK. You may need to adjust the SENS setting.
oIs it below freezing outside? The battery could be frozen below its
operational level. Lithium-Ion batteries are less ecient in cold/freezing
weather. When temperatures warm-up, the battery will return to normal
function.
oIt’s possible the battery is draining early due to multiple activations and/or
a longer stay-on time. Lower the LUX and SENS settings to medium or
low, and reduce the TIMER to 1 minute, or as low as possible for your use.
Light turns ON during the day
oAdjust the LUX to Medium (M) or lower. The LUX setting is very sensitive,
and at High (H) it will activate the light in bright or daylight conditions.
Light Heads are ashing rapidly
oIncrease the LUX setting about one quarter, for example, from Low (L) to
between Low and Medium (M).
o Reset the unit by turning it OFF, then ON again.
Light doesn’t turn ON when I walk in front of it.
oConduct any testing (aside from the 3-minute testing) at night or in low-
light conditions.
o For the motion sensor to work properly, the Light Unit needs to be
mounted at 7.5 feet above the ground. Having the light lower, on a table
or fence, or in a small, enclosed space may reduce the eectiveness of
the motion sensor.
oIncrease SENS and adjust the Motion Sensor Head accordingly.
Light does not turn ON when my dog/cat walks in front of or under it.
The motion sensor is not calibrated for small to medium pets or animals.
Think I need a new battery.
If you’ve had a series of freezing, stormy, overcast or cloudy days, the
rechargeable battery may not have been able to store enough of a charge to
optimally power the light.
oWait until there are clearer skies, and the temperature has reached above
freezing.
oAllow the light to charge in full sunlight for at least 6 hours.
oCheck for the indicator light for BLUE ashing during the day, or GREEN in
the evening. If you see either of these, it’s less likely you need a new battery.
o If you do not see the indicator light ash BLUE during the day, check the
solar panel installation, and make sure the Panel is free of dirt or debris.
Common Questions and Fixes

16
WHAT IS COVERED
This product is guaranteed to be free of factory defective parts and
workmanship for a period of 1 year from date of purchase.
Purchase receipt is required for all warranty claims.
WHAT IS NOT COVERED
This guarantee does not include repair service, adjustment and calibration
due to misuse, abuse or negligence. Unauthorized service or modication
of the product or of any furnished component will void this warranty in its
entirety. This warranty does not include reimbursement for inconvenience,
installation, setup time, loss of use, unauthorized service, or return shipping
charges. This warranty is not extended to other equipment and components
that a customer uses in conjunction with this product.
No service parts are available for this product.
Keep this QSG, along with a copy of your
purchase receipt, accessible for future reference.
Have Questions about your Deant DFI-0452-WH
Motion Security Light?
Home Depot Customer Service
1-866-308-3976
1-Year Limited Manufacturers Warranty
Table of contents
Popular Floodlight manuals by other brands


Ibiza
Ibiza LMH400LED-MKII instruction manual

Velleman
Velleman PEREL LEDA500 W-B Series user manual

Venture Lighting
Venture Lighting Select-Pro FL58601 user manual

Microh
Microh Titan RGB 1.5 user manual

Extreme Tent
Extreme Tent EXLED-001 Safety instructions and operation manual

DOTLUX
DOTLUX ARENA 4238 Series user manual


