Squire FEASQ01 User manual

SQUIRE
ADJUSTABLE BED
Model Number: FEASQ01
This product and all our bedding products are covered by one or
more of the following issued and pending U.S. patents including
Nos. 7448100, D657157, D663542, D657158, D657156, 8209801,
8209800, D663544, D663543 and other patents pending.
Photos are for illustration purposes only.
COPYRIGHT 2018 CUSTOMATIC®
Serial Number: _____________________________
(Place your serial number here for ready reference)
Owner’s Manual

NOTE: The serial number of your Squire can be found under the head and foot sections of the adjustable bed.
CUSTOMATIC® is a registered trademark of PPJ, LLC; d.b.a. Customatic Technologies and Customatic Adjustable Bedz.
All other trademarks are the property of their respective owners.

Safety Precautions
Parts List
Installation Guide
Remote Control Guide
Special Functions
Troubleshooting
Warranty & Registration
4
6
7
11
14
15
18
Table of Contents
09.26.2018

4
Safety Precautions
ATTENTION!
IMPORTANT SAFETY INSTRUCTIONS.
PLEASE READ THESE INSTRUCTIONS THOROUGHLY BEFORE USING THIS PRODUCT.
FOR OPTIMAL SAFETY, YOUR ADJUSTABLE BED SHOULD BE PLUGGED INTO A SURGE
PROTECTOR (not supplied with this adjustable bed).
ELECTRICAL SAFETY
Always unplug this adjustable bed from the electrical outlet
before any cleaning or maintenance of the bed. To safely
disconnect, make sure all controls are in the off position, then
remove the plug from the outlet.
Keep cord away from heated surfaces. Keep air openings free
of lint, hair and the like. Never operate when air openings are
blocked. Never drop or insert any object into any opening. Use
only indoors.
Cease use of this adjustable bed and contact the Customer Care
Center for repair if: (1) it has a damaged cord or plug, (2) it is not
working properly, (3) it has been dropped or damaged, or (4) it
has been dropped into water.
GROUNDING SAFETY
To reduce the risk of electric shock, electrical fire, or faulty
operation of this product, your adjustable bed may feature a
polarized plug meant to be used only with a grounded electrical
outlet. If this plug does not fit into your outlet, contact a qualified
electrician to install a properly grounded outlet. Failure to use
a properly grounded outlet for this product will compromise
this important grounding safety feature. The use of adapters
is not recommended unless the outlet is checked by a qualified
electrician to ensure the proper grounding of the adapter.
NOTE: Unauthorized modifications to this product could void
the electrical portion of your warranty.
WARRANTY WARNING!
This bed is specifically designed to require no maintenance by
you, the user. Any opening or tampering with the control box,
motors, or hand controls (with the exception of the battery
compartment if equipped) will result in a void of the warranty.
Only those authorized may conduct repairs or part replacement
on your adjustable bed. Unauthorized modifications to this
product could void the electrical portion of your warranty.
IN-HOME USE ONLY
This adjustable bed is designed exclusively for in-home use.
HOSPITAL DISCLAIMER: It is NOT designed for hospital use
and is NOT designed to meet hospital standards. Do not use
this bed with TENT TYPE oxygen therapy equipment or use near
explosive gases.
IMPORTANT SAFETY FEATURES
Weight fail safe feature: In the case that an overload of
weight is placed on the head or foot mechanism, the control
unit will automatically stop all functions. The control unit will
automatically resume all functions 30 seconds after excess
weight is removed.
The recommended weight limitations for your adjustable bed
is 850 lbs. on all sizes. For your adjustable bed to structurally
support the recommended weight, weight must be distributed
evenly across the head and foot sections. The adjustable bed
will not and is not intended to support or lift this amount in just
the head or foot section. Dependent on the size and/or model
of mattress, the available weight limit may be less.
Locking caster feature: This adjustable bed may be equipped
with special locking casters. For your safety, these casters will
prevent bed movement when all casters are in the locked
position. To lock casters, push down the safety latch on the
caster. To resume product mobility, lift the safety latch up.
NOTE: If your adjustable bed is positioned on a hard floor
surface such as hardwood or tile, it is strongly recommended
that rubber caster cups or carpet squares are placed under the
casters in addition to locking them in place. Casters will not roll
when locked, but may slide on an uncarpeted surface.

5
Safety Precautions
SAVE THESE INSTRUCTIONS.
Proper operation of your adjustable bed is necessary to ensure the long life and durability you expect
from a high-quality product. The manufacturer has tested and inspected this product prior to shipment.
USER-SERVICEABLE PARTS
This bed is specifically designed to have no maintenance by you,
the user. Therefore, you are encouraged not to open any motors,
alter the wiring, or adjust, modify or change the structure of the
product, as it will void the warranty.
RADIO FREQUENCY IS 433.92 MHZ
FCC compliant device complies with part 15 of the FCC Rules.
Operation is subject to the following two conditions: (1) This
device may not cause harmful interference, and (2) this device
must accept any interference received, including interference
that may cause undesired operation.
IMPORTANT NOTE: To comply with the FCC RF exposure
compliance requirements, no change to the antenna or
the device is permitted. Any change to the antenna or the
device could result in the device exceeding the RF exposure
requirements and void user's authority to operate the device.
CONSUMERS WITH PACEMAKERS
It is possible that the (optional) vibrating feature of this adjustable
bed may be misinterpreted by some pacemakers as movement
and/or exercise. This is common with any product that produces
a vibrating motion, and may or may not affect your pacemaker.
Please consult your physician with any concerns.
PRODUCT RATINGS
Lift Motor Restrictions: The lift motors in this bed are NOT
designed to operate continuously for more than three (3)
minutes over a thirty (30) minute time period, or approximately
10% duty cycle. To ensure reliable functionality and full life of
this product, do not attempt to exceed these limits.
NOTE: Attempting to circumvent or exceed this rating will shorten
the life expectancy of the product and may void the warranty.
The structure of the bed will support the recommended
weight when distributed evenly across the bed. The head and
foot sections are not designed to individually support or lift
this amount of weight. For optimal performance, entering
and exiting the adjustable bed with the bed in the flat or level
position is recommended.
NOTE: Exceeding the recommended weight restrictions could
damage your adjustable bed and void your warranty.
SMALL CHILDREN AND PETS WARNING
Immediately dispose of all packing materials as it can pose a
smother risk to small children and pets. Injury could occur also
if children or pets are permitted to play on or under the bed. Do
not allow children to operate this bed without adult supervision.
LIFT WARNING
Do not sit on the head or foot sections while in the raised
position, or during lift or lowering cycles.
MOVING AFTER INSTALLATION
Do not place adjustable bed vertically on its head or foot sections.
This may cause injury to persons or damage to the adjustable
bed. Two people are required for moving this adjustable bed
due to its heavy weight.
SAFETY
Massage motors, if any, will automatically shut off after running
continuously for 15 minutes. All massage functions will be
operational again after 5 minutes.
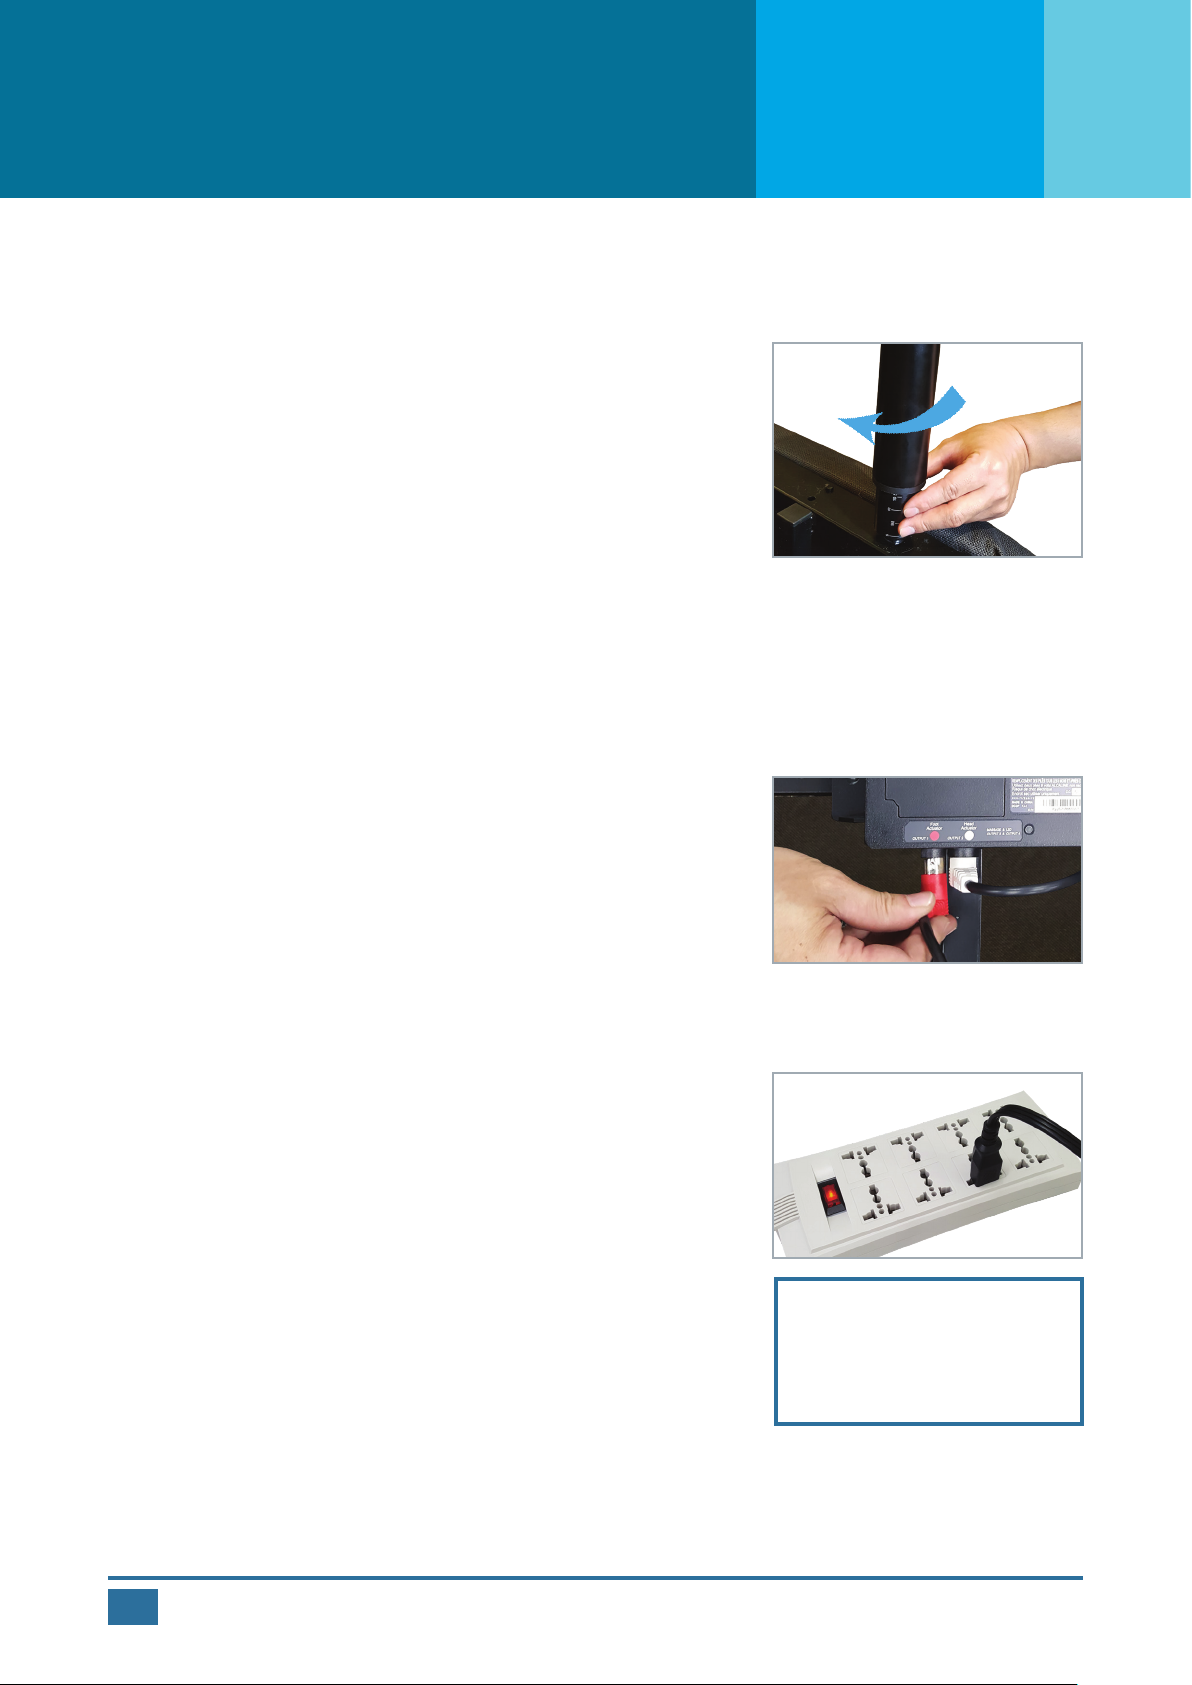
The input transformer voltage is AC 120V 60HZ; the output
voltage is DC24V 3A. In the case of a short circuit, a fuse on the
transformer will blow to protect the electrical equipment (Fuse:
1A~1.5A). If this occurs, seek professional assistance to replace
the fuse. Contact our Customer Care Center.
NOTICE: The changes or modifications not expressly approved
by the party responsible for compliance could void the user's
authority to operate the equipment.
Read the Owner's Manual carefully and completely before
operating the product. Electric shock may occur if electrical
components are not installed or operated according to these
guidelines.

6
Parts List
Before discarding any packing materials, check the adjustable bed carton and verify all items in the parts
list are included.
** Only available with Twin XL, Split Queen, and Split Cal King models.
*** Twin, Twin XL, Full, Full XL, Queen, Split Queen, and Split Cal King models have 4 bed legs. King and Cal King have 6 bed legs.
Remote control (1) AAA batteries (3)
Adjustable bed legs ***
Mattress retainer bar (1) Bed leg strap (1) **

7
NOTE: For safety reasons, lifting of the adjustable bed must always be performed by two (2)
people; and the unit should always be on a flat surface before opening.
Installation Guide
Setting up your adjustable bed
1
2
Lift the adjustable bed out of the shipping carton carefully, and
put it on a flat floor with the top side facing downward.
Remove all accessory boxes and cut the orange ties from inside
the bed.
FOR TWIN, TWIN XL, FULL, FULL XL, QUEEN, SPLIT QUEEN,
AND SPLIT CAL KING MODELS
FOR KING AND CAL KING MODELS
1
2
5
Lift the two separate sections of the adjustable bed out of the
shipping carton carefully, and put them on a flat floor with the
top side facing downward.
Remove all accessory boxes and cut the orange ties from inside
the adjustable bed.
Move the head and foot sections of the bed together. Make
sure they are properly aligned at the center.
To connect the head and foot sections, lift and place the foot
section cleat over the frame stem peg on the head section of
the adjustable bed.
Insert the cleat into the peg.
Insert the steel pin through the cleat and peg holes to ensure
stable assembly.
Repeat steps 4 to 6 on the other side of the bar connecting the
head and foot sections.
3
6
4
7

8
Installation Guide
Setting up the electronics
1
3
Remove and extend the power cord from the adjustable bed.
Turn the adjustable bed over carefully so the top side is now
facing upward.
NOTE: Do not rest the adjustable bed on its side. The weight
may damage the legs.
Plug the power cord into a working electrical outlet.
NOTE: For optimal safety, using a surge protector (not included)
is highly recommended.
Install batteries in the remote control. Try all functions on the
remote to make sure all features are operational.
NOTE: If the bed does not work, see the Troubleshooting section
of this manual.
Return bed to flat position before continuing with the installation.
4
5
2
IMPORTANT!
Make sure power cords do
not obstruct any adjustable
bed mechanisms.
Plug the foot lift cord into the control box. Insert it into the port
labeled “Foot Actuator”.
FOR KING AND CAL KING MODELS
FOR ALL MODELS
Attaching the bed legs
Take out the adjustable bed legs from the accessory box.
Thread the bed legs into the pre-drilled holes on the bed by
turning them in a clockwise direction.
Tighten the legs securely to the adjustable bed.
Adjust the legs to the desired height by turning it either
clockwise or counterclockwise.
NOTES:
• Do not overtighten the bed legs.
• Make sure all legs are adjusted to the same height.
1
2
3
4

9
Installation Guide
If the adjustable bed is set up without a headboard, place
your mattress on the adjustable bed. Your adjustable bed
installation is now complete.
If a headboard is to be installed, see "Assembling the
headboard bracket."
Installing the bed leg straps (optional)
Wrap the bed legs (front & back) together tightly using the bed
leg straps.
Fasten the straps to prevent movement & maintain stability.
1
2
To help prevent separation when using two (2) adjustable beds
together, use the bed leg straps.
Attaching the mattress retainer bracket
Align the open ends of the retainer brackets with the “loop”
retainer anchors located at the foot of the bed.
Slide the retainer bracket into the anchors allowing the ends to
glide into the loop.
NOTE: It is normal for the retainer bracket to indent into the sides
of the mattress when using the lift positions. This secures the
mattress to the bed deck providing superior body contouring.
1
2

10
Assembling the headboard bracket (optional)
IMPORTANT!
• Failure to follow the installation steps as they appear in this guide could result in damage to
your adjustable bed.
• For safety reasons, lifting of the adjustable bed must always be performed by two (2) people;
and the unit should always be on a flat surface.
• Make sure to position the bottom of the headboard cross member no more than
3 inches (76.2 mm) between the headboard and the top of the mattress.
Installation Guide
Place your mattress on the adjustable bed.
Your adjustable bed and headboard installation is now complete.
Using the remote control, raise the head section of the adjustable
bed to its full height.
Locate the first round panel under the head section of the
adjustable bed. The second round panel is for the bed leg.
Position the inner headboard bracket underneath the first round
panel. The bracket opening should be facedown under the bar.
Insert a retainer bolt fitted with a washer into the slot under the
inner headboard bracket and through the round panel. Tighten
the bolt using the Allen key wrench.
Place the open side of the outer headboard bracket onto the
exposed square tube of the inner headboard bracket to create
a tight fit.
Insert a retainer bolt fitted with a washer through the outer
headboard bracket and into the inner headboard bracket.
Tighten the bolt with an Allen key wrench. Leave loose enough
for adjusting.
Repeat steps 2 to 6 to install the brackets on the other side of
the head section of the adjustable bed.
When the headboard brackets are assembled, make sure there
is a space of 1.5 inches (38.1 mm) to 2 inches (50.8 mm) between
the edge of the adjustable bed and the headboard brackets.
Securely fasten the headboard bolts (not included with your
parts box) to the end of the headboard bracket assembly.
If you need to adjust the headboard brackets, unscrew the
bolts holding the outer headboard bracket and move them the
necessary distance. Reinstall the bolts and tighten securely.
4
6
8
7
9
10
1
2
3
5
NOTE: Headboard bracket parts are sold separately.

11
Remote Control Guide
1
2
10
11
6
Head or Foot Position Adjustments (1, 2, 7, 8)
Press the up or down button to raise or lower the head or foot sections of your adjustable bed.
Flat (3)
Press this button to return the bed to a flat position.
Under Bed Light (4)
Press this button to turn the under bed lighting on or off to help you safely navigate in and out of bed during the
night.
Presets
Anti-Snore (5)
Press this button to gently raise the head section and allow easier air intake which can help reduce snoring.
Reading/TV (6)
Press this button to raise the head section to an ideal position for watching TV, reading, or laptop use.
Rest Mode (9)
Press this button to slightly raise the foot section into a comfortable and relaxing position.
Zero-G or Zero Gravity (11)
Press this button to elevate the legs slightly higher than the chest, in effect, allowing the blood to flow back to the
heart to help reduce stress and fatigue.
LED Flashlight (10)
Press this button to turn the flashlight on your remote control on or off.
7
8
4
5
9
3

12
Remote Control Guide
Understanding the remote control features
• The adjustable bed uses RF (radio frequency) remote control system.
• The buttons are backlit when pressed to aid in the visibility of the remote control in low-light environments.
• It is not necessary to face the receiver when operating the remote control. Remote signal is best transmitted
within 9 feet (3 meters) of the adjustable bed.
NOTE: The adjustable bed may show minor intermittent performance because of typical RF interference. This is
normal in the operation of the adjustable bed, not a defect.
Pairing your remote control to your adjustable bed
Your adjustable bed is already paired to your remote control at the factory. Manual pairing is only needed for
replacement remote controls or to change tandem systems back to a single system.
NOTE: For the pairing to be successful, make sure the distance between the control box and the remote control is
not more than 2 meters.
Plug your adjustable bed to a working electrical outlet. A surge
protector is recommended.
The control box automatically enters and stays in pairing mode
for 7 seconds.
On the remote control, press the LED and Foot Up () buttons
together for 3 seconds.
The LED light on the control box lights up and remains on,
which means the pairing is successful.
Your remote control is now successfully paired with your
adjustable bed.
1
2
LED light on the control box

13
Remote Control Guide
Synchronizing two beds for tandem operation
To operate two adjustable beds simultaneously, you must pair both beds (Bed A and Bed B) to one remote control
(Remote A).
LED light on the control box
Plug both Bed A and Bed B to working electrical outlets. A surge
protector is recommended.
Press the FLAT button on Remote A and Remote B to align the
beds properly in a flat position.
Unplug and then plug Bed B again to put it back into pairing
mode. Pairing mode lasts for 7 seconds.
1
2
3
Using Remote A, press the LED and Foot Up () buttons together
for 3 seconds. The LED light on the control box lights up and
remains on, which means the pairing is successful.
Bed A and Bed B can now be controlled simultaneously using
Remote A.
NOTE: When operating beds in tandem, both beds should
always be plugged into working electrical outlets.
4
Resetting your system
Resetting the system is sometimes necessary to restore the system to its factory setting, clear a system error, or
change a tandem system to a single system or to two independent systems.
Unplug the power cord from the electrical outlet.
Press and hold the FLAT button to continue sending a signal
to the control box, and then plug the power cord back in.
Wait for 7 seconds, and then release the FLAT button.
NOTE: The control box must receive the Flat signal from the
remote control for at least 5 seconds after the power cord is
plugged back in. The reset is complete.
Pair the remote control with the control box again. For
more information, see "Pairing your remote control to your
adjustable bed" on page 12.
1
2
3
4

14
Activating the emergency power down feature
Locate and remove the cover on the 9V battery compartment
of your control box.
Install two (2) alkaline 9V batteries (not included with the
adjustable bed). Replace the battery cover.
When the 9V batteries are installed and a power failure occurs,
press the FLAT button on the remote control for the bed to
return to a flat position.
NOTE: The 9V batteries are for single use only. After lowering
the adjustable bed once during a power failure, replace with a
new set of batteries.
1
3
2
Your adjustable bed supports the emergency power down feature when a power failure occurs while the head and/
or foot sections are raised.
Special Function

15
In the event the adjustable bed fails to operate, investigate the symptoms and possible solutions below.
• Make sure the remote control is paired with the
adjustable bed.
• Check that the power cord is plugged into a working
electrical outlet. Unplug the power cord from the
outlet. After 30 seconds, plug it back in. Press any
button on the remote control and hold until light on
the remote control illuminates.
The adjustable bed does not respond
when the remote is used. Remote
control LED illuminates and appears to
be normal.
SYMPTOM SOLUTIONS
• Make sure the remote control is paired with the
adjustable bed.
• Check that the power cord is plugged into a working
electrical outlet. Unplug the power cord from the
outlet. After 30 seconds, plug it back in. Press any
button on the remote control and hold until light on
the remote control illuminates.
• Check that the surge protection device or electrical
outlet is not defective. Test the outlet by plugging in
another working appliance.
No features or function of the
adjustable bed activates.
• Check if the remote buttons light up when pressed.
If not, replace the batteries.
• Remove batteries. Leave them out for 30 seconds
before putting them back into the remote control.
• Scratch the terminals inside the remote's battery
compartment with a coin or key.
• Make sure batteries are properly installed. Follow the
markings on the battery compartment.
Remote control does not work or
light up.
This is normal. The lift motors click when they are
engaged. No action is required.
A clicking noise is heard under the bed
when raising or lowering the sections.
Troubleshooting

16
Troubleshooting
In the event the adjustable bed fails to operate, investigate the symptoms and possible solutions below.
• Your adjustable bed may be obstructed preventing
smooth operation. Remove obstructions from around
and under the bed.
• Check that the head section is not too close to the
wall.
• If a headboard is installed, check that it is not too
close to the edge of the mattress. Make sure there
is enough distance between the headboard bracket
and the mattress.
Head or foot section elevates adjustable
bed but does not return to flat position.
SYMPTOM SOLUTIONS
• Check the batteries in the remote control. Replace
with new batteries, if necessary.
• Make sure that you are following the duty cycle of the
motors. Do not operate for more than two minutes
over a 20-minute period or approximately 10% duty
cycle.
• Press the lift buttons firmly and accurately.
• Wireless remote control may be experiencing
common radio frequency interference from other
radio transmitting devices. Wait several seconds and
then try pressing the lift buttons again.
Head or foot lift function has minor
interference during operation.
Reset the system and then sync one remote to both
adjustable beds again.
Split or tandem system is out of sync.
Only one of the two adjustable bed
raises or both beds raise but one side is
higher than the other.

17
Troubleshooting
1. Clear any clutter or obstructions under and around
the adjustable bed. Radio frequency interference
from other remotes or electronic devices may affect
normal operation.
2. Check the batteries in the remote.
3. Press the lift buttons firmly and accurately.
The adjustable bed stutters when in
motion.
In the event the adjustable bed fails to operate, investigate the symptoms and possible solutions below.
1. Remove any pin, nut, bolt or white bushing one at a time.
2. Lubricate it by applying the grease with a cotton
swab. Using a lithium or spray lubricant is
recommended. (Lubrication can be obtained by
contacting Customatic's Customer Care Center).
3. When placing the lubricated pin, nut, bolt, or white
bushing back onto the adjustable bed, make sure
there is a looser tightening on the nut.
4. Additional solution: After completing these steps,
spray the pins, nuts, bolts, and white bushings with a
lubricant.
The adjustable bed is squeaking.
SYMPTOM SOLUTIONS
1. Unplug the adjustable bed, and then plug it back in.
Wait for one minute.
2. Press any button on the remote. Wait for 3 seconds.
3. Turn the under bed lights on. Lights should be
working properly now.
Under bed lights are alternating.

18
Warranty
5-Year Limited Warranty For Adjustable Beds
PPJ, LLC (“CUSTOMATIC”) WARRANTS THAT IT WILL, AT
CUSTOMATIC’S OPTION, REPLACE OR REPAIR PURCHASER’S
CUSTOMATIC® SYSTEM IF IT IS DEFECTIVE DUE TO FAULTY
WORKMANSHIP OR MATERIALS, SUBJECT TO THE LIMITATIONS
DESCRIBED IN THIS WARRANTY. CUSTOMATIC UNDERTAKES
NO RESPONSIBILITY FOR THE QUALITY OF THE GOODS EXCEPT
AS OTHERWISE PROVIDED IN THIS CONTRACT. THERE ARE NO
WARRANTIES THAT EXTEND BEYOND THE DESCRIPTION ON THE
FACE THEREOF.
THIS WARRANTY APPLIES ONLY TO THE MODELS OF THE
CUSTOMATIC SYSTEM LINE. THESE MODELS MAY BE IDENTIFIED
BY REFERENCE TO THE SERIAL NUMBER ON THE PRODUCT.
YEARS 1 THROUGH 5: FULL COVERAGE OF PARTS AND LABOR
CUSTOMATIC models are warranted against defects in the
workmanship or materials for a period of five (5) years from the
Warranty commencement date. During these first five years of
the Warranty, the entire product is so covered, including factory
supplied electronics, electrical components, drive motors, Wi-Fi
module, power supply and power supply cords, and massage
motors. Upon notice during the first through fifth year from
the Warranty commencement date, CUSTOMATIC will send
replacement parts to the Purchaser, at no cost, in order to
replace any such defective part. In addition, CUSTOMATIC will
pay all authorized labor and transportation costs associated
with the repair or replacement of any parts which CUSTOMATIC
determines to be defective. This five (5) year Warranty shall not
apply if the Purchaser does not return any and all defective
parts to CUSTOMATIC within 15 days of Purchaser’s receipt of
such replacement parts furnished. Return of the adjustable bed,
however, should it need to be replaced, may be required.
In no instance will this Warranty cover any damage attributable
to misuse or to normal wear and tear or to excessive weight
placed upon the product. Nor will this Warranty cover any
Purchaser other than the original Purchaser nor will it cover
product purchased from an unauthorized third party. If you
are not the original Purchaser of this product, you take “as is”
and “with all faults.” Purchases of “Floor Models” are regarded
“as is” products & subject to the terms thereof. If you did not
purchase this CUSTOMATIC System directly from CUSTOMATIC
or any of its approved authorized distributor/retailer dealers, we
will require proof of purchase from you demonstrating that you
are the original Purchaser and are eligible to make a valid claim
under this Warranty.
FRAME ONLY—LIFETIME WARRANTY
Notwithstanding the above, CUSTOMATIC extends a LIFETIME
WARRANTY on the frame itself used in this product. Specifically,
CUSTOMATIC warrants that for a full 20 years, the estimated life
of the frame, any defect in the workmanship or the materials
used in the frame itself shall be covered. The 20-year time span
will be dated from the commencement of this Warranty. For
purposes of this Lifetime Warranty, the frame consists of the
metal structure of the adjustable bed and specifically excludes
its cover, its side rails, decking and legs, actuator lift motors,
massage motors, control box, remote controls, Wi-Fi modules,
power supply, and any power supply cords. Return of the frame
should it need to be replaced, is not required.
ADDITIONAL TERMS AND CONDITIONS
In no instance will this Warranty cover any damage attributable
to misuse or to normal wear and tear or to excessive weight
placed upon the product. Nor will this Warranty cover any
Purchaser other than the original Purchaser nor will it cover
product purchased from an unauthorized third party. If you
are not the original Purchaser of this product, you take “as is”
and “with all faults.” If you did not purchase this CUSTOMATIC
System directly from CUSTOMATIC or an Authorized Dealer,
we will require proof of purchase from you demonstrating that
you are the original Purchaser and eligible to make a valid claim
under this Warranty.
This Warranty does not include coverage for damage caused by
the Purchaser or by other users, if the product has been used
in a manner inconsistent with the operation and maintenance
procedures outlined in the Owner's Manual, this Warranty,
or any other applicable document published or approved by
CUSTOMATIC.
Nor does it include coverage if the product has been repaired or
modified by the Purchaser or by an unauthorized third party or
if the product has been damaged in transit.
This Warranty does not apply to damage to mattresses, fabric,
cables, electrical cords or items supplied by Resellers, as defined
below. Contact the Reseller or other appropriate party for
Warranty information on these items. Nor does this Warranty
apply to any unnecessary service calls, including costs for in-
home service calls solely for the purpose of educating the
consumer about the unit or finding an unsatisfactory power
connection. In addition, if the recommended weight restrictions
are not followed (850 lbs. on all sizes), this Warranty is void.
Replacement parts may be new or reconditioned at
CUSTOMATIC’s discretion.
Except for the Lifetime Warranty provided for the frame of this
product, there is no Warranty at all after five years, dating from
commencement of this Limited Warranty.
Additional Limitations on Warranty Coverage
In the event a Warranty claim is filed and a Warranty replacement
is deemed necessary, Purchaser will be required to surrender
the original product, including any components, to CUSTOMATIC
at the time of the replacement. Return of the adjustable bed,
however, should it need to be replaced, may be required.
Repairs to or replacement of the CUSTOMATIC System or its

19
Registration
NAME ________________________________________________
PHONE _______________________________________________
ADDRESS _____________________________________________
CITY _________________________________________________
STATE __________________________ ZIP CODE ___________
EMAIL ADDRESS ______________________________________
STORE WHERE PURCHASED __________________________
SERIAL NO. ___________________________________________
INVOICE NO. _________________________________________
MODEL NO. __________________________________________
SURVEY
GENDER: __ M __ F
AGE: __ 18-30 __ 31-40 __ 41-50
__ 51-60 __ 61-70 __ 71 & up
Reason for purchasing an adjustable bed:
___ Health ___ Comfort ___ Other
How did you find out about our beds?
___ Advertising ___ A friend
___ Store ___ Article
___ Internet ___ Other
Please mail to:
CUSTOMATIC® TECHNOLOGIESTM
Customer Care Center
550 Crescent Blvd., Gloucester City, NJ 08030
WARRANTY REGISTRATION FORM
You can also register your adjustable bed online at www.customaticbeds.com.
components under the terms of this Limited Warranty will apply
to the original Warranty period and will not serve to extend such
period. This Warranty begins on the “Warranty commencement
date” which is the date of purchase for new unused products.
If you did not purchase this CUSTOMATIC System directly from
CUSTOMATIC or an Authorized Dealer, proof of purchase will
be required to demonstrate that you are the original Purchaser
and eligible to make a valid claim under this Warranty. If original
proof of purchase is not provided by the Purchaser, CUSTOMATIC
reserves the right to determine if the unit is covered, or is not
covered, by this Warranty and may use the manufacturing date
as the Warranty commencement date.
The decision to repair or to replace defective parts under this
Limited Warranty shall be made by CUSTOMATIC at its option
and at its sole discretion. Except for the Lifetime Warranty
provided for the frame of this product, there is no Warranty at
all after five years, dating from commencement of this Limited
Warranty.
CUSTOMATIC SHALL NOT BE LIABLE FOR INCIDENTAL
OR CONSEQUENTIAL DAMAGES RESULTING FROM THE USE
OF THIS PRODUCT OR ARISING OUT OF ANY BREACH OF THIS
WARRANTY. THE EXCLUSIVE REMEDY FOR BREACH OF THIS
WARRANTY SHALL BE REPLACEMENT OR CREDIT TOWARDS
REPLACEMENT AS SET FORTH HEREIN. THERE ARE NO EXPRESS
OR IMPLIED WARRANTIES, INCLUDING IMPLIED WARRANTIES OF
MERCHANTABILITY AND FITNESS FOR A PARTICULAR PURPOSE,
OTHER THAN THE WARRANTY DESCRIBED ON THE FACE OF THIS
LIMITED WARRANTY.
Some states do not allow the exclusion or limitation of incidental
or consequential damages, so the above limitation or exclusion
may not apply to every Purchaser. This Warranty gives the
Purchaser specific legal rights, and the Purchaser may also
have other legal rights, which may vary from state to state. This
Warranty is valid in all 50 states, Puerto Rico, and Canada.
If you, the Purchaser, experience any problem with your
CUSTOMATIC System during the Warranty period, please
consult the troubleshooting section of your Owner's Manual.
If problem persists, please contact CUSTOMATIC’s Customer
Service Department by calling the telephone number located in
your manual.

IF YOU EXPERIENCE ANY TROUBLE WITH YOUR BED WITHIN THE
WARRANTY PERIOD, PLEASE CONSULT THE TROUBLESHOOTING
GUIDE PROVIDED WITH YOUR BED AND ONLINE, IF APPLICABLE. IF
PROBLEMS PERSIST, PLEASE CALL:
CUSTOMER SERVICE TOLL FREE NUMBER
1-720-458-5955
Please have your receipt ready and available.
THANK YOU AND ENJOY YOUR ADJUSTABLE BED!
POWERED BY
Table of contents
Popular Indoor Furnishing manuals by other brands

GMI
GMI SRI-205 Assembly instructions

KOBLE
KOBLE Larsen HM-TS001-001 Assembly instructions

Accora
Accora Configura Advance instruction manual

American Standard
American Standard Moments 2506.011 installation instructions

JWA
JWA HENDON 68569 Assembly instruction

LumiSource
LumiSource LS-VIVIDFL XX Assembling instructions