SR Suntour Electric bicycle User manual
Owners Manual
SRS/SY pedelec
SRS/SY pedelec
English

Caution
SR SUNTOUR OWNERS MANUAL SRS/SY pedelec
2
►
Be sure to read this manual carefully before using your electric bicycle.
Inappropriate usage of your electric bicycle may cause damage to the
product, serious injuries or even death to the rider.
►
Do not use damaged components – consult your authorised SR SUNTOUR
dealer immediately.
►The battery of the electric bicycle contains chemicals which can be dan-
gerous when used improperly, warnings included in this manual must
be followed in order to reduce the possibility of dangerous situations
resulting in injuries or possible death. Never try to open any SR SUNTOUR
device of the electric bicycle, especially not the battery. Opening any SR
SUNTOUR battery implies the risk of getting seriously injured.
►Do not let the battery come into contact with water or any other liquid
other than rain or snowfall. The guarantee will be void if the battery gets
in contact with water. Whenever the battery gets in contact with liquid
immediately disconnect it to prevent dangerous situations.
►
Do not store the battery above room temperature. The battery life expec-
tancy will be signicantly reduced if the battery is stored under higher
temperatures.
►Do not place the battery immediately close to a ame or any other heat
source. Extreme heat can cause the battery to explode. Keep the area
where the battery is charged well ventilated. Keep it free from litter and
anything combustible to avoid re from sparks or overheating.
►
The battery must only be charged with the supplied charger. Using a
dierent charger can result in malfunction and reduced lifecycle of the
battery.
►
Charge the Li-ion battery indoors at a temperature between 0ºC to 40ºC
(32ºF -104 ºF). The Li-ion battery charger cannot charge a battery with a
temperature above 60º C or less than -3 ºC.
English
WARNING !
Failure to comply with the given warnings and instructions may cause
damage to the product, injuries or even death to the rider and user.

Caution
SR SUNTOUR OWNERS MANUAL SRS/SY pedelec
3
►
If you notice a strange smell or smoke, un-plug the charger immediately
from the power socket and disconnect the battery from the charger!
Take your battery and charger to your authorized dealer for service or
replacement.
►Disconnect the charger when the battery is fully charged.
►Use only genuine SR SUNTOUR parts. The use of non-designated after-
market accessories, replacement and spare parts voids the warranty of
the electric bike drive unit and might cause failure to the system.
►
Do not disassemble or modify any of the parts of the drive unit. The
warranty will be void in case of any modication.
►
SR Suntour electric bike units are designed for the usage on single
seated bicycles for regular and common use on regular city- and trek-
king bikes. The intended use of the drive unit is accordingly.
►
This instruction sheet contains important information about the correct
installation, service and maintenance of your drive unit. Nevertheless
please be informed that special knowledge and tools are essential to
install, service and maintain SR SUNTOUR drive units for electric bicycles.
Common mechanical knowledge may not be sucient to repair, service
or maintain the devices. Therefore we strongly recommend getting your
system serviced and/or maintained by a trained and qualied bicycle
mechanic. Improper installation, service or maintenance can result in
failure of the product, accident, injury or even death.
►
Always be equipped with proper safety gear. This includes a properly
tted and fastened helmet. Make sure your equipment is in awless
condition.
►
Make sure to learn about the electric power assistance, the changed
bicycle behaviour and handling of your bike. Learn how to ride and train
your skills. Know your limits and never ride beyond those.
English
SR SUNTOUR OWNERS MANUAL SRS/SY pedelec
4
Foreword
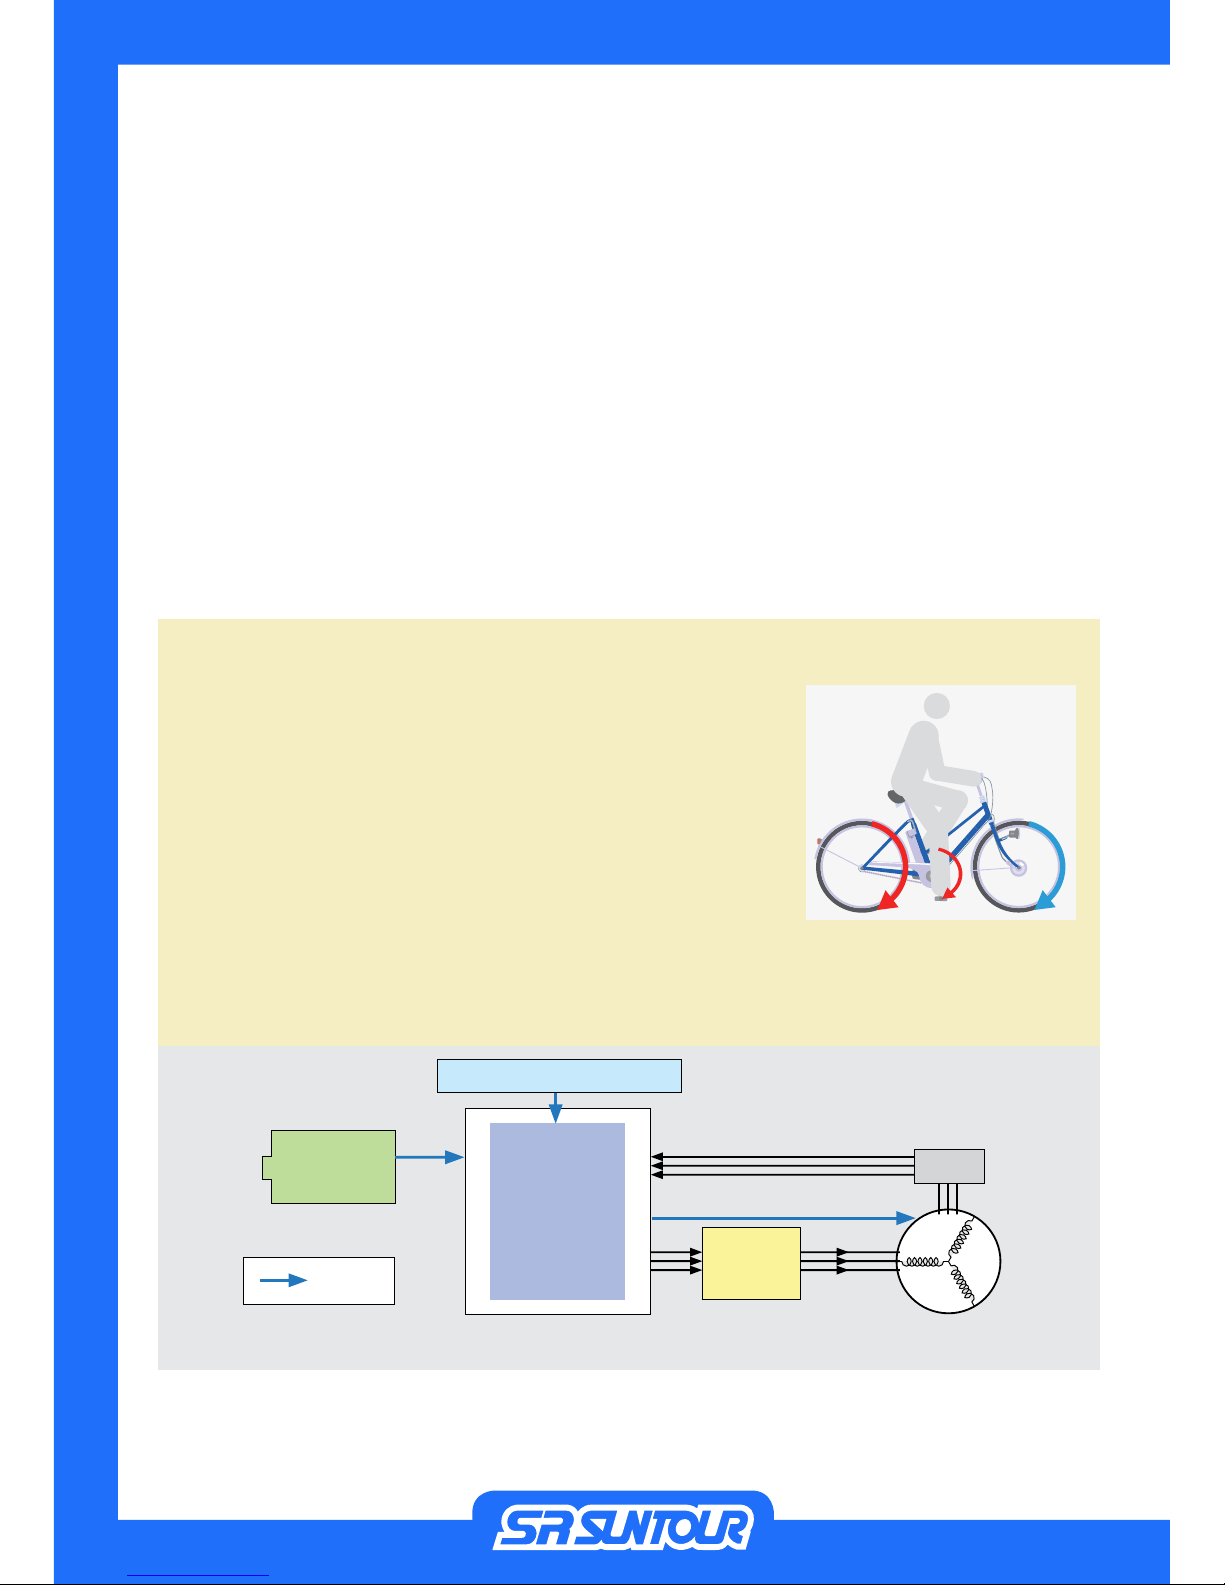
What is a Pedelec?
It is legally considered as a conventional bicycle, whereas the
rider is enjoying some electrical power assistance based on
the human power brought up by the rider. Just ride like on a
conventional bike, the system will add some extra power. It feels
like having tailwind or a continuous descending ride.
In European Countries the assistance is legally limited to 250W
nominal power and a max. speed of 25km/h. Riding faster than
that is possible, but there will be no assistance when riding
faster than 25km/h.
A Pedelec is sometimes called EPAC, Light-Electric-Vehicle (LEV), Hybrid Bicycle or eBike or
electric bicycle with Pedal-Assisted-System (PAS).
Dear customer,
congratulations on your new electric bicycle purchase. The bike is equipped with the SR SUNTOUR
SRS-SY-pedelec drive unit with a rechargeable Lithium-Ion battery, a display and user interface,
a torque sensor, a controller and a brushless front hub motor..
To make your ride smooth, safe and fun please take some time to read this manual carefully. It
contains information on the proper care of the drive unit of your electric bicycle and advice on
how to achieve the bikes’and batteries’ full lifespan.
In case of any enquiries not covered by this manual please contact your local dealer.
Enjoy the riding!
Torque Sensor
Motor
Drive
Control
Motor drive
3-Phase
Brushless
Motor Driver
DC Brushless
Motor
Li-Ion Battery
Hall IC
schematic functional diagram
English

SR SUNTOUR OWNERS MANUAL SRS/SY pedelec
5
Table Of Contents
Foreword ...................................... 4
Table Of Contents ........................ 5
Drive Unit Components .............. 6
Display and User Interface...........7
Battery, Charger and charger
adaptor......................................... 8
Battery Charging ......................... 9
User Interface and Display........ 11
Fuel Gauge ..................................... 12
Assist Mode .................................... 13
Information Modes...................... 13
Speed................................................ 14
Total Distance ................................ 14
Trip Distance .................................. 15
Re-setting the trip distance.................15
Trip Time .......................................... 15
Re-setting the trip time.........................15
Average Speed .............................. 16
Wheel Size....................................... 16
Setting the wheel diameter................ 16
Error Code........................................17
Error Codes................................. 18
Error Code Chart........................... 18
Error troubleshooting guide.... 19
E00 - Controller Communication
Error..............................................................19
E02 - Coil Sensor Error........................... 20
E03 - Beyond the torque sensor
range............................................................21
E05 - Torque Sensor Error .....................22
E11 - Beyond the battery voltage sen-
sor- or battery-current sensor-
range................................................ 23
E12 - Beyond the battery temperature
sensor range.................................. 24
E13 - Beyond the motor temperature
sensor range...................................25
E21 - Drive Battery over current, low
voltage or overvoltage.............. 26
E22 - Battery Overheating....................27
E23 -Motor Overheating ...................... 28
E31 - Hall-IC Error.................................... 29
E32 - Switch Box Communication
Error.................................................. 30
E33 - Battery Communication Error..31
Operating Range ....................... 32
Range Inuencing Factors........ 32
Maintenance and cleaning ....... 33
Cleaning .......................................... 33
Tightening Torque........................ 33
Disassemble and assemble front
wheel................................................ 34
Technical Specication.............. 38
Motor .......................................................... 38
Controller features ................................. 38
Charger....................................................... 38
Battery ........................................................ 38
Conformity ................................. 38
Limited Warranty....................... 39
English
SR SUNTOUR OWNERS MANUAL SRS/SY pedelec
6
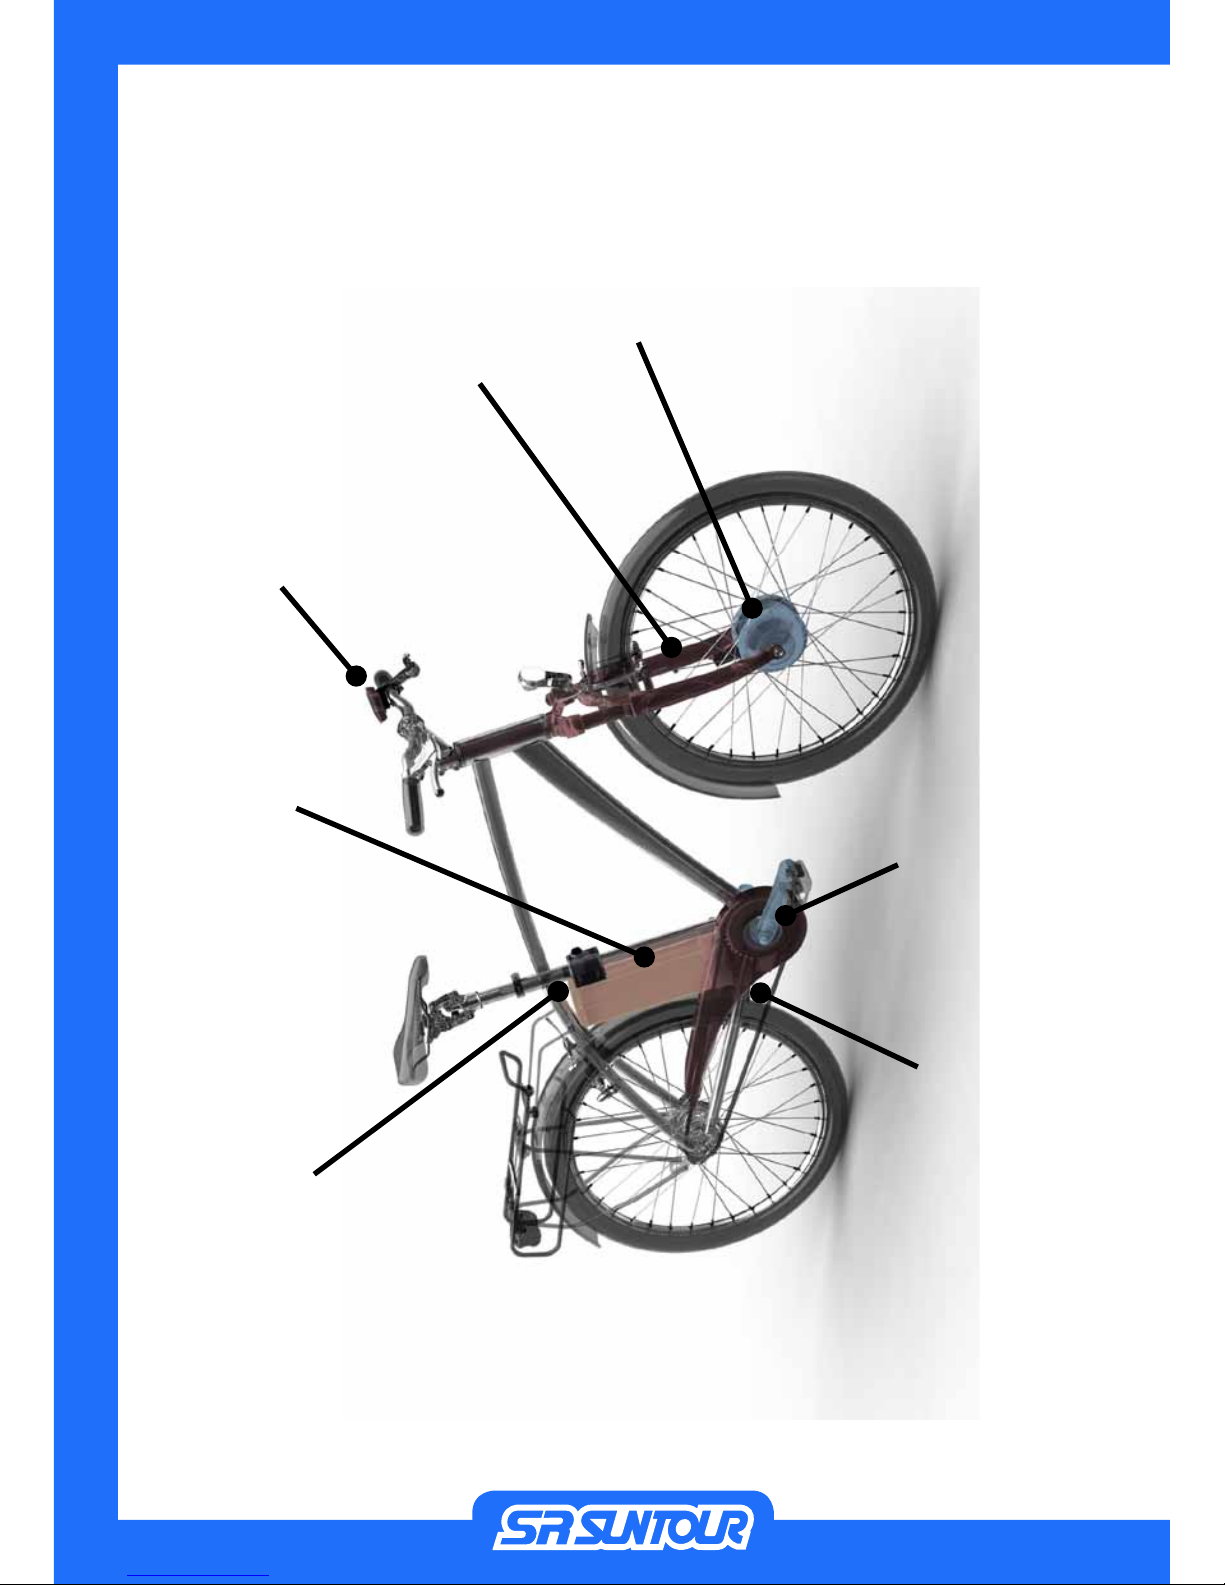
Hub motor
Suspension fork
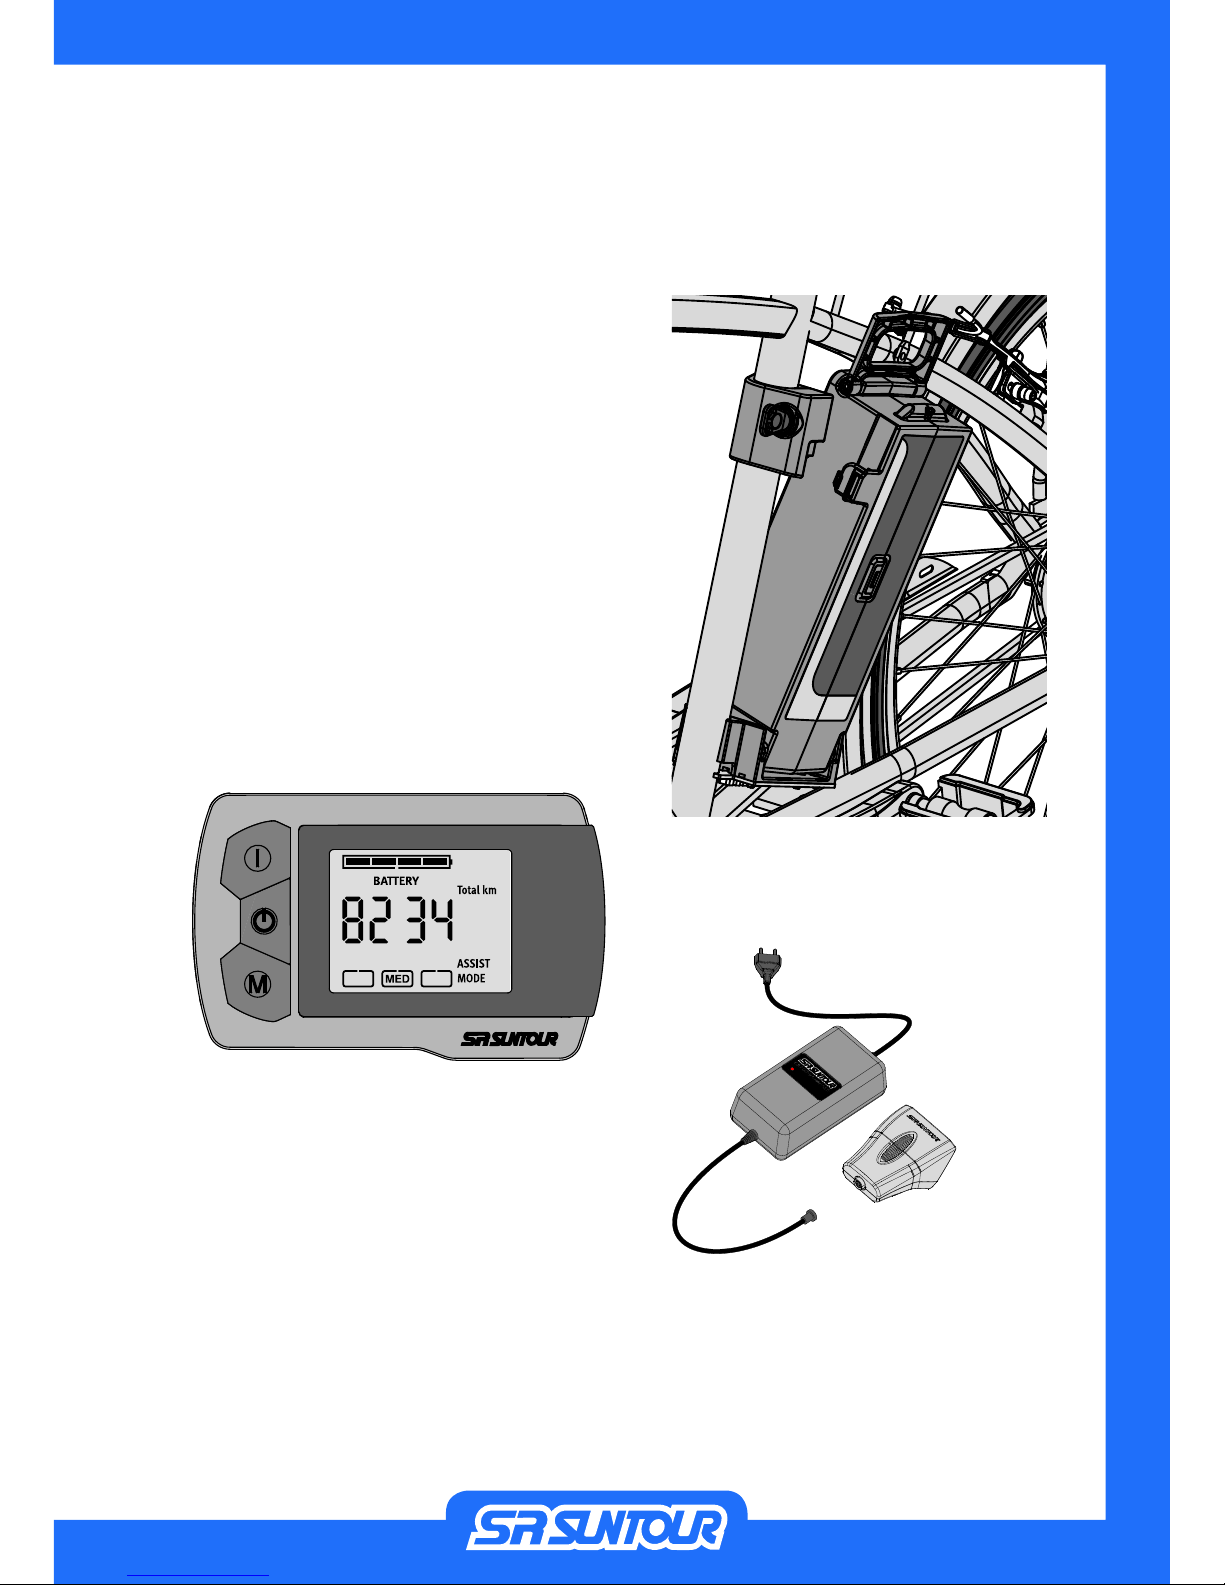
Upper holder and lock
Controller
Torque sensor crank-
assembly
Display
Battery
* Shown on a virtual bike which may look dierent to the bike which this owners manual came along with
Drive Unit Components
English

SR SUNTOUR OWNERS MANUAL SRS/SY pedelec
7
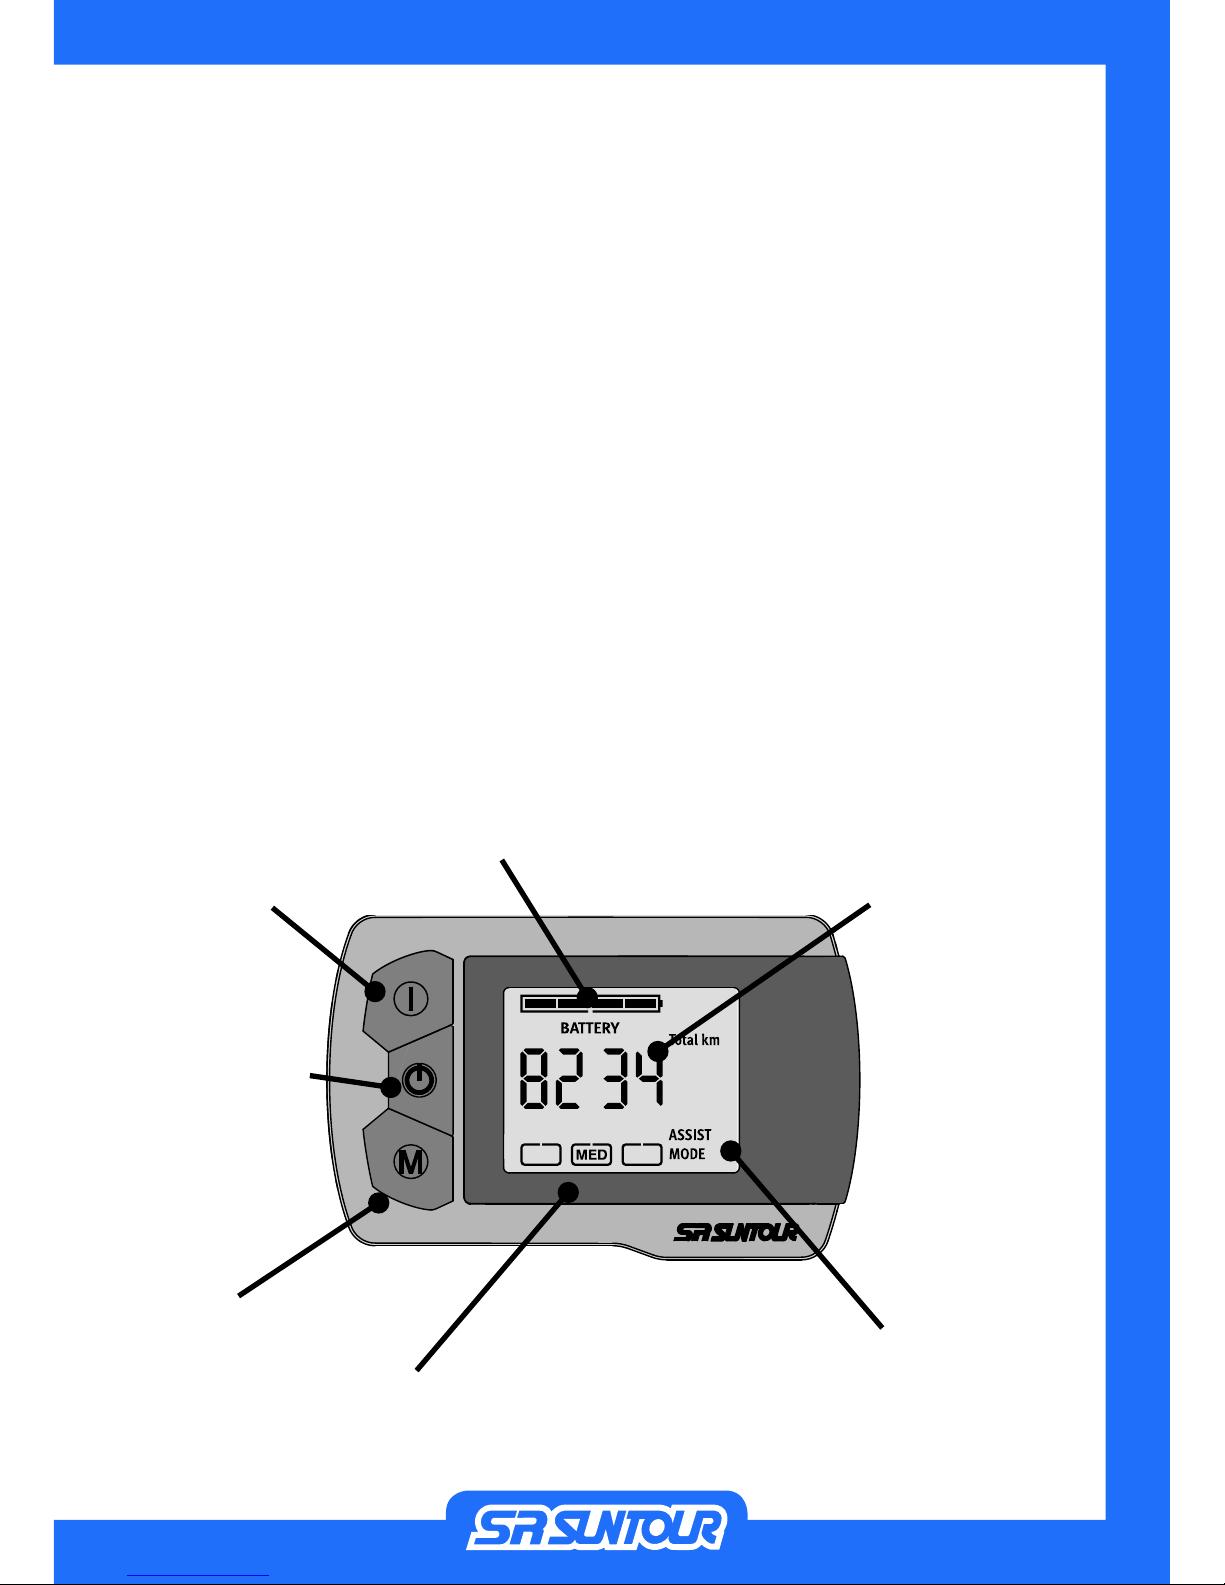
Mode Button
On/O-Button
Info-Button
* Shown display layout may vary compared the display on the bike which this owners manual came along with
Display and User Interface
English
SR SUNTOUR OWNERS MANUAL SRS/SY pedelec
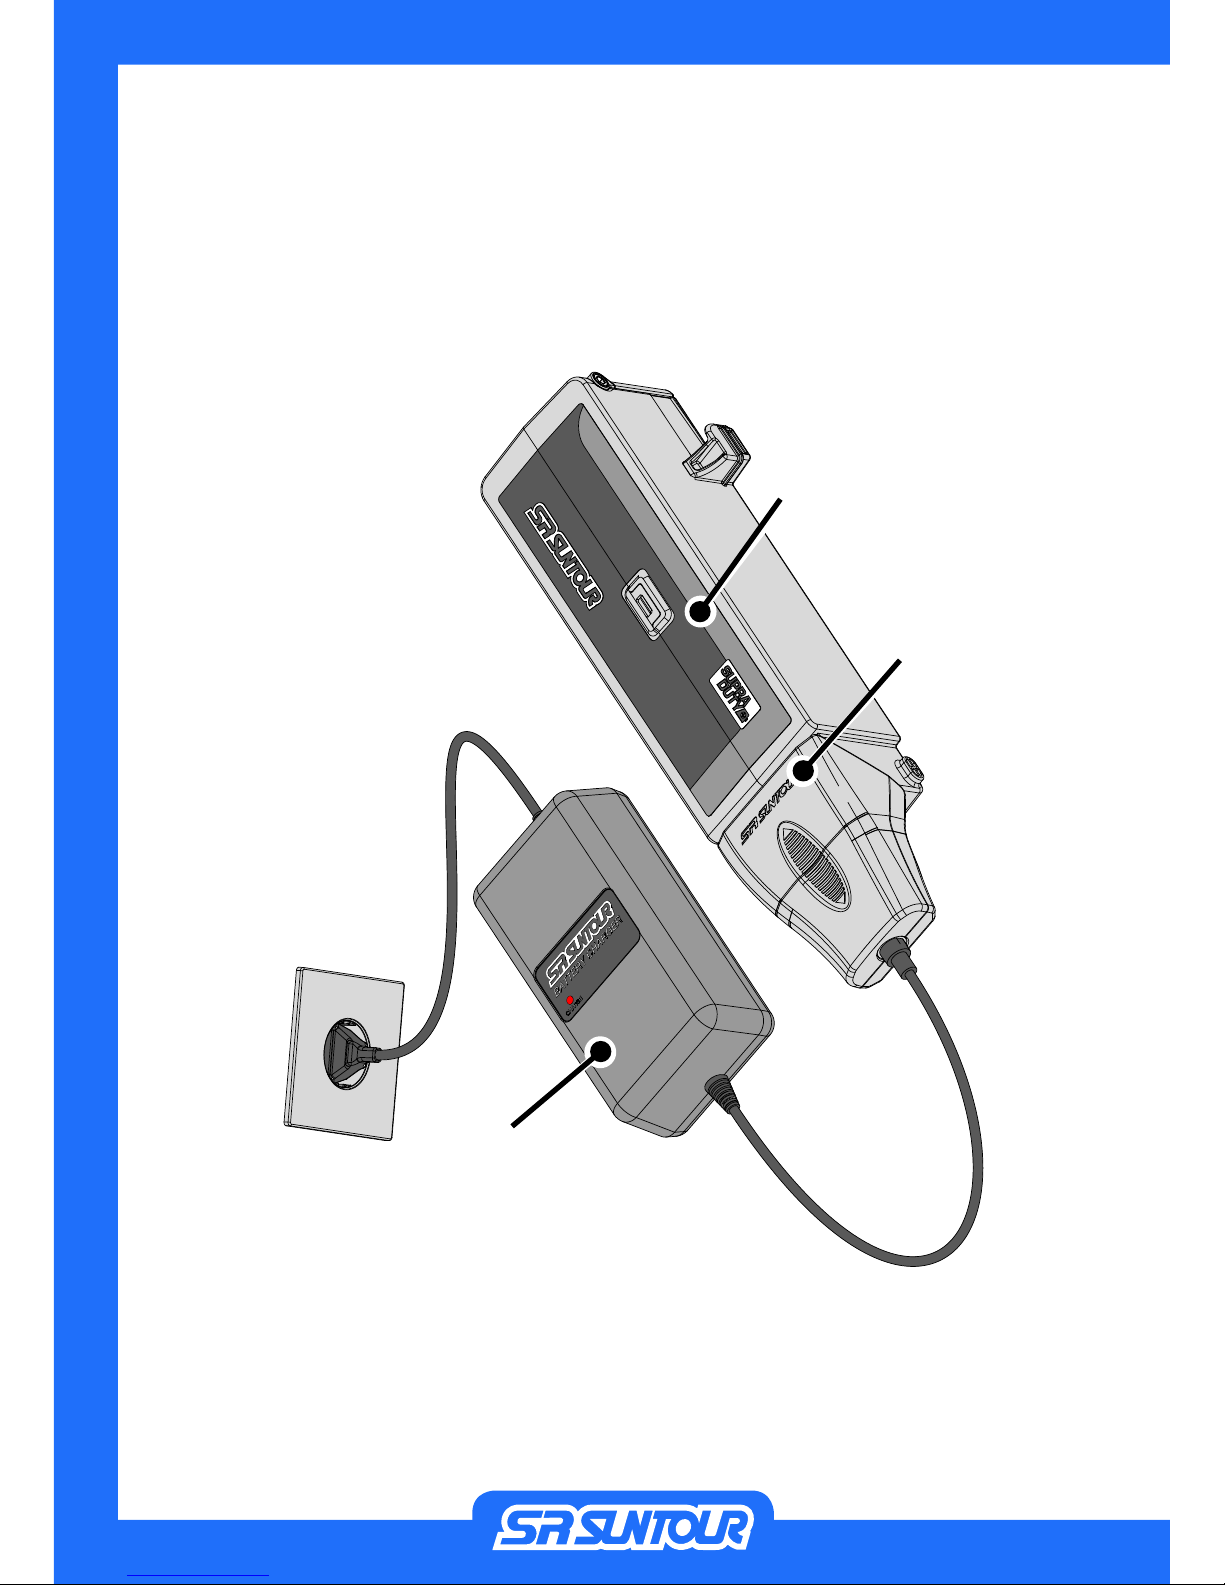
8
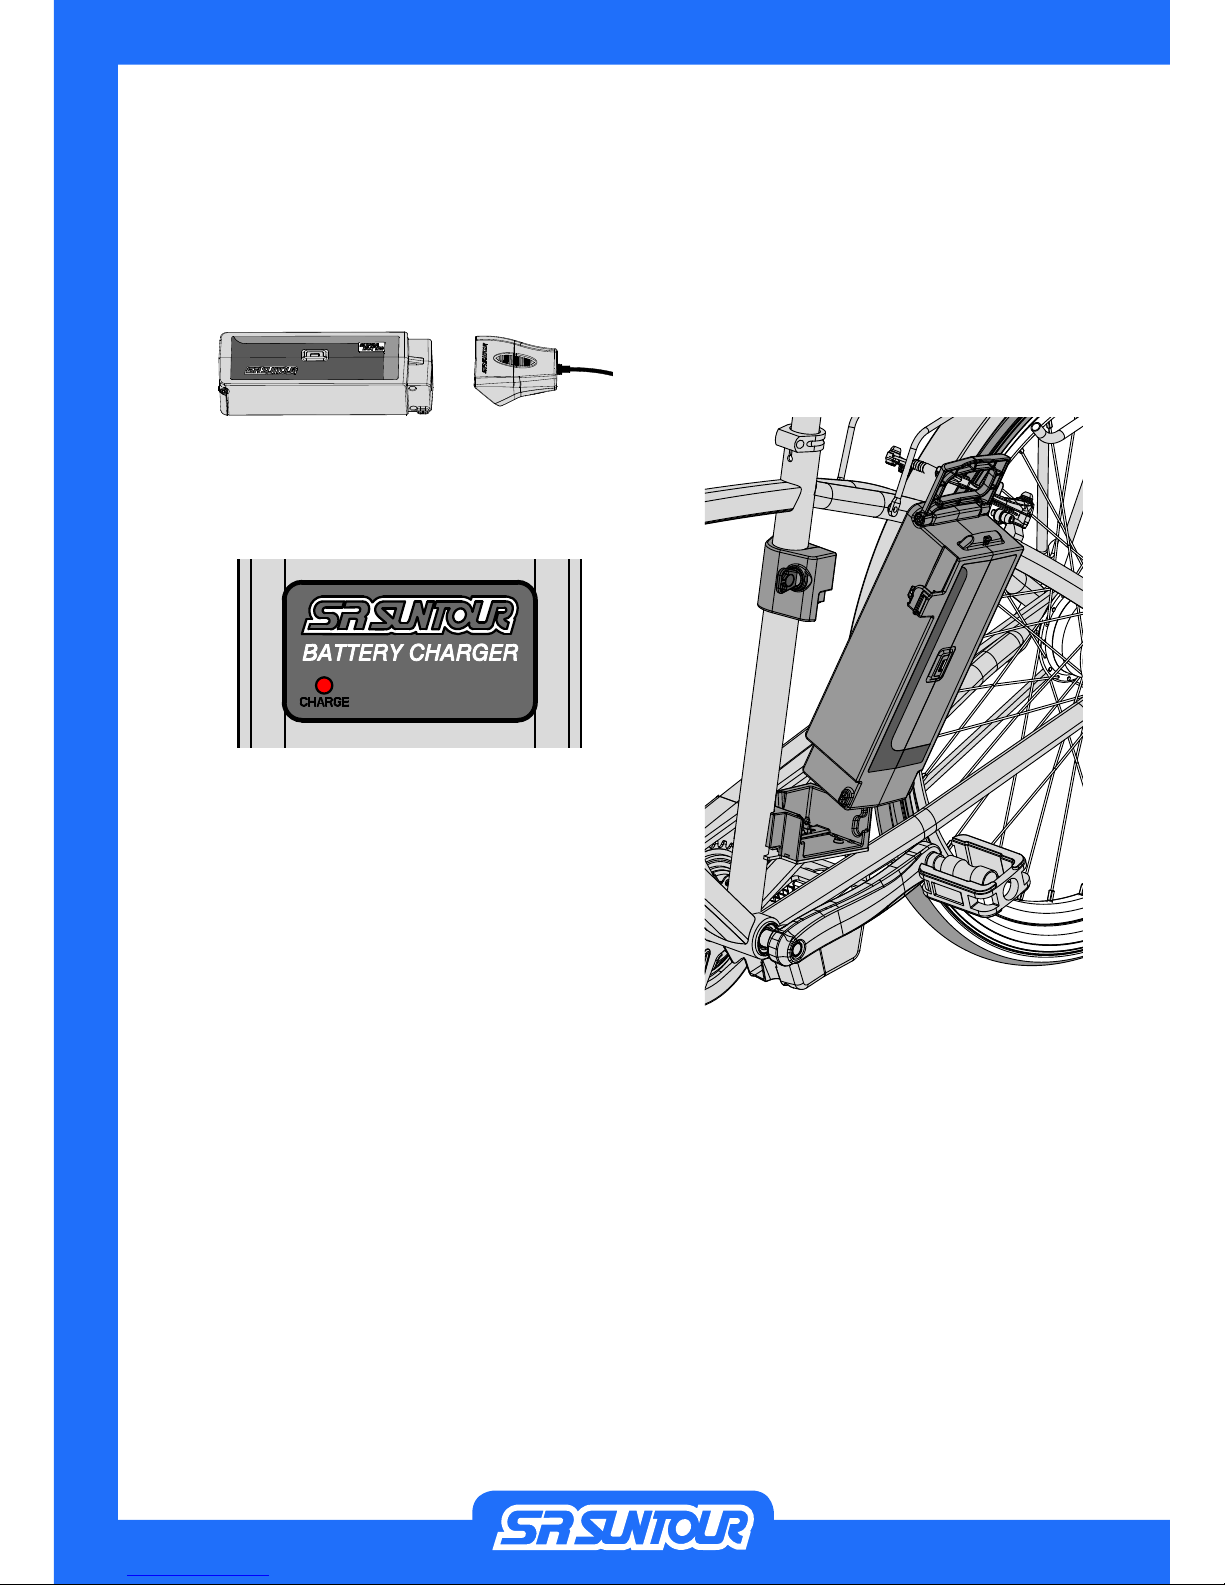
Battery charger adaptor
Battery
Battery charger
Battery, Charger and charger adaptor
* Shown devices may vary compared the display on the bike which this owners manual came along with
English
SR SUNTOUR OWNERS MANUAL SRS/SY pedelec
9
Battery Charging
Your bike is delivered together with a charger
and charger adaptor. Please only use these
together and don’t try to combine with other
devices.
Please note: The battery needs an initial full
charge before the rst use of the bike and
after every use, regardless of the remaining
capacity of the battery. The battery doesn’t
need to be empty before charging it.
To charge the battery please follow these
steps:
1.
The system must be switched off by
pressing the “on/o”-button on the dis-
play.
2.
Insert the key of the battery lock into
the upper battery holder, turn the key
counter-clockwise and keep it so while
you push the battery out to the left side
of the bike.
3. After you have pushed out the battery a
little bit to the side (depending on the
frame design) the handle can be swinged
out for an easy and safe handling.
4. Pull the battery out upwards.
5.
Connect the charger adaptor to the
charger.
6. Connect the charger to a 110-240V wall
socket.
English
SR SUNTOUR OWNERS MANUAL SRS/SY pedelec
10
7. Connect the battery to the adaptor.
8.
The LED on the charger shows a red con-
tinuous light during charging.
In case the LED starts ashing fast (0.2s
on / 0.2s o) it means there is a abnormal
situation. In this case please disconnect
and reconnect the charger to the battery.
If the same ashing is showing up again
please unplug the charger and battery
and contact your local dealer.
In case the LED starts ashing slowly
(0.5s on / 1.0s o) the temperature of
the battery is not within the specica-
tion for charging. Unplug the battery and
wait until the battery is cooling down to
room temperature.
9.
When the LED is o the battery is fully
charged.
If the battery is completely discharged a
full charge will take approximately 400
minutes.
10.
Insert the battery into the lower cradle
and swing it back into the upper holder.
Check if the lock has snapped in by push-
ing the battery back out to the left.
English
SR SUNTOUR OWNERS MANUAL SRS/SY pedelec
11
Info-Button
On/O-button
Mode-button
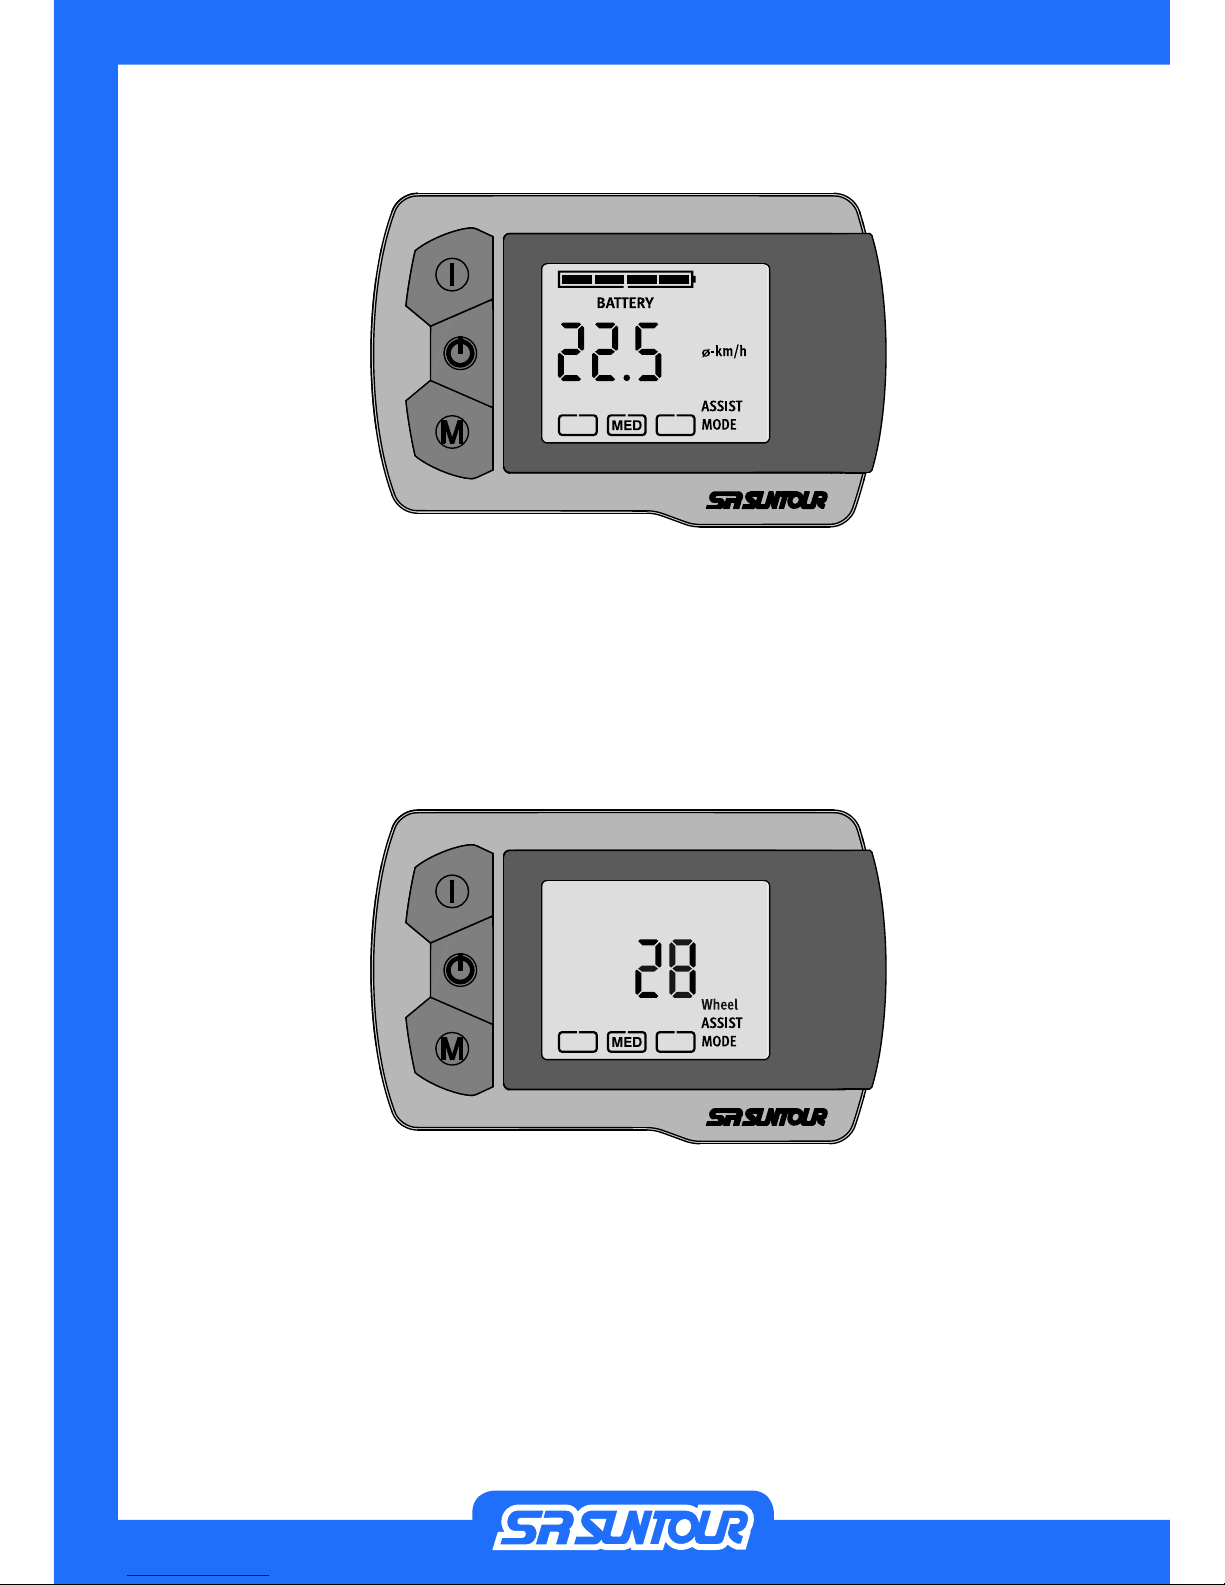
Fuel gauge
Assist-mode indicator
Datacorrespondingtothechoiceof
information mode
Information-indicator
User Interface and Display
The user interface and display are located on
the handlebar. When the system is switched
on by using the on/o-switch, the LCD display
is showing the remaining battery capacity, the
chosen assist mode as well as information on
the following features:
• Remaining battery capacity
• Speed
• Average speed
• Total riding distance
• Trip distance
Any information will be displayed only when
the system is activated.
The system will switch o automatically after
10 minutes of inactivity.
The 3-button design is providing a intuitive way
to switch between the available assist modes
and the desired ride information.
When it is dark the backlight of the screen dis-
play is turned on automatically when the drive
unit is activated. The backlight is only on as the
system is activated.
During the rst setup of the bike the wheel size
have to be set on this user interface.
English

SR SUNTOUR OWNERS MANUAL SRS/SY pedelec
12
Remaining capacity
100-75%
Remaining capacity
75-50%
Remaining capacity
50-25%
Remaining capacity
10-0%
Remaining capacity
25-10%
Remaining capacity
0%
Fuel Gauge
When the main switch is turned on, the battery
fuel gauge shows up. with its 4 digit icon.
The remaining battery capacity is is represented
by illustration as follows.
Blinking 2 times per second Blinking 8 times per second
English

SR SUNTOUR OWNERS MANUAL SRS/SY pedelec
13
press
press
press
speed total
distance
trip
distance
trip
time
average
speed
wheel
size setting
press
press
press
press
press
press
press simultaniously
Assist Mode
The user can choose the ratio of assistance depending on his personal wish by pressing the
Mode-button “M” on the user interface.
The percentage of assist power related to the input of the rider is varied from 50%, 100% and
150%.
Information Modes
The ride information Speed, Total Distance, Trip Distance, Trip Time and Average Speed are shown
one after another when pressing the Information-Button“I”.
The setting mode and data re-setting modes are entered by pressing the Information Button “I”
and Mode button “M” simultaneously when the related data is being displayed.
* setting mode
avalable
* settingmodeava-
lable
* setting mode
avalable
English

SR SUNTOUR OWNERS MANUAL SRS/SY pedelec
14
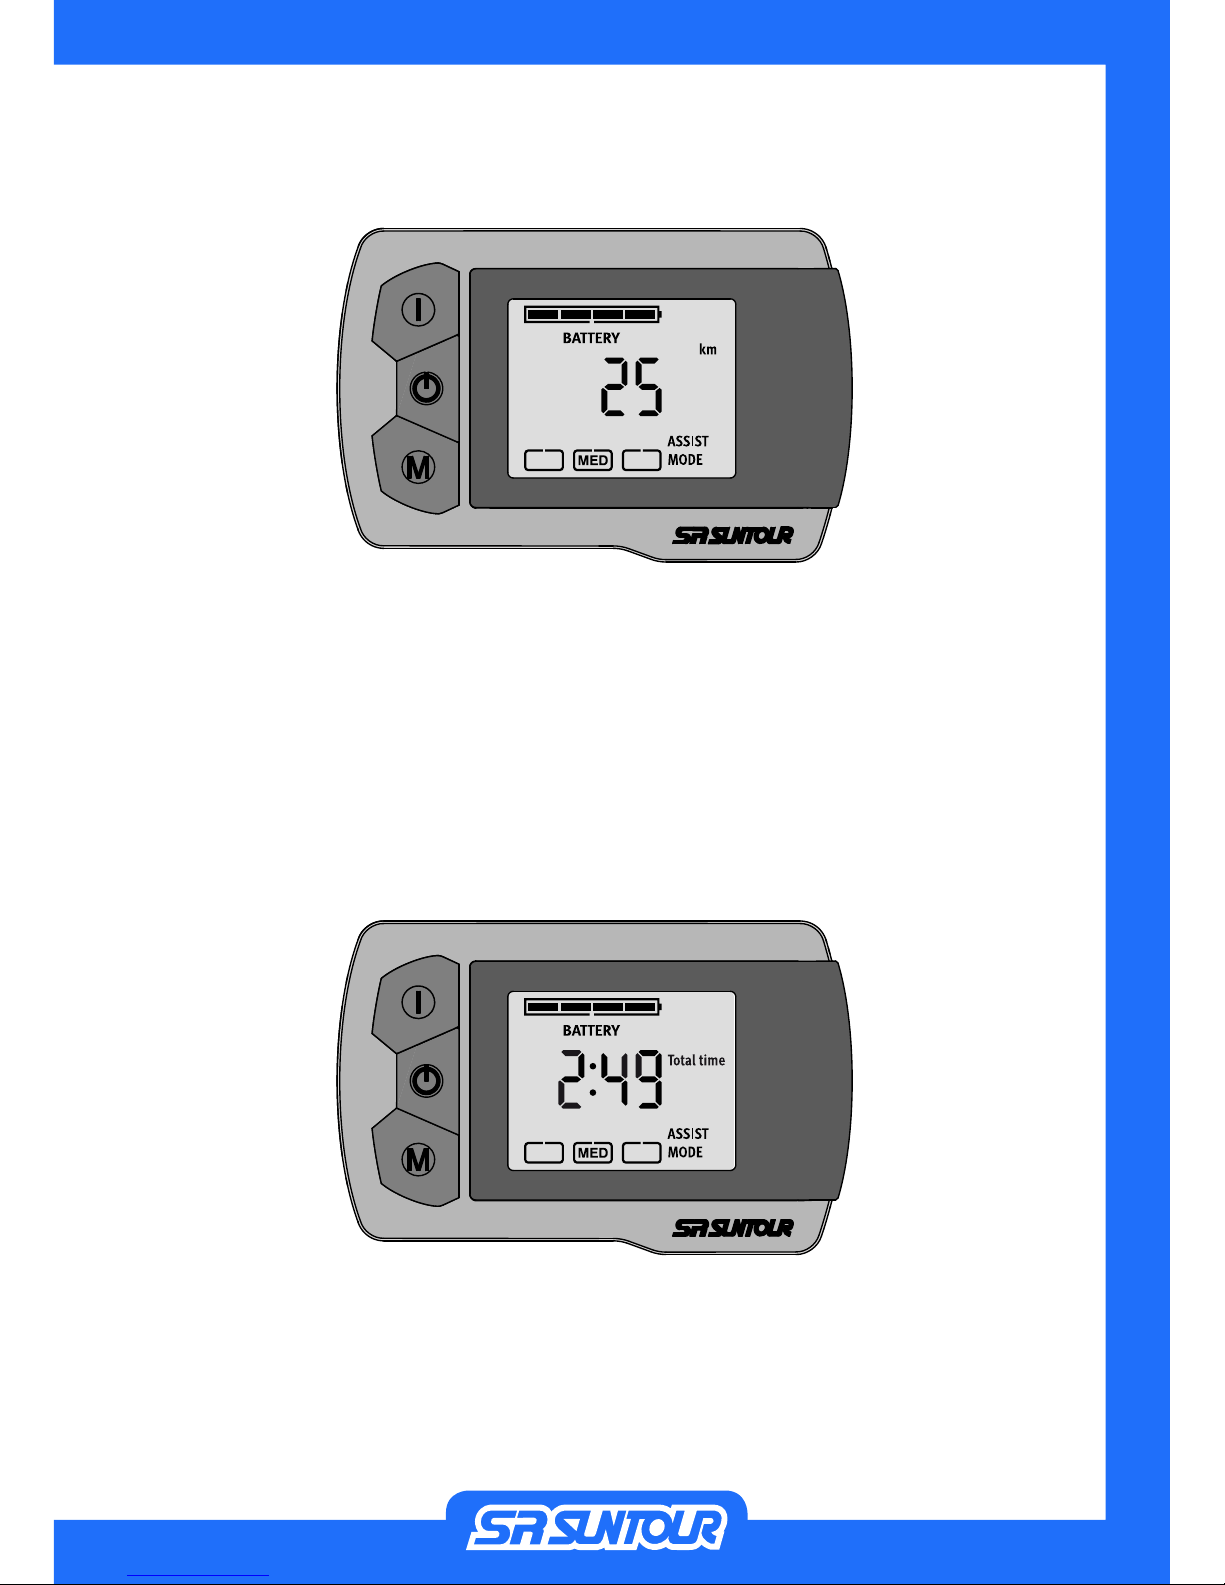
Speed
The speed is shown in kilometres per hour.
Display speed range: 0.0 .. 60.0km/h
Display accuracy: 0.1km/h
Total Distance
The total distance is counted when the system is activated and is displayed in kilometres.
Display range: 0.0 .. 9999km
Display accuracy: 1km
English
SR SUNTOUR OWNERS MANUAL SRS/SY pedelec
15
Trip Distance
The trip distance is counting when the system is activated.
Display range: 0.0 .. 999km
Display accuracy: 1km
Re-setting the trip distance
1.
Reset the trip distance by pressing the mode- (M) and info-button (I) simultaneously while
it is displayed.
Trip Time
The Average Speed is calculated on the trip distance.
.Display range: 00.00 .. 99.59 hh:mm
Re-setting the trip time
1.
Reset the trip time by pressing the mode- (M) and info-button (I) simultaneously while the
trip time is displayed
English
SR SUNTOUR OWNERS MANUAL SRS/SY pedelec
16
Average Speed
The average speed is calculated on the trip distance.
.Display range: 0.0 .. 60.0km/h
Display accuracy: 0.1km/h
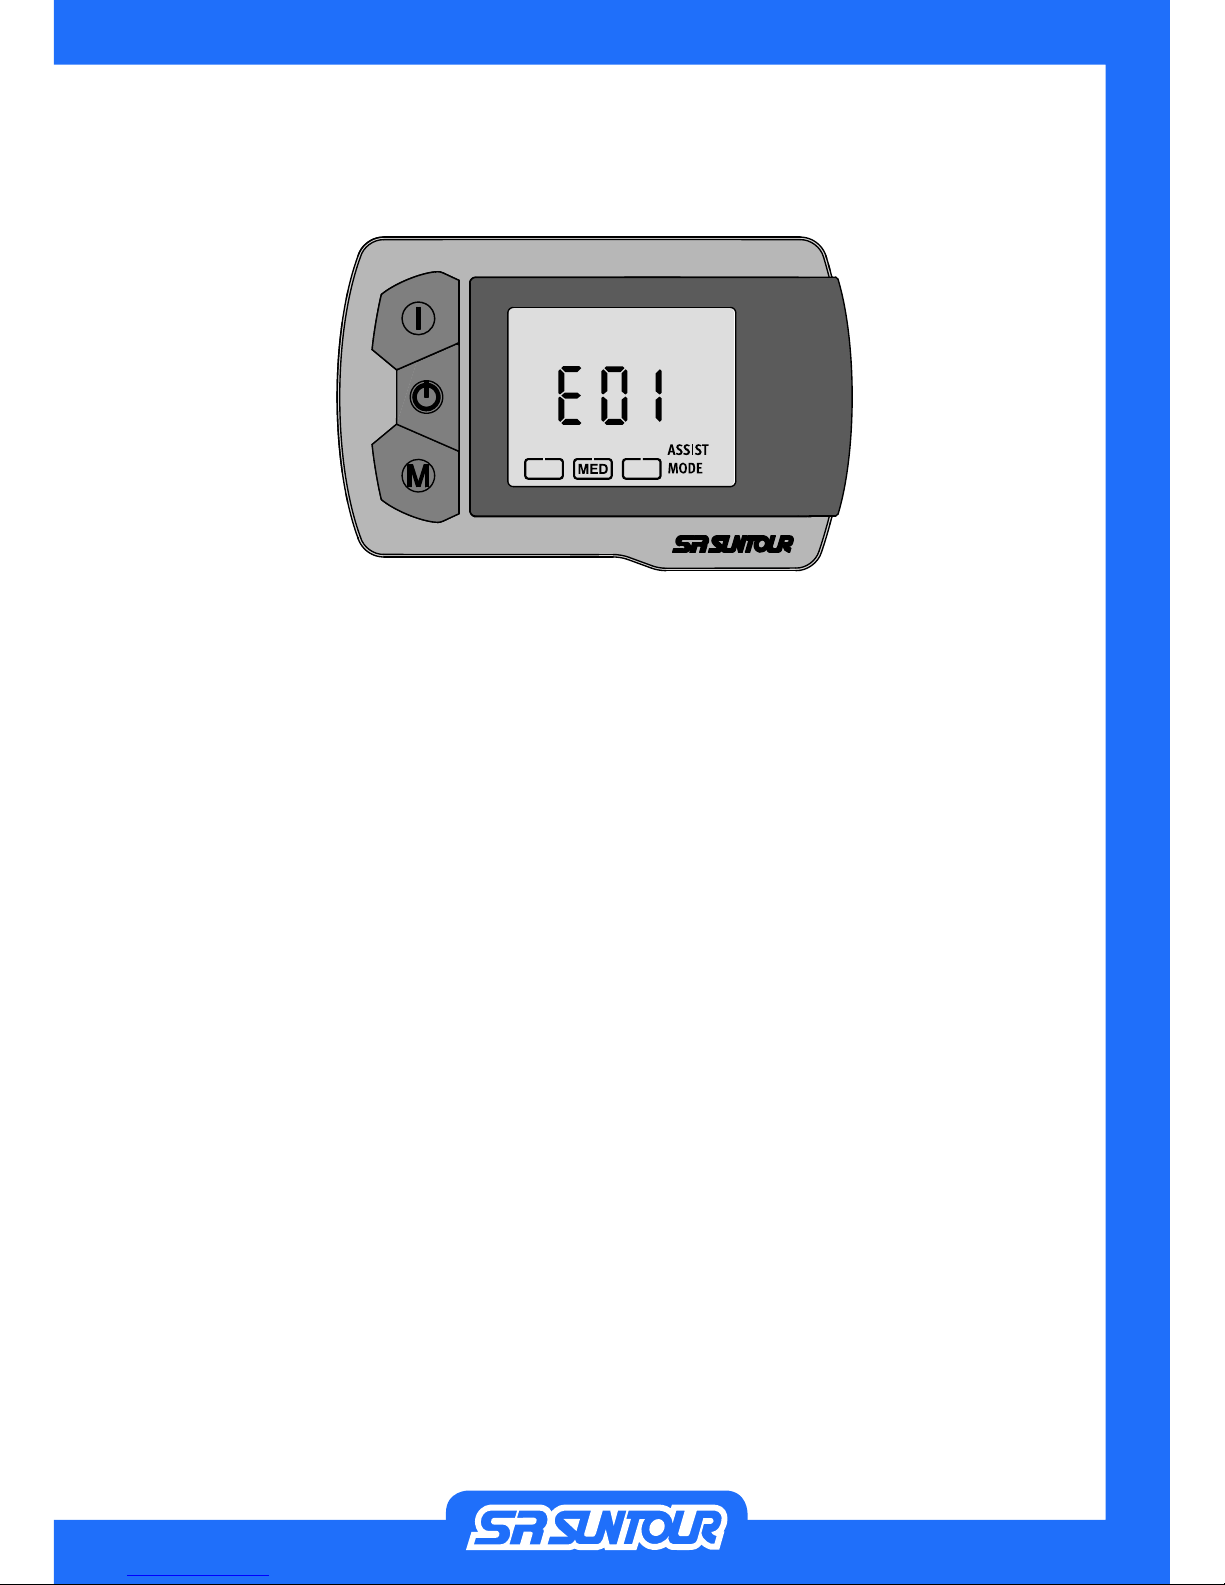
Wheel Size
The Wheel Size need to be set in order to show the correct speed.
.Nominal Wheel Diameter: 26inch, 27inch or 28inch
Setting the wheel diameter
1.
Set the wheel diameter by pressing the mode- (M) and info-button (I) simultaneously while
the average speed is shown.
2. The hours start blinking and can value can be increased by pushing the mode button (M)
3. Press the info button (I) to adjust the diameter
4. Exit the setting mode by pressing the info-button (I)
English
SR SUNTOUR OWNERS MANUAL SRS/SY pedelec
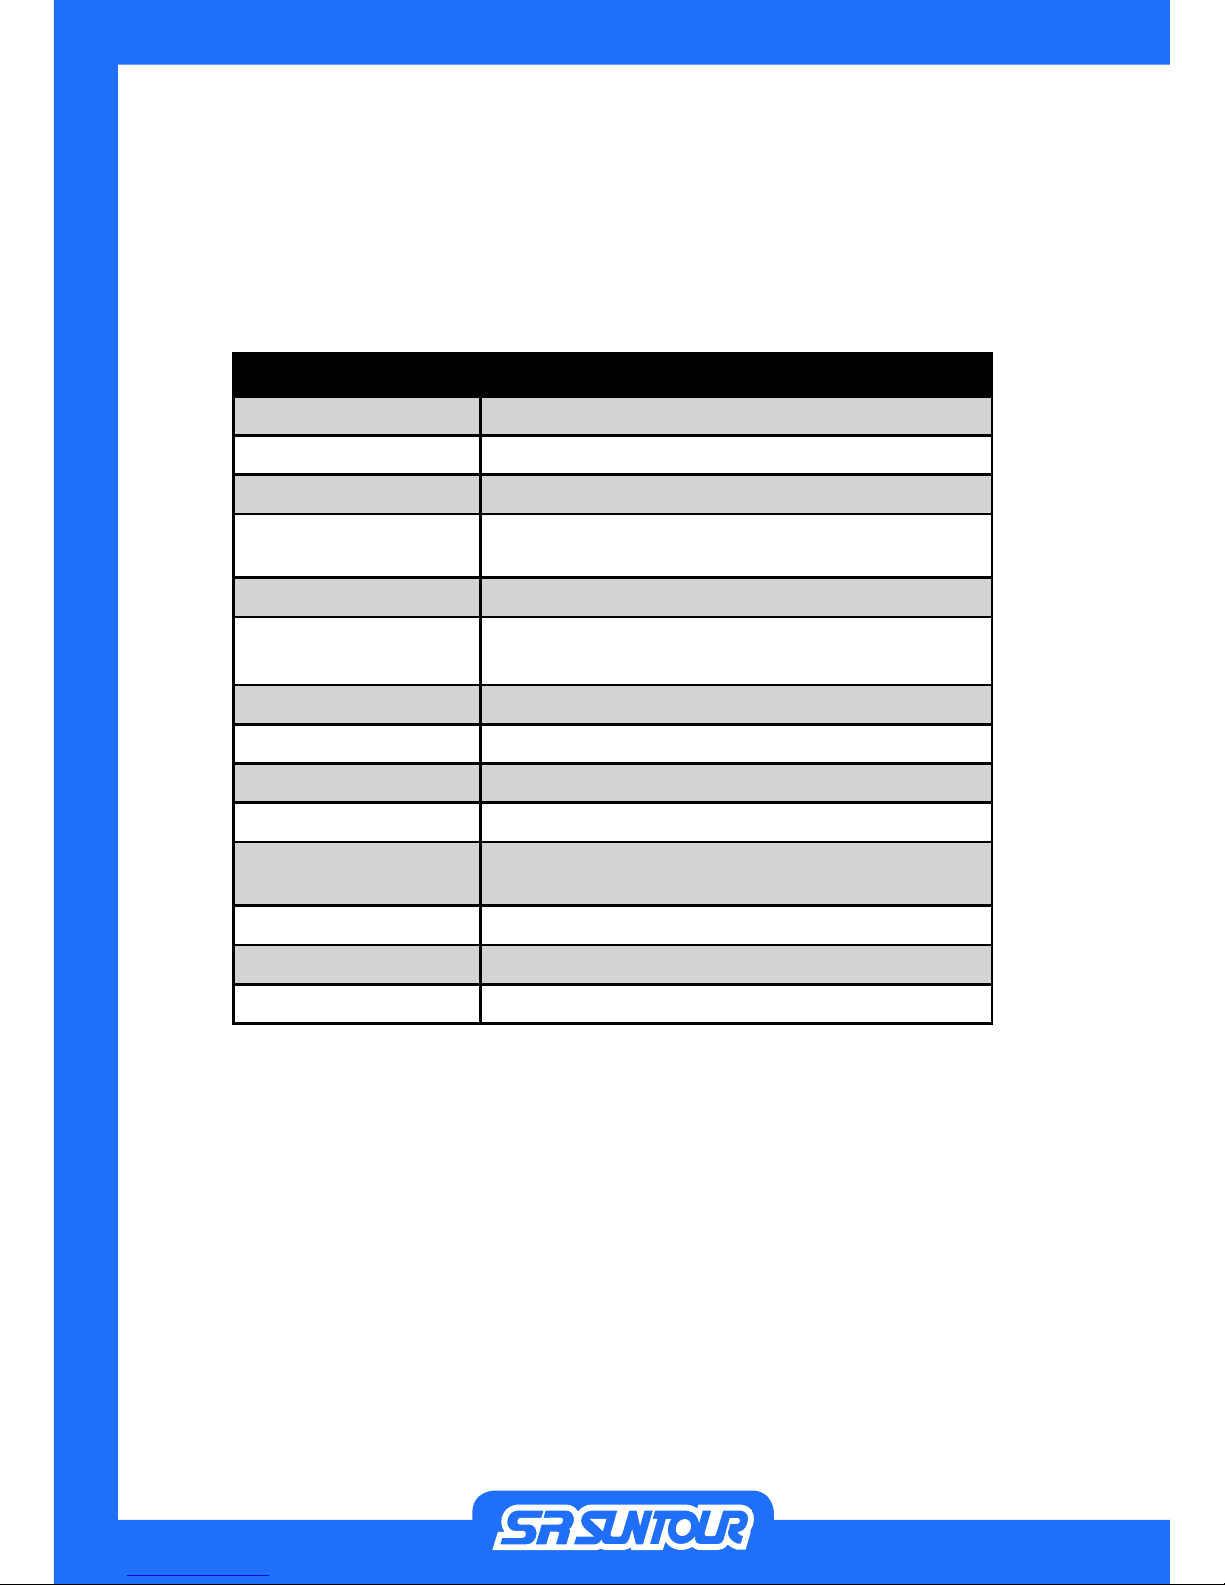
17
Error Code
When an error is recognized by the system, it is shown on the display based on the error data
from the controller. When an error is shown, the fuel gauge will not be displayed.
The error codes are shown in the chart on the following page.
English
SR SUNTOUR OWNERS MANUAL SRS/SY pedelec
18
Error Codes
Error code Type of error
E00 Controller communication error
E01 Coil sensor error
E02 Electric potential error
E03 Beyond of the torque sensor range
E05 Torque sensor error
E11 Beyond the battery voltage sensor range or
battery current sensor range
E12 Beyond the battery temperature sensor range
E13 Beyond the motor temperature sensor range
E21 Drive battery over current, lower/over voltage
E22 Battery overheating
E23 Motor overheating
E31 Hall-IC signal error
E32 Switch case communication error
E33 Battery communication error
Error Code Chart
English
SR SUNTOUR OWNERS MANUAL SRS/SY pedelec
19
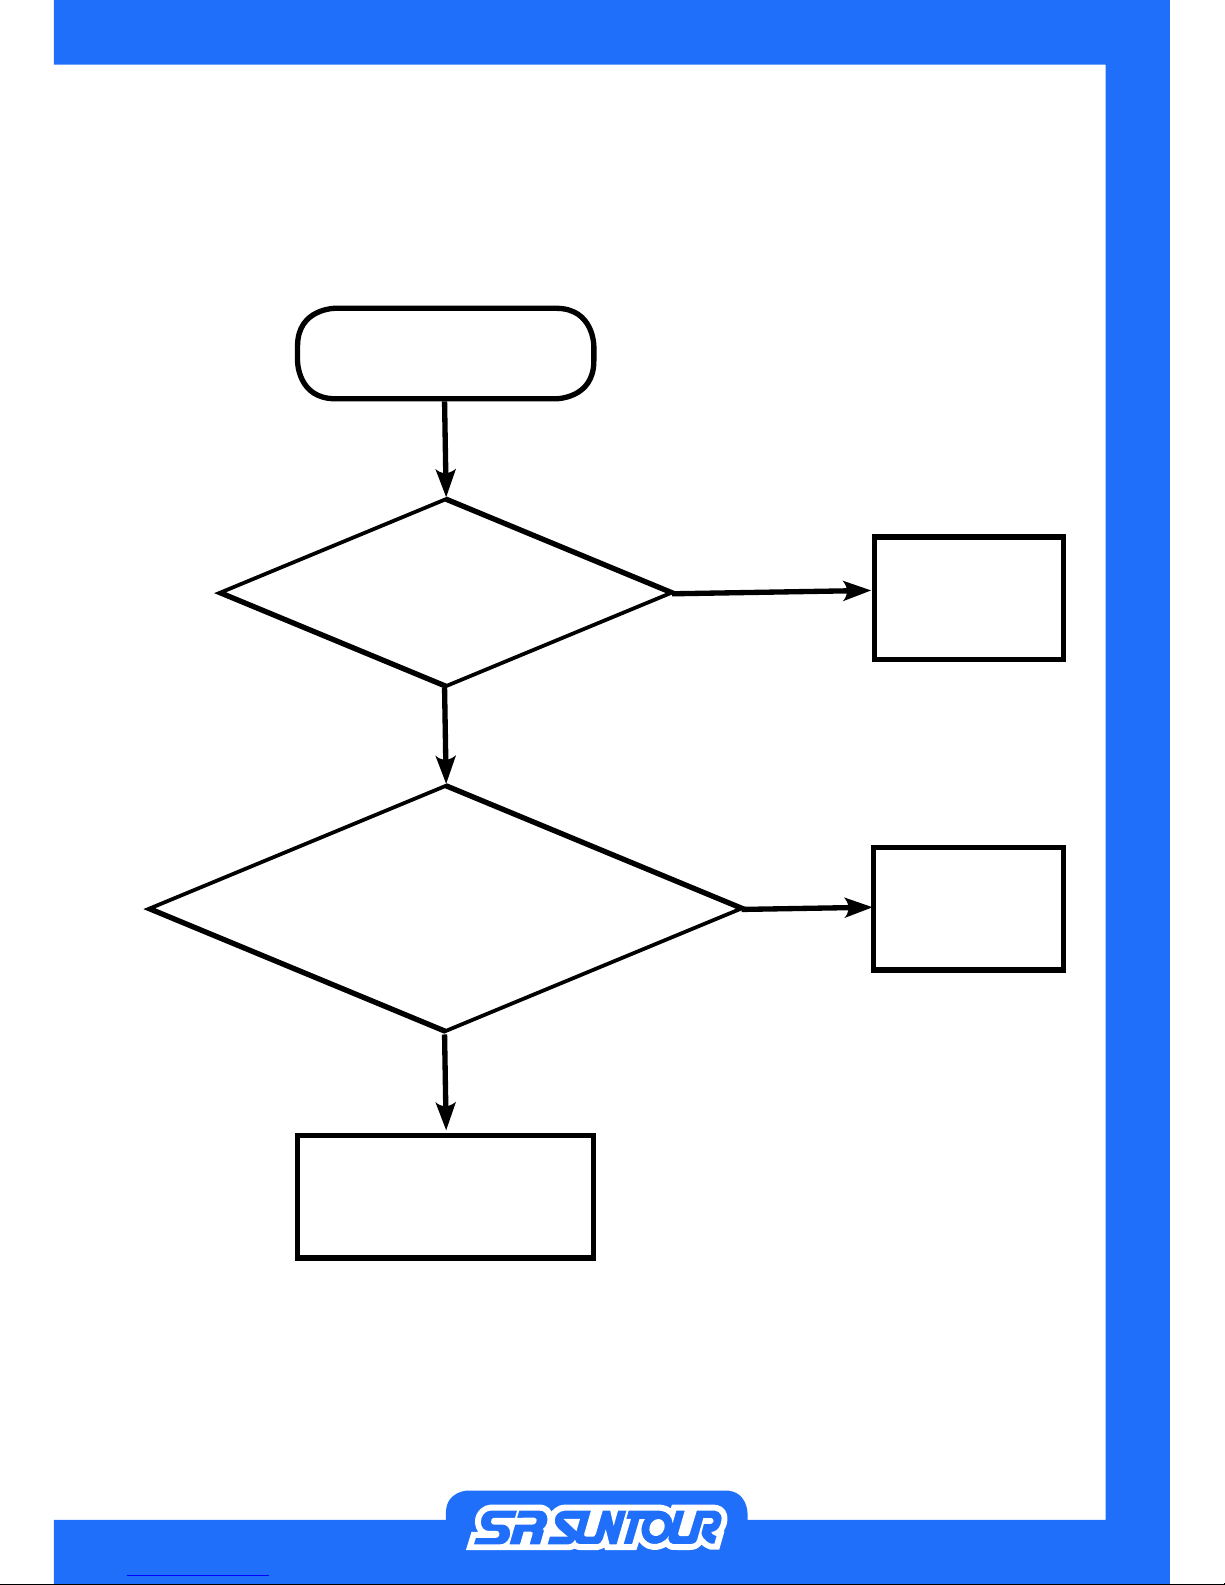
Error troubleshooting guide
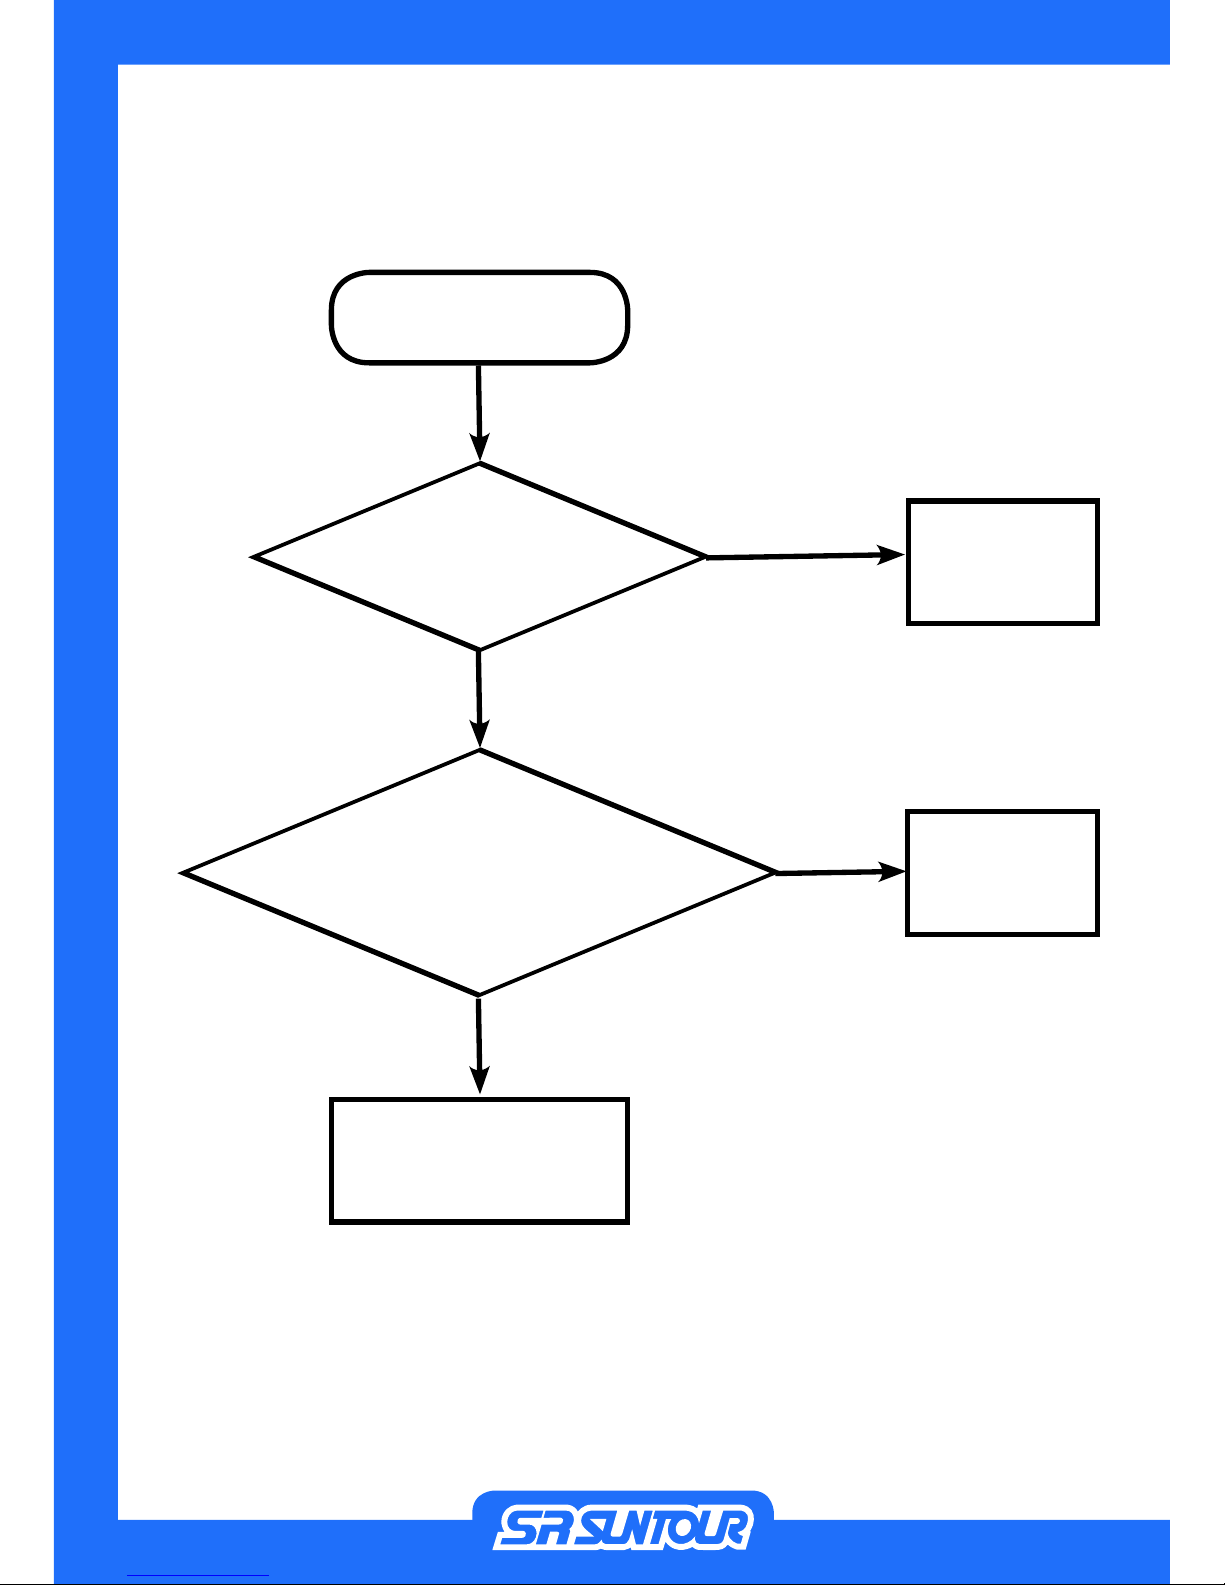
E00 - Controller Communication Error
Problem solved
Problem solved
Display shows
E00
Restart the system after
10s interruption. Does E00
show up?
Check cables and con-
nections between battery,
controller, crank sensor
and display
no
no
Contact SR
SUNTOUR pedelec
dealer
yes
yes
English
SR SUNTOUR OWNERS MANUAL SRS/SY pedelec
20
E01 - Coil Sensor Error
Problem solved
Problem solved
Display shows
E02
Check cables and connec-
tors between controller
and crank
Exchange the coil bobbin
no
no
Contact SR
SUNTOUR pedelec
dealer
yes
yes
English
This manual suits for next models
2
Table of contents


