Srne RM-6 User manual

Version: 1.01 Subject to change without notice
User Manual RM-8
I. Features V. Button Operations
LCD Display Unit
◆ LCD graphical main menu, intuitive and simple;
◆ Provide easy view of system’s complete operating data and parameter
settings in real time;
◆ Simple double button design for aesthetic appearance and convenient
operation;
◆ LCD unit can be powered by controller via a communication cable, and no
external power supply is required;
◆ Movable installation for strong applicability;
◆ Industrial grade design for use in a variety of outdoor environments and
running safely for a long time.
III. Installation Dimensions
Overall dimensions: 104.4*55.3*30.0mm
Mounting dimensions: 96*3.5mm
Buttons Functions
SELECT
ENTER
Menu/parameter switching
Parameters setting/adjusting
VI. LCD Menu
USEUSEUSE
Charging phase
indication
Day indication
Solar panel indication
Charge indication
Battery indication
Load output indication
Parameters
display area
Unit display
area
Battery type area
Exception indication
Communication
indication
Settings indication
System voltage
1. Menu diagram
(Note: for some controllers, part of the following graphics is not displayed)
2. Menu viewing
M P P T
2.1 Menu of controller with no load
Charge current
Battery capacityBattery voltageSolar panel voltageMain interface
Charge power
Charge AHController temperatureError code
2.2 Menu of controller with a load
Battery capacityBattery voltageSolar panel voltageMain interface
Charge current
Charge power
Charge AH
Load voltageLoad currentLoad powerDischarge AH
Load mode
Controller
temperature
12V/24V/36V/48V
Menu identification: The LCD screen will automatically identify whether the
controller is designed with a load;
If it is identified that the controller is not designed with a load, the load
related menu will not be displayed;
If it is identified that the controller is designed with a load, the load related
menu will be displayed;
Exception code
Ⅳ. Communication Interface
No. Functions
①
②
RS232 communication port
TTL communication port
II. Appearance
30
①②
VII. System Parameter Settings
1. Methods
In any menu, press and hold “ENTER” to enter the “Parameter Settings”
menu:
① Press the “ENTER” button to adjust parameter value;
② Press the “SELECT” button to switch between different setting items;
③ Press and hold the “ENTER” button for 2 seconds to save what has been set
and exit setting mode;
④ Select the “FLD/GEL/SLD/LI” battery type and press the “SELECT” button
to switch between “System voltage” and “Battery type”;
⑤ After selecting “USE” to define the battery type, press “SELECT” button to
switch between “system voltage”, “Equalizing charge voltage”, “Boost
charge voltage”, “Floating charge voltage”, “Over-discharge return voltage”
and “Over-discharge voltage” to change some common parameters.
① For safety considerations, after changing “System Voltage”, it is required
to power up again to take effect!
② Care should be taken when the user defines parameters to their needs, and
incorrect parameters may make the system fail to work properly.
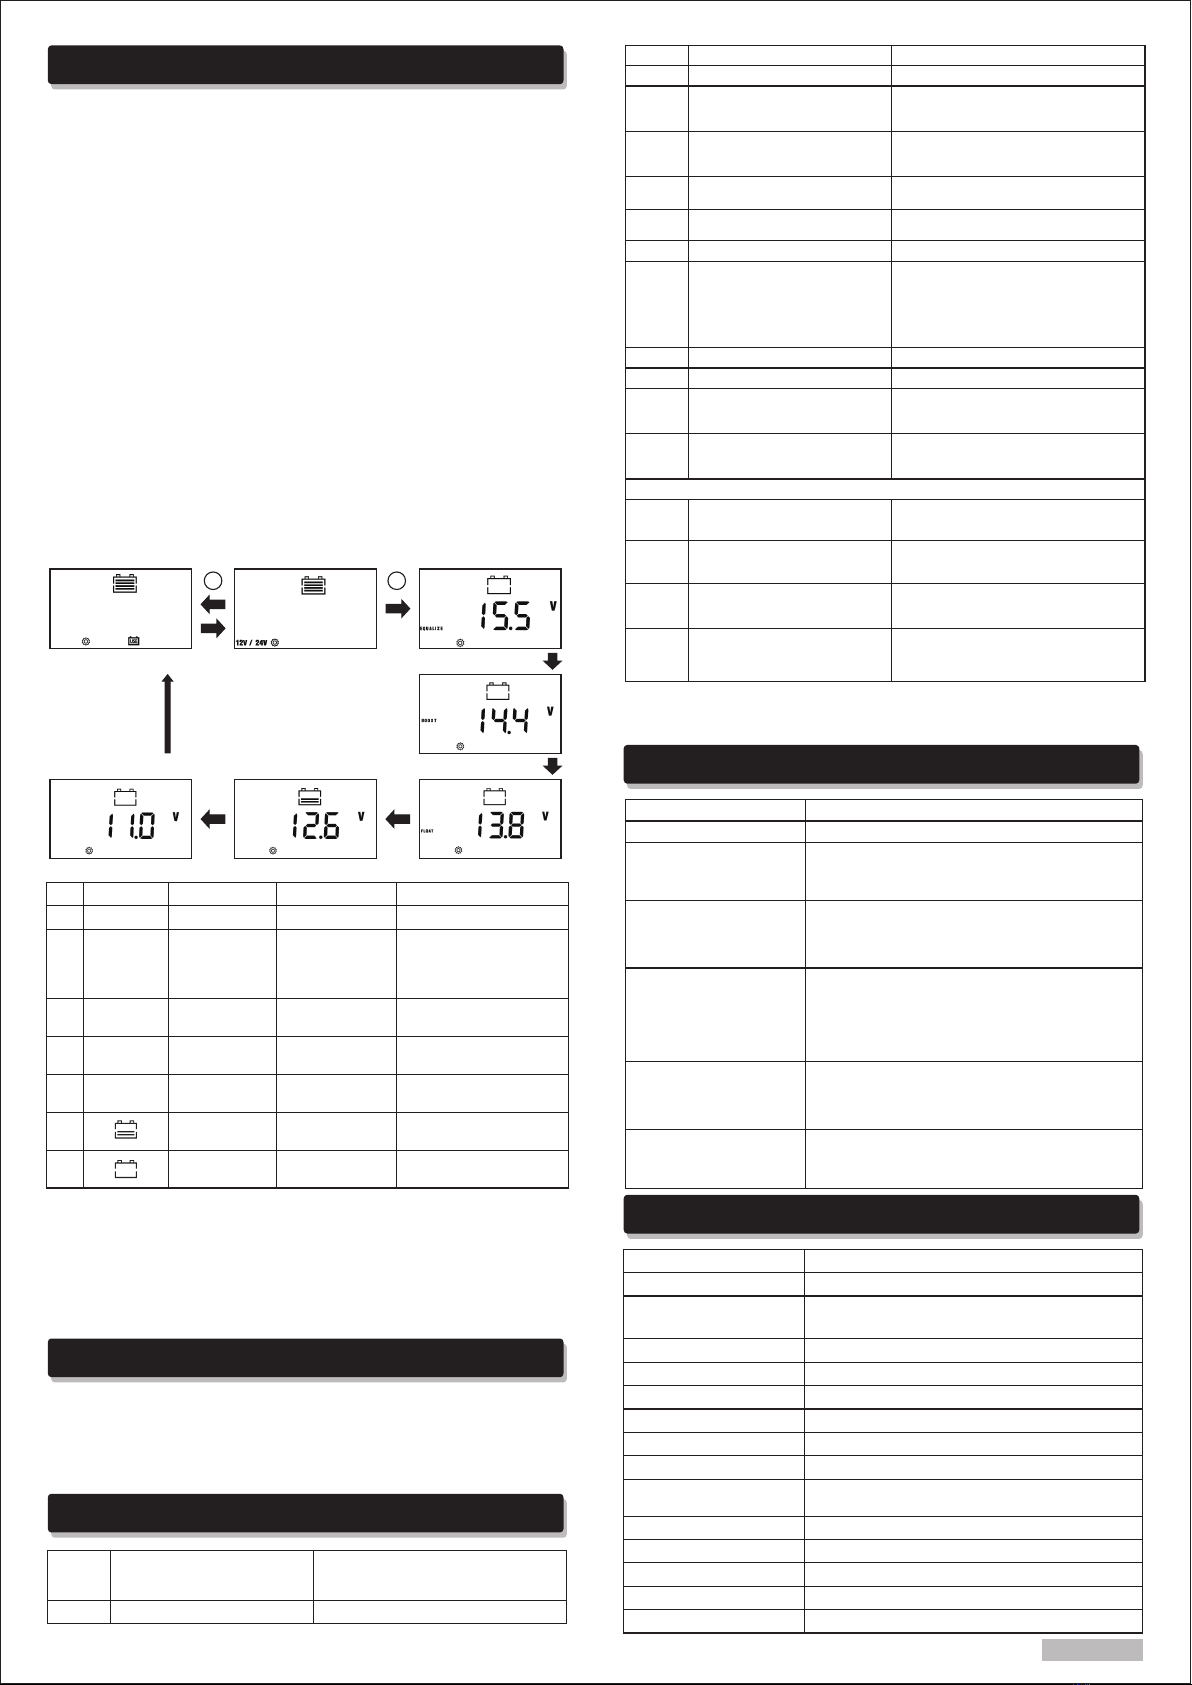
3. USE menu
X. Common Problems and Handling Methods
Mode:104074
Battery type System voltage Equalizing charge voltage
Over discharge voltage Over discharge return voltage Floating charge voltage
Boost charge voltage
3 4
IX. Exception Code Display
2. Load mode settings (Controller with a load)
In the menu with load mode displayed, press and hold “ENTER” to go to load
mode settings. At this time, press “ENTER” to adjust the load mode, and press
and hold “ENTER” to save the current mode and exit the settings interface.
Note:
Phenomenon Handling methods
LCD screen is not lit Please check if the battery and solar panel are properly connected.
Solar panel has voltage,
battery terminal has no
voltage output, but the code
E1 is displayed
If it is not lithium battery set in the system, when the
battery is not connected, there is no voltage output at
both ends of the battery, and this will return to normal
as the battery is connected.
Battery icon flashes slowly,
battery voltage is normal or
fully charged, but the over-
discharge code E1 is displayed
Check if it is set to the corresponding system voltage.
For example, the controller with 24V battery is set to 12V
or the controller is not restarted as system voltage has been set.
Because: After the system voltage is changed, the controller
needs to be restarted to take effect! !
The load indication icon
flashes and the code E4 is
displayed (controller with
load)
1. Check if the load is short-circuited. After short-circuit is
removed, the load will automatically return to normal.
2. After short circuit is removed, E4 battery voltage normal
is always displayed, and automatic recovery fails. It may
reach the maximum number of times for recovery in one day.
The limit is automatically removed the next day, or restart
the controller to remove the limit.
Controller does not charge Check wiring, check whether the solar panel voltage exceeds
the rated value and whether the battery is over-voltage, and
check LCD error codes for internal over-temperature, external
over-temperature, external lithium battery low temperature,
lead-acid battery open circuit, charge disable set in the system, etc.
Controller is normal but no
data is displayed on the screen,
and the communication and
warning icons are flashing
Communication is faulty, check the communication cable
No.
1
2
3
4
5
6
7
Display
USE
12V/24/
36V/48V
EQUALIZE
BOOST
FLOAT
Setting items
Battery type
System voltage
Equalizing
charge voltage
Floating charge
voltage
Over discharge
return voltage
Over discharge
voltage
Boost charge
voltage
Parameters range
9.0~17.0V
9.0~17.0V
9.0~17.0V
9.0~17.0V
9.0~17.0V
Remarks
User-defined battery type
“12V/24/36V/48V”
light up at the same time,
indicating automatic
identification
USE
12V/24/
36V/48V
4. Menu auto page turning, backlight settings
Press and hold “SELECT” for 2 seconds to set menu auto page turning;
Press and hold “SELECT” for 5 seconds to set menu auto page turn and
backlight steady on;
Menu auto page turning: each page stays for 3 seconds, and the setting will
not be saved when power off.
If any button is pressed, it will exit the auto page turning mode.
VIII. Load Control (Controller with a load)
Method of controlling load on/off
First, the controller load mode needs to be set to “Manual Mode” before it
can be manually controlled;
In any menu in a non-setting mode, press “ENTER” to control the on/off of
the load.
EO
Description
No exception
Execution result
System is normal
LCD
error
code
E1
E2
E3
E6
E8
E10
E18
E15
E13
E20
E7
Battery over-discharge
Battery over voltage
Battery under-voltage warning
Controller internal over
temperature
Solar panel input power
excessive
Solar panel over voltage
BMS over-current protection
No battery or lithium battery
feed detected ①
Solar panel reverse polarity ①
Battery reverse polarity ①
Battery temperature is higher
than charge upper limit
temperature ①
Turn off load output for controller with a load
Turn off charging
The battery voltage is lower than the
under-voltage warning threshold. Only
reminder is given. The system is normal.
MPPT controller starts linear power
charging;
PWM controller turns off charging
MPPT controller charges with rated current;
PWM controller turns off charging
Turn off charging, and it will automatically
recover when voltage is below the set value
Turn off charging
As long as the solar panel voltage meets
the charging conditions, the system setting
is that the lithium battery terminal has a
voltage output, and the lead acid battery
will not have a voltage output if not
connected to the battery terminal.
Turn off charging
Turn off charging and turn off load output
Turn off charging, and it will automatically
recover when the temperature is below
a certain value
E19 Battery temperature is lower
than charge lower limit
temperature ①
Turn off charging, and it will automatically
recover when the temperature is above
a certain value
Controller designed with a load
E4
E5
E16
E17
Load short circuit
Load over current
Battery temperature is higher
than discharge upper limit
temperature ①
Battery temperature is lower
than discharge lower limit
temperature ①
Turn off load output, and it will
automatically recover when short-
circuit is removed.
Turn off load output, and it will
automatically recover after a certain
period of time.
Turn off load output, and it will
automatically recover when the
temperature is below a certain value
Turn off load output, and it will
automatically recover when the
temperature is above a certain value
Notice:For the descriptions marked with ①, not all of the controllers have
the above error codes. For details, please refer to the corresponding
controller manual.
XI. Technical Parameters
Items
Model
Applicable models
of controller
Input voltage
Standby power consumption
Operating power consumption
Communication Baud rate
Communication mode
Communication interface
Connecting cable length
Operating temperature
IP rating
Weight
Altitude
Dimensions
Values
RM-8
MC24 series, MC48 series, ML series, MT2410N10, etc
9-30V
6mA (backlight is off)
28mA (backlight is on)
9600bps
TTL (3.3V level)
TTL- white 4P port, RS232- black Rj11
TTL communication line 1.5m, RS232 communication
-35℃ ~ +65℃
IP32
90g
≤ 3000M
104.5*55.3*30.0mm
line 2m
This manual suits for next models
2


