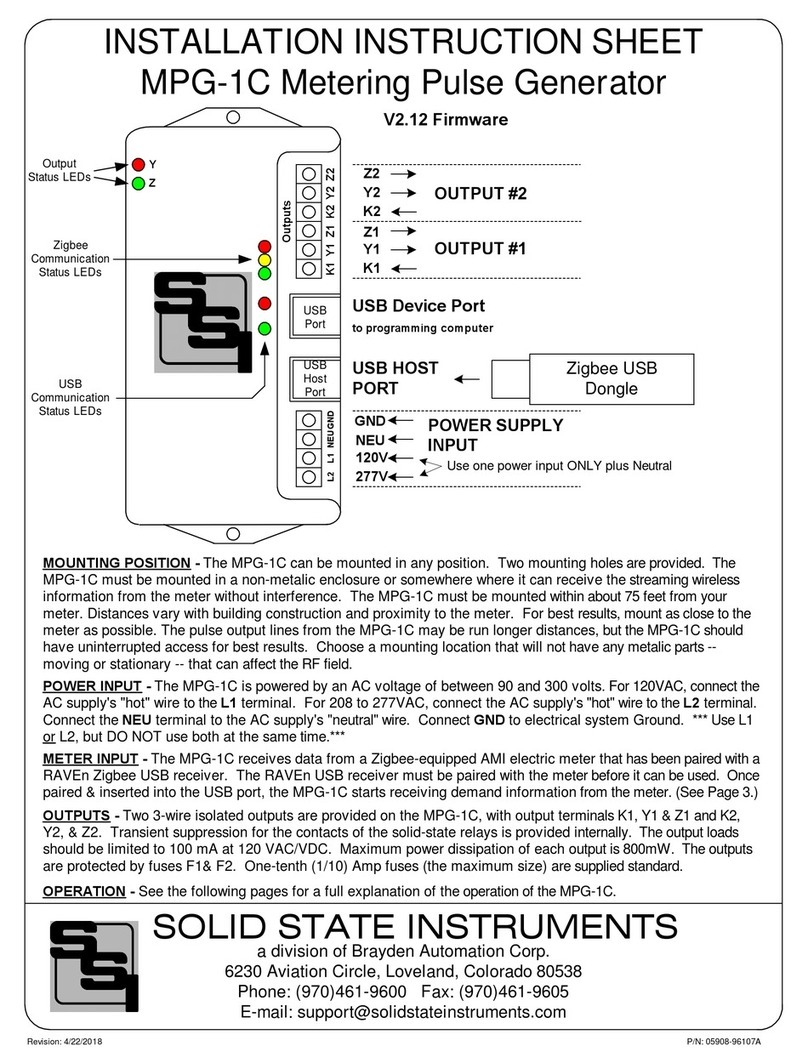
SSI MPG-2 User manual

ZIGBEE PULSE GENERATOR
INSTRUCTION SHEET
Z
1
Y
1
K
1
POWER CONNECTIONS
CUSTOMER'S TERMINALS
1/10
Amp
UTILITY
COMPARTMENT
CUSTOMER
COMPARTMENT
LED's
R
E
D
G
R
N
F1
2
7
7
V
1
2
0
V
N
E
U
(For 120VAC)
SOLID STATE INSTRUMENTS
a division of Brayden Automation Corp.
6230 Aviation Circle, Loveland, Colorado 80538
Phone: (970)461-9600 Fax: (970)461-9605
E-mail:support@solidstateinstruments.com
Revision: 9/25/2020 P/N: 05910-97006E
MPG-2
Premium Solid State
MOUNTING POSITION - The MPG-2 may be mounted in any position but is intended to be mounted with the
hinged door on the left such that the circuit board is upright. The MPG-2 must be mounted within 25' line-of-site of
the meter. Actual operational distance may vary with building construction and ability for the RF signal to penetrate
building materials. For best results, mount the MPG-2 as close to the meter as reasonably possible.
POWER INPUT - For 120VAC, connect 120VAC "hot" lead to the 120V terminal. Connect the neutral wire to the
NEU terminal. For 208 to 277VAC, use the 277V terminal for the "hot" lead and the NEU terminal for the neutral
power supply lead. The EGND terminal MUST be connected to the power supply ground. If the MPG-2 is mounted
at the meter and powered from the meter potentials, AND no true neutral exists at the meter, connect the EGND
and NEU terminals to the electrical system ground.
ZIGBEE WIRELESS COMMUNICATION - The MPG-2 is designed to receive power monitoring information from
an electric meter equipped with Zigbee wireless communications. The Zigbee transceiver dongle is mounted on
the MPG-2's circuit board and may be secured with a tyrap. Ensure that the dongle is properly seated in the USB
host socket. Do not remove.
CUSTOMER OUTPUTs - The customer's outputs are located at the bottom of the MPG-2 board in the customer
compartment. There are two KYZ Form C (3-wire) dry-contact outputs for watt-hour pulses, and one End-of-
Interval (EOI) KY Form A (2-Wire) pulse output. The two 3-wire isolated pulse outputs are provided on the MPG-2,
with output terminals K1, Y1 & Z1 and K2, Y2, & Z2. The End-of-Interval pulse output uses terminals T1 & T2.
Transient suppression for the contacts of the solid-state relays is provided internally. The output loads should be
limited to 100 mA at 120 VAC/VDC with maximum power dissipation of each output limited to 800mW.
FUSES - Fuses are 3AG fast-blow type. One-fourth (1/4) Amp fuses (the maximum size) are supplied
standard. The KYZ outputs for Output1 and Output 2 are protected by fuses F1& F2, respectively. The EOI
output is protected by fuse F3.
Out 1
EGND
Power
Input
1/10
Amp
F2
Z
2
Y
2
K
2
T
2
T
1
Y
E
L
Out 2 EOI
F3
Zigbee USB
Dongle USB Host Socket
for Zigbee Dongle
USB Programming
Port
OPERATION - See the following pages for a full explanation of the operation of the MPG-2.
1/10
Amp
Firmware Version 2.19

MPG-2 Wiring Diagram
s
1/26/2020 N/A
DATE ORIGINAL
LATEST REVISION
SCALE
JOB NO.
REVISIONS
NO. DATE DESCRIPTION
WHB
DRAWNCHECKED
MPG-2 Wireless Pulse
Generator
Wiring Diagram
Brayden Automation Corp./
Solid State Instruments div.
6230 Aviation Circle
Loveland, CO 80538
(970)461-9600
(970)461-9605 fax
www.solidstateinstruments.com
MPG-2WiringDiagram.vsd
AMI
Electric
Meter
w/Zigbee
Radio
K1
Z1
Y1
K2
Z2
Y2
Out 1
Out 2
MPG-2
Wireless Pulse
Generator Relay
Service
Entrance
To Line
1 32 NEU
To Loads
Wireless
Data - 25' max USB
Zigbee
dongle
To EMS
To SCADA
120-277VAC
Power
Supply
Connections
120V
277V
NEU
GND
Host Port
F1
F2
T1
T2 EOI
F3
2
7
7
1
2
0
N
E
U
EGND

MPG-2 Wireless Meter Pulse Generator
1.0 General
The process for installing the MPG-2 usually is done in this order but may vary depending on several factors:
1. Provisioning (Section 2)
2. Hardware Installation (Section 3)
3. Programming Setup (Section 4)
4. Programming System Settings (Section 5)
5. Operation (Section 6)
If your utility is doing the installation and they are experienced with this process, they may choose to do it in a different
order.
1.1 Provisioning - This is the process of pairing the Zigbee transceiver (dongle) in the MPG-2 with the electric meter
that will be sending it power monitoring information. It is usually best to get this done first if you are not familar with the
process. Provisioning can be done by the utility after the MPG-2 is installed by sending the MAC address and Installation
ID to the electric meter through the AMI system. This means that the utility can send this information directly to the specific
electric meter to which the MPG-2 will be paired.
1.2 Hardware Installation - Once you are confident that the MPG-2's Zigbee transceiver is paired with the meter,
completing the installation of the physical unit is the next step. If the utility is doing the MPG-2 installation and they are
experienced in provisioning, then the Provisioning process may be done after installation. Installation includes mounting
the unit at or near the electric meter and connecting the outputs to the destination (pulse receiving) devices.
1.3 Programming Setup - To program the MPG-2, a Windows 7 or 10 PC computer with the SSI Universal
Programmer program is required. The SSI Universal Programmer program can be downloaded from the
solidstateinstruments.com website located on the MPG-2's Downloads webpage.
1.4 Program the System Settings - Once the ability to communicate with the MPG-2 has been established, all system
settings must be configured. This includes the Output Pulse Value, Output Pulse Mode, Directional mode, Fixed Pulse
Width Time, Reset Time, as well as a number of other settings.
1.5 Operation - Once the unit has been paired and programmed, it will automatically begin operating.

MPG-2 Wireless Meter Pulse Generator
MPG-2 Metering Pulse Generator.vsd
2.0 Provisioning
2.1 Pairing the USB Zigbee Dongle Transceiver
The USB Zigbee Transceiver device must be paired with a Zigbee-equipped AMI electric meter. This may be
accomplished either manually with the assistance of the utility or on their website if they have the process automated. The
process for accomplishing this varies from utility to utility and not all utilities provide Zigbee radio availability. Contact your
electric utility to find out how their pairing process is accomplished. This process is also known as "provisioning". The
Dongle must be powered to be paired with the meter and must be within range of the meter, usually within 25 feet.
Distances may vary depending on the types of structures and building materials that the radio signal must penetrate.
The Meter must be programmed with the Dongle's MAC address and Installation ID code. By being "paired", the meter
creates a network with only two nodes, and knows that it can only send data to that particular Dongle and the Dongle only
accepts data from that particular electric meter. Non-volatile memory in the dongle and meter provides retention of pairing
data.
2.2 Power up the MPG-2 for Provisioning
Apply power to the MPG-2 using a 120VAC line cord. Make sure to get the Hot lead(usually Black) of the line cord
connected to the 120V terminal. Connect the neutral lead(usually White) connected to the NEU terminal. Connect the
ground lead (Green) to the EGND terminal. Upon power-up the yellow COM LED will light indicating the the MPG-2's
microprocessor senses the presence of the Zigbee dongle and that it is installed correctly.
2.3 Pairing Process - If the utility has previously sent the provisioning information to the electric meter, the RED LED
on the Zigbee dongle will flash for up to 60 seconds while it is establishing network communications with the meter. Once it
has completed establishing communications, the dongle's RED LED will stay on continuously (solid). If the dongle's RED
LED is on continuously, it is correctly provisioned and you may proceed with installation.
2.4 Unsuccessful Pairing - If the dongle's RED LED is not on continuously, the network has not been created, and the
MPG-2 will not receive information from the dongle. If no connection has been made, the MPG-2 will reset the dongle
every 120 seconds (default reset time) attempting to establish a connection. The RED LED on the dongle MUST be lit
continuously before moving on. If it is not, then it is not provisioned correctly with the utility's meter. Do not proceed until
this step is successfully completed. Make sure that the dongle has not been previously paired with a different meter.
2.5 Contact Utility - If the utility has not previously sent the provisioning information to the electric meter, or has not
previously paired this meter with this dongle, you will have to contact them to get this accomplished. Give them the
dongle's MAC address and the Installation ID code, supplied with the MPG-2.
3.0 Installing the MPG-2
3.1 Mounting Location - Mount the MPG-2 to the building at or near the electric meter that will be wirelessly sending
communications to the MPG-2. It must be within 75' but distances may vary depending on whether the radio signal must go
through any walls and the material of those walls. For best results mount the MPG-2 as close to the meter as possible with
an unobstructed line-of-sight with the meter if possible.
3.2 Mounting Hardware - Two mounting flanges, top and bottom, are provided in the fiberglass NEMA 4X enclosure.
Mount with the hinge on the left hand side of the enclosure and latches on the right hand side. Use 1/4" Lag Bolts or
suitable hardware to attach the MPG-2 to the building.
3.3 Wire the Power Supply - Drill a suitable 1/2" conduit-sized hole (.875" max) into the upper compartment from the
left hand side of the enclosure. Wire the power supply to the MPG-2. For 120VAC, wire the Hot lead(usually Black) to the
120V terminal. Connect the neutral lead(usually White) to the NEU terminal. Connect the ground lead (Green) to the
EGND terminal. If the MPG-2 is mounted directly to the meter, AND no true Neutral exists at the meter, wire the NEU and
EGND terminals both to Ground.
3.4 Wire the Pulse Outputs - Drill a suitable 1/2" conduit-sized hole (.875" max) into the lower compartment from the
bottom or lower sides of the enclosure into the customer compartment. Run 1/2" conduit as desired to destination wiring
enclosure. Determine whether the device(s) receiving pulses from the MPG-2 will need 2 wires or 3 wires. A 3-Wire (Form
C) connection will use all three wires K,Y, and Z. A 2-Wire (Form A) connection will use only two wires, usually K and Y.
See Figure 1 or Figure 2 for wiring diagrams. A minimum wire size of #18AWG is recommended. Although smaller wires
will adequately carry the ultra-low current involved, it is generally hard to work with and subject to easy breakage.
3.5 Wire the End-of-Interval Output - If you are using the EOI output for synchronization of the demand interval to the
meter you will use the 2-Wire (Form A) pulse output. Two wires will be required to the T1 and T2 terminals.

4.0 Programming Setup
All settings of the MPG-2 are made through the the USB Programming Port. Programming is accomplished by
using the SSI Universal Programmer software. Download it from http://solidstateinstruments.com/productpages/mpg-2-
wireless-pulse-generator.php if you have not already done so. The download link is under the Downloads tab.
4.1 Equipment Required -
a.) Windows computer running Windows 7 or later OS.
b.) USB A-B cable
4.2 Setting up the Programming Port - Connect a USB cable with one USB Type A connector and one USB Type B
connector. Connect the USB-B end to the MPG-2.
4.3 Verify Communications with MPG-2 - Turn on power to the MPG-2 and after the initialization process, the RED
LED on the dongle should be lit continuously. Start the SSI Universal Programmer program. The SSI Universal
Programmer software should immediately recognize that it is connected to the MPG-2. A Green simulated LED at the top
of the programming page indicates that the connection has been made. All the current settings of the MPG-2 will be
displayed.
Assuming that the dongle is paired (correctly) with the meter, is on, and is within 75' of the meter, then every 8 to 10
seconds, you will see information similar to the listing below received from the MPG-2. Click on the Monitor box to enter
the SSI UP Monitor mode:
-----------------------
Time Stamp: 21582e64 TSR:N
Demand: 000967
Multiplier: 00000001
Divisor: 000003e8
Energy (U): 5.35 Wh
Energy (F): 5.70 Wh
Note that the Timestamp, Demand, Mulitplier and Divisor are all in hexidecimial format and this represents the identical
information received from the meter. Also keep in mind that this Multiplier is the INTERNAL multipler that is sent by the
meter, NOT the EXTERNAL multipler (CT Ratio) that is programmed by the user.
4.4 Read System Parameters - Stop the monitoring mode and press "Read" button to view the current status or value
of all current system programming parameters. This is what is currently stored in the MPG-2's memory. The MPG-2 will
return the following information:
-----------------------
Multiplier: 1
Pulse Value: 10 Watt-hours
Output Mode: Normal
Output Form: C
Dongle Mode: Normal
Reset Time: 120 seconds
Filter: Enabled
Filter Setting: 2 Samples
End of Interval: 1000ms
Interval every: 15 min.
07/01/19 07:13:57 DOW:2
5.0 Programming System Settings
5.1 Programming the Multipler (CT Ratio or CT x PT Ratio)
This is the programmable EXTERNAL multiplier that represents the Transformer Factor of the utility's metering
configuration. This is usually the Current Transformer (CT) ratio. In configurations that use potential (voltage)
transformers, this is the current transformer ratio(CT) x potential (voltage) transformer ratio (PT). An 800 Amp to 5 Amp
current transformer has a ratio of 160. Therefore, the meter multipler on a building with 800:5A CT's would be 160. The
Multiplier is normally printed on the monthly utility bill. If you cannot find it any other place, call your utility and ask what
the meter or billing multiplier is.
MPG-2 Programming

If the building on which you are using the MPG-2 has an "Instrument-Rated" electric meter (an electric meter that has
current transformers), AND the local utility has not included this multiplier in the programming of the meter (which is
normally the case), you will have to program the Meter Multipler into the MPG-2's operating parameters. To check out
whether or not this is needed, look at the serial output using the MPG-2's programming USB port using the SSI-UP, and
convert the demand data in hexideciminal format to to decimal data. If the kW demand is not correct, then the meter is
sending a Secondary value, meaning that the multiplier is not included.
5.1 Multiplier (CT Ratio or CT x PT Ratio) (Con't)
Determine the Multiplier of the facility's electric meter. If the meter is a self-contained meter (no external current
transformers), the multiplier is 1. The default external multiplier in the MPG-2 is one (1), so you can skip this step. If the
utility's Zigbee transmission to the dongle includes the correct CT/PT multiplier value (Primary value), you can skip this
step also. This is very rare on instrument-rated metering implementations however, since most utilities do not want to
program the multiplier into the meter due to conflicts with the billing process. If you are looking at the serial data received
from the meter, you will be able to see what internal multipier is being sent in every transmission. This will be in
hexideciminal format. What you're looking for is whether this is 1 or something else besides 1. If, for instance, the multipler
is a decimal 160, it will be transmitted by the meter to the dongle as a hexideciminal "A0". If the multiplier is one(1), (and
this is the standard) AND you know that that the meter's external multipler is something other than 1, you will have to
program the correct external multiplier into the MPG-2 so that the true energy value, and thus the kW demand is correct.
To change the multiplier in the MPG-2, enter the correct multiplier in the Meter Multiplier field. If you are done entering
information you can press the "Send" box and the multiplier will be sent to the MPG-2 and will show correctly now in the
Meter Multipler field.
The USB serial link will return the current multiplier stored in the MPG-2, along with all other system settings. The
maximum multiplier is 99999 and must be an integer (whole) number.
5.2 Programming the Output Pulse Value
The output pulse value is the number of watt-hours that each pulse is worth. This is represented by the Pulse Value field.
The MPG-2 can be set from 1 Wh to 99999 Wh per pulse. Select a pulse value that you think will be appropriate for your
application. A good starting point is 100 wh/pulse. You can adjust it up or down as needed. Larger facilities will require a
larger pulse value to keep from overranging the MPG-2's registers or the maximum number of output pulses per second.
Enter 100 in the Pulse Value field and press <Send> to set the Output Pulse Value at 100 wh/pulse. The Pulse Value on
the SSI-UP will now show the correct value:
----------------------------------------
Pulse Value: 100 watt-hours
----------------------------------------
5.3 Set Output Mode
For one direction operation, set the MPG-2's Output Mode to Normal mode (kWh delivered). Set the MPG-2's mode to the
Signed mode (kWh delivered or received) if desired for a distributed energy resource(DER) application such as solar or
wind. In the Normal mode only positive energy (delivered) is displayed and pulses generated. In the Signed mode,
bidirectional energy (delivered or received) can be displayed and pulses generated for each mode individually. Use the
Output Mode field to select desired mode. The Normal mode is the default.
For Normal Mode:
Set the Mode field to Normal and press <Send> to set the Output Mode to Normal Mode. The serial link to the MPG-2 will
return:
----------------------------------------
Normal
----------------------------------------
For Signed Mode:
Set the Mode field to Signed and press <Send> to set the Output Mode to Signed Mode. The serial link to the MPG-2 will
return:
----------------------------------------
Signed
----------------------------------------
MPG-2 Programming

5.4 Set the Pulse Output Form
The MPG-2 has two output forms, the 3-Wire (Form C) Toggle mode or the 2-Wire (Form A) fixed mode. Set the Toggle
mode by selecting C or the A in the Output Form field from the pull-down menu. The toggle mode is the classic pulse
output mode that emulates the standard KYZ 3-Wire electric meter output. It toggles back and forth, to the opposite state,
each time a "pulse" is generated by the MPG-2. Even though there are three wires, it is common to use K and Y, or K and
Z, for many two-wire systems that require or desire a generally symetrical 50/50 duty cycle pulse. The toggle mode is used
for systems that are doing demand control and need regularly spaced "symmetrical" pulses. The 3-Wire pulse value must
be doubled if your pulse receiving device uses only two wires and is only counting the closure as a pulse(not the
subsequent contact opening also). Red and Green Output LEDs show the output status. See additional information on
Page 11.
In the Form A (fixed) mode, only the K-Y output is used. This is the standard 2-Wire system where the output contact is
normally-open until such time as a pulse is generated. When a pulse is generated, the contact is closed for a selected
fixed time interval(dwell) in milliseconds. Form A mode is generally associated with Energy measuring systems that are
only counting kwh or some other volumetric unit but are not concerned about how or at what rate the energy is consumed
at.
For Form C (Toggle) Mode:
Select C and <Send> to set the Output Form field to the Toggle (Form C) Mode. The serial link to the MPG-2 will return:
----------------------------------------
C
----------------------------------------
For Form A (Fixed) Mode:
Select A and <Send> to set the Output Form field to the Fixed (Form A) Mode. The serial link to the MPG-2 will return:
----------------------------------------
A
----------------------------------------
5.5 Set the Form A Pulse Width Time
If you are using the MPG-2 in the Form A Mode, set the output closure time or pulse width using the Form A Width field,
selectable 25 to 1000 mS (1 second) in 6 possible pulse widths. Upon a pulse being generated, the K-Y terminals of each
contact will close for the selected pulse width and light the RED LED only. This setting applies only to the Form A output
mode, and does not affect the toggle output mode. Use the Form A Width field pull-down menu to select the Output Pulse
Width to 200 mS, for example. Press "Send". The serial link to the MPG-2 will return:
----------------------------------------
200
----------------------------------------
5.6 Full Default Settings Reset
If you find that you want to reset all parameters of the MPG-2 back to the factory defaults, pull down the File dropdown
menu and select Reset Factory Defaults. The following parameters will default back to the factory settings as follows:
Multiplier=1
Pulse Value: 10
Reset Time: 120 seconds
Note that this resets the non-volatile memory of the MPG-2's processor only. It does not reset the memory in the dongle.
5.7 Viewing the Firmware Version
The MPG-2's firmware version is displayed in the upper left-hand corner of the SSI-UP software and shows:
You are connected to a: MPG-2 V2.19
MPG-2 Programming

MPG-2 Programming (cont)
MPG-2 Metering Pulse Generator.vsd
5.8 Dongle Monitor Mode
There are two dongle readout modes available on the MPG-2, Normal and Echo. The Normal Mode is the default and
shows you the time stamp, the demand, the multiplier and the divisor coming from the meter. The Normal mode is set by
selecting the Normal radio button on the right side of the SSI-UP dialog box and clicking on Monitor.
----------------------------------------
Dongle Model: Normal
----------------------------------------
The Echo mode allows you to view the entire transmission coming from the meter the way it is received by the MPG-2's
microcontroller from the dongle in XML format. This mode may be useful in troubleshooting in the event of intermittent
transmissions from the meter. The Echo mode is set by selecting the Echo radio button on the right side of the SSI-UP
dialog box and clicking on Monitor.
5.9 Filter Mode Enable/Disable
The MPG-2 includes a filtering mode to smooth out the erratic communications from the electric meter which happen for a
number of known and unknown reasons. This mode allows you to use 2 to 10 samples, each at about 8 seconds long, to
average usage, and thus kW demand, over the selected interval from approximately 16 to 80 seconds. Depending on the
device receiving the pulses and the methodology it uses to interpret them, this can be a great help in representing the real
kW demand and eliminate the quantitization problem caused.
To enable the filter mode select Enable in the Filter field. Hit "Send". The serial link on the MPG-2 will return the following:
----------------------------------------
Enabled
----------------------------------------
To disable the filter mode select Disable in the Filter field. Hit "Send". The serial link on the MPG-2 will return the
following:
----------------------------------------
Disabled
----------------------------------------
5.10 Set the number of Filter Samples
Select the number of samples used by the Filter Mode from 2 to 10. The default is 2. Hit "Send". The serial link on the
MPG-2 will return the following:
----------------------------------------
5
----------------------------------------
5.11 End-Of-Interval Mode
The MPG-2 has a synthesized End-Of-Interval (EOI) feature. The MPG-2 has an internal software Real Time Clock (RTC).
The MPG-2 reads the timestamp from the meter at 1 hour intervals and updates the internal RTC if necessary to keep the
timeclock accurate. If the EOI feature is enabled, upon the stroke of the quarter hour (if set for a 15-minute interval), the
MPG-2 will output an End-Of-Interval pulse, the duration of which is determined by the Ex setting.
E0 - EOI disabled and no EOI pulses will be generated.
E1 - EOI enabled at 50mS (1/20th of a second).
E2 - EOI enabled at 100ms (1/10th of a second).
E3 - EOI enabled at 250ms (1/4th of a second).
E4 - EOI enabled at 500ms (1/2 of a second).
E5 - EOI enabled at 1000ms (1 second).
E6 - EOI enabled at 2000ms (2 seconds).
E7 - EOI enabled at 5000ms (5 seconds).
E8 - EOI enabled at 10000ms (10 seconds).
To disable the EOI feature enter E0 and press <Enter>. The serial link on the MPG-2 will return the following:
----------------------------------------
EOI Pulse: Disabled
----------------------------------------
To enable the End-of-Interval mode AND set the Pulse Width for 100mS enter E2 and <Enter>. The serial link on the
MPG-2 will return the following:
----------------------------------------
EOI Pulse: Enabled-100mS
----------------------------------------

5.12 Setting the Interval Length
The MPG-2 allows the user to set the internal length for the correct meter interval. While a 15 minute
interval is almost universal for interval data and the majority of demand rates, other intervals may also
exist, like 30 or 60 minutes.
The MPG-2 uses the "I" command to set the interval length from 1 minute to 60 minutes.
I1 - EOI length 1 minute.
I2 - EOI length 5 minutes.
I3 - EOI length 10 minutes.
I4 - EOI length 15 minutes.
I5 - EOI length 30 minutes.
I6 - EOI length 60 minutes.
To enter the desire Interval length for 15 minutes for example, I4 and <Enter>. The serial link on the
MPG-2 will return the following:
-----------------------------------
Interval Energy: 15 min.
-----------------------------------
5.13 Setting the Real Time Clock
The MPG-2 allows the user to set the internal real time clock (RTC) with an initial time using the K
command. Once the time is set, the time will elapse until the 2nd data packet is received from the
dongle, usually about 30 to 60 seconds after startup.
When the 2nd packet is received the timestamp from the meter will be compared to the RTC setting and
the time adjusted to match the meter. The clock setting feature is provided for situations where the
Zigbee transmissions from the meter may not be immediately available. The clock is set as follows:
"KMODYYRHRMNSC<CR>"
Where: K - Command Write RTCC
MO - Month (01-12)
DY - Day of Month (1-31)
YR - Year (00-99)
HR - Hour (00-23)
MN - Minutes (00-59)
SC - Seconds (00-59)
Note 1: CR terminates the command.
Note 2: The Firmware will calculate the correct day of week for the provided Month, Day, and Year.
Note 3: A proper date must be provided, Feb. 29th 2017 is not accepted, as it does not exist. However,
Feb. 29th. 2020 is accepted. Any improper parameter will result with a response of 'Error'. If the month
is provided as 13, this will result in 'Error'. etc. If the day is provided as 31 on a month that only has 30
days, response 'Error', etc.
Responses: "Error" - Improper values provided or invalid command.
- or -
-------------------------------
06/23/19 06:06:06 DOW :1 TSR:N
-------------------------------
Note: RTCC defaults upon power up as 1/1/2019 00:00:00.
MPG-2 Programming (cont)

MPG-2 Wireless Meter Pulse Generator (con't)
6.0 Operation
6.1 Communication LEDs
Upon power-up, the YELLOW comm LED should light indicating that the Zigbee dongle is enumerated, correctly initialized
and communicating with the MPG-2's processor. Within about approximately 45 - 60 seconds, the GREEN comm LED will
blink each time a valid transmission is received from the meter. As long as valid transmissions are received by the dongle
and successfully relayed by the MPG-2's processor, the Green comm LED will blink about once every 8-9 seconds. If the
Green comm LED does not blink, that is an indication that the data transmissions from the meter are not being received,
may be corrupted, or in some manner are not valid transmissions. If the Green comm LED has been blinking reliably for
some time, then stops for a while and then restarts again, this indicates that transmissions are intermittent and sporatic, or
generally means there is a problem in the dongle's ability to receive data reliably from the meter. To correct this, change
the proximity of the MPG-2 to the meter, move it closer to the meter if possible and eliminate any metalic obstructions
between the meter and the MPG-2. Also check to make sure that any walls or barriers between the MPG-2 and the meter
have as little metal in them as possible. For the longest distances you must have line-of-sight.
6.2 Pulse Outputs
Outputs can be configured to be in the Toggle (Form C) mode or the Fixed (Form A) mode. Generally speaking, the
Form C mode can be used with either 2-Wire or 3-Wire Pulse receiving devices, while the Form A mode uses only a 2-
Wire interface to the downstream (receiving) pulse device. The choice would depend on the desired pulse format that the
receiving device prefers to see.
If the dongle is reliably receiving data from the meter and passing it on to the MPG-2's processor, then you should see the
Red and Green output LED's toggle each time the selected pulse value is reached, and the MPG-2's processor generates
a pulse. If the pulse output value is too high and pulses are too slow, then select a lower pulse value using the
programming port and the SSI Universal Programmer program or a terminal program (See Page 6).
If pulses are being generated too rapidly, select a higher pulse output value. The maximum number of pulses per second
is approximately 10, which means that the output's open and closed times are about 50mS each in toggle mode. If the
calculation by the MPG-2's processor for pulse output timing exceeds 15 pulses per second, the MPG-2 will light the RED
comm LED, indicating an overflow error, and that the pulse value is too small. The LED is "latched" on so that the next
time you look at it this RED LED will be lit, and you will have a indication that an error has occurred. The operation of the
MPG-2 will continue even though some pulses were lost. In this way, you can quickly determine if a pulse output value is
too small, and thus, pulses too fast at a high demand. However, in the optimum application, pulses would not exceed
more than one pulse every 2 seconds, with a 1 pulse per second maximum. This allows a very even and "normal" pulse
rate that as closely as possible resembles an actual KYZ pulse output from the meter.
The MPG-2 will "spread out" the pulses over the next 7 second period if a high enough watt-hour value is received in a
transmission to require that more than one pulse is generated. For example, suppose you have the Output Pulse Value of
10 wh selected. The next 8 second transmission yields 24 wh have been used. Since 24 watt-hours exceeds the 10 watt-
hour setting, two pulses must be generated. The first 10wh pulse will be generated immediately. About three seconds later
the second 10wh pulse will be generated. The remainder of four watt-hours stays in the accumulated energy register (AER)
awaiting the next transmission and the energy value of that transmission to be added to the contents of the AER. Another
example: Assume 25 wh/p Output Pulse Value. Let's say the next transmission is for 130 watt hours. 130 is greater than
25, so 5 pulses will be outtputted over the next 7 seconds, approximately one each 1.4 seconds (7 seconds / 5 = 1.4
seconds). The remainder of 5 wh will stay in the AER awaiting the next transmission. Some trial and error may have to be
done for any particular building since pulse rates will change depending on maximum load. The larger you can make the
pulse value the more regular the output pulses from the MPG-2 will be.
5.3 Overranging the Output
As mentioned above, if there are too many pulses calculated to be outputted in a 7 second interval than the MPG-2 can
generate given the timing constraints, the MPG-2 will light the RED comm LED. In this situation, simply increase the pulse
output value using the programming port, and cycle power to the MPG-2 to reset the RED comm LED. This is intended to
notify the user that a higher pulse value is needed. As load is added to a building over time, there is some likelihood that
this will occur so be sure to consider this if/when you add load to the building. If an error condition occurs, set the Pulse
Value to a higher pulse value, for example double the current value. Remember to change the pulse constant of your
receiving device as well, since pulses will now be worth a higher watt-hour value. Cycle power to the MPG-2 to reset the
RED comm LED after increasing the pulse value.

WORKING WITH THE MPG-2 RELAY
PULSE OUTPUT MODES: The MPG-2 Meter Pulse Generator allows the outputs to be
configured in either the "Toggle" or "Fixed" pulse output mode. In the Toggle mode, the
outputs alternate or toggle back and forth each time a pulse is generated. This is
synonomous with the classic 3-Wire Pulse metering and emulates the SPST KYZ switch
model. Figure 1 below shows the timing diagram for the "Toggle" output mode. KY and KZ
closures or continuity are always opposite of each other. In other words, when the KY
terminals are closed (on), the KZ terminals are open(off). This mode is best for timing
pulses to derive demand, whether 2 or 3 wires are being used.
Contact the factory for technical support at (970)461-9600.
In the Fixed output mode, shown in Figure 2 below, an output pulse (K-Y closure only) is a
fixed width (T1) each time the output is triggered. The pulse width (closure time) is
determined by the W command using the Programming port. (See Page 7.) This mode is
best for energy counting systems but generally is not best for systems doing demand control
where pulses are timed to derive instantaneous kW demand. The K-Z output is not used in
the Normal/Fixed(A) mode. However, it is used in the Signed mode. See Page 7.
T1
Figure 2: 2-Wire Only FIXED Output Operation
K-Y Out Open
Closed
Open
Closed
K-Z Out
Figure 1: 2-Wire or 3-Wire TOGGLE Output Operation
K-Z Out
K-Y Out Open
Open
Closed
Closed
KY closure time
In Signed mode, with a Form A output mode selected, the K-Z output pulse represents
negative (or kWh received) energy. (See Page 7.)

Working with the MPG-2 (cont)
Bi-Directional Energy Flow (Signed Mode)
If you have energy flowing in both directions in the case of distributed energy resourses (solar, wind, etc), the MPG-2 can
provide both positive and negative pulses. This is known as the Signed mode, meaning that "kWh Delivered" (from the
utility to the customer) is positive or forward flow, and "kWh Received" (from the customer to the utility) is negative or
reverse flow.
The Pulse Value Setting is the same for both positive and negative values.
To enter the functional or operational mode into the MPG-2, use the Pulse Mode field. Select Normal to set the MPG-2
in the Normal mode. Hit "Send". Select Signed to set the MPG-2 in the Signed mode. Hit "Send". The serial link to the
MPG-2 will return "Signed". To read click on Read Values. The serial link will return the mode stored in the MPG-2. For
example, "Normal" will be returned for the Pulse Mode. Case does not matter.
Form C Signed mode - A positive energy value received from the meter is added to the positive Accumulated Energy
Register(+AER). Negative energy values received are ignored. Only Form C toggle pulses are generated on the KYZ
output for Positive energy flow. See Figure 3 below.
Form A Signed mode - A positive energy value received is added to the positive Accumulated Energy Register(+AER).
A negative energy value received is added to the negative Accumulated Energy Register(-AER). When either register
equals or exceeds the Pulse Value setting, a pulse of the corresponding sign is outputted on the correct line. Pulses in
this mode are Form A (2-wire) "Fixed" only. K-Y pulses are Positive pulses and K-Z pulses are negative pulses. They
share a common K terminal on the output. Set the pulse value with the Pulse Value field. Set the pulse width using the
Pulse Width field. See Figure 4 below.
T1
Figure 4: 2-Wire (FORM A) FIXED Output Operation
K-Y Out Open
Closed
Open
Closed
K-Z Out KY closure time
In Signed mode, with a Form A output mode selected, the K-Y output pulse represents
positive (or kWh delivered) energy; K-Z output pulse represents negative (or kWh received)
energy.
(Positive)
(Negative)
Figure 3: 3-Wire (FORM C) TOGGLE Output Operation
K-Z Out
K-Y Out Open
Open
Closed
Closed
Positive Energy Pulse Outputs Only
Positive and Negative Energy Pulse Outputs
In Signed mode, with a Form C output mode selected, the K-Y and K-Z output pulses
represent positive (or kWh delivered) energy; Negative (or kWh received) energy is ignored.
Positive Flow Positive FlowNegative Flow
Positive Flow Positive FlowNegative Flow

MPG-2 Metering Pulse Generator.vsd
List of MPG-2 Commands
Here is a list of the available commands if you are using an ASCII terminal program instead of the
SSI Universal Programmer software. If you don't remember them use the help, 'h', 'H', or '?' to
bring up the list.
mXXXXX<CR> or MXXXXX<CR> - Set multiplier (XXXXX is 1 to 99999).
pXXXXX<CR> or PXXXXX<CR> - Set pulse value, Watt-hours (XXXXX is 0 to 99999)
tXXX<CR> or TXXX<CR> - Set Reset Time, seconds (XXX is 30 to 600).
'f0<CR>' or 'F0<CR>' - Disable Filter.
'fx<CR>' or 'Fx<CR>' - Enable Filter and set number of samples x=2 to 10
'r<CR>' or 'R<CR>' - Read Parameters.
's0<CR>' or 'S0<CR>' - Set into Normal mode (positive only with Form A or C set by C command)
's1<CR>' or 'S1<CR>' - Set into Signed mode (positive/negative with only Form A)
'd0<CR>' or 'D0<CR>' - Set into Dongle Normal mode
'd1<CR>' or 'D1<CR>' - Set into Dongle Echo mode
'z<CR>' or 'Z<CR>' - Set Factory Defaults
'v<CR>' or 'V<CR>' - Query Firmware version
Pulse Output Mode (Form)
'c0<CR>' or 'C0<CR>' - Pulse Output Mode Form C Disabled (Form A Output Mode)
'c1<CR>' or 'C1<CR>' - Pulse Output Mode Form C Enabled (Form C Output Mode) (default)
Form A Pulse Width
'wX<CR>' or 'WX<CR>' - Pulse Width in Form A mode, milliseconds - 25 to 1000mS, 100mS
default;
Form A Pulse Width Selections:
'w0<CR>' or W0<CR>' - 25mS Closure
'w1<CR>' or 'W1<CR>' - 50mS Closure
'w2<CR>' or 'W2<CR>' - 100mS Closure
'w3<CR>' or 'W3<CR>' - 200mS Closure
'w4<CR>' or 'W4<CR>' - 500mS Closure
'w5<CR>' or 'W5<CR>' - 1000mS Closure
EOI Form A Pulse Width
'eX<CR>' or 'EX<CR>' - EOI Pulse Width in Form A mode, milliseconds - 50 to 10000mS, 1000mS
default;
EOI Form A Pulse Width Selections:
'e0<CR>' or E0<CR>' - EOI disabled
'e1<CR>' or 'E1<CR>' - 50mS Closure
'e2<CR>' or 'E2<CR>' - 100mS Closure
'e3<CR>' or 'E3<CR>' - 250mS Closure
'e4<CR>' or 'E4<CR>' - 500mS Closure
'e5<CR>' or 'E5<CR>' - 1000mS Closure
'e6<CR>' or 'E6<CR>' - 2000mS Closure
'e7<CR>' or 'E7<CR>' - 5000mS Closure
'e8<CR>' or 'E8<CR>' - 10000mS Closure

MPG-2 Metering Pulse Generator.vsd
List of MPG-2 Commands
EOI Interval Length
'iX<CR>' or 'IX<CR>' - EOI Interval Length, minutes - 1 to 60 minutes, 15 min. default;
EOI Interval Length Selections:
'i1<CR>' or 'I1<CR>' - 1 Minute Interval
'i2<CR>' or 'I2<CR>' - 5 Minute Interval
'i3<CR>' or 'I3<CR>' - 10 Minute Interval
'i4<CR>' or 'I4<CR>' - 15 Minute Interval
'i5<CR>' or 'I5<CR>' - 30 Minute Interval
'i6<CR>' or 'I6<CR>' - 60 Minute Interval
Table of contents
Other SSI Portable Generator manuals
Popular Portable Generator manuals by other brands
Generac Power Systems
Generac Power Systems 005981-2 owner's manual

MULTIQUIP
MULTIQUIP WHISPERWATT DCA-25SSIU2 Operation and parts manual

Base aire
Base aire UVC2 Pro Installation & operation manual
Alpha Technologies
Alpha Technologies AlphaGen DCX2000 Operation manual

Generac Power Systems
Generac Power Systems 004991-0 owner's manual
Dynascan
Dynascan B&K 2050 instruction manual

Mi-T-M
Mi-T-M GEN-3600-0MM0/0DM0 Operator's manual

Homelite
Homelite UT905700 series Operator's manual

Mosa
Mosa NAKED GE 6000 YDM Use and maintenance manual

ETQ
ETQ Liquid Propane Operation manual
Gopel Electronic
Gopel Electronic basicCON 4115 user manual

Generac Power Systems
Generac Power Systems 006000-0 owner's manual
