Stûv 30 Compact User manual

installation | installatie | installazione | instalación | instalação | instalace | installation | installatie | installa-
zione | instalación | instalação | instalace | installation | installatie | installazione | instalación | instalação |
instalace | installation | installatie | installazione | instalación | instalação | instalace | installation | installatie
| installazione | instalación | instalação | instalace | installation | installatie | installazione | instalación | insta-
lação | instalace | installation | installatie | installazione | instalación | instalação | instalace | installation |
installatie | installazione | instalación | instalação | instalace | installation | installatie | installazione | instala-
ción | instalação | instalace | installation | installatie | installazione | instalación | instalação | instalace |
[en]
installation instructions
Stûv 30
FOR PROFESSIONALS
July 2013 – SN 138804 > ...

2SN 138804 - ...
Stûv 30 - installation [en] - 07/13
Contents
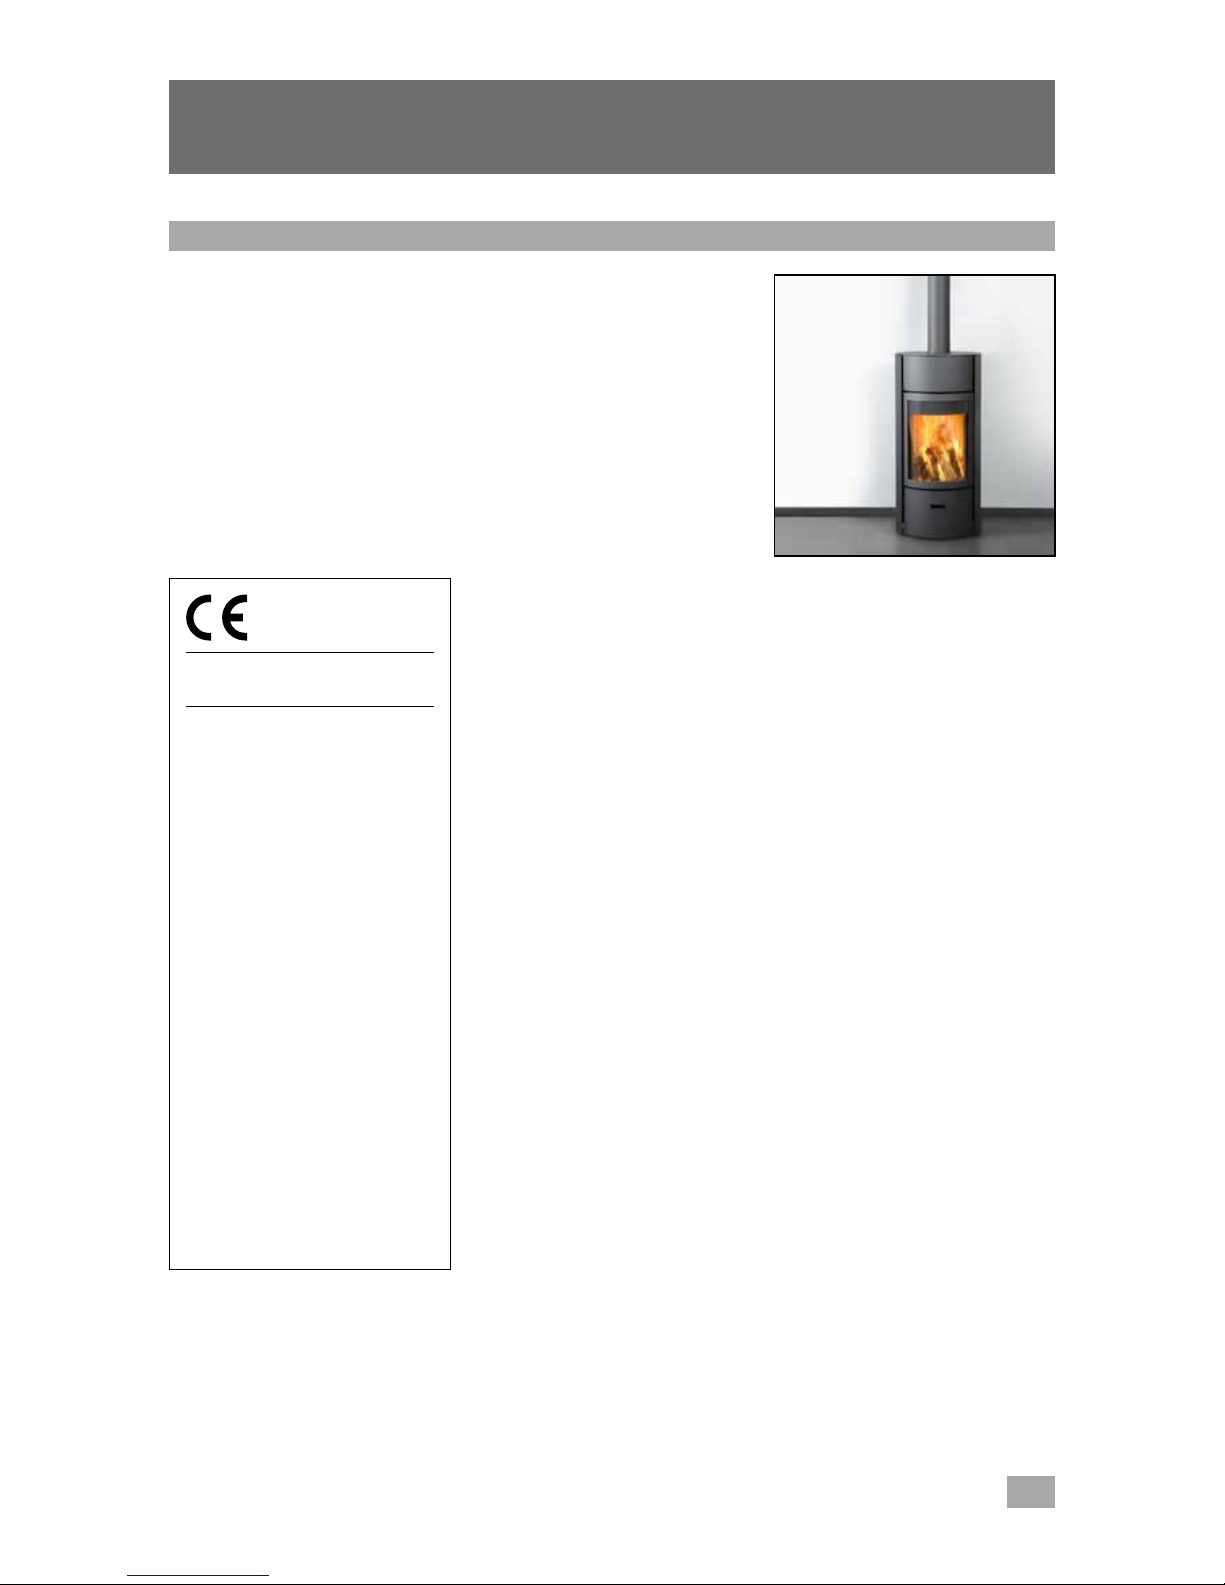
This Stûv stove has been designed
to offer you maximum comfort and
safety. It has been manufactured
with the greatest of care. If however
you should find the slightest
dissatisfaction with it, please contact
your supplier.
We recommend that you read these
instructions prior to installation.
Some configurations might have an
impact on the sequence of operations
to be performed.
PRESENTATION OF THE PRODUCT 3
Standards, certification and technical characteristics 3
Dimensions 5
Recommendations 7
Overview 8
PREPARATION OF THE AREA 9
Combustion air inlet 9
Smoke flue 10
Connection to the smoke flue 10
Holding capacity of the structure 11
Please note 11
The stove’s surroundings 11
Tools 11
INSTALLATION 12
On taking delivery of the equipment 12
Moving the stove 12
Unpacking 13
Removing the exterior parts of the stove 14
Separating the hearth from its pallet 16
Removal of the contents of the combustion chamber 17
Final positioning of the stove 17
Connection with outside air 18
Levelling the stove 21
Installing the lock for the rotary Stûv 30 22
Connection to the flue - the various configurations 23
Connection to flue - top exit for fixed hearth 24
Connection to flue - top exit for rotating hearth 25
Connection to the smoke flue – back outlet 26
Attachment of the smoke flue 27
Accessories for the connection to the smoke flue 27
Directing the stove 28
Positioning of the ground plate 31
Final assembly 32
Adjusting the minimum valve opening stop 34
When installation of the stove is complete… 34
CONTACTS 35
3
SN 138804 - ...
Stûv 30 - installation [en] - 07/13
Standards, certification and technical characteristics
PRESENTATION OF THE PRODUCT
The Stûv 30 stoves (for intermittent
operation) comply with the
requirements of EN European
Standards in terms of efficiency,
gas emissions, safety etc….
Data provided in this notice are
supplied by a certified laboratory.
Test results according to
EN13240: 2001 and
13240-A2:2004 standards
(stoves)
Stûv 30-compact are covered by the
patent nr1130323.
Stûv sa
B-5170 Bois-de-Villers (Belgium)
13 QA131324008
EN 13240: 2001 / A2: 2004
Wood insert 30
Minimum safety distance from
adjacent combustible materials:
– behind: 10cm
– on the sides: 10cm
– below: 0cm
Recommended fuel: wood logs only
CO emissions*: 0,05 %
Average smoke temperature
at rated power*: 263°C
Nominal heat power*: 10kW
Efficiency*: > 80%
Particle emissions: 28 mg/Nm3
Please read the installation
instructions and directions for use!
Stûv 30 stoves are protected by Patent
no. 1130323.

4SN 138804 - ...
Stûv 30 - installation [en] - 07/13
Other technical characteristics
Stûv 30
Minimum diameter of the duct for the intake of outside combustion air 100cm2
Maximum length of logs in vertical position 50cm
Maximum length of logs in horizontal position 33cm
System mass 215kg
Optimum output range for usage 5 – 12kW
Range of wood consumption per hour recommended (at 12% humidity) 1,4 – 3,4kg
Maximum limit for consumption of wood per hour
(to avoid overheating the system) 5kg/h
glass-door mode closed-door
mode open-fire mode
Minimum draught needed to obtain the rated calorific output 12Pa 12Pa 6Pa
Weight-flow ratio of smokes 8,1g/s 8,2g/s 30g/s
Average smoke temperature at rated power 319°C 331 °C 153 °C
Standards, certification and technical characteristics (continued)

5
SN 138804 - ...
≥800*
≥100
≥100
120°
ab
Stûv 30
575
323
560
150/180
1090
1230
630534
313
240
237
Ø150/Ø180
Ø240
Ø150/Ø180
-0
+20
-0
+20
Stûv 30 - installation [en] - 07/13
Dimensions
* safe distances from combustible
materials
The radiation from the glass door
[diagram 1/a] and from the sides
of the stove [diagram 1/b] can be
considerable.
Whatever the direction of the rotating
stove, ensure safe distances from
combustible materials are maintained.
View from below
View from front and left
View from above

6SN 138804 - ...
100
65
1160
Ø 1160
315
343
880
257
63
292
560
257
min 100 - Max 420
Stûv 30 - installation [en] - 07/13
Dimensions
Rear outside air supply
Oval floor plate
Round floor plate
View from above
View from above
View from above
Profile view
Floor plate thickness = 2 mm
Floor plate thickness = 2 mm

7
SN 138804 - ...
Stûv 30 - installation [en] - 07/13
Recommendations
The Clean Air Act 1993 and Smoke Control Areas
We strongly recommend you entrust
the installation of this Stûv to a
qualified professional who is able to
ensure that the characteristics of the
smoke flue correspond to the stove
installed.
The installation of the stove, its
accessories and surrounding materials
must adhere to all regulations (local
and national) and all standards
(national and European).
Some national and local regulations
require the installation of an access
flap in the connection between the
stove and the smoke flue.
The stove has to be installed in such
a way as to facilitate access to sweep
the stove, the connection duct and
the smoke flue.
Any modification made to the system
may be dangerous and will invalidate
the guarantee.
Under the Clean Air Act local
authorities may declare the whole or
part of the district of the authority
to be a smoke control area. It is
an offence to emit smoke from a
chimney of a building, from a furnace
or from any fixed boiler if located
in a designated smoke control area.
It is also an offence to acquire an
"unauthorised fuel" for use within a
smoke control area unless it is used in
an "exempt" appliance ("exempted"
from the controls which generally
apply in the smoke control area).
The Secretary of State for
Environment, Food and Rural Affairs
has powers under the Act to authorise
smokeless fuels or exempt appliances
for use in smoke control areas in
England. In Scotland and Wales this
power rests with Ministers in the
devolved administrations for those
countries. Separate legislation, the
Clean Air (Northern Ireland) Order
1981, applies in Northern Ireland.
Therefore it is a requirement that fuels
burnt or obtained for use in smoke
control areas have been "authorised"
in Regulations and that appliances
used to burn solid fuel in those areas
(other than "authorised" fuels)
have been exempted by an Order
made and signed by the Secretary
of State or Minister in the devolved
administrations.
Further information on the
requirements of the Clean Air Act can
be found here : http://smokecontrol.
defra.gov.uk/
Your local authority is responsible for
implementing the Clean Air Act 1993
including designation and supervision
of smoke control areas and you can
contact them for details of Clean Air
Act requirements”
The Stûv 30 has been recommended
as suitable for use in smoke control
areas when burning wood.
• Refuelling on to a low fire bed
If there is insufficient burning material
in the firebed to light a new fuel
charge, excessive smoke emission can
occur. Refuelling must be carried out
onto a sufficient quantity of glowing
embers and ash that the new fuel
charge will ignite in a reasonable
period. If there are too few embers in
the fire bed, add suitable kindling to
prevent excessive smoke
• Fuel overloading
The maximum amount of fuel
specified in this manual should not
be exceeded, overloading can cause
excess smoke.Fuel level must not
exceed the upper line of secondary air
holes in the back of the combustion
chamber [diagram 1].
• Operation with door left open
Operation with the door open can
cause excess smoke. The appliance
must not be operated with the
appliance door left open except as
directed in the instructions.
• Dampers left open
Operation with the air controls or
appliance dampers open can cause
excess smoke. The appliance must
not be operated with air controls,
appliance dampers or door left open
except as directed in the instructions.
• The air valve can not be turned
down lower than the medium
position. There is a physical stop
to prevent closing air valve further.
[diagrams 2 & 3]
1
2
3
8SN 138804 - ...
a
b
c
d
e
f
g
h
Stûv 30 - installation [en] - 07/13
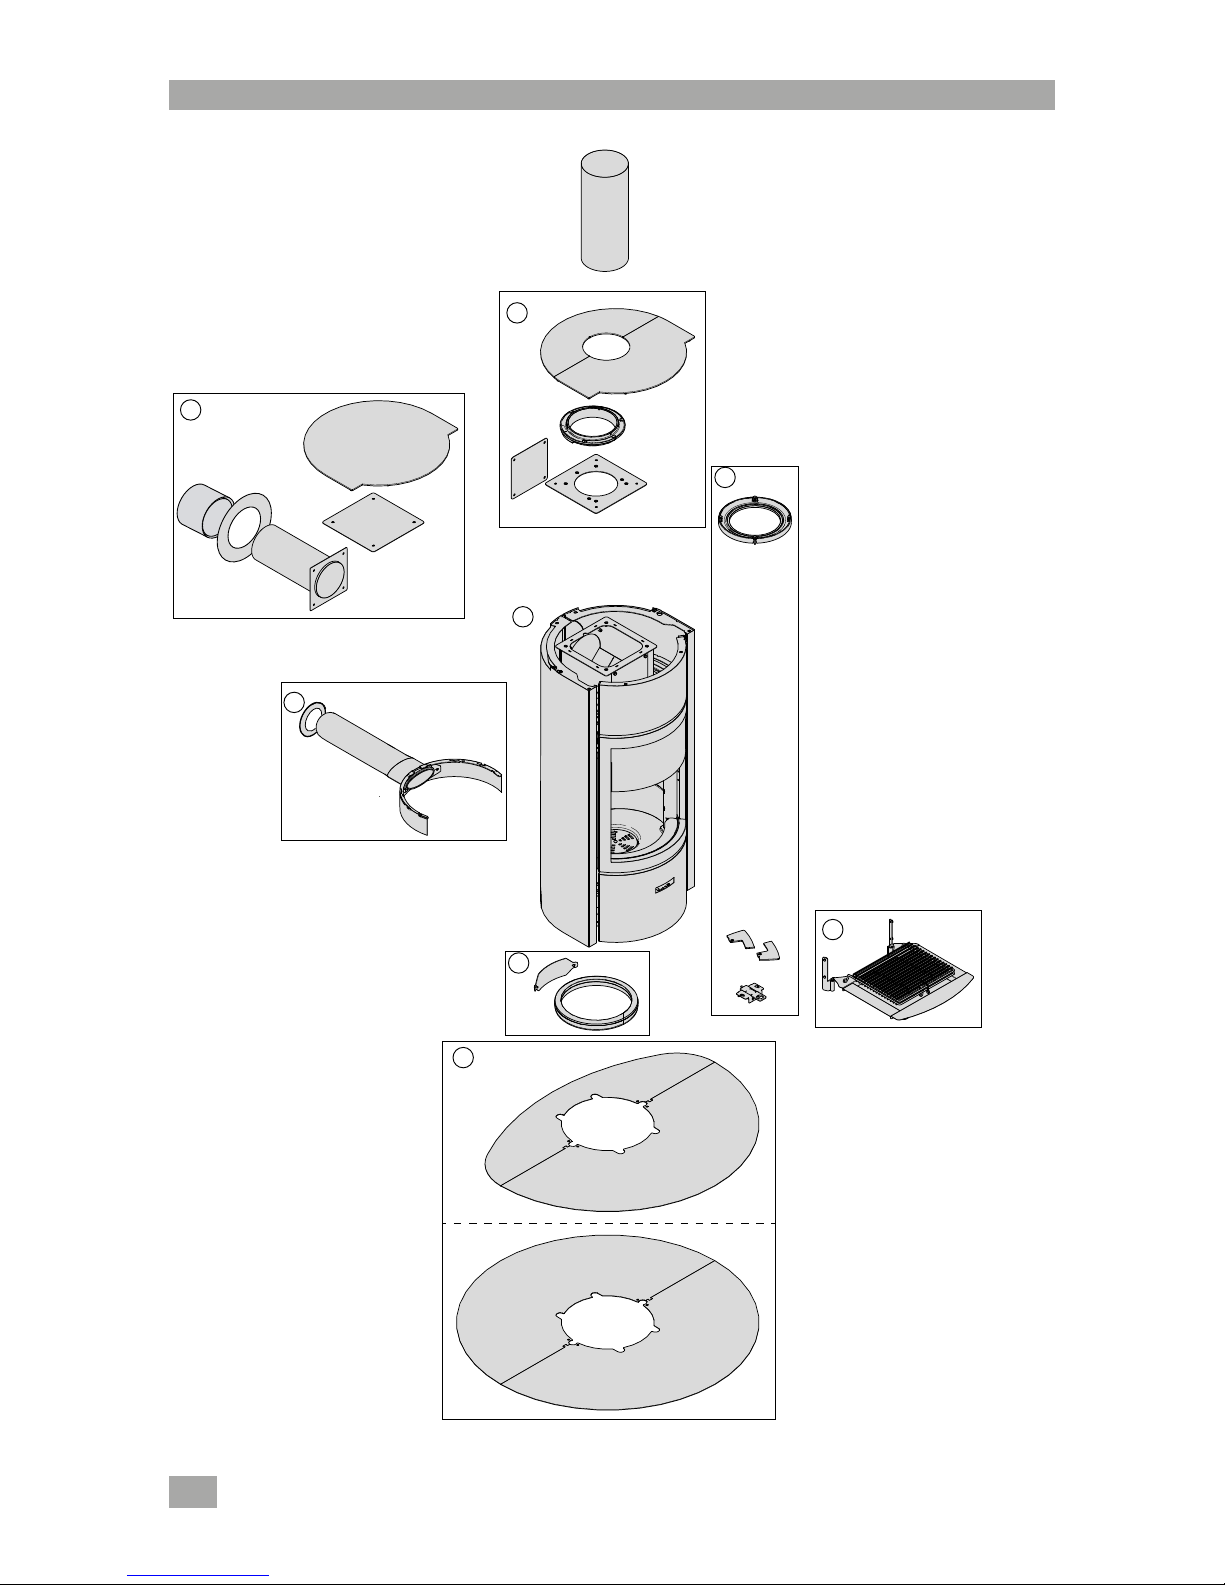
Overview
a. Stûv 30.3
b. Rear smoke exit kit
Available in diameter 150 or 180 mm
c. Top smoke exit kit
Available in diameter 150 or 180 mm
d. Stûv 30.3 rotary kit
e. BBQ grille
f. Floor plate
g. Bottom external air supply
h. Top external air supply

9
SN 138804 - ...
2
3
1
240
100
65
4
b
a
a
a
Stûv 30 - installation [en] - 07/13
PREPARATION OF THE AREA
If you exceed these guidelines, you
must compensate with a greater
diameter and/or a smoother duct.
Careful not to crush the flue.
The stove requires air for combustion.
(particularly when working in open-
fire mode).These requirements vary
depending on the nature of the
building.
The ideal solution
The Stûv 30 is designed to be directly
connected to an outside air inlet
(independent of the air in the house).
We recommend this set-up. The
connection can be made below the
stove [diagrams 1/a et 2] or at the
back [diagram 1/b & 3].Stûv offers
optional connections for each of these
configurations.
If the stove is not connected
directly to an outside air inlet...
A sufficient air inlet (Ø 120mm)
should ideally be created close to the
stove.
This air inlet comes from a ventilated
empty space, a ventilated room
(cellar) or from outside (mandatory
regulation in some countries).
The flue that brings in outside
air… (whether it is connected to
the stove or not)
...will be protected on the outside
by a grill [diagram2/a-3/a] the free
passage section of which is at least
equivalent to the section of the air
inlet. Please note that the infiltration
of water and the effect of the wind
can damage the system.
...will ideally be fitted with a closure
valve (for example, the Stûv valve –
see below) [photo4] to prevent the
room from becoming cold when the
stove is not in use.
...will be as short as possible to
prevent pressure loss and to prevent
making the house cold.
If you use our standard flexible Ø
100mm flue, we recommend a
maximum length of 6m and no more
than 6 elbows (see table below).
Combustion air inlet
Length of flue
max. permitted
number of
elbows
1m 6 elbows
2m 6 elbows
3m 6 elbows
4m 6 elbows
5m 6 elbows
6m 6 elbows
The external valve
[diagram 2/b and photo3] prevents
the house from becoming cold when
the stove is not in use.
This device is optional if you choose
a direct connection to the stove
(diagrams 1 and 2). However, it is still
an attractive option if the duct lengths
to the stove are too great. This air
ducting has a large, non-insulated
surface area containing the outside air
(heat loss). The impact is even greater
for installation in a low-energy house.
It should ideally be located as close as
possible to the outside wall. It can be
controlled from inside if it is not too
far away from the stove (length of the
flexible of the valve control =1.2m).
If it is not possible to bring in
outside air near the stove
(most unfavourable case)...
...ensure there is sufficient
replenishment of air in the room when
the stove is in use.
Please note
Be careful with air extraction systems
(kitchen hoods, air conditioning,
mechanically-controlled ventilation,
other stoves) in operation in the same
space or in an adjacent room. They
also use lots of air and can cause a
depression in the room and prevent
the stove from operating correctly
(risk of draughtback). They can affect
the operation of the stove even if it is
connected to an outside air inlet.

10 SN 138804 - ...
min 100 mm 245
1090 mm -0
+20
min 60 mm
Ø150 / 180 mm
Ø150 / 180 mm
35 mm (ép 0.4 mm)
25 mm (ép 2 mm)
1
Stûv 30 - installation [en] - 07/13
Smoke flue
Connection to the smoke flue
Ensure the flue’s dimensions meet
local regulations and the applicable
installation standards in line with good
practice.
Basic information
For good draught, the stove must be
suited to the flue (or vice versa).
An oversized flue is as detrimental to
the smooth operation of the stove as
an undersized flue.
You will find a simplified method
providing an initial evaluation of the
characteristics of the flue based on the
type of stove at www.stuv.com > Info
& Services > Practical questions.
As the Stûv 30 is a highly efficient
stove, the smoke flue must be of
good quality. The flue must also be as
straight and smooth as possible and
insulated to encourage drawing and
to prevent condensation.
The ideal solution is a flue built inside
the building and thermally insulated.
An outside flue without any insulation
must be avoided.
The stove must never be connected to
a smoke flue serving several systems.
Allow play of 2mm/m for expansion of
the flue and to ensure smooth rotation
of the stove.
Connection above
[diagrams 1/a]
If the flue is straight, it is simply placed
on the stove; the flue turns with the
stove.
If the flue has an elbow or is deflected,
it is fixed at wall or ceiling level (rotation
of stove only).
Connection at the back
[diagram 1/b]
The flue will be fixed onto the stove
for maximum air-tightness.
Air-tightness
The various components which make
up the connection between the stove
and the smoke flue and those which
make up the flue itself have to be
fitted so that they are airtight for the
condensation [diagram 2/a] rather
than the smoke [diagram 2/b].
25 if duct thickness = 2 mm
35 if duct thickness = 0.4 mm
Take care to avoid heat loss!
If several flues are available: only use
one of them. Block up the unused
flues at the top and bottom and,
generally speaking, ensure that the
top of the recess where the stove is
fitted is air-tight.
Standard outlet diameter
Stûv 30 can be connected to a Ø150
mm or Ø180 mm flue
Some flue configurations may
require a different diameter than that
provided as standard. Should this be
the case, please consult your retailer.

11
SN 138804 - ...
1
≥800*
120°
10 cm
10 8 7
7
7
2,5 3 5
10
ph 2
0,4 x 2,5
21 3 4 5 6 7 8 9 10 11 12 13 14 15 16 17 18 19
21 3 4 5 6 7 8 9 10 11
10 cm
10 8 7
7
7
2,5 3 5
10
ph 2
0,4 x 2,5
21 3 4 5 6 7 8 9 10 11 12 13 14 15 16 17 18 19
21 3 4 5 6 7 8 9 10 11
10 cm
10 8 7
7
7
2,5 3 5
10
ph 2
0,4 x 2,5
21 3 4 5 6 7 8 9 10 11 12 13 14 15 16 17 18 19
21 3 4 5 6 7 8 9 10 11
10 cm
10 8 7
7
7
2,5 3 5
10
ph 2
0,4 x 2,5
21 3 4 5 6 7 8 9 10 11 12 13 14 15 16 17 18 19
21 3 4 5 6 7 8 9 10 11
10 cm
10 8 7
7
7
2,5 3 5
10
ph 2
0,4 x 2,5
21 3 4 5 6 7 8 9 10 11 12 13 14 15 16 17 18 19
21 3 4 5 6 7 8 9 10 11
10 cm
10 8 7
7
7
2,5 3 5
10
ph 2
0,4 x 2,5
21 3 4 5 6 7 8 9 10 11 12 13 14 15 16 17 18 19
21 3 4 5 6 7 8 9 10 11
10 cm
10 8 7
7
7
2,5 3 5
10
ph 2
0,4 x 2,5
21 3 4 5 6 7 8 9 10 11 12 13 14 15 16 17 18 19
21 3 4 5 6 7 8 9 10 11
10 cm
10 8 7
7
7
2,5 3 5
10
ph 2
0,4 x 2,5
21 3 4 5 6 7 8 9 10 11 12 13 14 15 16 17 18 19
21 3 4 5 6 7 8 9 10 11
8
6, 8, 10 & 13
2
a b
Stûv 30 - installation [en] - 07/13
Tools
Holding capacity of the structure
The stove’s surroundings
Ensure the floor is resistant enough to
support the stove; consult a specialist
if in doubt.
Prevent "heat traps" in the
cladding, recess and hood
If the stove is situated in a bell-shaped
area (ex: a former hearth), this space
must be ventilated to prevent "heat
traps".
The heat radiated from the glass door
and the walls may be significant.
Whichever direction the stove is
facing, please adhere to the safety
distances from combustible materials
[diagram 1] or ensure that the
materials exposed to radiated heat are
resistant to high temperatures.
Please note
We strongly recommend attaching the
Stûv 30 stove to the ground.
This step ensures the stability of the
system.
Calculation of the height of the
duct
For the sinking of the duct at stove level,
add 25mm for a duct 2mm in thickness
and 35mm for a 0.4mm duct.
Connection to the smoke flue

12 SN 138804 - ...
1
XXXXX
XXXXXXXX
Stûv S.A. B-5170 Bois-de-Villers www.stuv.eu
AEAI / VKF xxxxxx
1
2
Stûv 30 - installation [en] - 07/13
On taking delivery of the equipment
INSTALLATION
Moving the stove
Please note!
The paint is not oven baked and is
therefore relatively fragile but will
harden after being heated a few
times. Handle the system with care
when installing.
Moving
While the stove is still packaged, you
can use a pallet loader or a hand-lift
truck [photo 1]. Move it close to its
final position.
Ensure the hand-lift truck is positioned
on the side of the hand-lift truck
support [diagram 2].
If you are unable to transport
the stove on its pallet to its final
position, please observe the following
unpacking instructions.
Please note!
Check that the stove has not suffered
any damage during delivery. The
guarantee only covers damage due to
transportation if it is indicated on the
delivery slip.
Complaints
If you wish to make a complaint,
always quote the serial number visible
on the stove in the closed-door
position [photo 1].
Accessories
– flue and rear or upper connection
– ground plate
– barbecue kit
– kit for rear outside air intake
If any of these accessories have been
ordered, they will be found around
the stove or its packaging. Check that
you have received them.

13
SN 138804 - ...
1
2
3
Stûv 30 - installation [en] - 07/13
Unpacking
> Remove the wooden structure using
a claw hammer [photo 1].
> Remove the plastic packaging and
the plastic films at the top and bottom
of the stove which hold the mobile
parts in place during transport [photo
2].
Note! The hand-lift truck protection
[photo 3] supports the stove during
handling to avoid putting pressure
on the doors or the drum. It is later
removed when the stove is moved
into its final position.
14 SN 138804 - ...
1
8
2
34
5 6 7
Stûv 30 - installation [en] - 07/13
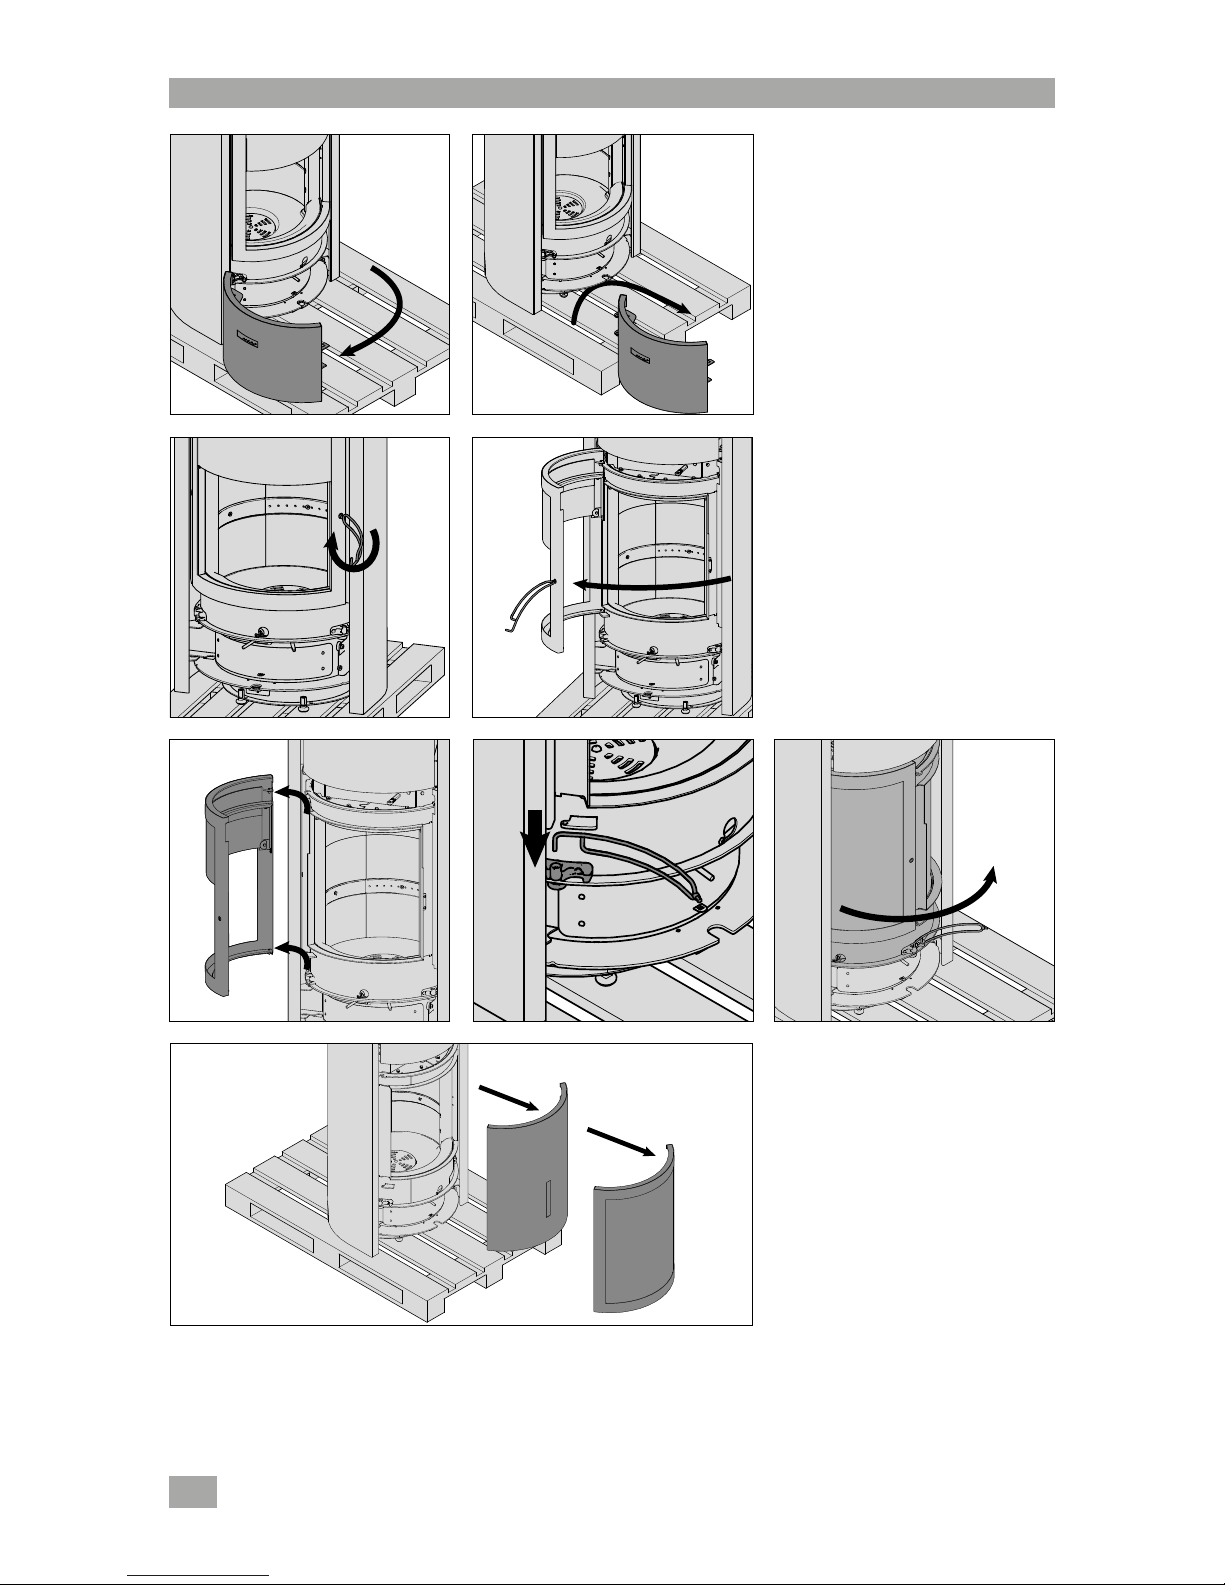
Removing the exterior parts of the stove
To make the hearth lighter and easier
to handle, and to avoid damage to the
moving parts, we strongly recommend
you to remove certain parts of the
Stûv30
> Remove the ash pan:
open the ash pan door [photo 1] and
take it out by lifting it off its hinges
[photo 2].
> Remove the doors:
half open them gently [photo 3], lift
them off their hinges and slide them
to the left [photo 4].

15
SN 138804 - ...
11
9 10
12
Stûv 30 - installation [en] - 07/13
Removing the exterior parts of the stove (continued)
> Remove the side panels
> Take of the front

16 SN 138804 - ...
10 cm
21 3 4 5 6 7 8 9 10 11 12 13 14 15 16 17 18 19
21 3 4 5 6 7 8 9 10 11
Torx n°
Allen n°
214
KG
360°
360°
1
2
Stûv 30 - installation [en] - 07/13
Separating the hearth from its pallet
To release the hearth from the pallet,
take out the 6 screws located near the
feet of the Stûv 30.
17
SN 138804 - ...
1
a
c
d
b
1
Stûv 30 - installation [en] - 07/13
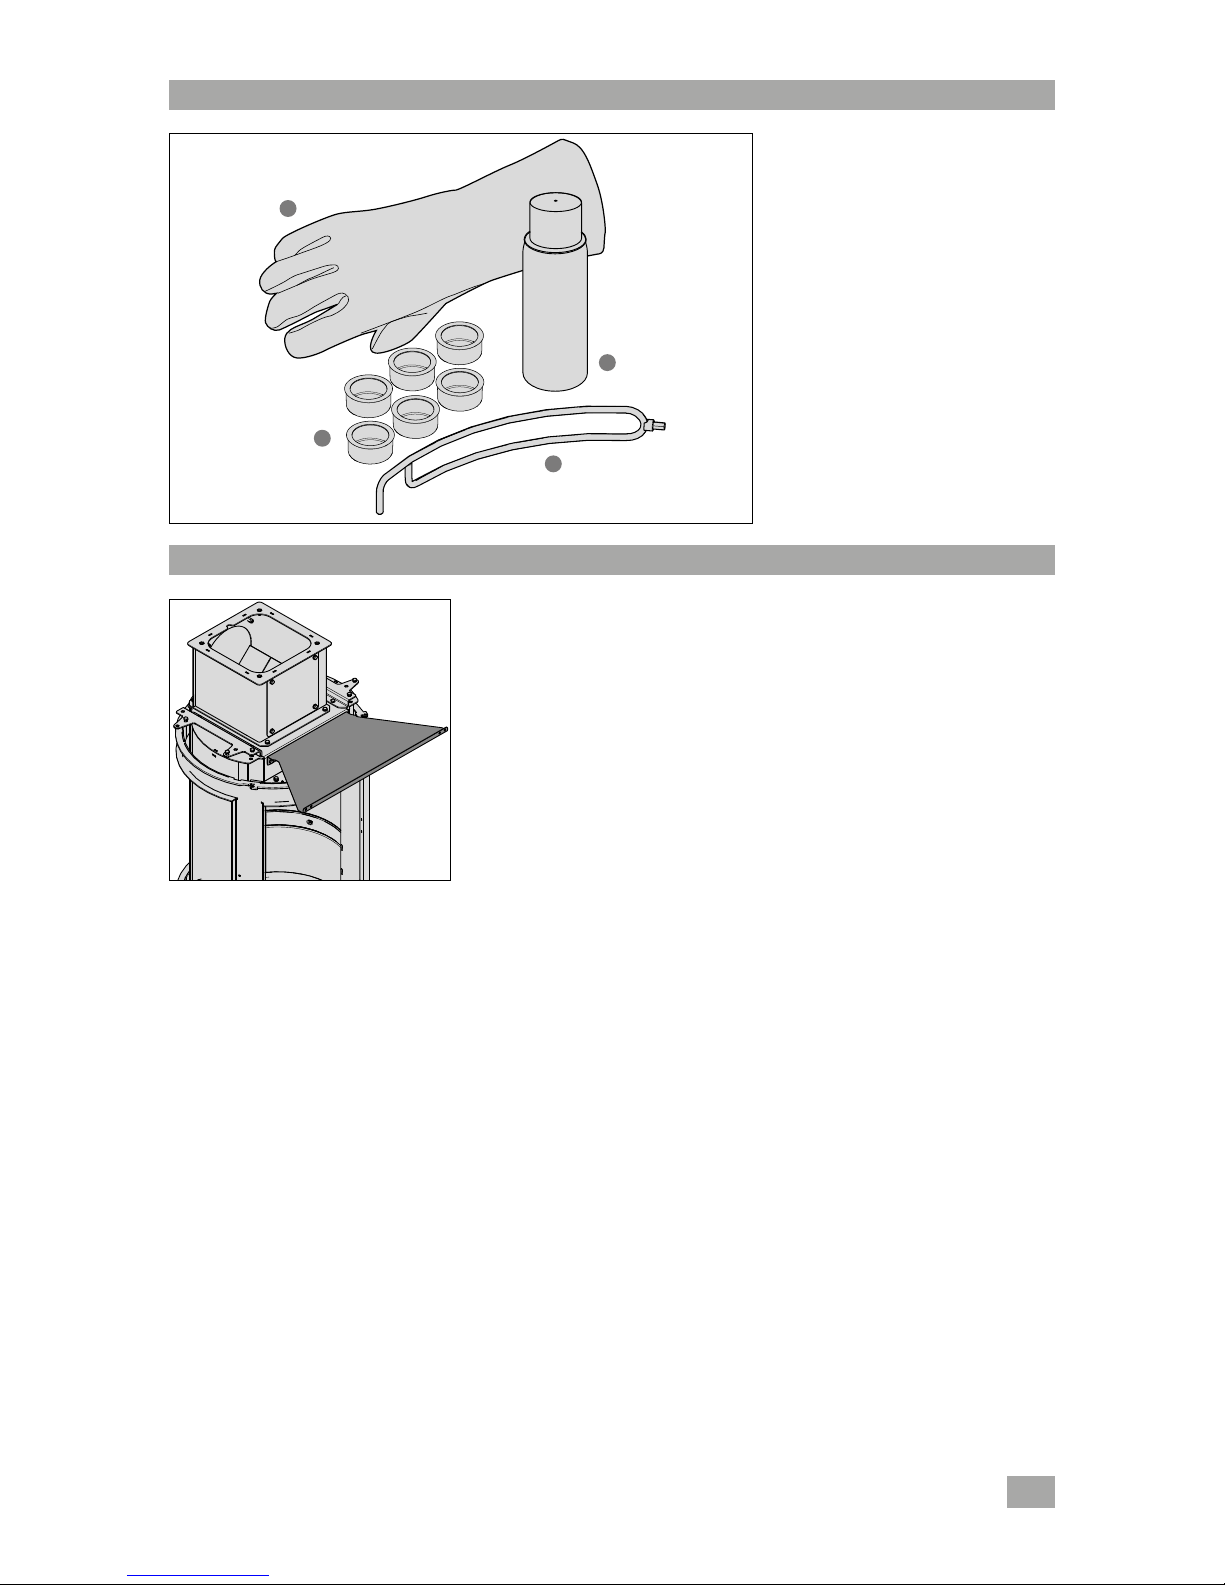
Removal of the contents of the combustion chamber
Final positioning of the stove
Please note! Do not forget to put
the hand-lift truck protection back on
before moving the stove!
The stove can now be moved to its
final position: tilt the stove onto its
front.
Note: remember to put a soft
protective cloth between the drum
ring and the hand-lift truck.
Checking the contents of the
combustion chamber [photo 1]
You will find :
– spray paint for touching up
[photo 1/a]
– cold grip to handle the door and the
valve [photo 1/b]
Anti-skid rubbers to fit under the feet
of the hearth [diagram 1c].
A heat-resistant glove [diagram 1d].
– installation instructions
– instructions for use

18 SN 138804 - ...
12
43
56
Stûv 30 - installation [en] - 07/13
Connection with outside air
If you are not connecting your stove
to the outside air, go to the next
section.
If the air connection comes from
the ground:
> Fix the filling plate (with an 8mm
flat spanner and 2 M5x8 hexagonal
head screws) [photos 1 to 4]:
> Position the stove over the outside
air inlet.
> Check that the joint is fully airtight
in relation to the floor.
If the air connection comes from
the wall:
> Find the "rear outside air inlet" kit
[photo 5].
> Make sure the duct is the desired
length bearing in mind the maximum
length of the standard Stûv inlet duct
is 48cm. Cut it if necessary.
> Connect the flue to the back of the
stove (using 2 M5x6 hexagonal head
screws and a size 8 spanner)
[photo 6].

19
SN 138804 - ...
a
b
8
9
10
12 13 14
7
11
Stûv 30 - installation [en] - 07/13
Connection with outside air (continued)
> Fix the 2 masking supports
[photo 7a]
– Position the supports so that the
appendage [diagram 8] is situated
behind the hearth
– Fix the 2 supports (using the 4
M5x6 hexagonal head screws and a
size 8 spanner) [photo 11].
> Clip on the 2 masking pieces
[photo 13] to their supports and check
that they are firmly in place
[photo 14].
> Prepare the 2 panels by removing
the lower pre-cut part (using a metal
saw) [photo 15]. Smooth the panel
edges with a half-moon file.

20 SN 138804 - ...
15 16
17
Stûv 30 - installation [en] - 07/13
Connection with outside air (continued)
Other manuals for 30 Compact
7
Table of contents
Other Stûv Stove manuals


Popular Stove manuals by other brands

monolith
monolith Extra Installation

MCZ
MCZ EGO AIR 8 UP! M2 installation guide

St. Croix
St. Croix 45Lbs. Hopper Operation & maintenance manual

Jøtul
Jøtul GF 160 DV Installation and operation instruction

United States Stove Company
United States Stove Company 1269E owner's manual

Coleman
Coleman Denali 9790-A25 Instructions for use


