Stabila REC 210 Series User manual


9
2. Volume button
The STABILA REC-120 Line is a simple-to-use receiver for the rapid capture of laser
lines.
Main components
The STABILA REC-120 Line can only receive pulse modulated laser beams.
The receiver will not work with rotation lasers.
We have endeavoured to explain the unit's handling and functioning in as clear and
comprehensible manner as possible. If, however, you still have any unanswered
questions, we should be pleased to provide advice over the telephone at any time
on the following telephone number: 0049 / 63 46 / 3 09-0
Operating instructions
1. ON/OFF button
3
4
7
2
1
6
3. Accuracy button
4. LCD
5. “In line” marks
6. Laser receiver glass
7. Beeper
5
10
4
9. Fixing thread for the clamp
10. Clamp Guides
8.
Battery compartment cover
10
8
9
GB

10
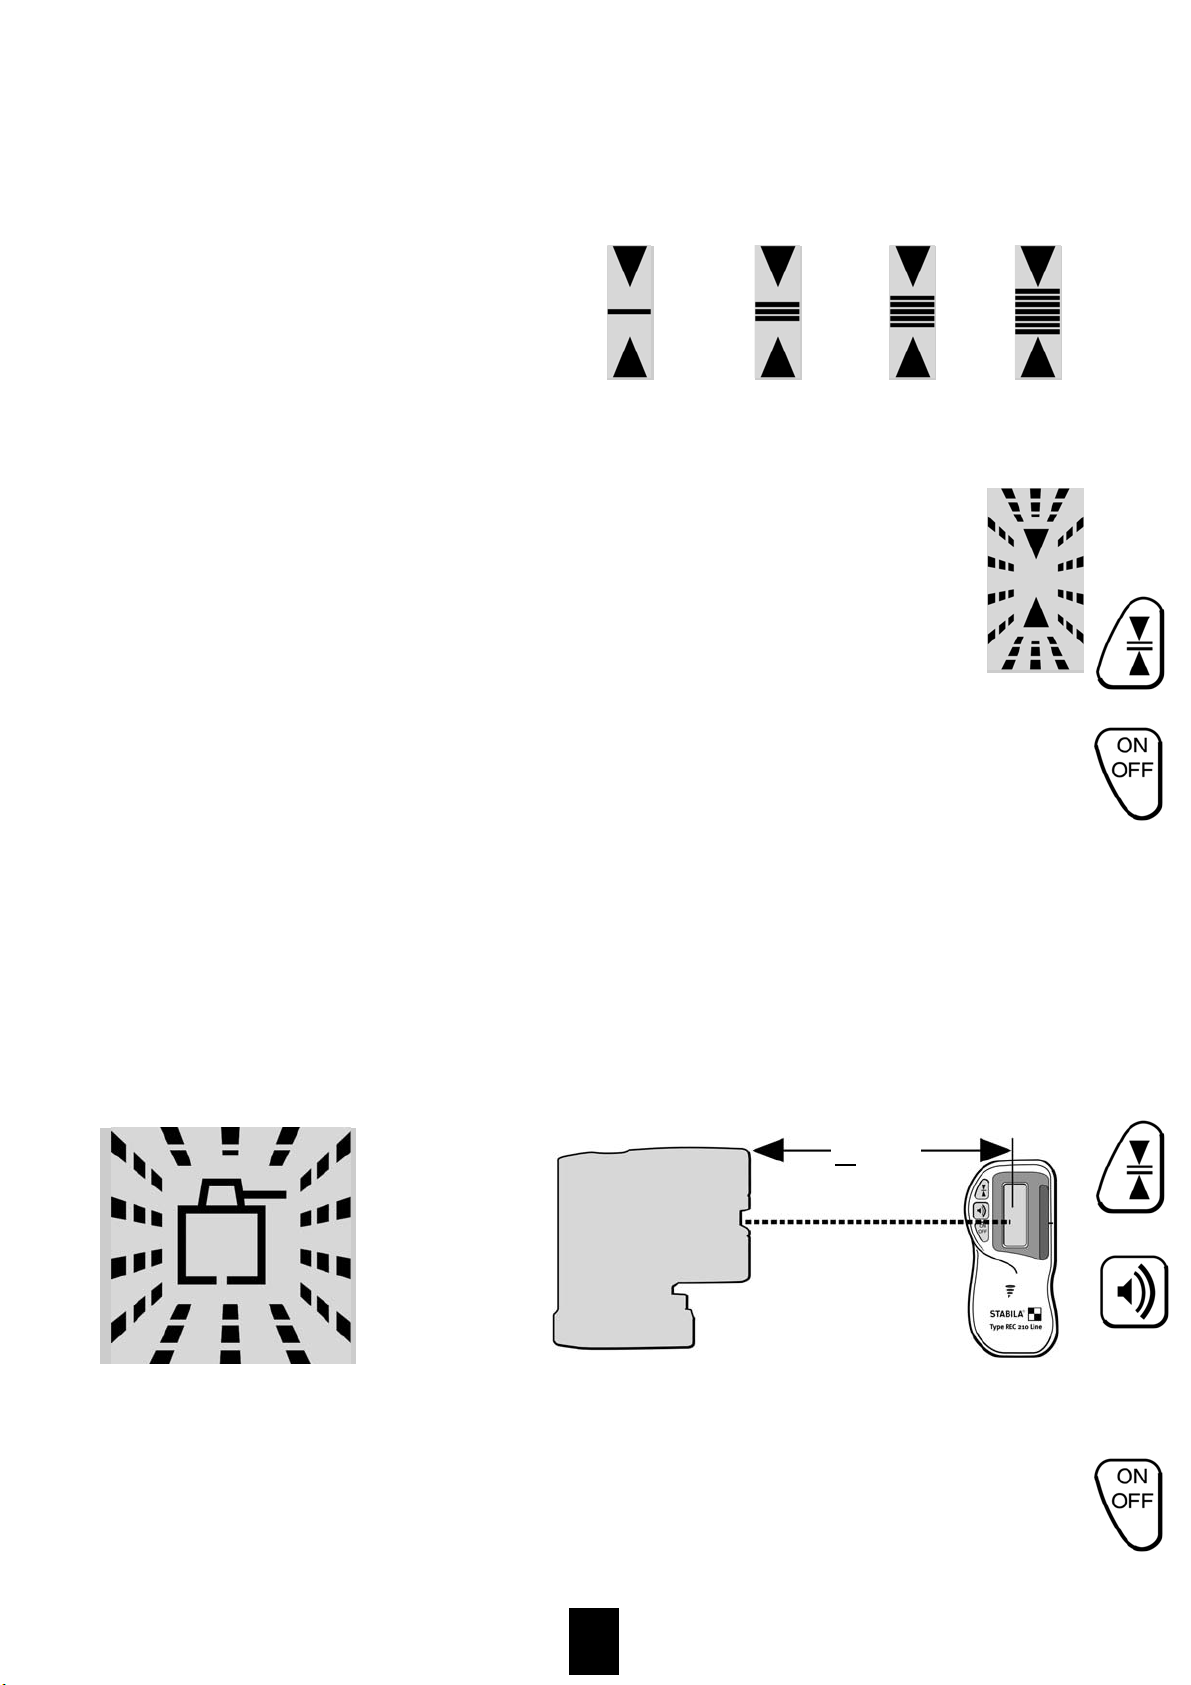
(a)
9 display steps indicate the divergence from the centre
of the laser line. The central bar indicates the “in line”
position of the REC 210 Line. The arrow increases in size
as the distance from the “in line” position increases.
Rapid beeping note
= too high / back
Continuous tone
= “in line”
Slow beeping note
= too low / forward
50 mm
Getting started
Press the ON/OFF button (1). An audio signal and a short flash from the display will
confirm, that the instrument is switched on. Press the ON/OFF button (1) quickly
once to switch the instrument off. If the instrument is not used, it will automatically
switch itself off after 30 minutes.
“In line” alarm mode
In this mode the continuous beeping note is switched
off when the receiver is “in line”. If the receiver moves
away from the correct alignment, the instrument emits
the corresponding audio signals. The other functions
operate as normal. Press the ON / OFF button (1) and
the volume button (2) at the same time to activate this
mode. The instrument will beep once to confirm it is in
this mode. The “Volume” icon in the LCD will flash.
Audio signals
Display
(b)
1
1
2
2
Setting the volume
The volume is increased/decreased by repeatedly pressing the button (2):
Loud (a), soft (b) or off.
If the instrument is set to “silent” only a short beep is emitted
when the laser beam is received.
11
For problem-free working at distances less than 3 m, switch to “close-up” mode.
When the instrument is switched on, press the Accuracy button (3) and the Volume
button (2) at the same time. The icon (d) will flash to confirm that “close-up” mode
is operational. To switch off this function, either press the Accuracy button (3) and
the Volume button (2) at the same time or simply switch the instrument off.
<3m
Close-up mode
(d)
Construction mode display
The icons appear permanently
Construction mode accuracy Super-fine
± 0,50 mm
Fine
± 1,0 mm
Medium
± 2,0 mm
Wide
± 3,0 mm
Construction mode
The construction mode is active each time the instrument is switched on.
Measuring modes
The instrument must first be switched off. Press the ON / OFF button (button1) and
the accuracy button (button 3) at the same time in order to switch the instrument
into industrial mode. It will beep once to confirm it is in this mode. The Accuracy
icon (c) in the LCD will flash.
To return to construction mode, press the Accuracy button (button 3) again or
switch the instrument off.
When the instrument is switched on again it will be in construction mode.
Industrial mode
Exact centre display
± 0,00 mm
The more sensitive industrial mode has a
tolerance of ± 0.00mm in the “in line” position.
(c)
1
1
2
3
3

12
Anzeige
Full:
Batteries
OK
Half:
Initial
Warning
Empty:
Approximately
30 Minutes
Remaining
Flashing:
Change
Batteries!
Replacing the batteries
Slide the battery cover (8) in the direction
of the arrow and insert new batteries in
accordance with the symbols in the battery
compartment.
2 x 1,5V
Mignon cells Alkaline,
Size AA, LR6
Mignon
AA
LR6
Battery compartment cover. Water-tight. Protection against water and
dust is ensured by the pressure of the cover against the seal. IP 67.
3
4
5
2
1
Bracket
2. Guide cones - assist in quickly and
securely fixing the bracket to the receiver.
3. Reading reference. The points are
“in line” and so help accurate readings
to be taken on levelling staffs.
4. Securing knob. Turning the securing
knob fixes / releases the clamp with the
receiver to / from the levelling staff.
5. Moveable clamping jaw - for fixing to the levelling staff.
1. Securing screw - for securing to the
rear side of the receiver.
Remove the batteries if the unit
will not be used for a long period !

13
Cleaning: Please do not remove dust and dirt from the receiving or display window
by using dry cloths or abrasive materials as this procedure scratches the windows.
A soft cloth and mild soap and water are effective.
The unit may be submerged under water or sprayed with a low pressure hose if
necessary. Do not use any other fluids other than water or glass- cleaner, as they
may attack polymer components.
Important information
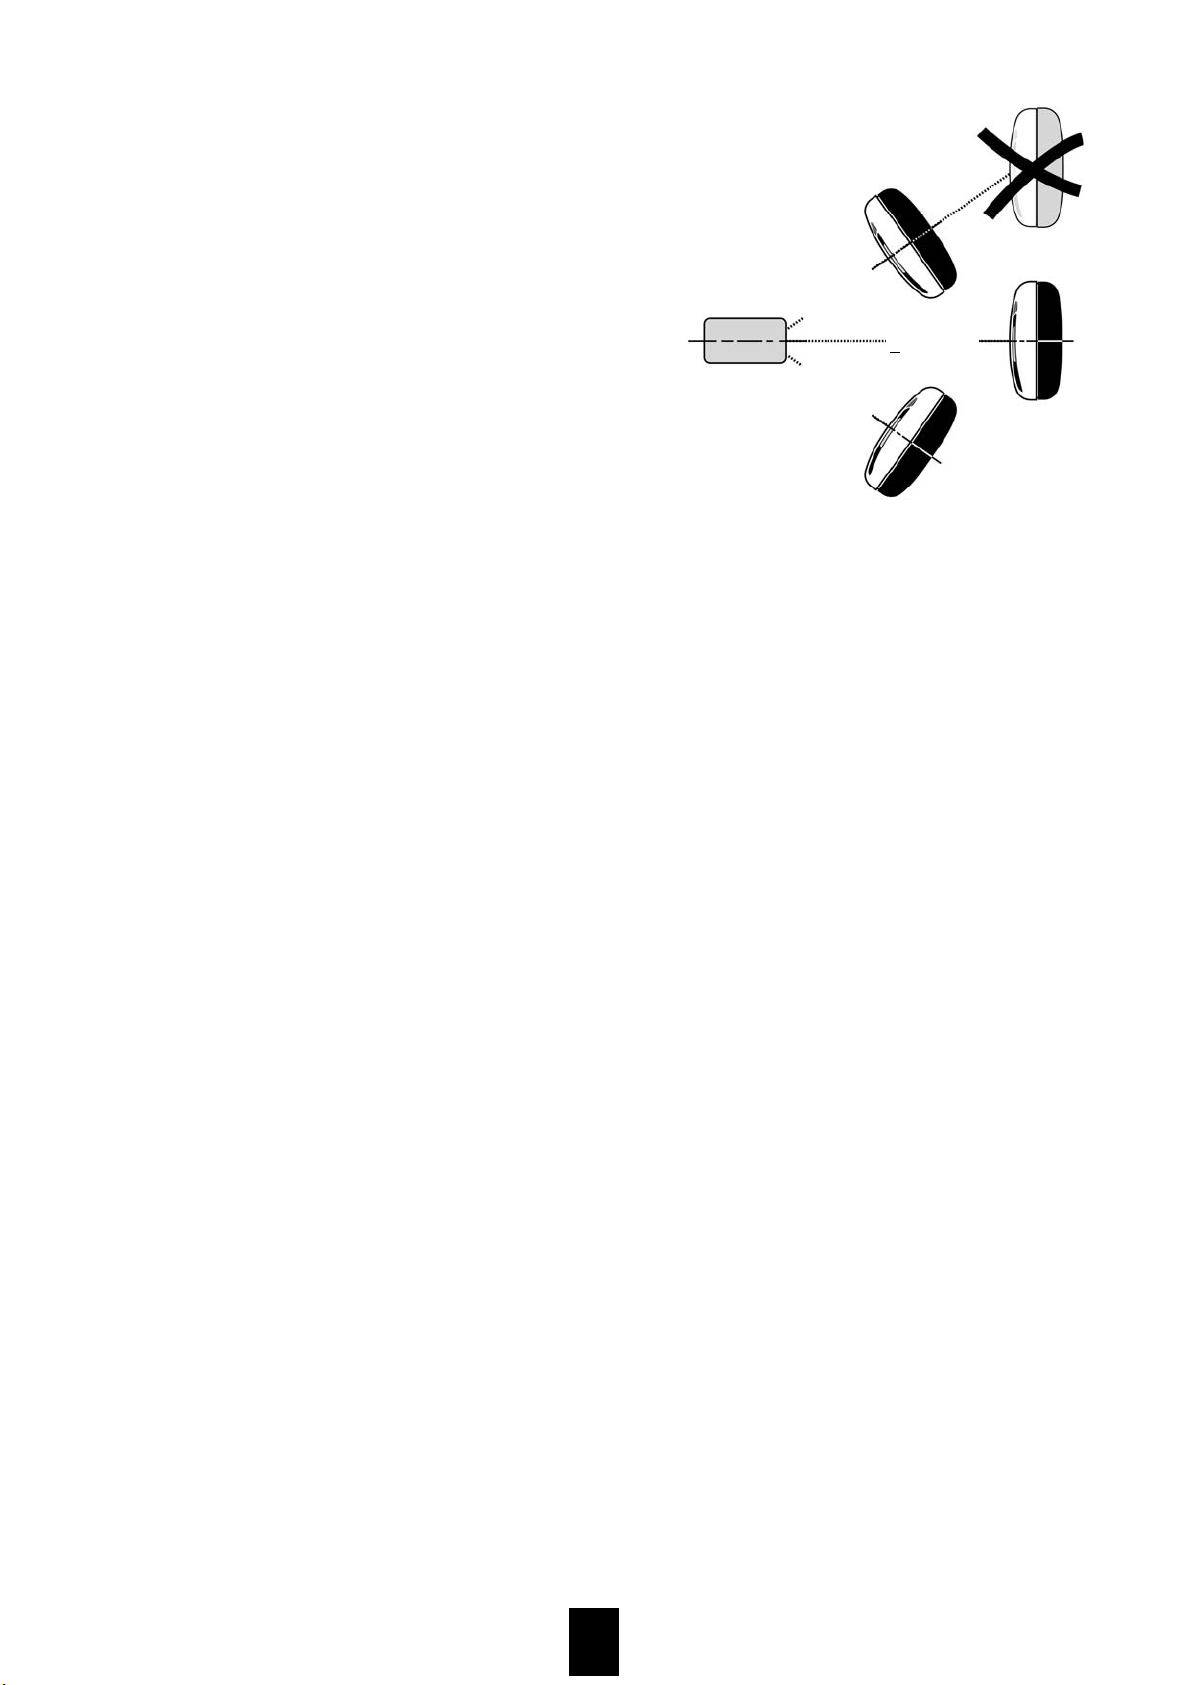
Positioning and adjustment of the instrument.
When setting up the instrument, take care that the laser beam does not produce
any unwanted reflections from reflective surfaces.
These reflections may also be captured by the receiver and produce incorrect
readings.
If working at distances of less than 3 m from the receiver, always use the
“close-up” mode.
Recycling programme for our EU customers:
In accordance with the WEEE regulations, STABILA provides a disposal
programme for electronic products at the end of their service life.
For more details, please contact:
www.STABILA.de / Recycling
or:
0049 / 6346 / 309-0
- The person in charge of the detector must understand the instructions in this
manual and ensure other users do also.
- Periodically carry out test measurements, particularly after the detector has been
subjected to abnormal use and before and after important measurements.
Prohibited Uses
- Operation without instruction.
- Operation other than the intended uses.
- Opening the detector, except the battery compartment.
- Modification or conversion of the detector.
Care and maintenance
14
Stabila provides a guarantee against deficiencies and faults in the assured characte-
ristics because of material or manufacturing faults for a period of 24 months from
date of purchase. Any faults will be eliminated at Stabila's own discretion either by
repairing or replacing the unit. Stabila accepts no wider claims.
No liability is accepted for any faults due to inappropriate treatment (e.g. damage
caused by the unit falling, operation with the wrong voltage or type of current, use of
unsuitable current supply sources) or for any autonomous changes made to the unit
by the purchaser or a third party.
Also no claims under guarantee are accepted for natural wear and tear or any small
faults that do not significantly affect the unit's operation.
Any guarantee claims must be made via the dealer on the duly completed guarantee
form (see last page) to be returned with the unit.
Guarantee terms and conditions
Accuracy -
Construction mode Super-Fine:
Fine:
Medium:
Wide:
Industrial - mode Zero:
Detectable Spectrum:
Beeper Volumes:
Batteries:
LCD Backlighting:
Operating life:
Automatic Shut Off:
Operating temperature range:
Storage temperature range:
Technical data
± 0,50 mm
± 1,0 mm
± 2,0 mm
± 3,0 mm
± 0,0 mm
635 nm
Loud: ~ 103 dBA Low: ~ 75 dBA
2 x 1,5V Mignon cells Alkaline , Size AA,LR 6
Yes (LCD symbol)
50 hours
30 minutes
-20°C to +60°C
-40°C to +70°C
~ 30m
<110m
~ 30m
Working Radius: up to 110 m, Laser dependent
Table of contents
Other Stabila Receiver manuals


