Stageline ODW-2410RGBW User manual

ODW-2410RGBW Bestellnummer 38.6790
ELECTRONICS FOR SPECIALISTS ELECTRONICS FOR SPECIALISTS ELECTRONICS FOR SPECIALISTS ELECTRONICS FOR SPECIALISTS
BEDIENUNGSANLEITUNG
INSTRUCTION MANUAL
MODE D’EMPLOI
ISTRUZIONI PER L’USO
GEBRUIKSAANWIJZING
MANUAL DE INSTRUCCIONES
INSTRUKCJA OBSŁUGI
SIKKERHEDSOPLYSNINGER
SÄKERHETSFÖRESKRIFTER
TURVALLISUUDESTA
DMX-LED-Scheinwerfer
DMX LED Floodlight

2
D Deutsch . . . . . . . . . . . Seite 4
GB English . . . . . . . . . . . . Page 9
F Français . . . . . . . . . . . Page 14
I Italiano . . . . . . . . . . . . Pagina 19
NL Nederlands . . . . . . . . . Pagina 24
E Español . . . . . . . . . . . Página 29
PL Polski . . . . . . . . . . . . . Strona 34
DK Dansk . . . . . . . . . . . . Sida 40
S Svenska . . . . . . . . . . . Sidan 40
FIN Suomi . . . . . . . . . . . . Sivulta 40
ELECTRONICS FOR SPECIALISTS ELECTRONICS FOR SPECIALISTS ELECTRONICS FOR SPECIALISTS ELECTRONICS FOR SPECIALISTS

3
2 2
3 3
454
10 11
6789
1

4
D
A
CH
DMX-LED-Scheinwerfer
Diese Anleitung richtet sich an den Installateur
des Scheinwerfers sowie den Bediener ohne
technische Ausbildung. Bitte lesen Sie die Anlei-
tung vor der Installation gründlich durch und
heben Sie sie für ein späteres Nachlesen auf.
Auf der ausklappbaren Seite 3 finden Sie alle be-
schriebenen Bedienelemente und Anschlüsse.
Inhalt
1 Übersicht der Bedienelemente und
Anschlüsse . . . . . . . . . . . . . . . . . . . . . . 4
2 Hinweise für den sicheren Gebrauch 4
3 Einsatzmöglichkeiten . . . . . . . . . . . . . 4
4 Montage . . . . . . . . . . . . . . . . . . . . . . . . 4
5 Inbetriebnahme . . . . . . . . . . . . . . . . . . 4
5.1 Anschluss mehrerer Scheinwerfer . . . . . 5
6 Bedienung . . . . . . . . . . . . . . . . . . . . . . 5
7 Eigenständiger Betrieb . . . . . . . . . . . . 5
7.1 Farbstrahler und Stroboskop . . . . . . . . . 5
7.2 Verschiedene Weißtöne,
Speichern von 11 Farbtönen . . . . . . . . . 5
7.3 Showprogramme und Szenenfolgen . . . 5
7.4 Szenenfolgen programmieren . . . . . . . . 5
7.5 Synchrone Steuerung mehrerer
Scheinwerfer (Master-Slave-Modus) . . . 6
7.5.1 Szenenfolgen kopieren . . . . . . . . . . . . . 6
8 Betrieb mit einem DMX-Steuergerät .6
8.1 DMX-Anschluss . . . . . . . . . . . . . . . . . . . 6
8.2 DMX-Betriebsart einstellen . . . . . . . . . . 6
8.3 DMX-Startadresse einstellen . . . . . . . . . 7
8.3.1 Unteradressen verwenden . . . . . . . . . . . 7
9 Weitere Funktionen . . . . . . . . . . . . . . . 7
9.1 Tastensperre . . . . . . . . . . . . . . . . . . . . . 7
9.2 Farben begrenzen . . . . . . . . . . . . . . . . . 7
9.3 Künstliche Trägheit der LEDs . . . . . . . . 7
9.4 Scheinwerfer auf die Werkseinstellung
zurücksetzen . . . . . . . . . . . . . . . . . . . . . 7
10 Technische Daten . . . . . . . . . . . . . . . . 8
10.1 DMX-Funktionen . . . . . . . . . . . . . . . . . . 8
10.1.1 Modus Arc.1 (3 Kanäle) . . . . . . . . . . 8
10.1.2 Modus HSV (3 Kanäle) . . . . . . . . . . . . 8
10.1.3 Modus Ar1.d (4 Kanäle) . . . . . . . . . . 8
10.1.4 Modus Arc.2 (4 Kanäle) . . . . . . . . . . 8
10.1.5 Modus Ar2.d (5 Kanäle) . . . . . . . . . . 8
10.1.6 Modus Ar2.s (6 Kanäle) . . . . . . . . . . 8
10.1.7 Modus Stage (10/11 Kanäle) . . . . . . 8
1 Übersicht der Bedienelemente
und Anschlüsse
1neigbarer Scheinwerferkopf
2Feststellschrauben für den Scheinwerferkopf
3Löcher (∅11,5 mm) für die Befestigung von
zwei Schellen oder C-Haken zur Montage an
Leuchtenträgersystemen
4Tasten zur Auswahl des Betriebsmodus und
zum Ändern von Einstellungen
5Display
6Stecker des Kabels DMX IN für den DMX-
Signaleingang:
Entweder über das Kabel mit dem XLR-Ste-
cker (10) an ein Lichtsteuergerät anschließen
oder an den DMX-Signalausgang eines wei-
teren DMX-gesteuerten Gerätes
7Stecker des Kabels POWER IN für die
Stromversorgung (230 V~/50 Hz):
Entweder über das Kabel mit dem Netzste-
cker (11) an eine Steckdose anschließen
oder an die Kupplung des Kabels POWER
OUT (8) eines weiteren ODW-2410RGBW
8Kupplung des Anschlusses POWER OUT für
die Stromversorgung eines weiteren ODW-
2410RGBW
9Kupplung des Anschlusses DMX OUT:
DMX-Signalausgang zum Anschluss an den
DMX-Signaleingang eines weiteren ODW-
2410RGBW oder eines anderen DMX-ge-
steuerten Geräts über das beiliegende Adap-
terkabel
10 XLR-Stecker des DMX-Signaleingangs
Pin 1 = Masse, Pin 2 = DMX−, Pin 3 = DMX+
11 Netzstecker zum Anschluss an eine Steck-
dose (230 V~/50 Hz)
2 Hinweise
für den sicheren Gebrauch
Das Gerät entspricht allen relevanten Richtlinien
der EU und ist deshalb mit gekennzeichnet.
GNehmen Sie das Gerät nicht in Betrieb und
trennen Sie es sofort vom Netz,
1. wenn sichtbare Schäden am Gerät oder am
Netzkabel vorhanden sind,
2. wenn nach einem Sturz oder Ähnlichem der
Verdacht auf einen Defekt besteht,
3. wenn Funktionsstörungen auftreten.
Geben Sie das Gerät in jedem Fall zur Repa-
ratur in eine Fachwerkstatt.
GEin beschädigtes Netzkabel darf nur durch
eine Fachwerkstatt ersetzt werden.
GZiehen Sie den Netzstecker nie am Kabel aus
der Steckdose, fassen Sie am Stecker an.
GVerwenden Sie zum Säubern des Scheinwer-
fergehäuses und der Schutzscheibe vor den
LEDs nur ein mildes Reinigungsmittel.
GWird das Gerät zweckentfremdet, nicht sicher
montiert, falsch bedient oder nicht fachge-
recht repariert, kann keine Haftung für daraus
resultierende Sach- oder Personenschäden
und keine Garantie für das Gerät übernom-
men werden.
3 Einsatzmöglichkeiten
Dieser LED-Scheinwerfer dient zur Effektbe-
leuchtung. Der Scheinwerfer besitzt ein wetter-
festes Aluminiumgehäuse (IP 66) und lässt sich
deshalb auch im Außenbereich einsetzen. Als
Lichtquelle werden 24 extrem helle LEDs ver-
wendet. Mit den LEDs kann Licht in den drei
Grundfarben (Rot, Grün und Blau) und Weiß
abgestrahlt werden sowie in deren Mischfarben.
Außerdem sind Farbüberblendungen und Stro-
boskop-Effekte möglich. Der Scheinwerfer ist für
die Steuerung über ein DMX-Lichtsteuergerät
ausgelegt (wahlweise 11, 10, 6, 5, 4 oder 3
DMX-Steuerkanäle). Er kann aber auch eigen-
ständig ohne Steuergerät betrieben werden.
Als Besonderheit bietet der Scheinwerfer
beim DMX-Betrieb mit 11 Kanälen die Verwen-
dung von 66 Unteradressen. Dadurch lassen
sich über eine einzige DMX-Startadresse bis zu
66 Scheinwerfer (-gruppen) unabhängig vonei-
nander steuern und die maximal mögliche
Anzahl DMX-gesteuerter Geräte wird erheblich
erhöht.
4 Montage
GPlatzieren Sie das Gerät immer so, dass im
Betrieb eine ausreichende Luftzirkulation ge-
währleistet ist.
GDer Abstand zum angestrahlten Objekt und zu
angrenzenden Wänden sollte mindestens
15 cm betragen.
1. Den Scheinwerfer auf seine Gummifüße stel-
len. Zum Ausrichten des Scheinwerfers die
zwei Feststellschrauben (2) lösen. Die ge-
wünschte Neigung des Scheinwerferkopfs
(1) einstellen und die Schrauben wieder fest
anziehen.
2. Alternativ lässt sich der Scheinwerfer an
einem Leuchtenträgersystem montieren. Den
Scheinwerfer über die beiden 11,5-mm-Lö-
cher (3) in den Seitenwinkeln mit zwei Monta-
geschellen oder stabilen C-Haken z. B. an
einer Traverse befestigen.
5 Inbetriebnahme
Den Stecker (7) des Kabels POWER IN in die
Kupplung des beiliegenden Kabels mit dem
Netzstecker (11) stecken und die Steckverbin-
dung mit der Überwurfmutter zusammenschrau-
ben. Den Netzstecker in eine Steckdose
(230 V~/50 Hz) stecken. Der Scheinwerfer ist
damit eingeschaltet. Das Display (5) zeigt LED
WASH LIGHTING und es leuchtet für einige
Sekunden die Display-Beleuchtung.
VORSICHT!
Das Gerät darf nicht über einen Dimmer an die
Netzspannung angeschlossen werden!
Ist kein weiterer Scheinwerfer an der Kupplung
(8) des Kabels POWER OUT und der Kupplung
(9) des Kabels DMX OUT angeschlossen, unbe-
dingt die beiliegenden Schutzkappen auf die
Kupplungen schrauben. Das Kabel POWER
OUT führt Netzspannung.
WARNUNG Blicken Sie nicht für längere Zeit
direkt in die Lichtquelle, das kann
zu Augenschäden führen.
Beachten Sie, dass sehr schnelle
Lichtwechsel bei fotosensiblen
Menschen und Epileptikern epilep-
tische Anfälle auslösen können!
WARNUNG
Der Scheinwerfer muss fachge-
recht und sicher montiert werden.
Soll das Gerät endgültig aus dem Be-
trieb genommen werden, übergeben
Sie es zur umweltgerechten Entsorgung
einem örtlichen Recyclingbetrieb.
WARNUNG Das Gerät wird mit lebensgefähr-
licher Netzspannung versorgt. Neh-
men Sie deshalb nie selbst Eingriffe
am Gerät vor. Durch unsachgemä-
ßes Vorgehen besteht die Gefahr
eines elektrischen Schlages.

5
5.1 Anschluss mehrerer Scheinwerfer
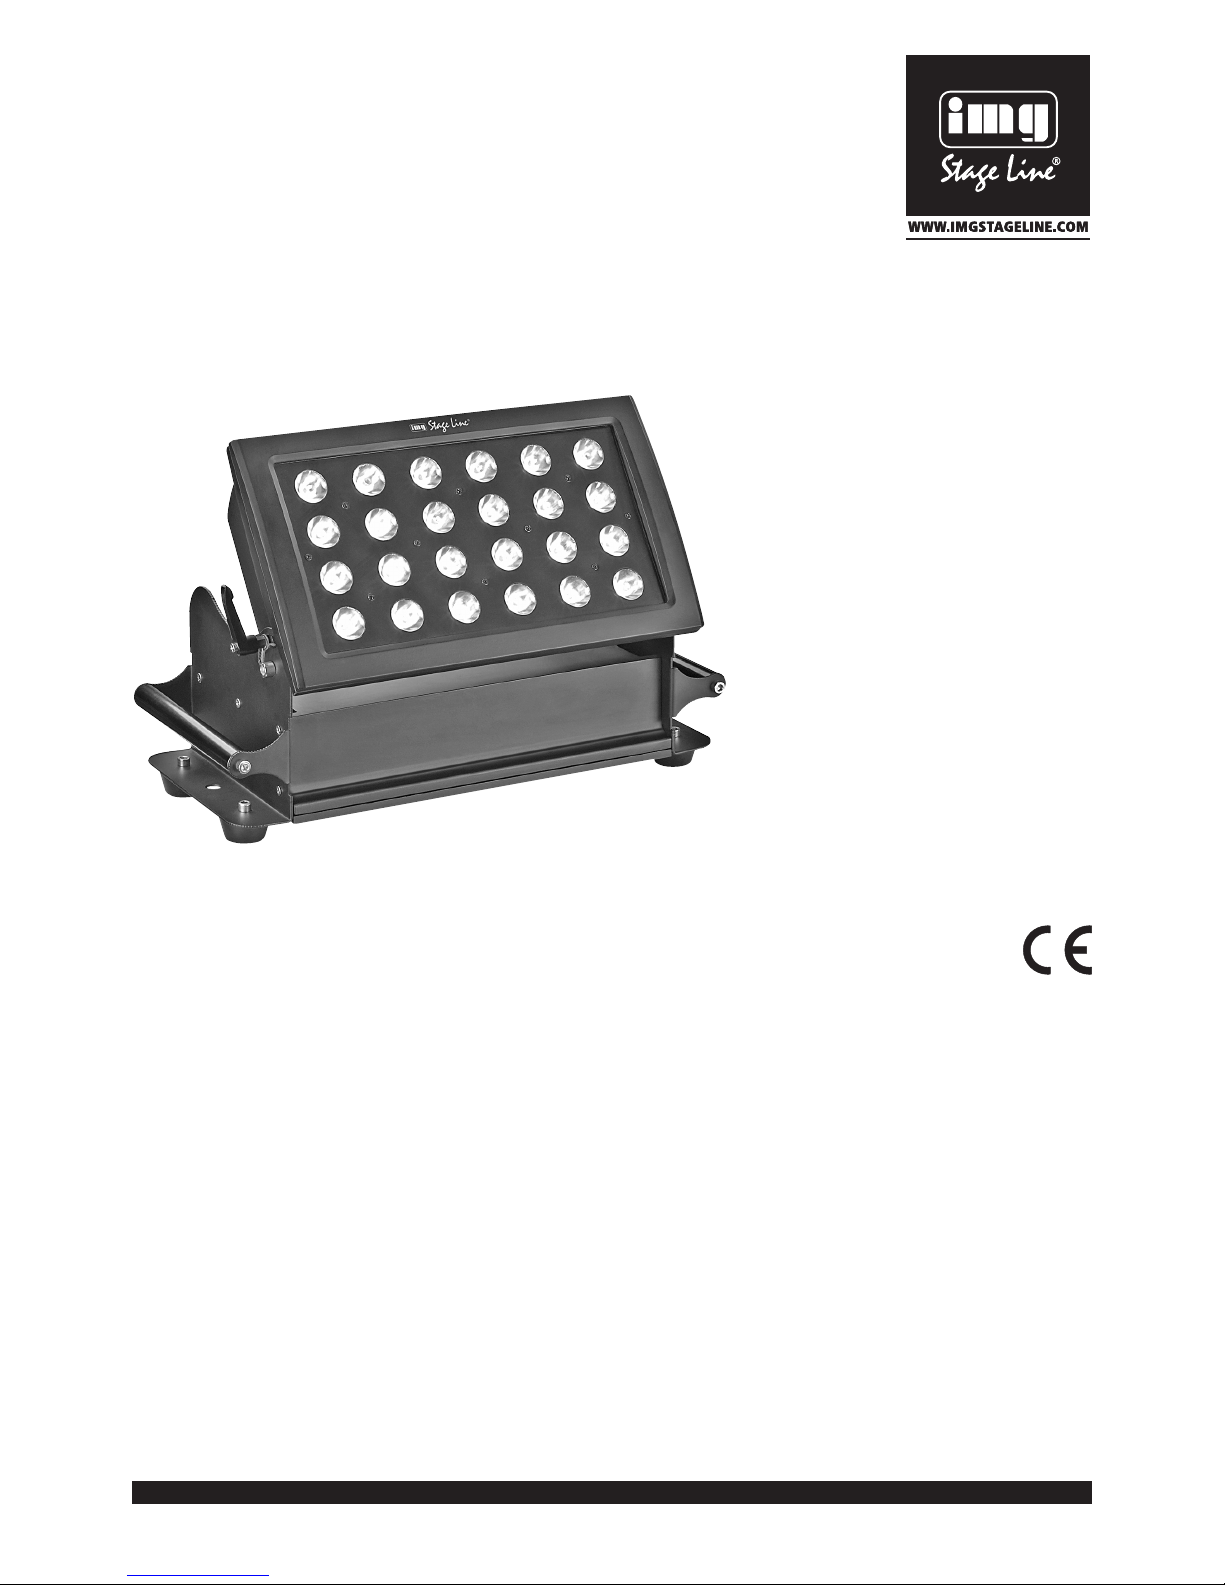
Werden mehrere ODW-2410RGBW eingesetzt,
können die Scheinwerfer zur Stromversorgung
miteinander verbunden werden. Den ersten
Scheinwerfer vorerst noch nicht an eine Steck-
dose anschließen.
1) Den 1. Scheinwerfer über die Kupplung (8)
des Kabels POWER OUT mit dem Stecker
(7) des Kabels POWER IN des 2. Scheinwer-
fers verbinden. Genauso den 2. Scheinwerfer
mit dem 3. verbinden usw., bis alle Geräte in
einer Kette angeschlossen sind.
Sollten die Netzverbindungskabel zwi-
schen den Scheinwerfern zu kurz sein, pas-
sende Verlängerungskabel verwenden, z. B.
ODP-34AC (2 m) oder ODP-34AC/10 (10 m).
2) Am letzten Scheinwerfer auf die Kupplung (8)
des Kabels POWER OUT die beiliegende
Schutzkappe schrauben. Das Kabel führt
Netzspannung.
3) Den Netzstecker (11) des ersten Scheinwer-
fers in eine Steckdose (230 V~/50 Hz) stecken.
6 Bedienung
Alle Einstellungen des Gerätes erfolgen über ein
Menü im Display (5) mithilfe der Tasten MENU,
ENTER, UP und DOWN (4). Dabei behält das
Gerät immer die zuletzt angewählte Menüan-
sicht. Zum Ändern einer Einstellung:
1) Die Taste MENU so oft drücken, bis sich die
Anzeige im Display nicht mehr ändert. Damit
ist die oberste Menüebene (Hauptmenü)
erreicht (Abbildung 2).
2) Mit der Taste UP oder DOWN den ge-
wünschten Menüpunkt anwählen. Der Pfeil Ɗ
zeigt immer auf den gewählten Menüpunkt.
3) Zum Aufrufen des gewählten Menüpunkts die
Taste ENTER drücken. Das Display zeigt
jetzt die aktuelle Einstellung (Ɗ) für diesen
Menüpunkt an.
4) Mit der Taste UP oder DOWN die Einstellung
ändern.
5) Wenn Untermenüpunkte vorhanden sind,
können diese mit der Taste ENTER aufgeru-
fen werden und deren Einstellungen mit der
Taste UP oder DOWN geändert werden.
6) Für weitere Einstellungen mit der Taste
MENU auf eine höhere Menüebene zurück-
springen (ggf. bis zum Hauptmenü, Be-
dienschritt 1).
Wird einige Sekunden lang keine Taste ge-
drückt, erlischt die Display-Beleuchtung. Beim
nächsten Tastendruck leuchtet das Display wie-
der.
Anhand der Kapitel 7 bis 9 die gewünschten Ein-
stellungen für den jeweiligen Betriebsmodus
vornehmen.
Übersicht Hauptmenü
7 Eigenständiger Betrieb
7.1 Farbstrahler und Stroboskop
In diesem Modus strahlt der Scheinwerfer kon-
stant in einer einstellbaren Farbe. Zusätzlich
lässt sich die Stroboskop-Funktion einschalten.
1) Den Menüpunkt Static Color aufrufen.
2) Die folgenden Parameter einstellen:
ƊRed : Helligkeit Rot (0 – 255)
green: Helligkeit Grün (0 – 255)
blue : Helligkeit Blau (0 – 255)
white: Helligkeit Weiß (0 – 255)
strob: Blitzfrequenz (0 – 20 Hz)
des Stroboskops
3) Der Pfeil Ɗsteht immer vor der aktuellen Aus-
wahl oder dem einzustellenden Wert. Zur
Einstellung des gewählten Parameters die
Taste ENTER drücken, mit der Taste UP
oder DOWN den Wert ändern und mit der
Taste MENU zur Parameterauswahl zurück-
kehren, um einen weiteren Parameter zu
ändern.
7.2 Verschiedene Weißtöne,
Speichern von 11 Farbtönen
In diesem Modus strahlt der Scheinwerfer wei-
ßes Licht ab. 11 verschiedene Weißtöne sind
gespeichert, die jedoch geändert werden kön-
nen. Für jeden Weißton lässt sich die Helligkeit
für die Farben Rot, Grün, Blau und Weiß unter-
schiedlich einstellen, sodass dieser Modus auch
zum Speichern von 11 individuellen Farbtönen
genutzt werden kann.
1) Den Menüpunkt CAL1 white aufrufen.
Das Display zeigt jetzt mit dem Pfeil Ɗeinen
der 11 Speicherplätze an (WT01… WT11)
und die LEDs leuchten im entsprechenden
Weißton.
2) Mit der Taste UP oder DOWN den ge-
wünschten Weißton wählen oder den Spei-
cherplatz, dessen Einstellungen geändert
werden sollen.
3) Zum Ändern einer Einstellung nach dem
Anwählen des Speicherplatzes die Taste
ENTER drücken.
4) Die folgenden Parameter einstellen:
ƊRed : Helligkeit Rot (0 – 255)
green: Helligkeit Grün (0 – 255)
blue : Helligkeit Blau (0 – 255)
white: Helligkeit Weiß (0 – 255)
5) Der Pfeil Ɗsteht immer vor der aktuellen Aus-
wahl oder dem einzustellenden Wert. Zur
Einstellung des gewählten Parameters die
Taste ENTER drücken, mit der Taste UP
oder DOWN den Wert ändern und mit der
Taste MENU zur Parameterauswahl zurück-
kehren, um einen weiteren Parameter zu
ändern.
6) Zum Aufrufen eines anderen Weißtones oder
zum Ändern der Einstellungen eines anderen
Speicherplatzes die Taste MENU so oft drü-
cken, bis wieder die Speicherplatznummer
angezeigt wird. Dann die Bedienschritte 2 – 5
wiederholen.
7.3 Showprogramme und Szenenfolgen
10 Showprogramme (Aut.01 … Aut.10)
sind im Scheinwerfer gespeichert. Außerdem
können 10 automatisch ablaufende Szenenfol-
gen (Pro.01 … Pro.10) mit bis zu 30 Sze-
nen selbst programmiert werden (Kap. 7.4).
Die Showprogramme und Szenenfolgen lassen
sich wie folgt starten:
1) Den Menüpunkt Auto aufrufen. Das Dis-
play zeigt jetzt mit dem Pfeil Ɗdas zuletzt
aufgerufene Showprogramm (Aut.01 …
Aut.10) oder die zuletzt aufgerufene Sze-
nenfolge (Pro.01 … Pro.10) an.
2) Das Showprogramm oder die Szenenfolge
mit der Taste UP oder DOWN auswählen.
Die Showprogramme haben folgenden Ablauf:
Showprogramme
7.4 Szenenfolgen programmieren
Es lassen sich 10 Szenenfolgen auf einfache
Weise programmieren. Eine Szenenfolge kann
aus max. 30 Szenen bestehen. Für jede Szene
lässt sich die Farbe zusammen mit der Helligkeit
einstellen und die Stroboskop-Funktion mit
variabler Blitzfrequenz einschalten. Zudem las-
sen sich die Szenendauer und die Überblendzeit
bestimmen.
1) Den Menüpunkt EDIT aufrufen. Das Display
zeigt jetzt mit dem Pfeil Ɗdie zuletzt gewählte
Szenenfolge (Pro01 … Pro10) an.
2) Die Nummer, unter der die Szenenfolge
gespeichert werden soll, mit der Taste UP
oder DOWN wählen und die Taste ENTER
drücken. Das Display zeigt die Nummer der
ersten Szene an (SC01
).
3) Die Taste ENTER drücken und die folgenden
Parameter einstellen:
ƊRed : Helligkeit Rot (0 – 255)
green: Helligkeit Grün (0 – 255)
blue : Helligkeit Blau (0 – 255)
white: Helligkeit Weiß (0 – 255)
strob: Blitzfrequenz (0 – 20 Hz)
des Stroboskops
Time : Szenendauer (time),
100 = 60 Sekunden
Fade : Überblendzeit (fade)
4) Der Pfeil Ɗsteht immer vor der aktuellen Aus-
wahl oder dem einzustellenden Wert. Zur
Einstellung des gewählten Parameters die
Taste ENTER drücken, mit der Taste UP
oder DOWN den Wert ändern und mit der
Taste MENU zur Parameterauswahl zurück-
Hauptmenü Beschreibung Kapitel
Static Color Farbstrahler/Stroboskop 7.1
Auto
Showprogramme (Aut.)/
programmierbare Szenenfolgen
(Pro.) abrufen 7.3
RUN Master-/Slave-Betrieb 7.5
DMX Address DMX-Startadresse 8.3
Personality DMX-Betriebsart/Anzahl der Kanäle 8.2
ID Address Unteradresse 8.3.1
EDIT Szenenfolgen programmieren 7.4
SET
UPLD: Szenenfolge auf andere
Scheinwerfer kopieren 7.5.1
REST: Einstellungen zurücksetzen 9.4
ID: Unteradressierung 8.3.1
REGW: Farbbegrenzung 9.2
Dim: Trägheit 9.3
CAL1 white 11 Weißtöne
oder individuelle Farben 7.2
CAL2 Parameter Farbgrenzwerte einstellen 9.2
KEY LOCK Tastensperre 9.1
Show-
programm Ablauf
Aut.01 Stroboskop: weißes Licht
Aut.02 Ein-/Ausblenden: Rot, Grün, Blau, Weiß
Aut.03 Farbwechsel: Rot, Weiß, Grün, Blau
Aut.04 Farbwechsel: Rot, aus, Weiß, aus,
Grün, aus, Blau, aus
Aut.05 Überblenden: Grün Rot Blau
Aut.06 Ein-/Ausblenden: Magenta, Gelb
Aut.07 Ein-/Ausblenden: Violett, Gelb
Aut.08 Ein-/Ausblenden: Violett
Aut.09 Ein-/Ausblenden: Türkis, Magenta
Aut.10 Ein-/Ausblenden: Violett, Grün
WARNUNG Der Gesamtstrom in den An-
schlusskabeln (7, 8) darf 10 A
nicht überschreiten, sonst kann
durch Überlastung ein Kabel-
brand entstehen. Darum nur
maximal 9 Scheinwerfer mit-
einander verbinden.
D
A
CH

kehren, um einen weiteren Parameter zu
ändern.
Hinweise
1. Die Zeitdauer einer Szene muss mindestens auf
den Wert 001 eingestellt werden, sonst lässt sich
die darauffolgende Szene nicht programmieren.
2. Soll von einer Szene auf die nächste Szene über-
geblendet werden, muss für beide Szenen eine
Überblendzeit eingestellt werden.
5) Nachdem die erste Szene eingestellt ist, die
Taste MENU so oft drücken, bis der Pfeil
wieder auf die Szenennummer zeigt
(ƊSC01
). Mit der Taste UP die zweite Szene
anwählen, die Taste ENTER drücken, die
Szene einstellen und den Vorgang für alle
anschließenden Szenen wiederholen.
6) Nachdem die letzte Szene eingestellt ist, die
Szenenfolge speichern: Direkt nach dem Ein-
stellen eines Parameters die Taste ENTER
5 Sekunden gedrückt halten. Nach dem Lösen
der Taste muss das Display die Nummer der
Szenenfolge anzeigen (Pro01 … Pro10),
anderenfalls wurde die Taste ENTER nicht
lange genug gedrückt.
Hinweise
1. Eine Szenenfolge muss komplett programmiert wer-
den, bevor der Scheinwerfer von der Stromversor-
gung getrennt wird. Nach dem erneuten Einschalten
lässt sich eine Szenenfolge nicht mehr ändern; sie
kann nur neu programmiert werden. Zum Über-
schreiben einer Szenenfolge brauchen so die zuvor
programmierten Szenen nicht erst gelöscht zu wer-
den.
2. Werden die Szenenfolgen nicht mit den Bedientas-
ten (4) aufgerufen (Kap. 7.3), sondern über ein DMX-
Lichtsteuergerät, bestimmt der DMX-Kanal 2 die
Szenendauer und der Kanal 3 die Überblendzeit
(Kap. 10.1.7). Der Kanal 2 muss dabei auf einen
DMX-Wert > 0 eingestellt sein, sonst bleibt der
Scheinwerfer dunkel.
7.5 Synchrone Steuerung mehrerer
Scheinwerfer (Master-Slave-Modus)
Es lassen sich mehrere ODW-2410RGBW zu-
sammenschließen. Das Hauptgerät (Master)
kann dann alle Nebengeräte (Slaves) synchron
steuern.
1) Die Scheinwerfer jeweils über die Kupplung
(9) des Kabels DMX OUT und den Stecker
(6) des Kabels DMX IN miteinander zu einer
Kette verbinden. Siehe dazu Kapitel 8.1
„DMX-Anschluss“, jedoch ohne den Bedien-
schritt 1 zu beachten.
2) Für den Master-Slave-Modus ist der Schein-
werfer ab Werk als Nebengerät eingestellt.
So muss nur der Scheinwerfer, der die
Nebengeräte steuern soll, als Hauptgerät
eingestellt werden.
Zum Ändern der Einstellung den Menüpunkt
RUN aufrufen. Das Display zeigt:
DMX = Hauptgerät
ƊSlave = Nebengerät
Die aktuelle Einstellung ist mit dem Pfeil
gekennzeichnet. Bei Bedarf die Einstellung
mit der Taste UP oder DOWN ändern.
3) Das Hauptgerät auf die gewünschte Be-
triebsart einstellen (Kapitel 7.1 – 7.3).
7.5.1 Szenenfolgen kopieren
Die programmierten Szenenfolgen eines Gerä-
tes (Kap. 7.4) können auf andere Geräte über-
tragen werden. Dies ist sinnvoll, wenn mehrere
Geräte eigenständig mit gleichen Szenenfolgen
laufen sollen. Für den Synchronbetrieb bei ver-
bundenen Geräten (Kap. 7.5) ist das Kopieren
der Szenenfolgen nicht erforderlich.
Das Gerät, dessen Szenenfolgen kopiert wer-
den sollen, als Hauptgerät mit den anderen
Geräten verbinden (Kapitel 7.5) und diese
als Nebengeräte einrichten:
1) Bei den Nebengeräten, die alle Szenenfolgen
vom Hauptgerät übernehmen sollen, den
Menüpunkt RUN aufrufen und die Option
ƊSlave einstellen.
2) Am Hauptgerät den Menüpunkt SET und den
Untermenüpunkt UPLD aufrufen. Das Dis-
play zeigt Password:.
3) Folgende Tasten drücken:
UP, DOWN, UP, DOWN.
Das Drücken dieser Tasten wird jeweils mit
einem Stern *im Display angezeigt.
4) Den Kopiervorgang mit der Taste ENTER
starten. Während des Kopiervorgangs leuch-
ten die Nebengeräte gelb, beim Auftreten
eines Fehlers rot und nach einem erfolgrei-
chen Kopieren grün.
Hinweis: Die kopierten Szenenfolgen sind erst verfüg-
bar, nachdem auf eine anderen Szenenfolge umge-
schaltet oder die Stromversorgung unterbrochen
wurde.
8 Betrieb mit einem
DMX-Steuergerät
DMX ist die Abkürzung für Digital Multiplexund
bedeutet digitale Steuerung von mehreren DMX-
Geräten über eine gemeinsame Steuerleitung.
Zur Bedienung über ein DMX-Lichtsteuergerät
(z. B. DMX-1440 oder DMX-510USB von „img
Stage Line“) verfügt der Scheinwerfer über 11
DMX-Steuerkanäle. Er lässt sich je nach Bedarf
aber auch über nur 10, 6, 5, 4 oder 3 Kanäle
steuern. Die Funktionen der Kanäle und die
DMX-Werte sind im Kapitel 10.1 angegeben.
8.1 DMX-Anschluss
Für die DMX-Verbindung sind 3-polige XLR-An-
schlüsse mit folgender Kontaktbelegung vorhan-
den:
Pin 1 = Masse, Pin 2 = DMX−, Pin 3 = DMX+
Zum Anschluss sollten spezielle Kabel für die
DMX-Signalübertragung verwendet werden
(z. B. Kabel der CDMXN-Serie von „img Stage
Line“). Bei Leitungslängen ab 150 m und bei der
Steuerung von mehr als 32 Geräten über einen
DMX-Ausgang wird grundsätzlich das Zwi-
schenschalten eines DMX-Aufholverstärkers
empfohlen (z. B. SR-103DMX von „img Stage
Line“).
1) Den Stecker (6) der Leitung DMX IN in die
Kupplung der beiliegenden Leitung mit dem
XLR-Stecker (10) stecken und die Steckver-
bindung mit der Überwurfmutter zusammen-
schrauben. Den XLR-Stecker über ein Ver-
längerungskabel an den DMX-Ausgang des
Lichtsteuergerätes anschließen oder, wenn
weitere DMX-gesteuerte Geräte verwendet
werden, an den DMX-Ausgang eines ande-
ren DMX-gesteuerten Gerätes.
2) Werden weitere ODW-2410RGBW-Schein-
werfer verwendet, den ersten Scheinwerfer
über die Kupplung (9) des Kabels DMX OUT
mit dem Stecker (6) des Kabels DMX IN des
2. Scheinwerfers verbinden. Genauso den
2. Scheinwerfer mit dem 3. verbinden usw.,
bis alle Geräte in einer Kette angeschlossen
sind.
Sollten die DMX-Verbindungskabel zwi-
schen den Scheinwerfern zu kurz sein, pas-
sende Verlängerungskabel verwenden, z. B.
ODP-34DMX (Länge 2 m) oder
ODP-34DMX/10 (Länge 10 m).
Für den Anschluss anderer DMX-gesteu-
erter Geräte das Adapterkabel mit der XLR-
Kupplung verwenden.
3) Um Störungen bei der Signalübertragung
auszuschließen, sollte bei langen Leitungen
bzw. bei einer Vielzahl von hintereinanderge-
schalteten Geräten der DMX-Ausgang des
letzten DMX-Gerätes der Kette mit einem
120-Ω-Widerstand (> 0,3 W) abgeschlossen
werden: In die XLR-Kupplung des mitgelie-
ferten Adapterkabels einen entsprechenden
Abschlussstecker (z. B. DLT-123 von „img
Stage Line“) stecken. Bei einer Außeninstal-
lation müssen die XLR-Kupplung und der Ab-
schlussstecker vor Feuchtigkeit geschützt
werden.
8.2 DMX-Betriebsart einstellen
Um den ODW-2410RGBW mit einem Lichtsteu-
ergerät bedienen zu können, müssen die DMX-
Startadresse (Kap. 8.3) und die DMX-Be-
triebsart eingestellt werden. Aus der gewählten
Betriebsart ergibt sich die Anzahl der benötigten
DMX-Kanäle (3 – 11 Kanäle). Informieren Sie
sich im Kapitel 10.1 über die Funktionen, die in
der jeweiligen DMX-Betriebsart steuerbar sind
und wählen Sie danach oder eventuell nach der
Anzahl der verfügbaren Steuerkanäle am Licht-
steuergerät die DMX-Betriebsart aus:
1) Den Menüpunkt Personality aufrufen.
2) Die folgenden Einstellungen sind verfügbar:
ƊStage 11 Kanäle/10 Kanäle ohne Unter-
adressierung
(Kap. 10.1.7)
Arc.1 3 Kanäle
1 = Rot, 2 = Grün, 3 = Blau
Ar1.d 4 Kanäle
1 = Dimmer, 2 = Rot, 3 = Grün,
4 = Blau
Arc.2 4 Kanäle
1 = Rot, 2 = Grün, 3 = Blau,
4 = Weiß
Ar2.d 5 Kanäle
1 = Dimmer, 2 = Rot, 3 = Grün,
4 = Blau, 5 = Weiß
Ar2.s 6 Kanäle
1 = Dimmer, 2 = Rot, 3 = Grün,
4 = Blau, 5 = Weiß, 6 = Stroboskop
HSV 3 Kanäle
1 = Farbe, 2 = Farbsättigung,
3 = Helligkeit
3) Der Pfeil Ɗzeigt die aktuelle Einstellung. Mit
der Taste UP oder DOWN die Einstellung
ändern.
D
A
CH
6

8.3 DMX-Startadresse einstellen
Um den Scheinwerfer mit einem Lichtsteuergerät
bedienen zu können, muss die DMX-Startadres-
se für den ersten DMX-Kanal eingestellt werden.
Ist z. B. am DMX-Steuergerät die Adresse 17
zum Steuern der Funktion des ersten DMX-
Kanals vorgesehen, am ODW-2410RGBW die
Startadresse 17 einstellen. Die weiteren DMX-
Kanäle des ODW-2410RGBW sind dann auto-
matisch den folgenden Adressen zugeordnet.
Nachfolgend ist ein Beispiel mit der Startadresse
17 aufgeführt:
DMX-Adressenbelegung
bei Verwendung der Startadresse 17
1) Den Menüpunkt DMX Address aufrufen.
2) Das Display zeigt die aktuelle DMX-Start-
adresse, z. B. Addr:001
3) Mit der Taste UP oder DOWN die Start-
adresse einstellen.
8.3.1 Unteradressen verwenden
Im 11-Kanal-Betrieb (Stage, Kap. 8.2) las-
sen sich durch die Verwendung von Unteradres-
sen bis zu 66 Scheinwerfer (-gruppen) über eine
einzige DMX-Startadresse nacheinander unab-
hängig steuern. Die maximal mögliche Anzahl
DMX-gesteuerter Geräte wird dadurch erheblich
erhöht. Die Anwahl von Scheinwerfern mit einer
Unteradresse erfolgt über den DMX-Kanal 11.
Scheinwerfer mit derselben Startadresse und
unterschiedlichen Unteradressen lassen sich
auch synchron steuern, wenn der DMX-Kanal 11
auf einen DMX-Wert von kleiner als 11 einge-
stellt wird.
1) Den Menüpunkt SET aufrufen und das
Untermenü ID.
2) Mit der Taste UP oder DOWN die Verwen-
dung der Unteradresse einschalten (ID
Ɗon). Ist die Unteradressierung ausgeschal-
tet (off), werden die Daten für Kanal 11 vom
Scheinwerfer ignoriert.
3) Mit der Taste MENU ins Hauptmenü zurück-
kehren und den Menüpunkt ID Address
aufrufen.
4) Mit der Taste UP oder DOWN dem Schein-
werfer eine Unteradresse (1 – 66) zuweisen.
Um den Scheinwerfer bedienen zu können, am
Lichtsteuergerät den DMX-Kanal 11 auf den
DMX-Wert stellen, welcher der Unteradresse
des Scheinwerfers entspricht (Kap. 10.1.7,
zweite Tabelle).
9 Weitere Funktionen
Hinweis: Um den Scheinwerfer per DMX steuern zu
können, nachdem eine in diesem Kapitel beschriebene
Einstellung durchgeführt worden ist, einen der folgen-
den Menüpunkte aufrufen:
RUN: DMX,
DMX Address,
Personality,
ID Address
9.1 Tastensperre
Gegen eine unbefugte Bedienung kann eine
Tastensperre eingeschaltet werden. Bei aktiver
Sperre können Einstellungen erst nach der Ein-
gabe einer bestimmten Tastenfolge vorgenom-
men werden.
1) Den Menüpunkt KEY LOCK aufrufen.
2) Mit der Taste UP oder DOWN die Tasten-
sperre einschalten (KEY Ɗon) oder wieder
ausschalten (off).
Wurde KEY Ɗon gewählt, ist die Tastensperre
aktiv, sobald die Displaybeleuchtung erlischt.
Zur Bedienung bei aktiver Tastensperre:
1) Die Taste ENTER drücken, sodass im Dis-
play Password:erscheint.
2) Diese Tastenfolge eingeben:
UP, DOWN, UP, DOWN, ENTER
Dabei wird für die ersten vier Eingaben
jeweils ein *angezeigt.
3) Der Scheinwerfer kann jetzt normal bedient
werden. Nach dem Erlöschen der Displaybe-
leuchtung ist jedoch wieder die Tastensperre
aktiv, wenn sie nicht über den Menüpunkt
KEY LOCK ausgeschaltet wurde.
9.2 Farben begrenzen
Die Helligkeitswerte der Farben Rot, Grün und
Blau lassen sich auf einen Maximalwert begren-
zen. Dadurch können z. B. Unterschiede zu
anderen Scheinwerfern ausgeglichen werden,
wenn diese gemeinsam mit dem ODW-
2410RGBW gesteuert werden. Die Begrenzung
wirkt sich sowohl auf den eigenständigen
Betrieb als auch auf die DMX-Steuerung des
Scheinwerfers aus.
1) Den Menüpunkt CAL2 Parameter aufru-
fen und das Untermenü REGW.
2) Die folgenden Maximalwerte einstellen:
ƊRed : Helligkeit Rot (0 – 255)
green: Helligkeit Grün (0 – 255)
blue : Helligkeit Blau (0 – 255)
3) Der Pfeil Ɗsteht immer vor der aktuellen Aus-
wahl oder dem einzustellenden Wert. Zur
Einstellung des gewählten Parameters die
Taste ENTER drücken, mit der Taste UP
oder DOWN den Wert ändern und mit der
Taste MENU zur Parameterauswahl zurück-
kehren, um einen weiteren Parameter zu
ändern.
Ob die eingestellten Grenzwerte berücksichtigt
werden sollen, kann an einer anderen Stelle des
Menüs gewählt werden:
4) Mit der Taste MENU ins Hauptmenü zurück-
kehren und den Menüpunkt SET sowie das
Untermenü REGW aufrufen.
5) Mit der Taste UP oder DOWN die Begren-
zung der Farben einschalten (on) oder aus-
schalten (off).
9.3 Künstliche Trägheit der LEDs
LEDs reagieren sehr schnell auf eine Änderung
der Helligkeitseinstellung. Um die Trägheit her-
kömmlicher Leuchtmittel zu simulieren, lässt
sich für die DMX-Steuerung eine künstliche
Trägheit in 4 Stufen einstellen. Bei der DMX-
Betriebsart Stage erfolgt diese Einstellung
über den DMX-Kanal 10 (Kap. 10.1.7). Für die
übrigen DMX-Betriebsarten die Einstellung wie
folgt vornehmen:
1) Den Menüpunkt SET aufrufen und das
Untermenü Dim.
2) Mit der Taste UP oder DOWN die Stufe der
Trägheit wählen (1…4) oder die künstliche
Trägheit ausschalten (off).
9.4 Scheinwerfer auf die
Werkseinstellung zurücksetzen
Ab Werk ist der Scheinwerfer wie folgt einge-
stellt:
Rücksetzwerte
Zum Zurücksetzen des Scheinwerfers auf die
Werkseinstellung:
1) Den Menüpunkt SET aufrufen und das
Untermenü REST.
Das Display zeigt Password:.
2) Folgende Tasten drücken:
UP, DOWN, UP, DOWN.
Das Drücken dieser Tasten wird jeweils mit
einem Stern *im Display angezeigt.
3) Das Zurücksetzen mit der Taste ENTER star-
ten.
Funktion Werkseinstellung
Farbstrahler
Static Color
Red = 255, green = 255,
blue = 255, white = —,
strob = 00
Showprogramme
Auto Aut.01
Master-Slave-Modus
RUN Slave
DMX-Startadresse
DMX Address Addr: 001
DMX-Kanäle
Personality Stage (10/11 Kanäle)
Unteradresse
ID Address Addr:01
Funktion Unteradresse
SET ID off (aus)
Funktion Farbbegrenzung
SET REGW off (aus)
Funktion LED-Trägheit
SET Dim off (aus)
11 Weißtöne
CAL1 white
Speicherplatz: Rot, Grün, Blau, Weiß
WT01: 255, 220, 5, 227
WT02: 242, 222, 5, 227
WT03: 255, 255, 61, 255
WT04: 255, 255, 103, 255
WT05: 255, 255, 130, 255
WT06: 255, 255, 138, 255
WT07: 255, 255, 153, 255
WT08: 255, 255, 167, 255
WT09: 255, 255, 180, 255
WT10: 255, 255, 185, 255
WT11: 255, 255, 202, 255
Farbbegrenzung
CAL2 Parameter
REGW Red = 255, green = 255,
blue = 255
Tastensperre
KEY LOCK KEY off (aus)
Anzahl der
DMX-Kanäle
belegte
DMX-Adressen
nächstmögliche Startadresse
für das
nachfolgende DMX-Gerät
317 – 19 20
417 – 20 21
517 – 21 22
617 – 22 23
11 17 – 27 28
7
D
A
CH

10 Technische Daten
Datenprotokoll: . . . . . . . . DMX 512
Anzahl der DMX-Kanäle: wählbar zwischen
3, 4, 5, 6 oder 10/11
Lichtquelle: . . . . . . . . . . . 24 RGBW-LEDs
Leistung je LED: . . . . . 8 W
Abstrahlwinkel: . . . . . . 45°
Stromversorgung: . . . . . . 230 V~/50 Hz
Leistungsaufnahme: . . . . max. 250 VA
Gehäuseschutzart: . . . . . IP 66
Abmessungen: . . . . . . . . 430 × 300 × 220 mm
Gewicht: . . . . . . . . . . . . . 11 kg
10.1DMX-Funktionen
10.1.1 Modus Arc.1 (3 Kanäle)
10.1.2 Modus HSV (3 Kanäle)
10.1.3 Modus Ar1.d (4 Kanäle)
10.1.4 Modus Arc.2 (4 Kanäle)
10.1.5 Modus Ar2.d (5 Kanäle)
10.1.6 Modus Ar2.s (6 Kanäle)
DMX-
Kanal
DMX-
Wert Funktion
10 – 255 Helligkeit Rot
20 – 255 Helligkeit Grün
30 – 255 Helligkeit Blau
DMX-
Kanal
DMX-
Wert Funktion
10 – 255 Dimmer (Gesamthelligkeit)
20 – 255 Helligkeit Rot
30 – 255 Helligkeit Grün
40 – 255 Helligkeit Blau
50 – 255 Helligkeit Weiß
60–15 kein Stroboskop
16 – 255 Stroboskop 1 – 20 Hz
DMX-
Kanal
DMX-
Wert Funktion
10 – 255 Dimmer (Gesamthelligkeit)
20 – 255 Helligkeit Rot
30 – 255 Helligkeit Grün
40 – 255 Helligkeit Blau
50 – 255 Helligkeit Weiß
DMX-
Kanal
DMX-
Wert Funktion
10 – 255 Helligkeit Rot
20 – 255 Helligkeit Grün
30 – 255 Helligkeit Blau
40 – 255 Helligkeit Weiß
DMX-
Kanal
DMX-
Wert Funktion
10 – 255 Dimmer (Gesamthelligkeit)
20 – 255 Helligkeit Rot
30 – 255 Helligkeit Grün
40 – 255 Helligkeit Blau
DMX-
Kanal
DMX-
Wert Funktion
10 – 255 Farbe
20 – 255 Farbsättigung
30 – 255 Helligkeit
D
A
CH
8
Diese Bedienungsanleitung ist urheberrechtlich für MONACOR ®INTERNATIONAL GmbH & Co. KG
geschützt. Eine Reproduktion für eigene kommerzielle Zwecke – auch auszugsweise – ist untersagt.
DMX-
Kanal
DMX-
Wert Funktion
10 – 255 Dimmer (Gesamthelligkeit)1
20 – 255 Helligkeit Rot1
Szenendauer, wenn Kanal 8 = 110 … 255
30 – 255 Helligkeit Grün1
Überblendzeit, wenn Kanal 8 = 110 … 255
40 – 255 Helligkeit Blau1
50 – 255 Helligkeit Weiß1
6
0–10 keine Funktion
11 – 20 Rot Gelb
21 – 30 Gelb Grün
31 – 40 Grün Türkis
41 – 50 Türkis Blau
51 – 60 Blau Magenta
61 – 70 Magenta Rot
71 – 80 Rot Rosa
81 – 90 Rosa Rot
91 – 100 Grün Rot
101 – 110 Blau Rot
111 – 120 Blau Grün
121 – 130 Blau Gelb
131 – 140 Türkis Rot
141 – 150 Grün Magenta
151 – 160 Blau Rot Grün
161 – 170 Türkis Gelb Magenta
171 – 180 Rot Grün Blau Weiß
181 – 190 Türkis Grün Gelb Rot Magenta Blau
191 – 200 Weiß, max. Helligkeit
201 – 205 WT01 (Weißton 1, Kap. 7.2)
206 – 210 WT02
211 – 215 WT03
216 – 220 WT04
221 – 225 WT05
226 – 230 WT06
231 – 235 WT07
236 – 240 WT08
241 – 245 WT09
246 – 250 WT10
251 – 255 WT11
7
0 – 255 Geschwindigkeit, wenn Kanal 6 = 11 … 190
0–15 kein Stroboskop
16 – 255 Stroboskop 1 … 20 Hz
8
0–9 keine Funktion
10 – 19 Showprogramm Aut.01 (Abb. 3)2
20–29 Showprogramm Aut.022
30–39 Showprogramm Aut.032
40–49 Showprogramm Aut.042
50–59 Showprogramm Aut.052
60–69 Showprogramm Aut.062
70–79 Showprogramm Aut.072
80–89 Showprogramm Aut.082
90–99 Showprogramm Aut.092
100 – 109 Showprogramm Aut.102
110 – 119 Szenenfolge Pro.01 (Kap. 7.4)3
120 – 129 Szenenfolge Pro.023
130 – 139 Szenenfolge Pro.033
140 – 149 Szenenfolge Pro.043
150 – 159 Szenenfolge Pro.053
160 – 169 Szenenfolge Pro.063
170 – 179 Szenenfolge Pro.073
180 – 189 Szenenfolge Pro.083
190 – 199 Szenenfolge Pro.093
200 – 255 Szenenfolge Pro.103
90 – 255 Geschwindigkeit, wenn Kanal 8 = 10 … 109 (Aut…)2
10
0–49 keine künstliche Trägheit (Kap. 9.3)
50–99 Trägheitstufe 14
100 – 149 Trägheitstufe 24
150 – 199 Trägheitstufe 34
200 – 255 Trägheitstufe 44
11 0 – 255 Unteradressen, folgende Tabelle
DMX-
Wert
Unter-
adresse
DMX-
Wert
Unter-
adresse
0–10 alle
11 – 19 01 223 34
20 – 29 02 224 35
30 – 39 03 225 36
40 – 49 04 226 37
50 – 59 05 227 38
60 – 69 06 228 39
70 – 79 07 229 40
80 – 89 08 230 41
90 – 99 09 231 42
100 – 109 10 232 43
110 – 119 11 233 44
120 – 129 12 234 45
130 – 139 13 235 46
140 – 149 14 236 47
150 – 159 15 237 48
160 – 169 16 238 49
170 – 179 17 239 50
180 – 189 18 240 51
190 – 199 19 241 52
200 – 209 20 242 53
210 21 243 54
211 22 244 55
212 23 245 56
213 24 246 57
214 25 247 58
215 26 248 59
216 27 249 60
217 28 250 61
218 29 251 62
219 30 252 63
220 31 253 64
221 32 254 65
222 33 255 66
Kanal 11:
Anwahl von Scheinwerfern über
die Unteradresse ID Address
10.1.7 Modus Stage (11 Kanäle oder 10 Kanäle ohne
die Nutzung von Unteradressen)
Zusätzliche Bedingungen der Funktionen:
1wenn Kanal 6 = 0 … 10 und K. 8 = 0 … 9
oder
Kanal 6 = 0 … 10 und K. 7 = 5 … 255
2wenn Kanal 7 = 0 … 4 und K. 6 = 0 … 10
3wenn Kanal 7 = 0 … 4 und K. 6 = 0 … 10
und K. 2 = 1 … 255
4wenn Kanal 6 = 0 … 10 und K. 8 = 0 … 9
und K. 7 = 0 … 15
oder
Kanal 6 = 0 … 10 und K. 7 = 5 … 15
Änderungen vorbehalten.

9
GB
DMX LED Floodlight
These instructions are intended for the installer
of the floodlight and for operators without any
technical training. Please read these instructions
carefully prior to installation and keep them for
later reference. All operating elements and con-
nections described can be found on the fold-out
page 3.
Contents
1 Operating Elements and Connections 9
2 Safety Notes . . . . . . . . . . . . . . . . . . . . . 9
3 Applications . . . . . . . . . . . . . . . . . . . . . 9
4 Installation . . . . . . . . . . . . . . . . . . . . . . 9
5 Setting into Operation . . . . . . . . . . . . . 9
5.1 Connecting multiple floodlights . . . . . . 10
6 Operation . . . . . . . . . . . . . . . . . . . . . . 10
7 Independent Operation . . . . . . . . . . . 10
7.1 Colour floodlight and stroboscope . . . . 10
7.2 Different shades of white,
storing 11 shades of colour . . . . . . . . . 10
7.3 Show programs and
sequences of scenes . . . . . . . . . . . . . . 10
7.4 Programming sequences of scenes . . 10
7.5 Synchronous control of multiple flood-
lights (master/slave mode) . . . . . . . . . 11
7.5.1 Copying sequences of scenes . . . . . . . 11
8 Operation with a DMX Controller . . . 11
8.1 DMX connection . . . . . . . . . . . . . . . . . 11
8.2 Setting the DMX operation mode . . . . . 11
8.3 Setting the DMX start address . . . . . . . 12
8.3.1 Using subaddresses . . . . . . . . . . . . . . 12
9 Additional Functions . . . . . . . . . . . . . 12
9.1 Key lock . . . . . . . . . . . . . . . . . . . . . . . . 12
9.2 Limiting colours . . . . . . . . . . . . . . . . . . 12
9.3 Artificial response time of the LEDs . . . 12
9.4 Resetting the floodlight to its
factory settings . . . . . . . . . . . . . . . . . . . 12
10 Specifications . . . . . . . . . . . . . . . . . . 13
10.1 DMX functions
10.1.1 Mode Arc.1 (3 channels) . . . . . . . . 13
10.1.2 Mode HSV (3 channels) . . . . . . . . . . . 13
10.1.3 Mode Ar1.d (4 channels) . . . . . . . . 13
10.1.4 Mode Arc.2 (4 channels) . . . . . . . . 13
10.1.5 Mode Ar2.d (5 channels) . . . . . . . . 13
10.1.6 Mode Ar2. (6 channels) . . . . . . . . . 13
10.1.7 Mode Stage (10/11 channels) . . . . . 13
1 Operating Elements
and Connections
1Tiltable floodlight head
2Setscrews for the floodlight head
3Holes (∅11.5 mm) to fasten two clamps or
C hooks for mounting the floodlight to lighting
stand systems
4Buttons to select the operation mode and to
change settings
5Display
6Plug of the cable DMX IN for the DMX signal
input:
Using the cable fitted with the XLR plug (10),
either connect the plug to a light controller or
to the DMX signal output of another DMX
controlled unit
7Plug of the cable POWER IN for power sup-
ply (230 V~/50 Hz):
Either connect the plug to the mains socket,
using the cable fitted with the mains plug
(11), or connect it to the inline jack of the
cable POWER OUT (8) of another ODW-
2410RGBW
8Inline jack of the connection POWER OUT for
power supply of another ODW-2410RGBW
9Inline jack of the connection DMX OUT:
DMX signal output for connection to the DMX
signal input of another ODW-2410RGBW or
another DMX-controlled unit via the adapter
cable supplied
10 XLR plug of the DMX signal input
pin 1 = ground, pin 2 = DMX−, pin 3 = DMX+
11 Mains plug for connection to a mains socket
(230 V~/50 Hz)
2 Safety Notes
The unit corresponds to all relevant directives of
the EU and is therefore marked with .
GDo not operate the unit and immediately dis-
connect it from the mains
1. if the unit or the mains cable is visibly dam-
aged,
2. if a defect might have occurred after the unit
was dropped or suffered a similar accident,
3. if malfunctions occur.
In any case the unit must be repaired by
skilled personnel.
GA damaged mains cable must only be
replaced by skilled personnel.
GNever pull the mains cable for disconnecting
the mains plug from the socket, always seize
the plug.
GFor cleaning the floodlight housing and the
protective pane in front of the LEDs, only use
a mild detergent.
GNo guarantee claims for the unit and no liabil-
ity for any resulting personal damage or mate-
rial damage will be accepted if the unit is used
for other purposes than originally intended, if it
is not safely mounted or not correctly oper-
ated, or if it is not repaired in an expert way.
GImportant for U. K. Customers!
The wires in this mains lead are coloured in
accordance with the following code:
green/yellow = earth
blue = neutral
brown = live
As the colours of the wires in the mains lead of
this appliance may not correspond with the
coloured markings identifying the terminals in
your plug, proceed as follows:
1. The wire which is coloured green and yel-
low must be connected to the terminal in the
plug which is marked with the letter E or by
the earth symbol , or coloured green or
green and yellow.
2. The wire which is coloured blue must be
connected to the terminal which is marked
with the letter N or coloured black.
3. The wire which is coloured brown must be
connected to the terminal which is marked
with the letter L or coloured red.
Warning – This appliance must be earthed.
3 Applications
This LED floodlight is used for effect illumination.
The floodlight features a weatherproof alu-
minium housing (IP 66) and is therefore also suit-
able for outdoor applications. 24 extra bright
LEDs are used as a light source. The LEDs can
emit light in the three primary colours (red, green
and blue) and in white as well as coloured light
created from additive colour mixing. Crossfading
from one colour to another and stroboscope
effects are also supported. The floodlight is
designed for control via a DMX light controller
(optionally 11, 10, 6, 5, 4 or 3 DMX control chan-
nels). However, it can also be operated on its
own without a controller.
As a special feature, the floodlight supports
66 subaddresses when used in DMX mode with
11 channels. Thus, it is possible to independ-
ently control up to 66 floodlights (floodlight
groups) via a single DMX start address and the
maximum number of DMX-controlled units pos-
sible is substantially increased.
4 Installation
GAlways position the floodlight in a way that en-
sures sufficient air circulation during operation.
GAlways keep a minimum distance of 15 cm to
the object illuminated and to the adjoining walls.
1. Place the floodlight on its rubber feet. To
align the floodlight, loosen the two setscrews
(2). Tilt the floodlight head (1) as desired and
then retighten the screws.
2. As an alternative, the floodlight can be
mounted to a lighting stand system: Use two
mounting clamps or stable C hooks to fasten
the floodlight via the two 11.5 mm holes (3) at
the lateral brackets to a cross bar, for example.
5 Setting into Operation
WARNING To prevent damage to your eyes,
never look directly into the light
source for any length of time.
Please note that fast changes in
lighting may trigger epileptic
seizures with photosensitive per-
sons or persons with epilepsy!
WARNING
Install the floodlight safely and
expertly.
If the unit is to be put out of operation
definitively, take it to a local recycling
plant for a disposal which is not harmful
to the environment.
WARNING The unit uses dangerous mains
voltage. Leave servicing to skilled
personnel only; inexpert handling
of the unit may result in electric
shock.

Connect the plug (7) of the cable POWER IN to
the inline jack of the supplied cable fitted with the
mains plug (11) and then use the cap nut to
screw the plug-in connection together. Connect
the mains plug to a mains socket (230 V~/
50 Hz). The floodlight will be switched on. LED
WASH LIGHTING will appear on the display
(5), and the display will be illuminated for a few
seconds.
CAUTION!
Do not connect the unit to the mains voltage via
a dimmer!
If no further floodlight is connected to the inline
jack (8) of the cable POWER OUT and to the
inline jack (9) of the cable DMX OUT, make
absolutely sure to screw the protective covers
onto the inline jacks. The cable POWER OUT
carries mains voltage.
5.1 Connecting multiple floodlights
If multiple ODW-2410RGBW are used, the flood-
lights can be interconnected for power supply.
Do not connect the first floodlight to a mains
socket for the time being.
1) Use the inline jack (8) of the cable POWER
OUT to connect the first floodlight to the plug
(7) of the cable POWER IN of the second
floodlight. Proceed in the same way to con-
nect the second floodlight to the third one etc.
until all floodlights are connected in a chain.
If the mains connection cables between
the floodlights are too short, use suitable
extension cables such as ODP-34AC (2 m) or
ODP-34AC/10 (10 m).
2) At the last floodlight, screw the protective
cover supplied onto the inline jack (8) of the
cable POWER OUT. The cable carries mains
voltage.
3) Connect the mains plug (11) of the first flood-
light to a mains socket (230 V~/50 Hz).
6 Operation
All settings of the unit are made via a menu on
the display (5) by means of the buttons MENU,
ENTER, UP and DOWN (4). The unit will always
display the most recently selected menu view.
To change a setting:
1) Press the button MENU repeatedly until the
indication on the display does not change
anymore: The top menu level (main menu)
has been reached (fig. 2).
2) Use the button UP or DOWN to select the
menu item desired. The arrow Ɗwill always
point to the menu item selected.
3) Press the button ENTER to call up the menu
item selected. The display will indicate the
current setting (Ɗ) for this menu item.
4) Use the button UP or DOWN to change the
setting.
5) If submenu items are available, use the but-
ton ENTER to call them up and then use the
button UP or DOWN to change their settings.
6) For further settings, press the button MENU
to go to a higher menu level (if required, go to
the main menu, step 1).
The display illumination will extinguish after a
few seconds if no button is pressed. It will light
up again when a button is pressed.
Make the desired settings for the respective
operation mode, observing the instructions given
in chapters 7 to 9.
Overview of the main menu
7 Independent Operation
7.1 Colour floodlight and stroboscope
In this mode, the floodlight constantly radiates
light in an adjustable colour. The stroboscope
function can additionally be activated.
1) Call up the menu item Static Color.
2) Set the following parameters:
ƊRed : Brightness of red (0 – 255)
green: Brightness of green (0 – 255)
blue : Brightness of blue (0 – 255)
white: Brightness of white (0 – 255)
strob: Flash frequency (0 – 20 Hz)
of the stroboscope
3) The arrow Ɗalways precedes the current
selection or the value to be set. To set the
parameter selected: Press the button ENTER
and use the button UP or DOWN to change
the setting; then press the button MENU to
return to the parameter selection and to
change another parameter.
7.2 Different shades of white,
storing 11 shades of colour
In this mode, the floodlight radiates white light.
11 different shades of white are stored which,
however, can be changed, if required. For each
shade of white, the brightness of the colours red,
green, blue and white may be set to different val-
ues so that this mode can also be used to store
11 individual shades of colour.
1) Call up the menu item CAL1 white. The
arrow Ɗon the display will point to one of the
11 storage locations (WT01… WT11), and
the LEDs will light up in the corresponding
shade of white.
2) Use the button UP or DOWN to select the
desired shade of white or to select the storage
location whose settings are to be changed.
3) To change a setting after selecting a storage
location, press the button ENTER.
4) Set the following parameters:
ƊRed : Brightness of red (0 – 255)
green: Brightness of green (0 – 255)
blue : Brightness of blue (0 – 255)
white: Brightness of white (0 – 255)
5) The arrow Ɗalways precedes the current
selection or the value to be set. To set the
parameter selected: Press the button ENTER
and use the button UP or DOWN to change
the setting; then press the button MENU to
return to the parameter selection and to
change another parameter.
6) To call up another shade of white or to
change the settings of another storage loca-
tion, press the button MENU repeatedly until
the storage location number is shown again.
Then repeat steps 2 – 5.
7.3 Show programs and
sequences of scenes
10 show programs (Aut.01 … Aut.10) are
stored on the floodlight. In addition, 10 automatic
sequences of scenes (Pro.01 … Pro.10)
with up to 30 scenes each can be programmed
(chapter 7.4). To start the show programs
and sequences of scenes:
1) Call up the menu item Auto. The arrow Ɗon
the display points to the show program
(Aut.01 … Aut.10) or sequence of
scenes (Pro.01 … Pro.10) most recently
called up.
2) Use the button UP or DOWN to select the
show program or the sequence of scenes.
The sequence of the show programs is as fol-
lows:
Show programs
7.4 Programming sequences of scenes
10 sequences of scenes can be easily pro-
grammed. Each sequence may include up to
30 scenes. For each scene, the colour can be
set together with the brightness and the strobo-
scope function with variable flash frequency can
be activated. In addition, the length of the scenes
and the crossfading time can be defined.
1) Call up the menu item EDIT. The arrow Ɗon
the display will point to the sequence of
scenes most recently selected (Pro01 …
Pro10).
2) Use the button UP or DOWN to select the
number to which the sequence of scenes is to
be stored, and then press the button ENTER.
The display will show the number of the first
scene (SC01
).
Show
program Sequence
Aut.01 Stroboscope: white light
Aut.02 Fade-in/fade-out: red, green, blue, white
Aut.03 Colour change: red, white, green, blue
Aut.04 Colour change: red, off, white, off,
green, off, blue, off
Aut.05 Crossfading: green red blue
Aut.06 Fade-in/fade-out: magenta, yellow
Aut.07 Fade-in/fade-out: purple, yellow
Aut.08 Fade-in/fade-out: purple
Aut.09 Fade-in/fade-out: cyan, magenta
Aut.10 Fade-in/fade out: purple, green
Main menu Description Chapter
Static Color Colour floodlight/stroboscope 7.1
Auto
Call up show programs (Aut.)/
programmable sequences of scenes
(Pro.) 7.3
RUN Master/slave mode 7.5
DMX Address DMX start address 8.3
Personality DMX operation mode/
number of channels 8.2
ID Address Subaddress 8.3.1
EDIT Program sequences of scenes 7.4
SET
UPLD: Copy sequence of scenes to
other floodlights 7.5.1
REST: Reset settings 9.4
ID: Subaddressing 8.3.1
REGW: Colour limitation 9.2
Dim: Response time 9.3
CAL1 white 11 shades of white
or individual colours 7.2
CAL2 Parameter Set colour limitation values 9.2
KEY LOCK Key lock 9.1
WARNING The total current in the connec-
tion cables (7, 8) must not
exceed 10 A; otherwise, a
cable fire may occur due to
overload. Therefore, only inter-
connect 9 floodlights as a max-
imum.
10
GB

3) Press the button ENTER and set the follow-
ing parameters:
ƊRed : Brightness of red (0 – 255)
green: Brightness of green (0 – 255)
blue : Brightness of blue (0 – 255)
white: Brightness of white (0 – 255)
strob: Flash frequency (0 – 20 Hz)
of the stroboscope
Time : Length of scene (time),
100 = 60 seconds
Fade : Crossfading time
4) The arrow Ɗalways precedes the current
selection or the value to be set. To set the
parameter selected: Press the button ENTER
and use the button UP or DOWN to change
the setting; then press the button MENU to
return to the parameter selection and to
change another parameter.
Notes
1. The length of a scene must at least be set to the
value 001; otherwise, it is not possible to pro-
gram the subsequent scene.
2. To crossfade from one scene to the next, a cross-
fading time must be set for both scenes.
5) Once the first scene has been set, press the
button MENU repeatedly until the arrow
points to the number of scene (ƊSC01
). Use
the button UP to select the second scene,
press the button ENTER, set the scene and
then repeat this procedure for all subsequent
scenes.
6) Once the final scene has been set, store the
sequence of scenes: Immediately after set-
ting a parameter, keep the button ENTER
pressed for 5 seconds. When the button is
released, the number of the sequence
(Pro01 … Pro10) will appear on the dis-
play; if not, the button ENTER has not been
pressed long enough.
Notes
1. A sequence of scenes must have been completely
programmed before the floodlight is disconnected
from the power supply. After the floodlight has been
switched on again, the sequence of scenes cannot
be changed anymore; it can only be programmed
again. To overwrite a sequence of scenes, it is not
necessary to delete the previously programmed
scenes first.
2. When the sequence of scenes is not called up by
means of the control buttons (4) [chapter 7.3.] but via
a DMX light controller, DMX channel 2 will define the
length of a scene and DMX channel 3 will define the
crossfading time (chapter 10.1.7). Channel 2 must be
set to a DMX value > 0; otherwise, the floodlight will
remain dark.
7.5 Synchronous control of multiple
floodlights (master/slave mode)
Multiple ODW-2410RGBW can be intercon-
nected. The master unit will then synchronously
control all slave units.
1) Use the inline jack (9) of the cable DMX OUT
and the plug (6) of the cable DMX IN to con-
nect the floodlights in a chain. Please refer
to chapter 8.1, “DMX connection”, skipping
step 1.
2) The floodlight is factory-set to act as a slave
unit in master/slave mode. Thus, only the
floodlight that is to control the slave units
must be defined as a master unit.
Call up the menu item RUN to change the
setting. The display will show the following:
DMX = master unit
ƊSlave = slave unit
An arrow will point to the current setting. If
required, use the button UP or DOWN to
change the setting.
3) Set the master unit to the operation mode
desired (chapters 7.1 – 7.3).
7.5.1 Copying sequences of scenes
The programmed sequences of scenes of a unit
(chapter 7.4.) can be copied to other units. This
is useful when multiple units are to run inde-
pendently with the same sequences of scenes.
For synchronous operation on interconnected
units (chapter 7.5), it is not necessary to copy the
sequences of scenes.
Define the unit whose sequences of scenes are
to be copied as a master unit and connect it to
the other units (chapter 7.5); set up the other
units as slave units:
1) At the slave units that are to adopt all
sequences of scenes from the master unit,
call up the menu item RUN and set the option
ƊSlave.
2) At the master unit, call up the menu item SET
and the submenu item UPLD. Password:
will appear on the display.
3) Press the following buttons:
UP, DOWN, UP, DOWN.
For each press of a button, an asterisk *will
appear on the display.
4) Use the button ENTER to start copying. Dur-
ing the copy process, the slave units will light
up in yellow; they will light up in red in case of
an error; and they will light up in green once
the copy process has been successfully com-
pleted.
Note: The sequences of scenes copied will only be
available after a different sequence of scenes has been
selected or after the power supply has been interrupted.
8 Operation with
a DMX Controller
DMX (Digital Multiplex) means digital control of
multiple DMX units via a common control line.
For operation by means of a DMX light controller
(e. g. DMX-1440 or DMX-510USB from “img
Stage Line”), the floodlight is equipped with 11
DMX control channels. However, it can also be
controlled by 10, 6, 5, 4 or 3 channels, if
required. The functions of the channels and the
corresponding DMX values can be found in
chapter 10.1.
8.1 DMX connection
For DMX connection, 3-pole XLR connections
with the following pin configuration are available:
pin 1 = ground, 2 = DMX−, 3 = DMX+
For the connection, special cables for DMX sig-
nal transmission (e. g. cables of the CDMXN
series from “img Stage Line”) should be used.
For cable lengths exceeding 150 m and for the
control of more than 32 units via a single DMX
output, the insertion of a DMX level matching
amplifier (e. g. SR-103DMX from “img Stage
Line”) is recommended.
1) Connect the plug (6) of the cable DMX IN to
the inline jack of the cable supplied that is fit-
ted with the XLR plug (10), and then use the
cap nut to screw the plug-in connection
together. Using an extension cable, connect
the XLR plug to the DMX output of the light
controller or, if additional DMX-controlled
units are used, to the DMX output of another
DMX-controlled unit.
2) If additional floodlights ODW-2410RGBW are
used, use the inline jack (9) of the cable DMX
OUT to connect the first floodlight to the plug
(6) of the cable DMX IN of the second flood-
light. Proceed in the same way to connect the
second floodlight to the third one etc. until all
floodlights are connected in a chain.
If the DMX connection cables between the
floodlights are too short, use suitable extension
cables, e. g. ODP-34DMX (length: 2 m) or
ODP-34DMX/10 (length: 10 m).
To connect other DMX-controlled units, use
the adapter cable fitted with the XLR inline
jack.
3) To prevent interference in signal transmis-
sion: For long cables or for a great number of
units connected in series, terminate the DMX
output of the last DMX unit in the chain with a
120 Ω resistor (> 0.3 W): Connect an appro-
priate terminating plug (e. g. DLT-123 from
“img Stage Line”) to the XLR inline jack of the
supplied adapter cable. For outdoor installa-
tion, protect the XLR inline jack and the ter-
minating plug against humidity.
8.2 Setting the DMX operation mode
To operate the ODW-2410RGBW by means of a
light controller, set the DMX start address
(chapter 8.3) and the DMX operation mode.
The DMX operation mode selected will deter-
mine the number of the DMX channels required
(3 – 11 channels). Please refer to chapter 10.1
for the functions that can be controlled with the
respective DMX operation modes, and then,
based on this information or based on the num-
ber of the control channels available at the light
controller, select the DMX operation mode:
1) Call up the menu item Personality.
2) The following settings are available:
ƊStage 11 channels/10 channels without
subaddressing
(chapter 10.1.7)
Arc.1 3 channels
1 = red, 2 = green, 3 = blue
Ar1.d 4 channels
1 = dimmer, 2 = red, 3 = green,
4 = blue
Arc.2 4 channels
1 = red, 2 = green, 3 = blue,
4 = white
Ar2.d 5 channels
1= dimmer, 2 = red, 3 = green,
4 = blue, 5 = white
Ar2.s 6 channels
1 = dimmer, 2 = red, 3 = green,
4 = blue, 5 = white, 6 = stroboscope
HSV 3 channels
1 = colour, 2 = colour saturation,
3 = brightness
3) The arrow Ɗpoints to the current setting. Use
the button UP or DOWN to change the set-
ting.
11
GB

8.3 Setting the DMX start address
For control of the floodlight by means of a light
controller, the DMX start address for the first
DMX channel must be set. If, for example, the
address 17 is to be used for controlling the func-
tion of the first DMX channel, set the start
address at the ODW-2410RGBW to 17. All other
DMX channels of the ODW-2410RGBW will be
automatically assigned to the subsequent ad-
dresses. The following table is an example with
the start address 17:
DMX address assignment for start address 17
1) Call up the menu item DMX Address.
2) The current DMX start address will appear on
the display, e. g. Addr:001.
3) Use the button UP or DOWN to set the start
address.
8.3.1 Using subaddresses
In the 11-channel mode (Stage, chapter 8.2),
subaddresses may be used to independently con-
trol up to 66 floodlights (floodlight groups) one
after the other via a single DMX start address.
Thus, the maximum number of DMX units possi-
ble is substantially increased. DMX channel 11 is
used to select floodlights with a subaddress.
Floodlights having the same start address and dif-
ferent subaddresses may be controlled in sync if
DMX channel 11 is set to a DMX value less than
11.
1) Call up the menu item SET and the submenu
ID.
2) Use the button UP or DOWN to activate the
use of subaddresses (ID Ɗon). When sub-
addressing is deactivated (off), the flood-
light will ignore the data for channel 11.
3) Use the button MENU to return to the main
menu, and then call up the menu item ID
Address.
4) Use the button UP or DOWN to assign a sub-
addresss (1 – 66) to the floodlight.
To be able to operate the floodlight, set the DMX
channel 11 at the light controller to the DMX
value that corresponds to the subaddress of the
floodlight (chapter 10.1.7, second table).
9 Additional Functions
Note: To be able to control the floodlight by DMX after
one of the settings described in this chapter has been
made, call up one of the following menu items:
RUN: DMX,
DMX Address,
Personality,
ID Address
9.1 Key lock
A key lock may be used to protect the floodlight
against unauthorized operation. When the key
lock is activated, settings can only be made after
a specific sequence of buttons has been
pressed.
1) Call up the menu item KEY LOCK.
2) Use the button UP or DOWN to activate the
key lock (KEY Ɗon) or to deactivate it (off).
When KEY Ɗon has been selected, the key lock
function will be active as soon the display illumi-
nation extinguishes.
To operate the floodlight with the key lock acti-
vated:
1)
Press the button ENTER so that Password:
appears on the display.
2) Press the following buttons:
UP, DOWN, UP, DOWN, ENTER
For each of the first four buttons pressed, an
asterisk *will appear on the display.
3) The floodlight can now be operated as usual.
The key lock, however, will be active again
when the display illumination extinguishes
(unless the key lock has been deactivated by
means of the menu item KEY LOCK).
9.2 Limiting colours
A maximum value can be defined for the bright-
ness of the colours red, green and blue. Thus, it
is, for example, possible to compensate differ-
ences to other floodlights if they are controlled
together with the ODW-2410RGBW. The colour
limitation will apply to both independent and
DMX-controlled floodlight operation.
1) Call up the menu item CAL2 Parameter
and the submenu REGW.
2) Set the following maximum values:
ƊRed : brightness of red (0 – 255)
green: brightness of green (0 – 255)
blue : brightness of blue (0 – 255)
3) The arrow Ɗalways precedes the current
selection or the value to be set. To set the
parameter selected: Press the button ENTER
and use the button UP or DOWN to change
the setting; then press the button MENU to
return to the parameter selection and to
change another parameter.
To define if the limitation values set are to be
applied:
4) Use the button MENU to return to the main
menu, then call up the menu item SET and
the submenu REGW.
5) Use the button UP or DOWN to activate the
colour limitation function (on) or to deactivate
it (off).
9.3 Artificial response time of the LEDs
LEDs almost instantly respond to changes in
brightness setting. To simulate the response
time of conventional lamps, four different levels
of artificial response time are available for DMX
control. For the DMX operation mode Stage,
make this setting by means of DMX channel 10
(chapter 10.1.7). For the other DMX operation
modes, proceed as follows:
1) Call up the menu item SET and the submenu
Dim.
2) Use the button UP or DOWN to select the
response time level (1…4) or to deactivate
the artificial response time (off).
9.4 Resetting the floodlight
to its factory settings
The factory settings of the floodlight are as fol-
lows:
Reset values
To reset the floodlight to its factory settings:
1) Call up the menu item SET and the submenu
REST.
Password: appears on the display.
2) Press the following buttons:
UP, DOWN, UP, DOWN.
For each press of a button, an asterisk *will
appear on the display.
3) Use the button ENTER to start the reset.
Function Factory setting
Colour floodlight beam
Static Color
Red = 255, green = 255,
blue = 255, white = —,
strob = 00
Show programs
Auto Aut.01
Master/slave mode
RUN Slave
DMX start address
DMX Address Addr: 001
DMX channels
Personality Stage (10/11 channels)
Subaddress
ID Address Addr:01
Subaddress function
SET ID off
Colour limitation function
SET REGW off
LED response time
function
SET Dim
off
11 shades of white
CAL1 white
Storage location:
red, green, blue, white
WT01: 255, 220, 5, 227
WT02: 242, 222, 5, 227
WT03: 255, 255, 61, 255
WT04: 255, 255, 103, 255
WT05: 255, 255, 130, 255
WT06: 255, 255, 138, 255
WT07: 255, 255, 153, 255
WT08: 255, 255, 167, 255
WT09: 255, 255, 180, 255
WT10: 255, 255, 185, 255
WT11: 255, 255, 202, 255
Colour limitation
CAL2 Parameter
REGW Red = 255, green = 255,
blue = 255
Key lock
KEY LOCK KEY off
Number of
DMX channels
DMX addresses
assigned
Next possible
start address for the
subsequent DMX unit
317 – 19 20
417 – 20 21
517 – 21 22
617 – 22 23
11 17 – 27 28
12
GB

13
GB
All rights reserved by MONACOR ®INTERNATIONAL GmbH & Co. KG. No part of this instruction
manual may be reproduced in any form or by any means for any commercial use.
10 Specifications
Data protocol: . . . . . . . . . . DMX 512
Number of DMX channels: selectable: 3, 4,
5, 6 or 10/11
Light source: . . . . . . . . . . . 24 RGBW LEDs
Power of each LED: . . . 8 W
Beam angle: . . . . . . . . . 45°
Power supply: . . . . . . . . . . 230 V~/50 Hz
Power consumption: . . . . . 250 VA max.
Protective class of housing: IP 66
Dimensions: . . . . . . . . . . . 430 × 300 × 220 mm
Weight: . . . . . . . . . . . . . . . 11 kg
10.1DMX Functions
10.1.1 Mode Arc.1 (3 channels)
10.1.2 Mode HSV (3 channels)
10.1.3 Mode Ar1.d (4 channels)
10.1.4 Mode Arc.2 (4 channels)
10.1.5 Mode Ar2.d (5 channels)
10.1.6 Mode Ar2.s (6 channels)
DMX
channel
DMX
value Function
10 – 255 Brightness of red
20 – 255 Brightness of green
30 – 255 Brightness of blue
DMX
channel
DMX
value Function
10 – 255 Dimmer (total brightness)
20 – 255 Brightness of red
30 – 255 Brightness of green
40 – 255 Brightness of blue
50 – 255 Brightness of white
60–15 No stroboscope
16 – 255 Stroboscope 1 – 20 Hz
DMX
channel
DMX
value Function
10 – 255 Dimmer (total brightness)
20 – 255 Brightness of red
30 – 255 Brightness of green
40 – 255 Brightness of blue
50 – 255 Brightness of white
DMX
channel
DMX
value Function
10 – 255 Brightness of red
20 – 255 Brightness of green
30 – 255 Brightness of blue
40 – 255 Brightness of white
DMX
channel
DMX
value Function
10 – 255 Dimmer (total brightness)
20 – 255 Brightness of red
30 – 255 Brightness of green
40 – 255 Brightness of blue
DMX
channel
DMX
value Function
10 – 255 Colour
20 – 255 Colour saturation
30 – 255 Brightness
DMX
channel
DMX
value Function
10 – 255 Dimmer (total brightness)1
20 – 255 Brightness of red1
Length of scene, if channel 8 = 110 … 255
30 – 255 Brightness of green1
Crossfading time, if channel 8 = 110 … 255
40 – 255 Brightness of blue1
50 – 255 Brightness of white1
6
0–10 No function
11 – 20 Red Yellow
21 – 30 Yellow Green
31 – 40 Green Cyan
41 – 50 Cyan Blue
51 – 60 Blue Magenta
61 – 70 Magenta Red
71 – 80 Red Pink
81 – 90 Pink Red
91 – 100 Green Red
101 – 110 Blue Red
111 – 120 Blue Green
121 – 130 Blue Yellow
131 – 140 Cyan Red
141 – 150 Green Magenta
151 – 160 Blue Red Green
161 – 170 Cyan Yellow Magenta
171 – 180 Red Green Blue White
181 – 190 Cyan Green Yellow Red Magenta Blue
191 – 200 White, max. brightness
201 – 205 WT01 (shade of white 1, chapter 7.2)
206 – 210 WT02
211 – 215 WT03
216 – 220 WT04
221 – 225 WT05
226 – 230 WT06
231 – 235 WT07
236 – 240 WT08
241 – 245 WT09
246 – 250 WT10
251 – 255 WT11
7
0 – 255 Speed, if channell 6 = 11 … 190
0–15 No stroboscope
16 – 255 Stroboscope 1 … 20 Hz
8
0–9 No function
10 – 19 Show program Aut.01 (fig. 3)2
20–29 Show program Aut.022
30–39 Show program Aut.032
40–49 Show program Aut.042
50–59 Show program Aut.052
60–69 Show program Aut.062
70–79 Show program Aut.072
80–89 Show program Aut.082
90–99 Show program Aut.092
100 – 109 Show program Aut.102
110 – 119 Sequence of scenes Pro.01 (chapter 7.4)3
120 – 129 Sequence of scenes Pro.023
130 – 139 Sequence of scenes Pro.033
140 – 149 Sequence of scenes Pro.043
150 – 159 Sequence of scenes Pro.053
160 – 169 Sequence of scenes Pro.063
170 – 179 Sequence of scenes Pro.073
180 – 189 Sequence of scenes Pro.083
190 – 199 Sequence of scenes Pro.093
200 – 255 Sequence of scenes Pro.103
90 – 255 Speed, if channel 8 = 10 … 109 (Aut…)2
10
0–49 No artificial response time (chapter 9.3)
50–99 Response time level 14
100 – 149 Response time level 24
150 – 199 Response time level 34
200 – 255 Response time level 44
11 0 – 255 Subaddresses, following table
DMX
value
Sub-
address
DMX
value
Sub-
address
0–10 All
11 – 19 01 223 34
20 – 29 02 224 35
30 – 39 03 225 36
40 – 49 04 226 37
50 – 59 05 227 38
60 – 69 06 228 39
70 – 79 07 229 40
80 – 89 08 230 41
90 – 99 09 231 42
100 – 109 10 232 43
110 – 119 11 233 44
120 – 129 12 234 45
130 – 139 13 235 46
140 – 149 14 236 47
150 – 159 15 237 48
160 – 169 16 238 49
170 – 179 17 239 50
180 – 189 18 240 51
190 – 199 19 241 52
200 – 209 20 242 53
210 21 243 54
211 22 244 55
212 23 245 56
213 24 246 57
214 25 247 58
215 26 248 59
216 27 249 60
217 28 250 61
218 29 251 62
219 30 252 63
220 31 253 64
221 32 254 65
222 33 255 66
Channel 11:
Selection of floodlights via the
subaddress ID Address
10.1.7 Mode Stage (11 channels or 10 channels without
using subaddresses)
Additional conditions of the functions:
1If channel 6 = 0 … 10 and ch. 8 = 0 … 9
or
channel 6 = 0 … 10 and ch. 7 = 5 … 255
2If channel 7 = 0 … 4 and ch. 6 = 0 … 10
3If channel 7 = 0 … 4 and ch. 6 = 0 … 10
and ch. 2 = 1 … 255
4If channel 6 = 0 … 10 and ch. 8 = 0 … 9
and ch. 7 = 0 … 15
or
channel 6 = 0 … 10 and ch. 7 = 5 … 15
Subject to technical modification.

Projecteur DMX à LEDs
Cette notice sʼadresse à lʼinstallateur du projec-
teur et à lʼutilisateur nʼayant pas de formation
technique spécifique. Veuillez lire la notice avec
attention avant lʼinstallation y conservez-la pour
vous y reporter ultérieurement. Vous trouverez
sur la page 3, dépliable, les éléments et bran-
chements décrits.
Table des matières
1 Eléments et branchements . . . . . . . . 14
2 Conseils dʼutilisation et de sécurité 14
3 Possibilités dʼutilisation . . . . . . . . . . 14
4 Montage . . . . . . . . . . . . . . . . . . . . . . . 14
5 Mise en service . . . . . . . . . . . . . . . . . 14
5.1 Branchement de plusieurs projecteurs 15
6 Utilisation . . . . . . . . . . . . . . . . . . . . . . 15
7 Fonctionnement indépendant . . . . . 15
7.1 Projecteur de couleurs et stroboscope 15
7.2 Différentes tonalités de blanc, mémo-
risation de 11 tonalités de couleur . . . . 15
7.3 Programmes Show et
suites de scènes . . . . . . . . . . . . . . . . . 15
7.4 Programmation de suites de scènes . . 15
7.5 Gestion synchrone de plusieurs
projecteurs (mode Master/Slave) . . . . 16
7.5.1 Copie de suites de scènes . . . . . . . . . . 16
8 Fonctionnement avec
un contrôleur DMX . . . . . . . . . . . . . . . 16
8.1 Branchement DMX . . . . . . . . . . . . . . . 16
8.2 Réglage du mode de
fonctionnement DMX . . . . . . . . . . . . . . 16
8.3 Réglage de lʼadresse de
démarrage DMX . . . . . . . . . . . . . . . . . 17
8.3.1 Utilisation des sous-adresses . . . . . . . 17
9 Autres fonctions . . . . . . . . . . . . . . . . 17
9.1 Verrouillage des touches . . . . . . . . . . . 17
9.2 Limitation des couleurs . . . . . . . . . . . . 17
9.3 Inertie artificielle des LEDs . . . . . . . . . 17
9.4 Réinitialisation du projecteur sur
les réglages usine . . . . . . . . . . . . . . . . 17
10 Caractéristiques techniques . . . . . . . 18
10.1 Fonctions DMX . . . . . . . . . . . . . . . . . . 18
10.1.1 Mode Arc.1 (3 canaux) . . . . . . . . . . 18
10.1.2 Mode HSV (3 canaux) . . . . . . . . . . . . 18
10.1.3 Mode Ar1.d (4 canaux) . . . . . . . . . . 18
10.1.4 Mode Arc.2 (4 canaux) . . . . . . . . . . 18
10.1.5 Mode Ar2.d (5 canaux) . . . . . . . . . . 18
10.1.6 Mode Ar2.s (6 canaux) . . . . . . . . . . 18
10.1.7 Mode Stage (10/11 canaux) . . . . . . 18
1 Eléments et branchements
1Tête orientable du projecteur
2Vis de fixation pour la tête du projecteur
3Trous (∅11,5 mm) pour fixer deux colliers ou
crochets C pour monter lʼappareil sur un por-
tique de lumière
4Touches pour sélectionner le mode de fonc-
tionnement et modifier les réglages
5Affichage
6Fiche du cordon DMX IN pour lʼentrée signal
DMX :
En utilisant le cordon avec la fiche XLR (10),
reliez soit la fiche du cordon DMX IN à un
contrôleur soit à la sortie de signal DMX dʼun
autre appareil géré par DMX
7Fiche du cordon POWER IN pour lʼalimenta-
tion (230 V~/50 Hz) :
Soit reliez la fiche à la prise secteur en utili-
sant le cordon avec la fiche secteur (11), soit
reliez-la à la prise du cordon POWER OUT
(8) dʼun autre ODW-2410RGBW
8Prise du branchement POWER OUT pour
lʼalimentation dʼun autre ODW-2410RGBW
9Prise du branchement DMX OUT :
Sortie signal DMX pour brancher à lʼentrée
signal DMX dʼun autre ODW-2410RGBW ou
dʼun autre appareil géré par DMX via le cor-
don adaptateur livré
10 Fiche XLR de lʼentrée signal DMX
Pin 1 = masse, pin 2 = DMX−, pin 3 = DMX+
11 Fiche secteur pour brancher à une prise sec-
teur 230 V~/50 Hz
2 Conseils dʼutilisation
et de sécurité
Lʼappareil répond à toutes les directives néces-
saires de lʼUnion européenne et porte donc le
symbole .
GNe faites pas fonctionner lʼappareil ou débran-
chez-le immédiatement du secteur lorsque :
1. des dommages visibles apparaissent sur
l'appareil ou sur le cordon secteur,
2. après une chute ou un cas similaire, vous
avez un doute sur l'état de l'appareil,
3. des dysfonctionnements apparaissent.
Dans tous les cas, les dommages doivent être
réparés par un technicien spécialisé.
GTout cordon secteur endommagé ne doit être
remplacé que par un technicien spécialisé.
GNe débranchez jamais l'appareil en tirant sur
le cordon secteur ; retirez toujours le cordon
secteur en tirant la fiche.
GPour nettoyer le boîtier du projecteur et la vitre
de protection devant les LEDs, utilisez uni-
quement un produit de nettoyage doux.
GNous déclinons toute responsabilité en cas de
dommages matériels ou corporels résultants
si lʼappareil est utilisé dans un but autre que
celui pour lequel il a été conçu, sʼil nʼest pas
monté dʼune manière sûre, s'il n'est pas cor-
rectement utilisé ou sʼil nʼest pas réparé par
une personne habilitée, en outre, la garantie
deviendrait caduque.
3 Possibilités dʼutilisation
Le projecteur à LEDs permet des effets d'éclai-
rage. Il est équipé dʼun boîtier étanche en alumi-
nium (IP 66) et peut être utilisé en extérieur.
Comme source de lumière, il possède 24 LEDs
très claires, permettant de diffuser une lumière
dans les trois couleurs primaires (rouge, vert,
bleu) et blanc et dans les couleurs de mixage
correspondantes. De plus, des transitions de
couleurs et des effets stroboscope sont possi-
bles. Le projecteur est prévu pour un fonctionne-
ment via un contrôleur DMX (au choix, 11, 10, 6,
5, 4 ou 3 canaux DMX). Il peut également fonc-
tionner seul sans contrôleur.
Particularité du ODW-2410RGBW : en mode
DMX, avec 11 canaux, il permet dʼutiliser 66 sous-
adresses. Via une seule adresse de démarrage
DMX, on peut ainsi gérer de manière indépen-
dante jusquʼà 66 projecteurs (groupes de projec-
teurs), le nombre maximal possible dʼappareils
gérés par DMX augmente donc de manière
conséquente.
4 Montage
GPlacez toujours lʼappareil de telle sorte que,
pendant le fonctionnement, une circulation
suffisante dʼair soit assurée.
GLa distance avec lʼobjet à éclairer et les cloi-
sons autour doit être de 15 cm au moins.
1. Placez le projecteur sur ses pieds caout-
chouc. Pour orienter le projecteur, desserrez
les deux vis de fixation (2). Réglez lʼinclinai-
son voulue de la tête du projecteur (1) et res-
serrez les vis.
2. Le projecteur peut également être monté sur
un portique de lumière. Via les deux trous de
11,5 mm (3) dans les étriers latéraux, fixez le
projecteur avec deux colliers de montage ou
deux crochets C solides, par exemple sur
une traverse.
5 Mise en service
Reliez la fiche (7) du cordon POWER IN à la
prise du cordon livré avec la fiche secteur (11) et
vissez la connexion avec lʼécrou. Reliez la fiche
secteur à une prise 230 V~/50 Hz. Le projecteur
est alors allumé, lʼaffichage (5) indique LED
WASH LIGHTING et lʼéclairage de lʼaffichage
brille pendant quelques secondes.
ATTENTION !
Lʼappareil ne doit pas être relié via un dimmer à
lʼalimentation.
Si aucun autre projecteur nʼest relié à la prise (8)
du cordon POWER OUT et à la prise (9) du cor-
don DMX OUT, vissez impérativement les
caches de protection livrés sur les prises. Le cor-
don POWER OUT est porteur de tension sec-
teur.
AVERTISSEMENT Ne regardez jamais directe-
ment la source de lumière
pendant un certain temps,
cela pourrait causer des trou-
bles de la vision.
N'oubliez pas que des chan-
gements très rapides de
lumière peuvent déclencher
des crises d'épilepsie chez les
personnes photosensibles et
épileptiques.
AVERTISSEMENT
L'appareil doit être monté de
manière professionnelle et
sûre.
Lorsque lʼappareil est définitivement retiré
du service, vous devez le déposer dans
une usine de recyclage adaptée pour
contribuer à son élimination non polluante.
AVERTISSEMENT Lʼappareil est alimenté par une
tension dangereuse. Ne tou-
chez jamais l'intérieur de l'ap-
pareil ! Risque de décharge
électrique.
14
F
B
CH

5.1 Branchement de plusieurs
projecteurs
Si plusieurs ODW-2410RGBW sont utilisés, ils
peuvent être reliés entre eux pour lʼalimentation.
Ne reliez pas dans un premier temps le premier
projecteur à une prise secteur.
1) Via la prise (8) du cordon POWER OUT,
reliez le premier projecteur à la fiche (7) du
cordon POWER IN du deuxième projecteur.
Reliez de la même manière le deuxième pro-
jecteur au troisième et ainsi de suite jusquʼà
ce que tous les appareils soient reliés en une
chaîne.
Si les cordons DMX entre les projecteurs
sont trop courts, utilisez les cordons prolon-
gateur adéquats, par exemple ODP-34AC
(2 m) ou ODP-34AC/10 (10 m).
2) Sur le dernier projecteur, vissez le cache de
protection livré sur la prise (8) du cordon
POWER OUT. Le cordon est porteur de ten-
sion secteur.
3) Reliez la fiche secteur (11) du premier pro-
jecteur à une prise secteur 230 V~/50 Hz.
6 Utilisation
Tous les réglages de lʼappareil sʼeffectuent via
un menu sur lʼaffichage (5), via les touches
MENU, ENTER, UP et DOWN (4). Lʼappareil
affiche toujours la dernière vue de menu sélec-
tionnée. Pour modifier un réglage :
1) Appuyez sur la touche MENU jusquʼà ce que
lʼaffichage ne se modifie plus. Vous avez
alors atteint la plage supérieure du menu
(menu principal, schéma 2).
2) Avec la touche UP ou DOWN, sélectionnez le
point de menu souhaité. La flèche Ɗindique
toujours le point de menu sélectionné.
3) Pour appeler le point de menu souhaité,
appuyez sur la touche ENTER. Lʼaffichage
indique le réglage actuel (Ɗ) pour ce point de
menu.
4) Avec la touche UP ou DOWN, modifiez le
réglage.
5) Si des points de sous-menus existent, vous
pouvez les appeler avec la touche ENTER et
modifier leurs réglages avec la touche UP ou
DOWN.
6) Pour dʼautres réglages, revenez au niveau
supérieur du menu avec la touche MENU (si
besoin jusquʼau menu principal, point 1).
Si aucune touche nʼest utilisée pendant
quelques secondes, lʼéclairage de lʼaffichage
sʼéteint. Il se rallume à la prochaine activation
dʼune touche.
Effectuez les réglages pour chaque mode de
fonctionnement selon les indications des chapi-
tres 7 à 9.
Présentation du menu principal
7 Fonctionnement indépendant
7.1 Projecteur de couleurs
et stroboscope
Avec ce mode, le projecteur diffuse une couleur
réglable de manière constante. On peut en plus
activer la fonction stroboscope.
1) Appelez le point de menu Static Color.
2) Réglez les paramètres suivants :
ƊRed : luminosité rouge (0 – 255)
green: luminosité vert (0 – 255)
blue : luminosité bleu (0 – 255)
white: luminosité blanc (0 – 255)
strob: fréquence des éclaires du strobo-
scope (0 – 20 Hz)
3) La flèche Ɗest toujours devant la sélection
en cours ou la valeur à régler. Pour régler le
paramètre sélectionné, appuyez sur la
touche ENTER, modifiez la valeur avec la
touche UP ou DOWN et revenez à la sélec-
tion de paramètres avec la touche MENU
pour modifier un autre paramètre.
7.2
Différentes tonalités de blanc, mémo-
risation de 11 tonalités de couleur
Avec ce mode, le projecteur diffuse une lumière
blanche. 11 tonalités différentes de blanc sont
mémorisées, elles peuvent être modifiées. Pour
chaque tonalité de blanc, on peut régler de
manière distincte la luminosité pour les couleurs
rouge, vert, bleu et blanc pour que ce mode
puisse également être utilisé pour mémoriser 11
tonalités individuelles de couleurs.
1) Appelez le point de menu CAL1 white. La
flèche Ɗsur lʼaffichage indique un des 11
emplacements de mémoire (WT01… WT11)
et les LEDs brillent dans la tonalité de blanc
correspondante.
2) Avec la touche UP ou DOWN, sélectionnez la
tonalité de blanc souhaitée ou lʼemplacement
de mémoire dont les réglages doivent être
modifiés.
3) Pour modifier un réglage, appuyez sur la
touche ENTER après avoir sélectionné lʼem-
placement de mémoire.
4) Réglez les paramètres suivants :
ƊRed : luminosité rouge (0 – 255)
green: luminosité vert (0 – 255)
blue : luminosité bleu (0 – 255)
white: luminosité blanc (0 – 255)
5) La flèche Ɗest toujours devant la sélection
en cours ou la valeur à régler. Pour régler le
paramètre sélectionné, appuyez sur la
touche ENTER, modifiez la valeur avec la
touche UP ou DOWN et revenez à la sélec-
tion de paramètres avec la touche MENU
pour modifier un autre paramètre.
6) Pour appeler une autre tonalité de blanc ou
modifier les réglages dʼun autre emplace-
ment de mémoire, appuyez sur la touche
MENU jusquʼà ce que le numéro de lʼempla-
cement de mémoire soit à nouveau affiché.
Répétez ensuite les points 2 à 5.
7.3 Programmes Show
et suites de scènes
10 programmes Show (Aut.01 … Aut.10)
sont mémorisés dans le projecteur. De plus, 10
suites de scènes à défilement automatique
(Pro.01 … Pro.10) avec jusquʼà 30 scènes
peuvent être programmées (chapitre 7.4).
Les programmes Show et suites de scènes peu-
vent être démarrés comme suit :
1) Appelez le point de menu Auto. Avec la
flèche Ɗ, lʼaffichage indique maintenant le
dernier programme Show appelé (Aut.01
… Aut.10) ou la dernière suite de scène
appelée (Pro.01 … Pro.10).
2) Sélectionnez le programme Show ou la suite
de scènes avec la touche UP ou DOWN. Les
programmes Show défilent comme suit :
Programmes Show
7.4 Programmation de suites de scènes
Il est possible de programmer 10 suites de
scènes simplement. Une suite de scènes peut
se composer de 30 scènes au plus. Pour chaque
scène, on peut régler la couleur avec la lumino-
sité et activer la fonction stroboscope avec une
fréquence dʼéclairs variable. De plus, on peut
définir la durée de la scène et la durée de transi-
tion.
1) Appelez le point de menu EDIT. Avec la
flèche Ɗ, lʼaffichage indique la dernière suite
de scènes sélectionnée (Pro01 … Pro10).
2) Avec la touche UP ou DOWN, sélectionnez le
numéro sous lequel la suite de scène doit
être mémorisée et appuyez sur la touche
ENTER. Lʼaffichage indique le numéro de la
première scène (SC01
).
3) Appuyez sur la touche ENTER et réglez les
paramètres suivants :
ƊRed : luminosité rouge (0 – 255)
green: luminosité vert (0 – 255)
blue : luminosité bleu (0 – 255)
white: luminosité blanc (0 – 255)
strob: fréquence des éclaires du strobo-
scope (0 – 20 Hz)
Time : durée de scène (time),
100 = 60 secondes
Fade : durée de transition (fade)
4) La flèche Ɗest toujours devant la sélection
en cours ou la valeur à régler. Pour régler le
paramètre sélectionné, appuyez sur la
Programme
Show Défilement
Aut.01 stroboscope : lumière blanche
Aut.02 fondu-enchaîné : rouge, vert, bleu, blanc
Aut.03 changement couleurs :
rouge, blanc, vert, bleu
Aut.04 changement couleurs : rouge, éteint, blanc,
éteint, vert, éteint, bleu, éteint
Aut.05 transition : vert rouge bleu
Aut.06 fondu-enchaîné : magenta, jaune
Aut.07 fondu-enchaîné : violet, jaune
Aut.08 fondu-enchaîné : violet
Aut.09 fondu-enchaîné : turquoise, magenta
Aut.10 fondu-enchaîné : violet, vert
Menu principal Description chapitre
Static Color projecteur couleurs/stroboscope 7.1
Auto
programmes Show (Aut.)/
appeler suites de scènes programmables
(Pro.) 7.3
RUN mode Master/Slave 7.5
DMX Address adresse de démarrage DMX 8.3
Personality mode de fonctionnement DMX/
nombre de canaux 8.2
ID Address sous-adresse 8.3.1
EDIT programmation de suites de scènes 7.4
SET
UPLD: copie dʼune suite de scènes
sur dʼautres projecteurs 7.5.1
REST: réinitialisation des réglages 9.4
ID: utilisation des
sous-adresses 8.3.1
REGW: limitation des couleurs 9.2
Dim: inertie 9.3
CAL1 white 11 tonalités de blanc
ou couleurs individuelles 7.2
CAL2 Parameter réglage des valeurs limites
de couleur 9.2
KEY LOCK verrouillage des touches 9.1
AVERTISSEMENT Le courant total dans les
cordons de branchement
(7, 8) ne doit pas dépasser
10 A. Sinon un cordon peut
prendre feu à cause dʼune
surcharge. Cʼest pourquoi
9 projecteurs au plus peu-
vent être reliés ensemble.
15
F
B
CH

touche ENTER, modifiez la valeur avec la
touche UP ou DOWN et revenez à la sélec-
tion de paramètres avec la touche MENU
pour modifier un autre paramètre.
Conseils
1. La durée dʼune scène doit être réglée sur la
valeur 001 au moins sinon, la scène suivante ne
peut pas être programmée.
2. Si vous voulez faire un fondu-enchaîné dʼune
scène vers la suivante, il faut régler une durée de
transition pour les deux scènes.
5) Une fois la première scène réglée, appuyez
sur la touche MENU jusquʼà ce que la flèche
soit à nouveau devant le numéro de la scène
(ƊSC01
). Avec la touche UP, sélectionnez la
deuxième scène, appuyez sur la touche
ENTER, réglez la scène et répétez le proces-
sus pour toutes les scènes suivantes.
6) Une fois la dernière scène réglée, mémorisez
la suite de scènes : juste après le réglage
dʼun paramètre, maintenez la touche ENTER
enfoncée 5 secondes. Lorsque vous relâchez
la touche, lʼaffichage doit indiquer le numéro
de la suite de scènes (Pro01 … Pro10);si
ce nʼest pas le cas, la touche ENTER nʼa pas
été enfoncée assez longtemps.
Conseils
1. Une suite de scènes doit être entièrement program-
mée avant de débrancher le projecteur. Lorsque
vous le rallumez, on ne peut plus modifier de suite de
scènes ; elle peut uniquement être reprogrammée.
Pour écraser une suite de scènes, il nʼest pas néces-
saire dʼeffacer les scènes préalablement program-
mées.
2. Si les suites de scènes ne sont pas appelées avec
les touches de commande (4) (chapitre 7.3), mais via
un contrôleur DMX, le canal DMX 2 détermine la
durée de la scène et le canal 3 la durée de transition
(chapitre 10.1.7). Le canal 2 doit être réglé sur une
valeur DMX > 0 sinon, le projecteur reste sombre.
7.5 Gestion synchrone de plusieurs
projecteurs (mode Master/Slave)
Il est possible de relier ensemble plusieurs
ODW-2410RGBW. Lʼappareil principal (Master)
peut gérer de manière synchrone tous les autres
appareils auxiliaires (Slave).
1) Reliez les projecteurs via la prise (9) du cor-
don DMX OUT et la fiche (6) du cordon DMX
IN pour former une chaîne. Voir chapitre 8.1
“Branchement DMX”, sans tenir compte
cependant du point 1.
2) Le projecteur est réglé, au sortir dʼusine,
comme appareil auxiliaire pour le mode Mas-
ter/Slave. Il faut uniquement régler le projec-
teur qui doit gérer les appareils auxiliaires
comme appareil principal.
Pour modifier le réglage, appelez le point de
menu RUN. Lʼaffichage indique :
DMX = appareil principal
ƊSlave = appareil auxiliaire
Le réglage actuel est indiqué par la flèche. Si
besoin, modifiez le réglage avec la touche
UP ou DOWN.
3) Réglez lʼappareil principal sur le mode de fonc-
tionnement souhaité (chapitre 7.1 – 7.3).
7.5.1 Copie de suites de scènes
Les suites de scènes programmées dʼun appa-
reil (chapitre 7.4) peuvent être transmises vers
les autres appareils. Cela est utile si plusieurs
appareils doivent fonctionner de manière auto-
nome avec les mêmes suites de scènes. Pour
un fonctionnement synchrone sur les appareils
reliés (chapitre 7.5), la copie des suites de
scènes nʼest pas nécessaire.
Définissez lʼappareil dont les suites de scènes
doivent être copiées comme appareil principal et
reliez-le avec les autres appareils (chapi-
tre 7.5) ; réglez-les comme appareils auxiliaires :
1) Sur les appareils auxiliaires qui doivent
reprendre toutes les suites de scènes de lʼap-
pareil principal, appelez le point de menu
RUN et réglez lʼoption ƊSlave.
2) Sur lʼappareil principal, appelez le point de
menu SET et le point de sous-menu UPLD.
Lʼaffichage indique Password:.
3) Appuyez sur les touches suivantes :
UP, DOWN, UP, DOWN.
Un astérisque *est affiché pour chacune
touche activée.
4) Démarrez le processus de copie avec la
touche ENTER. Pendant la copie, les appa-
reils auxiliaires brillent en jaune, en cas dʼer-
reurs, ils brillent en rouge, et une fois la copie
réalisée, en vert.
Conseil : les suites de scènes copiées ne sont dispo-
nibles quʼune fois que vous avez commuté sur une
autre suite de scène ou que lʼalimentation est coupée.
8 Fonctionnement avec
un contrôleur DMX
DMX est l'abréviation de Digital Multiplexet
signifie transmission digitale de plusieurs appa-
reils DMX via un câble commun de commande.
Pour une gestion via un contrôleur DMX (par
exemple DMX-1440 ou DMX-510USB de “img
Stage Line”), le projecteur dispose de 11 canaux
de commande DMX. Selon les besoins, il peut
être géré uniquement via 10, 6, 5, 4 ou 3 canaux.
Vous trouverez les fonctions des canaux et les
valeurs DMX dans le chapitre 10.1.
8.1 Branchement DMX
Pour la connexion DMX, des branchements XLR
3 pôles avec la configuration de contact suivante
sont prévus :
Pin 1 = masse, pin 2 = DMX−, pin 3 = DMX+
Pour le branchement, il est recommandé d'utili-
ser des câbles spécifiques pour la transmission
de signaux DMX (par exemple câbles de la série
CDMXN de “img Stage Line”). Pour des lon-
gueurs de liaison dépassant 150 m et pour une
gestion de plus de 32 appareils via une seule
sortie DMX, il est recommandé d'insérer un
amplificateur DMX de signal (p. ex. SR-103DMX
de “img Stage Line”).
1) Branchez la fiche (6) du cordon DMX IN dans
la prise du cordon livré avec la fiche XLR (10)
et vissez la connexion avec lʼécrou. Reliez la
fiche XLR via un cordon prolongateur à la sor-
tie DMX du contrôleur ou, si dʼautres appa-
reils gérés par DMX sont utilisés, à la sortie
DMX dʼun autre appareil géré par DMX.
2) Si dʼautres projecteurs ODW-2410RGBW
sont utilisés, reliez le premier projecteur via la
prise (9) du cordon DMX OUT à la fiche (6) du
cordon DMX IN du deuxième projecteur.
Reliez de la même manière le deuxième pro-
jecteur au troisième et ainsi de suite de
manière à ce que tous les appareils forment
une chaîne.
Si les cordons DMX entre les projecteurs
sont trop courts, utilisez les cordons prolon-
gateur adéquats, par exemple
ODP-34DMX (longueur 2 m) ou
ODP-34DMX/10 (longueur 10 m).
Pour brancher un autre appareil géré par
DMX, utilisez le cordon adaptateur avec la
prise XLR.
3) Pour éviter les perturbations lors de la trans-
mission du signal, il convient, pour de longs
câbles ou pour une multitude dʼappareils
branchés les uns derrière les autres, de ter-
miner la sortie DMX du dernier appareil DMX
de la chaîne avec une résistance 120 Ω
(> 0,3 W) : mettez un bouchon (par exemple
DLT-123 de “img Stage Line”) dans la prise
XLR du cordon adaptateur livré. Pour une
installation en extérieur, il faut protéger la
prise XLR et le bouchon de lʼhumidité.
8.2 Réglage du mode de
fonctionnement DMX
Pour pouvoir utiliser le ODW-2410RGBW avec
un contrôleur, il faut régler lʼadresse de démar-
rage DMX (chapitre 8.3) et le mode de fonc-
tionnement DMX. Le nombre de canaux DMX
nécessaires (3 à 11 canaux) est fonction du
mode de fonctionnement sélectionné. Reportez-
vous au chapitre 10.1 pour plus dʼinformations
sur les fonctions gérables dans chaque mode de
fonctionnement DMX et sélectionnez ensuite, ou
selon le nombre de canaux de commande dis-
ponibles sur le contrôleur, le mode de fonction-
nement DMX :
1) Appelez le point de menu Personality.
2) Les réglages suivants sont disponibles :
ƊStage 11 canaux/10 canaux sans utilisa-
tion de sous-adresses
(chapitre 10.1.7)
Arc.1 3 canaux
1 = rouge, 2 = vert, 3 = bleu
Ar1.d 4 canaux
1 = dimmer, 2 = rouge, 3 = vert,
4 = bleu
Arc.2 4 canaux
1 = rouge, 2 = vert, 3 = bleu,
4 = blanc
Ar2.d 5 canaux
1 = dimmer, 2 = rouge, 3 = vert,
4 = bleu, 5 = blanc
Ar2.s 6 canaux
1 = dimmer, 2 = rouge, 3 = vert,
4 = bleu, 5 = blanc, 6 = stroboscope
HSV 3 canaux
1 = couleur, 2 = saturation des cou-
leurs, 3 = luminosité
3) La flèche Ɗindique le réglage en cours. Avec
la touche UP ou DOWN, modifiez le réglage.
16
F
B
CH

8.3 Réglage de lʼadresse de
démarrage DMX
Pour pouvoir utiliser le projecteur avec un
contrôleur, il faut régler lʼadresse de démarrage
DMX pour le premier canal DMX. Si par exemple
sur le contrôleur DMX, lʼadresse 17 est prévue
pour gérer le fonctionnement du premier canal
DMX, réglez sur le ODW-2410RGBW lʼadresse
de démarrage 17. Les autres canaux DMX du
ODW-2410RGBW sont automatiquement attri-
bués aux adresses suivantes. Ci-dessous un
exemple avec lʼadresse de démarrage 17 :
Configuration des adresses DMX
si on utilise lʼadresse de démarrage 17
1) Appelez le point de menu DMX Address.
2) Sur lʼaffichage, lʼadresse de démarrage DMX
actuelle est indiquée, p. ex. Addr:001.
3) Avec la touche UP ou DOWN, réglez
lʼadresse de démarrage.
8.3.1 Utilisation des sous-adresses
Avec le mode de fonctionnement 11 canaux
(Stage, chapitre 8.2), on peut gérer jusquʼà
66 projecteurs (groupes de projecteurs) via une
seule adresse de démarrage DMX indépendam-
ment les uns des autres en utilisant les sous-
adresses. Le nombre maximal possible dʼappa-
reils gérés par DMX augmente donc de manière
conséquente. La sélection des projecteurs avec
une sous-adresse se fait via le canal DMX 11.
Les projecteurs avec la même adresse de
démarrage et des sous-adresses différentes
peuvent être gérés de manière synchrone si le
canal DMX 11 est réglé sur une valeur DMX infé-
rieure à 11.
1) Appelez le point de menu SET et le sous-
menu ID.
2) Avec la touche UP ou DOWN, activez lʼutili-
sation de la sous-adresse (ID Ɗon). Si la
fonction des sous-adresses nʼest pas activée
(off), les données pour le canal 11 sont
ignorées par le projecteur.
3) Avec la touche MENU, revenez au menu
principal et appelez le point de menu ID
Address.
4) Avec la touche UP ou DOWN, attribuez une
sous-adresse (1 – 66) au projecteur.
Pour pouvoir utiliser le projecteur, réglez sur le
contrôleur le canal DMX 11 sur la valeur DMX
qui correspond à la sous-adresse du projecteur
(chapitre 10.1.7, second tableau).
9 Autres fonctions
Conseil : pour pouvoir gérer le projecteur par DMX,
une fois un réglage présenté dans ce chapitre effectué,
appelez un des points de menu suivants :
RUN: DMX,
DMX Address,
Personality,
ID Address
9.1 Verrouillage des touches
Il est possible dʼactiver le verrouillage des
touches contre toute utilisation non autorisée.
Lorsque le verrouillage est activé, les réglages
ne peuvent être effectués quʼaprès la saisie
dʼune suite de touches donnée.
1) Appelez le point de menu KEY LOCK.
2) Avec la touche UP ou DOWN, activez le ver-
rouillage des touches (KEY Ɗon) ou désacti-
vez-le (off).
Si KEY Ɗon est sélectionné, le verrouillage des
touches est activé dès que lʼéclairage de lʼaffi-
chage sʼéteint.
Pour utiliser lʼappareil lorsque le verrouillage des
touches est activé :
1) Appuyez sur la touche ENTER jusquʼà ce
que Password: soit visible sur lʼaffichage.
2) Tapez sur les touches dans lʼordre suivant :
UP, DOWN, UP, DOWN, ENTER
Un astérisque *est affiché pour les quatre
premières saisies.
3) Le projecteur peut être maintenant utilisé nor-
malement. Une fois lʼéclairage de lʼaffichage
éteint, le verrouillage des touches est à nou-
veau activé sʼil nʼa pas été désactivé par le
point de menu KEY LOCK.
9.2 Limitation des couleurs
Vous pouvez limiter les valeurs de luminosité
des couleurs rouge, vert et bleu à une valeur
maximale. On peut ainsi compenser par exem-
ple des différences avec les autres projecteurs
sʼils sont gérés ensemble avec le ODW-
2410RGBW. La limitation est activée sur le
mode de fonctionnement indépendant et sur la
gestion DMX du projecteur.
1) Appelez le point de menu CAL2 Parame-
ter et le sous-menu REGW.
2) Réglez les valeurs maximales suivantes :
ƊRed : luminosité rouge (0 – 255)
green: luminosité vert (0 – 255)
blue : luminosité bleu (0 – 255)
3) La flèche Ɗest toujours devant la sélection
en cours ou la valeur à régler. Pour régler le
paramètre sélectionné, appuyez sur la
touche ENTER, modifiez la valeur avec la
touche UP ou DOWN et revenez à la sélec-
tion de paramètres avec la touche MENU
pour modifier un autre paramètre.
Pour définir si les valeurs limites réglées doivent
être prises en compte :
4) Avec la touche MENU, revenez au menu
principal et appelez le point de menu SET et
le sous-menu REGW.
5) Avec la touche UP ou DOWN, réglez la limi-
tation des couleurs (on) ou désactivez-la
(off).
9.3 Inertie artificielle des LEDs
Les LEDs réagissent très rapidement à une
modification du réglage de la luminosité. Pour
simuler lʼinertie des lampes classiques, on peut
régler lʻinertie artificielle en 4 niveaux pour la
gestion DMX. Avec le mode Stage de fonction-
nement DMX, ce réglage se fait via le canal DMX
10 (chapitre 10.1.7). Pour les autres modes
de fonctionnement DMX, effectuez le réglage
comme suit :
1) Appelez le point de menu SET et le sous-
menu Dim.
2) Avec la touche UP ou DOWN, sélectionnez le
niveau de lʼinertie (1…4) ou désactivez
lʼinertie artificielle (off).
9.4 Réinitialisation du projecteur sur
les réglages usine
Le projecteur est réglé comme suit au sortir
dʼusine :
Valeurs de réinitialisation
Pour réinitialiser le projecteur sur les réglages
usine :
1) Appelez le point de menu SET et le sous-
menu REST.
Lʼaffichage indique Password:.
2) Appuyez sur les touches suivantes :
UP, DOWN, UP, DOWN.
Un astérisque *est affiché pour chacune
touche activée.
3) Démarrez la réinitialisation avec la touche
ENTER.
Fonction Réglage usine
projecteur couleur
Static Color
Red = 255, green = 255,
blue = 255, white = —,
strob = 00
programmes Show
Auto Aut.01
mode Master/Slave
RUN Slave
adresse de
démarrage DMX
DMX Address
Addr: 001
canaux DMX
Personality Stage (10/11 canaux)
sous-adresse
ID Address Addr:01
fonction sous-adresse
SET ID off (désactivé)
fonction limitation
des couleurs
SET REGW
off (désactivé)
fonction inertie des LEDs
SET Dim off (désactivé)
11 tonalités de blanc
CAL1 white
emplacement mémoire :
rouge, vert, bleu, blanc
WT01: 255, 220, 5, 227
WT02: 242, 222, 5, 227
WT03: 255, 255, 61, 255
WT04: 255, 255, 103, 255
WT05: 255, 255, 130, 255
WT06: 255, 255, 138, 255
WT07: 255, 255, 153, 255
WT08: 255, 255, 167, 255
WT09: 255, 255, 180, 255
WT10: 255, 255, 185, 255
WT11: 255, 255, 202, 255
limitation des couleurs
CAL2 Parameter
REGW Red = 255, green = 255,
blue = 255
verrouillage des touches
KEY LOCK KEY off (désactivé)
Nombre de
canaux DMX
Adresses DMX
configurées
Prochaine adresse
de démarrage pour
lʼappareil DMX suivant
317 – 19 20
417 – 20 21
517 – 21 22
617 – 22 23
11 17 – 27 28
17
F
B
CH

18
F
B
CH
Notice dʼutilisation protégée par le copyright de MONACOR ®INTERNATIONAL GmbH & Co. KG.
Toute reproduction même partielle à des fins commerciales est interdite.
10 Caractéristiques techniques
Protocole données : . . . . . DMX 512
Nombre de canaux DMX : sélectionnable entre
3, 4, 5, 6 ou 10/11
Source de lumière : . . . 24 LEDs RGBW
Puissance par LED : . . 8 W
Angle de rayonnement : . 45°
Alimentation : . . . . . . . . . . 230 V~/50 Hz
Consommation : . . . . . . . 250 VA max.
Type protection boîtier : . . IP 66
Dimensions : . . . . . . . . . . 430 × 300 × 220 mm
Poids : . . . . . . . . . . . . . . . 11 kg
10.1Fonctions DMX
10.1.1 Mode Arc.1 (3 canaux)
10.1.2 Mode HSV (3 canaux)
10.1.3 Mode Ar1.d (4 canaux)
10.1.4 Mode Arc.2 (4 canaux)
10.1.5 Mode Ar2.d (5 canaux)
10.1.6 Mode Ar2.s (6 canaux)
Canal
DMX
Valeur
DMX Fonction
10 – 255 luminosité rouge
20 – 255 luminosité vert
30 – 255 luminosité bleu
Canal
DMX
Valeur
DMX Fonction
10 – 255 dimmer (luminosité globale)
20 – 255 luminosité rouge
30 – 255 luminosité vert
40 – 255 luminosité bleu
50 – 255 luminosité blanc
60–15 pas de stroboscope
16 – 255 stroboscope 1 – 20 Hz
Canal
DMX
Valeur
DMX Fonction
10 – 255 dimmer (luminosité globale)
20 – 255 luminosité rouge
30 – 255 luminosité vert
40 – 255 luminosité bleu
50 – 255 luminosité blanc
Canal
DMX
Valeur
DMX Fonction
10 – 255 luminosité rouge
20 – 255 luminosité vert
30 – 255 luminosité bleu
40 – 255 luminosité blanc
Canal
DMX
Valeur
DMX Fonction
10 – 255 dimmer (luminosité globale)
20 – 255 luminosité rouge
30 – 255 luminosité vert
40 – 255 luminosité bleu
Canal
DMX
Valeur
DMX Fonction
10 – 255 couleur
20 – 255 saturation couleurs
30 – 255 luminosité
Canal
DMX
Valeur
DMX Fonction
10 – 255 dimmer (luminosité globale)1
20 – 255 luminosité rouge1
durée de scène si canal 8 = 110 … 255
30 – 255 luminosité vert1
durée de transition si canal 8 = 110 … 255
40 – 255 luminosité bleu1
50 – 255 luminosité blanc1
6
0–10 sans fonction
11 – 20 rouge jaune
21 – 30 jaune vert
31 – 40 vert turquoise
41 – 50 turquoise bleu
51 – 60 bleu magenta
61 – 70 magenta rouge
71 – 80 rouge rose
81 – 90 rose rouge
91 – 100 vert rouge
101 – 110 bleu rouge
111 – 120 bleu vert
121 – 130 bleu jaune
131 – 140 turquoise rouge
141 – 150 vert magenta
151 – 160 bleu rouge vert
161 – 170 turquoise jaune magenta
171 – 180 rouge vert bleu blanc
181 – 190 turquoise vert jaune rouge magenta bleu
191 – 200 blanc, luminosité max.
201 – 205 WT01 (tonalité de blanc 1, chapitre 7.2)
206 – 210 WT02
211 – 215 WT03
216 – 220 WT04
221 – 225 WT05
226 – 230 WT06
231 – 235 WT07
236 – 240 WT08
241 – 245 WT09
246 – 250 WT10
251 – 255 WT11
7
0 – 255 vitesse si canal 6 = 11 … 190
0–15 pas de stroboscope
16 – 255 stroboscope 1 … 20 Hz
8
0–9 sans fonction
10 – 19 programme Show Aut.01 (schéma 3)2
20–29 programme Show Aut.022
30–39 programme Show Aut.032
40–49 programme Show Aut.042
50–59 programme Show Aut.052
60–69 programme Show Aut.062
70–79 programme Show Aut.072
80–89 programme Show Aut.082
90–99 programme Show Aut.092
100 – 109 programme Show Aut.102
110 – 119 suite de scènes Pro.01 (chapitre. 7.4)3
120 – 129 suite de scènes Pro.023
130 – 139 suite de scènes Pro.033
140 – 149 suite de scènes Pro.043
150 – 159 suite de scènes Pro.053
160 – 169 suite de scènes Pro.063
170 – 179 suite de scènes Pro.073
180 – 189 suite de scènes Pro.083
190 – 199 suite de scènes Pro.093
200 – 255 suite de scènes Pro.103
90 – 255 vitesse si canal 8 = 10… 109 (Aut…)2
10
0–49 pas dʼinertie artificielle (chapitre 9.3)
50–99 niveau inertie 14
100 – 149 niveau inertie 24
150 – 199 niveau inertie 34
200 – 255 niveau inertie 44
11 0 – 255 sous-adresses, tableau suivant
Valeur
DMX
Sous-
adresse
Valeur
DMX
Sous-
adresse
0–10 tous
11 – 19 01 223 34
20 – 29 02 224 35
30 – 39 03 225 36
40 – 49 04 226 37
50 – 59 05 227 38
60 – 69 06 228 39
70 – 79 07 229 40
80 – 89 08 230 41
90 – 99 09 231 42
100 – 109 10 232 43
110 – 119 11 233 44
120 – 129 12 234 45
130 – 139 13 235 46
140 – 149 14 236 47
150 – 159 15 237 48
160 – 169 16 238 49
170 – 179 17 239 50
180 – 189 18 240 51
190 – 199 19 241 52
200 – 209 20 242 53
210 21 243 54
211 22 244 55
212 23 245 56
213 24 246 57
214 25 247 58
215 26 248 59
216 27 249 60
217 28 250 61
218 29 251 62
219 30 252 63
220 31 253 64
221 32 254 65
222 33 255 66
Canal 11:
Nombre de projecteurs via la
sous-adresse ID Address
10.1.7 Mode Stage (11 canaux ou 10 canaux sans
utiliser les sous-adresses)
Conditions supplémentaires des fonctions :
1si canal 6 = 0 … 10 et canal 8 = 0 … 9
ou
canal 6 = 0 … 10 et canal 7 = 5 … 255
2si canal 7 = 0 … 4 et canal 6 = 0 … 10
3si canal 7 = 0 … 4 et canal 6 = 0 … 10
et canal 2 = 1 … 255
4si canal 6 = 0 … 10 et canal 8 = 0 … 9
et canal 7 = 0 … 15
ou
canal 6 = 0 … 10 et canal 7 = 5 … 15
Tout droit de modification réservé.

19
I
Proiettore DMX a LED
Queste istruzioni sono rivolte all'installatore del
proiettore nonché all'utente senza conoscenze
tecniche. Vi preghiamo di leggerle attentamente
prima dell'installazione e di conservarle per un
uso futuro. A pagina 3, se aperta completa-
mente, vedrete tutti gli elementi di comando e i
collegamenti descritti.
Indice
1 Elementi di comando e collegamenti 19
2 Avvertenze per l'uso sicuro . . . . . . . 19
3 Possibilità d'impiego . . . . . . . . . . . . . 19
4 Montaggio . . . . . . . . . . . . . . . . . . . . . . 19
5 Messa in funzione . . . . . . . . . . . . . . . 19
5.1 Collegamento di più proiettori . . . . . . . 20
6 Funzionamento . . . . . . . . . . . . . . . . . 20
7 Funzionamento autonomo . . . . . . . . 20
7.1 Proiettore di colori e stroboscopio . . . . 20
7.2 Varie tonalità del bianco,
Memorizzare 11 tonalità cromatiche . . 20
7.3 Programmi show e
sequenze di scenari . . . . . . . . . . . . . . . 20
7.4 Programmare sequenze di scenari . . . 20
7.5 Comando sincronizzato di più
proiettori (modo master-slave) . . . . . . . 21
7.5.1 Copiare sequenze di scenari . . . . . . . . 21
8 Funzionamento con un'unità di
comando DMX . . . . . . . . . . . . . . . . . . 21
8.1 Collegamento DMX . . . . . . . . . . . . . . . 21
8.2 Impostare il modo di
funzionamento DMX . . . . . . . . . . . . . . 21
8.3 Impostare l'indirizzo di start DMX . . . . 22
8.3.1 Uso dei sottoindirizzi . . . . . . . . . . . . . . 22
9 Ulteriori funzioni . . . . . . . . . . . . . . . . 22
9.1 Blocco tasti . . . . . . . . . . . . . . . . . . . . . 22
9.2 Limitare i colori . . . . . . . . . . . . . . . . . . . 22
9.3 Inerzia artificiale dei LED . . . . . . . . . . . 22
9.4 Resettare il proiettore alle
impostazioni della fabbrica . . . . . . . . . 22
10 Dati tecnici . . . . . . . . . . . . . . . . . . . . . 23
10.1 Funzioni DMX . . . . . . . . . . . . . . . . . . . 23
10.1.1 Modo Arc.1 (3 canali) . . . . . . . . . . . 23
10.1.2 Modo HSV (3 canali) . . . . . . . . . . . . . 23
10.1.3 Modo Ar1.d (4 canali) . . . . . . . . . . . 23
10.1.4 Modo Arc.2 (4 canali) . . . . . . . . . . . 23
10.1.5 Modo Ar2.d (5 canali) . . . . . . . . . . . 23
10.1.6 Modo Ar2.s (6 canali) . . . . . . . . . . . 23
10.1.7 Modo Stage (10/11 canali) . . . . . . . 23
1 Elementi di comando
e collegamenti
1Testa inclinabile del proiettore
2Viti di bloccaggio per la testa del proiettore
3Fori (∅11,5 mm) per il fissaggio di due fas-
cette o ganci a C per il montaggio di sistemi
portalampade
4Tasti per scegliere il modo di funzionamento
e per modificare delle impostazioni
5Display
6Connettore del cavo DMX IN per l'ingresso
del segnale DMX:
Collegarlo, per mezzo del cavo con il connet-
tore XLR (10), con un apparecchio di
comando luce oppure con l'uscita del seg-
nale DMX di un ulteriore apparecchi con
comando DMX.
7Connettore del cavo POWER IN per l'alimen-
tazione (230 V~/50 Hz):
Collegarlo con una presa di rete per mezzo
del cavo con il connettore (11) oppure colle-
garlo con la presa del cavo POWER OUT (8)
di un ulteriore ODW-2410RGBW.
8Presa del contatto POWER OUT per l'ali-
mentazione di un ulteriore ODW-2410RGBW
9Presa del contatto DMX OUT:
Uscita del segnale DMX per il collegamento
con l'ingresso del segnale DMX di un ulte-
riore ODW-2410RGBW o di un altro appa-
recchio con comando DMX per mezzo del
cavo adattatore in dotazione
10 Connettore XLR dell'ingresso del segnale
DMX
pin 1 = massa, pin 2 = DMX−, pin 3 = DMX+
11 Spina per il collegamento con una presa di
rete (230 V~/50 Hz)
2 Avvertenze per l'uso sicuro
Questʼapparecchio è conforme a tutte le direttive
rilevanti dellʼUE e pertanto porta la sigla .
GNon mettere in funzione lʼapparecchio e stac-
carlo subito dalla rete se:
1. lʼapparecchio o il cavo rete presentano dei
danni visibili;
2. dopo una caduta o dopo eventi simili sus-
siste il sospetto di un difetto;
3. lʼapparecchio non funziona correttamente.
Per la riparazione rivolgersi sempre ad unʼof-
ficina competente.
GIl cavo rete, se danneggiato, deve essere sos-
tituito solo da un laboratorio specializzato.
GStaccare il cavo rete afferrando la spina,
senza tirare il cavo.
GPer la pulizia del contenitore del proiettore e
del vetro protettivo davanti ai LED usare solo
un detergente delicato.
GNel caso dʼuso improprio, di montaggio non
sicuro, dʼimpiego scorretto o di riparazione non
a regola dʼarte dell'apparecchio, non si assume
nessuna responsabilità per eventuali danni
consequenziali a persone o a cose e non si
assume nessuna garanzia per l'apparecchio.
3 Possibilità d'impiego
Questo proiettore a LED serve per un'illumina-
zione a effetti. Il proiettore è equipaggiato con un
contenitore d'alluminio resistente alle intemperie
(IP 66) e pertanto è utilizzabile anche all'esterno.
Come fonte di luce servono 24 LED estrema-
mente luminosi. Con i LED è possibile irradiare
la luce nei tre colori fondamentali (rosso, verde e
blu) oltre alla luce bianca nonché nei relativi
colori miscelati. Inoltre si possono realizzare
delle dissolvenze fra i colori e effetti strobosco-
pici. Il proiettore è previsto per il comando tra-
mite un'unità DMX di comando luce (a scelta 11,
10, 6, 5, 4 o 3 canali di comando DMX). Tuttavia
può essere usato anche in modo autonomo,
senza unità di comando.
Come particolarità, il proiettore offre, con il
funzionamento DMX a 11 canali, l'uso di 66 sot-
toindirizzi. Così, con un solo indirizzo di start
DMX, si possono gestire in modo indipendente
fino a 66 (gruppi di) proiettori, e il numero mas-
simo possibile di apparecchi con comando DMX
è notevolmente aumentato.
4 Montaggio
GPosizionare l'apparecchio sempre in modo
tale che sia garantita una circolazione suffi-
ciente dell'aria.
GLa distanza dall'oggetto irradiato e da pareti
vicini non deve essere inferiore a 15 cm.
1. Sistemare il proiettore sui suoi piedini di
gomma. Per orientarlo, allentare le due viti di
bloccaggio (2). Impostare l'inclinazione desi-
derata della testa (1) del proiettore e strin-
gere nuovamente le viti.
2. In alternativa, il proiettore può essere mon-
tato su un sistema di portalampade. Fissare il
proiettore p. es. a una traversa, tramite i due
fori di 11,5 mm (3) negli angoli laterali per
mezzo di due fascette di montaggio oppure
con due ganci robusti a C.
5 Messa in funzione
Inserire il connettore (7) del cavo POWER IN
nella presa del cavo con la spina di rete (11) in
dotazione e assicurare il collegamento con il
dado di accoppiamento. Inserire la spina in una
presa di rete (230 V~/50 Hz). In questo modo,
il proiettore è acceso. Il display (5) indica
LED WASH LIGHTING e per alcuni secondi è
accesa l'illuminazione del display.
ATTENZIONE!
Il proiettore non deve essere collegato alla rete
per mezzo di un dimmer!
Se alla presa (8) del cavo POWER OUT e alla
presa (9) del cavo DMX OUT non è collegato
nessun altro proiettore, avvitare assolutamente
le protezioni in dotazione sulle prese. Il cavo
POWER OUT è sotto tensione.
AVVERTIMENTO Non guardare direttamente in
modo prolungato nei LED per
escludere possibili danni agli
occhi.
Tenete presente che i veloci
cambi di luce possono provo-
care attacchi d'epilessia presso
persone fotosensibili o epilettici!
AVVERTIMENTO
Il proiettore deve essere montato
a regola d'arte e in modo sicuro.
Se si desidera eliminare l'apparecchio
definitivamente, consegnarlo per lo
smaltimento ad un'istituzione locale per
il riciclaggio.
AVVERTIMENTO Lʼapparecchio è alimentato con
pericolosa tensione di rete. Non
intervenire mai personalmente
al suo interno. La manipola-
zione scorretta può provocare
delle scariche elettriche perico-
lose.

20
I5.1 Collegamento di più proiettori
Se sono impiegati più ODW-2410RGBW, è pos-
sibile collegare i proiettori per un'alimentazione
comune. Per il momento, non collegare ancora il
primo proiettore con la presa di rete.
1) Collegare il primo proiettore con il connettore
(7) del cavo POWER IN del secondo proiet-
tore tramite la presa (8) del cavo POWER
OUT. Collegare nello stesso modo il secondo
proiettore con il terzo e via dicendo finché
tutti gli apparecchi sono collegati formando
una catena.
Se i cavi di collegamento fra i proiettori
dovessero essere troppo corti, utilizzare delle
prolunghe adatte, p. es. ODP-34AC (2 m) o
ODP-34AC/10 (10 m).
2) Sull'ultimo proiettore, avvitare sulla presa (8)
la protezione in dotazione. Il cavo è sotto ten-
sione.
3) Inserire la spina di rete (11) del primo proiet-
tore in una presa di rete (230 V~/50 Hz).
6 Funzionamento
Tutte le impostazioni del proiettore si fanno tra-
mite un menu sul display (5) con l'aiuto dei tasti
MENU, ENTER, UP e DOWN (4). Il proiettore
mantiene sempre l'ultima vista del menu selezio-
nato. Per modificare un'impostazione:
1) Premere il tasto MENU tante volte finché l'in-
dicazione sul display non cambia più. In questo
modo è stato raggiunto il livello superiore del
menu (menu principale, figura 2).
2) Con il tasto UP o DOWN scegliere la voce del
menu. La freccia Ɗindica sempre la voce del
menu selezionata.
3) Per aprire la voce del menu premere il tasto
ENTER. Il display indica ora l'impostazione
attuale (Ɗ) per quella voce del menu.
4) Con il tasto UP o DOWN cambiare l'imposta-
zione.
5) Se esistono delle voci di un sottomenu, pos-
sono essere aperte con il tasto ENTER, e i
suoi valori possono essere modificati con il
tasto UP o DOWN.
6) Per ulteriori impostazioni, con il tasto MENU
ritornare a un livello superiore del menu
(eventualmente fino al menu principale,
punto 1).
Se per alcuni secondi non si preme nessun
tasto, l'illuminazione del display si spegne. Alla
prossima pressione si riaccende.
Seguendo i capitoli 7 a 9 effettuare le imposta-
zioni per il relativo modo di funzionamento.
Menu principale
7 Funzionamento autonomo
7.1 Proiettore di colori e stroboscopio
In questo modo, il proiettore irradia costante-
mente un solo colore impostabile. In più si può
attivare la funzione stroboscopio.
1) Aprire la voce del menu Static Color.
2) Impostare i parametri seguenti:
ƊRed : Luminosità rosso (0 – 255)
green:Luminosità verde (0 – 255)
blue : Luminosità blu (0 – 255)
white: Luminosità bianco (0 – 255)
strob: Frequenza lampi (0 – 20 Hz)
dello stroboscopio
3) La freccia Ɗsi trova sempre davanti alla
scelta attuale oppure davanti al valore da
impostare. Per impostare il parametro scelto,
premere il tasto ENTER, con il tasto UP o
DOWN modificare il valore e con il tasto
MENU ritornare alla scelta dei parametri per
modificare un altro.
7.2 Varie tonalità del bianco,
memorizzare 11 tonalità cromatiche
In questo modo, il proiettore irradia della luce
bianca. Sono memorizzate 11 tonalità differenti
del bianco che possono essere modificate. Per
ogni tonalità del bianco, la luminosità per i colori
rosso, verde, blu e bianco può essere impostata
in modo differente; così, questo modo serve
anche per memorizzare 11 tonalità cromatiche
differenti.
1) Aprire la voce del menu CAL1 white. Il
display indica ora con la freccia Ɗuna delle
11 locazioni di memoria (WT01… WT11), e i
LED si accendono nella tonalità corrispon-
dente del bianco.
2) Con il tasto UP o DOWN scegliere la tonalità
del bianco oppure la locazione di memoria le
cui impostazioni devono essere modificate.
3) Per modificare un'impostazione, dopo la
scelta della locazione di memoria, premere il
tasto ENTER.
4) Impostare i parametri seguenti:
ƊRed : Luminosità rosso (0 – 255)
green: Luminosità verde (0 – 255)
blue : Luminosità blu (0 – 255)
white: Luminosità bianco (0 – 255)
5) La freccia Ɗsi trova sempre davanti alla
scelta attuale oppure davanti al valore da
impostare. Per impostare il parametro scelto,
premere il tasto ENTER e con il tasto UP o
DOWN modificare il valore e con il tasto
MENU ritornare alla scelta dei parametri per
modificare un altro.
6) Per aprire un'altra tonalità del bianco o per
modificare le impostazioni di un'altra loca-
zione di memoria, premere il tasto MENU
tante volte finché si vede nuovamente il
numero della locazione di memoria. Quindi
ripetere i punti 2 – 5.
7.3 Programmi show e
sequenze di scenari
Nel proiettore sono memorizzati 10 programmi
show (Aut.01 … Aut.10). Inoltre si possono
programmare individualmente 10 sequenze di
scenari a svolgimento automatico (Pro.01 …
Pro.10) con un massimo di 30 scenari
(cap. 7.4). I programmi show e le sequenze
di scenari si avviano come segue:
1) Aprire la voce del menu Auto. Il display
indica ora con la freccia Ɗil programma show
aperto per ultimo (Aut.01 … Aut.10)
oppure la sequenza di scenari aperta per
ultima (Pro.01 … Pro.10).
2) Scegliere il programma show o la sequenza
di scenari con il tasto UP o DOWN. I pro-
grammi show si svolgono come segue:
Programmi show
7.4 Programmare sequenze di scenari
Si possono programmare 10 sequenze di sce-
nari in modo semplice. Una sequenza di scenari
può consistere di un massimo di 30 scenari. Per
ogni scenario si può impostare il colore insieme
alla luminosità e si può attivare la funzione stro-
boscopica con frequenza variabile dei lampi.
Inoltre si può determinare la durata dello scena-
rio e delle dissolvenze.
1) Aprire la voce del menu EDIT. Il display
indica ora con la freccia Ɗla sequenza di sce-
nari scelta per ultima (Pro01 … Pro10).
2) Con il tasto UP o DOWN scegliere il numero
con il quale la sequenza di scenari deve
essere memorizzata e premere il tasto
ENTER. Il display indica il numero del primo
scenario (SC01
).
3) Premere il tasto ENTER e impostare i
seguenti parametri:
ƊRed : Luminosità rosso (0 – 255)
green: Luminosità verde (0 – 255)
blue : Luminosità blu (0 – 255)
white: Luminosità bianco (0 – 255)
strob: Frequenza lampi (0 – 20 Hz)
dello stroboscopio
Programmi
show Svolgimento dei programmi show
Aut.01 Stroboscopio: luce bianca
Aut.02 Dissolvenza in/out:
rosso, verde, blu, bianco
Aut.03 Cambio colore: rosso, bianco, verde, blu
Aut.04 Cambio colore: rosso, spento, bianco,
spento, verde, spento, blu, spento
Aut.05 Dissolvenza: verde rosso blu
Aut.06 Dissolvenza in/out: magenta, giallo
Aut.07 Dissolvenza in/out: viola, giallo
Aut.08 Dissolvenza in/out: viola
Aut.09 Dissolvenza in/out: turchese, magenta
Aut.10 Dissolvenza in/out: viola, verde
Menu principale Descrizione Capitolo
Static Color Proiettore di colori/stroboscopio 7.1
Auto
Aprire programmi show (Aut.)/
sequenze di scenari programmabili
(Pro.) 7.3
RUN Funzionamento Master/Slave 7.5
DMX Address Indirizzo di start DMX 8.3
Personality Tipo di funzionamento DMX/
numero dei canali 8.2
ID Address Sottoindirizzo 8.3.1
EDIT Programmare sequenze di scenari 7.4
SET
UPLD: Copiare sequenze di
scenari su altri proiettori 7.5.1
REST: Resettare le impostazioni 9.4
ID: Sottoindirizzamento 8.3.1
REGW: Limitazione colori 9.2
Dim: Inerzia 9.3
CAL1 white 11 tonalità di bianco
o colori individuali 7.2
CAL2 Parameter Impostare valori limiti dei colori 9.2
KEY LOCK Blocco tasti 9.1
AVVERTIMENTO La corrente totale nei cavi di
collegamento (7, 8) non deve
superare 10 A, altrimenti il
sovraccarico dei cavi può
provocare un incendio dei
cavi. Perciò non collegare
più di 9 proiettori.
Table of contents
Languages:
Popular Light Fixture manuals by other brands

SDJ
SDJ Slimpar SG SLIMPARCOB30 user manual

HUE
HUE Go quick start guide

Whelen Engineering Company
Whelen Engineering Company Inner Edge FST WeCan installation guide

Cedes
Cedes cegard/Mini-CC manual

LumaPro
LumaPro 45C244 operating instructions

Malibu Boats
Malibu Boats 8409-1607-01 Instructions for assembly and installation