manuals.online logo
Brands
  1. Home
  2. •
  3. Brands
  4. •
  5. Energetic Lighting
  6. •
  7. Light Fixture
  8. •
  9. Energetic Lighting ELYSL-5004 Series User manual

Energetic Lighting ELYSL-5004 Series User manual

1
48W Shop Light
Installation Instructions
Model # ELYSL-5004 series
Questions, problems, missing parts? Before returning to your retailer, call our customer
service department at 1-866-492-6566.
Item Number Purchase Date
ATTACH YOUR RECEIPT HERE
www.energeticlighting.com
LIGHTING
32
Please read and understand this entire manual before attempting to assemble, operate or
install the product. Failure to do so could lead to electric shock, fire or other injuries that
could be hazardous or even fatal.
Be sure the electricity to the wires you are working on is shut off. Either remove the fuse or
turn off the circuit breaker.
Changes or modifications not expressly approved by the party responsible for compliance
could void the user’s authority to operate the equipment.
This product must be installed in accordance with local, state and national electrical codes.
Installation work shall be completed by a licensed installer that is familiar with the
construction and operations of the product.
CAUTION:
The fixture body is one piece. Do not disassemble it.
This product can NOT be used with a dimmer switch.
NOTICE
This device complies with Part 15 of the FCC Rules. Operation is subject to the following
two conditions: (1) This device may not cause harmful interference, and (2) this device
must accept any interference received, including interference that may cause undesired
operation.
This equipment has been tested and found to comply with the limits for a Class B digital
device, pursuant to part 15 of the FCC Rules. These limits are designed to provide
reasonable protection against harmful interference in a residential installation. This
equipment generates, uses and can radiate radio frequency energy and, if not installed and
used in accordance with the instructions, may cause harmful interference to radio or
television reception, which can be determined by turning the equipment off and on. The
user is encouraged to try to correct the interference by one or more of the following
measures:
Reorient or relocate the receiving antenna.
Increase the separation between the equipment and the receiver.
Connect the equipment into an outlet on a circuit different from that to which the receiver is
connected.
Consult the dealer or an experienced radio/TV technician for help.
•
•
•
•
•
•
•
•
-
-
-
-
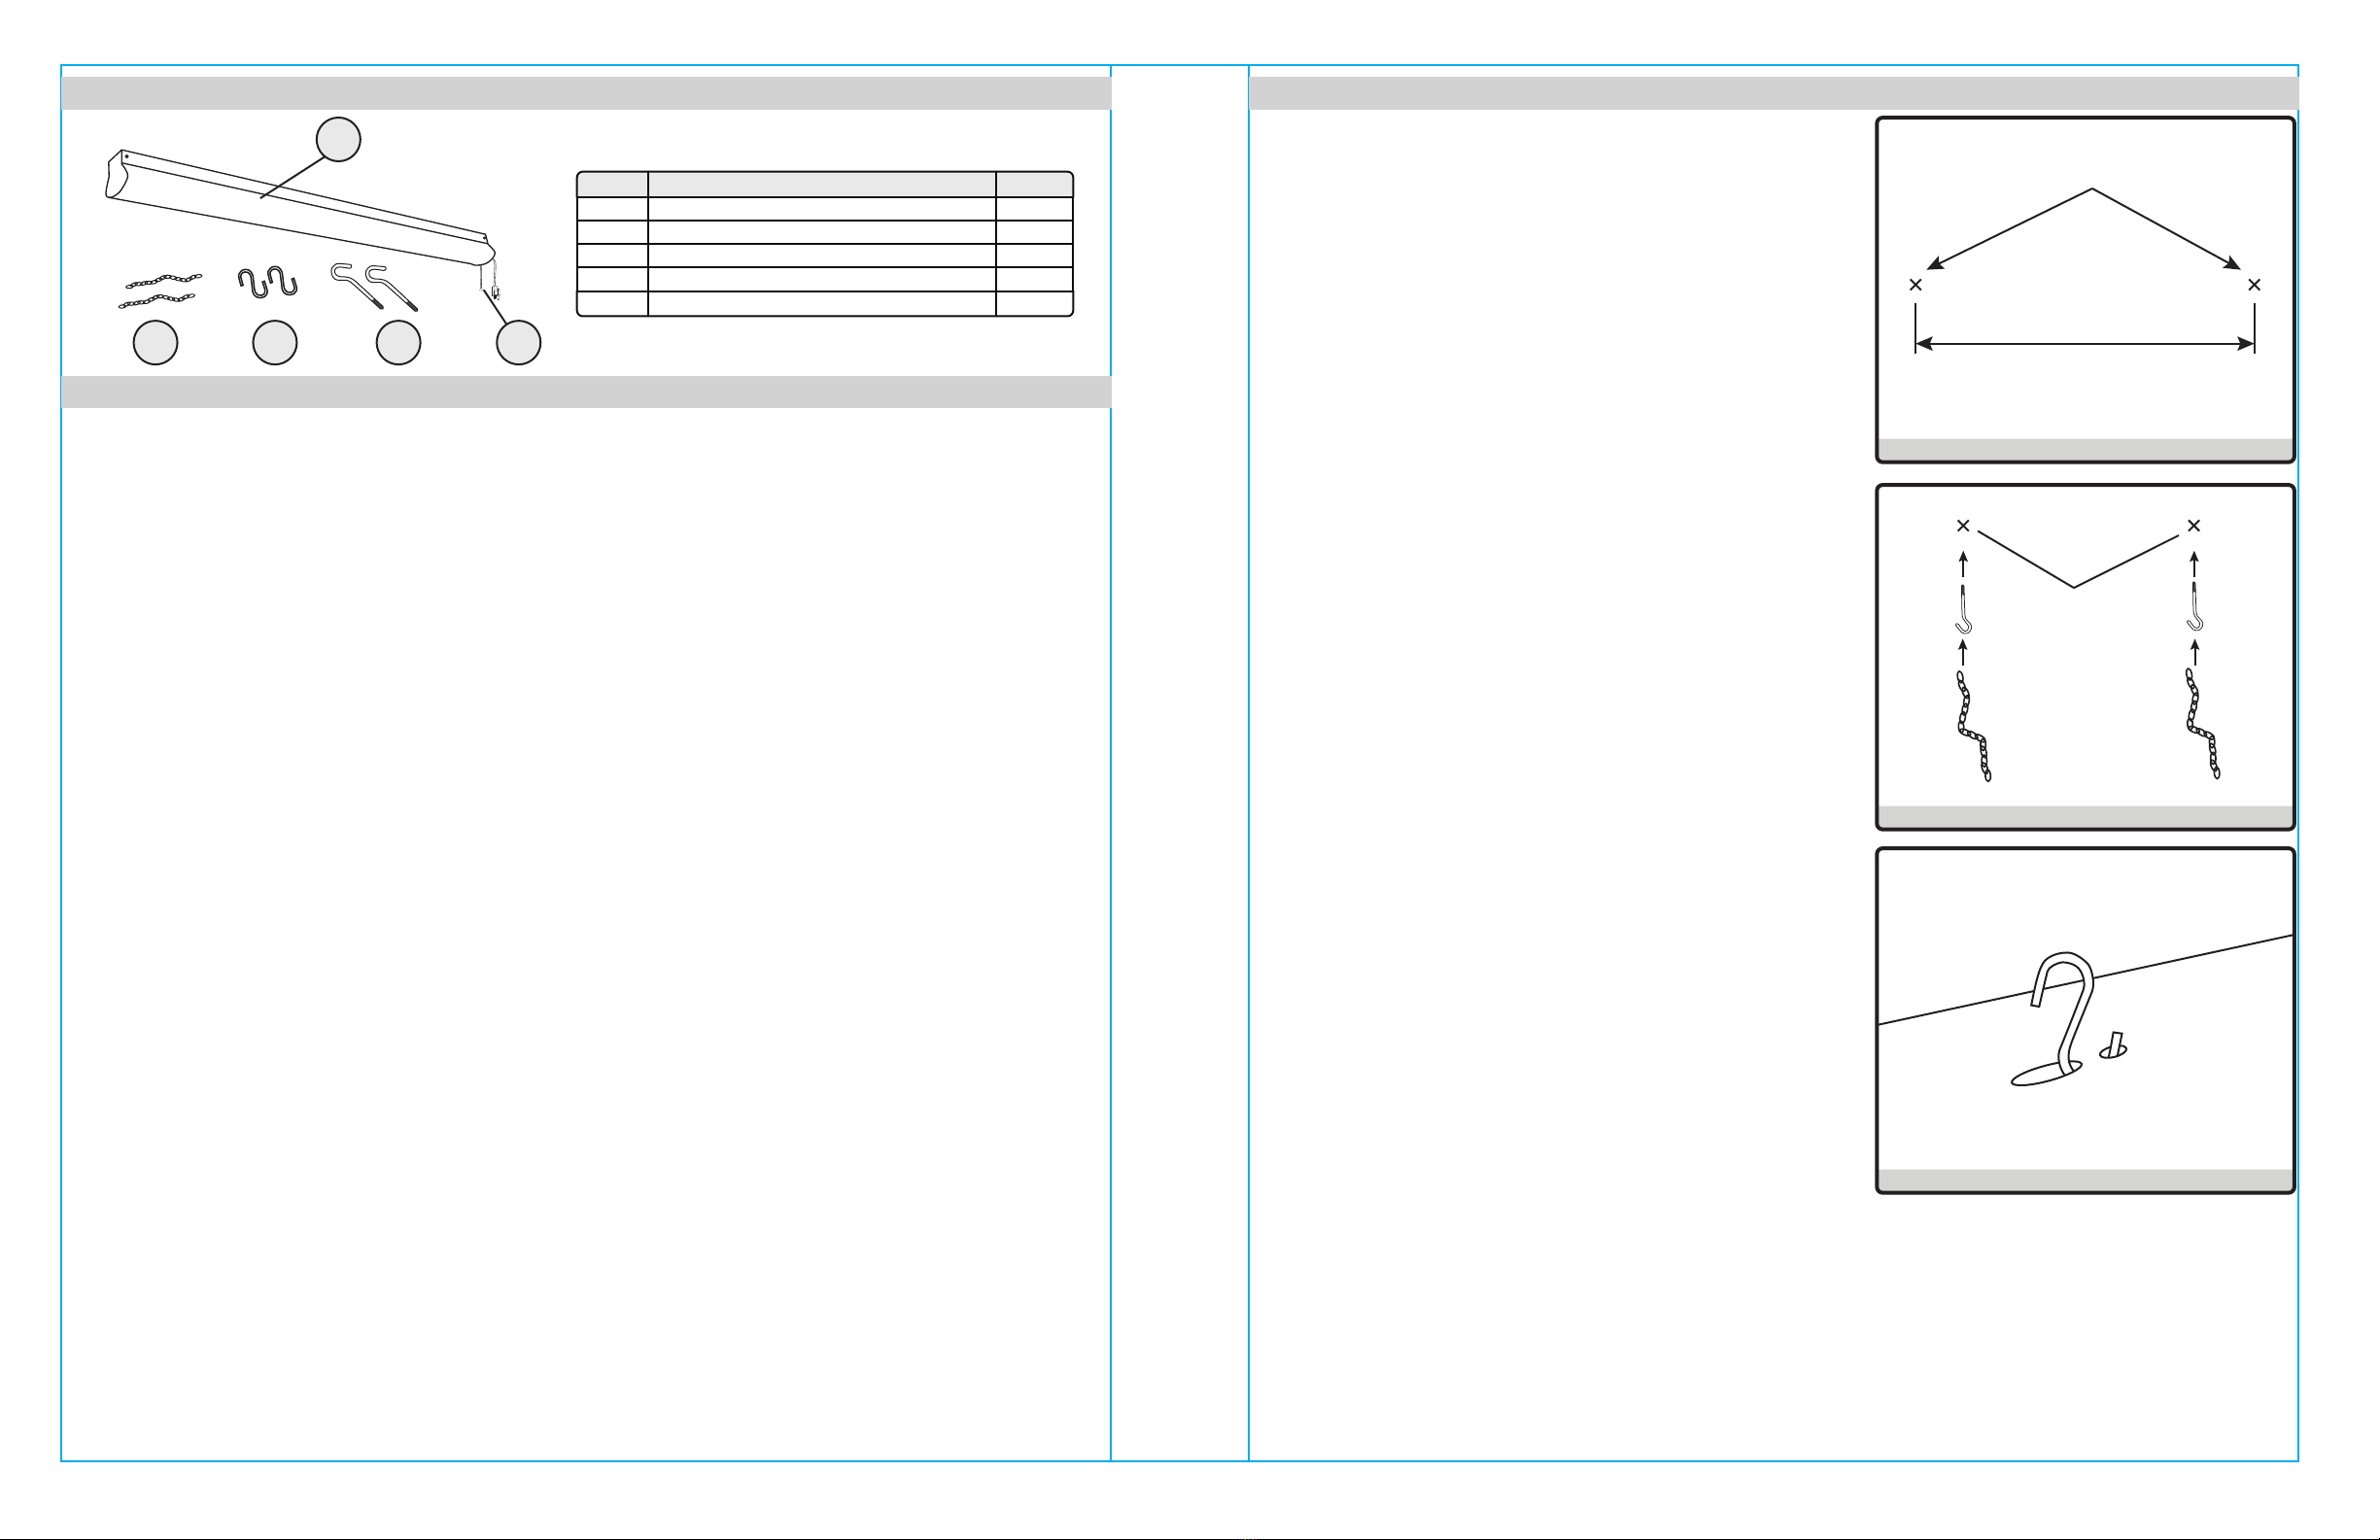
1. Mark two (2) locations on mounting surface spaced
apart by 36-in.
www.energeticlighting.com www.energeticlighting.com
Part Item Name Qty.
AFixture 1
BChain 2
C“S” Hook 2
D“J” Hook 2
EPower Pull Chain 1
PACKAGE CONTENTS
SAFETY INFORMATION
INSTALLATION INSTRUCTIONS
Fig. 1
36-in.
Mark these two locations
on mounting surface
2. Drill pilot holes in each of the two marked locations.
Screw in the two “J” hooks (D), one in each pilot hole.
Hook one chain (B) onto each “J” hook (D).
Fig. 2
3. Insert one end of the “S” Hook (C) into the fixture
back as shown in Fig. 3, and hook the other end to
the chain to support the fixture on the mounting
surface. Repeat for the second mounting hole.
Fig. 3
A
B C D
Pilot holes
E
4
This fixture is warranted to perform free from defects for five(5) years. If it fails to do so, you may
return it with proof of purchase to 13445 12th St., Chino, CA 91710 for replacement.
Clean with a mild, non-abrasive glass cleaner and soft cloth. Do NOT use solvents or clean-
ers containing abrasive agents. When cleaning the fixture, make sure the power is turned
off, and any liquid spray should be applied to the cleaning cloth and not sprayed directly onto
the fixture itself.
The fixture is powered on and off by pulling on the Power Pull Chain (E).
www.energeticlighting.com
3. Check that black, white and green wires are
extending from the back of the fixture. With the
power turned off, hold the fixture pan (A) firmly and
connect the
using wire nuts (CC). (If house wiring
does not include a ground wire, consult local
electrical code for approved grounding methods).
For proper connection, place wire nut (CC) over
wires, twisting clockwise until tight. Use wire nuts
(CC) to connect black fixture wire to black power
supply wire.
white wire from the junction box with the
white wire from the fixture pan and the green wire
from the junction box with the green wire from the
fixture pan
1-1/5in
Long Screw
2. Install two short screws (AA) into crossbar (DD)
and then secure assembly into threaded holes on
junction box (not included) tightly. Install two long
screws (BB) into the crossbar (DD), leaving
approximately 1-1/5 in. out.
INSTALLATION INSTRUCTIONS
CARE AND MAINTENANCE
OPERATING INSTRUCTIONS
TROUBLESHOOTING
WARRANTY
Problem Possible Solution Corrective Action
Fixture does not light. Power is off. Check circuit breaker
or wall switch.
4. After mounting the fixture plug the power cord into a
grounded outlet to finish the installation.
Fig. 4

Other Energetic Lighting Light Fixture manuals

Energetic Lighting LED Shoebox Fixture User manual

Energetic Lighting

Energetic Lighting LED Shoebox Fixture User manual

Energetic Lighting E1STA Series User manual

Energetic Lighting

Energetic Lighting E1STA Series User manual

Energetic Lighting E1HBA Series User manual

Energetic Lighting

Energetic Lighting E1HBA Series User manual

Energetic Lighting MXL2048-LED40K8040 User manual

Energetic Lighting

Energetic Lighting MXL2048-LED40K8040 User manual

Popular Light Fixture manuals by other brands

FormaLighting ARENA 70 Installation instruction

FormaLighting

FormaLighting ARENA 70 Installation instruction

Heath Zenith Compact Twin 150 Watt Halogen SL-5502 owner's manual

Heath Zenith

Heath Zenith Compact Twin 150 Watt Halogen SL-5502 owner's manual

1 BY ONE 315NA-0003 instruction manual

1 BY ONE

1 BY ONE 315NA-0003 instruction manual

HAMPTON BAY NXT-LV-2002 Use and care guide

HAMPTON BAY

HAMPTON BAY NXT-LV-2002 Use and care guide

ARTFOX Lighting LED Beam Wash 19E user manual

ARTFOX Lighting

ARTFOX Lighting LED Beam Wash 19E user manual

Lightmybricks 21325 installation guide

Lightmybricks

Lightmybricks 21325 installation guide

UEBEX PLANELO user manual

UEBEX

UEBEX PLANELO user manual

Jolly Q-4 Wash user manual

Jolly

Jolly Q-4 Wash user manual

Lightmaxx Vector Spot Zoom 2.0 user manual

Lightmaxx

Lightmaxx Vector Spot Zoom 2.0 user manual

SSC-LUXon RW-1 Assembly & operating instructions

SSC-LUXon

SSC-LUXon RW-1 Assembly & operating instructions

Pfannenberg Quadro LED-TL operating instructions

Pfannenberg

Pfannenberg Quadro LED-TL operating instructions

Cooper Lighting PM121cb Specification sheet

Cooper Lighting

Cooper Lighting PM121cb Specification sheet

DIVA Light JVT Series Installation instruction

DIVA Light

DIVA Light JVT Series Installation instruction

Philips GreenPower LED toplighting Series Quick installation guide

Philips

Philips GreenPower LED toplighting Series Quick installation guide

NERI Nebula L installation guide

NERI

NERI Nebula L installation guide

Avsl QTX PAR 36 user manual

Avsl

Avsl QTX PAR 36 user manual

Cooper Lighting Metal Halide PAR Lamps MD6X Specification sheet

Cooper Lighting

Cooper Lighting Metal Halide PAR Lamps MD6X Specification sheet

Home Decorators Collection HB3533-281 Use and care guide

Home Decorators Collection

Home Decorators Collection HB3533-281 Use and care guide

manuals.online logo
manuals.online logoBrands
  • About & Mission
  • Contact us
  • Privacy Policy
  • Terms and Conditions

Copyright 2025 Manuals.Online. All Rights Reserved.