Stairmaster ClubTrack 510 User manual

S
TAIR
M
ASTER
C
LUB
T
RACK
T
READMILLS
U
SER
’
S
G
UIDE FOR THE
:
510 T
READMILL
510 P
LUS
T
READMILL
612 T
READMILL
612 P
LUS
T
READMILL
®
®

(This page blank)

Page iii
Corporate Headquarters
12421 Willows Road N.E., Suite 100
Kirkland, WA 98034
(800) 635-2936
(425) 823-1825
Fax (425) 823-9490
www.stairmaster.com
Printed in the United States.
© 2002 StairMaster® Health & Fitness Products, Inc.
All rights reserved.
This is the CE marking of conformity indicating that the
device having this symbol on its immediate label meets the
applicable requirements of the EMC, Low Voltage, and
Machinery Directives.
P/N 00501-841 Rev New
© 2002 StairMaster Health & Fitness Products, Inc. StairMaster and ClubTrack are registered trademarks or
trademarks of StairMaster Health & Fitness Products, Inc. in the United States and/or other countries. All other
trademarks are trademarks of their respective companies.

Page iv
WARRANTY
This is to certify that the StairMaster®ClubTrack®510/612 treadmills and the ClubTrack
510/612 Plus treadmills are warranted by StairMaster Health & Fitness Products, Inc. to
be free of all defects in materials and workmanship. This warranty does not apply to any
defect caused by negligence, misuse, accident, alteration, improper maintenance, or an
“act of God.” This warranty is non-transferable from the original owner.
If, within two years from the date of purchase, any part of the StairMaster ClubTrack
treadmill should fail to operate properly contact our Customer Service Department to
report the problem. When calling, please be prepared to provide the customer service
representative with the following information:
• Your name, customer number, shipping address, and telephone number
• The model and serial number of the inoperable machine
• The date(s) of purchase for the inoperable machine(s)
• Your billing address
This information will ensure that you are the only one ordering parts under your
warranty protection. If warranty replacement parts are shipped to you, you may be
required to return the inoperable parts. To facilitate this process, the following policy
has been established:
• Please call our Customer Service Department to receive a Return
Material Authorization (RMA) number prior to shipment.
• StairMaster Health & Fitness Products, Inc. will incur all freight
charges for warranty parts ordered for a machine that is less than 45
days old. The parts will be shipped to you via an overnight courier.*
• You are responsible for freight charges on warranty parts for
machines that are more than 45 days old. You will not be responsible
for the return shipment of the inoperable parts.
• Some inoperable warranty parts must be promptly returned to our
Customer Service Department. We will pay the shipping cost for the
inoperable warranty parts. Detailed instructions are included with
each warranty replacement part.
StairMaster Health & Fitness Products, Inc. neither makes, assumes, nor authorizes any
representative or other person to make or assume for us, any other warranty whatso-
ever, whether expressed or implied, in connection with the sale, service, or shipment of
our products. We reserve the right to make changes and improvements in our products
without incurring any obligation to similarly alter products previously purchased. In
order to maintain your product warranty and to ensure the safe and efficient operation
of your machine, only authorized replacement parts can be used. This warranty is void if
parts other than those provided by StairMaster Health & Fitness Products, Inc. are used.
* Note: Aerosol products cannot be transported via air.

Page v
PREFACE
Regular use of the StairMaster®ClubTrack®treadmill is a safe and effective
way to develop aerobic fitness while conditioning the major muscles of the
lower body. To get the best results, and to keep your machine in peak operat-
ing condition, you should carefully read and follow the guidelines presented in
this manual.
WHAT IS IN THIS MANUAL?
This manual contains operating instructions and maintenance requirements
for the StairMaster ClubTrack 510, ClubTrack 612, ClubTrack 510 Plus, and
ClubTrack 612 Plus treadmills. The manual is designed for use by club owners
and fitness trainers. It is expected that owners and trainers will instruct the
client in the proper user of the treadmill and its accessories. Please read the
manual carefully, noting the Safety Requirements before using the treadmill.
Throughout this manual, console keypad keystrokes are enclosed in brackets
[ ]. The names of the keys and special console operational modes are shown
in capital letters. For example, your machine is ready to use when the console
displays "SELECT WORKOUT." Press [MANUAL] to start the MANUAL exercise
program.
Upon request, StairMaster will provide a technical document containing block-
level theory of operation, troubleshooting, removal and replacement instruc-
tions (by module), maintenance, and other information that will assist appropri-
ately-trained personnel in repairing those parts of the equipment designated
by StairMaster as repairable.

Page vi
CONTENTS
SAFETY REQUIREMENTS.................................................................................. 1
INSTALLATION INSTRUCTIONS....................................................................... 4
Site Requirements.......................................................................................... 4
Installation Instructions.................................................................................. 5
Testing the Treadmill and Controller ............................................................. 9
Accessories and Options ............................................................................. 10
How to reach us ........................................................................................... 10
GUIDELINES FOR GETTING ON AND OFF THE TREADMILL..................... 11
LIMITED-ACCESS CONTROL........................................................................... 12
Activation...................................................................................................... 12
Deactivation.................................................................................................. 12
Magnetic Key as Emergency Stop.............................................................. 13
HEART RATE MONITORING ............................................................................ 14
Telemetry Heart Rate ................................................................................... 14
Using the Transmitter Belt ................................................................... 14
Maintaining the Transmitter Belt ........................................................ 16
Contact Heart Rate....................................................................................... 17
Using Contact Heart Rate ............................................................................17
EXERCISE INTENSITY, FREQUENCY, & DURATION .................................... 18
Exercising...................................................................................................... 18
Intensity................................................................................................. 18
Frequency and Duration....................................................................... 19
OPERATING THE CLUBTRACK®510/612 TREADMILL................................ 21
Turning on the Power................................................................................... 21
Understanding the Controller ...................................................................... 21
Controller Keys ............................................................................................. 22
Exercise Program Keypad............................................................................ 26
The Quick Start Program ...................................................................... 27
The Manual Program ........................................................................... 28
The Fat Burner Program ....................................................................... 30
The Aerobic Training Program .............................................................33
The Speed Intervals Program .............................................................. 35
The Constant Heart Rate Program ...................................................... 38

Page vii
CONTENTS
The StairMaster®Submaximal Fitness Test....................................... 41
Fitness Rating Norms (VO2max) ....................................................... 44
Heart Rate Input on the ClubTrack 510/612 Treadmills.....................45
Locked/Non-Locked Heart Rate Signal Options..........................45
Error Codes ...........................................................................................47
1-minute Auto Reset ............................................................................47
Viewing Maintenance Information .....................................................47
Customizing the ClubTrack 510/612 Treadmill................................... 48
Instruction Page....................................................................................49
Using the ClubTrack 510/612 Treadmill .......................................50
OPERATING THE CLUBTRACK®510/612 PLUS TREADMILL ..................... 51
Turning on the Power................................................................................... 51
Understanding the Controller ......................................................................51
Controller Keys............................................................................................. 52
Displays and Indicators................................................................................55
Exercise Parameters ....................................................................................56
Time....................................................................................................... 56
Distance ................................................................................................ 57
Calories................................................................................................. 57
Exercise Workout Options............................................................................58
Manual Workout ..................................................................................58
Pre-Programmed Workouts.................................................................. 59
Editing a Pre-Programmed Workout .............................................63
Interval Workouts .................................................................................65
Heart Rate Control Workout ................................................................ 68
Status Screens For All Workouts.................................................................72
Speed and Grade Graph View............................................................. 72
Manual Mode ................................................................................ 72
Programmed Workout Mode......................................................... 72
Workout Status View ........................................................................... 73
Manual and Heart Rate Modes .................................................... 73
Programmed and Interval Modes ................................................. 73
Heart Rate Graph View ........................................................................ 74
Scanning All Views .............................................................................. 74
Entering An ID Number ................................................................................74
Error Codes ...................................................................................................75
5-Minute Auto Reset.................................................................................... 75
Customizing The ClubTrack 510/612 Plus Treadmill..................................75

Page viii
Entering Custom Mode........................................................................ 75
Setting a Custom Greeting................................................................... 76
Viewing Maintenance Information ............................................................. 77
Adjusting Screen Contrast........................................................................... 78
Setting a User Time Limit ............................................................................. 78
Setting a Maximum Speed.......................................................................... 79
Setting US or Metric Units........................................................................... 80
Instruction Page ........................................................................................... 80
Using the ClubTrack 510/612 Plus Treadmill...................................... 81
MAINTENANCE................................................................................................. 83
Cleaning........................................................................................................ 83
Treadmill and Controller....................................................................... 83
Daily ................................................................................................ 83
Weekly............................................................................................ 84
Treadmill Interior................................................................................... 84
Transmitter Belt .................................................................................... 84
Transmitter Battery............................................................................... 84
Transmitter Storage.............................................................................. 84
Treadmill Belt Adjustments.................................................................. 85
Belt Tension ................................................................................... 85
Belt Tracking................................................................................... 87
Belt Replacement .......................................................................... 87
Moving and Storing the Treadmill....................................................... 87
Using After Storage Period............................................................ 88
TROUBLESHOOTING ........................................................................................ 89
Error Codes ................................................................................................... 89
The ClubTrack 510/612 Treadmill........................................................ 89
Self-Test Errors............................................................................... 90
Operation Error Codes ................................................................... 90
The ClubTrack 510/612 Plus Treadmill................................................ 92
Self-Test Errors............................................................................... 93
Operation Errors ............................................................................. 93
Transmitter Belt ............................................................................................ 95
Troubleshooting the Treadmill..................................................................... 96
CONTENTS

Page ix
SPECIFICATIONS............................................................................................... 98
Treadmill Frame ............................................................................................ 98
Performance .........................................................................................98
Physical................................................................................................. 98
Environmental....................................................................................... 98
Power Requirements............................................................................ 99
Fuse Ratings .......................................................................................100
Controller Specifications ...........................................................................100
The ClubTrack 510/612 Treadmill......................................................100
The ClubTrack 510/612 Plus Treadmill..............................................102
Symbols and Labels ...................................................................................104
IMPORTANT PHONE NUMBERS ..................................................................106
CONTENTS

Page x
(Thispage blank)

Page 1
WHEN USING ELECTRICAL EQUIPMENT, ALWAYS FOLLOW THESE BASIC PRECAUTIONS:
IMPORTANT SAFETY INSTRUCTIONS
This symbol appearing throughout this manual means
Attention! Be Alert! Your safety is involved.
The following definitions apply to the words “Danger” and
“Warning” found throughout this manual:
DANGER - Used to call attention to IMMEDIATE hazards which, if not
avoided, will result in immediate, serious personal injury or loss of life.
WARNING - Used to call attention to POTENTIAL hazards that could result in
personal injury or loss of life.
READ ALL INSTRUCTIONS BEFORE USING THE MACHINE.
To reduce the risk of electrical shock, always
unplug the external power supply from the
electrical outlet before cleaning, maintaining, or
repairing.
To reduce the risk of burns, electric shock, or
injury to persons:
Read this manual in full before operating the treadmill. Failure to follow these
guidelines can produce a serious or possibly fatal electrical shock hazard or other
serious injury. Consult a qualified electrician as required.
1. The controller Power key does not turn off the electrical current to the
treadmill. The treadmill continues to draw power, even when the
controller is off. To avoid electric shock, do not remove treadmill hood or
place hands beneath the treadmill while the treadmill is plugged into a
power source.
2. Do not start the treadmill when someone else is standing on the belt.
!
DANGER
!
WARNING
!
SAFETY REQUIREMENTS

Page 2
3. Keep speed and grade at the lowest settings when someone is getting
on and off the treadmill.
4. Keep the area underneath and around the treadmill clear.
5. Before each use of this equipment, check the power receptacle for signs
of damage. Do not operate the equipment if the integrity of this item is
inquestion.
6. To avoid potential safety and electrical problems, use parts and acces-
sories that meet StairMaster specifications.
7. This equipment is classified Class I, Type B, ordinary equipment. Not
protected against fluid ingress. Rated for continuous operation. Do not
operate this equipment in the presence of flammable anesthetic
mixtures.
8 Do not let liquid enter the controller. If it does, the controller must be
inspected and tested for safety by an approved technician before it can
be used again.
10. Increased risk due to leakage current can result if this equipment is not
grounded properly.
11. The treadmill must be on an appropriate, dedicated electrical circuit.
Nothing else should be connected to the circuit.
12. Incorrect installation by unauthorized personnel can lead to equipment
damage and may void the warranty.
13. Do not stand on treadmill hood or front trim cover.
14. Close supervision is necessary whenever the machine is used by or
near children, invalids, or disabled persons.
SAFETY REQUIREMENTS

Page 3
Failure to follow the conditions set forth below shall limit, to the extent allowed
by law, StairMaster Health & Fitness Products, Inc. Company’s responsibility for
the safety, reliability, and performance of this equipment.
• The operator manual must be read in full by each owner and
trainer before the product is first used. Each user must be
instructed in the proper use of the treadmill and its
accessories.
• Assembly operations, extensions, readjustments, modifica-
tions, or repairs must be carried out only by StairMaster-
trained or StairMaster-authorized personnel.
• The electrical wiring within the treadmill setting and the
electrical installation of the treadmill must comply with the
applicablelocalor provincial requirements.
• The equipment must be used in accordance with the instruc-
tions for use.
SAVE THESE INSTRUCTIONS
SAFETY REQUIREMENTS

Page 4
When the carrier delivers your order, verify that the number of items received
equals the number listed on the freight bill or express receipt. Inspect the
containers for damage. Itemize discrepancies and damage on the waybill and
have the agent sign it. Failure to adequately describe external evidence of loss
may result in the carrier refusing to honor your claim. Do not discard the packing
materials until you have verified physical condition and proper operation.
The treadmill and controller must be installed correctly before being
used. StairMaster®recommends that you contact your treadmill dealer or sales
representative when your equipment arrives. The representative will help
unpack, install, and demonstrate it, to ensure that:
• The equipment is free from shipping damage
• The treadmill is connected correctly to the appropriate AC
power source
• Installation and operation are in accordance with
StairMaster standards
Incorrect installation by unauthorized personnel can lead to equipment
damage and may void the warranty.
Site Requirements
The treadmill requires a dedicated AC power line. To ensure electrical safety, the
treadmill is equipped with a three-wire power cord and three-pronged plug. To
maintain ground reliability, the plug must be connected to an equivalent
INSTALLATION INSTRUCTIONS
!WARNING
THE TREADMILL MUST BE ON A DEDICATED BRANCH CIRCUIT.
NO OTHER DEVICE SHOULD BE CONNECTED TO THAT CIRCUIT.
EXCESSIVE RISK CURRENT (LEAKAGE) CAN RESULT IF THE
EQUIPMENT IS NOT PROPERLY GROUNDED.
FAILURE TO FOLLOW THESE GUIDELINES WILL PRODUCE A SERIOUS
OR POSSIBLY FATAL ELECTRICAL SHOCK HAZARD.
CONSULT A QUALIFIED ELECTRICIAN AS REQUIRED.
Page 5
grounded receptacle.The treadmill is designed to operate in a typical exercise
environment with adequate heat dissipation (1850 Watts maximum). Place the
treadmill on a flat surface, free of moisture and debris. Maintain a minimum
clearance of 1.5 feet on each side and 6 feet at the rear.
Installation Instructions
If you choose to install your treadmill without the assistance of your StairMaster
representative, follow the procedure given below:
Tools:
• Flat blade screwdriver
• 4-mm Hex key (allen wrench, provided)
• 13-mm Hex socket wrench
• Torque wrench,
if available
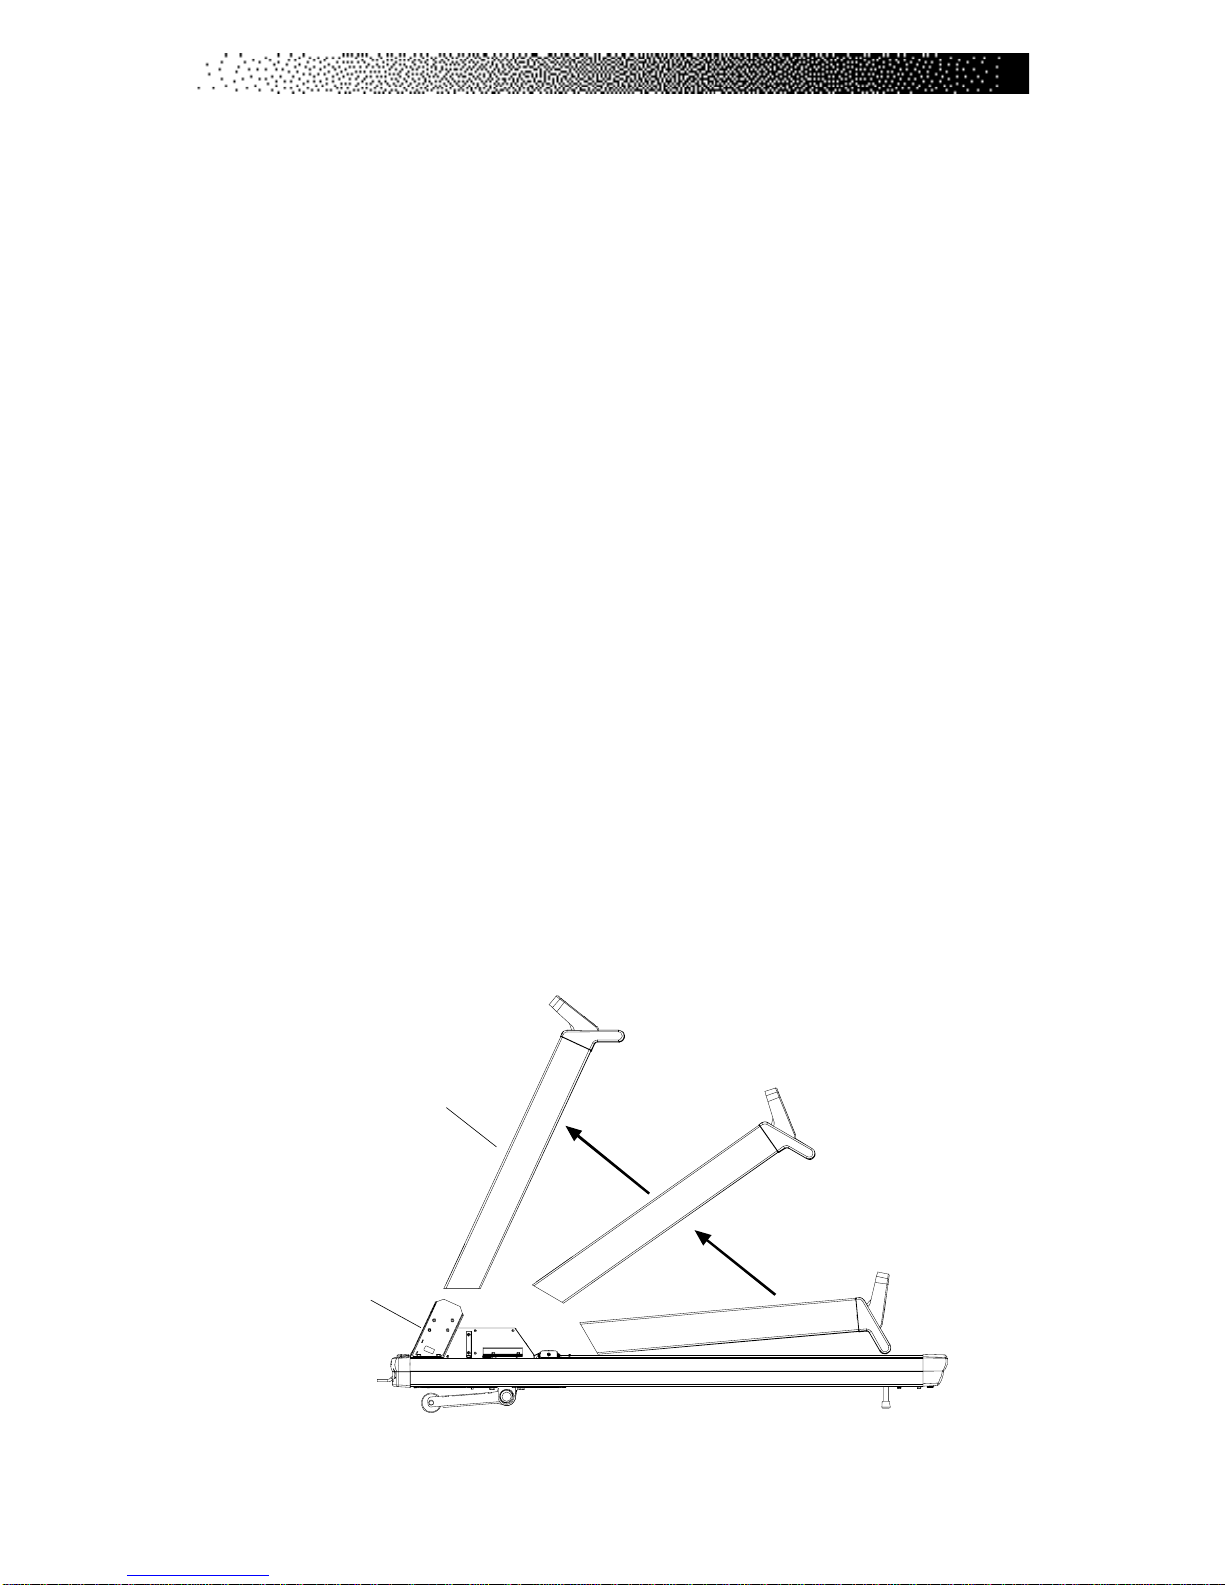
1. Grasp the controller uprights and pull the upright tube ends over the
brackets. Lift the controller, pivoting the uprights until the upright
tubes slide down the brackets. Note: Gently pull slack from the
controller cable down to the bottom of the upright to keep from
damaging any wires.
INSTALLATION INSTRUCTIONS
Controller Upright
Bracket
Page 6
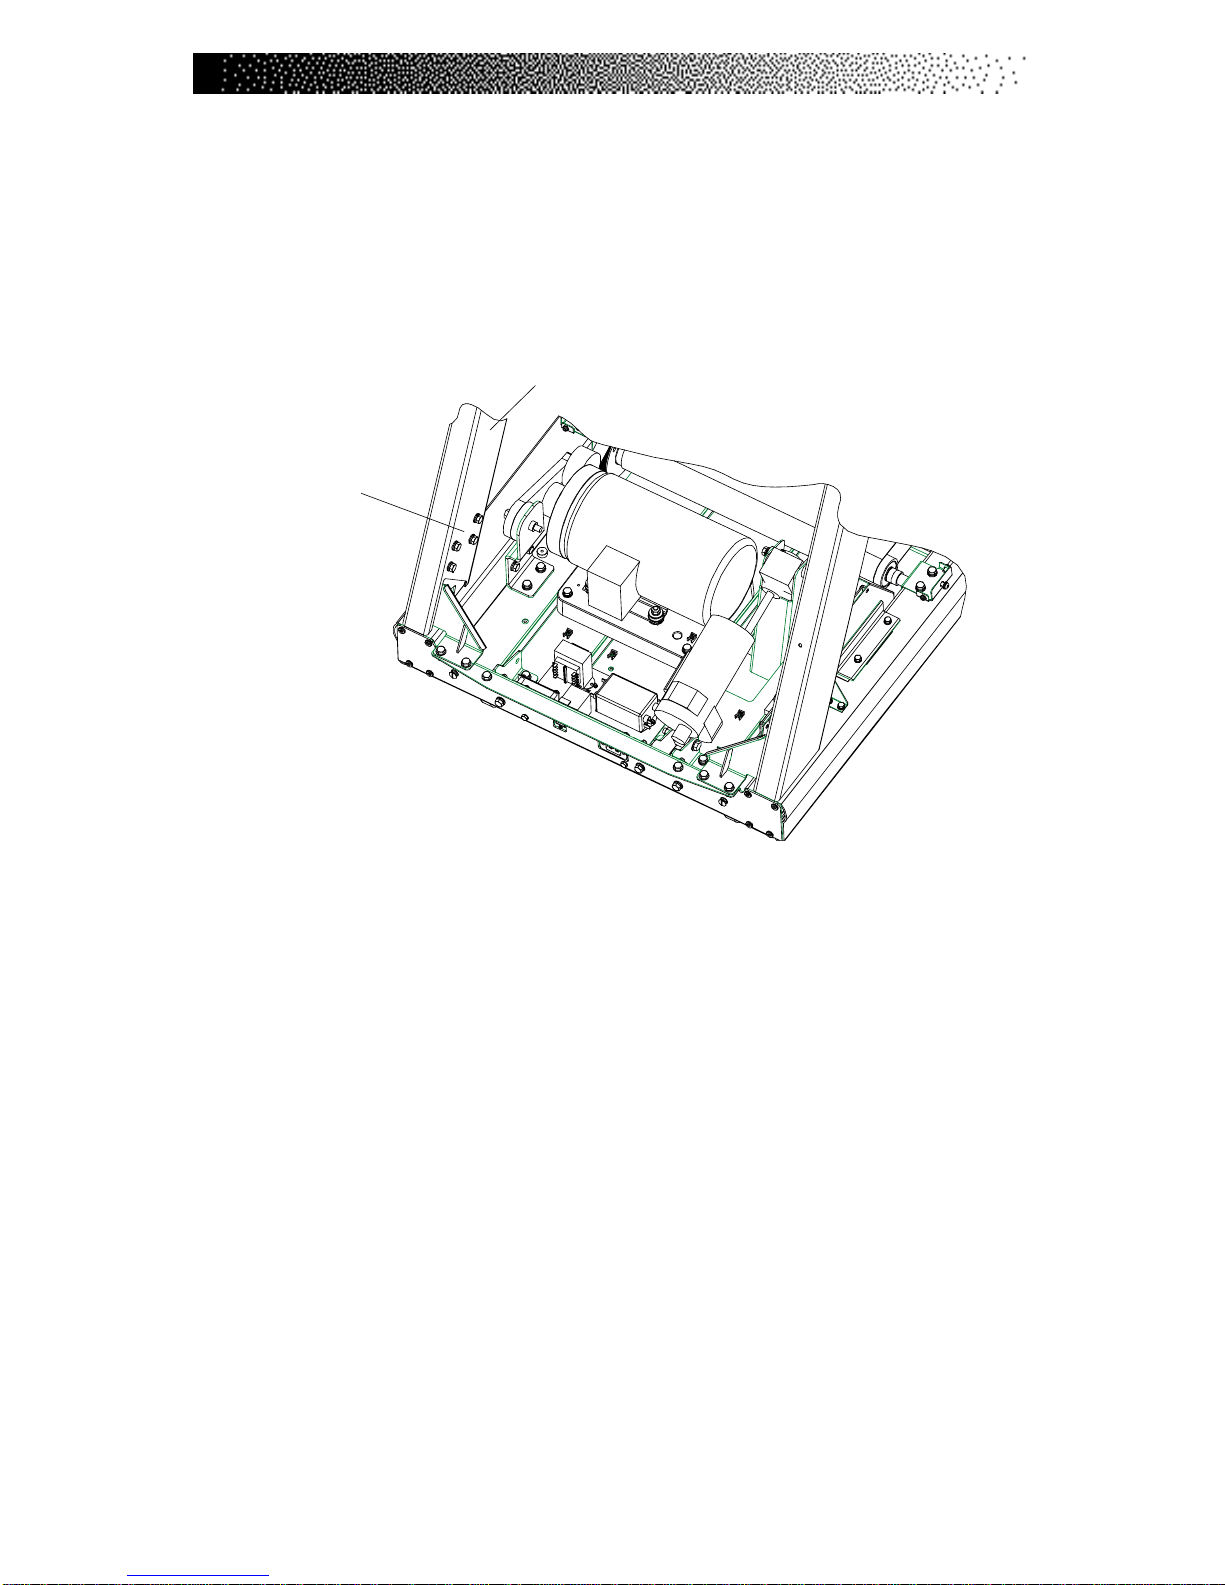
2. Align the holes in the base of the uprights with the holes in the
upright brackets; there are four holes in each bracket. Fasten the
uprights into place with the hardware supplied with the treadmill: M8
bolt, M8 lock washer, and M8 flat washer (all black).
3. Tighten each bolt securely with a 13-mm socket wrench. If available,
use a torque wrench to tighten each bolt to 200 in/lb. Do not over
tighten.
4. Loop the controller cable slack and secure in the clamp provided.
Clamp the EMI suppressor provided over the controller cable.
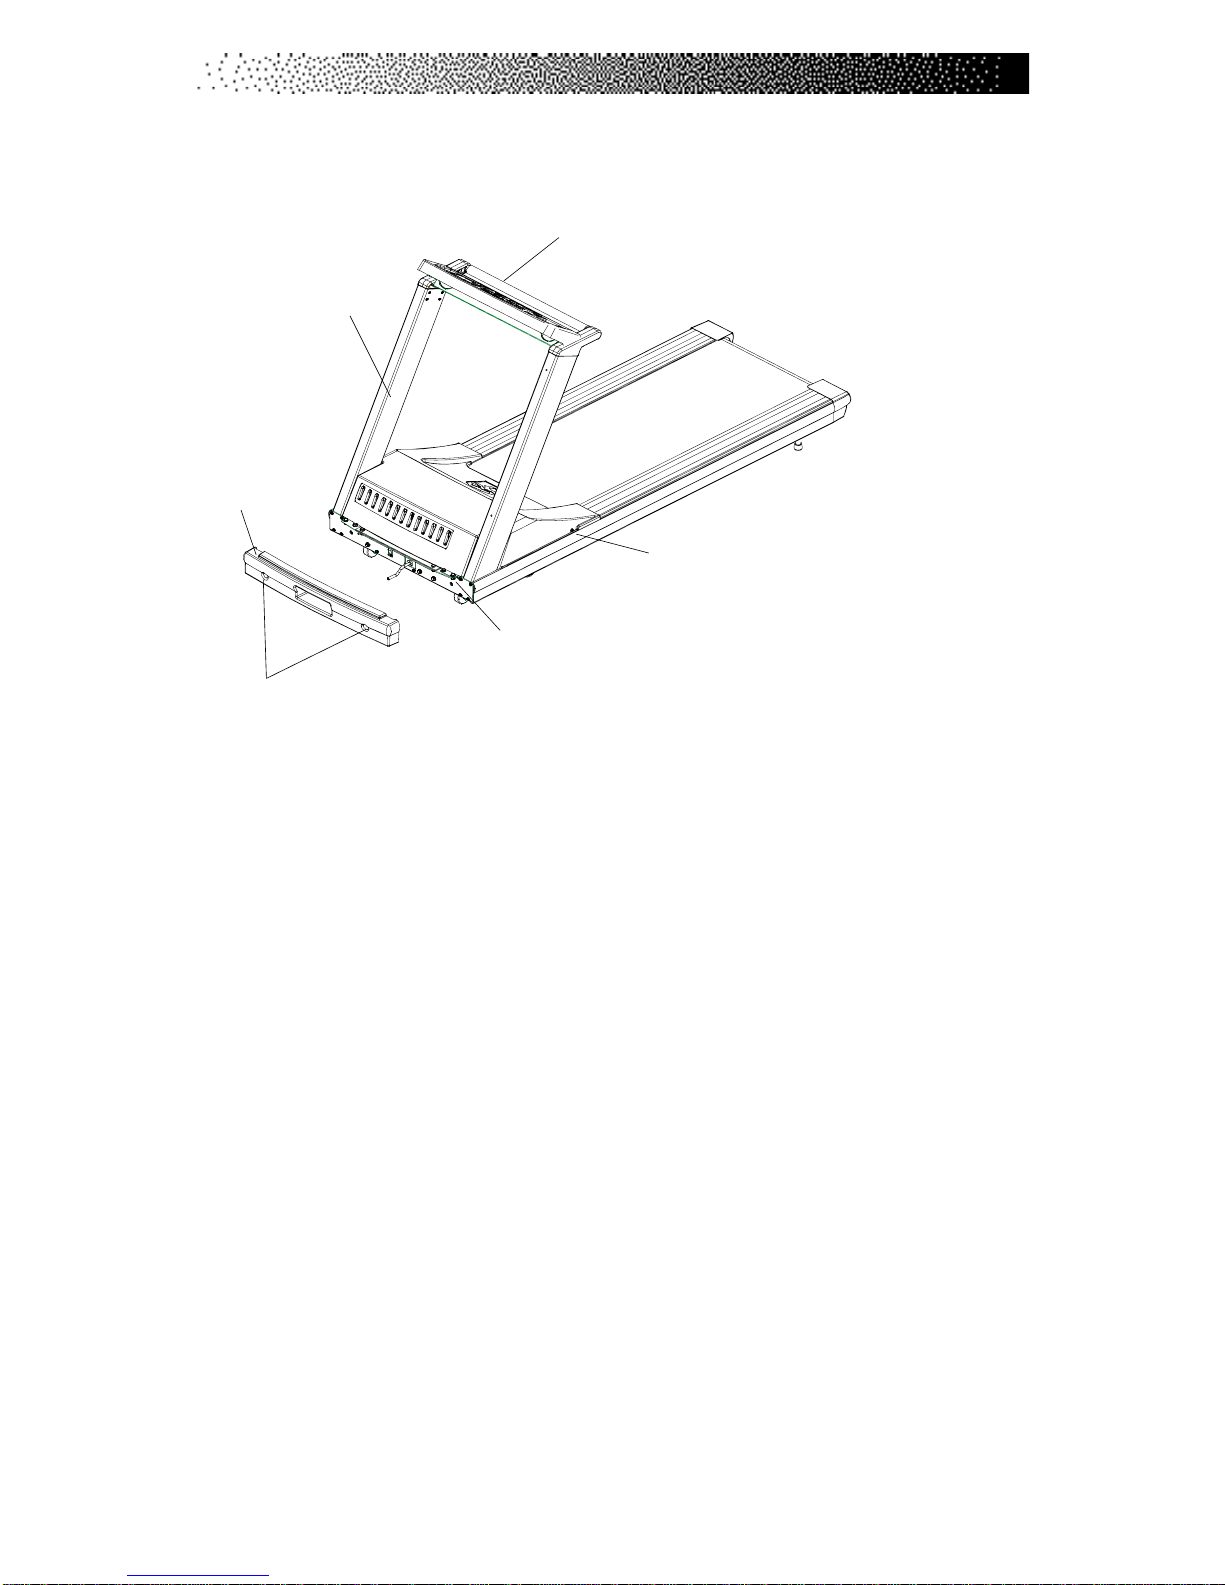
5. Remove the treadmill hood and trim cover from the packaging.
6. Install the hood between the uprights and align the holes at the front
andsides.
7. Install the M8 bolts, flat washers, lock washers, and hex nuts at the
front of hood. Install M6 button head screw and lock washer.
INSTALLATION INSTRUCTIONS
Upright
M8 Bolt
Lock Washer
Flat washer
Page 7
8. Feed the power cord through the hole in the trim panel, position the
trim panel on front of the treadmill, and fasten the two ¼-turn fasten-
ers by pushing and turning clockwise a ¼-turn.
9. Verify that the voltage for the power source matches the voltage on
the nameplate on the front of the treadmill hood, then plug in the
power cord.
10. Be sure the circuit breaker switch on the treadmill hood is set to ON.
The circuit breaker on the rear of the treadmill controls the power to
the treadmill. The circuit breaker must be set to ON for the treadmill
to run. Turn off the treadmill circuit breaker before connecting or
disconnecting the treadmill to the wall outlet.
INSTALLATION INSTRUCTIONS
M6 Button head screws
M6 Lock washers
M6 Bolts/nuts/flat washers/lock washers
Trim panel
Upright
Controller
¼-Turn
fasteners

Page 8
Power Cord Connection (USA)
PowerCordConnection(International)
11. Test all operational functions, including speed, grade, timer, param-
eters, and all limit controls.
INSTALLATION INSTRUCTIONS
Circuit
Breaker Power cord
connection
Power cord
connection
Circuit
Breaker
!WARNING
THE POWER KEY ON THE CLUBTRACK 510/612 PLUS CONTROLLERS
DO NOT TURN OFF THE ELECTRICAL CURRENT TO THE TREADMILL.
THE TREADMILL CONTINUES TO DRAW POWER, EVEN WHEN THE
CONTROLLER IS OFF.
TO AVOID ELECTRIC SHOCK, DO NOT REMOVE THE TREADMILL
HOOD OR PLACE YOUR HANDS BENEATH THE TREADMILL WHILE
THE TREADMILL IS PLUGGED INTO A POWER SOURCE.

Page 9
Testing the Treadmill and Controller
1. Turn on power to the controller.
•ClubTrack 510/612 - turn the circuit breaker switch to “ON.”
Within seconds, the blue LCD screen should light up and the
“SELECT WORKOUT”message should flash in the center
display.
•ClubTrack 510/612 Plus - turn the circuit breaker to “ON”and
press [Power]. After a second, the heart symbol should flash in
the LCD screen.
2. Press [START BELT]. Verify that the treadmill accelerates gradually to
minimumspeed.
3. Press and hold [Grade: ∨] until the treadmill reaches zero grade.
4. Press [Grade: ∧] and [Speed: +] until the treadmill is running at
maximum speed and grade.
5. Let the treadmill run for 15 minutes.
6. Watch the walking belt carefully to ensure that it does not drift left or
right. Listen for unusual noises, such as squeals or squeaks.
7. Return the grade to 0 and slow the belt down. Walk on the moving belt
and verify proper operation at representative speeds and grades. If the
walk belt slips, but the front roller turns, adjust the walk belt tension
(seeTroubleshooting).
8. Check menu displays and functionality.
9. When the test is finished:
a. Press [Grade: ∨]until the treadmill is at zero grade.
b. Press [STOP BELT].
c. Press [POWER], or turn off the circuit breaker to turn off the
controller.
INSTALLATION INSTRUCTIONS

Page 10
If the treadmill does not run smoothly, contact your StairMaster service
representative before using it.
Accessories and Options
An operator manual (P/N 00501-841) is shipped with each treadmill. The follow-
ing options are available:
Part No. Description
36147-001 Left Handrail Kit
36147-002 Right Handrail Kit
36147-003 Left and Right Handrails
34198-003 Transmitter Belt with strap (HRM)
00501-831 Service Manual (English language only)
•To avoid potential safety and electrical problems, use parts and
accessories that meet StairMaster specifications.
How to Reach Us
For Technical Assistance/ Parts:
In the United States: 800/331-3578
OutsidetheU.S.A.: 425/823-1825
See addresses and phone numbers listed at the end of this manual.
INSTALLATION INSTRUCTIONS
This manual suits for next models
3
Table of contents
Other Stairmaster Treadmill manuals


Popular Treadmill manuals by other brands

NordicTrack
NordicTrack NTL06907.1 user manual

NordicTrack
NordicTrack NTL2495.3 user manual

Weslo
Weslo Cadence M5 Treadmill user manual

Fit4Home
Fit4Home JK-04 quick start guide
ICON Health & Fitness
ICON Health & Fitness PRO 9000 user manual

Vision Fitness
Vision Fitness Platform Treadmill T9700 Runne owner's guide


