STAMINA WAVE 1450 User manual

CAUTION:
Weight on this product should not exceed 300 lbs.
Owner's
Manual
Product May Vary Slightly From Pictured.
STAMINA PRODUCTS
MADE IN CHINA
©2016 Stamina Products, Inc.
2019, 03
Exercise can present a
health risk. Consult a
physician before beginning
any exercise program with
this equipment. If you feel
faint or dizzy, immediately
discontinue use of this
equipment. Serious bodily
injury can occur if this
equipment is not assembled
and used correctly. Serious
bodily injury can also occur
if all instructions are not
followed. Keep others and
pets away from equipment
when in use. Always make
sure all bolts and nuts are
securely tightened prior to
each use. Follow all safety
instructions in this manual.
!WARNING
When calling for parts or
service, please specify
the following numbers:
Model#: 35-1450A
S/N: _____________
This Product is Distributed Exclusively by
2040 N Alliance Ave, Springeld, MO 65803
Customer Care
1 (800) 375-7520
www.staminaproducts.com


TABLE OF CONTENTS
Safety Instructions ...................................... 3
Before You Begin ........................................ 5
Equipment Warning, Caution & Notice Labels
... 6
Hardware Identication Chart .................... 7
Assembly Instructions ................................ 8
Operational Instructions ........................... 10
Storage ....................................................... 16
Maintenance ............................................... 16
Trouble Shooting Guide ............................ 17
Conditioning Guidelines ........................... 21
Warm-Up and Cool-Down ......................... 22
Warranty ..................................................... 23
Product Parts Drawing .............................. 24
Parts List .................................................... 25
Fax/Mail Ordering Form ............................ 27
SAFETY INSTRUCTIONS
3
1. Save these instructions and ensure that other exercisers read this manual prior to using the Wave
Water Rowing Machine 1450 for the rst time.
2. Read all warnings and cautions posted on the Wave Water Rowing Machine 1450.
3. The Wave Water Rowing Machine 1450 should only be used after a thorough review of the Owner’s
Manual. Make sure that it is properly assembled and tightened before use.
4. We recommend that two people be available for assembly of this product.
5. Keep children away from the Wave Water Rowing Machine 1450.Do not allow children to use or
play on the Wave Water Rowing Machine 1450. Keep children and pets away from the Wave Water
Rowing Machine 1450 when it is in use.
6. It is recommended that you place this exercise equipment on an equipment mat.
7. Set up and operate the Wave Water Rowing Machine 1450 on a solid level surface. Do not position
the Wave Water Rowing Machine 1450 on loose rugs or uneven surfaces.
8. Make sure that adequate space is available for access to and around the Wave Water Rowing
Machine 1450.
9. Before using, inspect the Wave Water Rowing Machine 1450 for worn or loose components, and
securely tighten or replace any worn or loose components prior to use.
10. Before using, always check the RAIL(3) to be sure it is securely tighten with the FIXING LEVER(46)
and LARGER WASHER(9).
11. Consult a physician prior to commencing an exercise program and follow his/her recommendations
in developing your tness program. If at any time during exercise you feel faint, dizzy, or experience
pain, stop and consult your physician.
12. Follow your physician’s recommendations in developing your own personal tness program.
13. Always choose the workout which best ts your physical strength and exibility level. Know your
limits and train within them. Always use common sense when exercising.
14. Do not wear loose or dangling clothing while using the Wave Water Rowing Machine 1450.
15. Never exercise in bare feet or socks; always wear proper footwear such as running, walking, or cross
training shoes that t well, provide foot support, and feature non-skid rubber soles.
16. Be careful to maintain your balance while using, mounting, dismounting, or assembling the Wave
Water Rowing Machine 1450, loss of balance may result in a fall and serious bodily injury.
17. The Wave Water Rowing Machine 1450 should not be used by persons weighing over 300 pounds.
18. The Wave Water Rowing Machine 1450 should be used by only one person at a time.
19. The Wave Water Rowing Machine 1450 is for consumer use only. It is not for use in public or
semipublic facilities.
Cancer and Reproductive Harm www.P65Warnings.ca.gov
Consult your physician before starting this or any exercise program. This is
especially important if you are over the age of 35, have never exercised before,
are pregnant, or suer from any health problem. This product is for home use
only. Do not use in institutional or commercial applications. Failure to follow all
warnings and instructions could result in serious injury or death.
The Bungee Cord(88) contain natural rubber latex which may cause allergic
reactions.
To reduce the risk of serious injury, read the following Safety Instructions
before using the
Wave Water Rowing Machine 1450
.
!WARNING
!WARNING
!CAUTION
!WARNING

NEED HELP?
CONTACT US FIRST
1 (800) 375-7520
customer.care@staminaproducts.com
Hi! From all of us here at Stamina Products, thank you for your purchase. We
know that you have big fitness goals in mind and we are here to help you along.
Call us, email us, or send us a message on Facebook. Be sure to contact us if you
have any questions on your new product. We look forward to hearing from you!
With your body in mind,
Stamina Customer Care
To enact your extended warranty and to help us better
serve you, please go onlineand register your new product.
register.staminaproducts.com
ONLINE
customer.car[email protected]om
www.staminaproducts.com
TELEPHONE
1 (800) 375-7520
FAX
(417) 889-8064
MAIL
Stamina Products, Inc.
ATTN: Customer Care
2040 N Alliance Ave
Springfield, MO 65803
facebook.com/StaminaProducts
facebook.com/AeroPilates
CUSTOMER CARE HOURS:
Monday-Thursday, 7:30 AM-5:00 PM, Central Time
Friday, 8:00 AM-3:00 PM, Central Time
It is quick and easy to register online, but if you’re a little old school or just need a
reason to raise that little flag on your mailbox, fill out the info on the last page of this
manual and mail it in.
THE FOLLOWING TOOLS ARE INCLUDED FOR ASSEMBLY : Allen Wrench (5mm)
Allen Wrench (6mm)
Combination Wrench
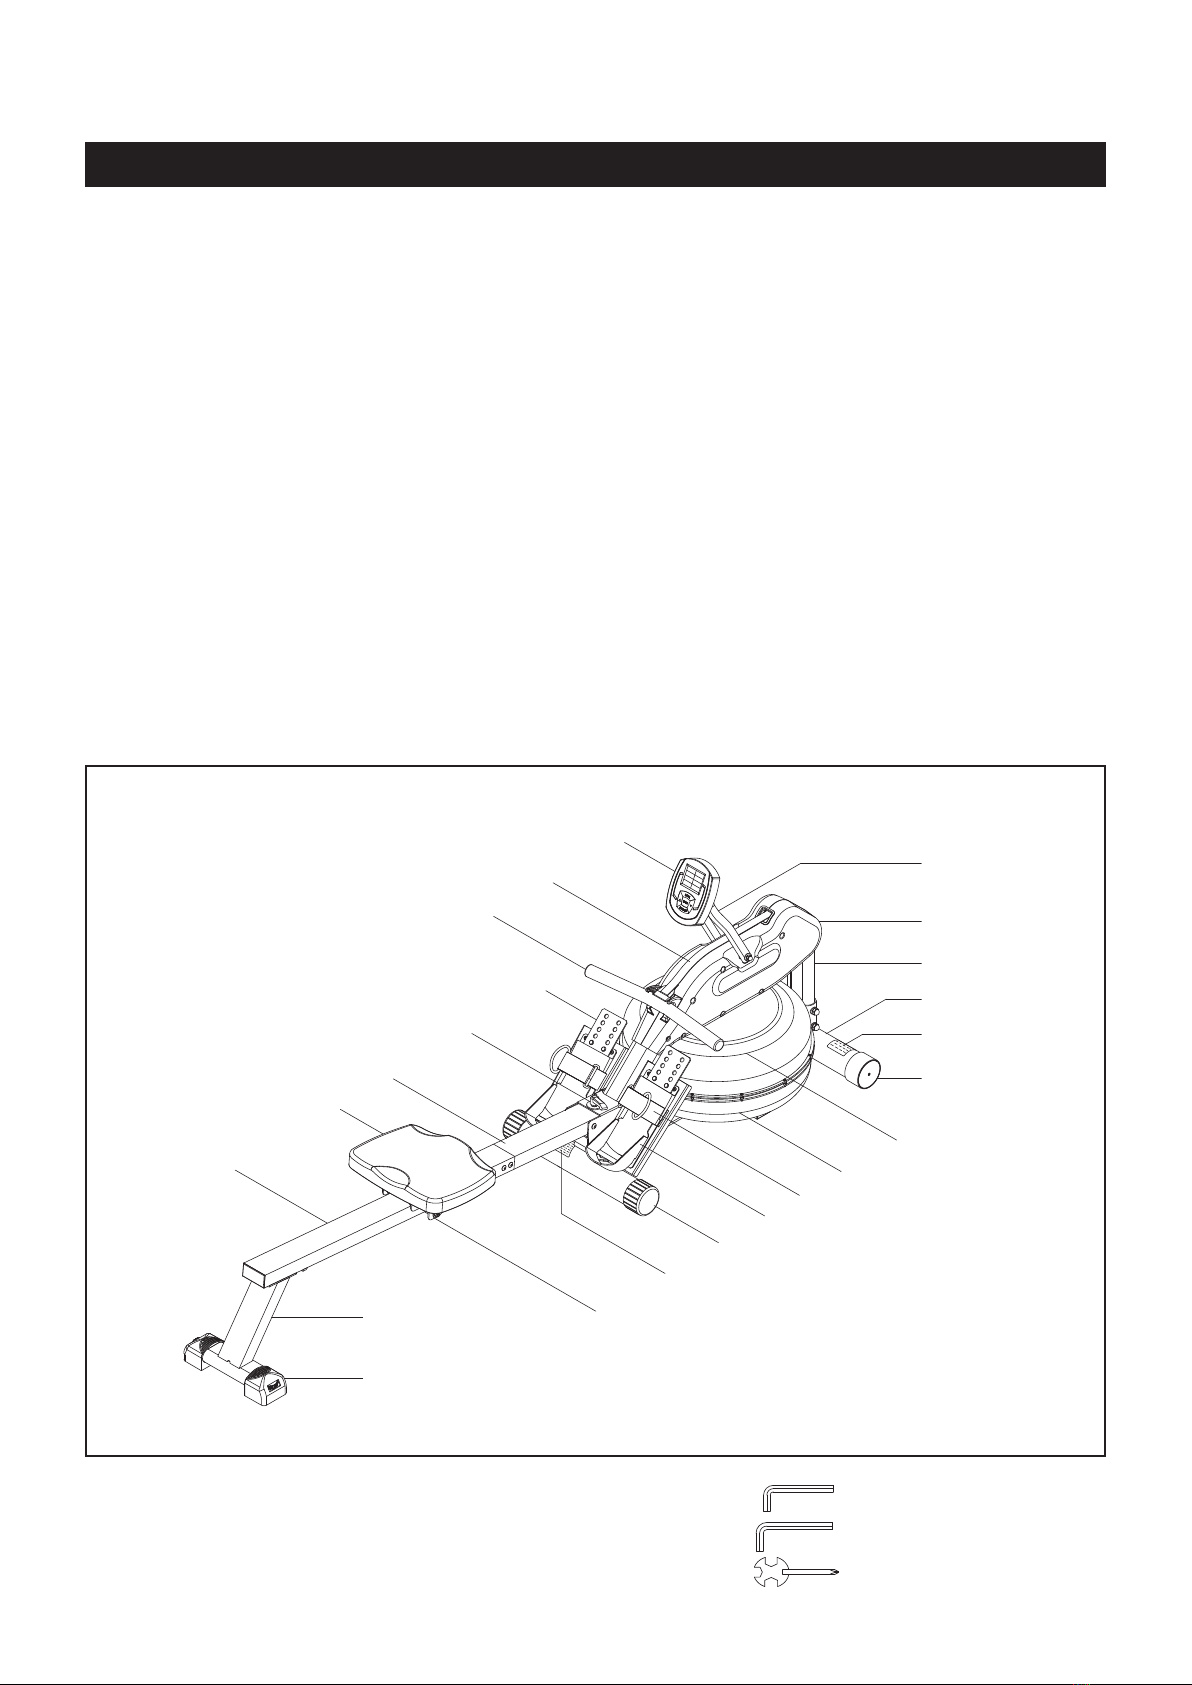
BEFORE YOU BEGIN
5
Strap
Handlebar Right Cover
Meter
Meter Post
Seat
Caution Label
Seat CarriageRear Stand
Adjustable Endcap
Lower Tank
Pedal Strap
Short Rail
Base Frame
Main Frame
Pedal Cap
Long Rail
Upper Tank
Wheel Endcap
Round Endcap
Fixing Lever
Pedal Cap
Thank you for choosing the Wave Water Rowing
Machine 1450.We take great pride in producing
this quality product and hope it will provide many
hours of quality exercise to make you feel better,
look better, and enjoy life to its fullest.
It's a proven fact that a regular exercise program
can improve your physical and mental health.
Too often, our busy lifestyles limit our time and
opportunity to exercise. The Wave Water Rowing
Machine 1450 provides a convenient and simple
method to begin your journey of getting your body
in shape and achieving a happier and healthier
lifestyle.
Before reading further, please review the
drawing below and familiarize yourself with the
parts that are labeled. Locate the serial decal on
the product and write the serial number on the
cover of the manual in the space provided. See
page 5 for an image of the serial decal. Model
number and serial number are required when
calling for assistance.
Read this manual carefully before using the
Wave Water Rowing Machine 1450.
Although Stamina constructs its products with
the nest materials and uses the highest standards
of manufacturing and quality control, there can
sometimes be missing parts or incorrectly sized
parts. If you have any questions or problems with
the parts included with your Wave Water Rowing
Machine 1450,please do not return the product.
Contact us FIRST!
If a part is missing or defective, please contact
Customer Care for assistance. Call us toll free
at 1-800-375-7520 (in the U.S.) or live chat on
staminaproducts.com. Our Customer Care Sta is
available to assist you from 7:30 A.M. to 5:00 P.M.
(Central Time) Monday through Thursday and 8:00
A.M. to 3:00 P.M. (Central Time) on Friday.
Be sure to have the name and model number of
the product available when you contact us.
Serial Decal
6
This chart is provided to help identify the warning, caution, and notice labels on the Wave Water
Rowing Machine 1450.Please take a moment to familiarize yourself with all of the warning, caution,
and notice labels.
EQUIPMENT WARNING, CAUTION & NOTICE LABELS
CAUTION LABEL(94)
To best serve you, our Customer Care Representatives will
need your serial number. For quick access, write in your
serial number on the cover of the manual.
SERIAL DECAL(118)

9 Larger Washer
(ø10.5mm x ø40mm x 3mm thick)
1
78 Washer (M8) 5
Part Number and Description Qty
64 Bolt, Button Head (M8 x 1.25 x 130mm) 1
7
90 Bolt, Flat Socket Head (M8 x 1.25 x 15mm) 4
length
length
mm.
in.
INCHES
This chart is provided to help identify the hardware used in the assembly process. Place the washers or
the ends of the bolts or screws on the circles to check for the correct diameter. Use the small scale to
check the length of the bolts and screws.
NOTICE: The length of all bolts and screws, except those with flat
heads, is measured from below the head to the end of the bolt
or screw. Flat head bolts and screws are measured from the
top of the head to the end of the bolt or screw.
After unpacking the unit, open the hardware bag and make sure that you have all the following items.
Some hardware may be already attached to the part.
MILLIMETERS
0 10 20 30 40 50 60 70 80 90 100 110 120 130 140 150
0 1/2 1 1/2 2 1/2 3 1/2 4 1/2 5 1/2 6
6 8 10 12
3/16" 1/4" 5/16" 3/8" 1/2"
HARDWARE IDENTIFICATION CHART
69 Bolt, Hex Head (M8 x 1.25 x 15mm) 4
81 Lock Washer (M8) 1
83 Acorn Nut (M8 x 1.25) 1
71 Bolt, Button Head (M6 x 1 x 15mm) 1
76 Bolt, Button Head (M8 x 1.25 x 15mm) 4
98 Barrel Nut (M8 x 1.25 x 88mm) 1

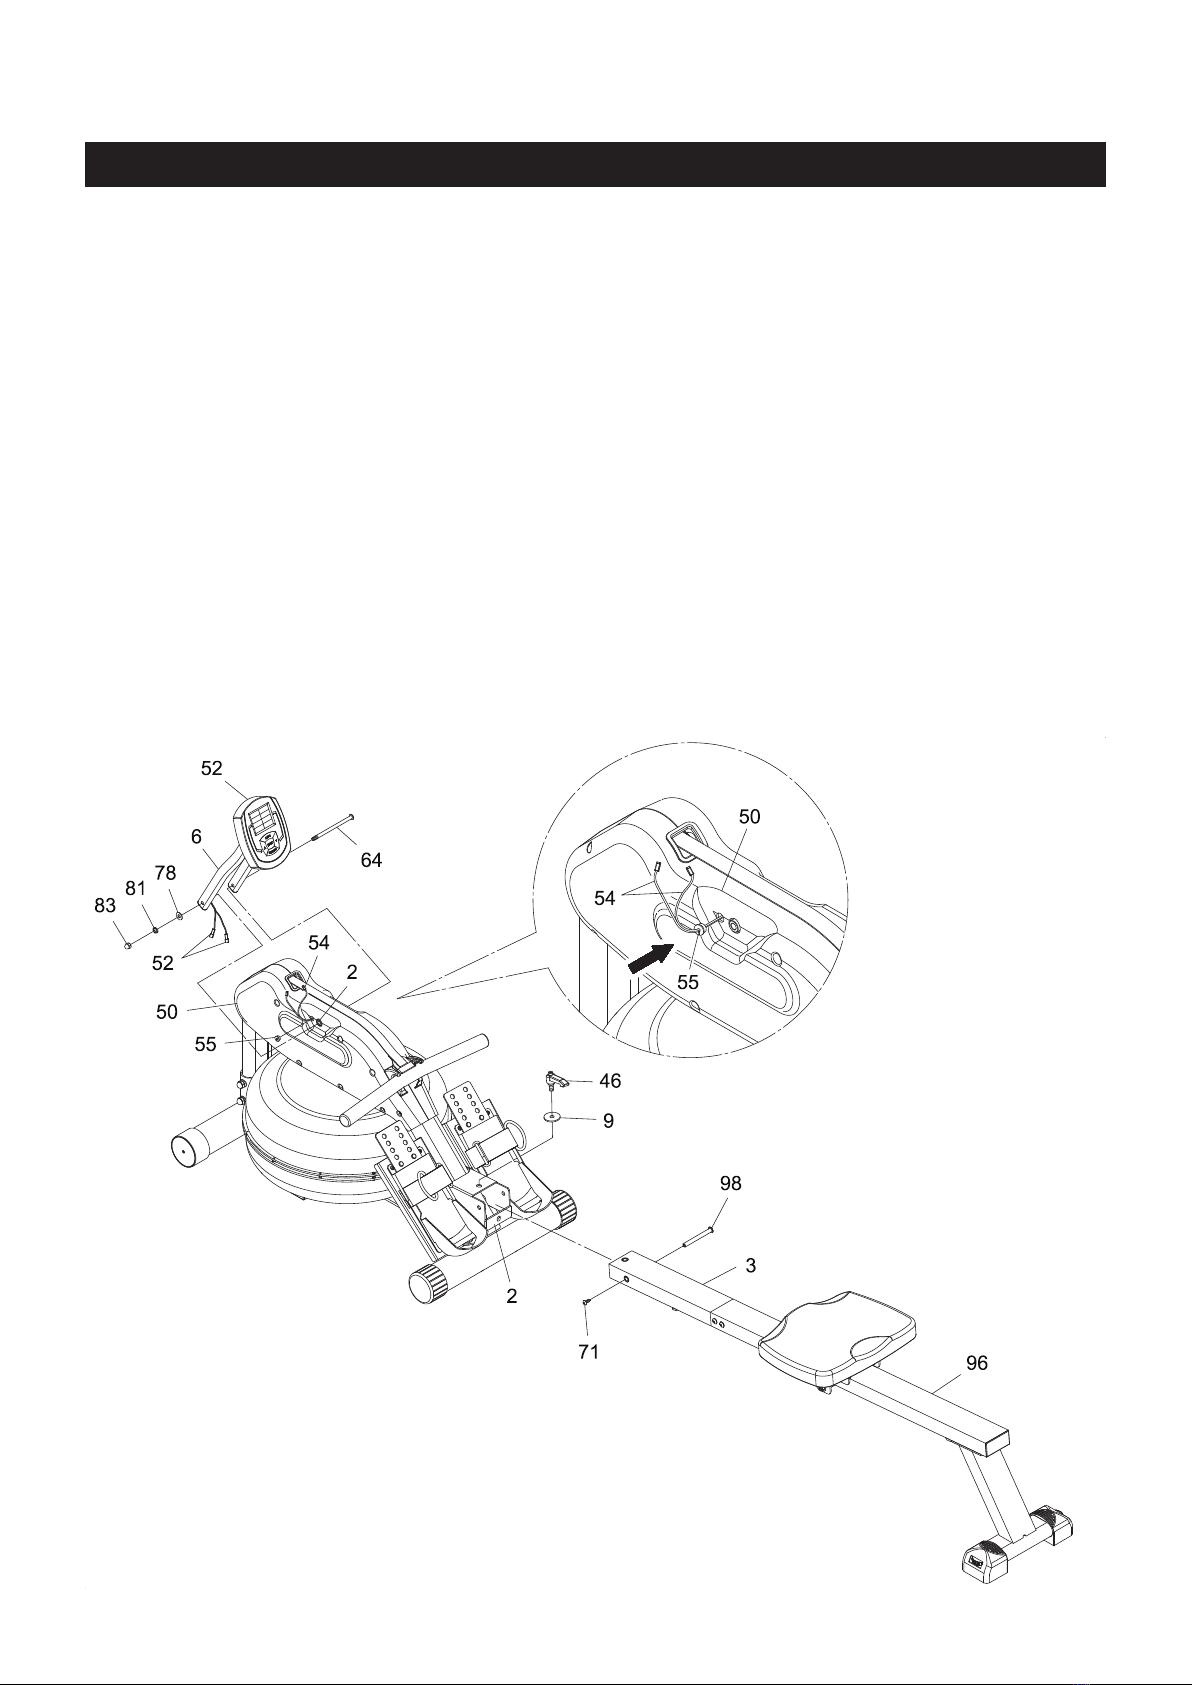
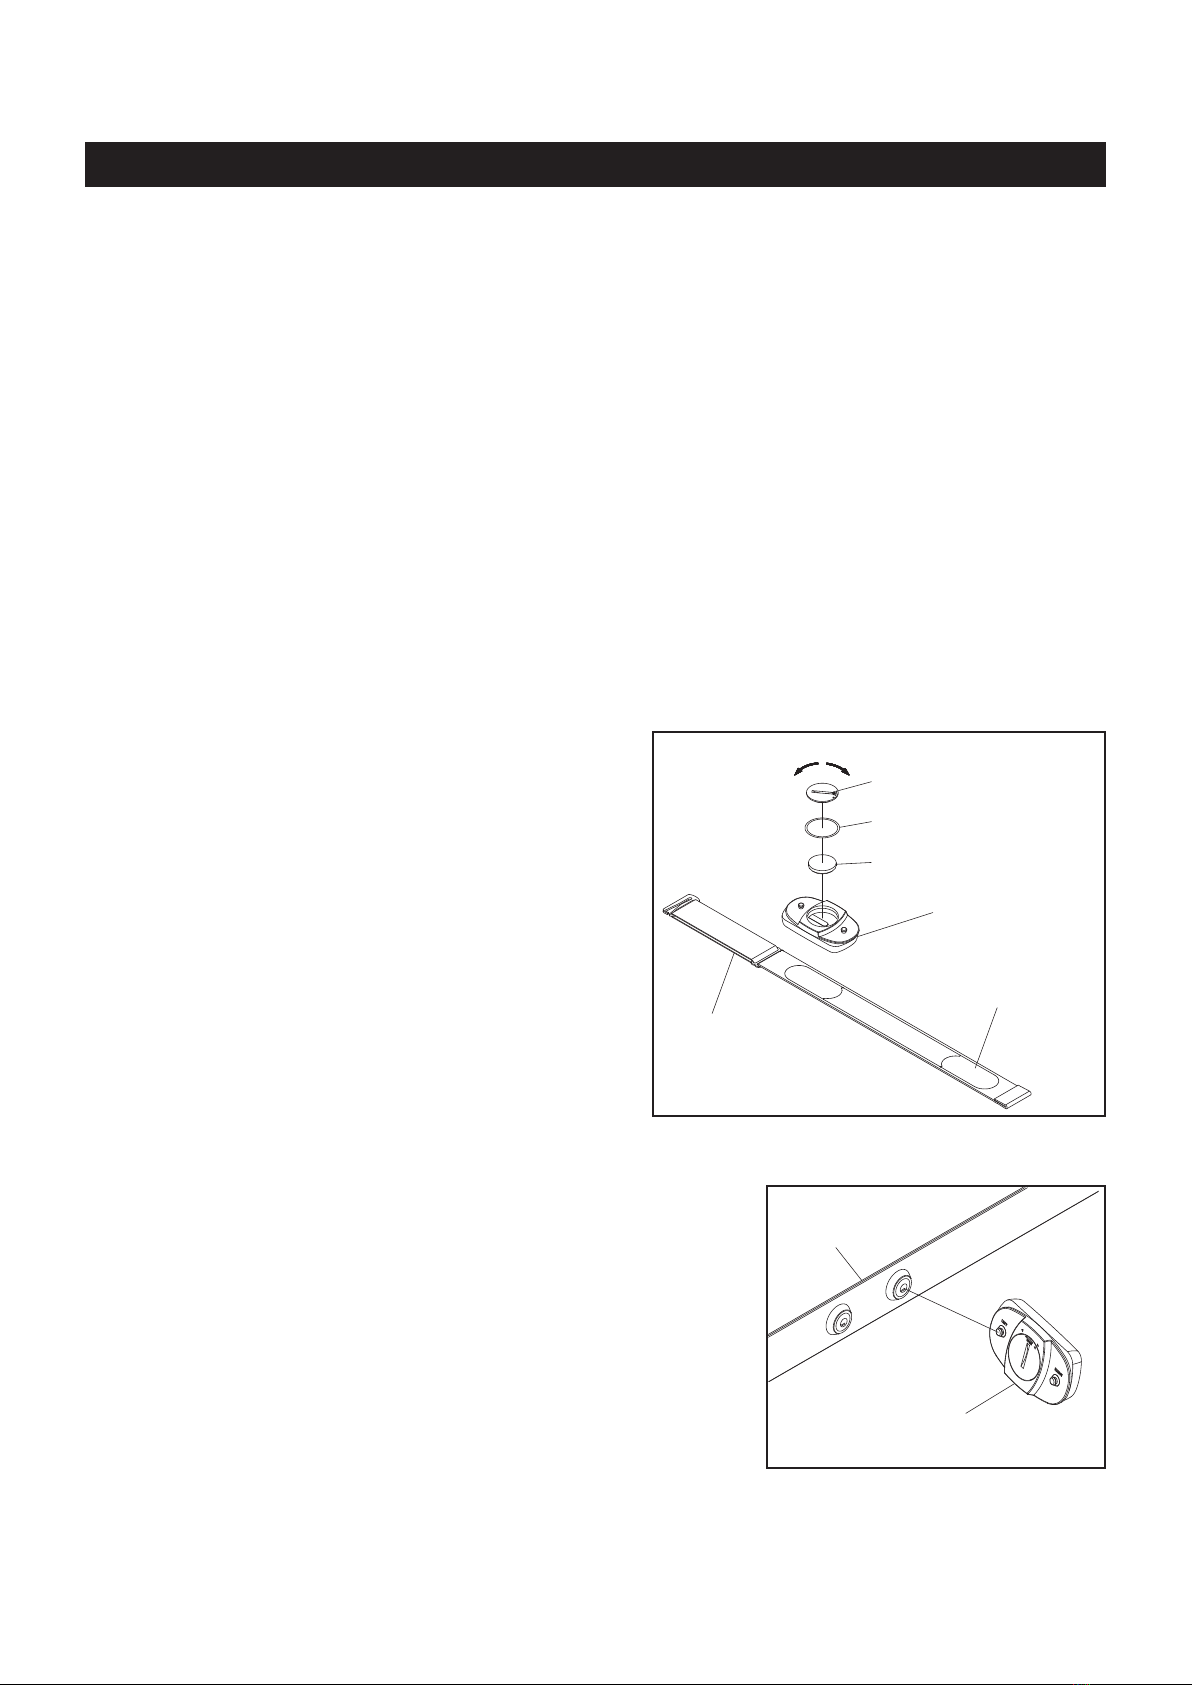
ASSEMBLY INSTRUCTIONS
8
STEP 1
Attach the REAR STAND(4) to the LONG RAIL(96) with HEX HEAD BOLTS(M8x1.25x15mm)(69) and
WASHERS(M8)(78).
STEP 2
Slide the SEAT(31) onto the LONG RAIL(96). Insert the SHORT RAIL(3) into the LONG RAIL(96), then secure
with BUTTON HEAD BOLTS(M8x1.25x15mm)(76) and FLAT SOCKET HEAD BOLTS(M8x1.25x15mm)
(90).
Place all parts from the box in a cleared area and position them on the oor in front of you. Remove
all packing materials from your area and place them back into the box. Do not dispose of the packing
materials until assembly is completed. Read each step carefully before beginning. If you are missing
a part, please go to staminaproducts.com under the Customer Care section and order the part
(in the U.S.). Our Customer Care Sta is available to assist you from 7:30 A.M. to 5:00 P.M. (Central
Time) Monday through Thursday and 8:00 A.M. to 3:00 P.M. (Central Time) on Friday.
Some product parts are t tested at the factory to ensure proper t and alignment. Marks in
the paint may be noticeable, but are not an indication of damage.
ASSEMBLY INSTRUCTIONS
9
STEP 3
Attach the SHORT RAIL(3) to the MAIN FRAME(2) with BUTTON HEAD BOLT(M6x1x15mm)(71) and
BARREL NUT(M8x1.25x88mm)(98). Lock the RAIL(3) in unfold position with the FIXING LEVER(46) and
LARGER WASHER(ø10.5mmxø40mmx3mm thick)(9).
NOTE: After tightening the FIXING LEVER(46) the rear stabilizer of the BASE FRAME(1) might be raised
o the oor slightly, this is normal, it will rest on the oor once you are seated.
STEP 4
Install two AA batteries into the METER(52), the batteries are not included. See page 13 for detailed
battery installation instructions. Attach the METER POST(6) to the MAIN FRAME(2) with BUTTON HEAD
BOLT(M8x1.25x130mm)(64), WASHER(M8)(78), LOCK WASHER(M8)(81), and ACORN NUT(M8x1.25)
(83).
STEP 5
Refer to the detail view. Clip the GROMMET(55) onto both SENSOR WIRES(54), then press the
GROMMET(55) into the LEFT COVER(50). Connect the SENSOR WIRES(54) to the CONNECTION WIRES
of the METER(52). Push the excess wires back into the LEFT COVER(50).
To assemble the HEART RATE TRANSMITTER(102),
insert the BUTTON BATTERY(CR2032)(106) as shown
in the illustration. Place the BATTERY RUBBER
RING(104) on the edge of the opening and place
the BATTERY COVER(105) over the BUTTON
BATTERY(CR2032)(106). Using a coin or similar object,
press down on the BATTERY COVER(105) and turn
to securely close the cover.
NOTE:
10
Using the Heart Rate Transmitter Chest Strap
The HEART RATE TRANSMITTER(102) worn around the chest is powered by a BUTTON BATTERY
(CR2032)(106) located in the back of the HEART RATE TRANSMITTER(102). Two electrodes on ELASTIC
SENSOR STRAP(103) monitor your heartbeat, and the adjustable ELASTIC SENSOR STRAP(103) holds
the transmitter in place. The receiver built into the Wave Water Rowing Machine 1450 picks up your heart
rate from the HEART RATE TRANSMITTER(102) and displays it on the monitor during your workout.
(102) Heart Rate Transmitter
(106) Button Battery
(105) Battery Cover
(104) Battery Rubber Ring
(103) Elastic
Sensor Strap
close
open
OPERATIONAL INSTRUCTIONS
The Wave Water Rowing Machine 1450 can measure how hard you are exercising by monitoring your
heart rate with the HEART RATE TRANSMITTER(102). Your heart rate reading gives you a snapshot of how
hard your heart is working at that point in your workout by measuring the number of heart beats per minute.
The HEART RATE TRANSMITTER(102) worn around your chest sends your heart rate information to a
receiver inside the METER(52) so your heart rate is tracked while you exercise. This is the most reliable
way to measure your heart rate to make sure you are exercising within your target heart rate zone so you
get the most out of your workout time.
HEART RATE TRANSMITTER
Heart Rate
Sensor Electrode
1. Make sure to close the BATTERY COVER
(105) very tightly as illustrated to prevent
sweat and moisture from damaging the
battery.
2. The HEART RATE TRANSMITTER(102) is
latex free and its material is appropriate for
human contact.
(103) Elastic
Sensor Strap
(102) Heart Rate Transmitter
Referto the illustration.Pressthe HEART RATE TRANSMITTER(102)
onto the buttons on the ELASTIC SENSOR STRAP(103).

NOTE: If your heart rate is inconsistent or not tracking on your workout monitor, do the following:
The HEART RATE TRANSMITTER(102) will connect to the monitor while using the unit and
within close proximity of the unit. If you are too far from the unit the connection will be lost.
Moisten the heart rate sensor electrodes on the back of the ELASTIC SENSOR STRAP(103)
and make sure they are in contact with the skin. Your skin may be dry when you begin your
workout and the moisture is necessary to ensure contact. As you sweat, contact will improve.
Tighten the elastic strap so it remains in place as you exercise. Movement of the heart rate sensor
electrodes will result in inaccurate or erratic signal and readings.
Clean the heart rate sensor electrodes as dirt can interfere with transmission. Use a mild soap
and water and dry with a soft towel.
Wash regularly with mild soap and water solution and dry with a soft towel being careful not to scratch
the heart rate sensor electrodes.
Store in a cool, dry place. Make sure the heart rate sensor electrodes aren’t stored with any wet material
and never store a wet transmitter in non-breathable material like a plastic bag or sports bag.
Do not stretch the heart rate sensor electrodes.
Transmitter Care and Maintenance
OPERATIONAL INSTRUCTIONS
NOTE: The frequency of the receiver built into the Wave Water Rowing Machine 1450 is 5 kHz. All
compatible heart rate transmitters from other companies will work with the Wave Water Rowing
Machine 1450.
11
To wear the HEART RATE TRANSMITTER(102) around the chest, hook the hook end of the ELASTIC
SENSOR STRAP(103) to the other end of the ELASTIC SENSOR STRAP(103). Adjust the ELASTIC
SENSOR STRAP(103) to t your chest snugly as shown in the illustration below. Apply water or conductive
gel to moisten the heart rate sensor electrodes. These heart rate sensor electrodes must be wet and in
contact with your chest skin to properly detect your heart rate.
(103)Elastic Sensor Strap(103)Elastic Sensor Strap
Hook
OPERATIONAL INSTRUCTIONS
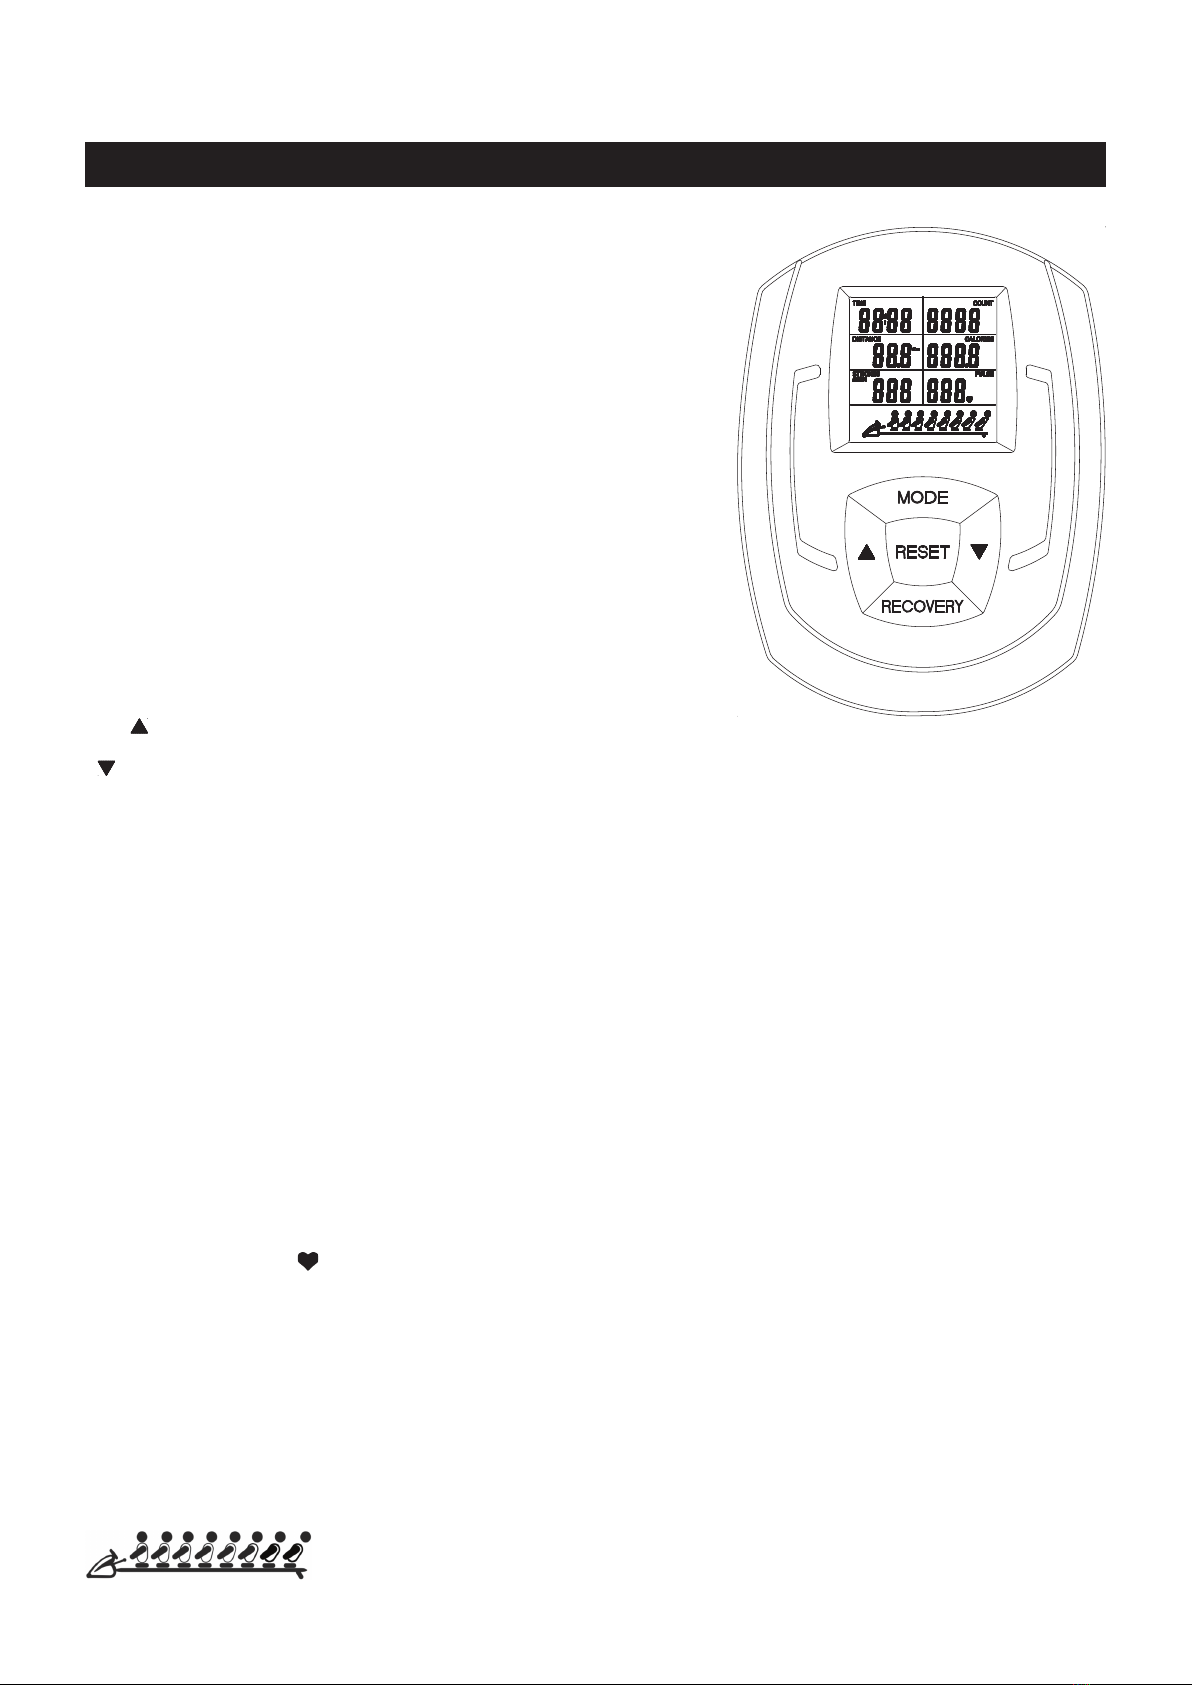
USING THE FITNESS METER
TIME:
COUNT:
DISTANCE:
CALORIES:
STROKES/MIN:
PULSE:
POWER OFF: Automatically shuts off after 4 minutes of
inactivity.
POWER ON:
FUNCTIONS:
Displays the time from 1 sec. up to 99:59 minutes. Counts down from preset value.
Displays the total number of rows you have taken from zero to 9999.
Displays distance from zero to 99.9 Kilometers. Counts down from preset value.
Displays the calorie burned from zero to 9999 Kcal. Counts down from preset value.
The calorie readout is an estimate for an average user. It should be used only as a
comparison between workouts on this unit.
Displays the rowing speed from zero to 999 strokes per minute.
Displays the heart rate, from 40 to 240 beats per minute.
To use this function, you must wear the HEART RATE TRANSMITTER(102) around your
chest so the receiver which is built into the rower registers your heart rate from the HEART
RATE TRANSMITTER(102) for displaying. Each heart rate signal will be accompanied with
one “ “ symbol ash. If you do not wear the HEART RATE TRANSMITTER(102) around
your chest correctly, a “P” mark will be displayed.
You can use UP, DOWN,and RESET buttons to input your target pulse value. When you
are exercising, the meter will remind you with an audible alarm when you reach or exceed
your target pulse value. Slow your exercise intensity gradually to stay within your target
pulse zone.
NOTE: The HEART RATE TRANSMITTER(102) is not a medical device. Maintaining a
consistent signal can be dicult due to the varying distances experienced during the rowing
stroke. The pulse function is a great tool to optimize your workout, but should be used as
a reference only.
FUNCTION BUTTONS :
MODE : Press and release to select each function for
preset target values for TIME, COUNT, DISTANCE,
CALORIES, and PULSE.
In the setting mode, press the button to reset the
setting values to zero for TIME, COUNT, DIS-
TANCE, and CALORIES. And reset the setting
value of PULSE to 90.
Press the button and hold it down for two seconds
to reset all functions to zero.
RESET :
Press to increase the values of the setting mode.
(UP):
Handlebar movement or press any button.
Press to decrease the values of the setting mode.
(DOWN):
TRAVEL DISTANCE INDICATOR:
Indicates the travel distance on the rower during exercise.
12
RECOVERY: Press to activate the pulse recovery function after training. You must wear the HEART RATE
TRANSMITTER(102) around your chest to measure your heart rate.

OPERATIONAL INSTRUCTIONS
PRESET VALUES OPERATION:
You can pull on the HANDLEBAR(8) to power on the meter and workout with the meter directly. Or, you can
preset the function values for counting down. Stop rowing for four seconds, then press the MODE button to
enter setting mode. The meter will go through the input items as follows and allow you to set the function
values. Use UP, DOWN,and RESET buttons to input the values, and press MODE button to conrm. Or,
just press the MODE button to skip the setting and move on to the next function. After all the desired settings
are chosen, begin pulling on the HANDLEBAR(8) to start the workout.
Time (1:00 to 99:00) Count (10 to 9990) Distance (0.01 to 99.9 Km) Calories (1.0 to 9999 Kcal) Pulse (90 to 220 bpm)
NOTE:
1. You may preset values for several functions. The preset function values will start to count down.
When you complete one of the preset functions, the meter will remind you with an audible alarm for
three seconds. Then the value of this completed function will start to count up, while the other preset
functions will continue to count down.
2. The Meter will shut o automatically after 4 minutes of inactivity. All function values will be kept. Press
the RESET button and hold it down for two seconds to reset all functions to zero.
13

OPERATIONAL INSTRUCTIONS
The PULSE RECOVERY function measures how quickly you return to a resting heart rate after exercising.
You can use this function to measure improvement as you get into shape. The meter will monitor your heart
rate for 60 seconds and calculate a Pulse Recovery value from 1 to 6.
1.0 = Excellent 2.0 = Good 3.0 = Fair
4.0 = Below Average 5.0 = Not Good 6.0 = Poor
1. You can press the RECOVERY button at any time to run pulse recovery program, even during
your workout.
2. Once the pulse recovery function starts, the TIME will count down from 60 seconds to zero. You
can press the RESET button to quit the pulse recovery function. If no heart rate signal is available,
a “P” mark will display in PULSE window. And an “E” mark will display in pulse recovery value
window when the TIME reaches 0.
The readout should only be used as a comparison between workouts. It can be used right after any aerobic
exercise. Stop exercising before starting this function.
To start the pulse recovery function, your heart rate will be displayed approximately ve (5) seconds after
the heart symbol is displayed. Then press the RECOVERY button. During the pulse recovery function, only
PULSE and TIME are working and the display will be as shown in illustration A. TIME will count down from
0:60 and the heart symbol will be blinking. When the TIME reaches 0, the meter will remind you with an
audible alarm for three seconds and show your pulse recovery condition from 1.0 to 6.0. See illustration B.
Press any button to exit the pulse recovery function and skip to Activity Mode.
NOTE:
NOTE: To use this program, you must wear the HEART RATE TRANSMITTER(102) around your chest.
PULSE RECOVERY FUNCTION
A. B.
Current heart rate
( A "P" mark will be
displayed if a proper
heart rate signal is
unavailable.)
The highest
heart rate
detected during
the rst 20
seconds.
Pulse Recovery
value
End heart
rate
1. Use your nger or a simple tool to pry the cover from the back of
the METER(52).
2. The METER(52) operates with two AA batteries (1.5V each), the
batteries are not included. Refer to the illustration to install or
replace the batteries.
HOW TO INSTALL AND REPLACE BATTERIES: AA Batteries
1. Do not mix a new battery with an old battery.
2. Use the same type of battery. Do not mix an alkaline
battery with another type of battery.
3. Rechargeable batteries are not recommended.
4. Ultimate disposal of battery should be handled
according to all state and federal laws and regulations.
5. Do not dispose of batteries in re.
NOTE:
Time Time
The lowest heart rate
detected during the
Pulse Recovery running.
14

OPERATIONAL INSTRUCTIONS
15
HOW TO FILL AND EMPTY THE TANK
1. Remove the FILL PLUG(24) from the UPPER TANK(17).
2. To ll with water, refer to illustration A. Place the FUNNEL(101) into the tank. Use a water cup, or
the SYPHON PUMP(100) and a bucket to ll the tank. Use Water Level Gauge on the side of tank to
measure volume of water in tank to the desired level.
3. To empty tank, refer to illustration B. Place a bucket next to the rower. Use the SYPHON PUMP(100)
to pump out the water from the tank into the bucket.
4. Once completed, insert the FILL PLUG(24) into the UPPER TANK(17). Please wipe excess water
from the frames after lling.
NOTE:
WATER LEVEL
Refer to the detail view of illustration A. The Water Level Gauge is positioned on the side of the tank. The
maximum level to ll the tank is Level 10. DO NOT ll above the Maximum Level - this could void the
warranty. The standard calibration level is Level 9.
The amount of resistance is dictated by the amount of water in the tank. For example Level 3 of water
oer light resistance, Level 9 oers the heaviest resistance.
A. B.
Water Cup
Water Level Gauge
1. Fill the tank only with municipal water, do not use well water. If municipal water is unavailable,
use distilled water and add a water purication tablet. NEVER USE POOL CHLORINE OR
CHLORINE BLEACH. Refer to the Maintenance section for more advice on water treatment.
2. The water in the tank is not for human or animal consumption. Please safely dispose of the
water properly after removal from the tank.
The safety and integrity designed into the Wave Water Rowing Machine 1450 can only be maintained
when the Wave Water Rowing Machine 1450 is regularly examined for damage and wear. Special
attention should be given to the following:
1. Sit on the SEAT(31) and pull on the HANDLEBAR(8) to verify that the Water System provides resistance
and the seat travel is smooth and stable.
2. Periodic maintenance is required to maintain proper condition of the water in the tank. The water must
be refreshed periodically by adding a water purication tablet, such as sodium dichlor (56% chlorine)
every 4-6 months. NEVER USE POOL CHLORINE (TRICHLOR 90% CHLORINE) OR CHLORINE
BLEACH. Use of these products will void the warranty and damage the product.
3. Clean the tank periodically. DO NOT use methylated spirits, chlorates, bleach or ammonia based uids.
The use of improper cleaning products will void the warranty and damage the product.
4. Clean the roller tracks on the RAILS(3, 96) with an absorbent cloth.
5. Verify that the CAUTION LABEL(94) is in place and easy to read. Call Stamina Products immediately
at 1-800-375-7520 for a replacement CAUTION LABEL(94) if it is missing or damaged.
6. It is the sole responsibility of the user/owner to ensure that regular maintenance is performed.
7. Worn or damaged components shall be replaced immediately or the Wave Water Rowing Machine
1450 removed from service until repair is made.
8.
Only Stamina Products supplied components shall be used to maintain/repair the Wave Water Rowing Machine 1450.
9. Keep your Wave Water Rowing Machine 1450 clean by wiping it o with an absorbent cloth after use.
STORAGE
MAINTENANCE
16
1. To store the Wave Water Rowing Machine 1450, simply keep it in a clean dry place.
2. To avoid damage to the electronics, remove the batteries before storing the Wave Water Rowing
Machine 1450 for one year or more.
3. Move the Wave Water Rowing Machine 1450 with the moving wheels on the front of the BASE
FRAME(1). Grasp the REAR STAND(4) to move the Wave Water Rowing Machine 1450.Do not
use the SEAT(31) to move the Wave Water Rowing Machine 1450.The SEAT(31) will move and the
SEAT CARRIAGE(5) may pinch your hand or ngers.
4. Remove water from tank if storing the rower for more than a month without use.
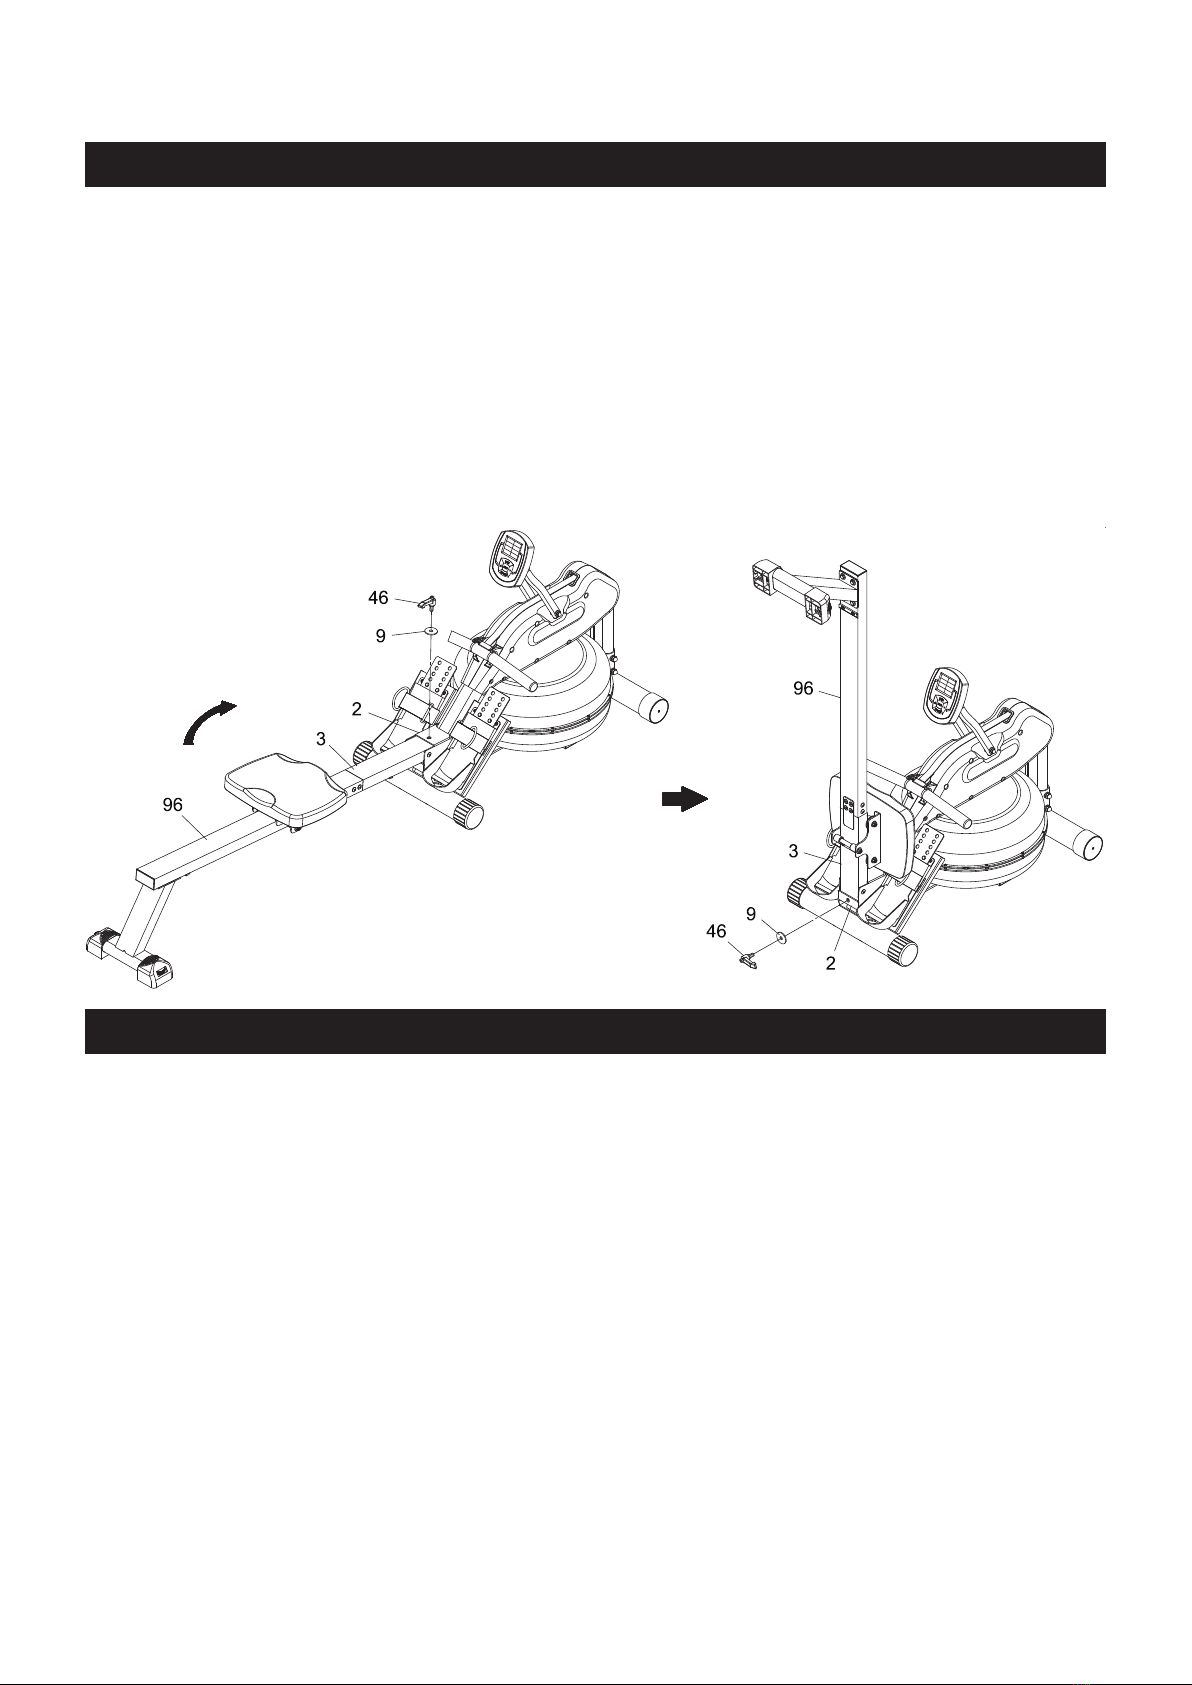
5.
Follow the following process to fold the Wave Water Rowing Machine 1450 as illustrated for easy storage.
a. Remove the FIXING LEVER(46) and LARGER WASHER(9) from the MAIN FRAME(2).
b. Fold the RAILS(3, 96) and lock in the folded position with the FIXING LEVER(46) and LARGER
WASHER(9).
A. B.

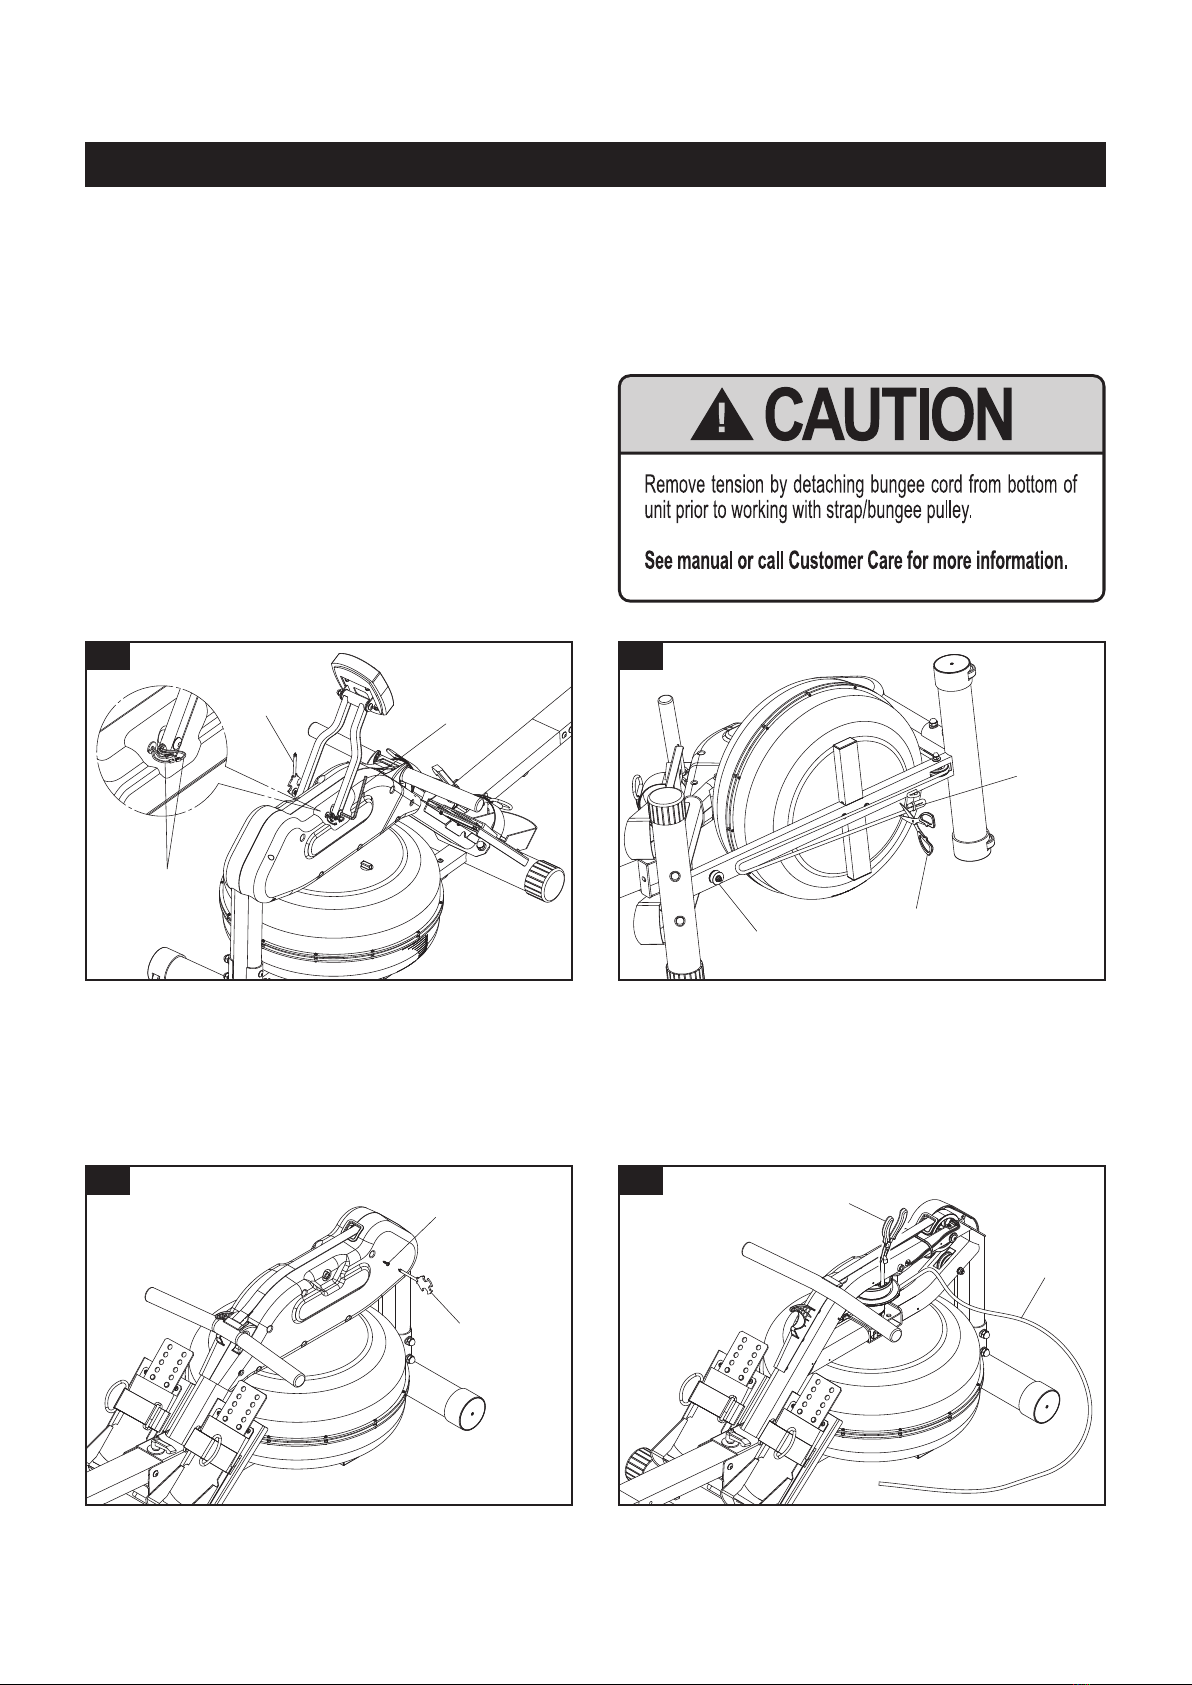
TROUBLE SHOOTING GUIDE
Sensor Wires
Allen Wrench
Wrench
Scissor
Bungee
Cord Tie
Wrench
Screw
Strap
3. 4.
1. 2.
Disconnect the Sensor Wires. Remove the Meter
Post Assembly hardware with Wrenches and
remove the Meter Post Assembly.
Detach the Bungee Cord from the Bungee Pulley
at the bottom of rower to release the Bungee
Cord tension. Unhook the Bungee Cord from the
hook locketed at the bottom of rower. Cut o the
Bungee Cord as close as possible to the Bungee
Cord Tie.
Remove all the Screws from the Right Cover and
remove Right Cover.
Slowly pull out the current Strap. Carefully rotate
the Strap/Bungee Pulley to release the Loop Pad
on the Strap.
The following are instructions for removing
the current STRAP(95) and installing the new
STRAP(95).
Please take a moment to read the caution posted
on the rower inside the covers.
17
STRAP REPLACEMENT
Over time, the STRAP(95) may become frayed or worn. If your Wave Water Rowing Machine 1450
is within the 90 day warranty, a replacement STRAP(95) is available by contacting Stamina Customer
Care at customer[email protected]. If your Wave Water Rowing Machine 1450 is not under
warranty, you can purchase a replacement STRAP(95).
Bungee
Pulley

Bungee
Cord
Bungee Cord
10.9.
7. 8.
Bungee
Pulleys
Sensor Wires
Allen Wrench
Wrench
Wrench
Screw
Attach the Meter Post Assembly back to the
frame. Connect the Sensor Wires.
Attach the Right Cover back to the frame. Place
the Handlebar on the Handlebar Holder.
Rotate the Strap/Bungee Pulley enough to place
the Handlebar up against the Strap Pulley. Run
the Bungee Cord through the Bungee Pulleys.
Secure the Bungee Cord to the frame with the
Cable Ties as illustrated.
Bungee Pulley
Strap Pulley
Place the Handlebar
at this position.
Cable Ties
Strap
Loop Pad of the
Strap facing down.
5.
Make sure the Loop Pad of the new Strap is
facing down, run the Strap through the Protection
Ring, then run over and around the Strap Pulley.
Strap Pulley Strap
Loop Pad of the Strap
6.
Run the Strap through the Strap Pulley, turn it
90 degrees on the Idler Roller, then attach to the
Strap/Bungee Pulley with the Loop Pad.
Strap/
Bungee Pulley
Strap Pulley
Idle Roller
TROUBLE SHOOTING GUIDE
18
Protection
Ring
TROUBLE SHOOTING GUIDE
Sensor Wires
Allen Wrench
Wrench
Wrench
Screw
Bungee
Cord
Pliers
4.3.
1.
Disconnect the Sensor Wires. Remove the Meter
Post Assembly hardware with Wrenches and
remove the Meter Post Assembly.
Remove all the Screws from the Right Cover and
remove Right Cover.
Use a Pliers to pull out the current Bungee Cord.
19
The following are instructions for removing the
current BUNGEE CORD(88) and installing the
new BUNGEE CORD(88).
Please take a moment to read the caution posted
on the rower inside the covers.
BUNGEE CORD REPLACEMENT
Over time, the BUNGEE CORD(88) may become frayed or worn. If your Wave Water Rowing Machine
1450 is within the 90 day warranty, a replacement BUNGEE CORD(88) is available by contacting
Stamina Customer Care at customer[email protected]. If your Wave Water Rowing Machine
1450 is not under warranty, you can purchase a replacement BUNGEE CORD(88).
Scissor
Bungee
Cord Tie
2.
Detach the Bungee Cord from the Bungee Pulley
at the bottom of rower to release the Bungee
Cord tension. Unhook the Bungee Cord from the
hook locketed at the bottom of rower. Cut o the
Bungee Cord at the position close to the Bungee
Cord Tie.
Bungee
Pulley
TROUBLE SHOOTING GUIDE
Bungee Cord
9.
8.7.
Sensor Wires
Allen Wrench
Wrench
Wrench
Screw
Attach the Meter Post Assembly back to the
frame. Connect the Sensor Wires.
Attach the Right Cover back to the frame. Place
the Handlebar on the Handlebar Holder.
Secure the Bungee Cord to the frame with the
Cable Ties as illustrated.
Cable Ties
Bungee
Cord
5.
Run the new Bungee Cord through the Strap/
Bungee Pulley, and pull the Bungee Cord to the
end.
Strap/
Bungee Pulley
Bungee
Cord
6.
Bungee
Pulleys
Rotate the Strap/Bungee Pulley enough to place
the Handlebar up against the Strap Pulley. Run
the Bungee Cord through the Bungee Pulleys.
Bungee Pulley
Strap Pulley
Place the Handlebar
at this position.
20
Table of contents
Other STAMINA WAVE Home Gym manuals


