Stanley DONARD 60K User manual

DONARD 60K GAS FIRED
To ensure safety, satisfaction and reliable service, this Cooker should be installed by a suitably qualified
and competent person. The provision of a Central Heating facility, requires that the hot water systems
involved, conform fully to good plumbing practice and established standards.
INSTALLATION AND OPERATING INSTRUCTIONS
TO BE LEFT WITH END USER
(SUPER STAR 60K GAS COOKER)

TABLE OF CONTENTS PAGE NO.
1. Introduction ....................................................................................................................................... 3.
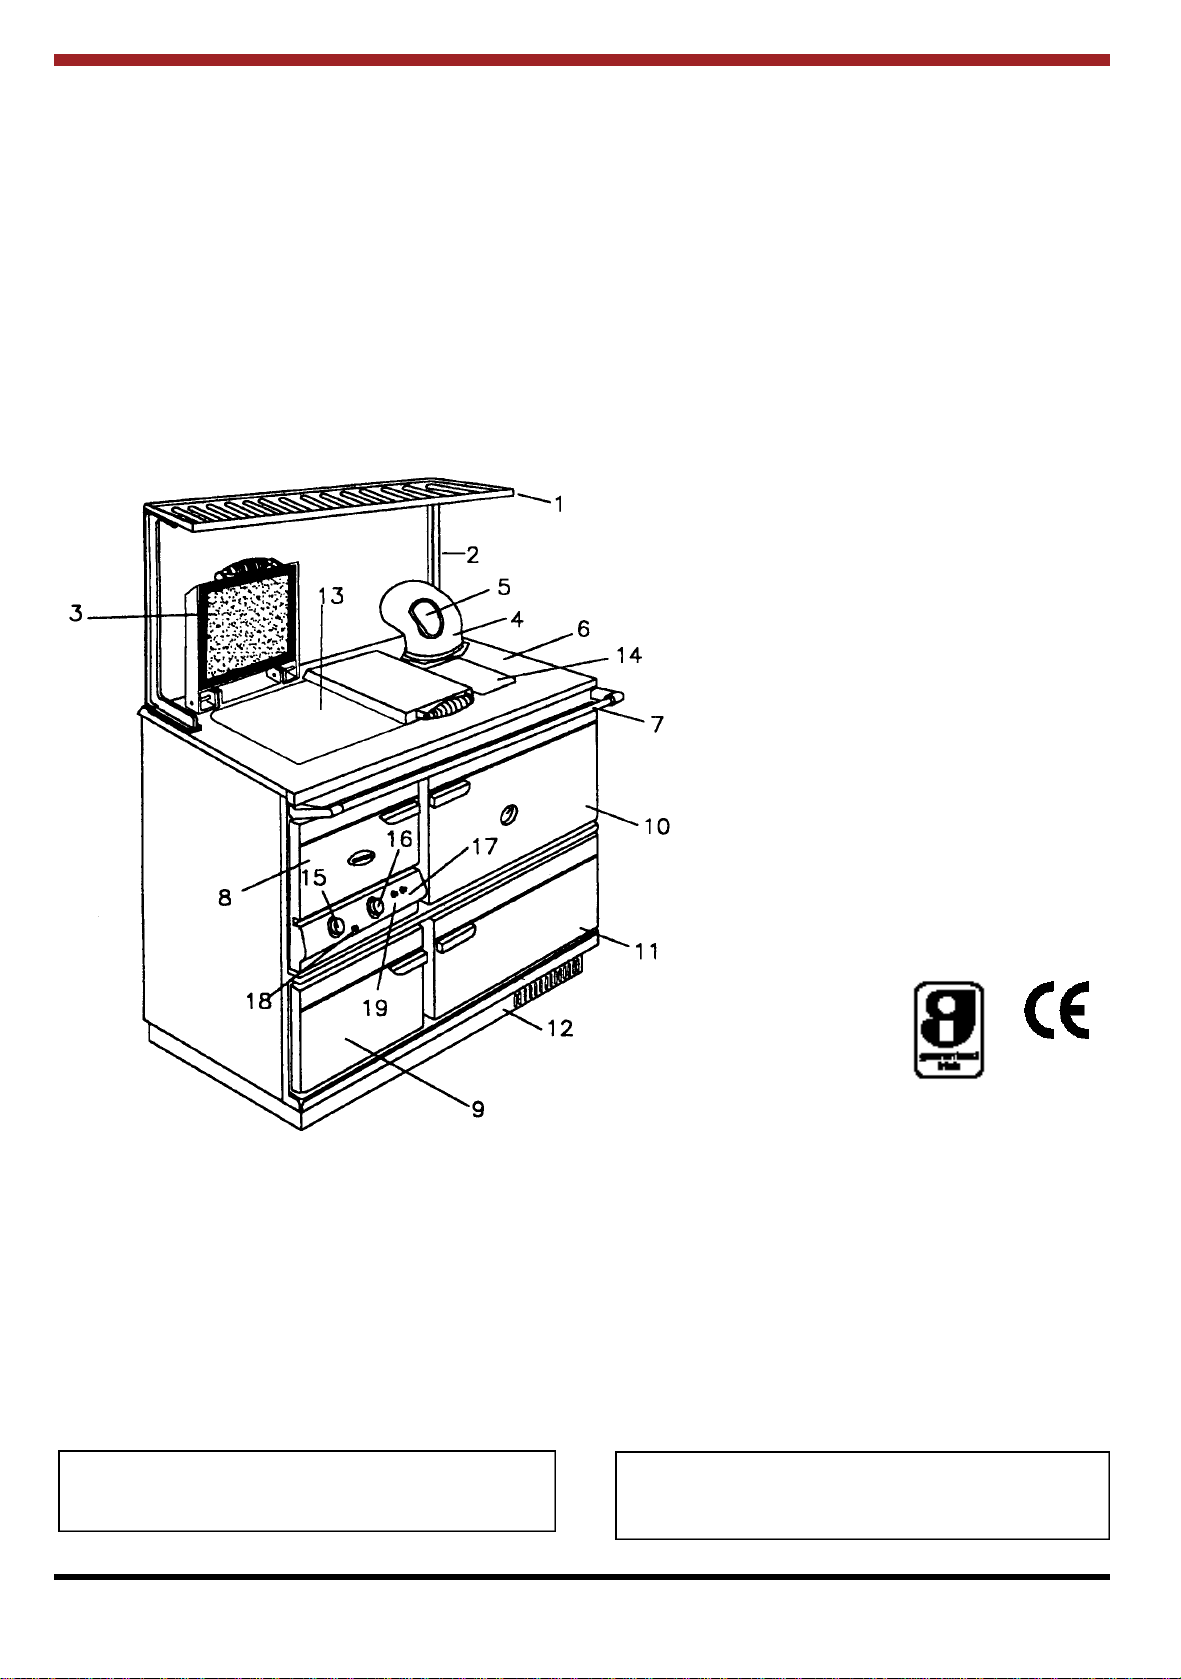
2. Specification .......................................................................................................................................4
3. Technical Data .................................................................................................................................. 5.
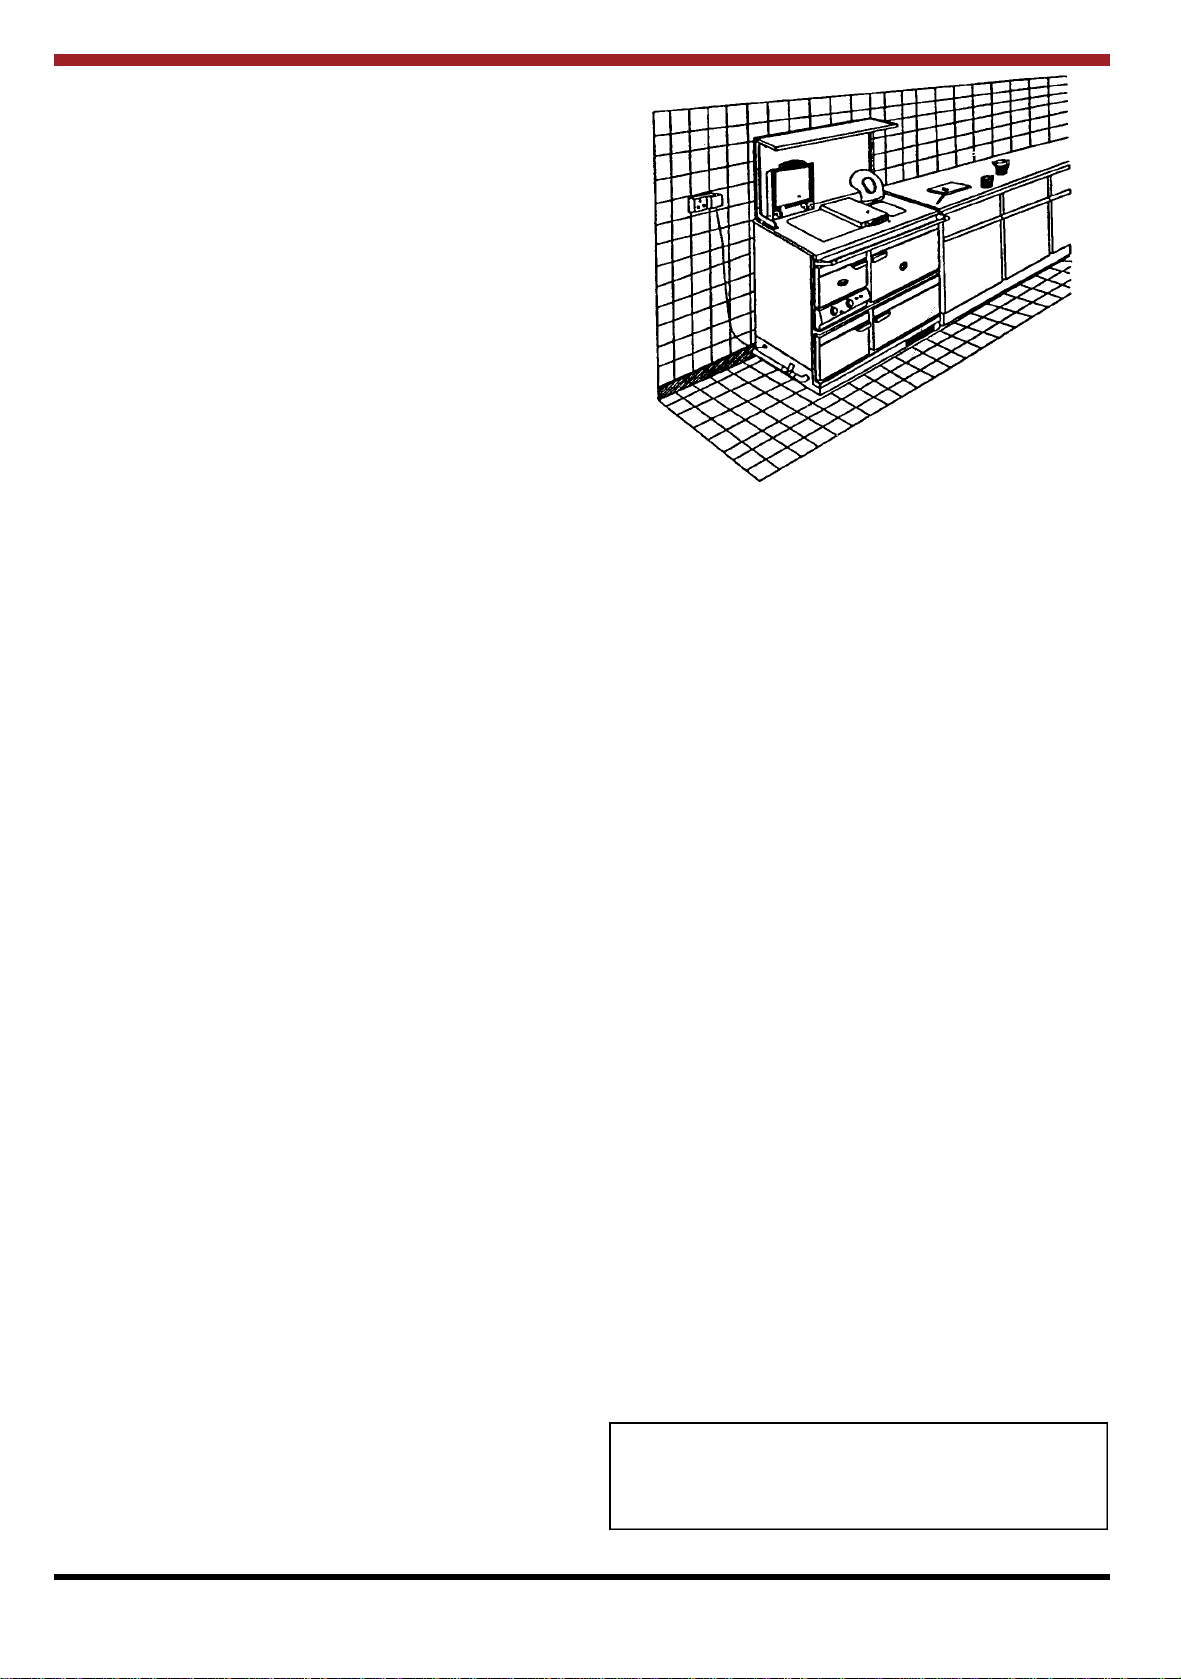
4. Location ............................................................................................................................................ 6.
5. Electrical Supply ............................................................................................................................... 6.
6. Gas Pipes & Fittings ......................................................................................................................... 6.
7. Meters ............................................................................................................................................... 6.
8. Gas Pipe Size .................................................................................................................................... 6.
9. Hearth Construction .......................................................................................................................... 7.
10. Installation ......................................................................................................................................... 7.
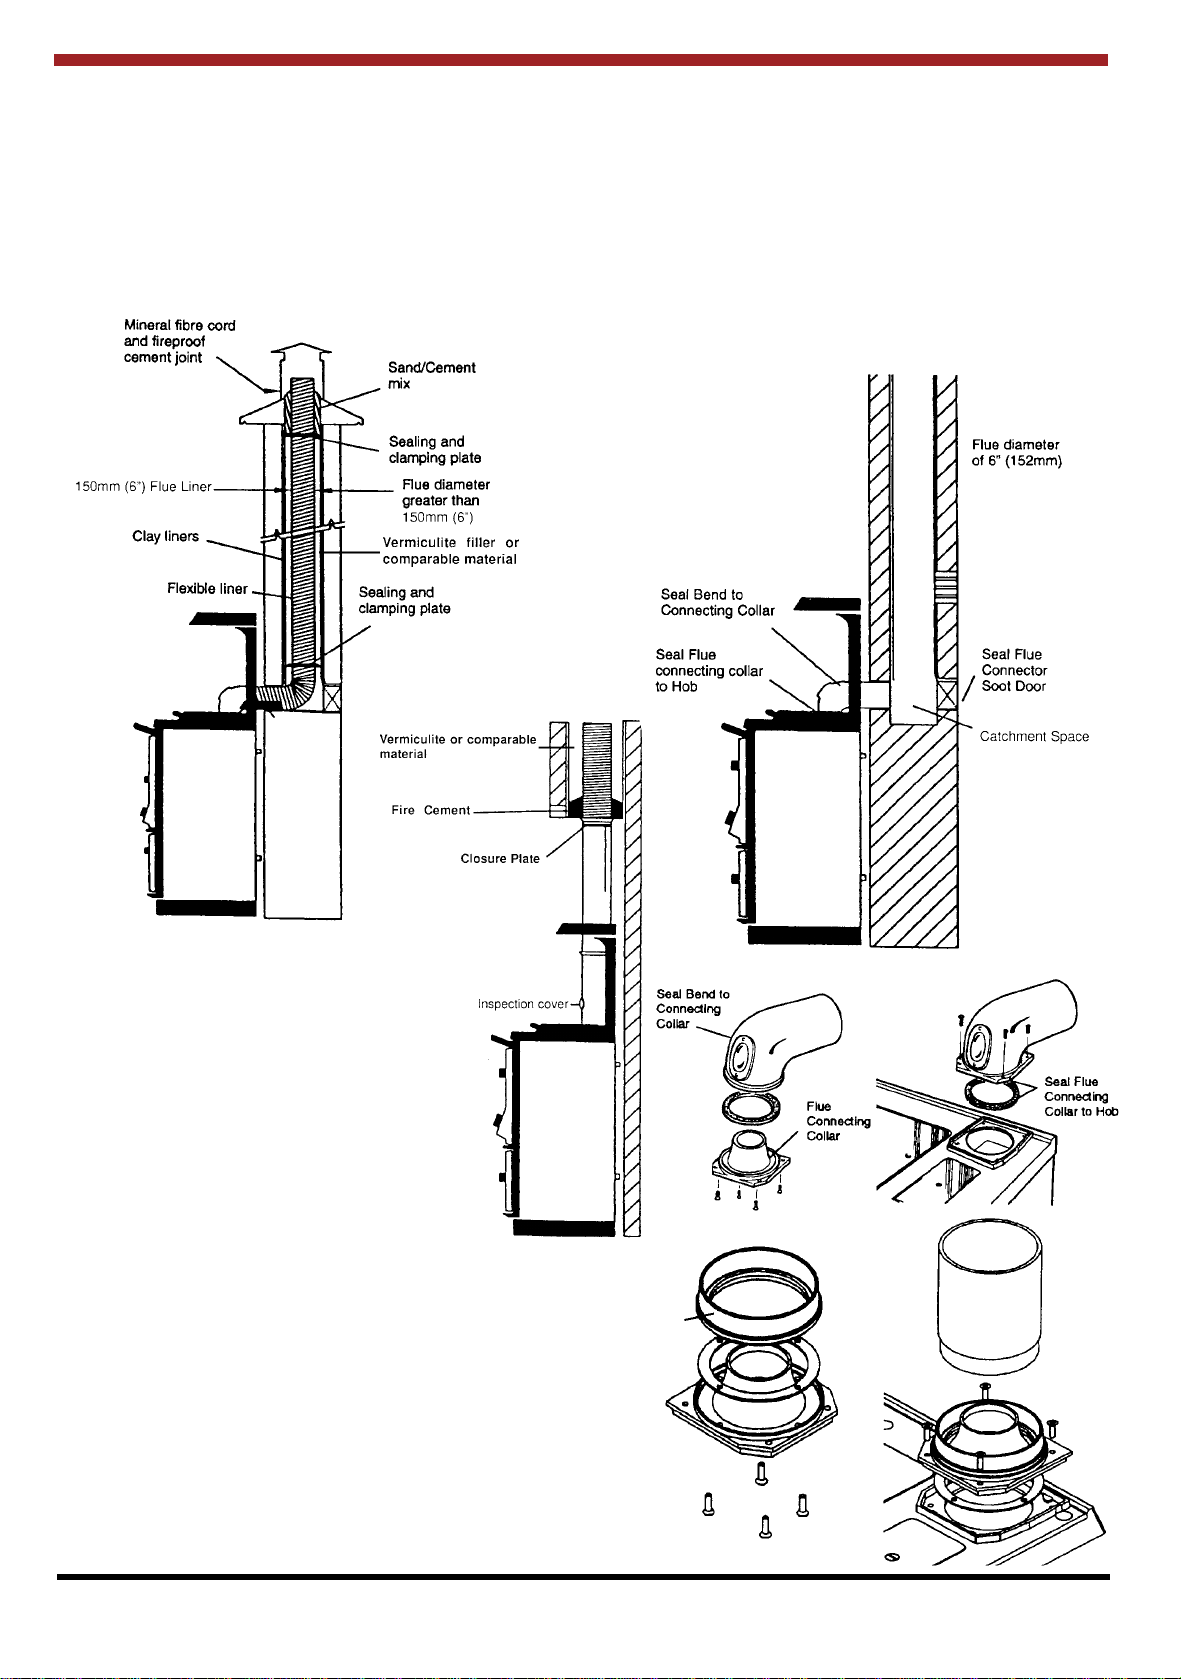
11. Chimney’s .......................................................................................................................................... 7.
12. Pre-Installation Check........................................................................................................................ 7.
13. Sealing............................................................................................................................................... 7.
14. Flue Height..........................................................................................................................................8
15. Flues ................................................................................................................................................. 8.
16. Suitable Material ............................................................................................................................... 8.
17. Connections ...................................................................................................................................... 8.
18. Draught Requirements....................................................................................................................... 8.
19. Flue Cleaning..................................................................................................................................... 8.
20. Down Draughts ................................................................................................................................. 9.
21. Use of Existing Chimneys and Flues ................................................................................................ 9.
22 Factory Made Insulated Chimneys ................................................................................................... 9.
23. Flue Liner .......................................................................................................................................... 9.
24. Ventilation and Combustion Air Requirements ................................................................................ 10.
25. Outside Air Connection..................................................................................................................... 10.
26. Clearance to Combustibles .............................................................................................................. 11.
27. Gas Connection.................................................................................................................................12.
28. Heating .............................................................................................................................................12.
29 Water Pipe Fittings ............................................................................................................................13.
30. Plumbing Drawings............................................................................................................................13.
31. Safety Valve.......................................................................................................................................14.
32. S Plan Wiring Diagram......................................................................................................................14.
33. By Pass Loop ....................................................................................................................................15.
34. Airing Cupboard Layout.....................................................................................................................15.
35. Provision for Filling Sealed Systems.................................................................................................16.
36. Water Circuit Temperature.................................................................................................................16.
37. Pipe Thermostats ..............................................................................................................................16.
38. Care for your Central Heating System..............................................................................................16.
39. General Maintenance ........................................................................................................................17.
40. Servicing............................................................................................................................................17.
41. Draining..............................................................................................................................................17
42. Indirect Domestic Cylinder ................................................................................................................17.
43. Commissioning Procedures and Checks ..........................................................................................17.
44. Operation...........................................................................................................................................18.
45. Ovens................................................................................................................................................19.
46. Cental Heating...................................................................................................................................19.
47. Summer Setting.................................................................................................................................19.
48. Hotplate.............................................................................................................................................19.
49. Hotplate Insulating Covers ................................................................................................................19.
50. Cooking Utensils................................................................................................................................19.
51. Heating System Controls...................................................................................................................19.
52. Opening Cooker Door .......................................................................................................................20.
53. Cleaning ............................................................................................................................................20.
54. Mild Steel...........................................................................................................................................21.
55. External Automatic Time Switch........................................................................................................21.
1

2
PAGE NO.
56. Condensation ....................................................................................................................................21.
57. Ovens ................................................................................................................................................21.
58. Hotplate.............................................................................................................................................21.
59. Servicing & Cleaning of the Appliance..............................................................................................21.
60. Chimney Cleaning .............................................................................................................................22.
61. Burner Removal.................................................................................................................................22.
62. Wiring Diagram..................................................................................................................................23.
63. Wiring Diagram..................................................................................................................................24.
64. Trouble Shooting Guide.....................................................................................................................25.

Congratulations on purchasing this fine Irish made Gas-Fired Central Heating Cooker. It is built to exacting
standards and it will give you every satisfaction in use. We invite you to read carefully the operating and
installation instructions provided. This will enable you to familiarise yourself with this appliance.
In your own interest and that of safety, it is the law that all gas appliances are installed and commissioned by
competent persons in accordance with the Gas Safety Installation and Use Regulations 1998 (as amended).
Cookers can become very hot with use and retain their heat for a long period of time after use.
Children, aged or infirm persons should be supervised at all times and should not be allowed to touch
the hot surfaces or be in the vicinity when in use or until the appliance has cooled down after use.
This is a combination appliance capable of providing up to 17.6 kW (60,000 Btu’s/hr) to water. Space heating
to room in which the appliance is installed is 3.67 kW (12,000 Btu’s/hr) approximately.
The complete installation must be done in accordance with current Standards and Local Codes. It should be
noted that the requirements and these publications may be superseded during the life of this manual.
3
INTRODUCTION
1. Plate rack (to order)
2. Splash back (to order)
3. Hotplate Covers
4. 150mm (6”) 90° Bend
5. Bend Cleaning Plate
6. Hob
7. Towel Rail
8. Fire Door
9. Burner Door
10. Main Oven Door
11. Simmer Oven Door
12. Base Frame
13. Hotplate
14. Simmer and Cleaning Plate
15. Boiler Thermostat
16. Oven Thermostat
17. Green Neon Indicator Light
18. Reset Button / Limit stat
19. Red Lock Out Light
IMPORTANT - CONTROL OF SUBSTANCES HARMFUL TO HEALTH
It is the Users/Installers responsibility to ensure that the necessary personal protective clothing is worn when
handling materials that could be interpreted as being injurious to health and safety.
When handling Firebricks & Fire Cement, use disposable gloves. Exercise caution and use disposable masks
and gloves when handling glues and sealants. When working with fibre glass, mineral wool, insulation
materials, ceramic blanket/board, avoid inhalation as it may be harmful. Avoid contact with skin, eyes, nose and
throat, use disposable protection. Installation should be carried out in a well ventilated area.
Note: These instructions are only valid if the country symbol appears on the appliance. If the symbol does not
appear on the appliance, it is necessary to refer to the technical instructions concerning modifications of the
appliance to the conditions of use of the country.
The manufacturers reserve the right to make alterations to design, materials or construction for manufacturing or other reasons subsequent to publication.
0063
U.K.: ALL GAS APPLIANCES MUST BY LAW BE
INSTALLED BY A COMPETENT PERSON, ONLY
USE A C.O.R.G.I REGISTERED ENGINEER.
IRELAND: ALL GAS APPLIANCES MUST BE
INSTALLED BY A COMPETENT PERSON AS
OUTLINED IN I.S. 813.

4
DIMENSIONS A B C D E F G H J K L M N
METRIC 915 920 530 560 300 1047 130 325 525 190 1475 1” BSP 150
(millimetre)
IMPERIAL 36 361/420 7/ 8 22 11 3/ 4 411/ 4 51/8 123/4205/8 71/258 1”BSP 6
(inches) Female
FEATURE METRIC IMPERIAL
HOT PLATE 555 x 325 22 x 13
ROASTING OVEN 400W x 320H x 410D 16W x 121/2H x 16D
SIMMERING OVEN 400W x 225H x 410D 16W x 9H x 16D
SPECIFICATION
This appliance has been tested and approved in accordance with the Gas Appliance Directive (90/396/EEC),
the Low Voltage Directive (72/23/EEC) and the Electromagnetic Compatibility Directive (89/336/EEC) as
amended.
Differential Pressure Across the Boiler
Note: Water temperature rise for above test recorded at 16°C.
Design flow rate through the boiler 23 Litres / min. (G.P.M)
Static differential across the boiler 52 mbar (21” W.G.)
Dynamic pressure differential across the boiler 6 mbar (2.41” W.G.)
Note: dimensions stated below may be subject to
a slight +/- variation

5
TECHNICAL DATA
FUELS: N.G. 2nd Family, Natural Gas.(I.E., G.B., F.R., A.T., D.K.,E.S.,
F.I., I.T., P.T. & S.E)
L.P.G. 3rd Family, L.P.G.(I.E., G.B., B.E., F.R., E.S., & P.T.)
PRODUCT IDENTIFICATION NO: 63AQ8500
COUNTRY OF DESIGNATION: I.E. & G.B., B.E., A.T., D.K., E.S., F.I., I.T., P.T., S.E., & F.R.
GAS TYPES: N.G. I2H, G20, 20 mbar & I2E+ (F.R. Only)
L.P.G. I3P, G31, 37 mbar
MAINS GAS PIPE: N.G. min.13mm 1/2” BSP capable of 90 ft3/hr from a domestic
regulator.
L.P.G. min. 13mm 1/2” coated copper capable of 45 ft3/hr from an
approved L.P.G. - Propane regulator.
MAINS CURRENT: 230V - 240V, 50 Hz, A.C.
SUPPLY FUSE RATING: 3A
IONISATION CURRENT: Minimum of 7µa.
IP PROTECTION DEGREE: IP 20.
ELECTRICAL INPUT: 90 watts.
MAINS GAS PRESSURE: N.G. 20 mbar 8” wg
GAS RATE: 2.3 m3/hr 81 ft.3/hr
L.P.G. 37 mbar 14” wg
FAN PRESSURE: 2.5 mbar 1” wg
MAXIMUM FLUE RESISTANCE: 0.8 mbar 0.32” wg
MANIFOLD PRESSURE: N.G. 14.9 mbar 6” wg
L.P.G. 7 mbar 2.8” wg
GROSS INPUT: 24.9 kW 85,000 Btu/hr
NET INPUT: N.G. 22.5 kW 76,811 Btu/hr
L.P.G. 23 kW 78,476 Btu/hr
BOILER OUTPUT: 17.6 kW 60,000 Btu/hr
SPACE HEATING: 3.67 kW 12,000 Btu/hr
BOILER CONSTRUCTION: 6mm & 4mm mild steel plate
BOILER TYPE: B23
MAX. BOILER WORKING PRESSURE: 1.9 Bar 27.3 P.S.I.
TEST PRESSURE OF BOILER: 2.7 Bar 40 P.S.I.
OPERATING TEMP. LIMIT IN BOILER: 96°C 205oF
BOILER CAPACITY: 9.1 Litres 2.5 Gallons
COOKER WEIGHT: 364kgs 800 lbs
Whilst the primary air and gas rate on this appliance have been set, combustion tests and the gas rating must
be undertaken, during commissioning and adjusted accordingly.
NOTE: This appliance shall be installed in accordance with the regulations in force and only used in a well
ventilated location. Read the technical instructions before installing this appliance. Read the user’s
instructions carefully before lighting this appliance.
As manufacturer’s and suppliers of cooking and heating appliances, we take every possible care to ensure, as reasonably practicable, that
these appliances are so designed and constructed as to meet the general safety requirement when properly used and installed.
United Kingdom Ireland
*Section 10 of the Consumer Protection Act. * Safety Health and Welfare at Work Act 1989.
*Gas Safety (Installation and Use) Regulations 1998 (as amended) * S.I. 101 of 1992 (as amended).
* Gas Appliance Safety Regulations (as amended). * S.I. 150 of 1995 (as amended).
*Health and Safety at Work Act. * I.S. 813 (as amended).
IMPORTANT NOTICE: Any alteration to this appliance that is not approved in writing by Waterford Stanley, will render the guarantee void.
The installation must comply with the following:
The Building Regulations: Part J England & Wales., Part F Section 5 Scotland, Part L Northern Ireland and Part J Ireland.
B.S. 5449: Forced circulation hot water central heating system for domestic installation.
B.S. 7671: Requirements for Electrical Regulations.
Safety Document 635: The Electricity at Work Regulations. I.S. 813 : Domestic Gas Installation
B.S. 7074 Part 1 & 2: Hot Water Supply. B.S. 5440 Parts 1 & 2 Installation & maintenance of flues and
B.S. 4814: Sealed Systems. ventilation
B.S. 6891 Gas Pipe Sizing B.S. 7593 Treatment of water in domestic hot water systems
PAS 33 : 1999: Product Assessment Specification for Design,
Installation & Commissioning of Gas Fired Central Heating
Systems in Domestic Premises.

6
LOCATION
Prior to installation, ensure that the local distribution
conditions (nature of the gas and gas pressure) and
adjustment conditions are compatible. The
adjustment conditions for this appliance are stated
on the data badge which is fitted inside the bottom
burner door.
When choosing a location for this appliance you
must have:
(a) Sufficient room for the installation (see
clearances), a satisfactory flue, and an
adequate air supply for correct combustion and
operation. (See Ventilation & Combustion Air
Requirements).
(b) Adequate space for maintenance and air
circulation.
(c) Solid floor or base of non-combustible material
which is capable of supporting the total weight
of the appliance. (see Technical Data).
ELECTRICAL SUPPLY
All wiring external to the appliance must conform to
the current BS 7671, B.S. 7462, Safety Document
635, ETC: Part 1 section 5.4.6. & The Electricity at
Work Regulations. The cooker requires a 230V -
240V, 50Hz supply. Connection of the appliance
and any system controls to the mains supply must
be through a moulded on plug top, (with a 5?Amp
fuse fitted), which is fitted to the appliance in
accordance with EN 60335, Consumer Protection, -
S.I. 1994 No. 1768, plug and sockets etc. (safety)
Regulations 1994.
Always install in accordance with current local
wiring regulations.
WARNING: THIS SUPPLY AND APPLIANCE
MUST BE EARTHED (Refer to B.S. 7430 Code
of Practice for Earthing)
Where a risk of low voltage can occur, a voltage
sensitive device should be fitted to prevent start up
of the burner so as not to endanger the installation.
(see fig. 30)
To isolate the appliance completely, unplug from the
mains socket. Always ensure that this socket is
easily accessible and close to the appliance.
Persons in charge of this appliance should be aware
of this socket outlet position.
GAS PIPES AND FITTINGS
Materials used for installation work should be fire
resistant and gas tight and should conform to the
following or their equivalent:
*B.S. 2871 Part 1 & pr EN 1057 - Copper Tubes.
*B.S. 219, EN 29453 & ISO 9453 - soft solders.
*B.S. 759 - Valves, gauges and other safety
equipment.
*B.S. 1387 - Steel tubes.
* B.S. 6362 & B.S. 4127 - Stainless steel tubes.
* B.S. 1552 - Manual Shut of valves.
*B.S. 1740 - Wrought steel pipes.
*B.S. 5295 & B.S. 6956 Jointing Materials.
* B.S. 4089 - LPG hoses and assemblies.
METERS
A suitable gas meter must be connected to the
service pipe either by a representative of the gas
board or by an appointed contractor. If using an
existing meter have it checked to ensure that the
meter is capable of dealing with the total rate of gas
supply needed. (See Technical Data).
GAS PIPE SIZE
It is important that the correct service pipe size be
used in order to ensure an adequate gas supply.
This depends on the distance between the supply
meter, the pressure drops caused by bends and the
expected pressure drop in the gas mains at peak
demand times.
NOTE: The Donard has an input rating of 24.9 kW
(85,300 Btu’s/hr) approximately. See BS 6891. (If
in doubt consult your gas supply company)
A3/4” gas shut off valve, which does not cause a
restriction in flow or a pressure drop when open,
must be fitted as close to the appliance as possible.
This tap should be accessible at all times.
Fig. 1
WARNING: To avoid pipe sealing compounds from
entering into the gas train, do not apply sealing
compound to the first two threads at the tip of the
gas connection.

HEARTH CONSTRUCTION
When a non-combustible floor surface is not available then we recommend that the cooker be placed on a slab
of pre-cast concrete 40mm (11/2”) deep or a slab of other insulating material. This hearth must extend (150mm)
6” to either side of the appliance and (225mm) 9” to the front. The cooker must stand on a flat surface.
INSTALLATION
Flue Liner greater than (150mm) 6” Diameter 150mm (6”) Salt Glazed Earthenware Flue &
Purposely Made Pre-cast Sealed Concrete
Chimney’s
CHIMNEYS
Generally the most effective chimney for gas is one
that is straight, avoid offsets and terminate an
approved low resistance flue terminal.
Fig.2
Fig.3
Fig.5 Fig.6
SEALING
This cooker and flue system operate under a
positive pressure, it is essential that all flue joints
are tightly sealed against flue gas leakage and
tested accordingly (see figs. above).
PRE-INSTALLATIONCHECK
Before installing your appliance, check
that the chimney is clean and clear of
obstructions. Cracked brick-work and
leaking joints should be made good.
IT IS RECOMMENDED TO CONNECT
TO A FLUE OF 150mm (6”).
Note: Fill voids and area around liner
with vermiculite or a comparable
approved material. (See figs. above).
7
Fig.4
Fig.6a Fig.6b
Vertical Flue
Adaptor (not
included)

8
The height of the chimney or flue serving this
appliance should not be less than 4m (13’)
measured vertically from the appliance outlet to the
top of the flue terminal, and having a diameter of
150mm (6”). The terminal position should be in
accordance with B.S. 5440 Part 1 and the Building
Regulations.
FLUES
The chimney and flue pipes intended for use with
this appliance should be mechanically robust,
resistant to internal and external corrosion, non-
combustible, and durable under the conditions to
which they are likely to be subjected.
Flues require a suitable external terminal which
should be designed to permit easy ingress of
combustion products whilst providing protection
against the entry of rain, birds and other foreign
matter into the system. Flue pipes and accessories
such as clips and stays should not be made of
unprotected mild steel or other material which is
likely to corrode.
Where flue piping passes through a closure plate
with a sliding door, ensure that the pipe continues up
and is ultimately connected to the flue liner and well
sealed with fire cement.
Do not connect to a chimney serving another
appliance. Always ensure that the connection is to
a chimney of the same size. Chimneys wholly
constructed of single skin pipe are not
recommended under any circumstances. Due to
their inability to retain heat such chimneys will
inevitably give rise to the formation of condensation.
(see figs 2,3,& 4).
SUITABLEMATERIAL
*Mineral Fibre cement pipes conforming to B.S.
7435.
*Sheet metal conforming to B.S. 715 & B.S. 4076.
*Insulated metal chimneys conforming to B.S.
4543 and B.S. 5440 (a galvanised finish is not
suitable).
* Clay flue linings conforming to B.S. 1181.
*Pre-cast concrete chimney blocks, incorporated
into the building structure. It is particularly
important that the correct connection block be
provided at the base of the flue. B.S. 3572. (see
fig 3)
*Cast iron or acid resistant vitreous enamel lined
mild steel to B.S. 41.
CONNECTIONS
This appliance can either be connected to an
approved masonry chimney or gas flue. This
appliance may be connected either direct vertical or
horizontal.
A cast iron 90° bend with cleaning door is provided
with the cooker. A vertical cast iron outlet pipe with
cleaning door is available to order. (See Figs. 5 & 6)
ALL FLUE CONNECTIONS MUST BE
THOROUGHLY SEALED. Blocked chimneys are
dangerous, keep chimneys and flueways clean; read
the operating instructions.
STANLEY CAST IRON PIPES AND BENDS ARE
HIGHLY RECOMMENDED FOR INTERIOR USE.
(see fig. 5 & 6)
NOTE: Maximum horizontal length should not be
more than 300mm (12”).
WHERE THE APPLIANCE SPIGOT OR FLUE PIPE
PROTRUDES INTO THE CHIMNEY, CARE
SHOULD BE TAKEN TO ENSURE THAT IT DOES
NOT BLOCK THE CHIMNEY.
DRAUGHT REQUIREMENTS
While inadequate draught can seriously effect the
efficient operation of the appliance, chimneys over
(5.4m) 18ft. or houses built on high ground can
experience excessive draught. The accepted
draught reading for satisfactory operation is 1.5mm
min. (06.” w.g.) 2.5mm max. (0.1” w.g.).
FLUE CLEANING
The flue pipe must be fitted with a cleaning plate,
the flue must be inspected annually and cleaned
when necessary.
Fig. 7
Note: Never connect to a chimney or flue
system serving another appliance.
FLUE HEIGHT
If it is necessary to offset the chimney, the
recommended angle is 60° to the horizontal and the
statutory minimum is 45°C.

9
DOWN DRAUGHTS
However well designed, constructed and positioned,
the satisfactory performance of the flue can be
adversely affected by down draught caused by
nearby hills, adjacent tall buildings or trees. These
can deflect wind to blow directly down the flue to
create a zone of high pressure over the terminal.
A suitable anti-down draught terminal or cowl will
usually effectively combat direct down blow but no
cowl is likely to prevent down draught due to a high
pressure zone. (see fig. 8) Ensure that any cowl
used will not restrict the flue exit, or cause excessive
back pressure, Refer to B.S. 5440: Part 1.
condition, and dimensions are acceptable. Flues
that have proved to be unsatisfactory, particularly
with regard to down draught, must not be considered
for this appliance until they have been examined and
any faults corrected. If there is any doubt about an
existing chimney a smoke test to B.S. 5440: Part 1
should be carried out.
Before connecting this appliance to a chimney or
flue pipe which has previously been used with
another fuel, the chimney or flue pipe must be
thoroughly swept and lined accordingly.
All register plates, restrictor plates, damper etc.
which could obstruct the flue at a future date must
be removed before connecting this appliance.
Where a chimney is not to be lined a suitable void
must be provided at the base to contain any debris
which might fall from the inside wall, so as to prevent
that debris from obstructing the appliance flue outlet.
(Removal of debris should be facilitated by the
provision of an access door). The void should have
a depth of not less than 250mm (10”) below the
appliance connection.
The combustion products from this appliance will
have a descaling effect on hardened soot deposits
left from burning solid fuels.
ALTHOUGH THE CHIMNEY MAY HAVE BEEN
CLEANED OF LOOSE SOOT PRIOR TO
INSTALLATION, IT IS IMPERATIVE THAT THE
CHIMNEY IS INSPECTED FOR SCALED SOOT
PARTICLES AFTER THE FIRST MONTH OF
OPERATION AND ANY LOOSE MATERIALS
REMOVED TO AVOID BLOCKAGE.
FACTORY-MADE INSULATED CHIMNEYS
Factory-made insulated chimneys should be
constructed and tested to meet the relevant
standards and recommendations given in:
*B.S. 7566 – Installation of factory-made chimneys
conforming to B.S. 4543 for domestic appliances.
Part 1: Method of specifying installations design
information.
Part 2: Specification for installation design.
Part 3: Specification for site installation.
Part 4: Recommendation for installation design
and installation.
FLUE LINERS
Chimney’s lined with salt glazed earthenware pipes
are acceptable if the pipes comply with BS 1181 and
must be 150mm (6”). When lining an existing
chimney, a liner approved to BS 715 & B.S. 4543
Parts 1, 2 & 3 should be used.
The liner should be secured at the top and bottom
using a closure/clamping plate, firmly sealed and
Fig.8
USE OF EXISTING CHIMNEYS AND FLUES
When connecting to an existing chimney it is
necessary to line the flue using either 150mm (6”)
rigid or flexible stainless steel liner. An existing flue
pipe or chimney that has proved to be satisfactory
when used for solid fuel can normally be used for
this appliance provided that its construction,

10
secured and an approved low resistance terminal
used at the top.
It is essential that every flue system be inspected
and tested by a competent person upon completion,
to ensure that the combustion products are
completely discharged to the outside atmosphere.
(see Fig. 2)
VENTILATION AND COMBUSTION
AIR REQUIREMENTS
It is imperative that there is sufficient air supply to
the burner of the cooker in order to support
combustion.
Detailed recommendations for air supply are given
in BS 5440 Part 2. The minimum effective air
requirement for this appliance is 90 cm2. When
calculating combustion air requirements for this
appliance use the following equation: 5cm2per each
kW of rated input above 7 kW.
If there is another combustion appliance fitted in the
same or adjacent room, it will be necessary to refer
to B.S. 5440: Part 2 to calculate the additional air
supply.
All materials used in the manufacture of air vents
should be such that the vent is dimensionally stable,
corrosion resistant, and no provision for closure.
The effective free area of any vent should be
ascertained before installation. The effect of any
grills should be allowed for when determining the
effective free area of any vent.
Air vents direct to the outside of the building should
be located so that any air current produced will not
pass through normally occupied areas of the room.
An air vent outside the building should not be
located less than the dimensions specified within the
Building Regulations and BS 5440 Part 2 (see
Technical Data) from any part of any flue terminal.
These air vents must also be satisfactorily fire
proofed as per Building Regulations.
Air vents in internal walls should not communicate
with bedrooms, bedsits, toilets, bathrooms or rooms
containing a shower.
Air vents traversing cavity walls should include a
continuous duct across the cavity. The duct should
be installed in such a manner as not to impair the
weather resistance of the cavity. Joints between air
vents and outside walls should be sealed to prevent
the ingress of moisture. Existing air vents should be
of the correct size and unobstructed for the
appliance in use.
If there is an air extraction fan fitted in the room or
adjacent rooms where this appliance is fitted,
additional air vents will be required to alleviate the
possibility of spillage of products of combustion from
the appliance/flue while the fan is in operation.
Refer B.S. 5440 Part 2 & I.S. 813 and the Gas
Safety (Installation & Use) Regulations as amended.
Where such an installation exists, a test for spillage
should be made with the fan or fans and other gas
burning appliances in operation at full rate. (i.e.
extraction fans, tumble dryers) with all external
doors and windows closed.
If spillage occurs following the above operation, an
additional air vent of sufficient size to prevent this
occurrence should be installed. As a guide an
additional 50cm2is generally sufficient for most
situations.
OUTSIDE AIR CONNECTION
This appliance may be connected direct to the
outside of the house for its combustion air supply.
1. If this option is used a special kit is available to
order.
2. Additional combustion air is not required as
indicated in BS 5440 Part 2.
3. Remove the blanking plate located at the back
of the cooker and remove the primary air grill
located at the front of the cooker base. Fix solid
blanking plate over the front of the base (See
Figs. 9 & 11). The primary air grill may be
disregarded.
4. Connect the optional 125mm (5”) spigot to the
rear. (See Fig. 10)
5. To connect this cooker to an outside air supply
use 125mm (5”) kit to order. (See Fig. 10)
6. Air inlets traversing cavity walls should include a
continuous duct across the cavity. The duct
should be installed in such a manner as not to
impair the weather resistance of the cavity. This
duct must also be satisfactorily fire proofed as
per Building Regulations.
7. Joints between air vents and outside walls
should be sealed to prevent ingress of moisture.
Fig.9

Fig.12
Fig. 13
Fig.11
11
CLEARANCES TO COMBUSTIBLES
When using a tiled background and/or if you want to
bring the Stanley to standard counter top depth (i.e.
600mm) (24”) and leave no gaps at the back of the
cooker use the back filler piece which is 85mm (3.25
ins) deep. There is a flue pipe collar available which
surrounds the flue where it meets the wall, giving a
tidier finish to a tiled background. The back filler
piece and flue pipe collar are available to order.
(see fig.11a).
When bringing the kitchen units up to the sides of
the cooker hob, leave a 10mm (3/8”) gap between
the hob and adjacent units, this gap can be masked
by fitting a filler strip up to the Stanley leaving a
5mm gap (see fig. 12 & 13).
Leave minimum 52mm (2”) at rear of cooker to a
combustible material (see fig. 10). Leave minimum
26mm (1”) at rear of cooker to a non-combustible
material (see fig. 13).
If optional hob rear filler piece is to be fitted leave
87mm clearance between hob and work surface.
Fig.10
Fig.11a
If a filler strip is used to fill the gap between the units
and the side of the cooker then a 3mm gap must be
left. (see fig.12).

GAS CONNECTION
The mains inlet gas connection is located at the
bottom left hand side towards the front.
A shut off valve must be fitted as close as possible
to the cooker and should be accessible at all times.
A combined valve and elbow fitting is supplied with
the appliance, located in the oven package. One
end of this fitting simply fits onto the gas train
located at the bottom left hand side of the cooker.
The other end has a 3/4” BSP thread. If it is
necessary to use an alternative valve, select a
valve which does not cause a restriction in the flow
or a pressure drop across it when open.
Step 1
Fit valve to the gas train pipe located at the bottom
left side.
Step 2
Connect mains gas pipe to the valve.
Step 3
Check all joints for soundness.
NOTE: Clean off any excess pipe compounds from
connections.
12
Fig.14
Fig.15
Fig.13a
Where the flue passes through a combustible
material a twin wall solid packed insulated chimney
connector must be used and must come flush with
the outer surface of the material and run all the way
to the masonry chimney or to the point of
termination of the factory made chimney. (See
Fig.13a).
HEATING
Care should be taken to ensure that the heating
system is correctly installed and that it complies with
all relevant codes of practice (see installation
section). If this appliance is being connected to an
existing system, it is strongly recommended to
check the following:
(a) That the system is sound.
(b) That pipework is adequately insulated (where
applicable).
(c) Check all controls, i.e. pump, motorised valves,
time control, radiator valves etc. are operating
satisfactorily and are compatible with the
requirements of the cooker.
(d) Are any modifications necessary to make the
heating system more efficient?
(e) Cleanse the system and add suitable inhibitor.
NOTE: This appliance must be connected to a
fully pumped system. NOTE: We strongly advise the use of pipe lagging
and also the use of a frost thermostat if the
installation is likely to be exposed to situations
where the temperature will dip to a level consistent
with frost.
The use of motorised valves, room thermostats,
radiator thermostatic valves, domestic hot water
controllers, etc, can greatly enhance a heating
system and we recommend their use.
Only competent personnel should be employed to
carry out your heating installation.
It is important that no external control devices e.g.
economisers be directly fitted to this appliance
unless covered by these installation instructions or
agreed with the manufacturer in writing. Any direct
connection of a control device not approved by the
manufacturer could make the guarantee void.
(see fig. 16 - 24 inclusive)
A flexible hose must not be used to connect the gas
supply to the cooker.

13
2 STOREY HOUSE FULLY PUMPED
USING MOTORISED VALVES
2 STOREY HOUSE FULLY PUMPED
Fig.16
Fig.19
BUNGALOW FULLY
PUMPED USING
MOTORISEDVALVES
Fig.18
WATER PIPE FITTINGS
Materials used for installation work should be
resistant, sound and should conform to the current
editions of the following or their equivalent.
1.1 Ferrous Materials
BS 4127 Stainless steel tubes.
BS 1387 Steel tubes.
BS 1740 Steel pipe fittings.
BS 6956 Jointing Materials
1.2 Non-Ferrous Materials.
EN 29453 Soft Solder Alloys .
BS 864 Compression tube fittings.
BS 2871 & BS E.N. 1057 Copper and Copper
Alloys.
FULLY PUMPED S PLAN SYSTEM
Fig.17
DONARD
COOKER
DONARD
COOKER
DONARD
COOKER
DONARD
COOKER

14
S PLAN WIRING DIAGRAM
Fig.22
Fig.21
SAFETYVALVE
A non-adjustable 3 bar safety valve must be fitted to
the primary flow pipe adjacent to boiler connection
ensuring that any discharge will not create a hazard
to occupants or cause damage to electrical
components or property.
BUNGALOW: FULLY
PUMPED SEALED SYSTEM
2 STOREY HOUSE: FULLY
PUMPED SEALED SYSTEM Fig.20
DONARD
COOKER
DONARD
COOKER

15
BY-PASS LOOP
A 15mm system by-pass must be fitted not
less than 1.5 meters (4.9ft) from the cooker to
allow correct water circulation for the pump
and to prevent condensation forming in the
boiler. This should be balanced. A heat sink
radiator must be installed in addition to the By-
Pass Loop (See Fig.24 & 25)
Fig. 23
Fig.24
INTERLINK SYSTEM
AIRING CUPBOARD LAYOUT
Fig.25

16
PROVISION FOR FILLING SEALED SYSTEM
Fig.26
WATER CIRCUIT TEMPERATURE
The return water temperature must be maintained at
not less than 50°C so as to avoid condensation on
the boiler and return piping. Fitting of a by-pass
loop, and a pipe thermostat to the flow pipe and
wiring it into the pump control will ensure rapid
circulation of the hot water to avoid premature
burner shut down being activated by the cooker
thermostat when the central heating circuit is in use.
PIPE THERMOSTAT
The fitting of a pipe thermostat to the common flow
pipe within 150mm (6”) of the cooker is required in
order to activate the water circulation pump when
water in the boiler reaches 60°C. This will ensure
that return temperatures are maintained and the
pump to “run on” to transfer any residual heat to
prevent possible overheating. (see figs. 19 & 20)
When the flow temperature falls below 60°C the pipe
thermostat will de-activate the circulating pump and
allow the cooker to operate. (see fig. 20, 27 &
Wiring Diagram)
If a second optional pipe thermostat is used see (S
Plan fig.19 - 20) then it should be fitted within
200mm 8” of the cooker common flow. It must be
set at 85oC and wired to make temperatures rise to
activate the central heating motorised valve should
this temperature be achieved, this will ensure that
any excessive heat is transferred from the boiler.
Fig.27
CARE FOR YOUR CENTRAL HEATING
SYSTEM
We strongly recommend the use of suitable
corrosion inhibitors and anti-freeze solution in your
heating system, in an effort to minimise black oxide,
sludge and scale build-up, which effects efficiency.
In hard water areas the use of a suitable limescale
preventer / remover is advised.
Use only quantities specified by the water treatment
product manufacturer. Only add to the heating
system after flushing and finally refilling. Refer to
BS 7953.
NOTE: Both thermostats must be connected to
make on temperature rise.

17
GENERAL MAINTENANCE
It is important that the user is familiar with their
heating system and that they ensure regular checks
and maintenance which can limit unnecessary
breakdowns.
SERVICING
To ensure continued efficient and safe operation of
the appliance, it is recommended that it is checked
and serviced by an Authorised Stanley Service
Engineer at least once a year.
DRAINING
Key-operated drain taps to B.S. 2879 should be
provided in an accessible position in all low parts of
the system. However, it should be noted that there
may be short sections of pipework, e.g. when
passing under doorways that may not be possible to
drain.
INDIRECT DOMESTIC CYLINDER
The cooker must only be connected to an indirect
cylinder of recommended size of 180 litres using
28mm (1”) diameter flow and return piping. It is
recommended that the cylinder is lagged together
with pipework with runs in excess of 4 meters (13’).
NOTE: One radiator (normally the bathroom) should
be selected for use as a heat sink, and connected to
open circuit. (See Fig.25)
COMMISSIONING PROCEDURES AND
CHECKS
1. Check that all items of packaging are removed
from the ovens and the shelves are properly
fitted.
2. Check that electrical wiring is correct.
3. Boiler and heating system to be purged of air
and full of water with a suitable safety valve
fitted.
4. Time switches and room thermostats to be on.
5. Baffles should be operating freely and locking in
position correctly.
6. Check that boiler and oven thermostats are
functional.
7. Check that the ignition electrode and ionisation
probe are correctly set.
8. Connect burner gas train making sure that the
connection is straight and properly connected.
9. Turn on the mains gas supply ensuring that the
cooker is switched off. Test the whole gas
installation including the meter for soundness
and purge in accordance with B.S. 6891 (U.K.)
and I.S. 813 (I.E.). Purge not to exceed 50
mbar.
10. Check the burner for leaks using an approved
leak detector spray and tighten if necessary.
11. With the mains gas supply off switch on the
burner.
12. Complete the start sequence to lock-out
observing the correct operating functions.
13. Pre-purge time to run on for 30 seconds
approximately.
14. Turn on mains gas supply and operate the
burner.
15. With cooker operating on full flame check for
adequate gas supply by connecting a
manometer to the nipple near the main union.
16. Similarly check the manifold pressure by
connecting the manometer to the test nipple
nearest to the burner head. (See Technical
Data).
17. Tighten all joints and re-check using an
approved leak detector spray. Check gas rate.
(See Technical Data).
18. After a minimum of 15 mins. of continuous
operation and with the burner still running check
flue gas analysis.
19. Correct position for the air shutter should be
checked to give a CO2reading between 7.8% to
8.3% and a CO level of below 100 ppm.
20. Make sure specified clearances are adhered to
correctly.
21. All air vents must be unobstructed and correctly
sized.
22. A spillage test should then be carried out, with
all windows and doors closed and all extract
fans in full operation and any other appliances
requiring air etc. Check flue joints are sealed
correctly and that no leakages are occurring
from the appliance to final termination.
23. When commissioning ensure that all doors of
the appliance are closed while in operation.
24. Check ionisation current by disconnecting the
link.
25. Disconnect the link to the probe and insert a
micro amp meter for direct current. (min. 7 micro
amps.)
26. If not satisfied check the trouble shooting guide.
27. If cooker is not operating correctly, postpone
lighting and contact your local Stanley Dealer.

18
CONTROL PANELS
The control panel consists of:
Two thermostats.
One limit stat reset button.
One red lock-out light.
One green running light.
The green light is on when the burner is running and
will go out when a selected temperature is reached.
OPERATION
The red light comes on when the burner goes to
lock-out. (See service manual).
The high limit thermostat button will pop out when
the thermostat settings are exceeded.
(see fig. 28 & 29)
The hotplate in this appliance is treated with a
protective coating, which when heated will
evaporate and will cause an odour for a short period.
1. Ensure that the boiler and oven thermostats are
in the “off” position.
2. Switch on the mains electricity supply.
3. Turn on the gas supply.
4. Turn on radiators as required.
5. Select the heating mode by opening the fire
door and by turning the baffle control knobs with
the tool provided to the required position.
There are three main heating modes as follows,
determined by the positioning of the baffles, which
are operated by rotating the control knobs.
Setting A:
High Boiler Output with Hot Plate and Oven.
1. Set the oven thermostat to idle.
2. Turn the left hand boiler baffle control knob anti-
clockwise until it engages.
3. Set the boiler thermostat to required
temperature.
Setting B:
High Hot Plate Output with Boiler and Oven.
1. Set the boiler thermostat to idle.
2. Turn both boiler baffle control knobs to down
position.
3. Set the oven thermostat as required to control
hot plate temperature.
Setting C:
High Oven Output with Hot Plate - Low Boiler
Output.
1. Set the boiler thermostat to idle.
2. Turn the right hand boiler baffle control knob
clockwise until it engages.
3. Set the oven thermostat to the required cooking
temperature.
Fig.28
Fig.29
60
50 70
60
50 70
IDLE 200
RADIATOR SETTING HOTPLATE SETTING OVEN SETTING
HEATING MODES
LIGHTING

OVENS
The MAIN OVEN is heated on all four faces and it
can be used for baking or roasting on Setting C,
Oven Mode.
The SIMMERING OVEN is heated on top face only.
The temperature will be about half that of the main
oven and is ideal for slow cooking, casseroles,
stews, soups etc. (see fig. 30)
CENTRAL HEATING
The boiler output is determined by the position of the
boiler baffle as follows:
Setting A Max. Output 17.6 kW (60,000
Boiler BTU’s/hr).
Setting B Max. Output 11 kW (38,000
Hotplate BTU’s/hr).
Min. Output 6 kW (20,000
BTU’s/hr).
Setting C Max. Output 7 kW (25,000
Oven BTU’s/hr).
Min. Output 2.6 kW. (9,000
BTU’s/hr).
(The above may vary slightly depending on
individual installation conditions)
The boiler therefore will operate at its maximum
output at setting A of the controls with the thermostat
turned up to 90oC. A range of outputs from the boiler
may be obtained to suit individual requirements,
normal operating setting 75/80oC by adjusting the
thermostat between 50oC and 90oC. In this mode
hot plate and oven cooking temperatures are
achieved but will vary depending on central heating
conditions.
SUMMER SETTING
For summer use and lowest Boiler Output use
setting C. When using the oven in this position turn
the oven thermostat to the required temperature.
HOTPLATE
The hotplate is machine ground for maximum
heating efficiency and is temperature graded, the
left hand side over the burner being the hottest at
setting A and B and the right hand side is suitable
for simmering.
For maximum hotplate temperature use setting B.
Fig.30
Fig.31
COOKING UTENSILS
For best cooking results and economy of operation
use heavy based, flat bottomed utensils.
HEATING SYSTEM CONTROLS
We recommend the use of zone control valves
especially in larger systems (see plumbing
schematics).
19
IMPORTANT: WHEN HOTPLATE IS NOT IN USE
ENSURE THAT HOTPLATE COVERS ARE IN A
DOWN POSITION.
IMPORTANT: DO NOT USE MIS-SHAPED PANS
WHICH MAY BE UNSUITABLE. DO NOT USE
ROUND BASED WOKS.
HOTPLATE INSULATING COVERS
The insulating covers retain most of the heat that
would otherwise be radiated into the kitchen. They
also retain the heat in the hotplate so that rapid
heating of cooking utensils will occur when one or
both of them are lifted for cooking purposes.
(see fig. 31)
Table of contents
Other Stanley Range manuals
Popular Range manuals by other brands

Garland
Garland SunFire X36-6R instruction manual

Frigidaire
Frigidaire GLEFM97FP Factory parts catalog

Kenmore
Kenmore 970C4250 Use & care guide

Wolf
Wolf R606DG Planning information

Verona
Verona VEFSGE486DGP Sreis User operating instructions

La Cornue
La Cornue CornuFe 44 User's guide & installation instructions