Starck 2 Hand Analog K62-132 User manual

- 1 -
ANALOG
2 Hand Analog
TIME SETTING
1. Pull crown out to position 2.
2. Rotate crown to set desired time.
NOTE: Hour is denoted by the hour markers (1-12). Minutes are denoted in 5-minute
increments between the hours. Each 5-minute increment is noted with a line “—” and each
15-minute increment is denoted with a dot “•”.
3. Return crown to position 1.
12
3 Hand Analog VX51E / R1063.2 / 9T33
TIME SETTING
1. Pull crown out to position 2.
2. Turn crown to advance the time.
3. Push crown back to position 1.
Palindrome Too
TIME SETTING
1. Pull crown out to position 2.
2. Turn crown to advance the time.
3. Push crown back to position 1.
12
12
PUSHER BUTTON FOR
TIME ADJUSTMENT
FRONT BACK
2 Hand Analog K62-132
TIME SETTING
1. Push button to move hands.
2. Set to correct time.
10:1512:00
1
12
2
VX51E / R1063.2 9T33
revised 6 / 12
ENGLISH

- 2 -
DIGITAL
Curved LCD
• Real Time
• World Time
• Alarm
• Auto EL
TIME AND ALARM
Normal Time Mode:
- “ ” will take you to the next time display. Time display selections are: digital time,
analog time, horizontal digital time, and world digital time.
- “ ” or “ ” will scroll through the time displays.
- “ ” will activate the backlight on the display for 4 seconds.
- “ ”will display the current date for 4 seconds.
SET MENU
1. Press and hold the “ ” button and the word in the center of the screen begins flashing.
2. Press button “ ” or “ ” to scroll through set menus. Set menus are Real Time, World Time, or Alarm.
3. Press button “ ” to select set menu.
4. Press button “ ” to exit and confirm the selection.
Setting Real Time:
1. “ ” enters set mode. The center of the screen begins flashing.
2. “ ” or “ ” will allow you to adjust the flashing digits. Choose “Real” in the center of the screen.
NOTE: For fields with two setting choices, pressing “ ” or “ ” continuously will toggle setting options.
3. “ ” will set and advance to the next adjustable element (in this case, home city selection).
4. Repeat steps 2 and 3 to set the hour, minute, year (2005-2054), month, date, Daylight Savings Time on/off, and auto-EL on/off (day will
be automatically calculated).
5. “ ” will exit set mode.
NOTE: Auto EL on will activate the backlight any time a button is pressed.
Setting World Time:
1. “ ” enters set mode. The center of the screen begins flashing.
2. “ ” or “ ” will allow you to adjust the flashing digits. Choose “World” in the center of the screen.
NOTE: “ ” will move the list down, while “ ” will move the list up.
- Scrolling through the world city list, the 3-letter city code will be displayed in the main display area. City code will flash.
- Bottom display scrolls the complete world city name, world city time, time difference, and Daylight Savings Time on (if on).
3. “ ” will select the city and advance to DST on/off.
4. “ ” will exit set mode and return to set mode display.
5. Selected city, time difference and am/pm will be shown in world digital time display.
MDY MIDWAY GMT –11 PAR PARIS GMT +1
HNL HONOLULU GMT –10 CAI CAIRO GMT +2
ANC ANCHORAGE GMT –9 MOW MOSCOW GMT +3
LAX LOS ANGELES GMT –8 DXB DUBAI GMT +4
DEN DENVER GMT –7 KHI KARACHI GMT +5
CHI CHICAGO GMT –6 DAC DACCA GMT +6
NYC NEW YORK GMT –5 BKK BANGKOK GMT +7
CCS CARACAS GMT –4 HKG HONGKONG GMT +8
RIO RIO DE JANEIRO GMT –3 TYO TOKYO GMT +9
ATA ANTARCTICA GMT –2 SYD SYDNEY GMT +10
CPV CAPE VERDE GMT –1 NOU NOUMEA GMT +11
LON LONDON GMT 00 AKL AUCKLAND GMT +12
Setting Alarm:
1. “ ”enters set mode. The center of the screen begins flashing.
2. “ ” or “ ” will allow you to adjust the flashing digits. Choose “Alarm” in the center of the screen.
NOTE: For fields with two setting choices, pressing “ ” or “ ” continuously will toggle setting options.
3. “ ” will set and advance to the next adjustable element.
4. Repeat steps 2 and 3 to set the minutes and alarm on/off.
5. “ ” will exit set mode.
6. “Alarm On” will scroll through real time display if alarm is on.
NOTE: Alarm time is only for Real Time. Alarm will sound for 20 seconds and automatically turn off, or you can deactivate by pressing
any button.
Scroll Up
Scroll Down
Select Set

- 3 -
Digital Instructions
• Time 1+2
• Alarm 1+2
• Chronograph
• Countdown Timer
• Auto EL
RESET
If the time display is interrupted, we suggest resetting the watch. To reset all
functions, press and hold all four buttons at the same time. It will default to
12:00 AM, January 1, 2000.
TIME
Normal Time Mode:
- “ ” will take you to the next mode. Each mode will flash twice on screen to indicate which mode you are in (when the Chime function is
activated, you will also hear a beep).
- “ ” will activate the backlight on the display. Pressing and holding the “ ” button until two short beeps sound, will turn on/off the auto EL
feature. This will activate the backlight any time that a button is pressed.
- “ ” will change the displayed time from Time 1 to Time 2. This will be indicated by the TIM 1 or TIM2. Press and release to view the
alternate time. Press and hold for 2 seconds to change to the alternate time.
- “ ” will turn the chime on/off. When on, this will allow you to hear a beep when any buttons are pressed, and at every hour. This will be
indicated by the dot in the center of the display.
Setting Time and Date:
1. Press and hold the “ ” button until you hear a beep sound twice, and the hour digits start to flash.
2. “ ” will allow you to adjust the flashing digits.
3. “ ” will advance to the next adjustable element (in this case the minutes).
4. Repeat steps 2 and 3 to reset the seconds to “00,” 12/24 hr, year (2000-2049), month, and date (day will be automatically calculated).
5. “ ” will exit set mode.
CHRONOGRAPH
1. “ ” will start/stop the 100th/sec. chronograph timer. The “O” will flash in any mode other than the Chronograph mode, to let you know the
chronograph timer is running.
2. “ ” will reset the chronograph when it is stopped. “ ” will split the chronograph timer when it is running. The “CHRO” will flash when in
split mode. The split time will only be displayed for 5 seconds. After that, the timer will return to the running chronograph mode.
* When the chronograph has counted to 1 hour, it will beep for 2 seconds (if the chime is on) and the chronograph display will change to
hour, minutes, seconds, instead of the minutes, seconds, 100th/sec.
COUNTDOWN TIMER
Timer Set Mode:
1. Press and hold “ ” until the minutes start to flash.
2. “ ” will allow you to adjust the minutes.
3. “ ” will advance to the seconds.
4. “ ” will adjust the seconds.
5. “ ” will exit the set mode.
* The minimum value for the countdown timer is 03 seconds. The maximum is 59 minutes, 59 seconds (default setting is 00 minutes,
and 00 seconds).
Timer Mode:
1. “ ” will start/stop the countdown timer. The “ ” will flash in any mode other than Timer mode, to let you know the countdown timer is
running.
2. “ ” will restore the previously set time on the countdown timer, when it is not running.
* When the timer counts down to zero, it will beep three times, and the “ ” will flash for three seconds.
ALARM
1. Press and hold “ ” until you hear a beep sound twice and the hour digits start to flash.
2. “ ” will allow you to adjust the flashing digits.
3. “ ” will advance to the next adjustable element.
4. “ ” will exit set mode.
5. “ ” will turn the alarm on/off.
NOTE: While there are two separate alarms (1 & 2), Alarm 1 is only for Time 1, and Alarm 2 is only for Time 2. When you change Time 1
to Time 2, in Time mode, Alarm 1 will also change to Alarm 2 in Alarm mode. Alarm 1 will only sound when in Time 1, and Alarm 2 will
only sound when in Time 2. The on/off function for each of these alarms (1 & 2) is independent and needs to be activated individually.
(=) Bar icons will appear in center of display when alarm is on.

- 4 -
LED Digital Instructions
MODE DESCRIPTION
12 HOUR AND 24 HOUR DISPLAY
Press Press
Time Mode Calendar Mode Sleep Mode
Press and hold for 1 second to wake up the watch
Date
Month
Minute
Hour
Time Mode
(24 Hour format)
Minute
Hour
Minute
Hour
Time Mode
(12 Hour format)
(Hour: 0−24)
(Hour: 1−12)
1. Press and hold the “ ” button for 1 second to “wake
up” the watch. In time mode, press and hold “ ” for 2
seconds to enter time setting mode; 12/24 hour time
setting will flash.
2. Press “ ” to adjust the flashing digits.
3. Press “ ” to set and advance to the next adjustable
element (in this case the hour digits).
4. Repeat steps 2 and 3 to set the hour and minutes.
5. “ ” will exit set mode.
Press Press
Hold
2 seconds
12 Hour/
24 Hour Setting Hour Setting Minute Setting
Press to advance
Press to
advance
Press to toggle
12/24 hour format
Press to exit
TIME MODE
1. Press and hold the “ ” button for 1 second to “wake up”
the watch. Press “ ” again to enter calendar mode. In
calendar mode, press and hold “ ” for 2 seconds to enter
calendar setting mode; year digits will start to flash. Year
digits will be between 2004-2053, and then return to
2004.
2. Press “ ” To adjust the flashing digits.
3. Press “ ” to set and advance to the next adjustable
element (in this case the month).
4. Repeat steps 2 and 3 to set the month and date.
5. “ ” will exit set mode and update the calendar.
6. If no button is pressed for 30 seconds, the setting values
will be ignored and the watch will return to time mode.
Press PressHold
2 seconds
Year Setting
(2004−2053)
Month Setting
(1−12)
Date Setting
(1−28,29,30,31)
depends on year
and month
Press to exit
CALENDAR MODE
• Press and hold “ ” for one second to “wake up” the watch. The watch will display time mode. “ ” will take you to the
next mode. Mode sequence is time, calendar and “sleep mode.”
• Watch will return to “sleep mode” if no button is pressed for 2 seconds.
• If “ ” is pressed for over 1 second, the display will light up for 6 seconds. The watch will then return to sleep mode,
even if the button is still pushed in.
• When in setting modes, if “ ” is pressed and held for 2 seconds, the digits will automatically advance.
NORMAL DISPLAY

- 5 -
Cross Digital Instructions
• Time 1 + 2
• Alarm 1 + 2
• Date
TIME AND DATE
Time/Date Mode:
- Press “ ” to select Time 1 or Time 2 Display. This will be indicated by “TIM 1” or “TIM 2.”
- Press “ ” to change to Date Mode.
- Press “ ” again to change to Alarm Mode.
- Press “ ” to return to Time Display Mode.
Setting Time:
1. In Time mode, press and hold “ ” for 2 seconds to enter Time setting mode.
2. Press “ ” to select Time 1 or Time 2. Press “ ” to advance to the next adjustable element (in
this case the 12 or 24 Hour display).
3. Press “ ” to select AM or PM or 24 Hour time. (For 24 Hour time, there will be no indication
visible at the AM/PM location). Press “ ” to advance to next adjustable element (in this case
the Hour setting).
4. Press “ ” to adjust the Hour display. Press “ ” to advance to the next adjustable element (in
this case the Minute setting).
5. Press “ ” to adjust the Minute display. Press “ ” to advance to the next adjustable element (in
this case the Second setting).
6. Press “ ” to adjust the Second display. Press “ ” to complete and exit Time setting mode.
Setting Date:
1. In Date mode, press and hold “ ” for 2 seconds to enter Date setting mode.
2. Press “ ” to adjust the Year. Press “ ” to advance to the next adjustable element (in this case
Month setting).
3. Press “ ” to adjust the Month. Press “ ” to advance to the next adjustable element (in this
case Day setting).
4. Press “ ” to adjust the Day. Press “ ” to complete and exit Date setting mode.
ALARM
1. In Alarm mode, press and hold “ ” for 2 seconds to enter the Alarm setting mode.
2. Press “ ” to select AM or PM. Press “ ” to advance to the next adjustable element (in this
case Alarm Hour setting).
3. Press “ ” to adjust the Alarm Hour. Press “ ” to advance to the next adjustable element )in
this case Alarm Minute setting).
4. Press “ ” to adjust the Alarm Minute. Press “ ” to complete and exit Alarm setting mode.
5. Press and hold “ ” for 2 seconds to turn the alarm on/off.
NOTE: While there are two separate alarms (1 and 2), Alarm 1 is only for Time 1 and Alarm 2
is only for Time 2. When you change Time 1 to Time 2 in Time mode, Alarm 1 will also change
to Alarm 2 in Alarm mode. Alarm 1 will only sound when in Time 1 and Alarm 2 will only
sound when in Time 2. The on/off function for both of these alarms is independent and needs
to be activated individually.
(ON) icon will appear in corner of display when alarm is on.

- 6 -
Dish Digital Instructions
TIME AND CALENDAR SETTING MODE
1. Press and hold “ ” for 2 seconds to enter time and calendar setting mode; “A” or “P” will
begin to flash.
2. Press “•” to advance the digital hour hand to correct hour.
3. “ ” will advance to the next adjustable element (in this case the minutes).
4. Repeat steps 2 and 3 to set the minutes “MI”, reset seconds to 00 “SE”, year “YR”,
month “MH” and date “DA”. Each two letter abbreviation will be displayed for 2 seconds
before showing the current value.
5. “ ” will exit set mode.
6. If no button is pushed for 30 seconds, setting will be ignored and normal time display
will resume.
7. Year range is 2004-2052.
Hour
Date
Minute
Second
Time: 10:15’ 25
Press
Press and hold
for 2 seconds
“HR” and hour hand flashing.
Press • to advance the hour hand
(12 step)
Press
“A” or “P” will be flashing.“MI” and minute hand flashing.
Press • to advance the minute hand
(60 step)
Press
Press
Press
“YR” will be shown
for 2 seconds, then
year is flashing for
setting. Press • to
advance the year
(2004−2053).
“MO” will be shown
for 2 seconds, then
month is flashing for
setting. Press • to
advance the month.
“DA” will be shown
for 2 seconds, then
date is flashing for
setting. Press to
advance the date.

- 7 -
O-Ring Module
TIME DISPLAY
There are 60 digital segments around the display. As each
minute goes by, black segments appear. The hour display will
appear in black segments until the minute segments build past
the number as they will then turn to a positive display.
TIME SETTING
Pushers are located on the case back.
1. Press and hold SET button for 2 seconds.
2. HOUR display will begin flashing. Press ADJUST button to change HOUR display.
3. Press SET to move to MINUTE.
4. Press ADJUST button to change MINUTE display.
5. Press SET to exit time setting function.
*Display will automatically return to time display if no buttons are pressed for 1 minute.
3:01 3:15 6:59 6:15
Digital Pendant and Ring Module V.1
SWITCHING OVER THE MODE
The mode will be switched each time the button is pressed respectively as shown in the diagram below.
Pendant (back)
Ring
MODESET MODE SET
Time Mode Calendar Mode Second
MODE SET
Press
MODE
Press
MODE
MONTH DATE
Press
MODE
TOGGLING 12 HOUR/24 HOUR
Press SET to toggle 12 hour or 24 hour format.
SETTING TIME/DATE
1. Press and hold SET for 2 seconds to enter setting mode, the YEAR flashes first for setting, press MODE to advance the value.
2. Press SET to change next setting item. The setting sequence is a cycle by Year, Month, Date, Hour and Minute.
3. During the setting mode, press MODE to advance the flashing digit.
NOTE: In setting mode, time will be updated to 24 hour format automatically.
12 hour format
Press SET to toggle
12 hour/24 hour format
MODE SET
MODE SET
24 hour format

- 8 -
FIGURE B
Deux Temps Digital
• Time - 12/24 Hour
• Dual Time Display
• Date
• Day of Week
TIME, DATE, AND DUAL TIME (fig. A)
Normal Display:
1. Normal time display will show time and date.
2. Press “ ” to change to time with day of the week display.
3. Press “ ” again to change to dual time display.
Setting Time and Date:
1. In normal time display (time and date display), press
and hold “ ” for 2 seconds to enter setting mode. Year
display will begin flashing. Press “ ” to advance year
display (press and hold for fast advance).
2. Press “ ” to move to month.
3. Press “ ” to advance month display. Press “ ” to move
to date display.
4. Press “ ” to advance date display. Press “ ” to move to
12/24 hour adjustment.
5. Press “ ” to change between 12/24 hour display (Time 2
will automatically change to selected format). Press “ ”
to move to hour display.
6. Press “ ” to advance hour display. Press “ ” to move to
minute.
7. Press “ ” to advance minute display. Press “ ” to move to
time 2 hour.
8. Press “ ” to advance time 2 hour display. Press “ ” to
move to time 2 minute.
9. Press “ ” to advance time 2 minute. Press “ ” to exit
setting mode.
NOTE: Display will automatically return to normal time
display if no buttons are pressed for 30 seconds.
STRAP INSTRUCTIONS (fig. B)
1. To lengthen strap pull on strap A.
2. To shorten strap pull on strap B.
CASEBACK
ADJUST SET
FIGURE A
Date Day Dual
Time
Time
Normal Time Display
Time and Date
Mode 2
Time with Day of
Week
Mode 3
Dual Time
Ladies Bangle Digital
TIME, DATE, SECONDS DISPLAY (fig. A)
Time, Date, and Seconds Counter Display:
1. Normal time display will show hour and minutes.
2. Press “•” to change to date display.
3. Press “•” to change to seconds counter display.
24 Hour Time Display:
In Normal time display, press “ ” to change to 24 hour display.
Setting Time and Date:
1. In normal time display, press and hold “ ” for 2 seconds. Year display will show.
2. Press “•” to change the year. Press “ ” to change to month display.
3. Press “•” to change the month. Press “ ” to change to day display.
4. Press “•” to change the day. Press “ ” to change to hour display.
5. Press “•” to change the hour. Press “ ” to change to minute display.
6. Press “•” to change the minute. Press “ ” to exit setting mode.
Normal Time
Display
Date
Display
Seconds
Display

- 9 -
Under Time Digital
NORMAL TIME DISPLAY
1. Press “ ” for time display.
2. Press “ ” again immediately for date display.
3. After time or date display, message will scroll. Display will automatically turn off after
message scrolling is complete.
TIME AND DATE SETTING
1. Press “ ” for time display.
2. Press and hold “ ” immediately for 2 seconds to enter setting mode; 12/24-hour format will
begin flashing.
3. Press “ ” to select 12/24 hour format.
4. Press “ ” to advance to hour.
5. Press “ ” to increase digits; press and hold “ ” for fast advance.
6. Press “ ” to advance to next setting value.
7. Setting sequence is: 12/24-hour format, hour, minutes, year, month, date
8. Press “ ” to save and exit setting mode.
NOTE: If no pusher is operated for 7 seconds, settings will be saved and the display will
automatically turn off after message scrolling is complete.
MESSAGE SETTING
1. Press “ ” two times for date display.
2. Press and hold “ ” immediately for 2 seconds to enter setting mode; first character will begin
flashing.
3. Press “ ” to change the character.
4. Press “ ” to advance to next character.
NOTE: Maximum message length is 10 characters.
NOTE: Default message is: “BE STUPID”. When the battery is replaced, message will reset to
default message.
Clear LCD Digital Instructions
• Time 1 + 2
• Date
• World Time
TIME
Normal Time Mode:
1. When in Time 1 mode, press “•” for quick view of Time 2, and vice versa.
2. Press and hold “•” to change time display between Time 1 and Time 2.
3. Date will be display in bottom right hand corner of display with month on top.
Setting Time and Date:
Time 1 and Time 2 are set separately. Before setting, time display must be changed to Time 1 or
2 depending on which needs to be set.
1. Press and hold “ ” for 3 seconds to enter time and date setting mode. 12/24 Hour
selection will begin flashing.
2. Press “•” to toggle between 12 and 24 hour display mode. Press “ ” to change to hour
display.
3. Press “•” to advance the hour. Press “ ” to change to minute display.
4. Press “•” to advance the minute. Press “ ” to change to seconds display.
5. Press “•” to reset seconds to “00”. Press “ ” to change to year display.
6. Press “•” to advance year. Press “ ” to change to month display.
7. Press “•” to advance month. Press “ ” to change to date display.
8. Press “•” to advance date. Press “ ” to exit time and date setting mode.
NOTE: In setting mode, time will automatically return to normal time mode if no buttons are
pressed for 30 seconds.
Time 2 Display
Indicator
Month Display
Date Display

- 10 -
Plateau Digital
NORMAL TIME DISPLAY
1. Press “•” to toggle chime on/off. Chime on icon is the letter “C” in the center of the display.
2. Press “ ” to display time zone 2; press and hold “ ” to toggle time zones.
3. Press “ ” for EL.
4. Press “ ” to change mode; mode sequence is: normal time, alarm, chronograph, and countdown timer.
NOTE: In any setting, if no pusher is operated for 1 minute, all changes will be saved and the setting will
automatically return to Normal Time Display.
TIME AND CALENDAR SETTING
1. In normal time display, press and hold “ ”; hour will begin flashing.
2. Press “ ” to increase digits.
3. Press “•” to save and advance to next setting value.
4. Repeat steps 2 and 3 through setting sequence. Setting sequence is: hour, seconds, 12/24-hour format, year, month, and date.
5. Press “ ” to save and exit setting mode.
NOTE: Weekday will automatically update upon exiting setting mode.
TIME ZONE 2 SETTING
1. In normal time display, press and hold “ ” to toggle to time zone 2.
2. Set time zone 2 by following steps 1-4 above.
ALARM MODE
1. Press “ ” to change to alarm mode.
2. Press “•” to toggle alarm on/off. Alarm on icon is a dot: “•” in the center of chime icon “C”.
NOTE: Alarm will sound for 20 seconds; press any pusher to silence alarm.
ALARM SETTING
1. In alarm mode, press and hold “ ”; hour will begin flashing.
2. Press “ ” to increase digits.
3. Press “•” to set and advance to next setting value.
4. Repeat steps 2 and 3 through setting sequence. Setting sequence is hour, minute.
5. Press “ ” to save and exit setting mode.
NOTE: There are two alarms. Alarm 1 is for normal time display only, and Alarm 2 is for Time Zone 2 only. Alarm automatically updates
according to time zone selection. Each alarm needs to be set on/off individually.
CHRONOGRAPH MODE
NOTE: Chronograph shows minutes, seconds, and 1/100th seconds up to one hour. At one hour, chronograph display will change to hour,
minutes, seconds. The chronograph will count up to 23 hours, 59 minutes, 59 seconds.
1. Press “ ” to change to chronograph mode.
2. Press “•” to start/stop the chronograph.
NOTE: “CHRO” will flash in any other mode if the chronograph is left running/on.
3. When the chronograph is stopped, press “ ” to reset to zero.
SPLIT TIME
1. Press “ ” while the chronograph is running. Split time will be displayed for 5 seconds, then automatically return to chronograph mode.
NOTE: “CHRO” will flash when in split mode.
2. Press “•” to nalize timing.
COUNTDOWN TIMER
1. Press “ ” to change to timer mode.
2. Press “•” to start/stop the timer.
NOTE: “TMR” will flash in any other mode if the timer is left running/on.
3. Press “ ” to reset timer to previously set value.
NOTE: When timer reaches zero, beeps will sound 20 times. Press any key to silence alarm.
TIMER SETTING
1. In timer mode, press and hold “ ”; minutes will begin flashing.
2. Press “ ” to increase digits.
3. Press “•” to save and advance to seconds.
4. Press “ ” to increase digits.
5. Press “ ” to save and exit setting mode.
NOTE: Maximum setting value for timer is 59 minutes, 59 seconds.
RESETTING THE WATCH
If the time display is interrupted, resetting the watch is recommended. To reset all functions, press and hold all four pushers at the same time
for 3 seconds. Watch will default to 12:00 a.m., January 1, 2009.

- 11 -
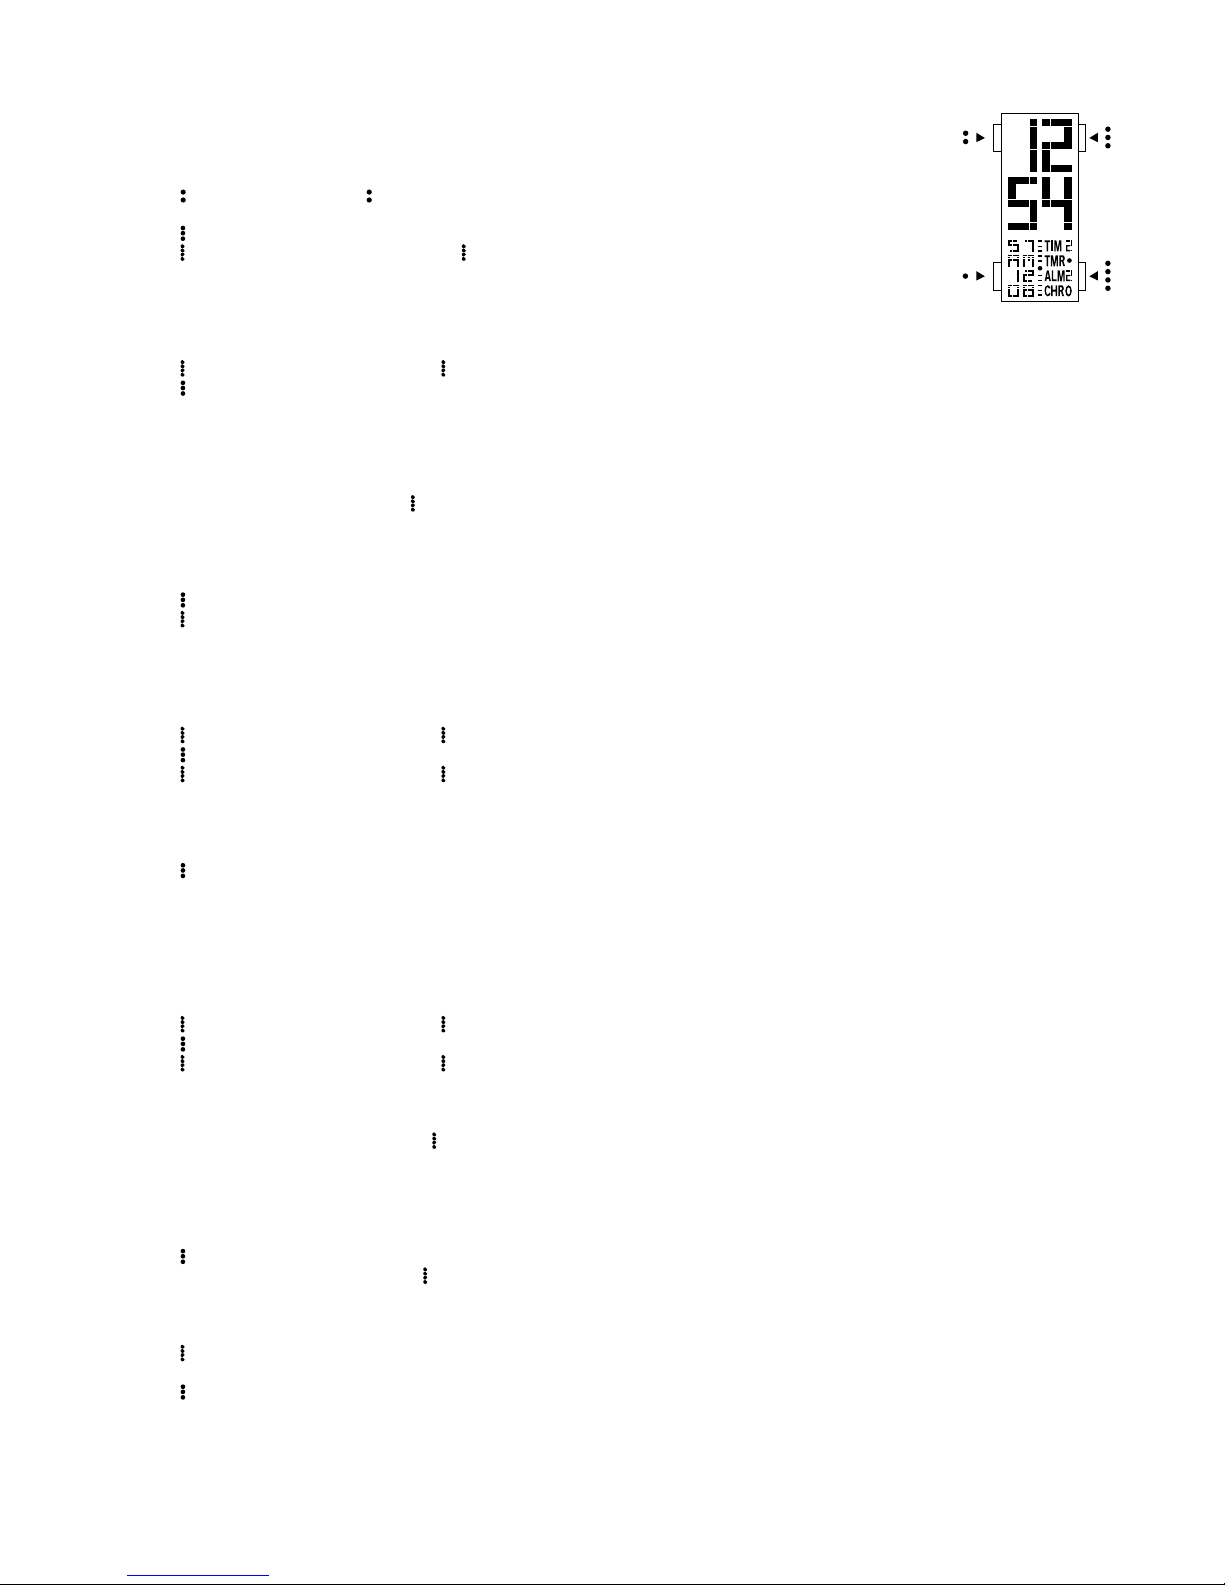
Hard Starck Digital
NORMAL TIME DISPLAY
1. Press “•” to change mode. Mode sequence is: normal time, chronograph, timer, alarm.
2. Press “ ” for EL; press and hold “ ” for 2 seconds to toggle auto-EL on/off. When auto-EL is on,
pressing any pusher will turn on EL for 3 seconds.
3. Press “ ” to toggle chime on/off.
4. Press “ ” to flash time zone 1 or time zone 2; press and hold “ ” for 2 seconds to toggle time
zone 1/time zone 2.
NOTE: In any setting mode, press “•” at any time during setting sequence to exit setting mode.
All changes will be saved.
NOTE: In any setting mode, if no pushers are operated for 2 minutes, setting will automatically
return to display mode. No changes will be saved.
TIME AND DATE SETTING
1. In normal time display, press and hold “•” for 3 seconds to enter setting mode; hour will begin
to flash.
2. Press “ ” to increase digit; press and hold “ ” for fast advance.
3. Press “ ” to set and advance to next setting value.
4. Setting sequence is: hour, minute, seconds, 12/24-hour format, year, month, date.
5. Press “•” to save and exit setting mode.
NOTE: Weekday will automatically update upon exiting setting mode.
CHRONOGRAPH MODE
1. Press “•” to change to chronograph mode.
2. Press “ ” to start/stop the chronograph.
3. Press “ ” to reset when the chronograph is stopped.
4. For split time, press “ ” while the chronograph is running (“CHRO” will flash in lower right
display for 5 seconds and then return to chronograph).
NOTE: “O” in “CHRO” will flash in lower right display in any other mode if the chronograph is
still counting.
TIMER MODE
1. Press “•” to change to timer mode.
2. Press “ ” to start/stop timer.
3. Press “ ” to reset timer to preset value when the timer is stopped.
NOTE: When timer reaches zero, the “•”symbol in “TMR•” will flash in lower right display in
any other mode if the timer is still counting.
TIMER SETTING
1. In timer mode, press and hold “•” for 2 seconds to enter setting mode; minute will ash.
2. Press “ ” to increase digit; press and hold “ ” for fast advance.
3. Press “ ” to set and advance to seconds.
4. Press “ ” to increase digit; press and hold “ ” for fast advance.
5. Press “•” to save and exit setting mode.
ALARM MODE
1. Press “•” to change to alarm mode; “ALM 1” or “ALM 2” will ash twice.
2. Press “ ” to toggle alarm on/off.
NOTE: Alarm will sound for 15 seconds; press any pusher to silence alarm.
NOTE: Alarm 1 is only for time zone 1; alarm 2 is only for time zone 2. Alarm will toggle
automatically when time zones are changed.
ALARM SETTING
1. In alarm mode, press and hold “•” for 2 seconds to enter setting mode; hour will begin ashing.
2. Press “ ” to increase digit; press and hold “ ” for fast advance.
3. Press “ ” to set and advance to minute.
4. Press “ ” to increase digit; press and hold “ ” for fast advance.
5. Press “•” to save and exit setting mode.
- 12 -
Clink Digital
NORMAL TIME DISPLAY
1. Press “•” to change mode; mode sequence is time, timer, alarm and chronograph.
2. Press “” for EL. Press and hold “ ” to toggle auto EL on/off. When auto EL is on, pressing any pusher will turn
on EL for 3 seconds.
3. Press “ ” to toggle hourly chime on/off.
4. Press “” to flash time zone 2. Press and hold “ ” to toggle time zone 1/time zone 2.
NOTE: In any setting, if no pusher is operated for 2 minutes, any changes will not be saved and the setting will
automatically return to display mode.
TIME AND CALENDAR SETTING
1. In time display, press and hold “•”; hour will begin flashing.
2. Press “” to increase digits; press and hold “ ” for fast advance.
3. Press “ ” to advance to next setting value.
4. Setting sequence is: hour, minute, seconds, 12/24-hour format, year, month, and date.
5. Press “•” to exit setting mode.
NOTE: Weekday will automatically update upon exiting setting mode.
TIME ZONE 2 SETTING
1. In normal time display, press and hold “ ” to toggle to time zone 2.
2. Set time zone 2 by following time and calendar setting instructions above.
COUNTDOWN TIMER
1. Press “•” to change to timer mode.
2. Press “ ” to start/stop the timer.
3. Press “” to reset timer to preset value, when the timer is stopped.
NOTE: “TMR” will flash in any other mode if the timer is left running/on.
NOTE: When timer reaches zero, alarm will sound twice.
TIMER SETTING
1. In timer mode, press and hold “•”; minutes will begin flashing.
2. Press “” to increase digits; press and hold “ ” for fast advance.
3. Press “ ” to save and advance to seconds.
4. Press “” to increase digits; press and hold “ ” for fast advance.
5. Press “•” to exit setting mode.
ALARM MODE
1. Press “•” to change to alarm mode.
2. Press “ ” to toggle alarm on/off. Alarm on icon is ten dots in the middle of the display.
NOTE: Alarm will sound for 15 seconds; press any pusher to silence alarm.
NOTE: There are two alarms. Alarm 1 is set for Time Zone 1 only, and Alarm 2 is set for Time Zone 2 only.
However, both alarms can be set to “on” at the same time, no matter what the active time zone is. Each alarm
will sound at the preset time in its respective time zone.
ALARM SETTING
1. In alarm mode, press and hold “•”; hour will begin flashing.
2. Press “” to increase digits; press and hold “ ” for fast advance.
3. Press “ ” to save and advance to minutes.
4. Press “” to increase digits; press and hold “ ” for fast advance.
5. Press “•” to exit setting mode.
ALARM 2 SETTING
1. From normal time display, press and hold “ ” to toggle to time zone 2.
2. Press “•” to change to alarm mode.
3. Follow alarm setting instructions above.
CHRONOGRAPH MODE
1. Press “•” to change to chronograph mode.
2. Press “ ” to start/stop the chronograph.
3. When the chronograph is stopped, press “” to reset to zero.
NOTE: “CHRO” will flash in any other mode if the chronograph is left running/on.
SPLIT TIME
1. Press “” while the chronograph is running. Split time will be displayed for 5 seconds, then automatically return
to chronograph mode.
2. Press “ ” to nalize timing.
RESETTING THE WATCH
If the time display is interrupted, resetting the watch is recommended. To reset all functions, press and hold all four
pushers at the same time for 3 seconds.

- 13 -
MISCELLANEOUS
Battery Life
Most Starck watches and jewelry have an average battery life expectancy of 17–18 months. The LED and Dish Digital watches have an average
battery life expectancy of 24 months.
NOTE: Be aware of the o-ring when removing the hatch back on the caseback. This must be replaced when replacing the hatch back in order to
maintain water resistancy.
Bracelet Instructions
1. To adjust length of bracelet, locate
screw/pin and unscrew. (fig. A)
NOTE: Once released, push screw/pin
through from other side.
2. Remove metal retainer from bracelet.
(fig. B)
3. Slide off necessary number of metal
sleeves. (fig. B)
NOTE: PU links removed should equal
number of metal sleeves removed.
4. Insert bracelet back into the buckle and
replace the screw/pin.
FIGURE A
Screw/Pin
Use Precautions - Resistance to Water
Indication Water-related Use
Depth Caseback
Marking
Light spray
perspiration, light
rain, etc.
Bathing, etc. Swimming, etc.
Skin diving
(Diving without
oxygen cylinder)
Water-resistant
characteristics
- -
NO NO NO NO
Non-water-resistant;
must be kept
away from water.
WATER-
RESISTANT
30m (3 bar)
3 ATM OK NO NO NO Normal daily
water contact.
WATER-
RESISTANT
50m (5 bar)
5 ATM OK OK NO NO
Suitable for bathing,
but cannot be worn for
swimming or diving.
WATER-
RESISTANT
100m-200m
(10bar-20bar)
10 ATM-
20 ATM OK OK OK OK Suitable for
skin diving.
Always set the crown in the normal position.
Tighten screw-lock crown completely.
• Clean your watch with a soft cloth and water only. Do not submerge your watch under water unless it is water rated (see caseback).
• After salt water use, rinse watch under tap water and wipe dry with a soft cloth.
• Metal watch bands should be washed periodically to keep them looking beautiful. Clean with a soft brush dipped in mild, soapy water.
Be sure to wipe dry thoroughly with a soft cloth.
FIGURE B
Metal
Sleeve
Screw/Pin
Buckle
Metal Retainer
Screw/Pin
PU Links

- 14 -
Strap Instructions
FIGURE A FIGURE B
Strap
Buckle
Tongue
1. To adjust length of strap, locate screws on inside
of buckle and remove. (fig. A)
2. Remove metal retainer from strap. (fig. B)
NOTE: Once strap is cut to length, the cut piece
cannot be reattached. Be sure the proper length
is determined before cutting.
3. Cut strap to desired length. Replace metal
retainer into seat. Slide buckle over metal retainer
and replace screws.
Wall
Metal
Retainer
Buckle
Screws
FIGURE A
1. To adjust the length of strap, locate top side of
buckle. (g. A)
2. Open buckle by taking out the pin inside in either
direction and remove strap. (g. B)
NOTE: Once strap is cut to length, the cut piece
cannot be reattached. Be sure the proper length is
determined before cutting.
3. Cut strap to desired length. Slide strap back into
buckle, then close the buckle by pressing the
cover and insert the pin again in either direction
until hear a “click” sound. (g. B)
FIGURE A
Wall
Strap
Buckle
FIGURE B
Take out pin (in
either direction)
and open buckle.
1. To adjust the length of strap, locate tongue on
inside of buckle. (g. A)
2. Open buckle and pull long end of strap until
tongue snaps open. (g. B)
3. Pull strap to desired length and line tongue up
with hole. Snap shut to close and secure strap.
Seat for Metal
Retainer
FIGURE B
Strap
This manual suits for next models
20
Table of contents


