Starfire Mount Warner Series User manual
WARNING: FOR OUTDOOR USE ONLY
CODE AND SUPPLY REQUIREMENTS: When an appliance is for connection to a fixed piping
system, the installation must conform with local codes, or in the absence of local codes with the
National Fuel Gas Code ANSI Z223.1/NFPA 54, OR International Fuel Gas Code.
WARNING WARNING
Improper installation, adjustment, alteration,
service or maintenance can cause injury or
property damage. Read the installation, operating
and maintenance instructions thoroughly before
installing or servicing this equipment.
CAUTION
IF YOU SMELL GAS:
This appliance is designed as an
“attended appliance”. Adults
must be present when the unit
is operating. DO NOT leave this
unit burning when unattended. If
this product is left burning unat-
tended it may cause damage or
serious injury.
CAUTION: CARBON MONOXIDE HAZARD
This appliance can produce carbon monoxide which has no odor.
Using it in an enclosed space can kill you.
Never use this appliance in an enclosed space such as a camper, tent, car, or home.
NOTE TO INSTALLER: Owner’s Manual must be left with the consumer for future reference.
NOTE TO CONSUMER: Owner’s Manual must be saved for future reference.
-1 -
COPYRIGHT © 2020, STARFIRE DIRECT, ALL RIGHTS RESERVED.
PROPOSITION 65 WARNING
ATTN CALIFORNIA RESIDENTS:
This product includes parts that may contain materials known to the state of California to
cause cancer, birth defects, or reproductive defects. For more information please v
isit www.
starredirect.com/prop-65.
By Starre Direct, Inc.
OWNER’S MANUAL
Mount Warner Series
Fire Pits Rev C, November 2020
This owner’s manual is valid for model numbers: -
FP-602416-BFCM FP-603616-BFCM, FP-723616-BFCM
Do not store or use gasoline or other flammable
vapors and liquids in the vicinity of this or any other
appliance.
An LP-cylinder not connected for use shall not be
stored in the vicinity of this or any other appliance.
1. Shut off gas to the appliance.
2. Extinguish any open flame.
3. If odor continues, keep away from the
appliance and immediately call your gas
supplier or fire department.
IMPORTANT SAFETY INFORMATION
CAUTION: INSTALLATION, MODIFICATION AND REPAIR MUST BE DONE BY
A QUALIFIED, PROFESSIONAL INSTALLER.
Be sure you understand all safety precautions and warnings contained in this manual.
1. CHECK STATE AND LOCAL CODES TO DETERMINE IF THE OUTDOOR FIRE PIT IS PERMITTED IN YOUR
LOCALITY BEFORE INSTALLATION.
2. FOR OUTDOOR USE ONLY. THIS UNIT MUST BE INSTALLED AT LEAST 36” FROM PERIMETER OF FIRE PIT
TO ANY COMBUSTIBLE WALLS, OR MATERIAL.
3. When shutting the unit down-be sure to TURN THE CONTROL VALVE FULLY OFF.
4. WARNING: CARBON MONOXIDE POISONING MAY LEAD TO DEATH. DO NOT MODIFY THIS OUTDOOR
FIRE PIT OR ITS CONTROLS, EXCEPT AS PROVIDED FOR IN THIS MANUAL.
Any other change may be dangerous. Improper installation or use of your Outdoor Fire Pit can
cause serious injury or death from fire, burns, explosions or carbon monoxide poisoning.
-2 -
COPYRIGHT © 2020, STARFIRE DIRECT, ALL RIGHTS RESERVED.
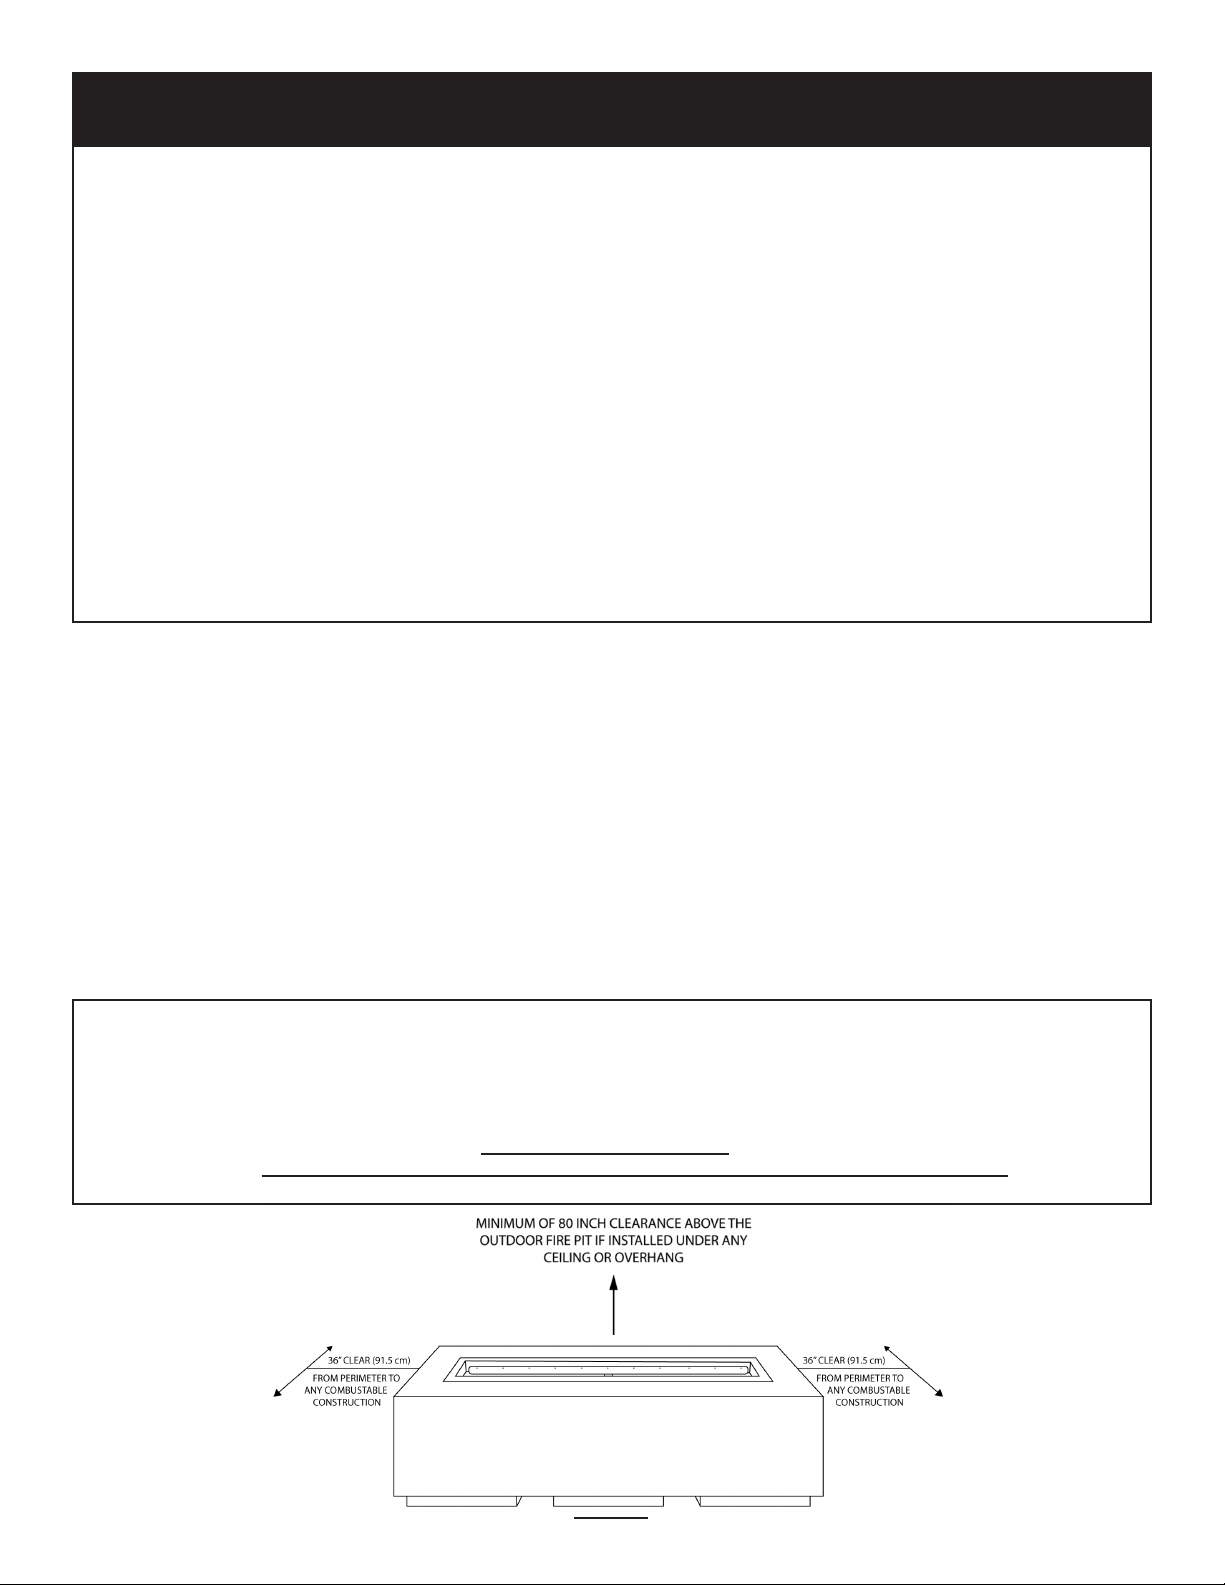
Clearances to Combustible Construction:
Sidewalls:
Ceiling:
Flooring:
36” (1.5 m) from perimeter of unit (Figure 1)
80” (1.5 m from top of unit to ceiling or overhang
0” - Can be installed on deck, slab, floor, etc.
The dimensions shown in Figure 1 are MINIMUM CLEARANCES to maintain when you install this
Outdoor Fire Pit. THERE MUST BE AT LEAST 36” of clearance from the perimeter of the unit to any
combustible sidewalls, ceilings, or materials.
FIG. 2-1
Cover - Important Safety Information ....................................................................................... 1
Table of Contents ........................................................................................................................ 2
Important Safety Information
Minimum Clearances to Combustibles ......................................................................... 2
Important Safety Information ......................................................................................... 3
Pre-Installation & Preparation Guidelines ...................................................................... 4
NG FIRE PIT AND BURNER INSTALLATION INSTRUCTIONS ... ....................................................... 5
PROPANE LP CONVERSION INSTALLATION INSTRUCTIONS ....................................................... 6
Operating Information
Ignition Safety Information .............................................................................................. 7 7
Match Lit Operating Information ................................................................................... 7
Maintenance and Care .............................................................................................................. 8
Warranty ........................................................................................................................................ 9
TABLE OF CONTENTS

A. YOUNG CHILDREN SHOULD BE CAREFULLY SUPERVISED WHEN THEY ARE IN THE AREA OF THIS
APPLIANCE.
B. DO NOT sit or place any part of the body or combustible materials on the Fire Pit surround.
Children and adults should be alerted to the hazard of high surface temperatures and
should stay away to avoid burns or clothing ignition.
C. Every time you use your Fire Pit make sure that the area around the Fire Pit is clear of
flammable items such as gasoline, yard debris, wood, etc.
D. WARNING: HOT WHILE IN OPERATION AND FOLLOWING OPERATION. Children must be
carefully supervised when in the vicinity of this appliance. Serious injury may occur. DO NOT
throw trash, paper, or other flammable materials onto your Fire Pit. DO NOT leave in
operation when unattended. WARNING: DO NOT operate this Fire Pit in the rain.
E. SOLID FUEL MUST NOT BE BURNED in the Fire Pit.
F. DO NOT continue using if you smell unusual odors or have headaches, nausea or are dizzy.
G. DO NOT store any combustible materials, gasoline, or any other flammable vapors/liquids
around the area of your Fire Pit. Provide adequate clearance for servicing and operation.
H. DO NOT hang or place clothing or any flammable material on or near your Fire Pit.
Matches, paper, garbage, or any other material must not be thrown on top of the lava
rock, fire glass, logs, or burner, or into the flame.
I. DO NOT use this appliance if any part of it has been under water. Immediately call a
qualified service technician to inspect the appliance and to replace any part of the
control system and any gas control which has been under water.
J. Installation and repair should be done by a qualified service person. Local certified
installers can be found on https://www.nficertified.org/
K. The appliance should be inspected before use and at least annually by a qualified service
person. More frequent cleaning may be required as necessary. It is imperative that the
control compartment, burners and circulating air passageways of the appliance be kept
clean.
L. The burner must be replaced prior to the appliance beinq put into operation if it is evident
that the burner is damaged. Contact Starfire Direct at 866-578-8538 for a replacement
burner.
M. DO NOT use this fire pit in high wind. Wind may cause flame to lay over and to discolor the
copper. Wind may also cause flame to extinguish. Your fire pit may not be equipped with
an automatic gas shut off. In the event that your flame is extinguished, you must know how
to manually shut off the gas to this appliance.
-3 -
COPYRIGHT © 2020, STARFIRE DIRECT, ALL RIGHTS RESERVED.
IMPORTANT SAFETY INFORMATION

- 5 -
COPYRIGHT © 2017, STARFIRE DIRECT, ALL RIGHTS RESERVED.
A. Before installing this Outdoor Fire Pit, check “Minimum Clearance to Combustibles”
(Fig. 1 on page 2). MINIMUM CLEARANCES must be maintained when you install this
Outdoor Fire Pit. THERE MUST BE AT LEAST 36” (91.5 cm) from the perimeter of the fire pit to
any combustible sidewall, or material and AT LEAST 80” to ceiling.
B. The Outdoor Fire Pit is for outdoor use only. DO NOT install or use this appliance inside
a building, garage, or any other enclosed area including recreational vehicles and/or
boats. This unit must be installed in such a manner that proper air ventilation is maintained
without obstruction at all times, and during all weather conditions.
C. CHECK GAS TYPE (natural gas or propane): The gas supply you intend to use must be
the same as that intended for use with this fire pit. This fire pit comes setup for use with
Natural Gas. If the gas supply is different, you MUST have the Fire Pit converted to the gas
type you intend to use, by a qualified, professional installer with the included propane
conversion kit. If you are unsure, contact your dealer for assistance.
D. DO NOT USE IF GAS PRESSURE IS LOWER THAN THE MINIMUM REQUIREMENT OR EXCEEDS THE
MAXIMUM.
E. FOR NATURAL GAS: The minimum inlet gas supply pressure for purposes of input adjustment
is 5 inches (127mm) water column and maximum inlet gas supply pressure is 10 inches (254
water column.
FOR PROPANE: The minimum inlet gas supply pressure for purposes of input adjustment is 8
inches (203 mm) water column and the maximum inlet gas supply pressure is 13 inches
(330 mm) water column.
DO NOT INSTALL THIS UNIT IF MINIMUM PRESSURE IS NOT AVAILABLE OR IF MAXIMUM
PRESSURE IS EXCEEDED.
The table below displays BTU ratings for the corresponding burner sizes and shapes. ‘H’=H-Burner,
‘L’=Linear Burner
PRE-INSTALLATION AND PREPERATION SAFETY GUIDELINES
-4 -
COPYRIGHT © 2020, STARFIRE DIRECT, ALL RIGHTS RESERVED.
BTU Rating Burner Size & Shape
120,000 48" L8”L
165,000 36" HH
200,000 48" H" H
F. Gas piping system must be sized to provide minimum inlet pressure at the maximum flow
rate (BTU/hr). Undue pressure loss will occur if the pipe is too small or the run is too long.
G.
H.
For installations at elevations above 2,000 ft., contact your local dealer or gas supplier
before installing as input ratings will be reduced approximately 4% for each 1,000 ft. above
sea level. Refer to the National Fuel Gas Code. Contact the dealer for the required orifice.
If the Outdoor Fire Pit is connected to Natural Gas, its main gas valve must be
disconnected from the gas supply piping system during any pressure testing of that system
at test pressures in excess of 2 psi.
I. If the Outdoor Fire Pit is connected to Natural Gas, it must be isolated from the gas supply
piping system by closing its individual manual shut-off valve during any pressure testing of
the gas supply piping system at test pressures equal to or less than 2 psi.
J. INSTALLER NOTE: This unit should be installed so that it can be removed at a later date for
service.
K. GAS SUPPLY PLUMBING REQUIREMENTS
Apply only joint compounds that are resistant to all gasses on all male pipe fittings. Make
sure to tighten every joint securely. Do not use pipe joint compound to connect flare
fittings.
SAFETY NOTICE:
An external on/off valve in the gas line is required for safety when your
Outdoor Fire Pit is not in use. It also provides for convenient maintenance and repair.
NG FIRE PIT AND BURNER INSTALLATION INSTRUCTIONS
-5 -
COPYRIGHT © 2020, STARFIRE DIRECT, ALL RIGHTS RESERVED.
FIG. 5-1
FIG. 5-2
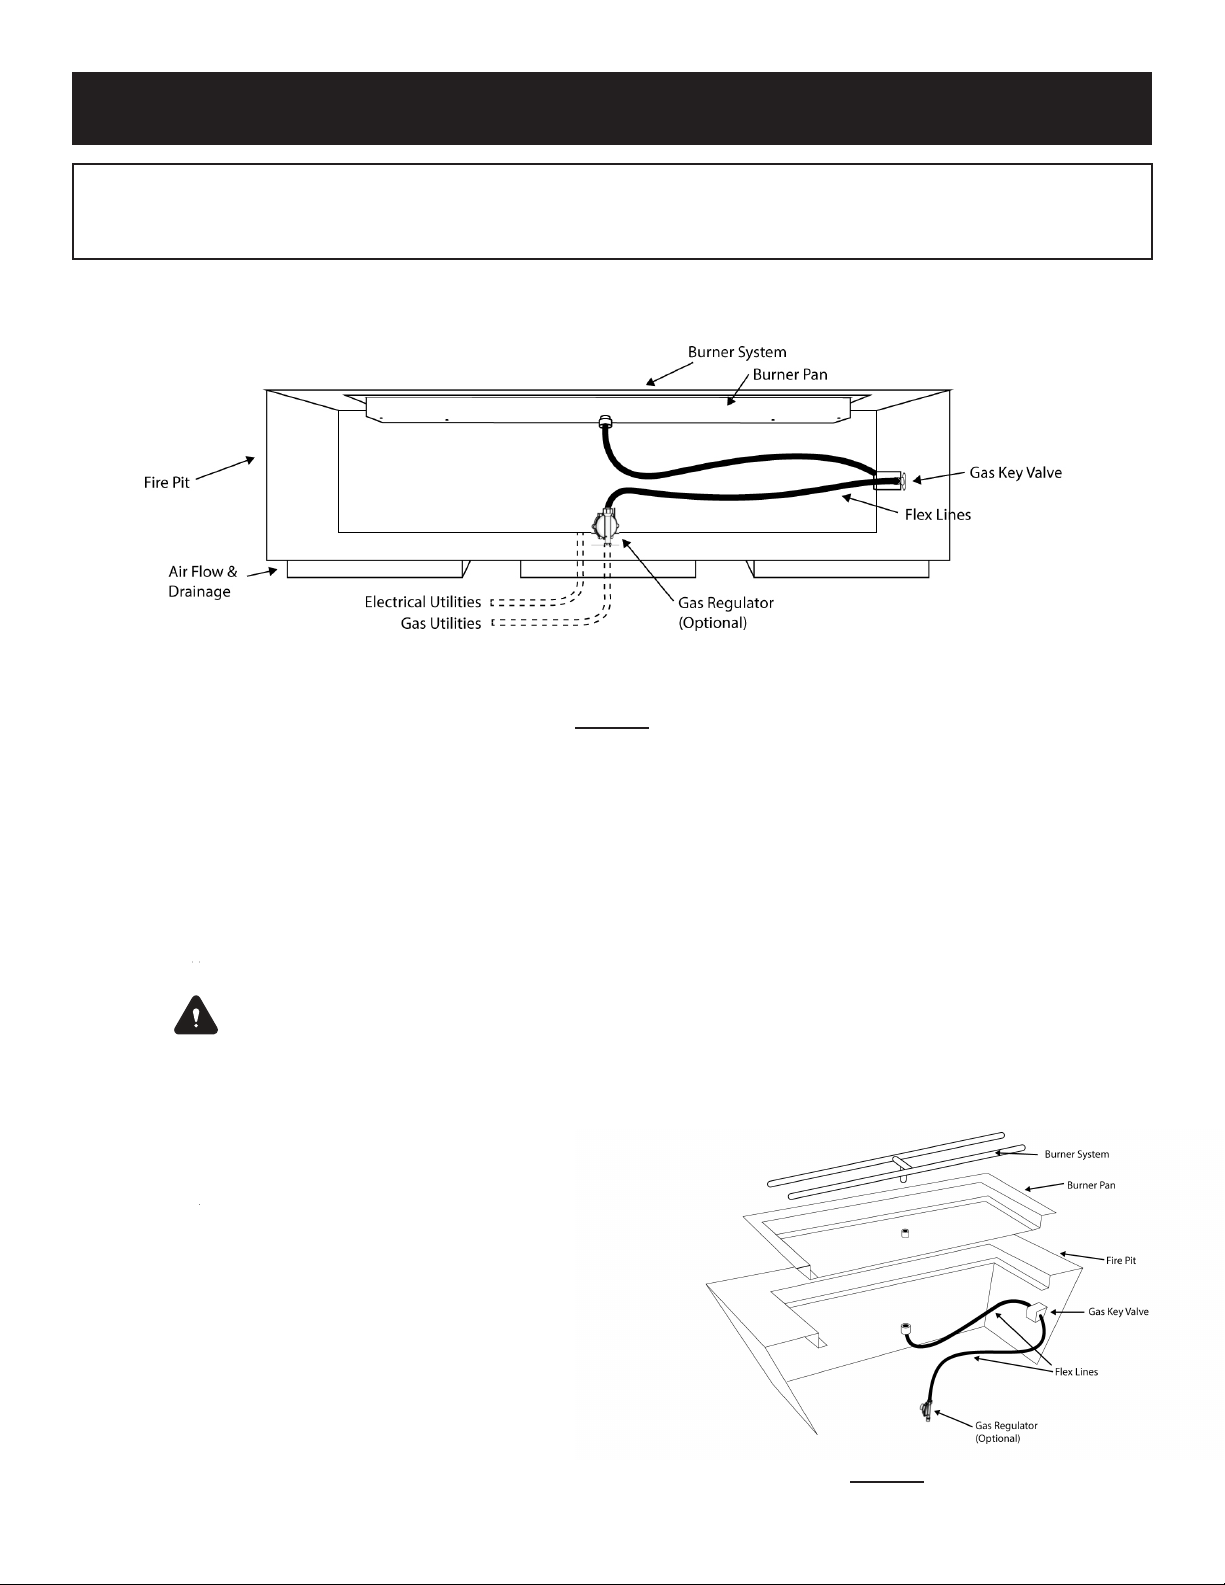
1. Place Fire Pit over Gas/Electrical Utilities.
2. The flex lines attached to the Gas Key Valve have been pre-tightened. Using two
adjustable wrenches, make sure they are nice and tight and did not loosen during shipping.
3. Remove the drop in burner from the box.
4. Both of the flexible gas lines will have a FLR x FIP fitting hand tightened at the end. Attach
the Flex line with the yellow tape to the burner pan. Attach the other line to your gas supply.
REMEMBER: Use “Pipe Joint Compound” or “Yellow Gas Tape” on all NPT fittings.
NEVER USE ON COMPRESSION THREADS!
4. Using two adjustable wrenches, tighten the end of the first flexible gas line to the
compression fitting on your gas stub.
5. Using two adjustable wrenches, tighten the end
of the second flexible gas line (with yellow tape) to
the compression fitting on the bottom side of the
Burner System. Make sure all fittings are tight and
secure, then set the Burner System into the Fire Pit.
6. Test your connections for leaks before
first use. Use a soapy water solution.
7. Before placing lava rock in burner pan, light your
burner to ensure proper ignition. For lighting
instructions, see page 8.
NOTE: These instructions are only for Natural Gas installations. To convert your fire pit for use
with propane, see page 6.

PROPANE LP CONVERSION INSTALLATION INSTRUCTIONS
-6-
COPYRIGHT © 2020, STARFIRE DIRECT, ALL RIGHTS RESERVED.
FIG. 6-1
1. Place Fire Pit over Gas/Electrical Utilities. Remove the drop in burner from the box.
2. The flex lines attached to the Gas Key Valve have been pre-tightened. Untighten and
disconnect the flexline from the elbow connected to the bottom of the pan.
3. Open the include PROPANE CONVERSION KIT bag.
Assemble the supplied propane air mixer.
NOTE: These instructions are only for Propane Gas installations. Natural Gas installations
refer to page 5.
4. Install the propane air mixer before the 90 degree elbow on underside of burner pan.
See Fig 6-1. Note directional arrow on propane air mixer to orient in the correct
direction for supply.
5. Install the supplied Flare x FIP to the air mixer. Connect your the flex line.
REMEMBER: Use “Pipe Joint Compound” or “Yellow Gas Tape” on all NPT fittings.
NEVER USE ON COMPRESSION THREADS!
FIG. 6-2
COMPLETED ASSEMBLY
Shown at right Fig. 6-3
PLEASE NOTE: This Air Mixer will
not operate properly if
installed incorrectly or does
not have adequate air flow.
When installing your air mixer,
ensure the gas is flowing in the
proper direction indicated by
arrow.

PROPANE LP CONVERSION INSTALLATION INSTRUCTIONS
-7 -
COPYRIGHT © 2020, STARFIRE DIRECT, ALL RIGHTS RESERVED.
4. The flex lines attached to the Gas Key Valve have been pre-tightened. Using two
adjustable wrenches, make sure they are nice and tight and did not loosen during
shipping.
5. Both of the flexible gas lines will have a FLR x FIP fitting hand tightened at the end.
Attach the Flex line with the yellow tape to the propane air mixer on bottom of
burner pan. Attach the other line to your gas supply.
REMEMBER: Use “Pipe Joint Compound” or “Yellow Gas Tape” on all NPT fittings.
NEVER USE ON COMPRESSION THREADS!
8. Using two adjustable wrenches, tighten the end of the first flexible gas line to the
compression fitting on your gas stub.
9. Using two adjustable wrenches, tighten the end of the second flexible gas line
(with yellow tape) to the compression fitting on the bottom side of the Burner
System. Make sure all fittings are tight and secure, then set the Burner System
into the Fire Pit.
10. Test your connections for leaks before first use. Use a soapy water solution.
11. Before placing lava rock in burner pan, light your burner to ensure proper
ignition. For lighting instructions, see page 8.

IGNITION SAFETY INFORMATION
We recommend that before you install your Fire Pit you familiarize yourself with the control valve
layout. This will help you to be condent operating the Fire Pit when fully installed (see gures
below for typical control positions).
FOR YOUR SAFETY, READ BEFORE LIGHTING
CAUTION
IF YOU DO NOT FOLLOW THESE INSTRUCTIONS EXACTLY, A FIRE OR EXPLOSION MAY RESULT
CAUSING PROPERTY DAMAGE, PERSONAL INJURY OR LOSS OF LIFE.
WARNING
BEFORE LIGHTING, smell all around the Outdoor
Fire Pit area for gas. Be sure to smell next to the
floor because some gas is heavier than air and
will settle on the floor. IF YOU SMELL GAS FOLLOW
THE INSTRUCTIONS ON PAGE 1.
WARNING
DO NOT use this appliance if any part has been
under water. Immediately call a qualified,
professional service technician to inspect the
Outdoor Fire Pit and to replace any part of the
control system and any gas control that has been
under water.
OPERATING INSTRUCTIONS
MANUAL MATCH LIT SYSTEMS ONLY
READ IGNITION SAFETY INFORMATION BEFORE LIGHTING
IGNITING THE FIRE PIT
1. Enter the included valve key into the key valve
opening
2. Using a long safety lighter, hold an open flame above
the outside edge of the burner ring.
3. Slowly turn the valve key towards the “ON” position.
4. Once fire burner is lit, remove safety lighter and turn
key valve up or down for desired flame height.
SHUTTING OFF THE FIRE PIT
1. To turn off, insert valve key into the key valve opening
and rotate to the off position.
CAUTION
DO NOT turn the main gas valve knob to the “ON” position FOR 5 MINUTES
after shutting the unit off.
-8 -
COPYRIGHT © 2020, STARFIRE DIRECT, ALL RIGHTS RESERVED.
FIG. 8-1
MAINTENANCE AND CARE
CAUTION:
Always remove any debris from the burn area.
Concrete is a porous material and can be susceptible to staining. The fire pit has a sealant put into
the concrete mix during manufacturing that can help protect against marks and minor stains.
With this sealant, your concrete will look great and natural for many occasions. Prolonged contact
with overly acidic, heavily pigmented or alkali substances should be avoided. We recommend
cleaning any spills as quickly as possible. We recommend that you avoid cutting or using hot pans
directly on your table.
We caution against use of caustic acids to clean or resurface concrete furniture. Such caustic
acids have historically been used to clean pools, sidewalks or other porous, all concrete surfaces.
These acids will etch the surface and change the structure of the concrete at the surface level.
Additionally, we caution against high-pressure cleaning, as with pressurized water or chemicals.
Using a garden hose should be enough pressure to clean the concrete. For normal spills, a quick
wipe up and gentle “scrub” with a cotton cloth or similar, should be enough to clean. For stains,
which contain dark colors or have been sitting longer than a normal spill, you can use a mild soap.
Please also note that fissures can appear on the surface due to age and/or exposure to the
atmospheric conditions. These commonly don’t have an effect on durability. Do not compromise
the structural integrity of tables by sitting or standing on them.
Cover when not in use: Starfire Direct recommends covering the fire pit when it is not in
use, to protect surface finish and keep clean of debris. Starfire Direct manufactures custom
covers for each fire pit model. You can contact Starfire Direct’s sales team at 866-578-8538 to
place an order for this additional accessory.
CAUTION: Allow fire pit to cool before covering.
Professional Inspection. This fire pit must be inspected by a qualified serviceman regularly to ensure
that all gas connections are tight and check for any leaks, cracked hoses, or burner clogs.
Frequency of inspections is depen dent on usage.
-9 -
COPYRIGHT © 2020, STARFIRE DIRECT, ALL RIGHTS RESERVED.

-9 -
COPYRIGHT © 2020, STARFIRE DIRECT, ALL RIGHTS RESERVED.
WARRANTY
Starfire Direct warrants this fire pit against manufacturing defects that prevent safe and correct
operation of the product for a period of three years from the date of delivery.
Defective product may be required to ship back. If the product does not need to be shipped
back, Starfire Direct is not responsible for removing or discarding original product. Contact Starfire
Direct to obtain an RMA (Return Merchandise Authorization) for that specific product which states
the nature of the defect or warranty claim. Product to be returned should be packed carefully -
Starfire Direct is not responsible for damage on returned items. The original purchase information
will be required. RMAs are only valid for 30 days from the date of issue and will not be processed if
received after the expiration date. The RMA number must be indicated on the outside of the
return package and a copy of the RMA in the package with product. Products shipped back
without an RMA may be refused.
Our warranty does not cover items that have been damaged by over heating, modification,
abuse, improper storage, installation, or maintenance. This warranty excludes claims for incidental
or consequential damage and indirect-collateral expenses arising from product defects or
warranty recovery. Starfire Direct is not responsible for damage incurred from use during high wind
or excess heat; the full cost of repairs or exchanges for such scenarios are the financial
responsibility of the owner. Starfire Direct is not responsible for the actions including negligence of
the installer. Should the buyer decide to return a fire pit, Starfire Direct is not responsible for the cost
of shipping.
Any costs incurred related to installation, repair or inspections by a contractor, installer or third
party are the responsibility of the consumer.
Starfire Direct is NOT responsible for local codes and/or if any of our products are not approved for
installa tion. Please check with your local building department or governing agencies for proper
approvals before purchasing. This product has not gone through third party testing and does not
carry any certifications.

By Starre Direct, Inc.
(866) 578-8538 | https://starfiredirect.com/pages/contact-us
This page is intentionally left blank.
This manual suits for next models
6
Table of contents
Popular Outdoor Fireplace manuals by other brands

CASAINC
CASAINC WFEHFP-08-B manual

The Haus Co.
The Haus Co. HEX WIDE BASE user manual

Paramount Fitness
Paramount Fitness FPT19134 instruction manual

Outdoor GreatRoom Company
Outdoor GreatRoom Company BRON52-K installation instructions

Extreme Fire
Extreme Fire TRI-FIRE Installation and operating instructions

Planika
Planika Lotus instruction manual


Endless Summer
Endless Summer WAD931SP Cleaning and care

Coleman
Coleman 5056-707 Assembly and instruction sheet

Landmann
Landmann CITY LIGHTS Montcello Assembly instructions

Good Directions
Good Directions Fire Put Assembly instructions

Menards
Menards L-FT885PST Assembly instructions

Costway
Costway NP10882 manual