Stark Tools USA ELITE 61132 Original instruction manual


Application
This hammer should be applied to breaking concrete,chipping offconcrete, grooving, bar cutting,
and driving piles in installation of piping and wiring,unitary facility installation, machinery installation
water supply, and drainage work, interior jobs, harbor facilities and other civil engineering involved.
Contents
1. Machine information
2. Optional accessories
3. Safety instruction
4. Assembly
5. Operation
6. Maintenanceand inspection
Technical Data
Standard accessories
One box of grease
30g (one box)
Bull point chisel(17x280mm)
1 piece
flat chisel(17x280mm)
1 piece
Carbon brush(6*10*14mm)
2 pieces
1. Machine information
1
Model number 61132
Rated Voltage AC 110V
Frequency 60Hz Rated current 10A
No load speed 3100/min
Tool holder 17mmHEX Chisel positioning 6 Step
Weight (without cord) 13.22lbs
Impact energy 11 J , 8 Ft/Lbs
Protection class II

Notice: Optional accessories (sold separately) are recommended only for toolfor specified
purpose in manual, anyother brand accessories or attachments used may present risk of injury.
1. Point chisel Hexagon size17*280 length (Unit:mm)
2. Flat chisel Hexagon size17*280 length (Unit:mm)
3. Bigflat chisel Hexagon size17*280 length*50Cutting width (Unit:mm)
4. Tine spade Hexagon size17*500 length (Unit:mm)
5. Groove chisel Hexagon size17*280 length (Unit:mm)
6. 4PCS KITS Hexagon size17*280 length (Unit:mm)
7. Lubricate grease one box 30g
Optional accessories are subject to change without notice.
In this operator's manual/or machine labels following symbols are used:
Class II tool Read the operating instructions before use.
General Warning Warning: Electricity
Wear ear 、eye and dust mask
protection.
I
mmediately unplug the plug from the main
electricity in the case that the cord gets
damage and during maintenance.
3. Safety instructions
2. Optional accessories (sold separately)
2

WARNINGRead all safety warnings and all instructions. Failure to follow the warnings and
instructions may result in electric shock, fire and/or serious injury.
Save all warnings and instructions for future reference.
The term "power tool" in the warnings refers to your mains-operated (corded) power tool or
battery-operated(cordless) power tool.
1) Work area safety
a) Keep work area clean and well lit. Cluttered or dark areas invite accidents.
b) Do not operate power tools in explosive atmospheres, such as in the presence of
flammable liquids, gases or dust. Power tools create sparks which may ignite the dust or
fumes.
c) Keep children and bystanders away while operating a power tool. Distractions can cause
you to lose control.
2) Electrical safety
a) Power tool plugs must match the outlet. Never modify the plug in any way. Do not use
any adapter plugs with earthed (grounded) power tools. Unmodified plugs and matching
outlets will reduce risk of electric shock.
b) Avoid body contact with earthed or grounded surfaces such as pipes, radiators, ranges
and refrigerators. There is an increased risk of electric shock if your body is earthed or
grounded.
c) Do not expose power tools to rain or wet conditions. Water entering a power tool will
increase the risk of electric shock.
d) Do not abuse the cord. Never use the cord for carrying, pulling or unplugging the power
tool. Keep cord away from heat, oil, sharp edges or moving parts. Damaged or entangled
cords increase the risk of electric shock.
e) When operating a power tool outdoors, use an extension cord suitable for outdoor use.
Use of a cord suitable for outdoor use reduces the risk of electric shock.
f) If operating a power tool in a damp location is unavoidable, use a residual current
device(RCD) protected supply. Use of an RCD reduces the risk of electric shock.
3) Personal safety
a) Stay alert, watch what you are doing and use common sense when operating a power
tool. Do not use a power tool while you are tired or under the influence of drugs, alcohol
or medication. A moment of inattention while operating power tools may result in serious
personal injury.
b) Use personal protective equipment. Always wear eye protection. Protectiveequipment
such as dust mask, non-skid safety shoes, hard hat, or hearing protection used for appropriate
conditions will reduce personal injuries.
c) Prevent unintentional starting. Ensure the switch is in the off-position before connecting
to power source and/or battery pack, picking up or carrying the tool. Carrying power tools
with your finger on the switch or energising power tools that have the switch on invites
accidents.
d) Remove any adjusting key or wrench before turning the power tool on. A wrench or a key
left attached to a rotating part of the power tool may result in personal injury.
e) Do not overreach. Keep proper footing and balance at all times. This enables better
control of the power tool in unexpected situations.
3

f) Dress properly. Do not wear loose clothing or jewellery. Keep your hair, clothing and
gloves away from moving parts. Loose clothes, jewellery or long hair can be caught in
moving parts.
g) If devices are provided for the connection of dust extraction and collection facilities,
ensure these are connected and properly used. Use of dust collection can reduce
dust-related hazards.
4) Power tool use and care
a) Do not force the power tool. Use the correct power tool for your application. The correct
power tool will do the job better and safer at the rate for which it was designed.
b) Do not use the power tool if the switch does not turn it on and off. Any power tool that
cannot be controlled with the switch is dangerous and must be repaired.
c) Disconnect the plug from the powersource and/or the battery pack from the power tool
before making any adjustments, changing accessories, or storing power tools. Such
preventive safety measures reduce the risk of starting the power tool accidentally.
d) Store idle power tools out of the reach of children and do not allow persons unfamiliar
with the power tool or these instructions to operate the power tool. Power tools are
dangerous in the hands of untrained users.
e)Maintain power tools. Check for misalignment or binding of moving parts, breakage of
parts and any other condition that may affect the power tool's operation. If damaged,
have the power tool repaired before use. Many accidents are caused by poorly maintained
power tools.
f) Keep cutting tools sharp and clean. Properly maintained cutting tools with sharp cutting
edges are less likely to bind and are easier to control.
g) Use the power tool, accessories and tool bits etc. in accordance with these instructions,
taking into account the working conditions and the work to be performed. Use of the
power tool for operations different from those intended could result in a hazardous situation.
5) Service
a)Have your power tool serviced by a qualified repair person using only identical
replacement parts. This will ensure that the safety of the power tool is maintained.
Additional Safety Rules for Demolition Hammer
1. Wear ear protectors. Exposure to noise can cause hearing loss.
2. Use auxiliary handles, if supplied with the tool. Loss of control can cause personal injury.
3. Hold power tools by insulated gripping surfaces, when performing an operation where the
cutting tool may contact hidden wiring or its own cord. Cutting accessorycontacting a "live" wire
may make exposed metal parts ofthe power tool "live" and could give the operator an electric shock.
4. Wear a dust mask. Do not inhale the harmful dusts generated in drilling or chiseling operation. The
dust can endanger the healthof yourself and bystanders.
5. Be sure the bit issecured in place before operation.
6. Under normal operation, the machine is designed to produce vibration, the screws and bolts
can come loose, causing a breakdown and accidents. Check tightness of them carefully before
running.
7. In cold weather or a long time tool not be used, please keep the tool running without load a
few minutes to warm up the grease inside, otherwise hammering function is difficult toget.
8. Be sure you stand stably and no one is below when you using tool isin high location.
9. Hold the tool firmly with two hands.
10. Don't touch any moving parts. 4

11. Don't leave the tool running itself, operate tool only when hand-held.
12. Don't point the tool to anybody for the bit could fly out in case.
13. Don't touch the BIT ORPARTS CLOSE TO THE BIT immediately after operation, they may
extremely hotand could burn your skin.
14. Any damage and abnormal happen, please stop touse immediately and disconnect it, ask
authorized serve center to check and repair.
15. Parts replace: Only original Stark parts can be used to replace by authorized service center.
16. Right use accessories and parts: Don't useother parts and accessories which not mentioned
in the manual otherwise may cause injuries!
17. Special attention to voltage: Before connect the power tool, please make sure the rated voltage
on the tool can match the power supply,otherwise the power tool may be damaged and cause
injuries.
18. Don't wipe plastic part with solvent: Solvent such as gasoline, thinner,alcohol etc. These kind
of chemical material, are not allowed to use, water or soap are recommended!
19. In case of damages the replacement of the plug or the supply cord shall always be carried out by
the manufacturer of the tool or hisservice organization
20. If the replacement of the supply cord is necessary,this has tobe done by the manufacturer or his
agent in order to avoid a safety hazard.
Residual risks
Even when the power tool is used as prescribed it is not possible to eliminate all residual risk
factors. The following hazards may arise in connection with the power tool’s construction and
design:
1. Damage to lungs if an effective dust mask is not worn.
2. Damage to hearing if effective hearing protection is not worn.
3. Damages to health resulting from vibration emission if the power tool is being used over longer
period of time or not adequately managed and properly maintained.
WARNING! This power tool produces an electromagnetic field during operation. This field may under
some circumstances interfere with active or passive medical implants. To reduce the risk of serious
or fatal injury, we recommend persons with medical implants to consult their physician and the
medical implant manufacturer before operating this machine.
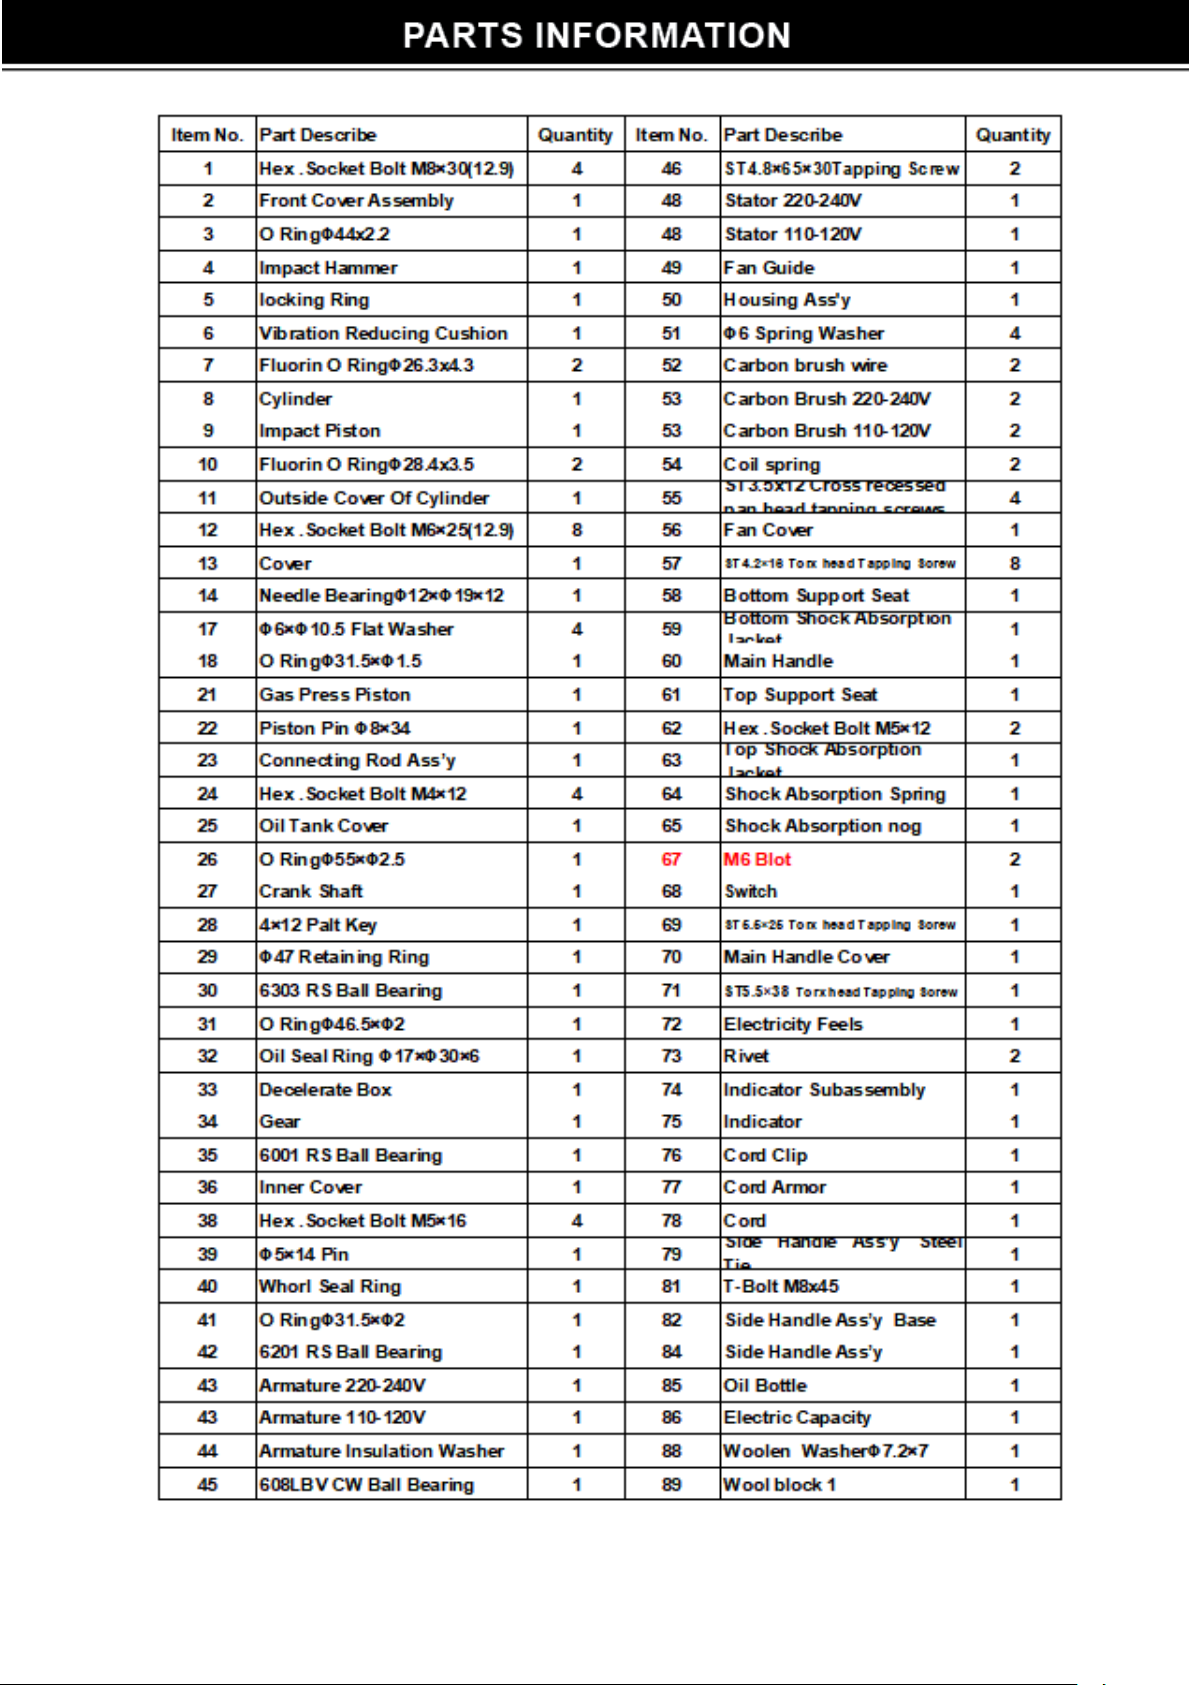
Name of the parts
4. Assembly
5

Prior to operation
Read the ENTIRE IMPORTANT SAFETY INFORMATION section at the beginning of this
manual including all text under subheadings therein before set up use of this products.
1. Power source
Ensure that the power source to be utilized conforms to the power requirements which specified
on the name plate of the hammer.
2. Power switch
Ensure that the power switch is in the position of OFF. If the plug is connected to power
receptacle while the power switch is in ON position, the demolition hammer will start operation
immediately, which can cause serious accident!
3. Extension cord
When the work area is removed from the power source, use an extension cord of sufficient
thickness and rated capacity. The extension cord should be kept as short as practicable.
Operation
1. Switch action
Switch on
Press the switch towards
①
direction
Switch off
Release the switch towards ②direction
If continuous Operation, turn on the switch and then push
in The lock button, to stop from the locked Position , just
press the Switch fully, then Release it.
2. Operate this demolition hammer by utilizing extra pressure.
The performance will be better if it is pressed properly against the work surface.
Note:
Sometimes the power tool does not begin the striking the stroke even the motor keep running,
because oil inside become thick. If the power tool is used at a low temperature, or it is used after a
long idle time, this demolition hammer should be kept running for above 5 minutes to warm up.
Mounting tool bits
Warning: before do it, make sure unplug the machine!
(1) Pivot the Flex Sheath to the side.
(it’s difficult to move the retainer with
your thumbs, tap it with a hammer.)
insert the bit into the tool barrel as
far as it is, then return Flex Sheath
to its original position.
(2) To unload tool, according to the
direction of arrow mark drop-down
telescopic set, remove picks.
6
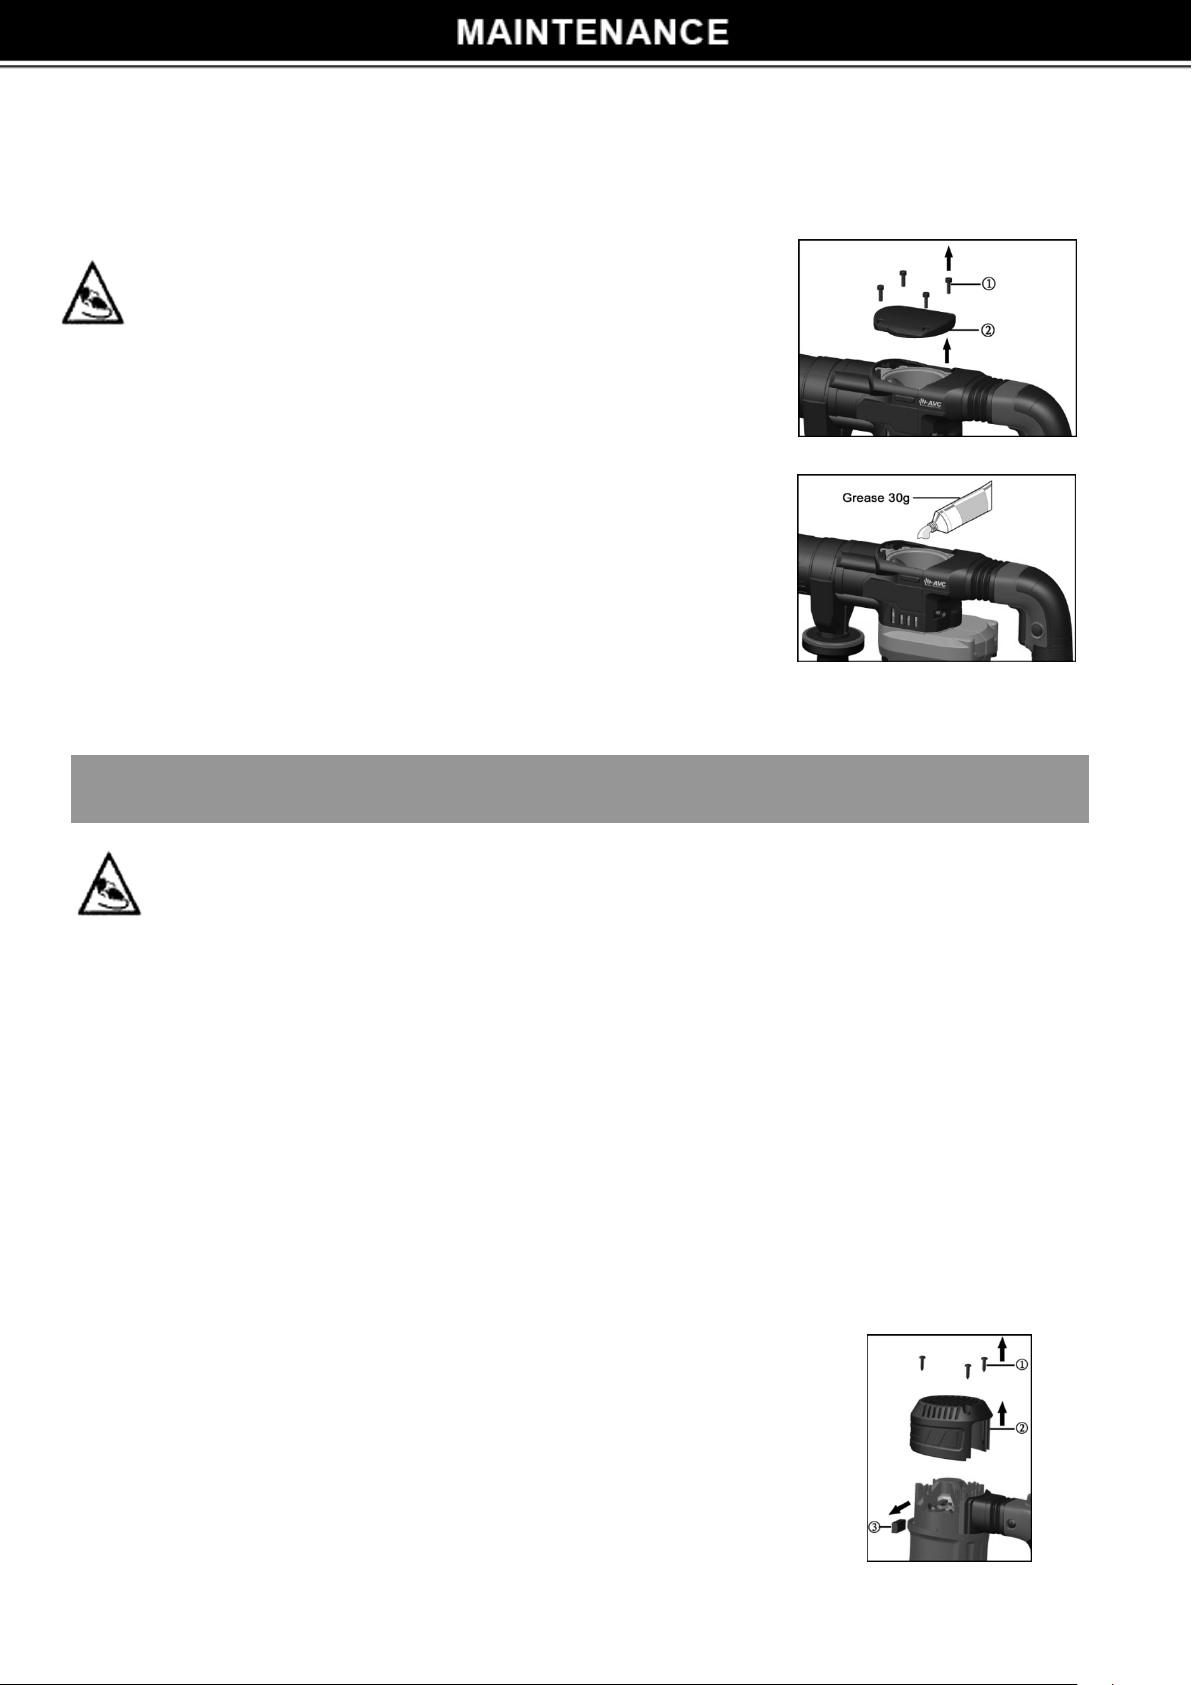
How to replace grease
This machine is if full air-tight construction to protect against dust and to prevent lubricant leakage.
Therefore, the machine can be used without lubrication for long periods. Replace the grease as
described below.
ACUTION:
Before replenishing the grease, turn the power off and pull
out the power plug.
Loosen the four set screws and remove oil tank cover.
Wipe off the grease inside.
Supply 30g of Demolition Hammer Grease
(Standard accessory,contained in tube) to the
Crank Housing.Too more or too little will cause the
machine non-properly work.
After replenishing the grease, Install the oil tank cover
Securely.
4. Clean the machine.
Before do any maintenance and inspection, ensure unplug the plug.
1.Inspecting the tool
Use a dull accessory, such as bull point, cutter, etc., will cause motor malfunction and efficiency
degraded. Replace with a new one when your accessory is abased.
2. Inspecting the mounting screws
Regularly inspect all mounting screws and ensure that they are properly tightened. Any loose
should be tighten immediately, failure to do maybe cause serious hazard.
3. Maintenance the motor
The motor is the heart of the machine, please avoid any damage to the winding, or any water
and oil to wet it.
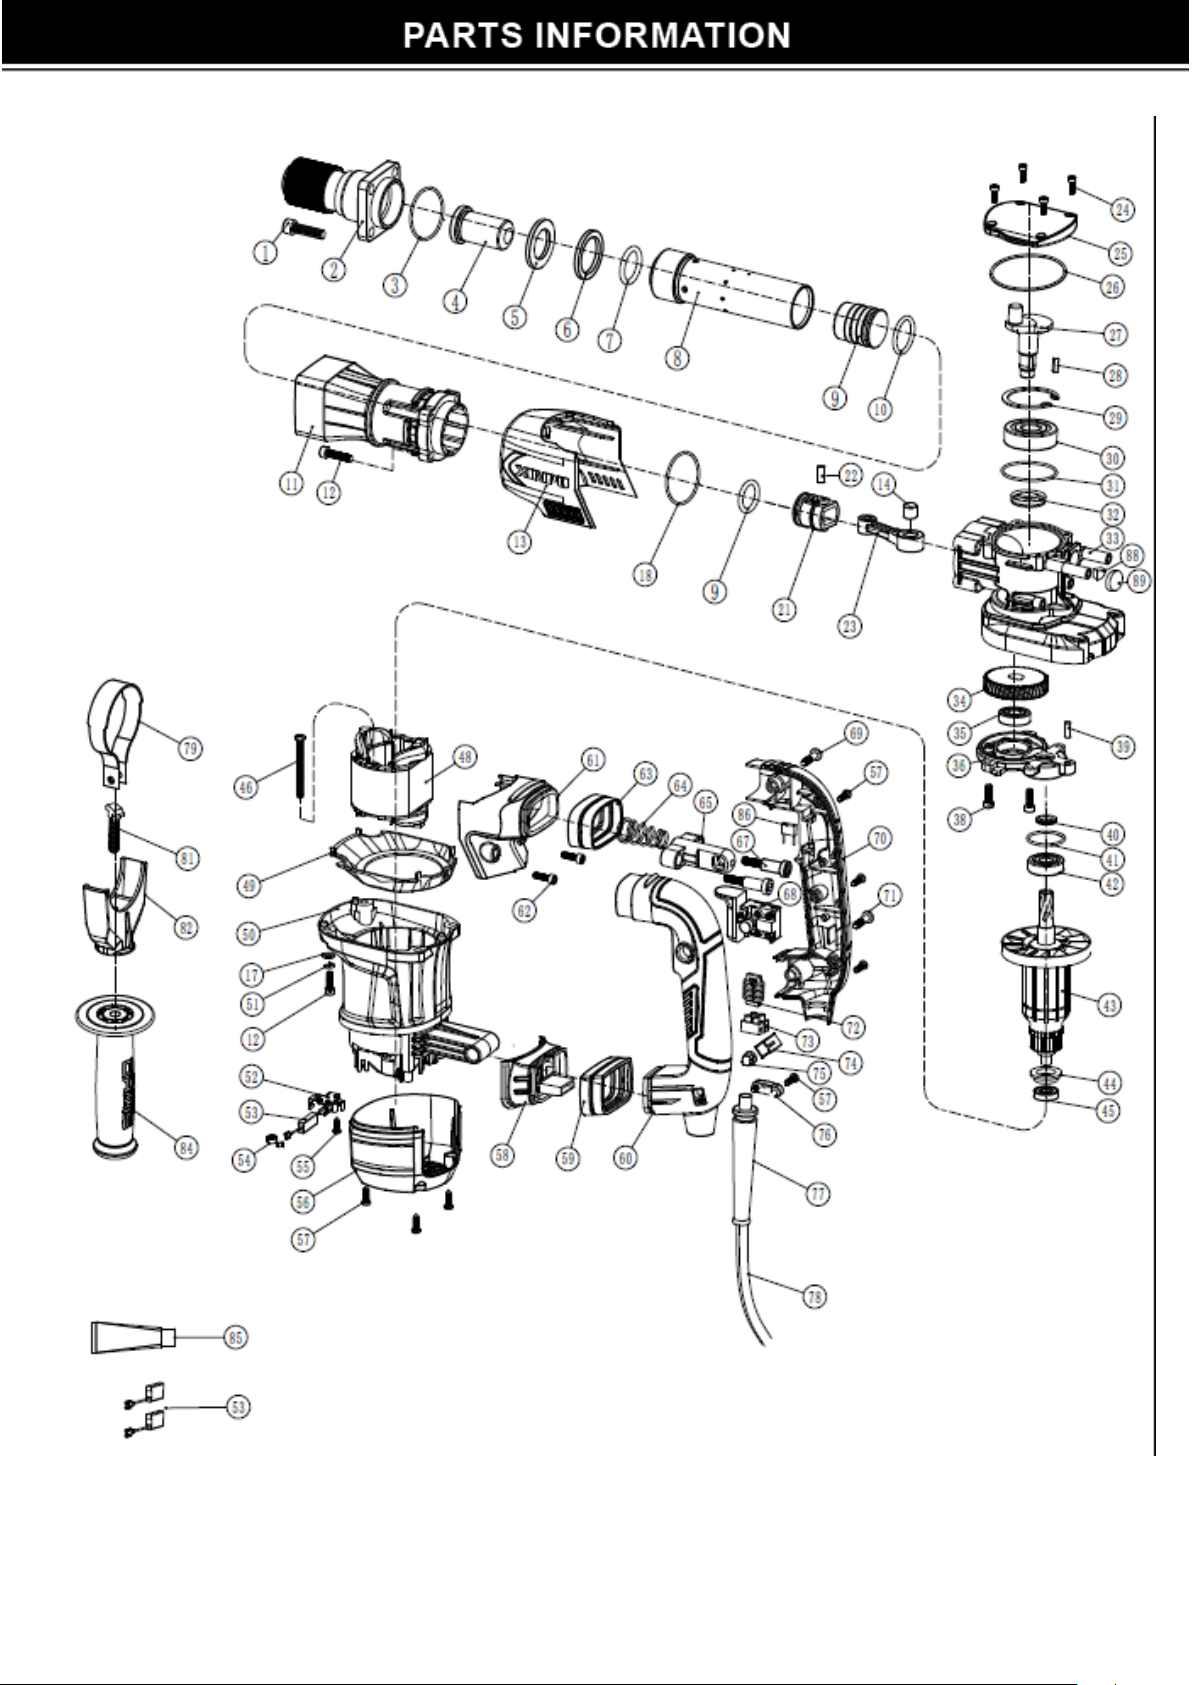
4. Carbon brush replacements
4.1 Carbon brushes are consumable parts, when it becomes worn or "limit worn" it can cause motor
trouble, we use auto-stop carbon brush, it stopped automatically when carbon brush worn out, at that
time, replace a new couple of them as following procedure:
4.2 When you have to replacement the carbon brushes by yourself, please
following the order:
(1)Loosen the three set screws and remove fan cover.
(2)Remove the helical spring and carbon brushes.
(3)After replacing the carbon brushes, install the helical spring and fan
cover,with securely tightening four set screws.
6.Maintenance and inspection
7

5. Cleaning
Clean the machine regularly with a soft cloth, preferably after each use. Solvent such as
gasoline, thinner, alcohol etc.These kind of chemical materials are not allowed to use, water or
soap are recommended!
6. Protecting the Environment
Do not dispose of power tools together with household waste material!
The machine, accessories and packaging should be sorted for environmental friendly
recycling.
Inobservance of European Directive on waste electrical and electronic equipment and its
implementation in accordance with national law, electric tools that have reached the end of their life
must be collected separately and returned to an environmentally compatible recycling facility.
CAUTION:
Repair,modification and inspection of Power tools must be carried out by a
Authorized Service Center.
In the operation and maintenance of power tools, the safety regulations and standards prescribed
in each country must be observed.
MODIFICATIONS:
Power Tools are constantly being improved and modified to incorporate the latest
technological advancements.
Accordingly,some parts (i.e. code numbers and/or design) may be changed without prior notice.
8
9
10
11
Table of contents
Popular Power Hammer manuals by other brands


Huskie Tools
Huskie Tools HH100 Service manual

Ratio
Ratio PRO XF45J instruction manual

DeWalt
DeWalt D25722K instruction manual

Parkside
Parkside PAH 1300 B2 Translation of the original instructions

Hitachi
Hitachi H 41SD Service manual

Bosch
Bosch 11317EVS - Hex Demolition Hammer 3/4 Inch Operating/safety instructions


