Starkpower JUMPBOX FLEET PRO 1500D User manual

Questions, missing parts, problems? Before returning to
your retailer, send us a message through our “Contact Us”
page on Starkpower.com
Jumpbox Model SP-12V1500-JB1
FLEET PRO 1500D

Period of Coverage: This product is warranted to the original
purchaser from the original purchase date for one (1) year
and is subject to the Warranty Coverage described herein.
Warranty Coverage: This product is warranted by Stark Pow-
er, Inc. 115 Denver Business Park Unit C., Mooresville, NC
28115 to be free from defects in material and workmanship.
This Limited Warranty does not cover defects or damage due to:
accidents, acts of God, misuse, abuse abnormal use, abnormal con-
ditions, alternation of to the product, attachment to any unauthorized
accessory; improper use of an electrical power supply that causes
malfunction; loss of power; dropped or crushed product; tampering
with or attempt to modify the product; unauthorized opening of the
product; transportation damage; theft, vandalism, loss of use during
the period the product is at a repair facility or otherwise awaiting
parts or repair; Failure to operate this product in accordance with
the instructions provided in this Owners’ Manual supplied with this
product. If product is use for commercial or industrial purposes the
warranty will be void.
DISCLAIMER: No warranty, written or oral, other than the above
warranty is valid with regard to this product. Manufacturer shall not in
any way be liable to the purchaser or any third party for any damages
the purchaser or any third party may suffer as a result of use, intended
or unintended or misuse of this product in conjunction with any
device, equipment or accessory other than the appropriate device or
equipment for which the product is designed.
Do not return product for warranty service to your Retailer.
Please return to Stark Power at address listed above.
ONE YEAR LIMITED WARRANTY

SAFETY INFORMATION
PLEASE Read this entire manual before attempting to use the product.
WARNING
1 Do not damage, drop or crush this item. Do not attempt to use this
item or battery charger that has been dropped, punctured, run over
or damaged in any way.
2. Do not charge this item in wet conditions (rain, snow, damp). Do not
use this product in explosive environments (dust, bilge, gaseous
fumes, or flammable materials).
3. Do not burn or incinerate this product. It may explode, causing
personal injury or damage. Toxic fumes and other potentially harmful
materials are created when the battery is burned.
4. Do not disassemble this product. It may result in risk of fire, electric
shock or exposure to battery chemicals
5. Do not insert foreign objects into ANY input or output ports. This item
may short circuit. Any metal that comes in contact with the jumper
cable port may short circuit. Short circuiting this product will damage
the battery and may cause personal injury or fire.
6. This is a Lithium Ion battery. In the unlikely event that this product
leaks battery chemicals, do not allow contact with skin, eyes or
mouth as it may cause personal injury or burns. If skin is exposed to
battery chemicals, wash with soap and water and rinse with vinegar.
If your eyes come in contact with battery chemicals, immediately
flush with water and then see a medical professional.
7. When recharging this item, make sure the area is well ventilated.
Please do not smoke or allow open flames near a charging battery.
8. Never jump start a frozen battery.
9. Please keep the product away from and out of reach of children.
10. Do not expose the battery to temperatures over +140F (60C) or below
-14F (-26C).
11. If the unit needs to be disposed of for any reason. It must be disposed
of properly by calling your nearest lithium-ion battery recycle facility
at 1-800-8-BATTERY.
12. If the product malfunctions or is having problems, discontinue use
13. Store this unit in a cool dry location.
13. This unit is not designed to be used in place of a vehicle battery.
14. This unit is not designed to be utilized as a battery charger.
1

WARNING
Warning - always check for the presence of flammable gases in enclosed
areas such as a bilge or in an engine compartment. Always properly ven-
tilate these areas before attempting to start the engine, hook up a jump
starter or start the jump starting process. Do not use this product near or in
the presence of propane tanks, natural gas or any other explosive fumes
that may accumulate, especially in low or enclosed areas. Note that the
lead acid battery may vent potentially explosive gases during the process
of cranking the engine - ALWAYS KEEP THE AREA WELL VENTILATED to
elimiate potentially explosive gases before performing any jump starting
process.
1. Shield eyes with protective safety glasses or safety goggles.
2. Make sure the ignition switch in the vehicle to be jumped is in the off
position before attaching cables.
3. Always put the ground (Black) cable on a non-moving engine ground
point. Never connect clamps to the carburetor or fuel injection system
as a ground point.
California Prop 65:
WARNING:
This product contains chemicals, including lead, known to the State of
California to cause Cancer and birth defects or other reproductive harm.
Wash hands after handling.
2

PACKAGE CONTENTS
3
Charger
Safety Jumper Cables
Laptop Adapter
4 in 1 Mobile Adapter
Carrying Case
Power Adapter

GENERAL INFORMATION
The FleetPro 1500 is capable of starting engines up to 7.0L diesel
gasoline. This also includes 4 cylinder, inline 6 and V.8 gasoline engines.
Compatible with:
The Fleetpro 1500 has 115,200 mWh of capacity for charging laptops, mo-
bile phones, portable gaming devices, MP3/MP4 players, cameras, tablets
and other electronic devices. It charges at 2 times the rate of a typical AC
wall outlet. It also has emergency LED flashlight with 3 modes.
Recharging the Jump Starter Unit:
Insert the small end of the AC power cord or the charger into the charge
input port, then plug into the 120V/220V power or 12V DC car charger
port. The device is charging when the LCD battery indicator “IN”flashes
red. When the unit is fully charged, the LED battery level indicator will be
fully illuminated.
Note: Full recharge of the unit should take between 4-6 hours depending
upon battery level. We recommend charging the unit every 6 months for
optimum performance.
4

LED Flashlight Operation:
Press and hold the button for three seconds to turn on the flashlight.
Afterwards, press the same button to change the normal LED function
to the flickering mode or SOS distress mode, press the button again to
turn it off.
Charging electronic devices:
Turn the power button to “ON” position. Insert matching adapter cable (4
in 1 cable or included) into the proper output port (USB/ circular output
port), then attach the device that needs to be charged (mobile phone,
tablet, camera, or other electronic device).
Charging laptop devices:
Turn the power button to “ON” position, then insert the adapter power
plug into output interface of laptop. Next, adjust power supply voltage to
the proper voltage recommended for your laptop. You will be able to tog-
gle from 12V and 19V as you briefly press the black button. Note: laptops
generally use 19V. Before use please confirm the product voltage number
with the manufacturer of the laptop
5
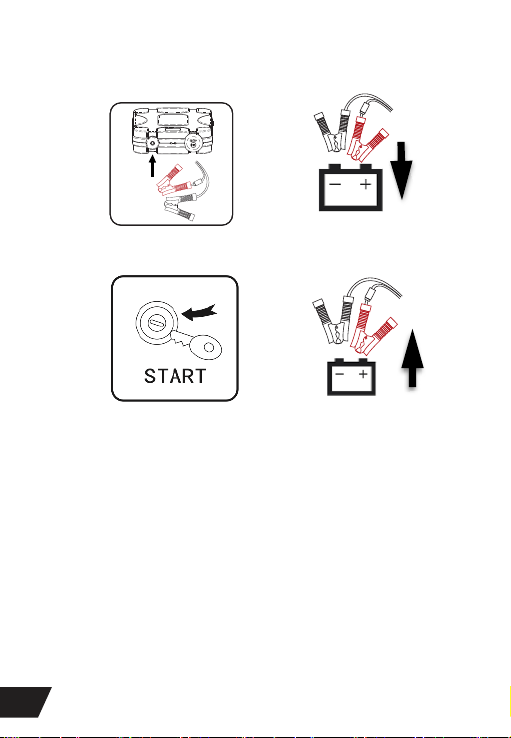
QUICK START GUIDE: JUMP STARTER
IMPORTANT: If jump starter does not jump start the engine, jump starter
may not have sufficient charge OR the jumper cable may be improperly
connected to the vehicle battery.
NOTE regarding cables: If there is an improper connection or the cable
polarity is reversed then the red light on unit will either be flashing or
illuminated and the unit will emit an audible alarm. If you are hearing the
alarm, this means that the unit is not connected properly and will not
charge the vehicle. Recheck connections and try again.
6
1
4
3
2
Plug cable into side
of unit
Connect the clamps:
Red to “+” and Black
to “-“
Start the engine Remove the clamps
from vehicle battery

7
FUNCTION ON SMART BATTERY
JUMPER CABLE
1. Reverse polarity connection: Solid Red LED with fast 2 short beep.
2. Short-circuit protection: Solid Red LED with long beep
3. Over-heat protection: Solid red LED with Long beep
4. Over-discharging protection: Solid red LED with fast 2 short beep
5. Green/Red LED flashing: Searching for status of connection
6. Green LED:Correct connection after one beep
DO NOT crank the engine for more than 4 continuous seconds while the
unit is connected to the battery. If the engine fails to crank or start, there
may be a problem other than a discharged battery.
WARNING

JUMP STARTING VEHICLE BATTERY
1. Refer to your vehicle’s owners manual for proper jump start location.
2. Check the battery terminals to ensure they are clean and free from any
debris for best connection.
3. Identify the positive “+” and negative “-“ terminals before connecting
the clamps.
4. Make sure jump starter battery has at least 30% charge.
5. Plug the jumper cables into the jump starter output port (next to the
LED light).
6. Double click the black button to activate the jumper cables.
7. Connect cables to your vehicle’s battery by first connecting the “+”
positive/red cable clamp to the “+” positive/red cable terminal on your
vehicle’s battery. Next connect the “-“ negative/black cable clamp to
the “-“ negative/black terminal on your vehicle’s battery.
8. Turn the ignition key to the first position, so that the unit will detect a
current draw and activate properly. For push button ignition systems,
push the ignition button twice to engage the smart cable.
9. When the safety jumper cable status light illuminates solid green, then
you have a proper connection to start the vehicle.
10. If status lights are blinking red, solid red or alternating red/green then
see smart battery function on page 7.
11. Start the engine (key cycle)
NOTE:This unit uses advanced safety jumper cables which provide short
circuit protection, reverse polarity protection and temperature limits.
Please ONLY use the jumper cables supplied with this unit to ensure
safety and best results.
12 Disconnect clamps immediately after starting vehicle.
8
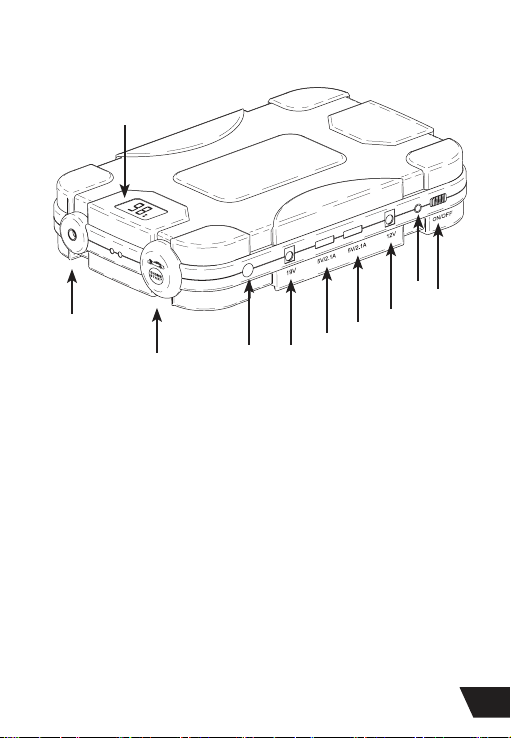
PRODUCT FEATURES
1. LED display
2. Flashlight
3. Battery terminal socket
4. Push button
5. 19V-2A/3.5A outlet
6. 5v/2.1A output
7. 12V-2A outlet
8. 12V/15A input
9. Power ON/OFF
9
1
2
35667
89
4

TECHNICAL SPECIFICATIONS
• Output voltage : 9V to 14.4V,
• Peak capacity : 115,200 mWh
• Dimensions : 7.21”(L) x 4.69”(W) x 1.8”(H) 183 x 119 x 45.6mm
• Input Charging Ports: 6mm - 15V, up to 1A/12V
Auto - 12V, up to 1.5A
• Output ports: USB - 5V 2.1A
Auto jump starter - 12V
Electronic- 12/19V-2A//3.5A
• Charge mode: CC/CV 15V 1A
• Start Current: 700A
• Peak Current: 1500A
• Cycle life: 1000 cycles @ 80 depth of discharge
• Application temperature range: -4F to +140F (-20C to+60C). Cell
performance may degrade at low temperature.
• Charging times - 110V Wall Charger: 4 hours
12V DC Charger: 8 hours
10

INTELLIGENT LI-ION BATTERIES BY
11

Emergency jump starter and
electronics charger device
115 Denver Business Park Unit C
Mooresville, NC 28036
Customer Service Line: 800-587-9940
www.starkpower.com
Patent Pending
Made in China
2015 All rights reserved.
This manual suits for next models
1
Table of contents


