SteakAger PRO 20 User manual

PRO 20 / Pro 40
USER GUIDE
Congratulaons on your purchase and welcome to the SteakAger family!
Every SteakAger product comes with a 1-year parts and labor warranty,
eecve as of original purchase date. Please retain proof of purchase to
obtain service under this warranty.
READ ALL INSTRUCTIONS BEFORE USE
For your safety and connued enjoyment of this product,
always read the instrucon manual before using.
Please join us on our Facebook page :
The ofFicial steakager owners group
2
First Time Operang Instrucons
• Remove all packaging materials and be sure to keep track of all parts
nested in the packaging for safe shipment.
• We recommend that you retain all packaging in the event of a move or
for shipping the appliance in the future.
• Let the unit sit for 24 hours before plugging in the power cable and
turning on.
• CAUTION: We do not recommend using extension cords. If you must
use an extension cord make sure it is UL/CUL, 3-wire grounding type
appliance extension cord having a grounding type plug and outlet
and that the electrical rang of the cord be 115 volts and at least 10
amperes.
• Two plugs are provided for the operaon of your PRO series SteakAger.
The main plug is for the refrigerator and one 12V plug for the SteakAger
Initial Setup GETTING
STARTED
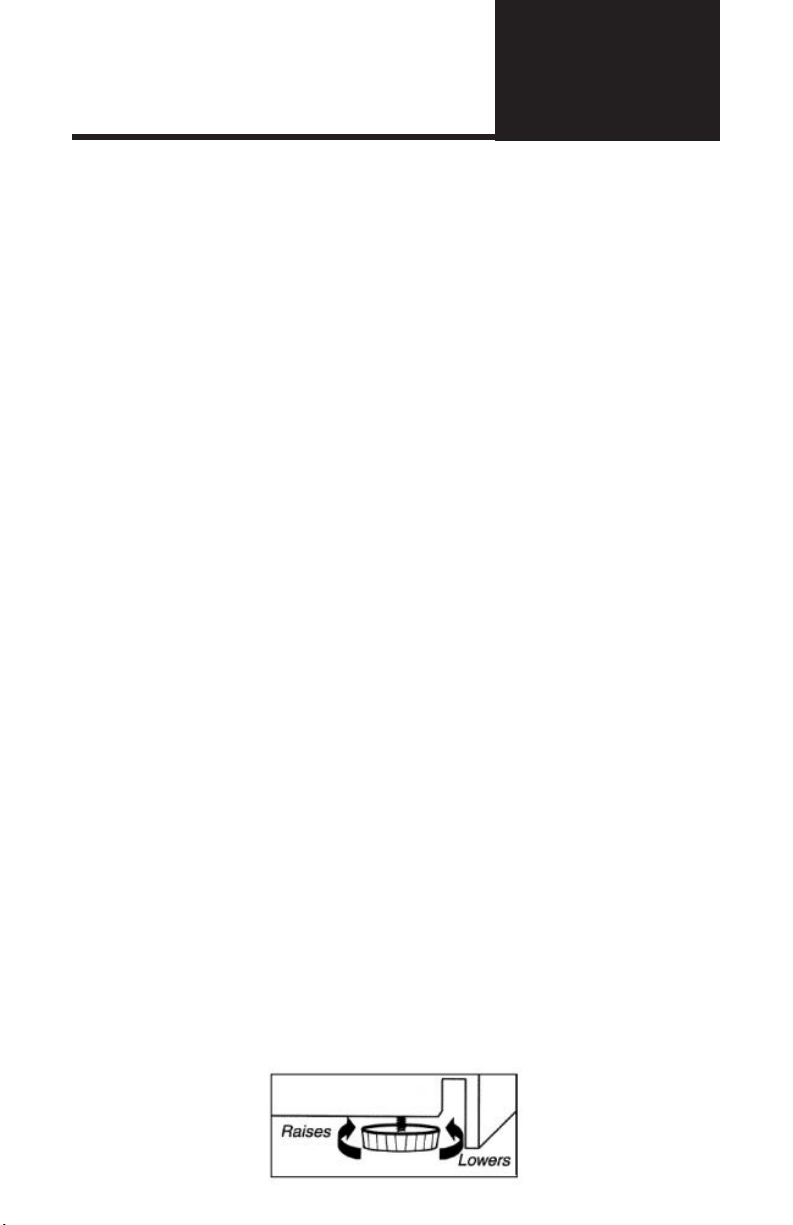
Leveling your PRO 20/40
• Move your PRO 20/40 to its nal desnaon.
• Have someone gently lean on the front of the PRO 20/40 to take some
of the weight o of the leveling leg.
• Turn the leveling leg clockwise to raise, and counter-clockwise to lower
the PRO 20/40. Connue in this manner unl the PRO 20/40 is level. It
iss best to ensure the appliance is lted slightly to the rear for draining
of water.
PRO 20/40 Setup Checklist
1. Place and level unit.
2. Wait 24 hours for compressor oil to sele from shipping.
3. Plug 120V compressor cable in.
4. Plug 12V power source supplied into the socket on the lower right hand
side of the back of the unit.
5. Conrm fans on the Control Panel are running.
6. Download and run our Steakager App.
7. Unwrap the drain hose, place and trim hose to drop into the Drain Pan.
8. Set the desired temperature.
9. Insert Humidicaon Pan with fresh water if desired.
10. Observe for normal operaon for a few hours before loading.

3
Initial Setup GETTING
STARTED
• ELECTRIC SHOCK HAZARD!
• Plug into a grounded 3 prong outlet.
• NEVER remove the grounding prong from the plug.
• NEVER use an adapter to bypass the grounding prong.
• NEVER use an extension cord.
• Failure to follow these instrucons can result in re, electrical shock or
death.
• A standard electrical supply (115V, 60hz), properly founded in accordance
with Naonal Electrical Code and local codes and ordinances is required.
Electrical Requirements
For your personal safety, this appliance must be grounded. It is equipped with
a power supply cord that has a 3-pronged grounding plug. To minimize possible
shock hazard, the cord must be plugged into a mang 3-pronged wall socket and
grounded in accordance with the Naonal Electrical Code and local codes and
ordinances. If a mang wall socket is not available, it is the personal responsibility
of the customer to have a properly grounded, 3-pronged wall receptacle installed
by a qualied electrician.
Recommended Grounding Method
Locang and Placing Requirements
• Your Steakager must be placed in a climate-controlled room above 50F
and below 90F.
• It should not be located next to ovens, grills, or other heat sources.
• To ensure proper venlaon, allow at least 5” of clearance at the back, 3”
at the top and 3” at each side.
Aer unboxing you may noce that the door is out of alignment. This can happen
during shipping and is a quick x.
• Using a athead screwdriver to carefully pry the top hinge cover o.
• Using a Philips screwdriver, loosen the top screws.
• Realign the door.
• Tighten the screws and snap the top hinge cover back on.
Adjusng the Door

4
PRO 20/40 Drain Pan Install
Upon receiving and unpacking your Pro 40 Steakager, you will have a small
black plasc pan.
• Remove this and unpack the pan from the packaging materials.
• Go to the rear of the fridge and you will see a hose coming o of the
black pan above the compressor.
• Pull out the hose and route it to the drain pan. This will allow for
the water to drain into an external previous for easy dumping when
necessary.
• When doing dry-aging you will have the most water drainage in the
rst 1-2 weeks as the most moisture is being removed from the meat.
It is recommended to check the drain pan every couple days in these
rst 1-2 weeks. Aer those inial 1-2 weeks you can go longer before
checking the pan.
• When doing charcuterie, the fridge will constantly be removing
moisture since you are running at a higher temperature and usually
have a higher moisture content. Checking the pan every couple days
throughout the curing process is recommended.
• Some of our competors recycle the waste water in their humidicaon
systems. We nd that removing the water results in a more hygenic
environment in the aging cabinet.
Initial Setup GETTING
STARTED
5
TEMPERATURE CONTROL OPERATING
INSTRUCTIONS
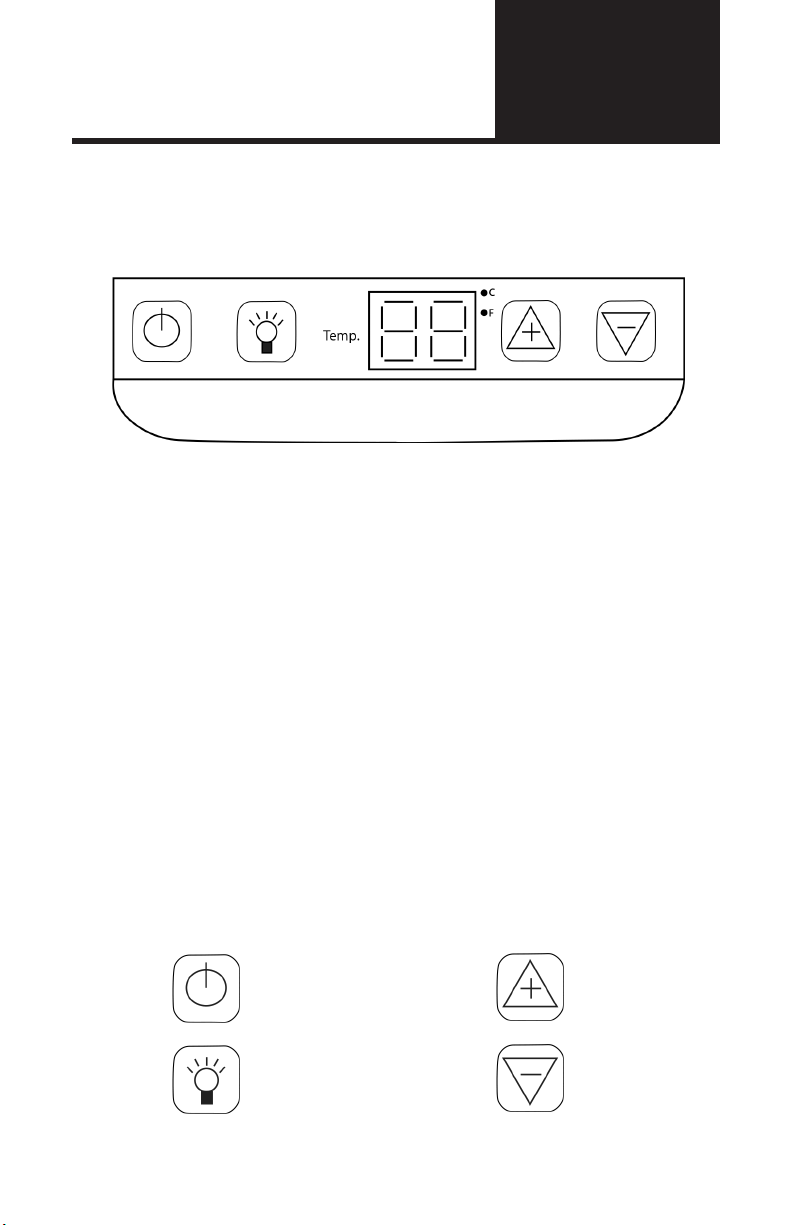
Temperature Controls and Sengs
Once you have completed the setup and assembly instrucons for your new
SteakAger, follow the instrucons below to set and adjust temperatures.
• With the 120vac power plugged into the wall you will see the display on
the interior top of your SteakAger turn on.
• To adjust the temperature you will use the + and - arrows to move up and
down.
• For Dry-Aging, we recommend seng the temperature to read
40F as the set temperature is the upper limit and will cycle down to
average 37F.
• For Charcuterie, we recommend seng the temperature to read 59F
to give you an average temperature of 55F.
• The readout on the controls head shows the set temperature of the unit.
If the readout displays 40F, this means that the fridge will cycle below this
number from 33F to 40F.
• Changing between Celsius and Fahrenheit can be done by pressing and
holding the LIGHT buon for 5 seconds.
• Toggling the interior blue light ON and OFF can be done by pressing the
LIGHT buon on the interface diagram above. This is just an interior light
and is not the UVC light in the unit. The UVC light is built into the Control
Module of the unit.
Power
Light Down
Up

6
Assembly Layout FEATURES AND
FUNCTIONS
Temp Controls
Humidier Tray
(oponal)
Humidier Port
SteakAger
Control Panel
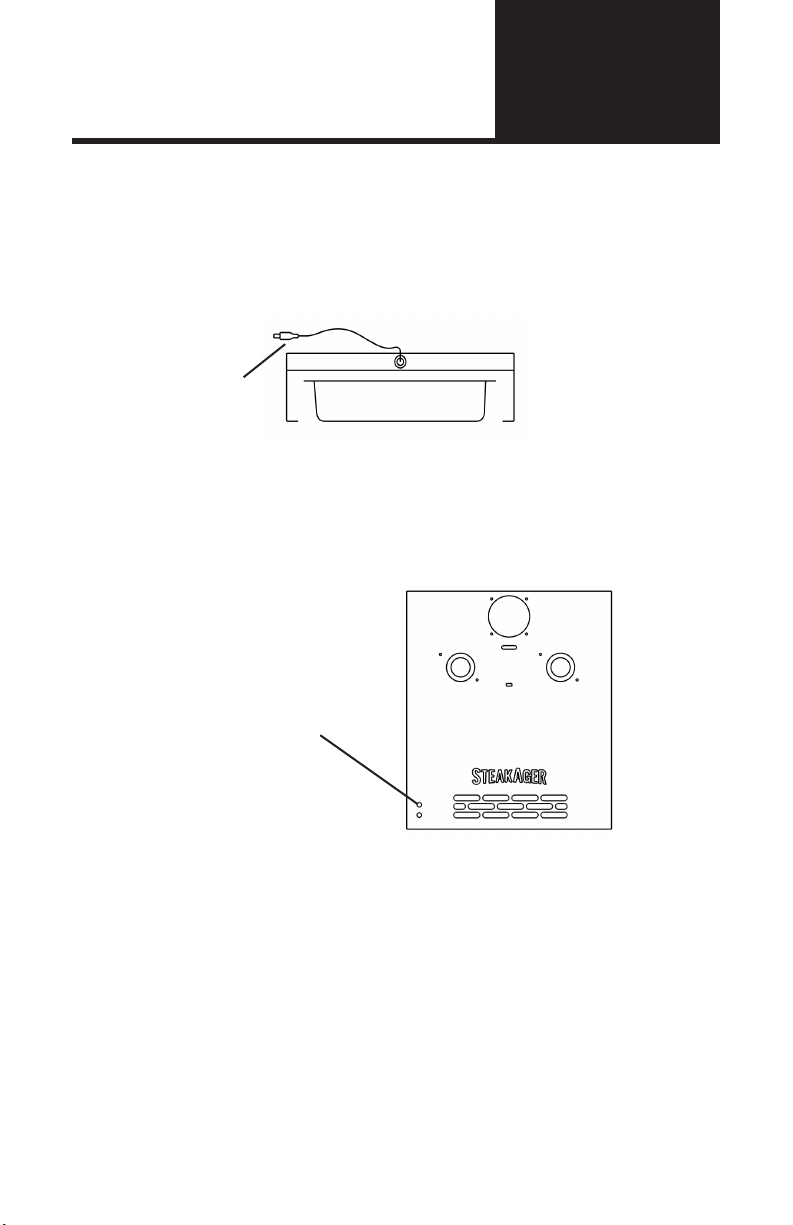
Power Port
PRO 20 / 40 Parts Layout and Assembly
12 Vdc Power Socket
Compressor
Compressor 120 Vac
Humidier
(oponal)
Drain Pan with Drain Hose
PRO 20
PRO 40
12 Vdc Power Supply

7
Parts List FEATURES AND
FUNCTIONS
Unboxing and Parts List
When unboxing your SteakAger PRO 20/40 check to be sure that the below
components are supplied.
PRO 40
Control Panel
Hanging Rack
12 Vdc
Power Supply
Meat Hook
(x2) and Twine
Drain Pan
PRO 20
Control Panel

8
Purchased Upgrades OPERATING
INSTRUCTIONS
PRO 20/40 Humidicaon Unit Details and Troubleshoong
When installing your Humidicaon Unit in your Steakager, follow the installaon
instrucons to ensure your installaon is correct. For addional help, email
info@steakager.com
• The Humidicaon Unit is designed to run on the algorithm programmed
on the control board in the Control Panel. The humidier will not turn on
for the rst hour of operaon while it collects data. Aer the rst hour,
if it sees an AVERAGE humidity below 75% it will turn on, if it sees an
AVERAGE humidity below 75% it will stay on. Once the humidier turns
on, if the AVERAGE humidity rises above 75% for longer than 1 hour it
will turn back o, when the AVERAGE humidity drops back below 75% for
longer than 1 hour it will turn back on. This process will help to maintain
the perfect 75% humidity AVERAGE. If you nd that your Humidicaon
Unit is running while your Steakager App is showing an AVERAGE
humidity higher than 75% you could have the plug in the wrong power
port.
• Some folks install aermarket temperature and humidity sensors which is
ne. Do note that the sensors will never read exactly the same, and some
variances should be expected.
• You will observe temperature and humidity cycling widely between each
compressor cycle. This is normal and does not aect the dry-aging cycle.
We only care about average temp and humidity over me.
• When lling the water reservoir we recommend using dislled water.
• Sit your truss racks right on top of the humidicaon system.
9
Purchased upgrades OPERATING
INSTRUCTIONS
PRO 20/40 Humidicaon Unit Assembly
1. When you receive your Humidicaon upgrade, it will come fully assembled
and ready to run. You will just need to ll the water tray up to the 1.5Q mark
and slide the tray back into the assembly.
2. There will be a cable coming from the back of the assembly, this should
be plugged into the topmost plug locaon on the Control Panel. The
humidicaon control algorithm will only turn the fan on if humidity drops
below a setpoint of 75% for 3 hours. This fan will only run periodically, usually
late in the dry-aging cycle and earlier in the charcuterie cycle.
Humidication Port
3. You will see that there is a black pan included with the Humidicaon unit.
This must remain lled with water for proper operaon of the humidier. You
do not need to remove the enre unit to ll the pan, just remove the pan to
rell. Dislled water is recommended.
Humidier Power Plug

10
APP SETUP OPERATING
INSTRUCTIONS
Connecng to your SteakAger
• Download the SteakAger App from the App Store or Google Play for free.
• Make sure your appliance is plugged in and running.
• Follow the below App instrucons for either iOS, Android.
• The app is not necessary for the proper funconing of your Steakager. It
allows monitoring of the unit.
WiFi Connecon :
• ** NOTE : If connecng through WiFi you will need to set up and account.
Make sure to conrm the account with the conrmaon email before
trying to sign in.
• Aer opening the app press “Connect to SteakAger”. You will then be
prompted to select “Wi Connecon” or “Bluetooth Connecon”. Press
“Wi Connecon” and enter your credenals. If you have already created
an account, enter your credenals and press login. If you have not created
an account press create account and enter your informaon.
• Aer signing in through WiFi you will need to go into the Sengs (Gear
Icon) and go into WiFi conguraon to select the network and enter your
password.
• If you receive an error message “Please wait 4 minutes for data to load”,
you may have entered the incorrect informaon or your ager is not
connecng to your network properly.
Bluetooth Connecon :
• When connecng through bluetooth you do not need a login to access
your SteakAger. This is the easiest and quickest way to setup and view your
SteakAger data.
• Aer opening the App press “Connect to SteakAger” you will then be
prompted to select “Wi Connecon” or “Bluetooth Connecon”. Press
“Bluetooth Connecon” and you will be immediately redirected to your
home screen.
• If you receive any error messages once connected, “Please wait 4 minutes
for data to load”. Your unit may not be plugged in or connecng properly. If
you are unable to resolve the issue with the troubleshoong guide, contact
us at www.TheSteakAger.com

11
CLEANING CLEANING AND
MAINTENANCE
Cleaning and Removal of Control Panel
• Unplug ALL power to the Steakager.
• Gently unplug the 12V Connector jacks at the front of the Control Panel
and tuck against the cabinet sidewall out of the way.
• Gently pull the le side of the Control Panel 1-2 inches and then slide the
enre unit out.
• Gently remove the Humidier.
• Carefully wipe and clean all surfaces of the Control Panel and the
Humidier. NEVER soak or wash electronics and fans.
• To clean fans use canned computer fan air cleaner to blow out any dust.
• You may clean the pans, racks and hooks in your dishwasher.
• Making sure the power connector jacks are safely tucked away, reinstall
the Control Panel, le side rst and then gently slide the Control Panel
into its home posion.
• Plug in the refrigerator and the 12V power supply. O bserve fans and App
running.
Other manuals for PRO 20
1
This manual suits for next models
1
Table of contents
Other SteakAger Refrigerator manuals


Popular Refrigerator manuals by other brands


Viking Range
Viking Range VCBB5363E installation guide

Vitrifrigo
Vitrifrigo FG Series Installation Use and Assistance Manual

Romo
Romo RCNF320D instruction manual

Zanussi Electrolux
Zanussi Electrolux ZSS 7/5 W Instruction booklet

Siemens
Siemens iQ500 KF96N Series INFORMATION FOR USE

U-Line
U-Line 29 Series Features and specifications


