SteakAger PRO 20 User manual

PRO 20 - Pro 40
USER GUIDE
Now that you have purchased a SteakAger product, you can be
condent knowing that as well as our 1-year parts and labor
warranty. Please retain proof of purchase in order to obtain
warranty services. Warranty begins from original date of
purchase.
READ ALL INSTRUCTIONS BEFORE USE For your
safety and continued enjoyment of this
product, always read the instruction
manula before use.

Contents
Introduction
Important Safety Instructions
Installing the Pro 20/40
Features and Functions
Operating Instructions
Cleaning and Maintenance
Warranty Terms and Conditions
For Your Records:
1
2
3
4
5
6
7
8
Please write down the model number and serial
number below for future reference. Both numbers
are located on the ratings label at the back of your
unit. You may also want to staple your receipt to
this manual as it is proof of your purchase, and is
also needed for service under you warranty.
• Moving your Pro 20/40
• Placing your Pro 20/40
• Leveling your Pro 20/40
• First Time Operating Instructions
Serial Number :
Purchase Date :

Introduction
Congratulations!
You have made an excellent choice with the purchase of this SteakAger
product. You can be condent this SteakAger product has been
manufactured to the highest standards of performance and safety, and is
supported by the team at SteakAger.
We want you to be completely satised with your purchase of this
SteakAger product, which is backed by a comprehensive manufacturer’s 1
year warranty and ongoing support through our After Sale Support Team.
If you require technical support or in the unlikely event your product was
received damaged, please contact us through www.thesteakager.com and
we will provide a responce within 1 business day.
Product claims made within the 1 year warranty period will be repaired and/
or replaced free of charge provided you have satisfactory proof of purchase
(keep your receipt). This limited warranty does not apply in cases of damage
caused by accident, improper use, abuse or force majeure.
This limited warranty will be invalidated if the appliance is tampered with
in any way whatsoever. In case of questions or technical problems please
contact us through www.thesteakager.com and we will provide a responce
within 1 business day.
If the appliance is returned, it must be packed correctly, as we cannot
accept responsibility for damage caused in transit. We recommend using a
traceable, insured delivery service.

Electrical Safety
• Do not exceed the power outlet ratings.
• It is recommended the your unit be connected to its own circuit.
• A standard electrical supply (115V/60Hz), that is properly grounded in accordance
with the National Electric Code and local codes and ordinances required.
• Use outlets that cannot be turned off by a switch or pull chain.
• Always turn the unit off and unplug it from the outlet when cleaning.
• Unplug the unit if it is not going to be used for an extended period of time and leave
door open for air circulation.
• Do not operate the unit with a power plug missing the ground plug, a damaged cord or
a loose socket.
• Be sure the unit is properly grounded.
• Never plug or unplug the unit with wet hands.
• Do not bypass, cut or remove the grounding plug.
• Do not use extension cords or power strips with this unit. You may need to contact
your electrician if it is necessary to use a longer cord or if you do not have a grounded
outlet. De not modify the power cord’s length or share the outlet with other
appliances.
• Do not start up or stop the unit by switching the circuit power on and off.
• If the power cord is damaged, it must be replaced by the manufacturer or a qualied
technician.
• Never repair unit while it is plugged in.
• Immediately unplug unit if it makes strange sounds, emits smells or smoke comes out
of it, and contact customer service.
• Do not remove any part of the casing unless instructed by an authorized technician.
• You should never attempt to repair the unit.
• Contact customer service for service options if the unit needs service.
SAFETY INSTRUCTIONS IMPORTANT
SAFEGUARDS
THIS APPLIANCE IS FOR HOUSEHOLD USE ONLY
WARNING: When using electrical appliances especially when children are
present, basic safety precautions should always be followed to reduce the
risk of re, shock, and/or injury to persons, including the following:

General Safety
• To prevent back and other types of injuries, use at least 2 people to move and install
the Pro 20/40.
• This unit is not intended for use by persons, including children, with reduced
physical, sensory or mental capabilities, unless they have been given supervision or
instruction concerning the use of the appliance by the person(s) responsible for their
safety.
• Install the unit in a well ventilated area where the ambient temperature is above
50oF and below 95oF
• The temperature range for this unit is optimized for dry-aging beef. Perishable food
items other than beef should be stored elswhere.
• This unit is designed to be installed indoors, and protected from rain, sleet, snow,
and/or moisture.
• This unit is not intended to be used by children.
• Children should be supervised to ensure that they do not play with this product.
• Never allow children to crawl inside the unit. If disposing the unit, remove the door.
• Do not use this unit near ammable gas or combustibles, such as gasoline, benzene,
thinner, etc.
• Do not place the unit near heat sources such as ovens, grills, or direct sunlight.
• Only use in an upright position on a at, level surface and provide proper ventilation.
• Do not pinch or kink the power supply line between the unit and cabinet.
• Do not leave cleaning solutions in the unit.
• Do not use solvent-based cleaning agents or abrasive solutions to clean the unit as
they may damage the interior and exterior.
• Do not place any other appliances on top of the unit.
• Do not turn the unit upside down, on its side, or at an angle off level.
• Do not move the unit without emptying the contents and securing the door in a
closed position.
SAFETY INSTRUCTIONS IMPORTANT
SAFEGUARDS
THIS APPLIANCE IS FOR HOUSEHOLD USE ONLY
WARNING: When using electrical appliances especially when children are
present, basic safety precautions should always be followed to reduce the
risk of re, shock, and/or injury to persons, including the following:

Installing
the Pro 20/40
Moving your Pro 20/40
Levelling your Pro 20/40
Placing your Pro 20/40
• Keep unit vertical at all times.
• Never use cord to lift or pull.
• Two people should carry to prevent injury.
• Place unit on solid, rm and level ground.
• WARNING: Do not store or install appliance outdoors.
• WARNING: Unit is NOT DESIGNED FOR CABINET INSTALLATION.
• We do not recommend installation on carpeted surface.
• Do not install near heat source such as oven or replace.
• Avoid placement in area with high moisture.
• Place unit on solid, rm and level ground.
• Unit is NOT DESIGNED FOR CABINET INSTALLATION.
• Leave at least 12cm or 5 inches between the back of the unit and the sides for
ventilation.
• The unit must not be placed in direct sunlight.
• Install the unit in a well ventilated area where the ambient temperature is above 50oF
and below 95oF.
IMPORTANT
SAFEGUARDS
• Move your Pro 20/40 to its nal destination.
• Have someone gently lean on the front of the Pro 20/40 to take some of the weight
off of the leveling leg.
• Turn the leveling leg clockwise to raise, and counter-clockwise to lower the Pro 20/40.
Continue in this manner until the Pro 20/40 is level. Its best to ensure the appliance is
tilted slightly to the rear for draining of water.

First Time Operating Instructions
• Let the unit sit for 24 hours before plugging in the power cable and turning on.
• Be sure to remove all packaging inside and outside.
• Do not load a Pro 20/40 until it reaches 34oF-39oF (1oC-3oC)
• We do not recommend using extension cords. If you must use an extension cord make sure it is UL/
CUL, 3-wire grounding type appliance extension cord having a grounding type plug and outlet and
that the electrical rating of the cord be 115 volts and at least 10 amperes.
• Two plugs are provided for the operation of your Pro series Steakager. The main plug for the
refrigerator and one 12V plug for the electronics control unit.
First time operating
Fridge Plug
Control Deck Plug
Control Deck Plug
Connection to Unit
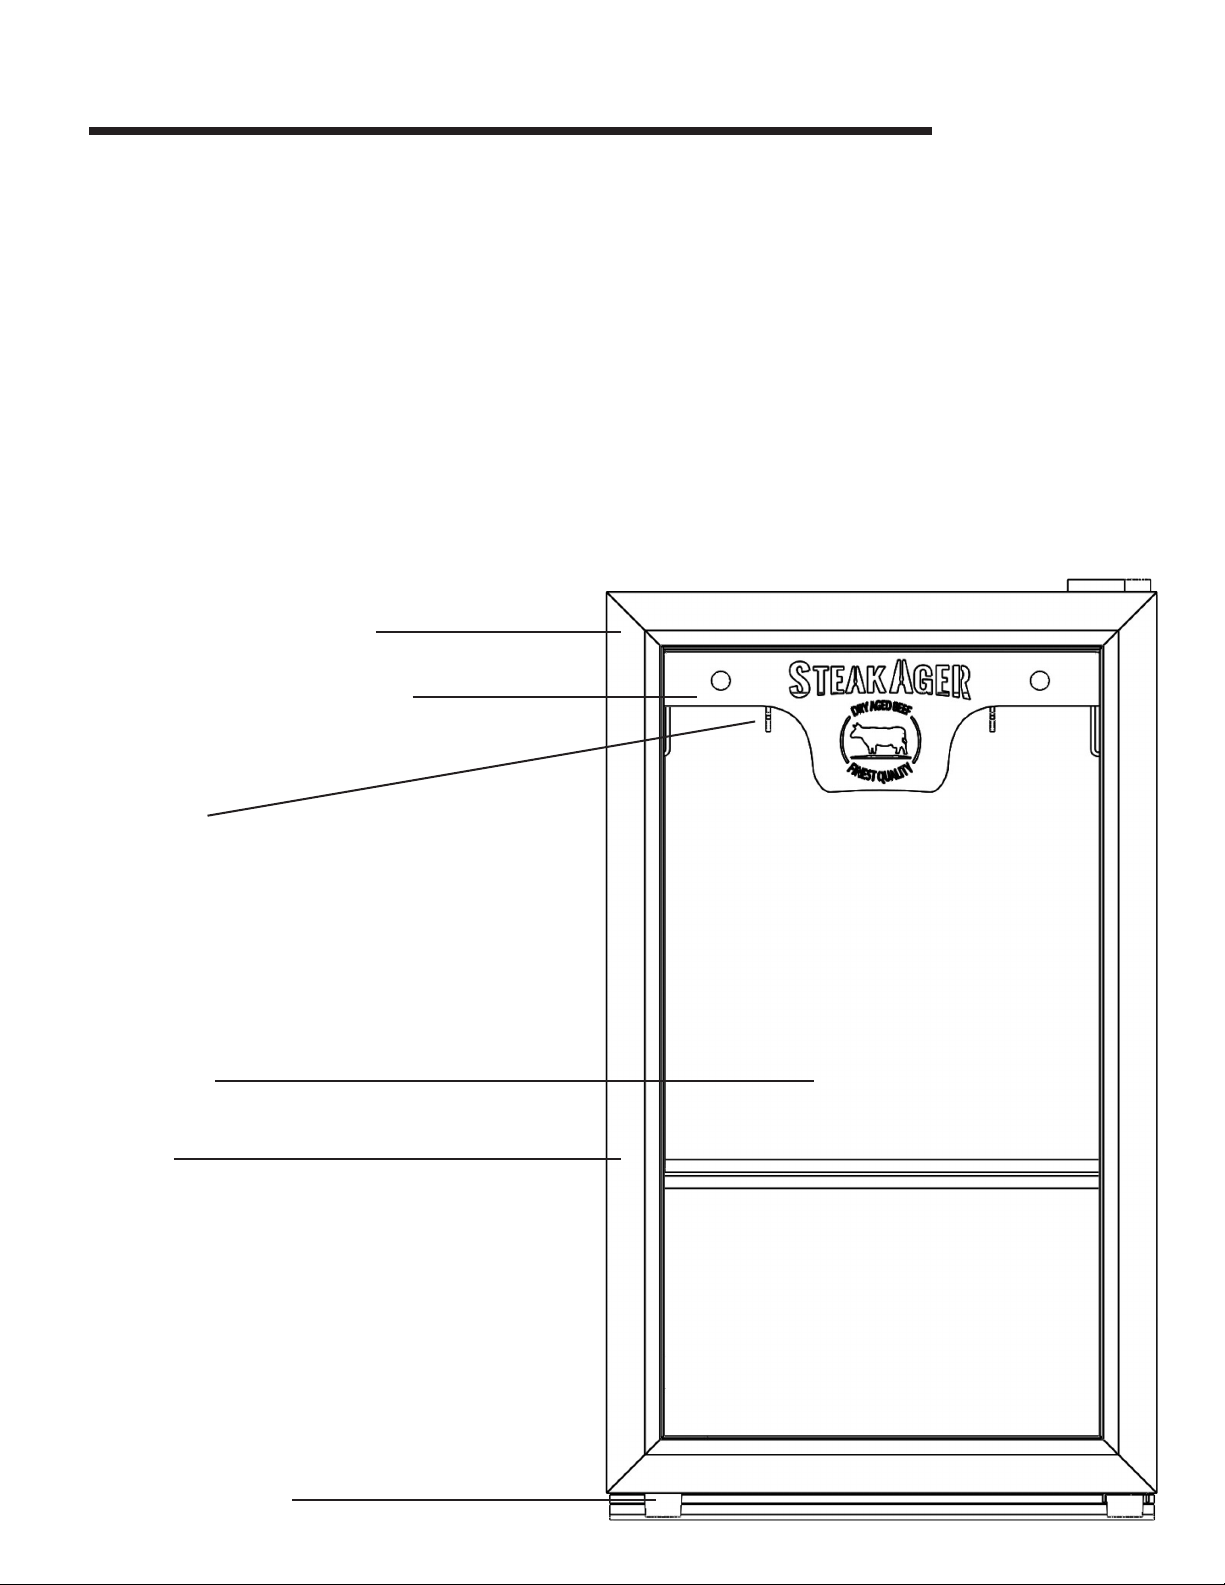
Features and Functions
The SteakAger Control Board runs the unit at the perfect temperature for aging
beef. Be sure read instructions on placement and operation of the unit before
running.
TO CONNECT TO YOUR STEAKAGER
TEMPERATURE CONTROL
Stainless Steel Door
Cabinet
• Download the SteakAger App from the App Store or Google Play for
freeMake sure your appliance is plugged in and running.
• Follow the App instructions for either iOS, Android or Bluetooth direct
connect monitoring of your SteakAger.
• Through the App you can set the Aging Counter, get recommendations and
track the progress through to a delicious dry aged experience.
Rack and Control Deck
Levelling Foot
Hanger
Door

Features and Functions
Hanging Rack and Control Deck
Hanger
Control Deck
Your Pro 20/40 is equiped with a hanging rack system connected to our Electronics
control deck.
• Each hanger has incremental knotches for precise beef placement. This also
prevents the hanger from rotating on the hanger which keeps the meat hanging
straight.
Cleaning and Removal
Since the hanging system and control system are all in one the removal and cleaning of
the system should be done with care.
• The power inlet for the control system is on the back left hand side. Unplug the
connector by carefully pulling out the 5.5mm jack.
• Carefully remove the digital thermocouple mount from the control deck
by pulling down on the magnetic mounting bracket. Once both of these are
disconnected, carefully pull out the control deck.
• Clean the Rack by wiping it with a damp cloth, being careful not to get any water
into the top of the control deck. Wipe dry with a dry cloth and reinsert.
• Note : The rack has been powder coated to insure durability during cleaning and
use. The use of harsh chemical cleaning agents can damage the coating over time,
so it is recommended that a soution of mild dish soap and warm water be use for
cleaning.
Thermocouple
Operating Instructions
If the appliance is placed on its back or side
for any length of time during this process, it
must be allowed to remain upright for 6 hours
before plugging in to avoid damage to internal
components.
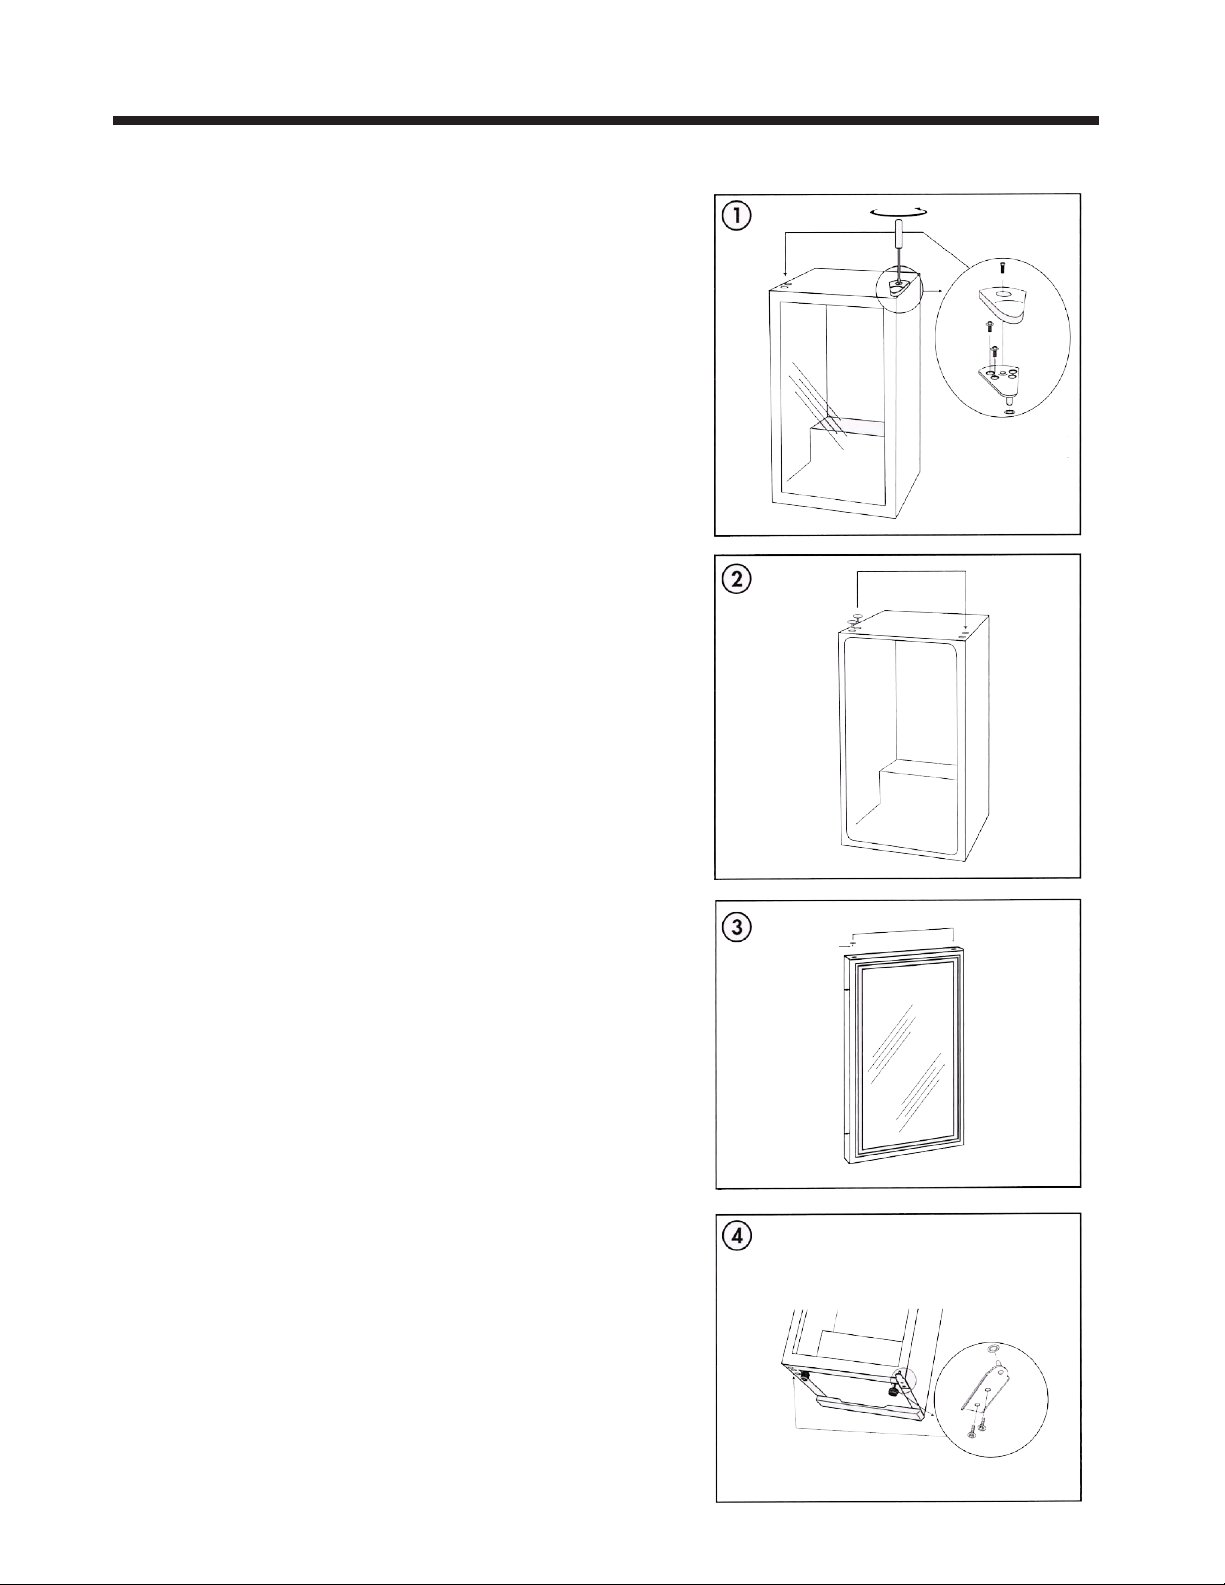
1. Use a screwdriver to remove the hinge from the
right side of the cabinet. Remove the door from the
cabinet. Remove the hole covers from the screw
holes on the left side of the cabinet and install the
upper hinge on the left side.
2. Install the hole covers in the screw holes on the
right side of the cabinet. Move the hole cover on
the top of the door from the left to the right side to
expose the hinge opin hole oin the left side of the
door.
3. Remove the hole cover from the top right side of
the door and install it in the hole on the top left side
of the door.
4. Install the door into the top hinge and the move
the lower hinge from the right side of the appliance
to the left side.
Note : Before tightening the bottom hinge, ensure
that the top of the door is level with the top of the
cabinet and that the rubber gasket is making a good
seal with the cabinet all the way around.
Door Reversal Instructions

Operating Instructions
GETTING READY TO USE YOUR STEAKAGER Pro 20/40
• Make sure the unit is running and cold before loading cuts of beef
• Purchase a cut of beef of your preference and use our App for quick reference
• Use the rack as a cutting guide for sizing length of cut
• Thoroughly pat dry the beef before placing in the Pro 20/40
• When placing beef in the Pro 20/40 be careful that beef DOES NOT TOUCH ANY
SURFACE INSIDE THE APPLIANCE. Use the rack as a cutting guide for sizing length of cut.
NOTES ON GETTING STARTED
Unlike other things you prepare in your kitchen, there is no “done” time with dry aging beef.
Your rst aging should be an 8-10lb cut of your choice aged for 21-28 days to begin your avor
journey. You will learn a lot from our Facebook Family page and our App. Try different cuts and
experiment with different aging times to experience different avor proles.
THE VISUAL CHANGES OF DRY AGING BEEF
You’ll notice lots of changes during the aging process such as:
• A hardening crust called the pellicle will form.
• Darkening color.
• Shrinkage which mostly occurs in the rst 21 days.
Your beef will lose up to 25% of it’s starting weight as water is removed
during aging.

Operating Instructions
TIME FOR DELICIOUSNESS!
You’ve waited long enough and now it’s time to experience the nest steaks you’ve ever had!
• Take the beef from the unit
• Carve off 1/8”-1/4” (3mm-7mm) of the pellicle from each end until you see non hard esh.
• If you are cooking the roast whole, continue to remove the pellicle from entire surface of the
cut. You will quickly see the color change and feel the cutting getting easier at the proper cut
point.
• If serving individual steaks, it has been found to be easier to cut steaks and then trim the
pellicle from the individual steaks.
• Freeze those extra steaks! Dry aged beef has very little water and they freeze and preserve
perfectly.
• CAUTION WHEN COOKING! Dry aged beef has very little water and cooks very quickly so
keep your eye on the prize while cooking and use a temperature probe if you can.
• Enjoy!
ATTENTION PLEASE NOTE
• You can only dry age whole cuts of beef – not individual steaks
• The SteakAger is designed to dry age beef only.
• The SteakAger is NOT designed to age sh, chicken, pork, lamb or game meat.
• To reduce risk of cross contamination, do not cut just a few steaks off and place the rest back in
you SteakAger.

Cleaning and Maintenance
• Carefully remove all packaging materials. Remove any glue or tape from
your Pro 20/40 before using
• Place unit on a level at surface that is clean and dry.
• Wash all surfaces of the appliance with a soft damp cloth and warm, sudsy
water.
• Wash drying racks with a soft damp cloth and warm, sudsy water or
dishwasher. Dry thoroughly with paper towel or soft cloth.
• Before you plug in the Pro 20/40 it is best to let it stand upright for 24 hours
to let the compressor oils settle.
• Wash all surfaces of the appliance with a soft damp cloth and warm, sudsy
water. Wash drying rack with a soft cloth.
• DO NOT spray water into the appliance.
• Leave the door open to allow for air circulation and to prevent mold and
mildew.
• CAUTION: Store the unit out of reach of children. If you have children,
you may want to take additional precautions such as removing the door to
prevent a child from being trapped inside the unit.
• Leave the door open to allow air movement and to prevent mold growth.
BEFORE FIRST USE
BETWEEN AGING CYCLES
These instructions, additional information , FAQ’s and
assembly videos can be found online at
www.thesteakager.com.

Warranty Terms & Conditions
Privacy Policy
We want you to be completely satised with your purchase of this SteakAger product,
which is backed by a comprehensive manufacturer’s 1 year warranty and ongoing support
through our After Sale Support Team.
If you require technical support or in the unlikely event your product was received
damaged, please contact us through www.thesteakager.com and we will provide a
responce within 1 business day. Product claims made within the 1 year warranty period
will be repaired and/ or replaced free of charge provided you have satisfactory proof of
purchase (keep your receipt). This limited warranty does not apply in cases of damage
caused by accident, improper use, abuse or force majeure.
This limited warranty will be invalidated if the appliance is tampered with in any way
whatsoever. In case of questions or technical problems please contact us through www.
thesteakager.com and we will provide a responce within 1 business day.
If the appliance is returned, it must be packed correctly, as we cannot accept
responsibility for damage caused in transit. We recommend using a traceable, insured
delivery service.
Your SteakAger and Our Commitment
We never share you information.
For Additional Information Online:
https://thesteakager.com/privacy-policy
For Additional Information Online:
https://thesteakager.com/return-policy
13
Other manuals for PRO 20
1
This manual suits for next models
1
Table of contents
Other SteakAger Refrigerator manuals


