SteakAger PRO 40 User manual

Pro 40
USER GUIDE
Congratulaons on your purchase and welcome to the SteakAger family!
Every SteakAger product comes with a 1-year parts and labor warranty,
eecve as of original purchase date. Please retain proof of purchase to
obtain service under this warranty.
READ ALL INSTRUCTIONS BEFORE USE
For your safety and connued enjoyment of this product,
always read the instrucon manual before using.
Troubleshooting
Troubleshoong Guide
• When experiencing issues with your SteakAger refer to this
troubleshoong guide to diagnose the issue you are having. If unable
to resolve the issue aer going through this guide contact us at
www.TheSteakAger.com
19
OPERATING
INSTRUCTIONS
No Connecvity Through the App
• If you are having trouble connecng to the your SteakAger through the
mobile app use the below instrucons to diagnose.
• If you are receiving “Please wait 4 minutes for data to load” you may be
having a conncon issue.
1. If monitoring over bluetooth rst try to unplug and plug the 12vdc plug
back into the unit to reset the control board.
2. Check to be sure that the fans are running on the interior of the unit.
1. If all plugs are plugged into the Back Plate, but the fans arent running
with the 12vdc plugged in contact Technical Support.
1. If monitoring over WiFi, you may have lost connecon to your network.
2. Check in WiFi Conguraon in the sengs menu to be sure your network
is sll connected to your SteakAger.
1. If your network is connected but you are sll receiving and error
message, contact SteakAger Technical Support.
WiFi Connecvity Issue
Defrosng
• If you start to experience a frosng or icing instance with the unit follow
the below instrucon for proper defrost and troubleshoong.
• It is reccomended that the unit be shut down and allowed to defrost if
nessesary between ages.
1. When defrosng your PRO 40, remove the meat if any inside and place it
inside another fridge.
2. Unplug the PRO 40 and allow it to sit with the door open. Once you see
that the unit has been fully defrosted plug the PRO 40 back in and allow
it to get back to temperature then add the meat back to the fridge.
1. Never use a sharp object to chip at the back plate as this could
puncture the cold plate and damage the operaon of the unit.

Contents
Introducon
Important Safeguards
Installing the PRO 40
Features and Funcons
Operang Instrucons
Cleaning and Maintenance
Warranty Terms and Condions
For Your Records:
1
2
3
4
5
6
7
8
Please write down the serial number below for
future reference. The number is located on the
rangs label at the back of your unit. You may also
want to staple your receipt to this manual as it
is proof of your purchase, and is also needed for
service under you warranty.
• Moving your PRO 40
• Placing your PRO 40
• Leveling your PRO 40
• First Time Operang Instrucons
Serial Number :
1
18
app setup
App Usage and Troubleshoong
• To set an aging mer press “Add New Cut of Beef”. You can then use the
scroll style interface to select the cut of meat along with the amount of
desired me.
• If you scroll to the boom of the list of beef cuts you can press the “+”
buon and enter a custom cut or any addional beef cuts that arent
preset into the App.
• To delete or edit the aging mer at anyme, swipe le on the set me and
you will see a “Edit” and “Delete” buon on the right side of the mer.
• To locate the seng inside the App locate the “Gear” icon in the top right
of the home page. This will take you to a page with a list of opons.
• SteakAger Devices List : To add or delete any SteakAger device you will
need to press “SteakAger Devices List”. Inside this menu you will see all of
the devices that are connected your account. Swiping le on a device will
allow you to either delete or edit the device. Pressing the “+” buon in the
top right of the screen will allow you to add any devices that are near you
(within Bluetooth range). If you are trying to connect to a unit near you
and you receive an error message “No SteakAger Devices Found”, unplug
and plug the SteakAger back i and try connecng again.
• Change SteakAger Type & Name : This will allow you to change the name
an unit designaon fo the SteakAger that you are currently viewing.
• WiFi Conguraon : In this menu is where you can change, view, and
connect to networks for monitoring over WiFi. If you do not see your
network in the list, try to refresh the menu with the refresh buon in the
top right.
• Edit Meat Types : If you are interested in remvoing, eding, or adding any
extra meat types that are not found in the presets menu this is where
you are able to do that. These changes will be for your meat aging mer
sengs.
• Measuring System : Changing between C/F and lb/kg can be done in this
menu.
• Change Connecon Type : To switch between Bluetooth and WiFi
monitoring go into this menu and select the monitoring type. If swapping
from Bluetooth to WiFi, you may be prompted to resign in or to create an
account if you havn’t already. **Refer to “Connecng to your SteakAger -
WiFi Connecon”
• Reset Applicaon : This is mostly used to do a full reset on the App if it is
not working properly. If you are experiencing issues with connecon or a
lot of error messages using this command should solve this. You can also
use this if you are wwanng to wipe your app clean for a new account
without having to uninstall and reinstall.
OPERATING
INSTRUCTIONS
Aging Timer
App Setup and Usage

Introduction
Congratulaons!
You have made an excellent choice with the purchase of this SteakAger product.
You can be condent this SteakAger product has been manufactured to the
highest standards of performance and safety, and is supported by the team at
SteakAger.
We want you to be completely sased with your purchase of this SteakAger
product, which is backed by a comprehensive manufacturer’s 1 year warranty and
ongoing support through our Aer Sale Support Team.
If you require technical support or in the unlikely event your product was received
damaged, please contact us through www.thesteakager.com and we will provide a
response within 1 business day.
Product claims made within the 1 year warranty period will be repaired and/ or
replaced free of charge provided you have sasfactory proof of purchase (keep
your receipt). This limited warranty does not apply in cases of damage caused by
accident, improper use, abuse or force majeure.
This limited warranty will be invalidated if the appliance is tampered with in any
way whatsoever. In case of quesons or technical problems please contact us
through www.TheSteakAger.com and we will provide a response within 1 business
day.
If the appliance is returned, it must be packed correctly, as we cannot accept
responsibility for damage caused in transit. We recommend using a traceable,
insured delivery service.
Please join us on our Facebook page
:TheSteakager Family.
In the case that you would like to return your appliance, please ensure it is
packaged correctly, as SteakAger cannot accept responsibility for damage caused
in transit. We recommend using a traceable, insured delivery service. Contact us
through www.TheSteakAger.com to packaging instrucons.
2
App setup
Connecng to your SteakAger
• Download the SteakAger App from the App Store or Google Play for free.
• Make sure your appliance is plugged in and running.
• Follow the below app instrucons for either iOS or Android. Instrucons
are the same for both devices.
•
• WiFi Connecon :
• ** NOTE : If connecng through WiFi you will need to set up and account.
Make sure to conrm the account with the conrmaon email before
trying to sign in.
• Aer opening the app press “Connect to SteakAger”. You will then be
prompted to select “Wi Connecon” or “Bluetooth Connecon”. Press
“Wi Connecon” and enter your credenals. If you have already created
an account, enter your credenals and press login. If you have not created
an account press create account and enter your informaon.
• Aer signing in through WiFi you will need to go into the Sengs (Gear
Icon) and go into WiFi conguraon to select the network and enter your
password. If you receive an error message “Please wait 4 minutes for data
to load”, you may have entered the incorrect informaon or your ager is
not connecng to your network properly.
• Once your network informaon is entered and your SteakAger connects
properly, you will be redirected to the home screen and your data will be
viewable.
• If you receive and error message and are unable to resolve the issue by re-
entering your network informaon, contact us at www.TheSteakAger.com
•
• Bluetooth Connecon :
• When connecng through bluetooth you do not need a login to access
your SteakAger. This is the easiest and quickest way to setup and view
your SteakAger data.
• Aer opening the App press “Connect to SteakAger” you will then be
prompted to select “Wi Connecon” or “Bluetooth Connecon”. Press
“Bluetooth Connecon” and you will be immediately redirected to your
home screen.
• If you receive any error messagers once connected, “Please wait 4
minutes for data to load”. Your unit may not be plugged in or connecng
properly. If you are unable to resolve the issue with the troubleshoong
guide, contact us at www.TheSteakAger.com
17
OPERATING
INSTRUCTIONS

Electrical Safety
• Do not exceed the power outlet rangs.
• It is recommended the your unit be connected to its own circuit.
• A standard electrical supply (115V/60Hz), that is properly grounded
in accordance with the Naonal Electric Code and local codes and
ordinances required.
• Use outlets that cannot be turned o by a switch or pull chain.
• Always turn the unit o and unplug it from the outlet when cleaning.
• Unplug the unit if it is not going to be used for an extended period of me
and leave door open for air circulaon.
• Do not operate the unit with a power plug missing the ground plug, a
damaged cord or a loose socket.
• Be sure the unit is properly grounded.
• Never plug or unplug the unit with wet hands.
• Do not bypass, cut or remove the grounding plug.
• Do not use extension cords or power strips with this unit. You may need
to contact your electrician if it is necessary to use a longer cord or if you
do not have a grounded outlet. De not modify the power cord’s length or
share the outlet with other appliances.
• Do not start up or stop the unit by switching the circuit power on and o.
• If the power cord is damaged, it must be replaced by the manufacturer or a
qualied technician.
• Never repair unit while it is plugged in.
• Immediately unplug unit if it makes strange sounds, emits smells or smoke
comes out of it, and contact customer service.
• Do not remove any part of the casing unless instructed by an authorized
technician.
• You should never aempt to repair the unit.
• Contact customer service for service opons if the unit needs service.
SAFETY INSTRUCTIONS
THIS APPLIANCE IS FOR HOUSEHOLD USE ONLY
WARNING: When using electrical appliances especially when
children are present, basic safety precauons should always be
followed to reduce the risk of re, shock, and/or injury to persons,
including the following:
App setup
You should never have to remove The SteakAger Back Plate System unless asked
to do so for parts replacement. The Back Plate is 304 stainless steel and can easily
be wiped down with a cleaning cloth when needed. If needing to remove for any
reason follow the below steps.
• Unplug the Extension Connector by carefully pulling out the 5.5mm jack
out of the connecon locaon on the front of the Back Plate Insert.
• Remove the Back Plate Insert by liing up and pulling out to li it out of
the rear slot pockets.
• Clean the Rack by wiping it with a damp cloth. Wipe dry with a dry cloth
and reinsert.
• Note : All parts of the unit are 304 stainless steel and are easily cleaned
with warm sudsy water. The hooks can be cleaned in the dishwasher.
Cleaning and Removal
Connecng to your SteakAger
• Download the SteakAger App from the App Store or Google Play for free.
• Make sure your appliance is plugged in and running.
• Follow the below App instrucons for either iOS, Android.
•
• WiFi Connecon :
• ** NOTE : If connecng through WiFi you will need to set up and account.
Make sure to conrm the account with the conrmaon email before
trying to sign in.
• Aer opening the app press “Connect to SteakAger”. You will then be
prompted to select “Wi Connecon” or “Bluetooth Connecon”. Press
“Wi Connecon” and enter your credenals. If you have already created
an account, enter your credenals and press login. If you have not created
an account press create account and enter your informaon.
• Aer signing in through WiFi you will need to go into the Sengs (Gear
Icon) and go into WiFi conguraon to select the network and enter your
password.
• If you receive an error message “Please wait 4 minutes for data to load”,
you may have entered the incorrect informaon or your ager is not
connecng to your network properly.
•
• Bluetooth Connecon :
• When connecng through bluetooth you do not need a login to access
your SteakAger. This is the easiest and quickest way to setup and view
your SteakAger data.
• Aer opening the App press “Connect to SteakAger” you will then be
prompted to select “Wi Connecon” or “Bluetooth Connecon”. Press
“Bluetooth Connecon” and you will be immediately redirected to your
home screen.
3
16
CLEANING AND
MAINTENACNCE
IMPORTANT
SAFEGUARDS

General Safety
• To prevent injury, use at least 2 people to move and install the Pro 40.
• This unit is not intended for use by persons, including children, with
reduced physical, sensory or mental capabilies, unless they have been
given supervision or instrucon concerning the use of the appliance by
the person(s) responsible for their safety.
• Install the unit in a well venlated area with an ambient temperature
between 50F and 95F
• The temperature range for this unit is opmized for dry-aging beef.
Perishable food items other than beef should be stored elsewhere.
• This unit is designed to be installed indoors, and protected from rain,
sleet, snow, and/or moisture.
• This unit is not intended to be used by children. Children should be
supervised to ensure that they do not play with this product. Never
allow children to crawl inside the unit.
• If disposing the unit, remove the door.
• Do not use this unit near ammable gas or combusbles, such as
gasoline, benzene, thinner, etc.
• Do not place the unit near heat sources such as ovens, grills, or direct
sunlight.
• Only use in an upright posion on a at, level surface and provide
proper venlaon.
• Do not pinch or kink the power supply line between the unit and
cabinet.
• Do not leave cleaning soluons in the unit.
• Do not use solvent-based cleaning agents or abrasive soluons to clean
the unit as they may damage the interior and exterior.
• Do not place any other appliances on top of the unit.
• Do not turn the unit upside down, on its side, or at an angle o level.
• Do not move the unit without emptying the contents and securing the
door in a closed posion.
SAFETY INSTRUCTIONS
IMPORTANT
SAFEGUARDS
THIS APPLIANCE IS FOR HOUSEHOLD USE ONLY
WARNING: When using electrical appliances especially when
children are present, basic safety precauons should always be
followed to reduce the risk of re, shock, and/or injury to persons,
including the following:
Temperature Control
Once you have completed the setup and assembly instrucons for your
new PRO 40 SteakAger, follow the instrucons below to set and adjust
temeratures.
Temperature Controls and Sengs
- With the 120vac power plugged into the wall you will see the display on the
interior top of your SteakAger turn on.
1. To adjust the temperature you will use the + and - arrows (Number 1 on the
above diagram) to move up and down.
- For Dry Aging, we recommend seng the temerature to read 40F as
the set temperature is the upper limit and will cycle down to average
37F
- For Charcuterie, we recommend seng the temperature to read 59F
to give you an average temperature of 55F.
+-
3. Knowing which measuring system you are in can be found
5. Toggling the interior blue light ON and OFF can be done by pressing buon
number 5 on the interface diagram above. This is just an interior light and is not
the UVC light in the unit. The UVC light is built into the Back Plate of the unit.
**Note that depending on the climate that you live these number may need to be adjusted
up or down. We always recommend our units be used inside of a climate controlled area
for the optimal functionality.
2. The readout on the controls head shows the set temperature of the unit. If
the readout displays 40F, this means that the fridge will cycle below this number
from 33F to 40F.
4
15
OPERATING
INSTRUCTIONS
4. Changing between Celcius and Fahrenheit can be done by pressing
buon number 4 on the above diagram and is indicated by a light beside the
correspoding call out

INSTILLATION & SETUP
Moving your PRO 40
Leveling your PRO 40
Placing your PRO 40
• Keep unit vercal at all mes.
• Never use cord to li or pull.
• Two people should carry to prevent injury.
• Place unit on solid, rm and level ground.
• WARNING: Do not store or install appliance outdoors.
• WARNING: Unit is NOT DESIGNED FOR CABINET INSTALLATION.
• We do not recommend installaon on carpeted surface.
• Do not install near heat source such as oven or replace.
• Avoid placement in area with high moisture.
• Place unit on solid, rm and level ground.
• Leave at least 5 inches (12cm) around all sides of the unit to insure proper
venlaon.
• The unit must not be placed in direct sunlight.
• Install the unit in a well venlated area where the ambient temperature is above
50F and below 95F.
• Adjust the leveling feet so that the unit is level.
INSTALLING
THE PRO 40
• Move your PRO 40 to its nal desnaon.
• Have someone gently lean on the front of the PRO 40 to take some of the
weight o of the leveling leg.
• Turn the leveling leg clockwise to raise, and counter-clockwise to lower the PRO
40. Connue in this manner unl the PRO 40 is level. Its best to ensure the
appliance is lted slightly to the rear for draining of water.
Humidity upgrade
PRO 40 Assembly Guide - Humidicaon
All PRO 40 SteakAger models come standard with the ability to add
humidicaon. Our simple plug and play system will allow you to take full control
of acve humidicaon inside your PRO 40. For ages under 50 days the PRO
40 will manage and maintain humidity levels without the added humidicaon
upgrade. For ages over 50 days added humidity will need to be added in order to
maintain the ideal humidity range. Humidicaon upgrades are available for
purchase on at www.TheSteakAger.com.
1. When you receive your Humidicaon upgrade, it will come fully assembled
annd ready to run. You will need to ll the water tray up to the 1.5Q mark and
then slide the tray back into the assembly.
2. There will be a cable coming from the back of the assembly, this will need to be
plugged into the top plug locaon on the Back Plate with the “H” label.
5
14
OPERATING
INSTRUCTIONS
First Time Operang Instrucons
• Let the unit sit for 24 hours before plugging in the power cable and
turning on.
• Be sure to remove all packaging inside and outside.
• DO NOT load your PRO 40 unl it reaches 34F-39F (1C-3C).
• Cauon : We do not recommend using extension cords. If you must
use an extension cord make sure it is UL/CUL, 3-wire grounding type
appliance extension cord having a grounding type plug and outlet
and that the electrical rang of the cord be 115 volts and at least 10
amperes.
• Two plugs are provided for the operaon of your PRO series SteakAger.
The main plug for the refrigerator and one 12V plug for SteakAger
electronics control unit. Both must be plugged in for full operaon.
Initial Setup
Truss Rack
PRO 40 Assembly Guide - Truss Rack
3. Using all of the hook secons lace (Like a boot) the butchers twine all the way
to the top. Once you reach the top, e a knot and fasten the twine to the hook
secon that you end on.
4. Once you have completed the trussing, you can start to move it to your ager. If
you purchased the Truss Rack Kit, you will have been provided a slide in shelf to
sit the Truss Rack on. With the shelf in place, lowest rack slot, place the lled Truss
Racks on the Truss Rack shelf.
With everything installed enjoy the ease of aging in your Pro 40 SteakAger. It
is possible to install two Truss Racks at a me and can be added or removed at
anyme during the aging process. 45 days on one side and 30 days on the other
side.
6
13
OPERATING
INSTRUCTIONS
FEATURES AND
FUNCTIONS
Truss Rack
Truss Shelf

Assembly Layout
Fridge Temp Controls
Leveling Foot
Power Pass through (Front)
SteakAger Backplate
Hanging Rack
Extension Plug
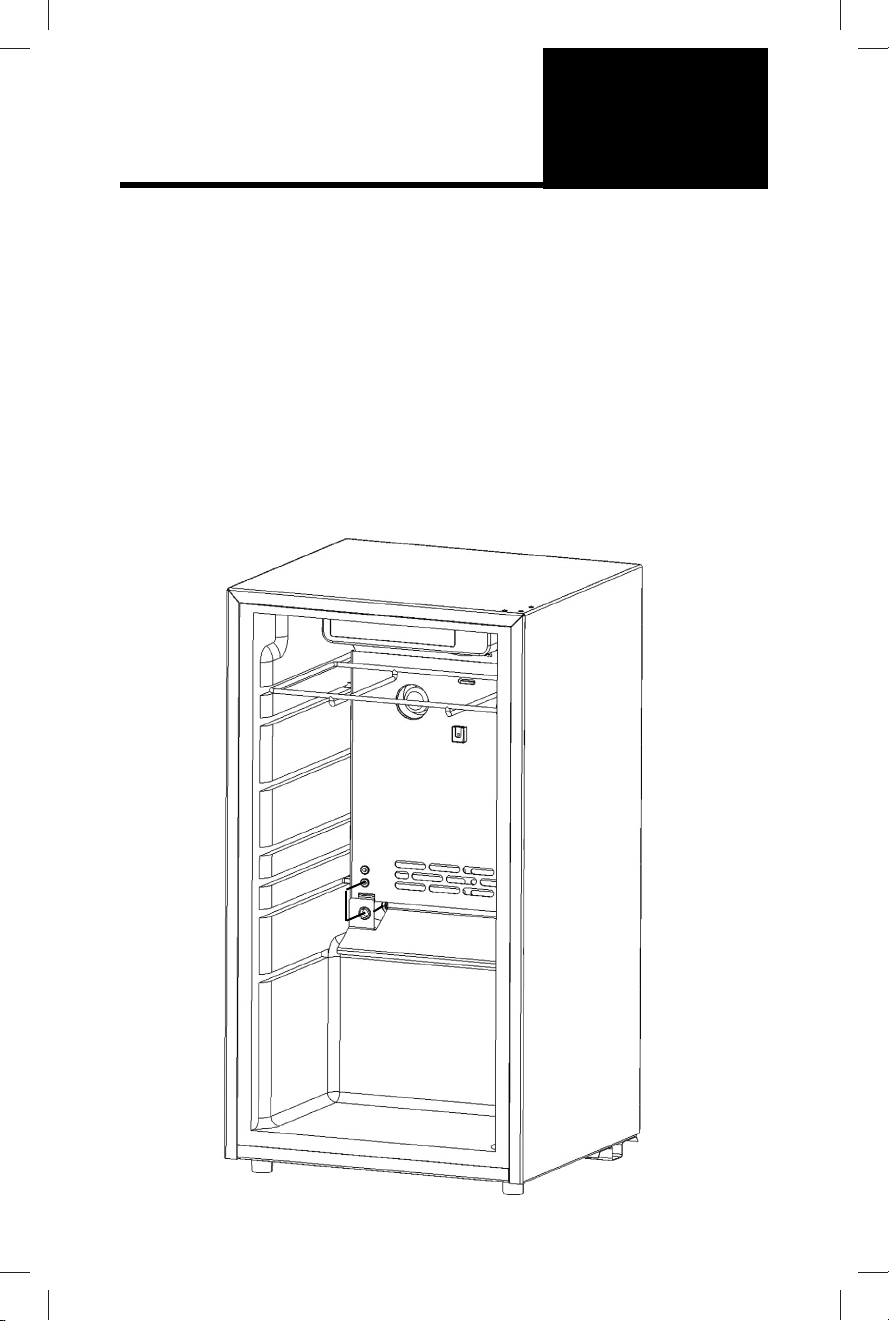
Pro 40 Parts Layout and Assembly
Power Pass through (Back)
Compressor
Power Plugs
Truss Rack
Pro 40 Assembly Guide - Truss Rack
The Truss Rack has been designed as a simpler way to truss and hang your meat.
With a half moon shape to t the meat and incremental e secons to quickly
loop butcher twine. You can truss a full subprimal in under a minute.
Tie Hooks
Hanging Leg
1. When you receive your truss rack the folding support leg may be sll in the
open posion and will need to be rotated out into the closed posion to support
the meat.
Open Closed
2. To truss your meat, you will next want to lay the Truss Rack at on the counter
or surface you are using so that it rests on the two hanging legs. Pat the meat
as dry as possible and lay it FAT side down in the rack. Starng from the closed/
boom side of the rack, e a knot in the butchers twine and secure it on the rst
loop.
7
12
FEATURES AND
FUNCTIONS
OPERATING
INSTRUCTIONS
Folding Support Leg
Bae

Parts List
Unboxing and Parts List
When unboxing your SteakAger Pro 40 check to be sure that the below
components are supplied.
Back Plate Insert Hanging Rack
Power Supply
12vdc
Meat Hook
(x2)
Extension
Connector
Purchased Upgrades
Truss Rack and Humidicaon Upgrade Assembly
Humidication System
Truss Rack
8
11
OPERATING
INSTRUCTIONS
FEATURES AND
FUNCTIONS
Bae

pro 40 assembly
PRO 40 Assembly Guide Connued
5. Remove the SteakAger Hanging Rack from the accessory box and slide it into
the top most rack slot of the fridge with the SteakAger logo facing towards you.
6. Using the supplied 12vdc power supply, plug the connector end into the other
side of the Power Pass Through on the back side of the fridge. Plug in the wall
plug side, and then check to be sure the fans are running on the interior of the
unit. Once you have conrmed that the fans are running plug in the 120vac wall
plug to turn on the fridge controls.
12vdc Power Supply
120vac for Compressor
PRO 40 Assembly
Owners of the Standard PRO 40 unit will receive the fridge shipping box with
the SteakAger accessory box aached. Please separate the accessory box from
the outer fridge and follow the steps below.
1. Remove all packing materials that enclose the fridge, then remove all
packaging materials from the interior of the unit. Remove all beverage racks
and store or dispose. DO NOT use beverage racks for meat aging.
2. Open the SteakAger accessory box and locate the Backplate Insert, Bae,
Hanging Rack, Hooks, Power Supply, and Extension Connector.
3. Slide in the SteakAger Backplate Insert making sure to use the second
highest rack slot from the top. (Refer to the below image). Push the Backplate
Insert to the back unl you feel it seat in the pocket at the back of the rack
slot. (You will feel a slight “ca-chunk” when it rests in place)
PRO 40 Assembly Guide
9
Use this rack slot as top slot
when inserng Backplate
4. Locate the Bae and install it using the tabs to lock in into place on the
Back Plate. When installing the Bae, you will rst want to run the Extension
Cable through the wire groment and plug it into the Power Pass Through on
the fridge. With the Extension Cable plugged into the Power Pass Through
lock in the Bae using the tabs and slots on the Back Plate. Once locked in
place, plug in the Extension Cable to the Back Plate.
10
OPERATING
INSTRUCTIONS
OPERATING
INSTRUCTIONS
The plug has one 90 degree elbow
and one straight end. The 90 degree
goes to the Back Plate and the stright
end goes to the Power Pass Through.
Step 1 Step 2
The Hanging Rack has been designed
to include 2 hooking sections that run
front to back to allow the use of our
hooks as well as V2 Hanger Bars.

Parts List
Unboxing and Parts List
When unboxing your SteakAger Pro 40 check to be sure that the below
components are supplied.
Back Plate Insert Hanging Rack
Power Supply
12vdc
Meat Hook
(x2)
Extension
Connector
Purchased Upgrades
Truss Rack and Humidicaon Upgrade Assembly
Humidication System
Truss Rack
8
11
OPERATING
INSTRUCTIONS
FEATURES AND
FUNCTIONS
Bae

Assembly Layout
Fridge Temp Controls
Leveling Foot
Power Pass through (Front)
SteakAger Backplate
Hanging Rack
Extension Plug
Pro 40 Parts Layout and Assembly
Power Pass through (Back)
Compressor
Power Plugs
Truss Rack
Pro 40 Assembly Guide - Truss Rack
The Truss Rack has been designed as a simpler way to truss and hang your meat.
With a half moon shape to t the meat and incremental e secons to quickly
loop butcher twine. You can truss a full subprimal in under a minute.
Tie Hooks
Hanging Leg
1. When you receive your truss rack the folding support leg may be sll in the
open posion and will need to be rotated out into the closed posion to support
the meat.
Open Closed
2. To truss your meat, you will next want to lay the Truss Rack at on the counter
or surface you are using so that it rests on the two hanging legs. Pat the meat
as dry as possible and lay it FAT side down in the rack. Starng from the closed/
boom side of the rack, e a knot in the butchers twine and secure it on the rst
loop.
7
12
FEATURES AND
FUNCTIONS
OPERATING
INSTRUCTIONS
Folding Support Leg
Bae

First Time Operang Instrucons
• Let the unit sit for 24 hours before plugging in the power cable and
turning on.
• Be sure to remove all packaging inside and outside.
• DO NOT load your PRO 40 unl it reaches 34F-39F (1C-3C).
• Cauon : We do not recommend using extension cords. If you must
use an extension cord make sure it is UL/CUL, 3-wire grounding type
appliance extension cord having a grounding type plug and outlet
and that the electrical rang of the cord be 115 volts and at least 10
amperes.
• Two plugs are provided for the operaon of your PRO series SteakAger.
The main plug for the refrigerator and one 12V plug for SteakAger
electronics control unit. Both must be plugged in for full operaon.
Initial Setup
Truss Rack
PRO 40 Assembly Guide - Truss Rack
3. Using all of the hook secons lace (Like a boot) the butchers twine all the way
to the top. Once you reach the top, e a knot and fasten the twine to the hook
secon that you end on.
4. Once you have completed the trussing, you can start to move it to your ager. If
you purchased the Truss Rack Kit, you will have been provided a slide in shelf to
sit the Truss Rack on. With the shelf in place, lowest rack slot, place the lled Truss
Racks on the Truss Rack shelf.
With everything installed enjoy the ease of aging in your Pro 40 SteakAger. It
is possible to install two Truss Racks at a me and can be added or removed at
anyme during the aging process. 45 days on one side and 30 days on the other
side.
6
13
OPERATING
INSTRUCTIONS
FEATURES AND
FUNCTIONS
Truss Rack
Truss Shelf

INSTILLATION & SETUP
Moving your PRO 40
Leveling your PRO 40
Placing your PRO 40
• Keep unit vercal at all mes.
• Never use cord to li or pull.
• Two people should carry to prevent injury.
• Place unit on solid, rm and level ground.
• WARNING: Do not store or install appliance outdoors.
• WARNING: Unit is NOT DESIGNED FOR CABINET INSTALLATION.
• We do not recommend installaon on carpeted surface.
• Do not install near heat source such as oven or replace.
• Avoid placement in area with high moisture.
• Place unit on solid, rm and level ground.
• Leave at least 5 inches (12cm) around all sides of the unit to insure proper
venlaon.
• The unit must not be placed in direct sunlight.
• Install the unit in a well venlated area where the ambient temperature is above
50F and below 95F.
• Adjust the leveling feet so that the unit is level.
INSTALLING
THE PRO 40
• Move your PRO 40 to its nal desnaon.
• Have someone gently lean on the front of the PRO 40 to take some of the
weight o of the leveling leg.
• Turn the leveling leg clockwise to raise, and counter-clockwise to lower the PRO
40. Connue in this manner unl the PRO 40 is level. Its best to ensure the
appliance is lted slightly to the rear for draining of water.
Humidity upgrade
PRO 40 Assembly Guide - Humidicaon
All PRO 40 SteakAger models come standard with the ability to add
humidicaon. Our simple plug and play system will allow you to take full control
of acve humidicaon inside your PRO 40. For ages under 50 days the PRO
40 will manage and maintain humidity levels without the added humidicaon
upgrade. For ages over 50 days added humidity will need to be added in order to
maintain the ideal humidity range. Humidicaon upgrades are available for
purchase on at www.TheSteakAger.com.
1. When you receive your Humidicaon upgrade, it will come fully assembled
annd ready to run. You will need to ll the water tray up to the 1.5Q mark and
then slide the tray back into the assembly.
2. There will be a cable coming from the back of the assembly, this will need to be
plugged into the top plug locaon on the Back Plate with the “H” label.
5
14
OPERATING
INSTRUCTIONS

General Safety
• To prevent injury, use at least 2 people to move and install the Pro 40.
• This unit is not intended for use by persons, including children, with
reduced physical, sensory or mental capabilies, unless they have been
given supervision or instrucon concerning the use of the appliance by
the person(s) responsible for their safety.
• Install the unit in a well venlated area with an ambient temperature
between 50F and 95F
• The temperature range for this unit is opmized for dry-aging beef.
Perishable food items other than beef should be stored elsewhere.
• This unit is designed to be installed indoors, and protected from rain,
sleet, snow, and/or moisture.
• This unit is not intended to be used by children. Children should be
supervised to ensure that they do not play with this product. Never
allow children to crawl inside the unit.
• If disposing the unit, remove the door.
• Do not use this unit near ammable gas or combusbles, such as
gasoline, benzene, thinner, etc.
• Do not place the unit near heat sources such as ovens, grills, or direct
sunlight.
• Only use in an upright posion on a at, level surface and provide
proper venlaon.
• Do not pinch or kink the power supply line between the unit and
cabinet.
• Do not leave cleaning soluons in the unit.
• Do not use solvent-based cleaning agents or abrasive soluons to clean
the unit as they may damage the interior and exterior.
• Do not place any other appliances on top of the unit.
• Do not turn the unit upside down, on its side, or at an angle o level.
• Do not move the unit without emptying the contents and securing the
door in a closed posion.
SAFETY INSTRUCTIONS
IMPORTANT
SAFEGUARDS
THIS APPLIANCE IS FOR HOUSEHOLD USE ONLY
WARNING: When using electrical appliances especially when
children are present, basic safety precauons should always be
followed to reduce the risk of re, shock, and/or injury to persons,
including the following:
Temperature Control
Once you have completed the setup and assembly instrucons for your
new PRO 40 SteakAger, follow the instrucons below to set and adjust
temeratures.
Temperature Controls and Sengs
- With the 120vac power plugged into the wall you will see the display on the
interior top of your SteakAger turn on.
1. To adjust the temperature you will use the + and - arrows (Number 1 on the
above diagram) to move up and down.
- For Dry Aging, we recommend seng the temerature to read 40F as
the set temperature is the upper limit and will cycle down to average
37F
- For Charcuterie, we recommend seng the temperature to read 59F
to give you an average temperature of 55F.
+-
3. Knowing which measuring system you are in can be found
5. Toggling the interior blue light ON and OFF can be done by pressing buon
number 5 on the interface diagram above. This is just an interior light and is not
the UVC light in the unit. The UVC light is built into the Back Plate of the unit.
**Note that depending on the climate that you live these number may need to be adjusted
up or down. We always recommend our units be used inside of a climate controlled area
for the optimal functionality.
2. The readout on the controls head shows the set temperature of the unit. If
the readout displays 40F, this means that the fridge will cycle below this number
from 33F to 40F.
4
15
OPERATING
INSTRUCTIONS
4. Changing between Celcius and Fahrenheit can be done by pressing
buon number 4 on the above diagram and is indicated by a light beside the
correspoding call out

Electrical Safety
• Do not exceed the power outlet rangs.
• It is recommended the your unit be connected to its own circuit.
• A standard electrical supply (115V/60Hz), that is properly grounded
in accordance with the Naonal Electric Code and local codes and
ordinances required.
• Use outlets that cannot be turned o by a switch or pull chain.
• Always turn the unit o and unplug it from the outlet when cleaning.
• Unplug the unit if it is not going to be used for an extended period of me
and leave door open for air circulaon.
• Do not operate the unit with a power plug missing the ground plug, a
damaged cord or a loose socket.
• Be sure the unit is properly grounded.
• Never plug or unplug the unit with wet hands.
• Do not bypass, cut or remove the grounding plug.
• Do not use extension cords or power strips with this unit. You may need
to contact your electrician if it is necessary to use a longer cord or if you
do not have a grounded outlet. De not modify the power cord’s length or
share the outlet with other appliances.
• Do not start up or stop the unit by switching the circuit power on and o.
• If the power cord is damaged, it must be replaced by the manufacturer or a
qualied technician.
• Never repair unit while it is plugged in.
• Immediately unplug unit if it makes strange sounds, emits smells or smoke
comes out of it, and contact customer service.
• Do not remove any part of the casing unless instructed by an authorized
technician.
• You should never aempt to repair the unit.
• Contact customer service for service opons if the unit needs service.
SAFETY INSTRUCTIONS
THIS APPLIANCE IS FOR HOUSEHOLD USE ONLY
WARNING: When using electrical appliances especially when
children are present, basic safety precauons should always be
followed to reduce the risk of re, shock, and/or injury to persons,
including the following:
App setup
You should never have to remove The SteakAger Back Plate System unless asked
to do so for parts replacement. The Back Plate is 304 stainless steel and can easily
be wiped down with a cleaning cloth when needed. If needing to remove for any
reason follow the below steps.
• Unplug the Extension Connector by carefully pulling out the 5.5mm jack
out of the connecon locaon on the front of the Back Plate Insert.
• Remove the Back Plate Insert by liing up and pulling out to li it out of
the rear slot pockets.
• Clean the Rack by wiping it with a damp cloth. Wipe dry with a dry cloth
and reinsert.
• Note : All parts of the unit are 304 stainless steel and are easily cleaned
with warm sudsy water. The hooks can be cleaned in the dishwasher.
Cleaning and Removal
Connecng to your SteakAger
• Download the SteakAger App from the App Store or Google Play for free.
• Make sure your appliance is plugged in and running.
• Follow the below App instrucons for either iOS, Android.
•
• WiFi Connecon :
• ** NOTE : If connecng through WiFi you will need to set up and account.
Make sure to conrm the account with the conrmaon email before
trying to sign in.
• Aer opening the app press “Connect to SteakAger”. You will then be
prompted to select “Wi Connecon” or “Bluetooth Connecon”. Press
“Wi Connecon” and enter your credenals. If you have already created
an account, enter your credenals and press login. If you have not created
an account press create account and enter your informaon.
• Aer signing in through WiFi you will need to go into the Sengs (Gear
Icon) and go into WiFi conguraon to select the network and enter your
password.
• If you receive an error message “Please wait 4 minutes for data to load”,
you may have entered the incorrect informaon or your ager is not
connecng to your network properly.
•
• Bluetooth Connecon :
• When connecng through bluetooth you do not need a login to access
your SteakAger. This is the easiest and quickest way to setup and view
your SteakAger data.
• Aer opening the App press “Connect to SteakAger” you will then be
prompted to select “Wi Connecon” or “Bluetooth Connecon”. Press
“Bluetooth Connecon” and you will be immediately redirected to your
home screen.
3
16
CLEANING AND
MAINTENACNCE
IMPORTANT
SAFEGUARDS

Introduction
Congratulaons!
You have made an excellent choice with the purchase of this SteakAger product.
You can be condent this SteakAger product has been manufactured to the
highest standards of performance and safety, and is supported by the team at
SteakAger.
We want you to be completely sased with your purchase of this SteakAger
product, which is backed by a comprehensive manufacturer’s 1 year warranty and
ongoing support through our Aer Sale Support Team.
If you require technical support or in the unlikely event your product was received
damaged, please contact us through www.thesteakager.com and we will provide a
response within 1 business day.
Product claims made within the 1 year warranty period will be repaired and/ or
replaced free of charge provided you have sasfactory proof of purchase (keep
your receipt). This limited warranty does not apply in cases of damage caused by
accident, improper use, abuse or force majeure.
This limited warranty will be invalidated if the appliance is tampered with in any
way whatsoever. In case of quesons or technical problems please contact us
through www.TheSteakAger.com and we will provide a response within 1 business
day.
If the appliance is returned, it must be packed correctly, as we cannot accept
responsibility for damage caused in transit. We recommend using a traceable,
insured delivery service.
Please join us on our Facebook page
:TheSteakager Family.
In the case that you would like to return your appliance, please ensure it is
packaged correctly, as SteakAger cannot accept responsibility for damage caused
in transit. We recommend using a traceable, insured delivery service. Contact us
through www.TheSteakAger.com to packaging instrucons.
2
App setup
Connecng to your SteakAger
• Download the SteakAger App from the App Store or Google Play for free.
• Make sure your appliance is plugged in and running.
• Follow the below app instrucons for either iOS or Android. Instrucons
are the same for both devices.
•
• WiFi Connecon :
• ** NOTE : If connecng through WiFi you will need to set up and account.
Make sure to conrm the account with the conrmaon email before
trying to sign in.
• Aer opening the app press “Connect to SteakAger”. You will then be
prompted to select “Wi Connecon” or “Bluetooth Connecon”. Press
“Wi Connecon” and enter your credenals. If you have already created
an account, enter your credenals and press login. If you have not created
an account press create account and enter your informaon.
• Aer signing in through WiFi you will need to go into the Sengs (Gear
Icon) and go into WiFi conguraon to select the network and enter your
password. If you receive an error message “Please wait 4 minutes for data
to load”, you may have entered the incorrect informaon or your ager is
not connecng to your network properly.
• Once your network informaon is entered and your SteakAger connects
properly, you will be redirected to the home screen and your data will be
viewable.
• If you receive and error message and are unable to resolve the issue by re-
entering your network informaon, contact us at www.TheSteakAger.com
•
• Bluetooth Connecon :
• When connecng through bluetooth you do not need a login to access
your SteakAger. This is the easiest and quickest way to setup and view
your SteakAger data.
• Aer opening the App press “Connect to SteakAger” you will then be
prompted to select “Wi Connecon” or “Bluetooth Connecon”. Press
“Bluetooth Connecon” and you will be immediately redirected to your
home screen.
• If you receive any error messagers once connected, “Please wait 4
minutes for data to load”. Your unit may not be plugged in or connecng
properly. If you are unable to resolve the issue with the troubleshoong
guide, contact us at www.TheSteakAger.com
17
OPERATING
INSTRUCTIONS

Contents
Introducon
Important Safeguards
Installing the PRO 40
Features and Funcons
Operang Instrucons
Cleaning and Maintenance
Warranty Terms and Condions
For Your Records:
1
2
3
4
5
6
7
8
Please write down the serial number below for
future reference. The number is located on the
rangs label at the back of your unit. You may also
want to staple your receipt to this manual as it
is proof of your purchase, and is also needed for
service under you warranty.
• Moving your PRO 40
• Placing your PRO 40
• Leveling your PRO 40
• First Time Operang Instrucons
Serial Number :
1
18
app setup
App Usage and Troubleshoong
• To set an aging mer press “Add New Cut of Beef”. You can then use the
scroll style interface to select the cut of meat along with the amount of
desired me.
• If you scroll to the boom of the list of beef cuts you can press the “+”
buon and enter a custom cut or any addional beef cuts that arent
preset into the App.
• To delete or edit the aging mer at anyme, swipe le on the set me and
you will see a “Edit” and “Delete” buon on the right side of the mer.
• To locate the seng inside the App locate the “Gear” icon in the top right
of the home page. This will take you to a page with a list of opons.
• SteakAger Devices List : To add or delete any SteakAger device you will
need to press “SteakAger Devices List”. Inside this menu you will see all of
the devices that are connected your account. Swiping le on a device will
allow you to either delete or edit the device. Pressing the “+” buon in the
top right of the screen will allow you to add any devices that are near you
(within Bluetooth range). If you are trying to connect to a unit near you
and you receive an error message “No SteakAger Devices Found”, unplug
and plug the SteakAger back i and try connecng again.
• Change SteakAger Type & Name : This will allow you to change the name
an unit designaon fo the SteakAger that you are currently viewing.
• WiFi Conguraon : In this menu is where you can change, view, and
connect to networks for monitoring over WiFi. If you do not see your
network in the list, try to refresh the menu with the refresh buon in the
top right.
• Edit Meat Types : If you are interested in remvoing, eding, or adding any
extra meat types that are not found in the presets menu this is where
you are able to do that. These changes will be for your meat aging mer
sengs.
• Measuring System : Changing between C/F and lb/kg can be done in this
menu.
• Change Connecon Type : To switch between Bluetooth and WiFi
monitoring go into this menu and select the monitoring type. If swapping
from Bluetooth to WiFi, you may be prompted to resign in or to create an
account if you havn’t already. **Refer to “Connecng to your SteakAger -
WiFi Connecon”
• Reset Applicaon : This is mostly used to do a full reset on the App if it is
not working properly. If you are experiencing issues with connecon or a
lot of error messages using this command should solve this. You can also
use this if you are wwanng to wipe your app clean for a new account
without having to uninstall and reinstall.
OPERATING
INSTRUCTIONS
Aging Timer
App Setup and Usage

Pro 40
USER GUIDE
Congratulaons on your purchase and welcome to the SteakAger family!
Every SteakAger product comes with a 1-year parts and labor warranty,
eecve as of original purchase date. Please retain proof of purchase to
obtain service under this warranty.
READ ALL INSTRUCTIONS BEFORE USE
For your safety and connued enjoyment of this product,
always read the instrucon manual before using.
Troubleshooting
Troubleshoong Guide
• When experiencing issues with your SteakAger refer to this
troubleshoong guide to diagnose the issue you are having. If unable
to resolve the issue aer going through this guide contact us at
www.TheSteakAger.com
19
OPERATING
INSTRUCTIONS
No Connecvity Through the App
• If you are having trouble connecng to the your SteakAger through the
mobile app use the below instrucons to diagnose.
• If you are receiving “Please wait 4 minutes for data to load” you may be
having a conncon issue.
1. If monitoring over bluetooth rst try to unplug and plug the 12vdc plug
back into the unit to reset the control board.
2. Check to be sure that the fans are running on the interior of the unit.
1. If all plugs are plugged into the Back Plate, but the fans arent running
with the 12vdc plugged in contact Technical Support.
1. If monitoring over WiFi, you may have lost connecon to your network.
2. Check in WiFi Conguraon in the sengs menu to be sure your network
is sll connected to your SteakAger.
1. If your network is connected but you are sll receiving and error
message, contact SteakAger Technical Support.
WiFi Connecvity Issue
Defrosng
• If you start to experience a frosng or icing instance with the unit follow
the below instrucon for proper defrost and troubleshoong.
• It is reccomended that the unit be shut down and allowed to defrost if
nessesary between ages.
1. When defrosng your PRO 40, remove the meat if any inside and place it
inside another fridge.
2. Unplug the PRO 40 and allow it to sit with the door open. Once you see
that the unit has been fully defrosted plug the PRO 40 back in and allow
it to get back to temperature then add the meat back to the fridge.
1. Never use a sharp object to chip at the back plate as this could
puncture the cold plate and damage the operaon of the unit.
Table of contents
Other SteakAger Refrigerator manuals


Popular Refrigerator manuals by other brands


Frigidaire
Frigidaire FGHS2655K Specification sheet

Foster Refrigerator
Foster Refrigerator LL2/1MS Service manual

Marvel
Marvel 8SBAR Installation, operation & maintenance instructions

LG
LG GN-M352RLCC owner's manual

Belling
Belling BE813 Installation and user instructions

Blaupunkt
Blaupunkt 5CB2 Series Instructions for use


