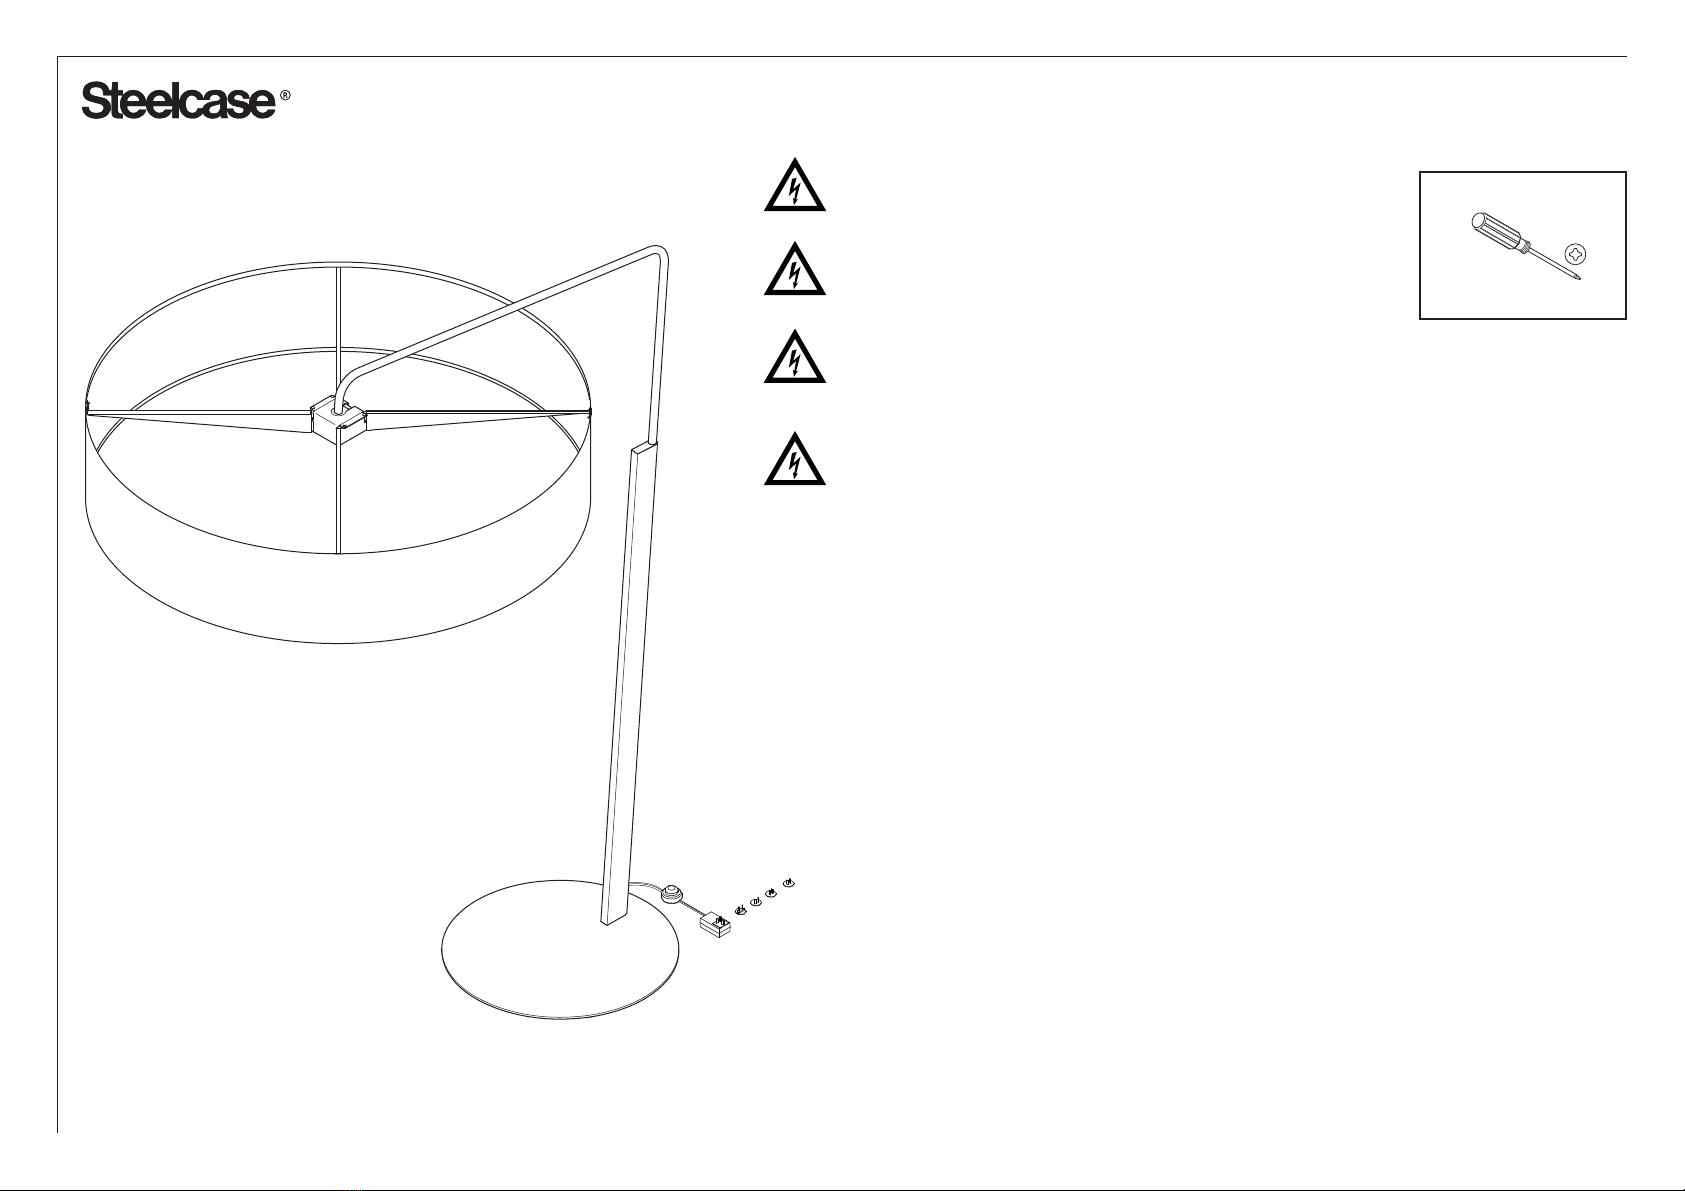
manuals.online logo
Brands
  1. Home
  2. •
  3. Brands
  4. •
  5. Steelcase
  6. •
  7. Home Lighting
  8. •
  9. Steelcase Campfire User manual

Steelcase Campfire User manual

Campfire Big Lamp
December 2012 Page 1 of 12
To Prevent Risk of Electrical Shock
1. All electrical installations must done by qualified personnel in accordance
with codes and regulations applicable at the installation site.
1. Before beginning work, ensure that the electrical power has been removed
from the circuits that are being connected to or disconnected from.
1. Ensure that circuits to which the lights are connected are properly grounded
and are the correct voltage.
1. To prevent wiring damage or abrasion, do not expose wiring to edges of
sheet metal or other sharp objects.
Deviation from the assembly instructions may result in a risk
of fire or electric shock.
To Reduce The Risk of Fire, use E27/E26 12V DC compact
fluorescent or LED Light bulb. Light bulb can be used as
long as the overall length does not exceed 113mm
To Reduce The Risk of Fire, Immediately remove any debris
in the lamp shade/diffuser assembly.
Important Safety Instructions :
The big lamp equipped with Universal AC input and DC output adaptor with
changeable plug face. Never use with an extension cord unless plug can be
fully inserted. Do not alter the plug.
APPLICATION NOTE: Consult your local fire code authorities when
planning the use of this product in a building with sprinklers. Some
authorities may limit the use of the Big Lamp in close proximity to
sprinkler heads due to the large shade being an obstruction in the
sprinkler spray pattern.
Campfire Big Lamp
December 2012 Page 2 of 12
BOX #1
Base Assembly
BOX #4
Power Unit
BASE
(QTY 1)
5/16-18
SCREW
(QTY 4)
POST
(QTY 1) COVER
(QTY 1)
LOCK PLATE
(QTY 1)
HUB
(QTY 1)
UPPER
BOOM
(QTY 1)
CANTILEVER
(QTY 2)
SHADE ASSEMBLY
(QTY 1)
DIFFUSER ASSEMBLY
(QTY 1)
#6 COVER
SCREW
(QTY 1)
#10-24 x 1/2”
SCREW
(QTY 8)
BOX #2
Lamp Upper Section
BOX #3
Shade and Diffuser Assemblies
Campfire Big Lamp
December 2012 Page 3 of 12
1. Assemble the base to the post using three (3) 5/16 -18 flat
head screws. Tighten using a philips screwdriver.
2. Start four (4) #10-24 x 1/2” adjusting screws into the boom
plate
3. Feed the cord into the post until the electrical connector is
exposed.
1
3
ab
Campfire Big Lamp
December 2012 Page 4 of 12
3
5
4
3. Feed the cord into the post until the electrical connector is
exposed.
4. Insert the 2-Pin head cable through the Boom hole
5. Connect the 2-Pin head cable with the 2-Pin connector
after the cable come out from the boom.
Campfire Big Lamp
December 2012 Page 5 of 12
Connect the interconnector cable with the 2-Pin head cable.
Make sure it connected properly. Wrap the connector by
Insulation Tape
Tighten the insert nut in the hole on the boom. Make sure the
fork connector passed through the insert nut.
Campfire Big Lamp
December 2012 Page 6 of 12
Tighten the fork connector to the lamp holder as per picture shown.
Assemble the Lamp
holder housing.
Install the Lamp holder to
the Boom.
Install the GRIPMASTER strain relief as per picture shown.
Campfire Big Lamp
December 2012 Page 7 of 12
5. Connect electrical connectors together. Push the connector
partially inside the boom tube.
5
Campfire Big Lamp
December 2012 Page 8 of 12
6. Fully insert the boom tube into the post
up to the notch in the tube, while allowing
excess cord to feed out the base
of the lamp.
7. Assemble the lock plate into the notch. Insert and tighten one.
Do not over tighten.
8. Install the cover plate and align it with the post. install the
cover screw.
6
7
8
a
a
b
b
Campfire Big Lamp
December 2012 Page 9 of 12
9. Assemble cantilever to hub by placing hooks on
bottom of hub into rectangular holes in cantilever
and rotating into position. Install and tighten four
screws.
9
Campfire Big Lamp
December 2012 Page 10 of 12
NOTE : The Shade and Diffuser are packaged folded up.
Their spring steel support rings can unfold rapidly. Hold them
out and away from you and others as you unfold them.
10. Unfold the shade and confirm the slots in the fabric
are visble in the top and bottom rings. Roll the rings
to make the slots visible if they are not initially visible.
11. Align the seam in the shade with the notch in the
cantilever hub assembly.
12. Snap the top ring of the shade to the cantilevers at
four locations.
SEAM OF SHADE ALIGNED WITH
THE NOTCH IN CANTILEVER
HUB ASSEMBLY
10
11
12
a
b
Campfire Big Lamp
December 2012 Page 11 of 12
13. Lift the shade/cantilever assembly to align
the notch in the cantilever assembly with
the boom post. Lower the shade assembly
onto the boom post.
14. Adjust the four leveling screws to level the
shade assembly
NOTE: Cantilevers and hub
removed from ilustration for
clarity
13
14
a
b
Campfire Big Lamp
December 2012 Page 12 of 12
15. E27/E26 12V DC Compact fluorescent or
LED light bulb.LED light bulb not provided.
16. Unfold the diffuser and insert the clips in the
slots on the bottom ring.
15
16

Other manuals for Campfire

1

Popular Home Lighting manuals by other brands

Philips 579913116 user manual

Philips

Philips 579913116 user manual

Fomei FY3465 user guide

Fomei

Fomei FY3465 user guide

Safavieh FLL4014A quick start guide

Safavieh

Safavieh FLL4014A quick start guide

Philips Softer Decorative Light brochure

Philips

Philips Softer Decorative Light brochure

hollandslicht Timber floor Assembly instruction

hollandslicht

hollandslicht Timber floor Assembly instruction

RH ROUSSEAU Assembly/installation instructions

RH

RH ROUSSEAU Assembly/installation instructions

Safavieh LIT4046A Care and maintenance

Safavieh

Safavieh LIT4046A Care and maintenance

URBAN OUTFITTERS ISOBEL FLOOR LAMP Assembly instructions

URBAN OUTFITTERS

URBAN OUTFITTERS ISOBEL FLOOR LAMP Assembly instructions

iHome Zenergy ZANDLE iZM100BH quick start guide

iHome

iHome Zenergy ZANDLE iZM100BH quick start guide

Philips Ledino 37351/31/16 Specifications

Philips

Philips Ledino 37351/31/16 Specifications

RL R55392102 manual

RL

RL R55392102 manual

Inspire Pina E27X1 manual

Inspire

Inspire Pina E27X1 manual

Orion 040.1212-01 Mounting and safety instructions

Orion

Orion 040.1212-01 Mounting and safety instructions

Good Earth Lighting RE1110-WHG-07LF2-G quick start guide

Good Earth Lighting

Good Earth Lighting RE1110-WHG-07LF2-G quick start guide

Philips Ecomoods 42151/48/16 manual

Philips

Philips Ecomoods 42151/48/16 manual

Anglepoise Original 1227 Mini manual

Anglepoise

Anglepoise Original 1227 Mini manual

FOSCARINI TWIGGY manual

FOSCARINI

FOSCARINI TWIGGY manual

CB2 Belgrave manual

CB2

CB2 Belgrave manual

manuals.online logo
manuals.online logoBrands
  • About & Mission
  • Contact us
  • Privacy Policy
  • Terms and Conditions

Copyright 2025 Manuals.Online. All Rights Reserved.