Steeper S-Charge User manual
S-Charge System
Battery System with Display
and Magnetic Charger
Technical Manual
3
2S-Charge Technical Manual
Contents
In the Box 4
Features and Benefits 5
System Compatibility 5
Principle Dimensions and Specifications 6
Connecting the S-Charge System 8
Installation Instructions 9
Important Notes for Fitting 13
Initial Start-up 15
Checking the Battery Level 15
Activating the Prosthesis 16
Deactivating the Prosthesis 16
Low Battery 17
Charging the Prosthesis 18
Charging Faults 20
Troubleshooting 21
Care, Cleaning and Safety 24
Important Information and Warnings 25
Warranty Terms 27
Returns 27
Environmental and Operational Conditions 28
Disposal 28
Test Certification 29
Quality Assurance 29
Symbols Used on Product & Packaging 30
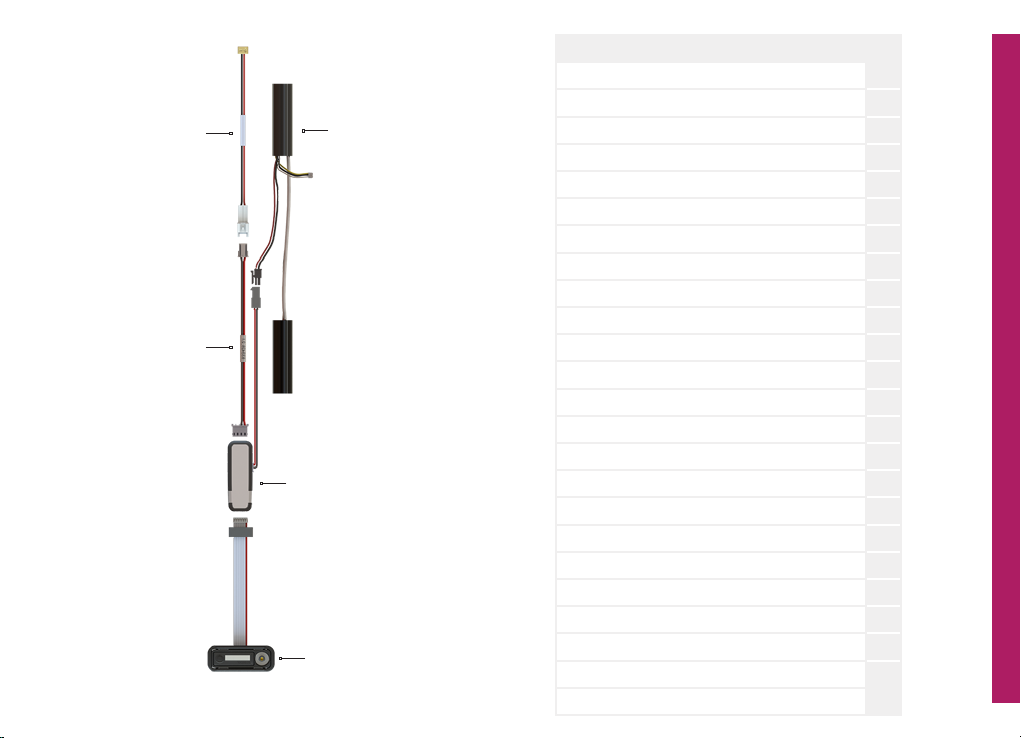
EQD
Connector
Cable
Power
Cable
Hub
3500S
Battery
Pack
Display

5
4S-Charge Technical Manual
S-Charge System
The S-Charge System is compatible with all powered
upper limb systems with equivalent power rating (8.4V at
full battery charge, 7.0V at low battery cut o, 2.5A peak
current).
Please contact your local service centre for guidance.
Please note: the S-Charge System is only compatible with
the Steeper 3500S battery pack.
For a 2-way to 4-way connection, or a connection to a short
wrist rather than EQD, a Short Wrist connector cable is
required (separate order: CBBHA72). See page 8 for setup.
S-Charge Kit (SC3500) Quantity
3500S Battery Pack 1
Hub 1
Display 1
Mounting frame 3
Wall charger plus mains adapters (UK, US, EU, AUS) 1
EQD connector cable 1
Power connector cable 1
Battery lamination dummies 1 pair
Hub & display lamination dummies 1 each
Foam gaskets 3
Alignment sticker 2
Technical manual 1
User guide 1
Extension ribbon cable 1
Silicone sealant and dispenser tip 1
• High-capacity 3500mAh batteries.
• The 3500S battery pack fits easily within the prosthesis.
• Fully charges the prosthesis within 5 hours.
• Visual display of the power status.
• Visual display to inform the user of any charging faults.
• Allows the user to activate and deactivate their
prosthesis at the touch of a button.
• Simple to use with one button that switches to and from
standby.
• Raised mounting frame to prevent accidental activation.
• Magnetic charger allows for easy connection to the
power supply.
• Quick-release magnet protects against damage.
• Automatic Sleep mode activation to save power.
The S-Charge System is a user-friendly battery system with
an OLED display and a magnetic charger, that is fitted into
a prosthesis to allow the user to easily activate, deactivate
and charge their prosthesis. The display informs the user of
the remaining power and if there is a charging fault.
In the Box
Features and Benefits
System Compatibility
7
6S-Charge Technical Manual
Display & Mounting Frame
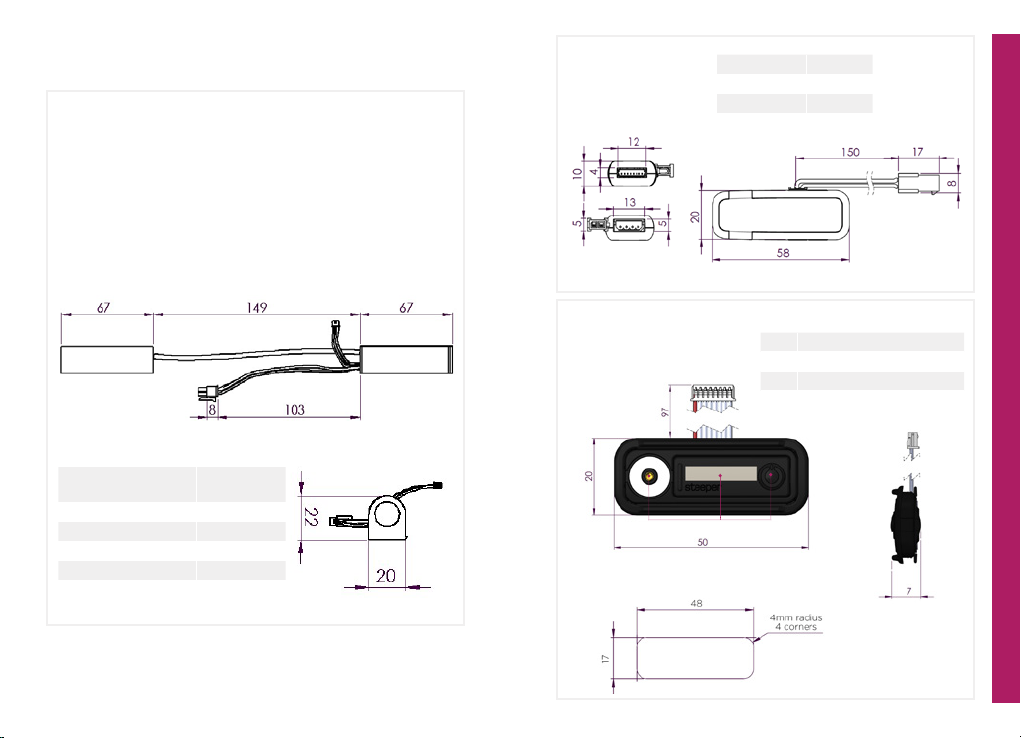
Principal Dimensions and Specifications Hub
3500S Battery Pack
The S-Charge System has been developed to employ
the latest advances in battery technology. The system
is only compatible with the Steeper 7.2V Lithium-ion
3500S Battery Pack provided.
Please note: The battery cells must not be separated.
The protection circuitry requires them to be connected.
A B C
Front view
Side view
Hole dimensions for
mounting frame
Size 50mm x 20mm x 7mm
AMagnetic charging point
BOLED display
CStandby button
(All dimensions are in mm)
Dimensions per cell
(not inc. cables)
67 x 20 x
22mm
Cable length 149mm
Weight 106g
Capacity 3500mAh
Voltage Nominal 7.2V
Current 2.5A
Top view
Side view
Length 58mm
Width 20mm
Thickness 10mm
Connect to
Display end view
Top view
Power Cable
end view

9
8S-Charge Technical Manual
Connecting the S-Charge System
EQD
Connector
Cable
Power
Cable
The S-Charge System is designed to be retrofitted to a
pre-made forearm. However, if the residual limb is too long
to allow all components of the system to fit within the space
in the forearm, lamination dummies may be required for a
new forearm unit to be created. These are supplied in the
box with the S-Charge System.
1. The lamination dummies
for the hub and the display
(shown opposite) can be
separated by snapping the
adjoining tabs. These, along
with the 3500S battery pack
dummy, can then be laminated
into the forearm using the
standard process.
2. After lamination, a hole
must be cut for the S-Charge
display. Use the fitting guide
label supplied in the box.
3. Place the alignment sticker
onto the desired location of
the prosthesis.
4. Using a suitable tool, cut
out the template, keeping
within the marked lines, and
push out the excess material.
5. File the internal edges of
the hole to fit the shape of the
mounting frame, and remove
any sharp edges.
Installation Instructions
The mounting frame for the display will accommodate a
forearm wall thickness of 2 - 2.5mm.
EQD Wrist Short Wrist
(Order the Short Wrist Connector
Cable separately, part no: CBBHA72.
Electrodes not included)
4-pin for
short wrist
connector
cable
2-pin
2-pin for
EQD
connector
cable
Short Wrist
Connector
Cable
(CBBHA72)
Power
Cable
Hub
3500S
Battery
Pack
3500S
Battery
Pack
Display
Hub
Display
11
10 S-Charge Technical Manual
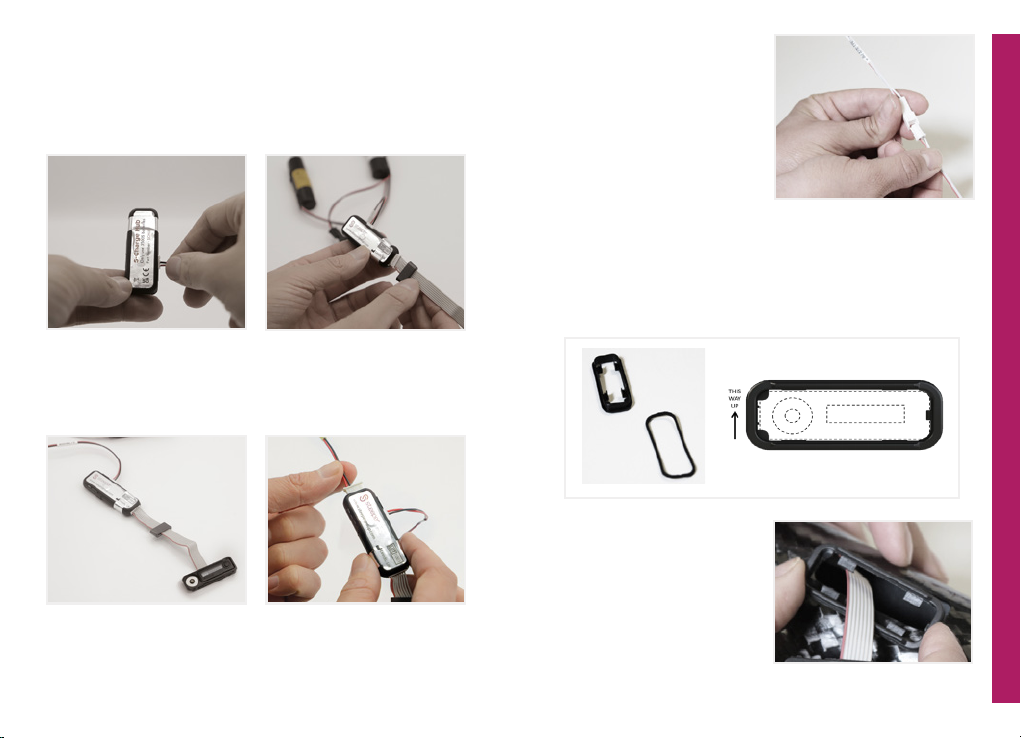
6. Please note, to connect all the components these
instructions MUST be carried out in this order:
a) Firstly, connect the 3500S
Battery Pack to the hub. The
hub is able to accommodate
one Battery Pack.
b) Next, connect the display
with the ribbon cable to
the hub.
7. Place the foam gasket around the mounting frame,
beneath the inner lip.
8. Apply the silicone sealant to the lip and fit the mounting
frame to the hole, ensuring the correct orientation as
shown below.
e) Connect the EQD cable to
the power cable (if required)
c) The system is now
connected. Turn on and test
by pressing the Standby
button on the display.
d) Connect the power cable
connector to the hub.
Mounting
frame
Foam
gasket
9. Ensure the plastic clips
of the mounting frame
are facing into the hole as
shown.

13
12 S-Charge Technical Manual
13. Turn on the power at the display. Test the terminal device
and ensure the unit is fully charged with the magnetic
charger supplied, prior to providing to the user.
10. Feed the full system through the forearm, and pull
the display through so it exits the forearm through the
mounting frame hole. If a bend is required to allow the
ribbon cable to run along the forearm, carefully fold it at
a minimum distance of 5mm from the display. Use the
extension cable, if required, to ensure that the cable is
not strained (with extra care required at the joint with the
display).
11. Secure the system inside the forearm using hook and
loop fasteners or similar to prevent movement of the
components and damage to the cables.
12. Sit the display flat on top of the mounting frame and
push the corners of the display until it clicks into place.
The front of the display should sit flush with the mounting
frame and the whole unit should feel secure in the
forearm.
• Press the four corners of the S-Charge display to
gently push it into position - do not exert any pressure
onto the display screen.
• Fitting and maintenance should be conducted in a
clean, dry environment and care should be taken to
not subject the system to Electrostatic Discharge
(ESD).
• Ensure that
the fitting process is conducted by a
qualified technician.
• Ensure that all components are plugged in securely
and that cables are not over-strained.
• Ensure that the unit is fully charged prior to providing
to the user and supply the accompanying user guide.
• The hub can only accommodate one 3500S battery
pack.
• We recommend the system is charged each night so
that a regular charging pattern is established and the
user starts each day with a fully charged battery.
• Lamination dummies are provided to aid manufacture
of the prosthesis.
• During charging, the surface of the hub will exhibit
an increase in temperature. This is a normal operation
and does not signify a fault. The hub must be
positioned to avoid any direct contact with the
residual limb. The prosthesis should not be worn
during charging, and has a fail-safe fitted to disable
the hand and prevent it from operating when the
battery is being charged.
• If the battery is in storage it should be charged at
least once every six months.
Important Notes for Fitting
15
14 S-Charge Technical Manual
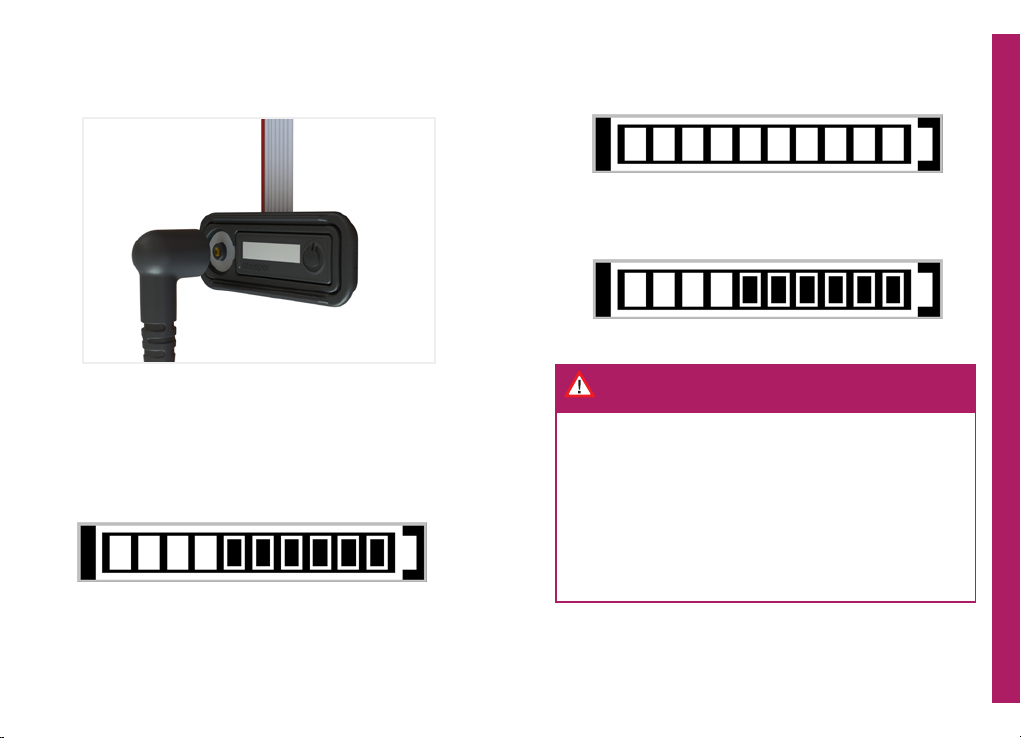
• Please see page 7 for the display key when following
the initial start-up instructions. (A) Magnetic charging
point, (B) OLED display, (C) Standby button.
Please Note: The standby button must not be pressed
with excessive force.
• The S-Charge System must only be fitted by a
qualified prosthetic technician, and prescribed by a
qualified prosthetist.
The S-Charge System may require a short amount of
charging time before initial start-up. Upon completion of
set-up, please ensure the device is placed on charge for 4
hours before providing to the user.
1. Connect the display to the hub.
2. Connect the 3500S Battery Pack to the hub.
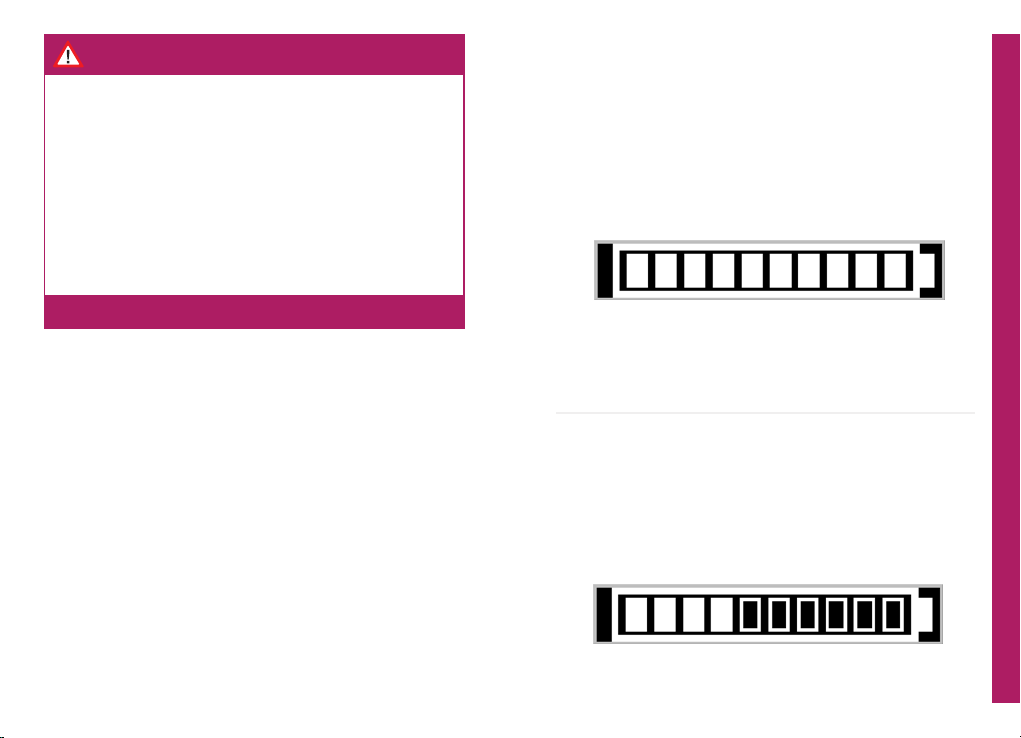
3. The display will show the battery status bar.
4. After 10 seconds the system will automatically enter
Sleep Mode and the display screen will become blank.
The myoelectric hand is still operational whilst the
S-Charge is in Sleep Mode.
Initial Start-Up
(When connecting the batteries)
1. Once the system is in Sleep Mode, it can be woken up by
a short press of the Standby button.
2. Once woken up, the Display will show the current charge
of the battery for 10 seconds, before returning to Sleep
Mode.
Checking the Battery Level
Important Notes for Fitting
Warning: Do not modify this equipment.

17
16 S-Charge Technical Manual
1. The prosthesis can be deactivated by holding down the
Standby button for 1.5 seconds. The system will then be
in Standby Mode.
2. The system will automatically deactivate the prosthesis
and the display screen will become blank.
3. A short press of the standby button will display the
standby symbol when the system is deactivated.
1. To activate the system, press and hold the standby button
for 1 second.
2. This screen is displayed after the system has been
activated:
3. The system will automatically enter Sleep Mode after 10
seconds where the display screen will become blank. The
prosthesis is still operational whilst the system is in Sleep
Mode.
Activating the Prosthesis
1. When the battery level reaches 10%, the display will
flash the below screen, on the press of the button, if the
system is active:
Note: If the battery level then falls below 10%, the system
may turn itself off as a safety precaution. It is important that
the system is placed on charge as soon as possible once it
Low Battery Level
Deactivating the Prosthesis
19
18 S-Charge Technical Manual
4. When the battery is fully charged, all segments will be
solid.
5. When the magnetic plug has been disconnected, the
display will show the current charge of the battery, and
the prosthesis will be activated.
Charging the Prosthesis
1. Connect the magnetic plug to the magnetic charging
port of the display.
If pulled, the magnetic charger will auto release. When
the charger is removed the system will activate the
prosthesis. When not in use, do not leave the wall charger
turned on.
2. Once the power supply is turned on, the charging display
will be shown.
3. The solid segments of the battery show the current
charge. The cycling segments of the battery highlight the
proportion of the battery total capacity that has yet to be
charged.
• Do not connect or disconnect the batteries from the
S-Charge whilst charging.
• The hand will not be operational during charging.
• Do not leave unattended for in excess of 12 hours
when charging.
• Do not use the wall charger if it is damaged, and
contact your supplier.
Important Information
21
20 S-Charge Technical Manual
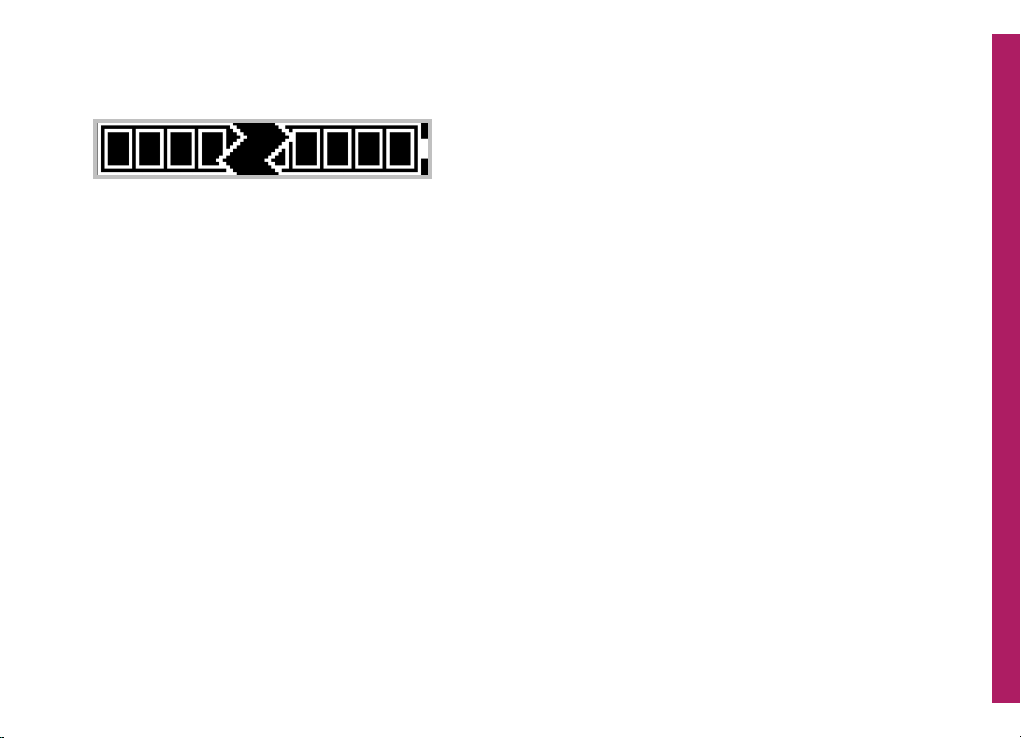
1. If there is a fault detected during charging, the display
will be as follows:
2. If this occurs, disconnect then reconnect the charger.
3. Possible faults indicated by the charging fault image
include:
• Overheating
• Faulty power supply
• Faulty battery
• Faulty circuit
4. If the issue has not been corrected by disconnecting and
reconnecting the charger, disconnect for 30 minutes and
try again. If the problem persists:
• The batteries will degrade over time, therefore may
require a replacement
• Charger may be faulty - try a different unit
5. If the problem persists it is important that the system is
not used until that fault is rectified. Please contact your
provider for further assistance or to order replacement
parts.
Charging Faults Troubleshooting
If you do encounter any problems during the set up of the
S-Charge System, please note the following troubleshooting
advice. For any further information, please contact your
supplier. Suitable advice is also provided to the user in the
User Guide.
Please note: Before following any of these steps, first ensure
that the batteries are charged, the wall charger is plugged
in and switched on, and ensure terminal devices are turned
on.
Display not working
Carry out in the following order until working:
1. Check that the wall charger is not faulty by using a
known functioning charger.
2. Check that the batteries are not faulty by using previously
charged batteries.
3. Remove the display from the forearm by inserting a flat-
head screwdriver under the mounting frame (note: the
mounting frame will break, replacements are provided
within the kit, and are available from Steeper). Check all
cables for sign of damage - if damaged, replacement
parts are required.
4. If cables show no sign of damage, connect the display to
a functioning hub. If this works, the hub will need to be
replaced.
5. Connect the hub to a functioning display. If this works,
the display will need to be replaced.
6. If the display still does not work, both the hub and display
will need to be replaced.

23
22 S-Charge Technical Manual
A broken battery symbol appears and does not
charge
Disconnect the wall charger if connected, then carry out the
following:
1. Disassemble the prosthesis as necessary to access the
S-Charge hub (as per the previous guide).
2. Disconnect all parts and ensure that the areas between
the connections are clear of debris.
3. Reconnect everything, and if the broken battery symbol
is not visible, the system has reset and is functioning
correctly.
4. If this does not work, the hub will need to be replaced.
Distorted display
Carry out in the following order until working:
1. Disconnect all parts and ensure that the areas between
the connections are clear of debris.
2. Connect the hub to the display and ensure that the
connection is pushed in securely.
3. Connect the battery pack, and if the screen is still
distorted, change the display with a known working
display. If this works, the display will need to be replaced.
4. Connect the working display to a working hub. If this
works, the hub needs to be replaced.
5. If these steps do not work, the hub and display need to
be replaced.
Prosthesis non-operational despite full charge and
power on
Carry out in the following order until working:
1. Check that the terminal device is turned on.
2. Disassemble the prosthesis as necessary to access the
hub. Disconnect the battery pack for 10 seconds and then
reconnect.
3. If the problem persists, replace the hub with a unit that
is known to be functioning correctly. If this rectifies the
issue, the hub will need to be replaced.
4. Replace the display with a known working device, if this
rectifies the issue the display needs replacing. If this
does not rectify the issue the hub and display need to be
replaced.
Prosthesis operational despite the S-Charge power
off
Carry out the following:
1. Disassemble prosthesis as necessary to access the
S-Charge Hub.
2. Disconnect the battery pack, then reconnect.
3. If the problem persists, replace the existing hub with a
new hub.

25
24 S-Charge Technical Manual
The S-Charge System has been designed to minimise
the requirement for any maintenance. There are no user/
customer-serviceable parts in the S-Charge System. Do
not adjust, dismantle, attempt to maintain or modify any
component within the system. If any aspect of the device is
not functioning as you believe it should, please contact your
supplier for guidance.
It is important to encourage the user to inspect their system
to ensure early detection of any potential problems, noting
the following:
• Ensure that the charging point is always clear of debris.
• Moisture must not enter the S-Charge System. If liquid
does enter the system, it must not be operated.
• Overexposure to heat can lead to damage to the display.
Do not leave the system for an extended period of time
in the sun.
• Do not expose the S-Charge System to a naked flame or
any other excessive heat.
• Avoid impact and do not subject the S-Charge System to
excessive loads.
• If the battery gives o an odour, generates extreme heat,
becomes discoloured or deformed, or in any way appears
abnormal during use, recharging or storage, immediately
remove it from the prosthesis.
The display can be wiped clean using a soft cloth only.
Solvents or abrasives must not be used as they may
damage the screen, thus affecting the visibility of the
text and compromising the effectiveness of the ingress
protection.
Care, Cleaning and Safety
This S-Charge is an accessory for Class I Medical Devices
which meets the general safety and performance
requirements in MDR 2017/745 Annex I.
The S-Charge must only be prescribed and fitted by a
qualified prosthetist in a suitable clinical environment.
If a serious incident occurs, in relation to the device, it
should be reported to the Manufacturer and the competent
authority of the Member State in which the user and/or
patient is established
The Steeper S-Charge System and its associated
components are not waterproof and should not be
exposed to moisture. Ingress of moisture may cause
corrosion and potentially severe damage.
This product is not designed to be opened and has no user
accessible or replaceable internal components.
In the event of failure or suspected malfunction, please
contact Steeper or your supplier. The batteries must only
be charged with the appropriate charger and its power
supply unit as detailed on page 4.
Do not charge the
battery whilst the limb is being worn by the user.
The battery is fitted with a safety circuit to prevent the
eects of unintended damage and eliminate the potential
hazard. Should the battery or charger fail to operate,
please note the circumstances for diagnostic purposes.
To avoid potential damage to the Wall Charger, do not
ax magnetic contact to any metallic surface other than
the S-Charge System.
If the S-Charge System has been in storage, please leave in
an ambient temperature (20° C) for a minimum of 2 hours
before use.
S-Charge: Important Information
Warning: Do not modify this equipment.

27
26 S-Charge Technical Manual
Warranty Terms
Where a claim is made under warranty, this claim must be
supported by appropriate documentation. Photographs of
any failed batteries must be provided in lieu of the product
itself. Please do not send faulty batteries back to Steeper.
You must state if you wish us to supply a replacement.
The warranty will be void on all system components if
any components have been subject to abuse, repair or
maintenance by an uncertified person, deliberate damage,
applied loads beyond those for which the product was
designed, or by modification, neglect or actions against
those outlined in the important information.
The designed service life of the S-Charge System is two
years. We would recommend replacing the 3500S batteries
every 24 months to maintain optimum performance. Other
than the guidance outlined in ‘Care and Cleaning’, no other
maintenance is required for this system.
Item Warranty
Period Warranty Terms
Hub and
Display* 12 months Design and Manufacture
*Mounting frames exempt
Cables 12 months Design and Manufacture
Charger 12 months Design and Manufacture
3500S Battery
Pack 12 months Design and Manufacture,
correct charging
Returns
Prior to Return of any device, the Customer must contact
Customer Services for an RA (Returns Authorisation
Number) and complete a 8.2.1 FRM 028 Product Concern
Report in full and submit with the product return.
• Handle batteries with care.
• When recharging, only use the specified battery charger.
• For transportation, ensure the batteries are stored in the
packaging in which they were provided.
• Store batteries out of reach of children.
• Do not immerse the battery in any liquid.
• Do not use or leave the battery near a heat source such as
fire or heater.
• Do not discard the battery in fire or expose it to a flame.
• Do not use or leave the batteries at high temperatures
(e.g. in direct sunlight or a vehicle in hot weather). This
can cause overheating, burning and performance may
degenerate therefore the service life will be reduced.
• If the battery leaks, and the electrolytes get into the eyes,
do not rub eyes as this could cause injury to the eyes or
loss of sight. Instead, rinse them with clean running water,
and immediately seek medical attention.
• Do not strike, throw, drop or damage the battery.
• Do not pierce, disassemble or modify the battery.
• The 3500S battery pack will degrade after a number of
cycles. To order a replacement, please contact Customer
Services - this is not included in the warranty.
• If batteries are in storage, recharge every six months
otherwise the battery function could be aected.
3500S Battery Pack: Important Information
Warning: Do not remove the plastic battery wrapping.

29
28 S-Charge Technical Manual
The S-Charge System is an electrical device and
should not be mixed with general household waste.
For proper treatment, recovery and recycling, please
take this product(s) to designated collection points.
Alternatively, in some countries, you may be able to
return your products to your local retailer upon the
purchase of an equivalent new product.
Disposing of this product correctly will help save valuable
resources and prevent any potential negative eects on human
health and the environment, which could otherwise arise from
inappropriate waste handling.
Please contact your local authority for further details of your
nearest designated collection point.
Penalties may be applicable for incorrect disposal of this waste,
in accordance with your national legislation.
Disposal
Test Certification
Storage and transport -20°C (-4°F) to
+25°C (+77°F)
Operational -5°C (+23°F) to
+40°C (+104°F)
Charging 0°C (+32°F) to
+45°C (+113°F)
Pressure range 700-1060 hPA
65 ± 20% humidity.
Do not expose to EM emissions above 8kV contact,
15kV air
If the S-Charge System has been in storage, please leave in an
ambient temperature (20°C) for a minimum of 2 hours before
use.
The S-Charge System and its associated components listed
within this document have been tested and certified to the
following standards and requirements:
• Medical Safety Testing:
• IEC 60601-1: 2005/AMD1:2012.
• IEC 60601-1-11: 2015; Includes meeting requirements:
ISO 14971:2019.
• IEC 60601-2: 2014.
• IP22 to BS EN 60529: 1992+ A2: 2013, when the S-Charge
display is sealed using the silicone sealant as outlined in the
fitting instructions.
• IEC62133-2:2017
• UN38.3
Environment and Operational Conditions
Steeper/SteeperUSA operate a quality management system that
fully complies with the requirements of BS EN ISO 13485:2016.
This certifies that Steeper/SteeperUSA meet the appropriate
international quality standards for design, manufacture and
supply of prosthetic products.
Steeper is registered with both the Medicines and Healthcare
Regulatory Authority in the UK, and the Food and Drugs
Administration of the United States Government for the
manufacture and supply of prosthetic and orthotic products.
MHRA Registration N°: 0000006617
FDA Registration N°: 9612243
Model N°: STP-RP616
Continued compliance with the standard is monitored by a
program of internal and external audits. Applied Standards:
MDSAP
ISO 14971:2019
Directive RoHS 2015/863/EU.
This S-Charge is an accessory for Class I Medical Devices which
meets the general safety and performance requirements in MDR
2017/745 Annex I.
Quality Assurance

31
30 S-Charge Technical Manual
This device is CE marked which indicates that the device meets
EU safety, health and environmental requirements. It also
indicates the device’s compliance with EU legislation and free
movement within the European market.
This device is UKCA marked which indicates that the device
meets safety, health and environmental requirements. It also
indicates the device’s compliance with the legislation of Great
Britain (England, Wales, Scotland) and free movement within the
market of Great Britain.
The design and manufacture of Steeper equipment and
components are subject to a policy of continuous reappraisal.
The company, therefore, reserves the right to introduce changes
and withdraw products without notice. For the most recent issue
of this technical manual, please visit: www.steepergroup.com.
Symbol Definition Source
Indicates the medical device
manufacturer.
ISO 15223- 1:2016
Reference no. 5.1.1.
(ISO 7000-3082)
Indicates the authorized
representative in the European
Community/European Union.
ISO 15223-1:2016
Reference no 5.1.2
Indicates a carrier that contains
Unique Device Identifier
information.
MDR 2017/745
23.2(h)
ISO 15223-1:2016
Indicates the manufacturer’s
batch code so that the batch or
lot can be identified.
ISO 15223- 1:2016
Reference no. 5.1.5.
(ISO 7000-2492)
Indicates the item is a medical
device.
ISO/DIS 15223-
1:2020
Certification mark that indicates
conformity with the applicable
requirements for products sold
within Great Britain (England,
Wales, Scotland).
https://www.gov.uk/
guidance/using-the-
ukca-marking
The requirements for
accreditation and market
surveillance relating to the
marketing of products; Medical
Device Regulations.
765/2008/EC,
768/2008/EC
MDR 2017/745
(Articles 2, 13, 14,
20, 21, 22, 74 and
Annex V)
Single Patient - Multiple use
Symbol
ISO/DIS 15223-
1:2020(E) DRAFT
Reference no. 5.4.12.
(ISO 7000-3706)
Indicates a medical device that
has not been subjected to a
sterilization process.
ISO 15223- 1:2016
Reference no. 5.2.7.
(ISO 7000-2609)
This product contains electrical
and electronic components that
may contain materials which,
if disposed of with general
waste, could be damaging to
the environment. Residents of
the European Union must follow
specific disposal of or recycling
instructions for this product.
Residents outside the European
Union must dispose or recycle this
product in accordance with local
laws or regulations that apply.
IS EN 50419:2006
Reference no. Fig. 1
To indicate that the marked item
or its material is part of a recovery
or recycling process.
ISO 704, ISO/IEC
13251, ISO 10987-1,
ISO 9687 (Reference
no. IS0 7000 -1135)
Packaging is covered by the
Forest Stewardship Council
assurance that it is made with, or
contains, forest-based materials
from FSC certified forests or
reclaimed sources.
FSC Certification
Symbols Used on Product & Packaging

Steeper Group
Unit 3, Stourton Link
Intermezzo Drive
Leeds
LS10 1DF
UK
Tel: + 44 (0) 870 240 4133
Email: customerservices@steepergroup.com
www.steepergroup.com
Steeper USA
8666 Huebner Road
Suite 112
San Antonio
TX 78240
USA
Tel: (+1) 210 481 4126
Email: sales@steeperusa.com
www.steeperusa.com
STPPR042 Issue 11 June 2021
© 2021 Steeper Group. All rights reserved.
EMERGO EUROPE
Prinsessegracht 20, 2514 AP The Hague,
Netherlands
KSA Authorised Representative
AL EWAN MEDICAL COMPANY
Oce 14, 1st Floor, Elite Trading Centre
Building 7934 King Abdul Aziz Road, Al
Rabi, 13315 Riyadh,
Saudi Arabia
Australian Sponsor
ORTHOPAEDIC APPLIANCES PTY LTD
(OAPL), 26-32 Clayton Road, Clayton,
VIC, 3168, Australia.
Other manuals for S-Charge
1
Table of contents
Other Steeper Batteries Charger manuals


