Sema Connect 4 EV Series User manual

Series 4 EV Home Charger
INSTALLATION AND USER GUIDE


1
TABLE OF CONTENTS
1. Safety and Compliance 2
2. Electrical Requirements 3
3. Parts List 4
4. Installation 4
5. Conguration 8
6. Operation 10
7. Troubleshooting and Maintenance 12
WARNINGS
Please read the full document before using this SemaConnect charger. While working
with electrical devices please follow basic electrical safety procedures.
Do not try to install this charger while the breaker is still powered on.
Do not try to install this charger near ammable or explosive materials.
Do not try to operate this charger if there are any signs of physical damage, i.e., cracks,
corrosion, or exposed wiring.
Do not try to modify this charger in any way not listed in this guide.
Do not try to resolve any issues with the charger that have not been outlined in the
troubleshooting section of this guide.
Do not allow an unlicensed individual to wire this charger during the installation process.
Do not insert any nger or any other foreign object into the connector of this charger.
If the user of this device has any medically implanted device, please contact the medical
device manufacturer to discuss how charging may affect the medical device before
attempting to use this charger.
Follow all instructions in this guide during the installation of this device to avoid
any additional complications.

2
1. Safety and Compliance
This document provides instructions to install the SemaConnect charger and should not be used for any other
product. This product must be installed in accordance with the National Electrical Code (NEC), the Canadian
Electrical Code (CEC), or any applicable local code.
Review this manual and consult a licensed contractor and/or electrician before installation to ensure compliance with
local building practices, climate conditions, safety standards, and state and local codes.
There are 2 options for installation:
Option 1: Use the NEMA plug included with the charger
Option 2: Hardwired charger should be installed by a licensed contractor/ electrician and inspected by a qualied
installer prior to initial use. Under no circumstances will compliance with the information in this manual relieve the user
of responsibility to comply with all applicable codes and safety standards.
This document describes the most common installation and mounting methods. Contact SemaConnect where
it is not possible to perform an installation using the procedures provided in this document.
SemaConnect is not responsible for damages that may occur or result from installations that are not described in this
document. Please read and understand instructions before attempting to unpack, install, operate, or maintain this
equipment. Study the charger and its mechanism carefully before attempting to operate it on an energized circuit. All
possible contingencies that may arise during installation, operation, or maintenance, and all details and variations of this
equipment do not purport to be covered by these instructions. If further information is desired by the purchaser regarding
a particular installation, operation, or maintenance of particular equipment, contact SemaConnect.
General
The SemaConnect charger is grounded through a dedicated conductor to the ground connection at the
power distribution panel.
Statements
Reasonable effort has been made to ensure that the specications and other information in this manual are
accurate and complete at the time of publication. However, specications and other information in this manual are
subject to change at any time without prior notice. Use of the SemaConnect charger in a manner not intended or any
modication not approved by the manufacturer will void the limited warranty. Other than the limited warranty,
SemaConnect products are provided “AS IS,” and SemaConnect and its distributors expressly disclaim all implied
warranties, including any warranty of design, merchantability, and tness for a particular purposes and
non-infringement, to the maximum extent permitted by law.
IN NO EVENT SHALL SEMACONNECT, INC. OR ITS AUTHORIZED DISTRIBUTORS BE LIABLE FOR ANY
INDIRECT, INCIDENTAL, SPECIAL, PUNITIVE, OR CONSEQUENTIAL DAMAGES, INCLUDING WITHOUT
LIMITATION, LOST PROFITS, LOST DATA, LOSS OF USE, COST OF COVER, OR LOSS OR DAMAGE TO
THE SEMACONNECT™ CHARGER ARISING OUT OF OR RELATING TO THE USE OR INABILITY TO USE
THIS MANUAL, EVEN IF SEMACONNECT, INC. OR ITS AUTHORIZED DISTRIBUTORS HAVE BEEN ADVISED OF
THE POSSIBILITY OF SUCH DAMAGES.
FCC Statement
This equipment has been tested and found to comply with the limits for a Class B digital device, pursuant to Part 15 of
the FCC rules. These limits are designed to provide reasonable protection against harmful interference when the
equipment is operated in a residential environment. The equipment generates, uses, and can radiate radio
frequency energy and, if not installed and used in accordance with the instruction manual, may cause harmful
interference to radio communications. If this equipment does cause harmful interference to radio or television
reception, which can be determined by turning the equipment off and on, the user is encouraged to try to correct the
interference by one or more of the following measures:
• Reorient or relocate the receiving antenna.
• Increase the separation between the equipment and receiver.
• Connect the equipment to an outlet on a circuit different from that to which the receiver is connected.
• Consult the dealer or an experienced radio/TV technician for help.
For questions, please contact SemaConnect:
Email: [email protected]
Phone: 1-877-794-2214 Ext: 105
Copyright ©2021 SemaConnect, Inc. All rights reserved.

3
2. Electrical Requirements
Wiring Diagram
Connect the charger to a single phase 120/240 volt, bonded neutral power source. All wire must be sized in
accordance with the National Electric Code.
Electric vehicle charging stations must be equipped
with an internal Ground Monitor/Interrupter circuit
(GMI circuit). For the GMI circuit to function, a
reference to ground must be made through a main
bonding jumper or system bonding jumper (located
where the neutral connection is established and
bonded to ground). Without the neutral to ground
connection, GMI protection is not possible, and the
charger will be inoperable.
If you have an electrical system without a neutral you
must upgrade your electrical service from the utility
or provide a separately derived system to effectively
power and protect the electric vehicle charger.
Wiring To System
Current Limit 2-Pole Breaker Size NEMA 14-50 Plug Hardwired
16 AMPS (default setting) 20 AMP YES YES
24 AMPS 30 AMP YES YES
32 AMPS 40 AMP YES YES
40 AMPS 50 AMP YES YES
48 AMPS 60 AMP NO YES
50 AMPS 70 AMP NO YES

4
3. Parts List
Materials Included
• SemaConnect Series 4 EV Home Charger
• Allen wrench
• Mounting hardware
Tools Needed
• Stud nder
• Level
• Marker
• Drill
• Measuring tape
Materials Needed
• 3/4“ Liquid Tight Flexible Metal Conduit - Hardwired Version Only
• 3/4“ Liquid Tight Flexible Metal Conduit Connector - Hardwired Version Only
4. Installation
Site Selection
The charger should be installed in a location suitable for the 25-foot output cable to extend to the electric vehicle’s
charging port and which allows sufcient space for output cable storage in the cable hanger. The top of the wall
mount bracket is recommended to be installed at a height of 50 inches above the nished oor (check local codes).
If installing the NEMA 14-50 plug version, ensure the charger location can accommodate a NEMA 14-50 receptacle.
The NEMA 14-50 receptacle should be located no less than 24-26 inches from the ground. Consideration should be
made to the NEMA 14-50 receptacle orientation (ground terminal in the upward ‘12 o’clock position’ or downward
‘6 o’clock position’). The NEMA 14-50 receptacle orientation will determine the NEMA 14-50 input cord’s installation
aesthetics.
Ensure the height of the wall mount bracket and the NEMA 14-50 receptacle are coordinated so the NEMA 14-
50 plug seats into the NEMA 14-50 receptacle without cable tension or stress. If installing the hardwired version,
ensure that the selected charger location is within reach of the site rated junction box using the supplied 3 feet of
manufactured cable.

5
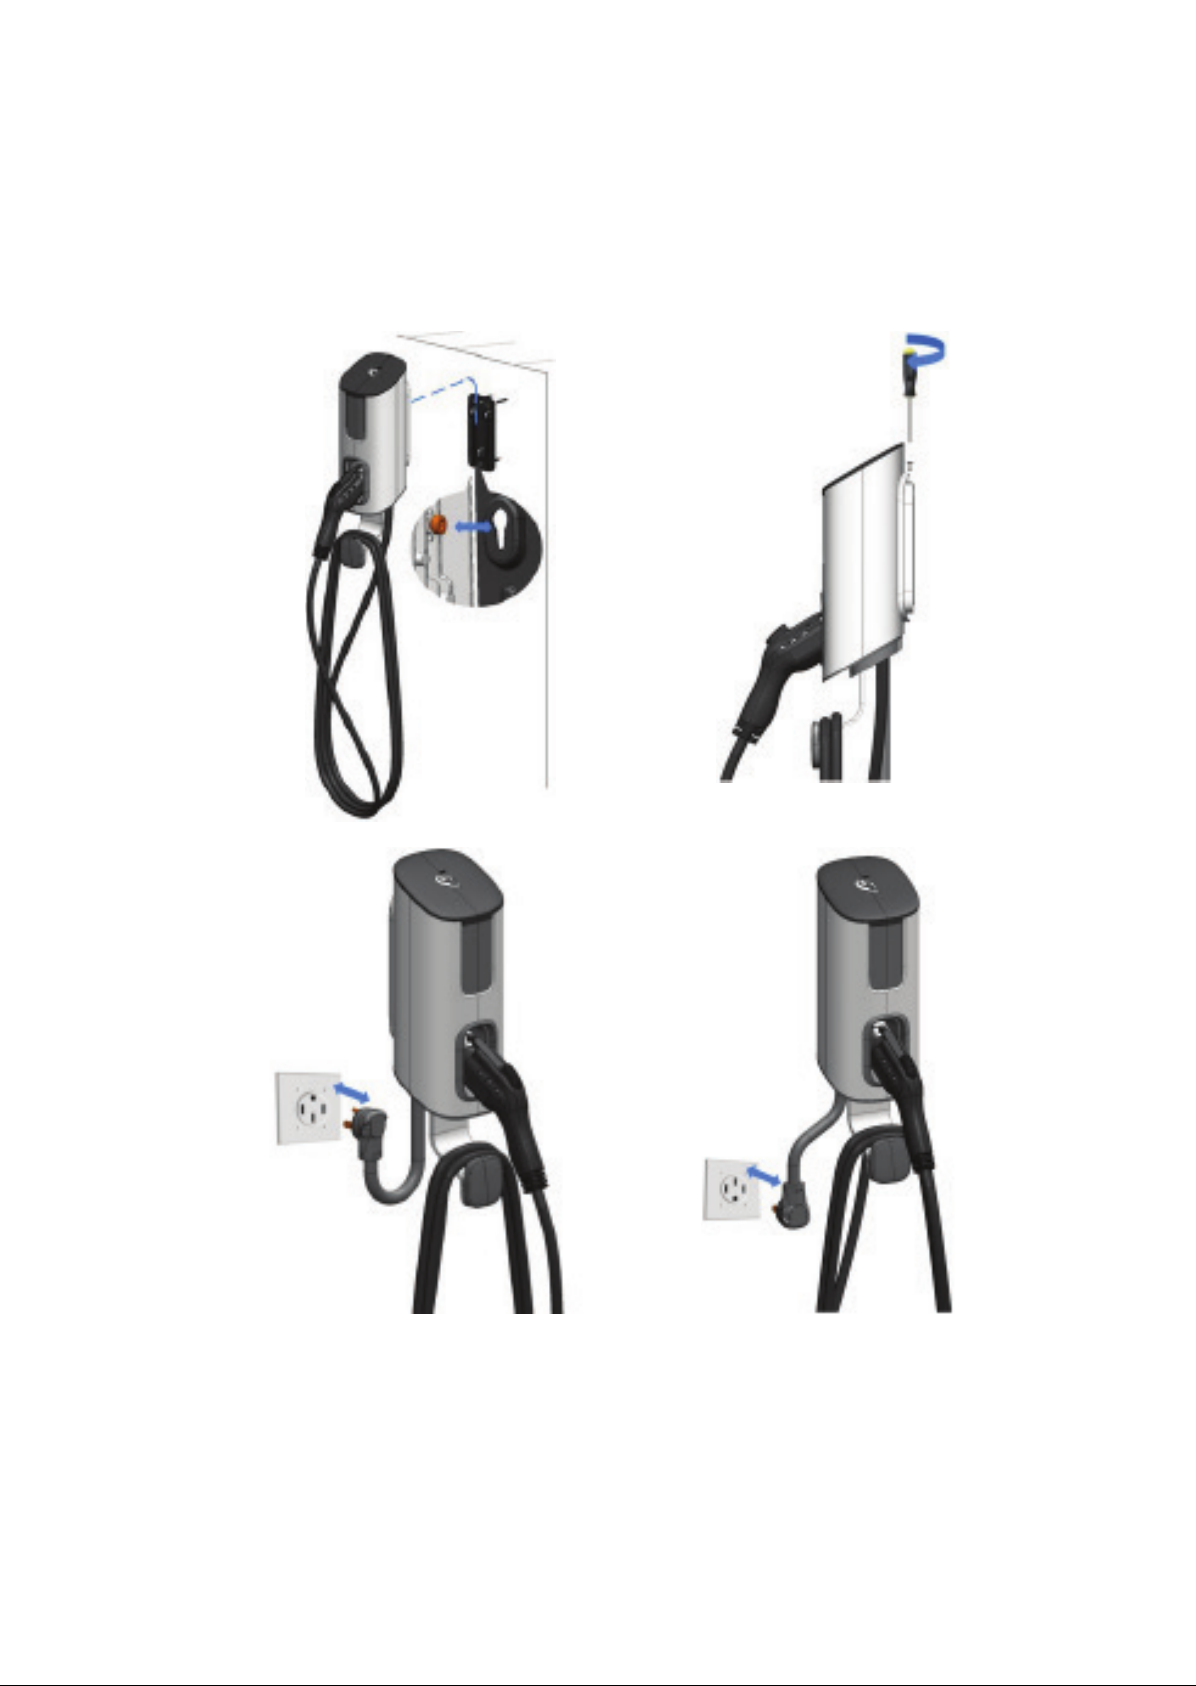
Wall Preparation
1. Locate and remove the top mounting screw from the charger using the supplied Allen wrench.
2. Remove the wall mount bracket from the charger by applying downward pressure on the wall mount
bracket until the charger mounting screws unseat from the wall mount bracket keyhole slots.
3. Store the charger and mounting screw in a safe place to avoid damage or loss.
4. At the selected location, mark the center of the stud and place the wall-mount bracket on the wall.
5. Using a level, ensure the wall-mount bracket is in an upright level position. Align center mounting holes with
the center of the stud and mark the wall-mounting screws holes.
6. Use mounting holes to secure the bracket to the wall using appropriate site-specic fasteners.
6
Wall Mounting (NEMA 14-50 Version)
1. Locate the 3 mounting screws on the rear of the charger. Position them into the corresponding keyhole slots on
the wall mount bracket. Slide downward until fully seated.
2. Reinstall the top mounting screw using the supplied Allen wrench to secure the charger. The charger should
feel secure after it is fully seated. If the charger can be easily moved then remove the charger, slightly tighten
the three mounting screws on the rear of the charger and replace the charger on the bracket.
3. Insert the NEMA 14-50 plug into the NEMA 14-50 receptacle. Ensure that the plug is fully seated into
the receptacle.

7
Wall Mounting (Hardwired Version)
The hardwired version of the SemaConnect Series 4 EV Home Charger is manufactured with 3 feet of cable that
has been listed by a Nationally Recognized Testing Laboratory (NRTL) to the appropriate UL standards for the
specied ampere ratings.
Ensure that the selected charger location is within reach of the site rated junction box using the supplied 3 feet of
manufactured cable.
1. To sufciently attach and tighten the 3/4” Liquid Tight Flexible Metal Conduit (LFMC) to the charger, the
bottom plate must be removed. Place the charger face down on a safe surface to avoid damage. Grasp the
outside of the charger with both hands, position thumbs on the inner edge of the protective lower cover and
apply downward pressure on the cover to unseat it from the charging station. Store protective cover in a safe
place to avoid damage or loss.
2. Measure and cut 3/4” LFMC to sufcient length between the charger and site rated junction box. Attach and
tighten the 3/4“ LFMC to the charger using the manufacturer-supplied 3/4“ LFMC connector. Re-install the
protective cover.
3. Locate the 3 mounting screws on the rear of the charger. Position them into the corresponding keyhole slots
on the wall mount bracket. Slide downward until fully seated.
4. Reinstall the top mounting screw using the supplied Allen wrench to secure the charger. The charger should
feel secure after it is fully seated. If the charger can be easily moved then remove the charger, slightly
tighten the 3 mounting screws on the rear of the charger and replace the charger on the bracket.
5. Attach and tighten the 3/4“ LFMC to the site rated junction box. Connect the supplied black and red
conductors to the 240-volt supply (ungrounded) conductors, and the supplied green conductor to the
grounding conductor.
Install SemaConnect Series 4 EV Home Charger in accordance with all State, Local, and National Electric Codes.
8
5. Conguration
Powering Up the Charger
After you have installed the SemaConnect Series 4 EV Home Charger, turn on the power at the breaker.
Allow up to 3 minutes for the charger to fully power on. The charger is ready to use when the LED is a steady blue
color and icons are visible on the screen. If the charger does not power on, contact your electrician to ensure
correct electrical installation.
The charger may now be connected to a vehicle to start charging. Please note the following default settings, which
may be changed by conguring the charger.
• Power level is set to 16 amps
• Unlocked
• No schedule
Appropriate Amperage Setting
The charger may be congured to charge a range of amperage levels. It is essential not to select a level that is
greater than your circuit breaker is rated for. Other factors, such as the electrical capacity of your panel and wiring
size, may need to be considered. Please consult with a qualied electrician if in doubt.
The tables below provide guidance on the amperage level to congure on the charger based on the circuit rating.
CIRCUIT RATING NEMA INSTALLATION HARDWIRED INSTALLATION
70 A N/A 50 A
60 A N/A 48 A
50 A 40 A 40 A
40 A 32 A 32 A
30 A 24 A 24 A
20 A 16 A 16 A
Conguring the Charger
The charger may be congured to provide the optimal power level and, optionally, connect the charger to your
home WiFi network. Connecting the charger to WiFi will enable additional features and is recommended if WiFi
is available at the installed location.
Connecting to the SemaConnect Mobile App
• Download the SemaConnect mobile application to your smartphone.
• Open the app, click on My Account, and log in (create an account if you do not have one).
Note: The SemaConnect mobile app provides access to all public SemaConnect charging stations in
addition to the Series 4 EV Home Charger.
Apple App Store Google Play Store

9
Basic Conguration
To congure the charger, perform the following steps in the SemaConnect mobile app:
1. Access the Home Charger menu and follow the instructions to add a charger.
• Initiate the pairing process on the charger by inserting the supplied Allen wrench into the small opening
where the vehicle connector attaches to the charger and briey pressing the recessed button for less
than 2 seconds. See diagram below.
• If connecting to an available WiFi network, select the network and provide the password.
2. The charger will now be listed in the Home Charger section of the mobile application.
Advanced Conguration
Advanced features may be congured if the charger is connected to WiFi.
To perform this conguration, click on the settings icon for your charger in the Home Charger section of
the mobile application.
Select one of the following modes:
• Unlocked (default): The charger will start charging immediately after an electric vehicle is connected.
• Locked: The charger requires authorization (using the mobile app) to begin charging once an electric
vehicle is connected.
• Scheduled: The charger will only charge the connected electric vehicle during the specied schedule.

10
6. Operation
Charging Your Vehicle
To start a charging session, connect the vehicle to the charger.
• Unlocked mode - charging will begin immediately.
• Locked mode - charging will begin once authorization is provided using the mobile app. Press the Start
Charging button in the Home Charger section.
• Scheduled mode - charging will begin automatically during the specied schedule.
Stopping a Charge
To stop a charging session, disconnect the vehicle from the charger.
LED Lights
The LED light on the station may display the following colors:
COLOR MEANING
Steady Blue No vehicle is connected. Plug in to start a charge.
Flashing cyan Vehicle connected but not charging. The charger is
waiting for authorization (from the mobile app) or the
schedule.
Flashing green Vehicle connected and charging in progress.
Steady green Vehicle connected and charging is complete.
Steady red Charger error. Please refer to the troubleshooting guide.
11
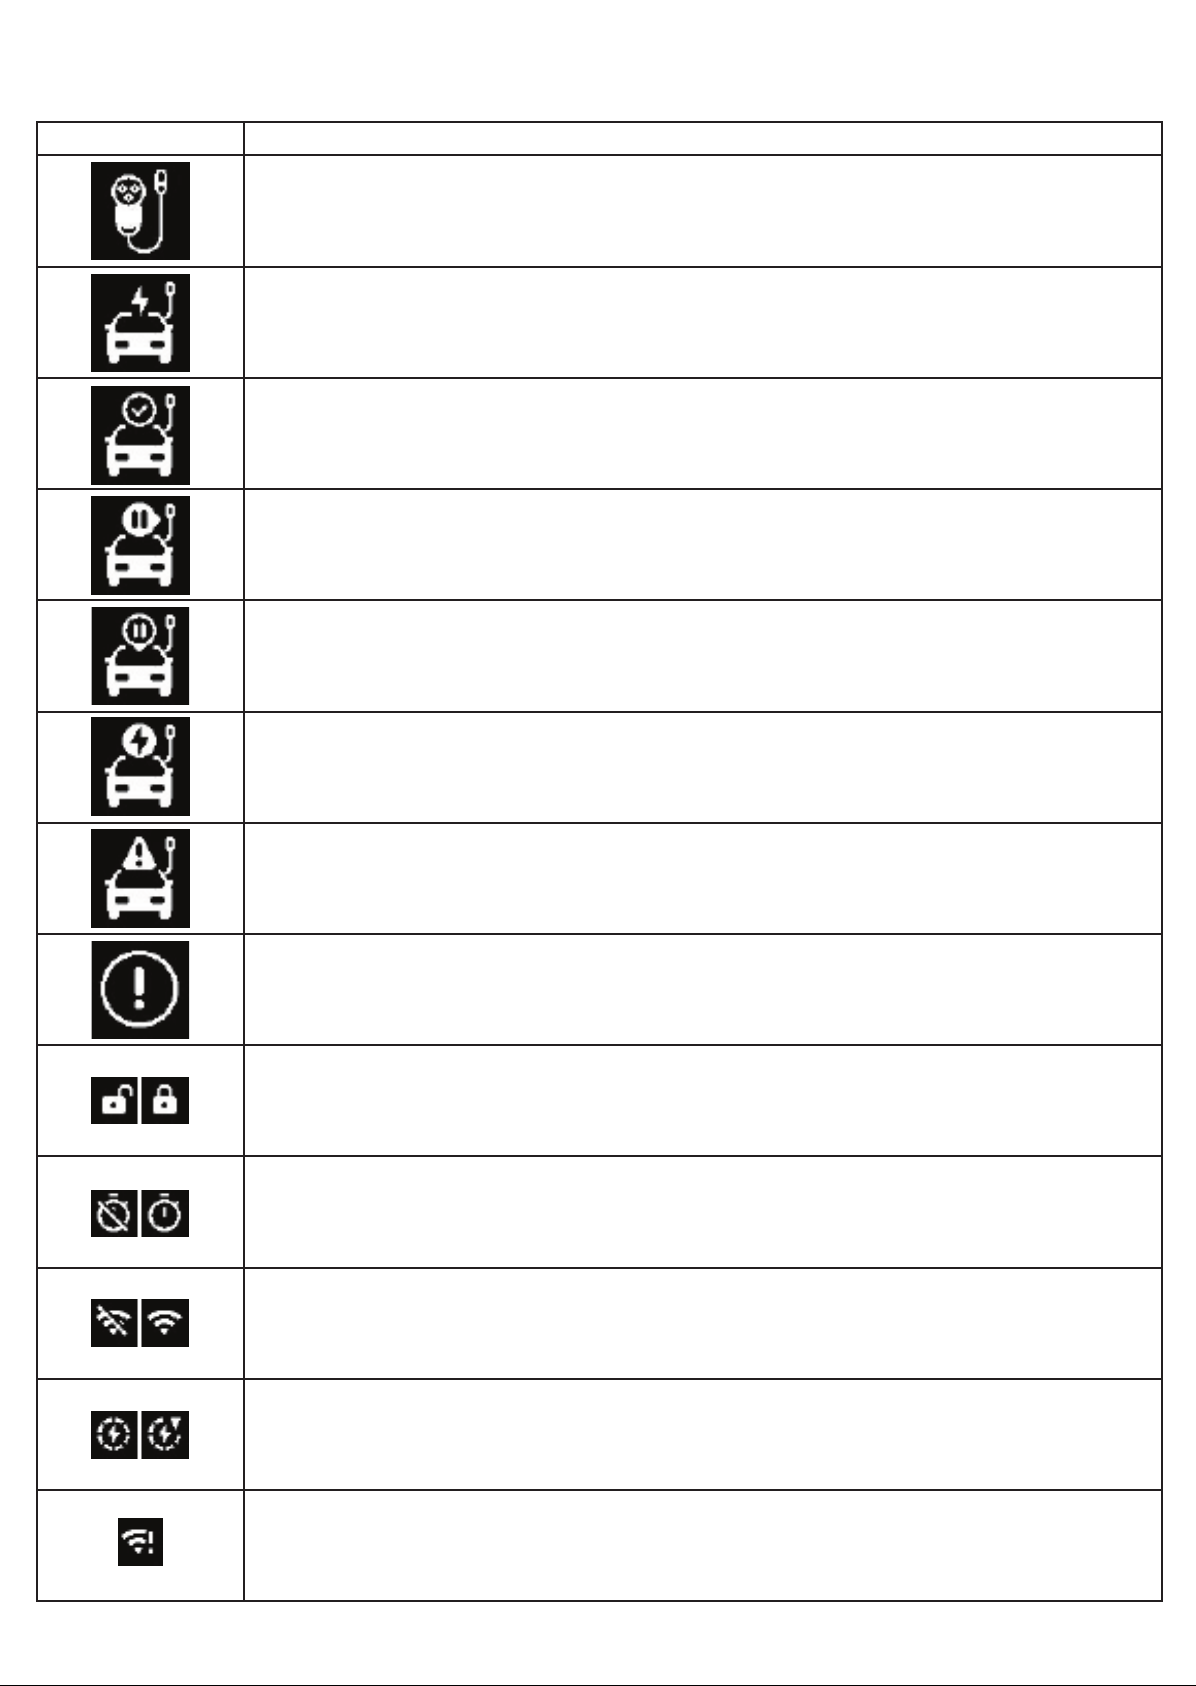
On-screen Icons
The charger may show the following icons on the screen:
ICON MEANING
No vehicle is connected. Plug in to start a charge.
The vehicle is charging.
A vehicle has been plugged-in to the charger.
The charger has paused the charging session. This could indicate the charger is waiting for
a schedule to begin or the session has been stopped by the mobile application.
The vehicle has paused the charging session. This could indicate that a schedule has been
congured in the vehicle.
The vehicle battery is full.
There is a charging error reported by the vehicle.
There is an error reported by the station.
Access mode: Unlocked and Locked.
Schedule mode: Schedule is off or on.
Connected mode: Station is disconnected or connected to WiFi.
Reserved for future use.
There is an error connecting to WiFi.

12
7. Troubleshooting and Maintenance
Troubleshooting
ISSUE POSSIBLE CAUSE RESOLUTION
No light or screen icons are
displayed.
The charger has no power. Ensure the breaker is powered on.
Ensure the charger is plugged-in or
correctly hardwired.
The charger is powered-on but the
connected vehicle is not charging.
The vehicle battery is already full. Reconnect the vehicle when the
battery requires charging.
A schedule is congured on the
vehicle.
Wait for the scheduled start time. To
start charging immediately, clear the
schedule from the vehicle.
A schedule is congured on the
charger.
Wait for the scheduled start time. To
start charging immediately, switch
the mode to Locked or Unlocked
using the mobile app.
Locked mode is enabled. Use the mobile app to start
charging.
The charger is locked and starting
the charging session using the
mobile app is not working
OR
Changes made in the mobile
application are not reected in
the charger.
The charger has lost connection to
home WiFi.
The home WiFi network name or
password has changed.
Check that your home WiFi is
enabled and has sufcient signal
strength to maintain a good
connection with the charger.
Use the mobile app to repeat the
conguration process using the new
WiFi network and password.
Other Troubleshooting Steps
If the above table does not resolve the issue, it is possible that the following steps may be attempted:
• Power cycle: Turn power off at the breaker, wait 20 seconds, and then restore power. Allow up to 3 minutes for
the charger to complete the power-on process.
• Reconnect the charger to your account: Delete the charger from your mobile application in the settings section
of the charger. Then repeat the conguration process described above.
• Factory reset: Delete the charger from your mobile application in the settings section of the charger. Perform
a factory reset by using the supplied Allen wrench to press the recessed button and hold it down for 15
seconds before releasing. Allow 3 minutes for the process to complete. Then repeat the conguration
process described above.

13
Maintenance
• Clean the charger by wiping it with a dry or slightly damp cloth.
• Do not exert too much pressure on the charger during cleaning.
• Do not open the device to clean it.
• Do not use a vacuum cleaner.
Updating Charger Firmware
Updated rmware may be made available to add additional features or correct reported issues. The mobile app
can be used to check for new rmware and apply it to the charger.
Removing the Charger from your Account
If you no longer wish to access the charger from the mobile application, it can be deleted in the settings
section of the mobile application.
Factory Reset
To remove your account information from the charger, perform a factory reset:
• Delete the charger from your mobile application in the settings section of the charger.
• Use the supplied Allen wrench to press the recessed button in the small opening where the vehicle connector
attaches to the charger and hold it down for 15 seconds before releasing. Allow 3 minutes for the process
to complete.

Table of contents
Other Sema Connect Batteries Charger manuals


Popular Batteries Charger manuals by other brands


JMP
JMP Skan 60.0 manual

Motorola
Motorola IMPRES Smart Energy System installation manual

Schumacher Electric
Schumacher Electric CBC 7700 instruction manual

Morningstar
Morningstar TriStar MPPT 600V Installation and operation manual

DieHard
DieHard Portable Power 1150 Operator's manual

Sistech
Sistech SWISSSOLARCARD operating instructions