STEGBAR Galleria BIR06 Instruction sheet
SAFETY INFORMATION
• Always wear appropriate safety equipment.
• This product requires two people for installation.
• If this product falls down, serious or fatal crushing injuries can
occur. This product should be permanently xed to the wall –
contact your local fastening device retailer for advice on what
fastening devices are suitable for your walls.
• Assembly should be carried out by an appropriately skilled person,
due to the risk of wrongful assembly leading to injury or damage.
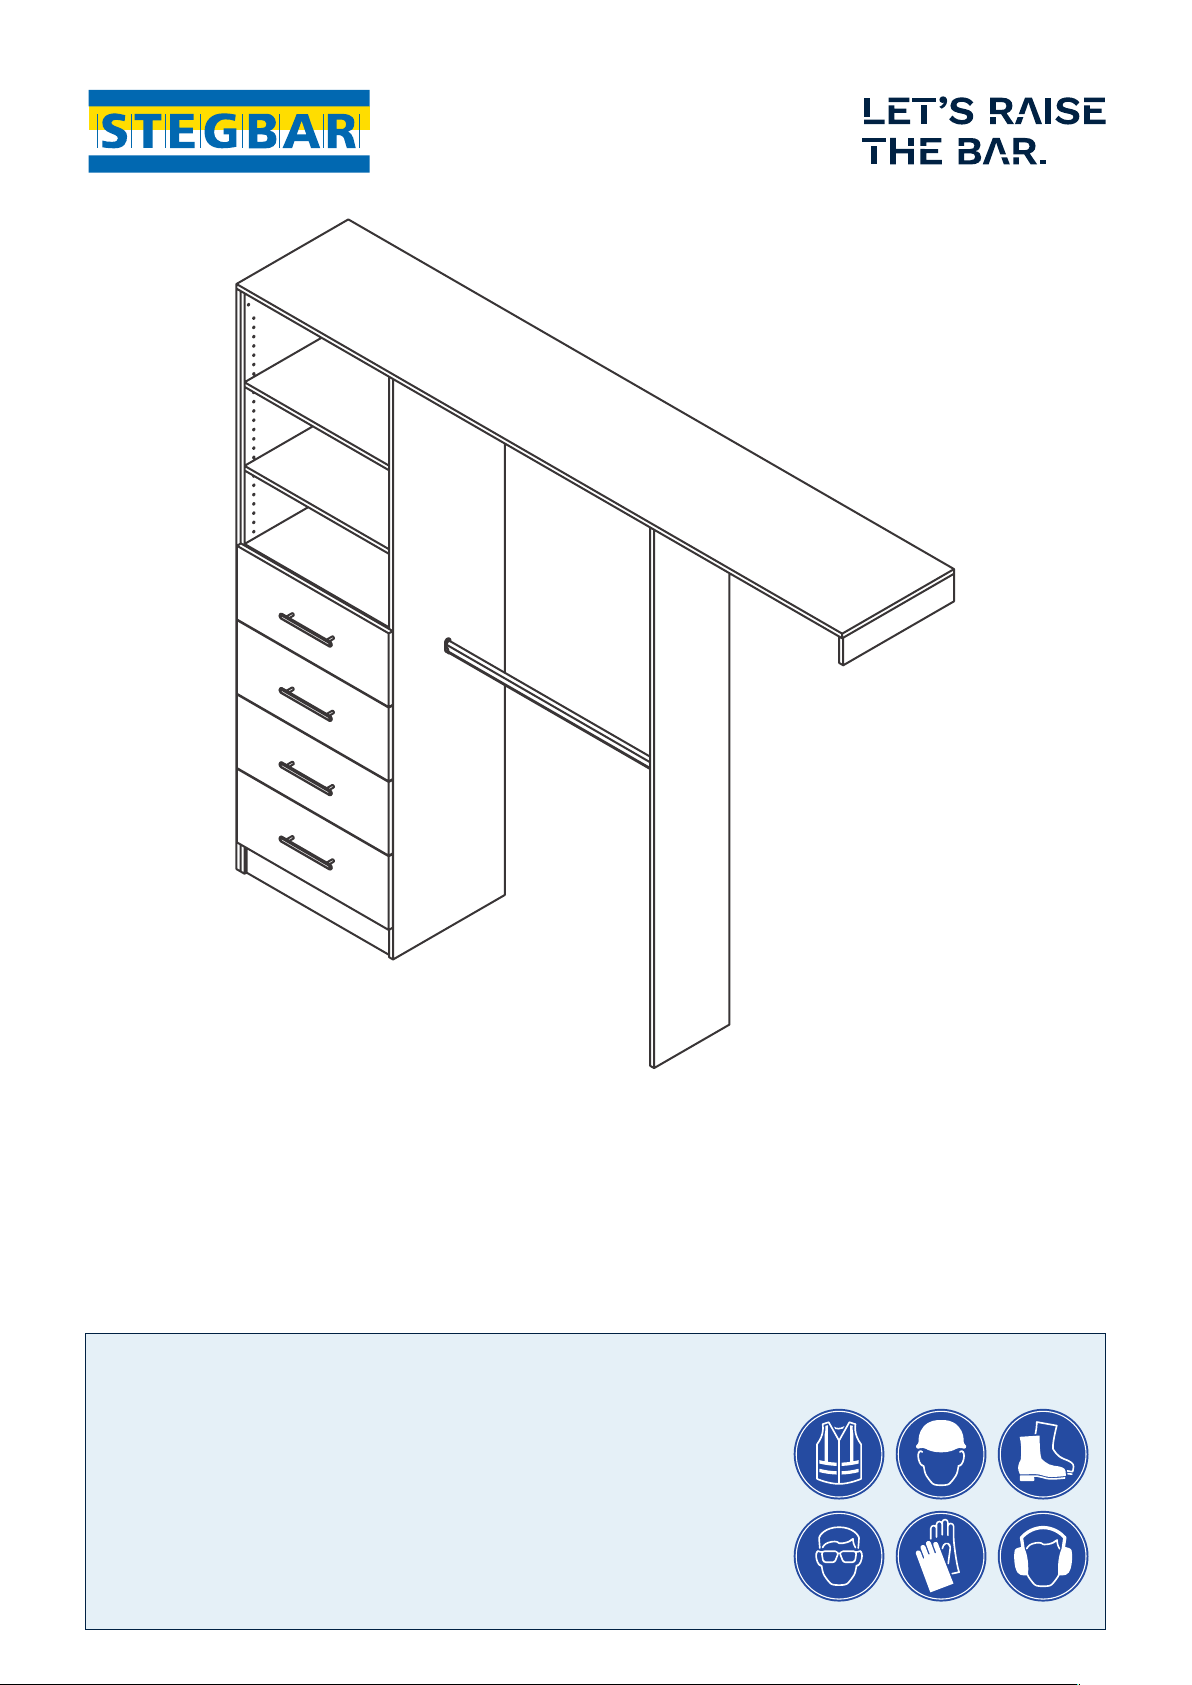
Assembly & Installation Guidelines
Built-in Wardrobe — Galleria BIR06
Please read these guidelines carefully before installing and using the product.
2 3www.stegbar.com.au/support
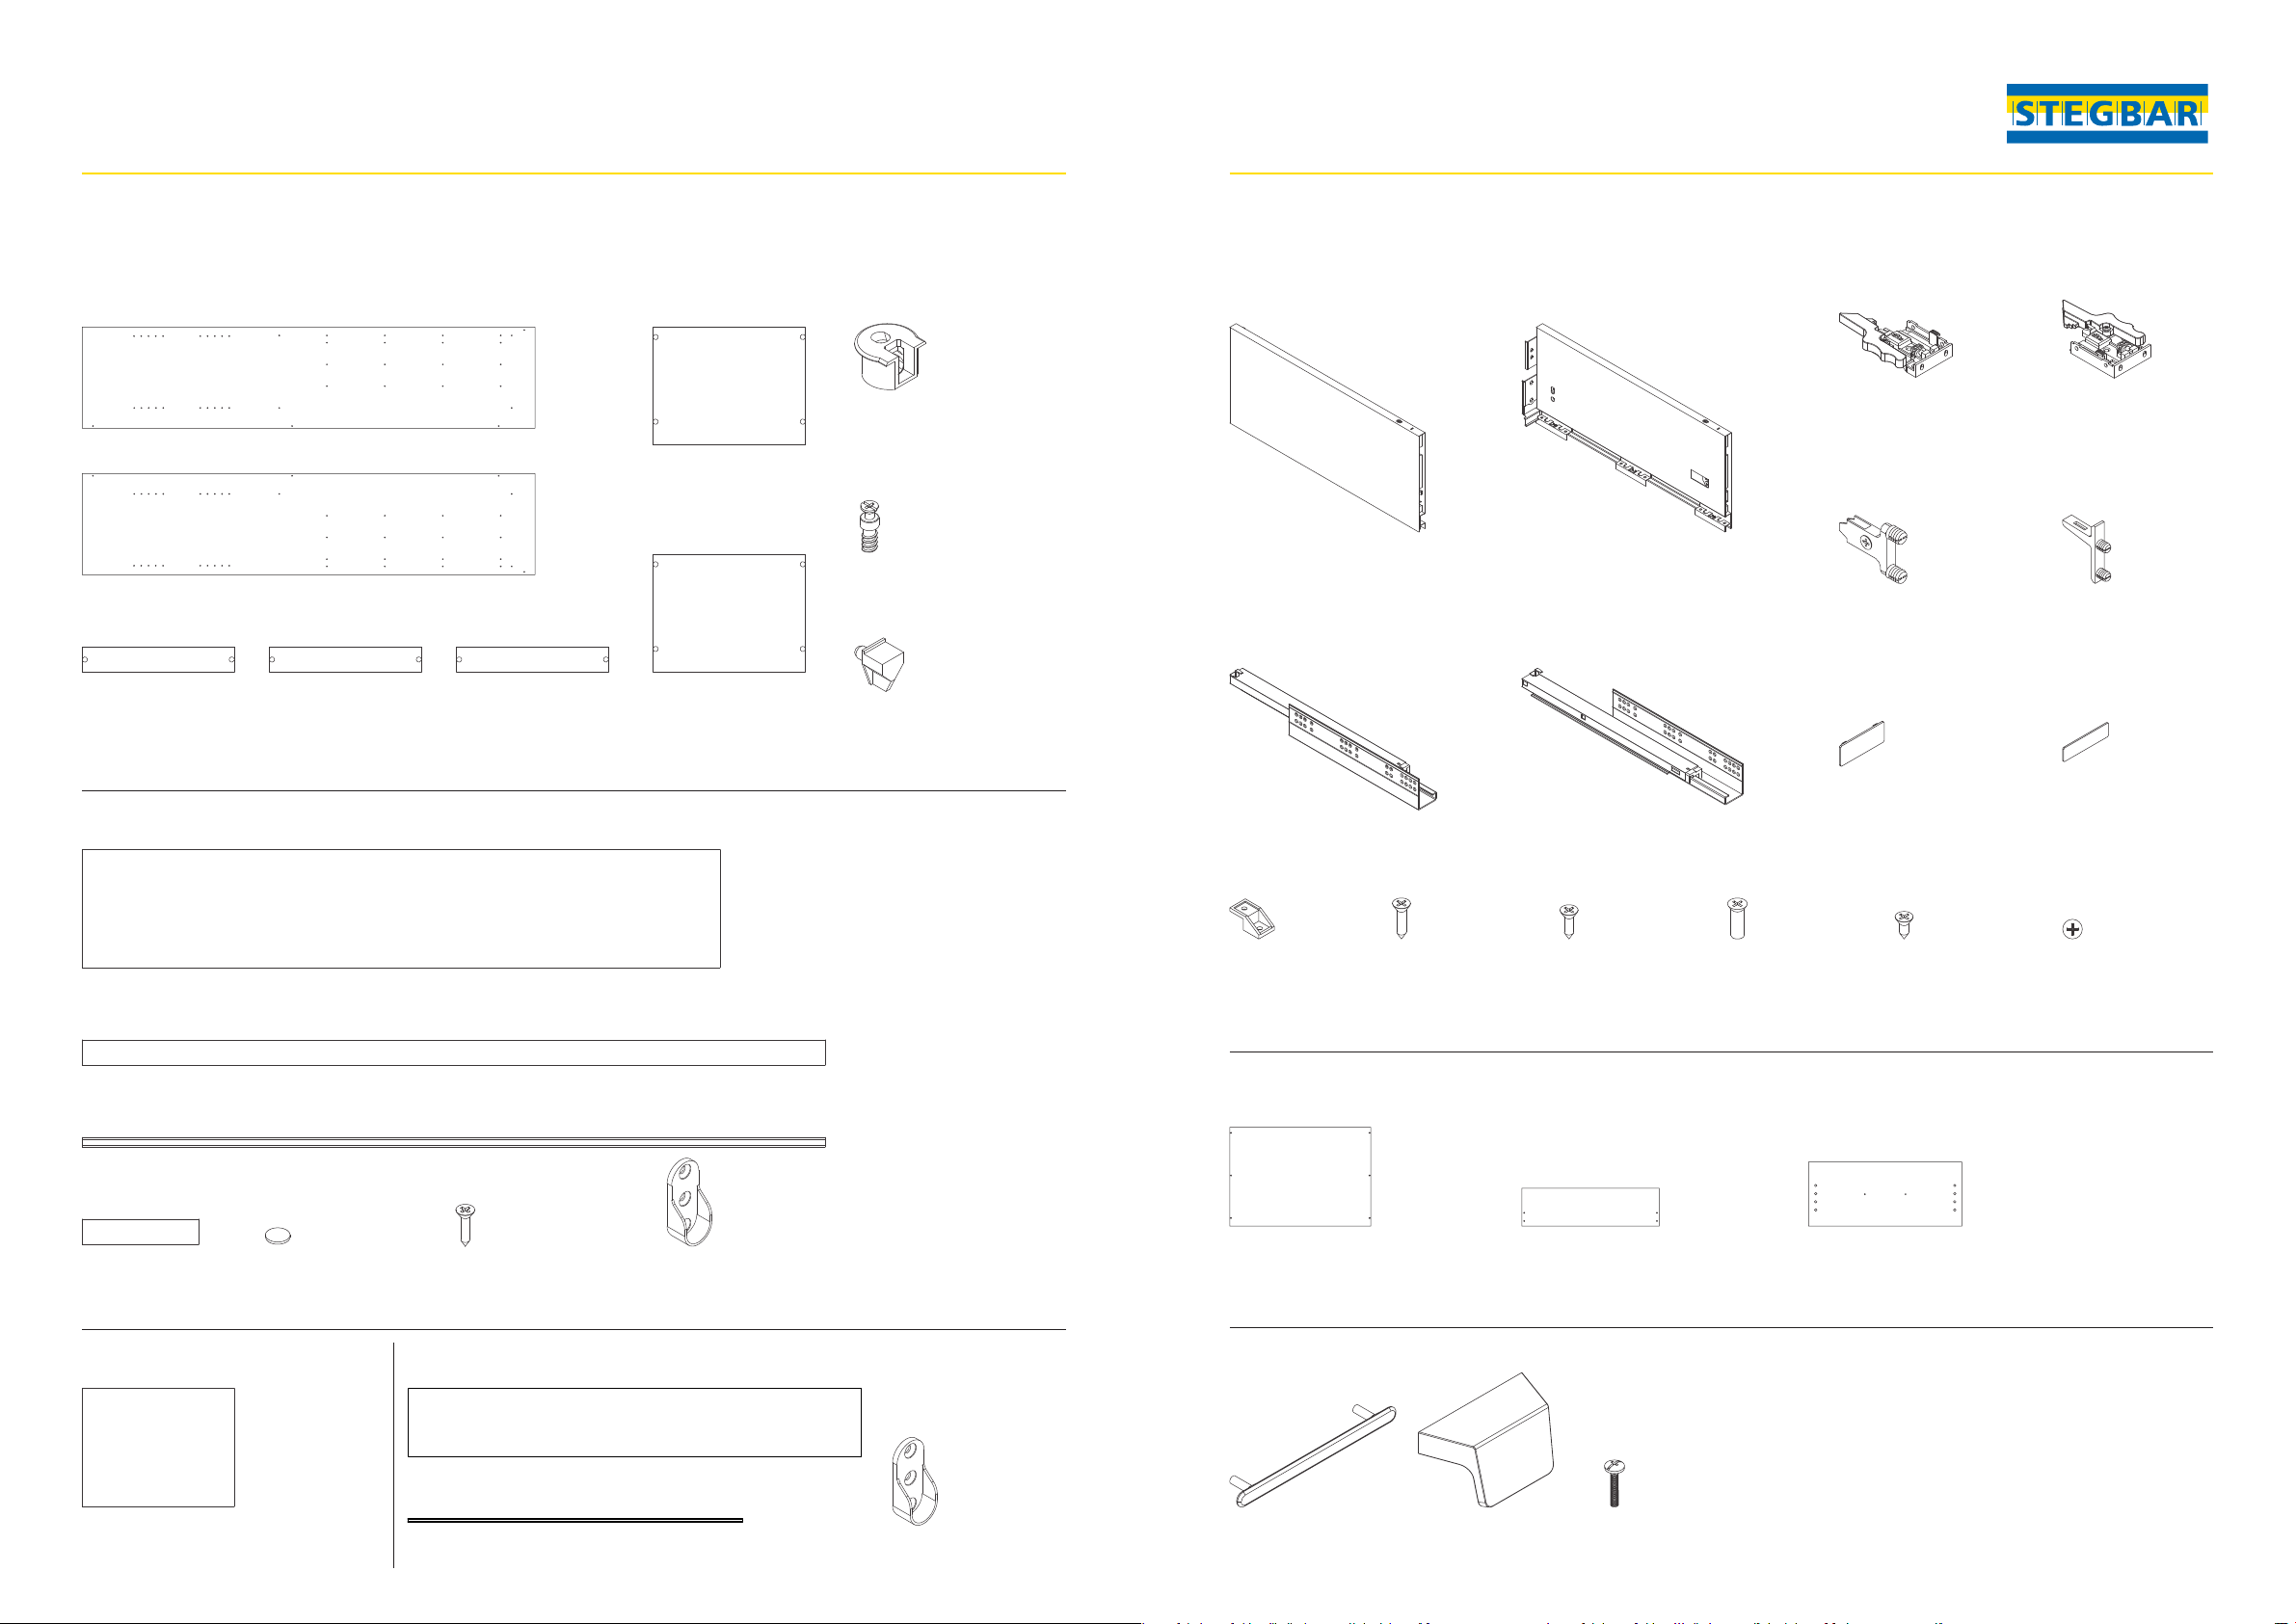
ITEMS INCLUDED IN THE BOX
2 x drawer tower sides
2000 mm W x 447 mm H x 16 mm D
1 x top shelf
Up to 3000 mm W x 447 mm H x 16 mm D
1 x back cleat
Up to 3000 mm W x 95 mm H x 16 mm D
1 x hanging rail
3000 mm W x 35 mm diameter
1 x deck
575 mm W x 447 mm H
x 16 mm D
1 x shelf nailer
575 mm W x 95 mm H
x 16 mm D
1 x front toe
575 mm W x 95 mm H
x 16mm D
2 x nailers
575 mm W x 95 mm H
x 16 mm D
16 x cams
20 mm diameter
16 x cam bolts
16 mm H x 6 mm diameter
16 x adjustable shelf pins
10 mm W x 14 mm H x 13 mm D
1 x xed shelf
575 mm W x 447 mm H
x 16 mm D
TOWER SHELL BOX
TOP SHELF BOX
Assembly & Installation Guidelines
Built-in Wardrobe — Galleria BIR06
4 x hanging rail brackets
45 mm H
4 x hanging rail brackets
45 mm H
Fast caps (white dots)
14 mm diameter
8 x hanging rail screws
16 mm H x 6 mm diameter
2 x adjustable shelves
575 mm W x 447 mm H x 16 mm D
1 x divider
2000 mm W x 300 mm H x 16 mm D
1 x hanging rail
1200 mm W x 35 mm diameter
ADJUSTABLE SHELVES BOX DIVIDER BOX
4 x drawer side (left)
400 mm W x 175 mm H x 14 mm D
4 x drawer runner (left)
400 mm W x 47 mm H x 47 mm D
4 x drawer
rear bracket
30 mm W x 11 mm H
x 15 mm D
4 x drawer bases
556 mm W x 390 mm H x 16 mm D
4 x drawer backs
535 mm W x 148 mm H x 16 mm D
4 x drawer fronts
602 mm W x 253 mm H x 16 mm D
4 x drawer side (right)
400 mm W x 175 mm H x 14 mm D
4 x drawer
runner clip (left)
103 mm W x 53 mm H
x 17 mm D
4 x drawer
front clip (lower)
54 mm W x 40 mm H
x 7 mm D
4 x drawer side
cover cap (bottom)
44 mm W x 17 mm H
x 1 mm D
4 x drawer side
cover cap (top)
44 mm W x 12 mm H
x 1 mm D
4 x drawer
front clip (upper)
52 mm W x 62 mm H
x 11 mm D
4 x drawer
runner clip (right)
103 mm W x 53 mm H
x 17 mm D
4 x drawer runner (right)
400 mm W x 47 mm H x 47 mm D
BACK, BASES AND FRONT BOX
HANDLES BOX
DRAWER RUNNERS BOX
2 x side cleats
425 mm W x 95 mm H
x 16 mm D
drawer screw #1
6G x 16 mm CSK
drawer screw #2
6G x 13 mm CSK
drawer screw #3
6G x 14 mm CSK
drawer screw #4
6G x 10 mm CSK
34 x Euro screw
4 x drawer handles 4 x drawer handle bolts
47 mm H x 5 mm diameter

4 5www.stegbar.com.au/support
Drill and No.2 Phillips head driver
Multi tool
Stepladder
Phillips head screwdriver
Spirit level
Measuring tape and pencil
Circular saw
Silicone/caulking gun
Stud nder
3 mm drill bits
IMPORTANT INFORMATION
• Pre-drill board and countersink before xing to walls.
• Read guidelines carefully before commencing.
IMPORTANT BUILDING TERMINOLOGY
In construction, tradespeople use terms like ‘square’, ‘level’ and ‘plumb’ to be sure that their
measurements are accurate, and the nished project is successful. Here are some denitions
of common building terminologies.
Square: when corners are 90 degrees.
Level: straight from side to side, like a shelf that’s been properly installed.
Plumb: straight up and down, like the walls of a building.
Flush: when two adjoining surfaces are perfectly at next to each other.
Skirting: a board that runs along the border between the interior wall and the oor.
Architrave: is used to frame windows and openings to conceal any shrinkage or movement
that may occur between the wall and the casing within the door surround.
Jamb: is a at surface that runs vertically on each side of the door frame.
Scribe: cutting away the waste material that is preventing two materials from meeting
together perfectly.
EXTRA ITEMS AND TOOLS REQUIRED CHECKLIST
These items are readily available from all major hardware stores.
Builder’s square
Countersink drill bit
Hammer
Liquid Nails
Gapping
Packers
6-gauge 40 mm screws
6-gauge 13 mm screws
6-gauge 28 mm screws
Wallmates
Open tower shell box.
Screw in cam bolts into drawer tower sides
(both sides).
Hammer cams into nailers, toe, deck
and xed shelf.
Step 1
Step 2
Front
Back
Assembly & Installation Guidelines
Built-in Wardrobe — Galleria BIR06

6 7www.stegbar.com.au/support
Open drawer, runners box and backs bases
and fronts box.
Layout all parts to assemble drawers.
Step 5
H
K
E
D
M
C
B
L
A
E
F
L
G
Place nailers over cam bolts and tighten.
Place deck over cam bolts and tighten.
Place xed shelf over cam bolts and tighten.
Place side on top over cam bolts
and tighten cams.
Step 3
Step 4
Front
Back
Front
Back
Front
Back
Front
Back
Assembly & Installation Guidelines
Built-in Wardrobe — Galleria BIR06

89www.stegbar.com.au/support
Fix runners L (B) and R (H) to tower sides,
screwing euro screw into third hole in
top row (Exploded image).
Secure drawer back to bracket using screw.
Drawer screw – 6Gx13 mm CSK (10)
Fix bracket M and D to drawer fronts.
Drawer screw – 6Gx16 mm CSK (8)
Open handles box.
Fit handle to the drawer front.
Step 6 Step 8
Step 9
F
D
M
Slide drawer sides A and G into drawer base.
Slide drawer back to the inside of the
brackets.
Step 7
A
G
Assembly & Installation Guidelines
Built-in Wardrobe — Galleria BIR06

10 11www.stegbar.com.au/support
Engage drawer front to drawer sides.
(click sound include)
Fit cover plates L and E.
Screw adjustment brackets C and K
to drawer base.
Drawer screw – 6Gx16 mm CSK (6)
Fully extend runner. Place drawer on runner
and push drawer all the way in until you hear
a click.
Drawer is now engaged to runner.
Step 10 Step 12
Step 13
L
E
K
C
B
B
C
H
Screw drawer sides to drawer base.
Step 11
Assembly & Installation Guidelines
Built-in Wardrobe — Galleria BIR06

12 13www.stegbar.com.au/support
Drawer adjustment:
Align drawers using the up down to the side
adjustment.
1a tilt drawer up and down at back.
1b and 1c moves laterally.
1d moves drawer up or down.
If required, to remove the drawer, extend
the drawer, place hands under drawer,
locating the brackets on each side and push
levers in on drawer. This will release, lifting
drawer o runner.
Check wall for plumb, place level on wall.
If wall greater than 3 mm out of plumb,
scribe inll.
If required, using the 6 x 28 6-gauge screws,
screw 16 mm inll to wall side of shelf unit
ush with the front.
Screw inll to side of tower if required from
front or back.
Step 14 Step 15
Step 16
1C
1D
1B
1C 1B 1D
1A
TIP: Refer to our guide – How to scribe inll.
All our guides are located at:
stegbar.com.au/support
Assembly & Installation Guidelines
Built-in Wardrobe — Galleria BIR06

14 15www.stegbar.com.au/support
Step 19
Step 18
Step 20
Step 21
Pre-drill 2 x 3 mm holes into tower nailer.
Place tower in position. Place level on tower
to ensure level and plumb.
Mark wall with pencil.
Fix 40 mm screw into stud – if stud is
not present, then x with screw and plug
(wallmate).
Use multi tool to cut and remove skirting
where tower to be installed.
Use spirit level to mark horizontal line from
top of shelf unit across full width of rear wall
for back cleat and side cleat positioning.
Locate wall studs with stud nder and mark
wall above pencil line (no greater than 16 mm).
Open top shelf box.
Apply liquid nails to back of side cleat in
radio wave pattern and screw cleat to wall
into stud.
If stud is not present, then x with screw
and plug (wallmate).
TIP: Use packers to level tower.
TIP: Pre-drill board and countersink.
Measure the width and depth of tower
and mark skirting with pencil
(be sure to include the inll if inll required).
Step 17
Y
X
Y
X
Assembly & Installation Guidelines
Built-in Wardrobe — Galleria BIR06

16 17www.stegbar.com.au/support
Step 24
Step 25
Step 26
Use a multi tool to cut and remove skirt.
Open divider box.
Place divider in position.
If divider has a gap against wall greater than
3 mm, scribe divider into wall.
Fix divider to back cleat with a minimum
of 2 x 40 mm screws.
TIP: Pre-drill board and countersink.
TIP: Check height of divider and cut to size
if required.
TIP: Pre-drill board and countersink.
Measure from tower to where the divider is to
be located. (max divider span 1200 mm).
Cut back wall cleat to size.
Apply liquid nails to back of cleat in radio wave
pattern and screw cleat to wall into stud.
Measure same distance from tower on skirting
mark with pencil (use square). This should line
up with end of wall cleat (check with spirit
level). Make another line 18 mm.
Step 22
Step 23
X X16 mm
X18 mm
Assembly & Installation Guidelines
Built-in Wardrobe — Galleria BIR06

18 19www.stegbar.com.au/support
Step 28
Measure top shelf width ensuring you check
the walls are square using a square edge.
Cut top shelf to correct size allowing for wall
run outs.
Place top shelf into position.
Screw top shelf down into wall cleats
and divider using 40 mm screws.
Measure from divider to side cleat.
Cut back cleat to size.
Apply liquid nails to back of cleat in radio
wave pattern and screw cleat to wall
into stud.
Step 27
Assembly & Installation Guidelines
Built-in Wardrobe — Galleria BIR06
TIP: Pre-drill board and countersink.
TIP: Pre-drill board and countersink.

20 21www.stegbar.com.au/support
Step 31
Using caulking, gap all connections between
board and wall or board and board.
Measure 214 mm o cleat on back wall and
80 mm down from side cleat.
This measurement is to the bottom hole of
hanging rod end.
Fix hang rail ends using 16 mm screws.
Double hang rail - measure 230 mm o back
wall and 1040 mm down from top shelf.
Step 29
80 mm
214 mm
230 mm
1040 mm
Assembly & Installation Guidelines
Built-in Wardrobe — Galleria BIR06
Step 30
Measure distance between board (tower to
divider and (divider to side cleat) and deduct
6 mm o overall width.
Cut hang rail to size and insert into hanging
rail end ends.
Tower to Divider
- 6 mm
Tower to Divider
- 6 mm
Divider to Cleat
- 6 mm
TIP: Face top hang rail with groove up –
if double hang face down.
Step 32
Open adjustable shelves box.
Fit shelf brackets in and place shelves
at desired height after tower has been
positioned and xed to the wall.
TIP: Only gap top shelf if under 1800 mm high.
22 23www.stegbar.com.au/support
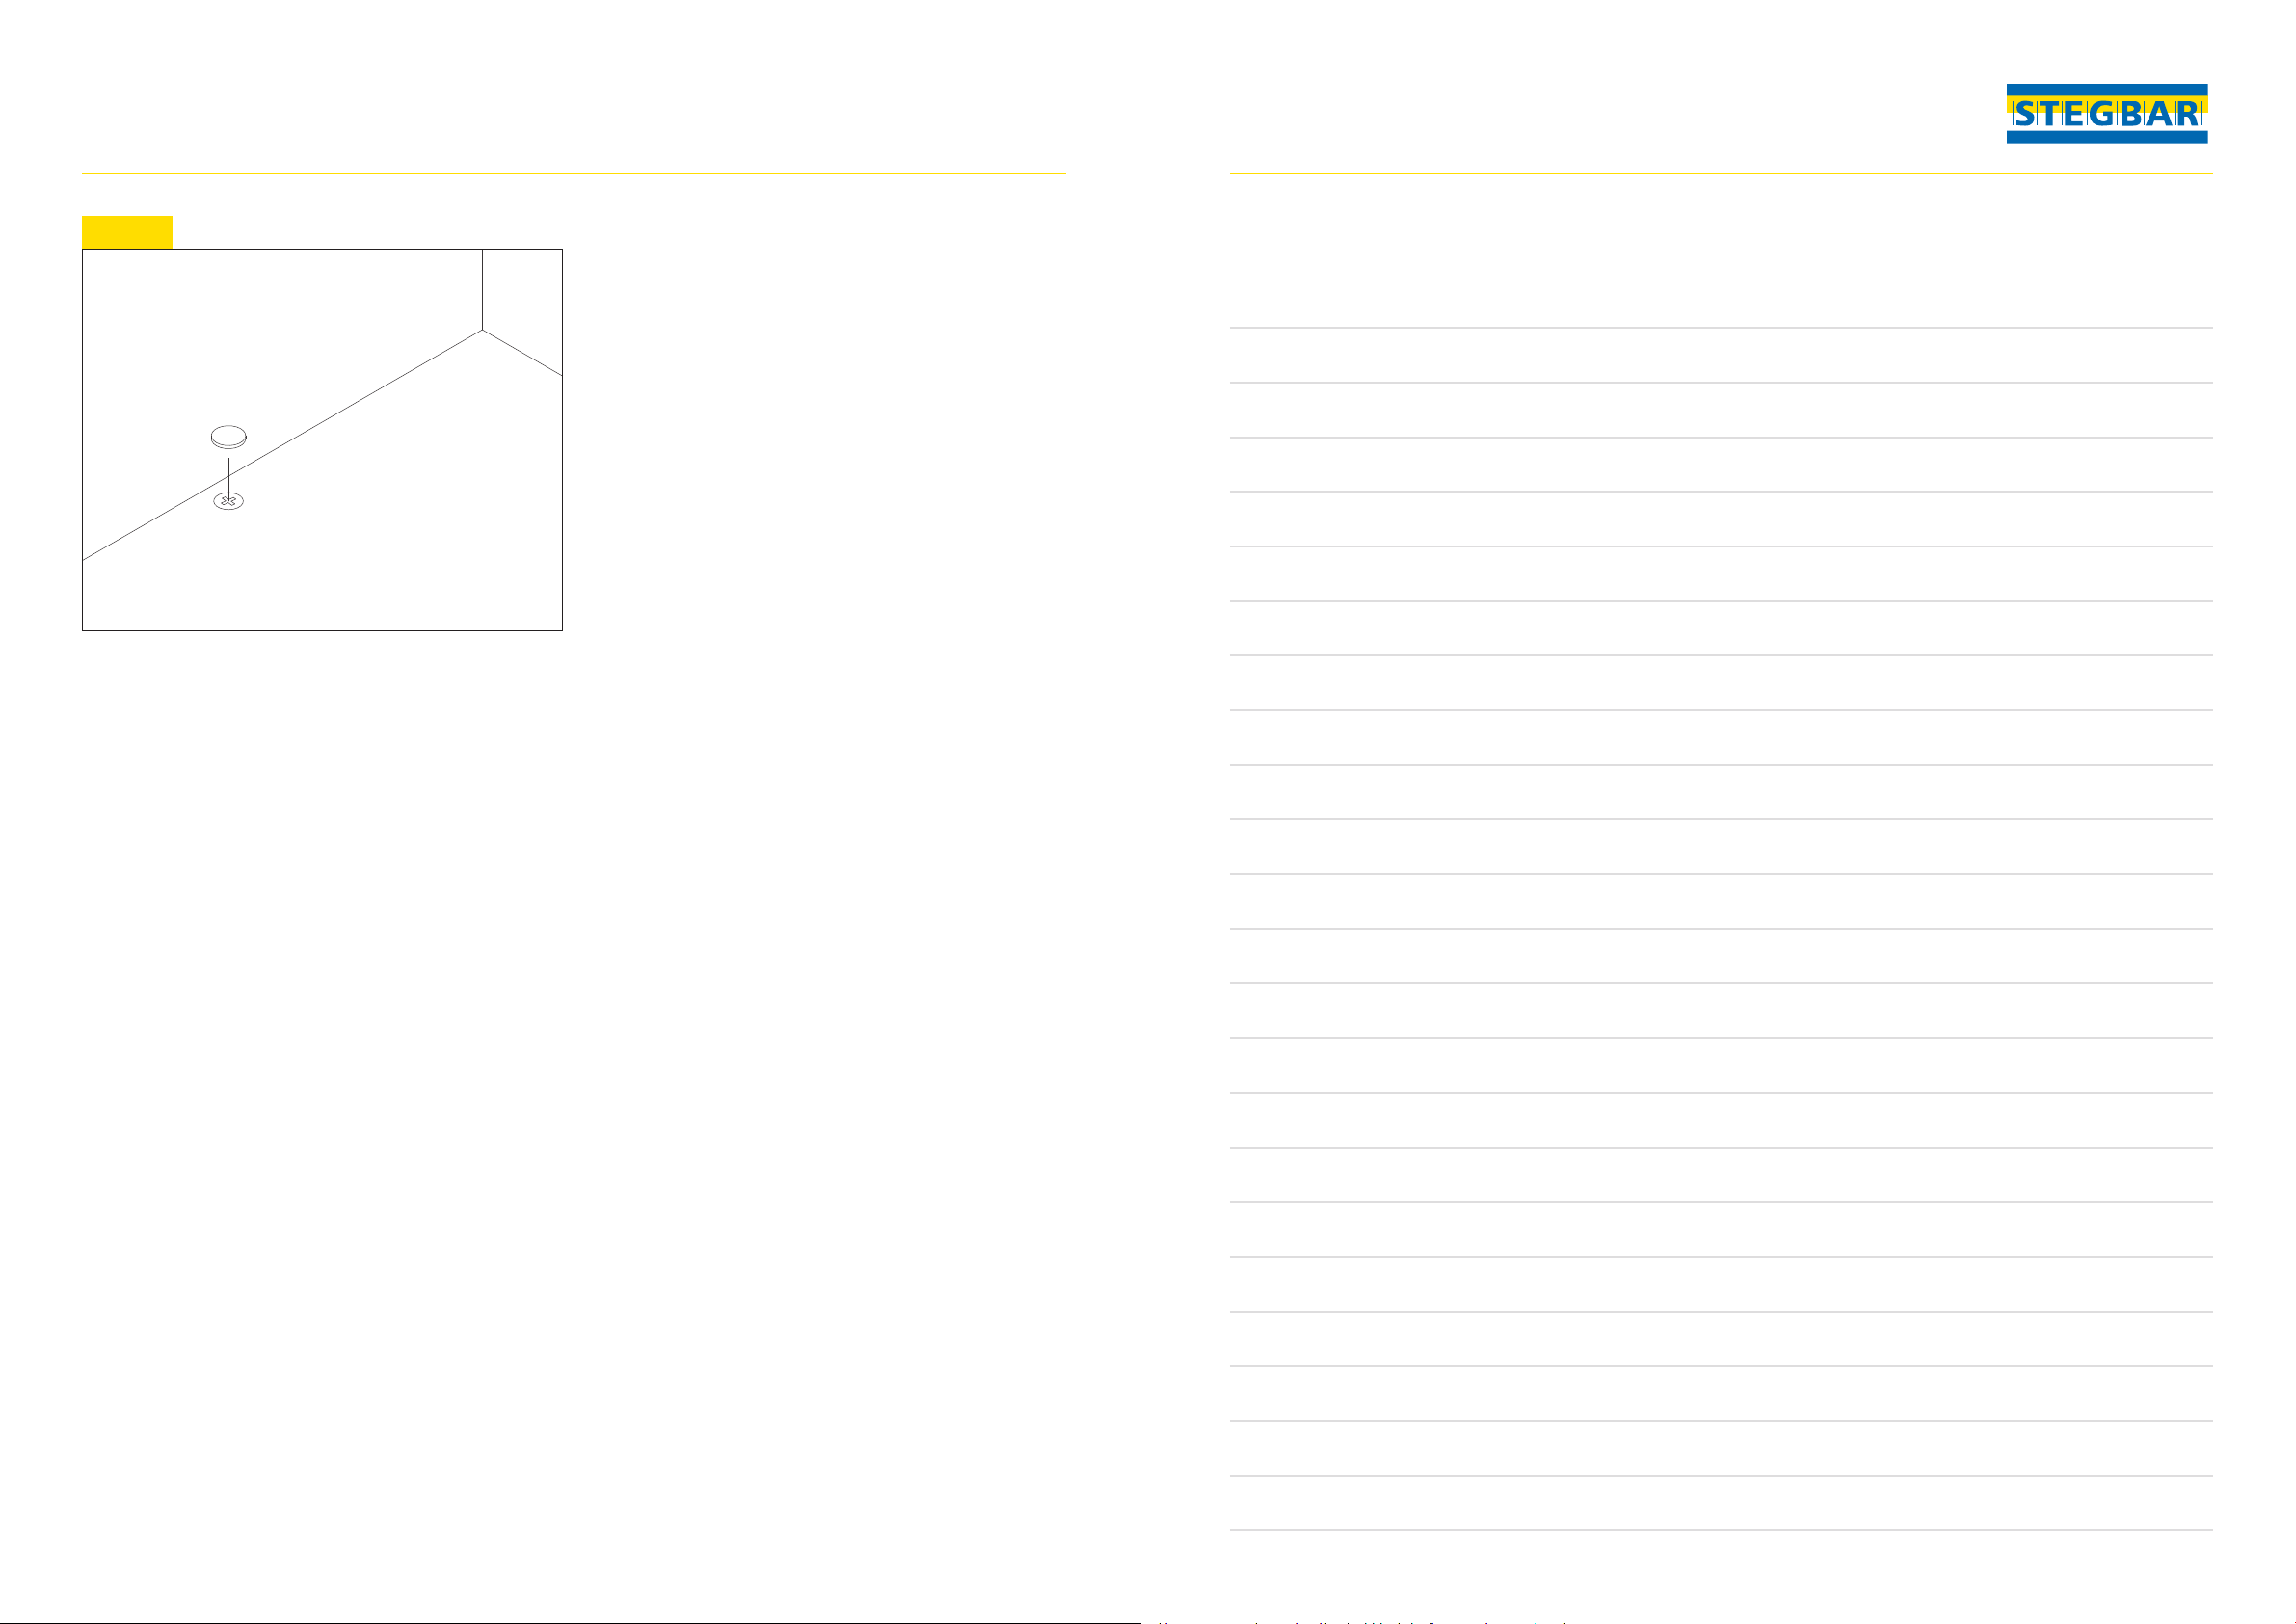
Fast cap (white dot) all screws.
Clean shelving with damp cloth
and remove stickers.
Step 33
Assembly & Installation Guidelines
Built-in Wardrobe — Galleria BIR06
NOTES:

Stegbar is not providing any installation of the product, which is your responsibility. The information in this assembly document is of a general
nature only and is provided regarding a typical installation process. Accordingly, this assembly document does not take into account your specic
circumstances, environment, needs, tools or skills.
You should not rely solely on the general information in this assembly document for installation. There are risks associated with installation and you
assume those risks voluntarily by installing this product. To the extent permitted by law, Stegbar does not accept responsibility and is not liable for any
loss, damage or injury suered by you as a result of any circumstances specic to you that are not addressed in these assembly documents.
You should independently consider whether the services of any third party are appropriate for you. Any service supplied by a third party is subject to
the terms and conditions of that third party. Stegbar is not responsible for any agreements, maintenance, delivery or satisfaction of any transactions
undertaken with a third-party provider. To the extent permitted by law, Stegbar is not responsible is and is not liable for any loss, damage or injury
suered by you as a result of the conduct of the third party.
Stegbar reserves the right to alter or amend without prior notice general information and design details specied in these assembly documents.
JWSNAT0574/0423 I stegbar.com.au I Version 1.0 I October 2023
Table of contents
Other STEGBAR Indoor Furnishing manuals


Popular Indoor Furnishing manuals by other brands

Regency
Regency LWMS3015 Assembly instructions

Furniture of America
Furniture of America CM7751C Assembly instructions

Safavieh Furniture
Safavieh Furniture Estella CNS5731 manual

PLACES OF STYLE
PLACES OF STYLE Ovalfuss Assembly instruction

Trasman
Trasman 1138 Bo1 Assembly manual

Costway
Costway JV10856 manual


