STELLAPRO reflex User manual

User Manual
stellaprolights.com

Table of Contents
Section 1
Reex Light
Section 2
Battery Handle
Section 3
Connecting the light to battery
handle and powering on
Section 4
Operation basics
Section 5
OLED display
Section 6
Menu overview
Section 7
Light settings for operation with
wireless transmitters
Section 8
Firmware Updates
Section 9
Notes on use
Section 10
Additional Information
Umbrella Mount
Speedring Mount
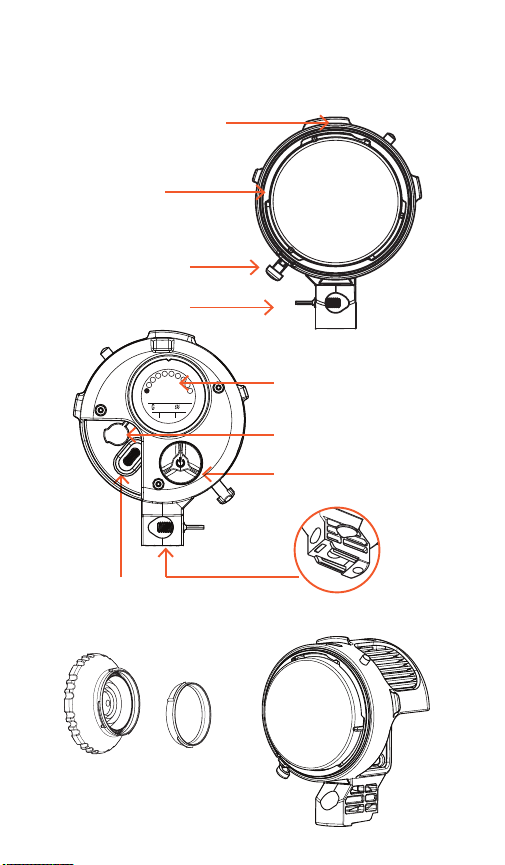
REFLEX LIGHT
Direct mount
Section 1
DIRECT MOUNT
Medium
Spot Optic
Flat Port
Cover*
USB-C Port
3.5 mm port
External Trigger
OLED Display
Control Dial
Mounting Point
100
1/4”-20 Mounting Point
*Always install a cover or optic over the
exposed LED to protect against dust or
moisture
Pwr

USB-C Port Cover
Section 2
Professional Light Stand Sold
Seperately
BATTERY HANDLE
MOUNTING BATTERY
HANDLE TO LIGHT STAND
Handstrap /
Pole Strap
Pole Mounting Feature
MOUNTING ON POLE
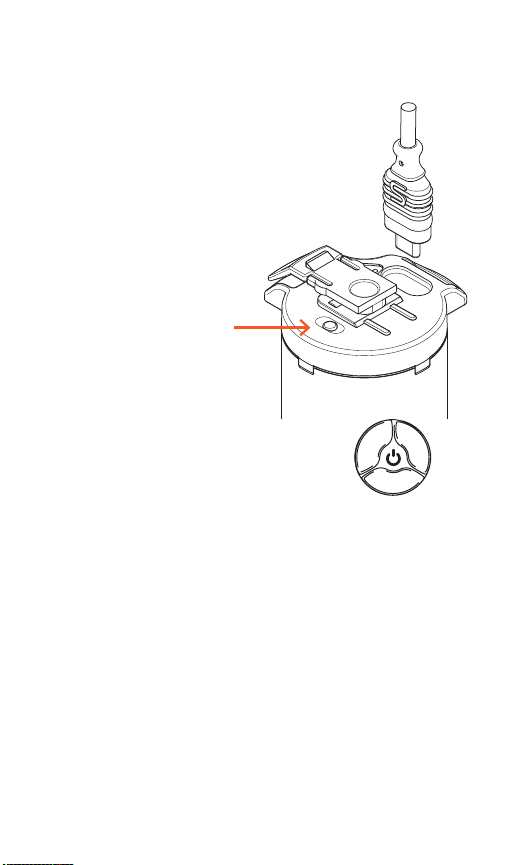
Power Button
Mounting Latch
State of Charge (SOC) LEDs
(25%, 50%, 75%, 100%)
BATTERY INDICATOR LED
to indicate battery state
Charging (Green)
Discharging (Red)
Allen bolt
secures
connection

Section 3
Unlatched Secured
Connect USB-C cord to Reex light and battery USB-C ports
CONNECTING LIGHT TO BATTERY
Push light onto battery until it “clicks”
Tip: Push from the front top of the optic
Connector tab
should no longer
be compressed
Section 4
OPERATION BASICS
Connect short USB-C to the light and
battery. Press the white power button on
the battery. Battery Indicator will turn red.
Check connection and charge if indicator
light does not turn red. The OLED display
will turn on if connections are ok.
•
•
•
•
•
A Short press (1 sec switches between
Continuous and Digital Burst*(Or advance
through menu)
A Medium press (2 sec enters and exits the the
Reflex menu
Long press (4 sec to enter power o (Unplug
when putting in storage or traveling)
Rotate Clockwise to increase output (Or change
menu setting)
Rotate Counter-clockwise to decrease output
(Or change menu setting)
USING THE CONTROL DIAL
*ransmitter is required for burst operation
Power Button

Section 5
OLED DISPLAY
Section 6
MENU OVERVIEW
L
B
Lm
Stops
S
LED Overheating
(Turn o to cool down)
Battery Overheating
(Turn o to cool down)
Sensor Fault
(Return for service)
100-6000 Lumens
1.0-4.4 Stops*
1/160-1/2500 Second
!
4000
Group Channel
Burst Modes
Wireless Modes
Godox,
Elinchrom,
Bluetooth,
-Radio O
Battery Level
Continuous/Burst Power
To navigate the menu short press
dial to advance the sub-menu. Ro-
tate dial to change the setting.
•
POWER DURATION
3.0Stops
•EPwr
E
•
Control the lumen
output with a set
burst duration of 5
milliseconds
Control the burst
duration with a set lu-
men output of 12000 lu-
mens
Power Level Indicators
*With 100W Power Supply lumens to 9000 and Digital Burst to 5-stops
∝2
Pwr
Pwr

Burst Modes
5ms Burst
Adjustable Power
Adjustable Duration (0.4ms - 6ms)
12000 Lumens***
POWER
DURATION **
Use this mode to:
• Shoot at any shutter speed (including HSS)
• Freeze action with the shutter
• Maximize the amount of light on subject
**Duration Mode only available on the Reflex S
***18000 Lumens when using 100W USB-C PD
Use this mode to:
• Shoot at the camera’s X-Sync shutter
speed or longer (not HSS)
• Freeze action with light
• Best used in low light situations
∝1Burst power matches continuous power
Optimize your settings in constant mode and, with Link
set to ∝1, Digital Burst will duplicate Continuous
Power level.
∝2Burst power delivers one stop more light
than set continuous power setting
Preset your camera to anticipate one more stop of light
by underexposing one stop of light.
∝Link Mode
Only exact at shutter speeds faster than 1/200
Pwr

Section 7
CHANGING LIGHT SETTINGS
Enter and exit the menu by pressing
the control dial for 2 seconds
Menu selection: Short press to
advance through sub-menus
mode
Burst Mode - Rotate dial to select
burst mode: Power or Duration
Group & Channel - Rotate dial to
select group and channel
E(1-4)(1-20)
G(A-F)
(1-32) P(A-
C) (1-8)
group
rotation
Rotation - Rotate dial to
change display orientation
(4 directions) - for mounting
Reex horizontal or upside
down.
Proportional (∝)Link - Rotate
dial to cycle through link modes.
Whenactive Reex will strobe n
times brighter than current
continuous light.
∝link
∝2
-∝1
∝2
Pwr
Pwr

Wireless - Rotate dial to select
transmitter type (Elinchrom,
Godox, Profoto, Bluetooth,
Wireless OFF)
Set Wireless mode to Bluetooth
to perform rmware updates.
Make sure you have exited the
menu.
Elinchrom
Godox
Bluetooth
Profoto
- wireless off
wireless
Section 8
UPDATING REFLEX FIRMWARE
1. Download the StellaPro Imaging
Control Application
2. Set Reex Wireless Mode to Bluetooth
3. Exit Reex Menu
4. In the app scan for Devices
5. Select a Device to connect
6. Enter Serial Number
7. Select a Device to start update
G

Section 9
HOW TO USE REFLEX
There are 3 distinct mode; Continuous, Burst, and
Continuous interrupted by Burst upon triggering.
1. Continuous
• Rotate dial to desired power output in lumens.
• Your trigger may also allow remote adjustment of
continuous power.
• Maximum power from the battery handle is
6000 lumens.
• Maximum power from a 100W USB-C source is
9000 lumens.
2. Digital Burst
• When set to Pwr, rotate the dial to set burst power.
Maximum burst power is 1 stop more light than
maximum continuous mode.
• In Duration mode , rotate the dial to set duration
from 0.4ms (1/2500 sec) to 6ms (1/160th sec).
3. Continuous light that Bursts upon triggering
• Sync Reex with trigger (same as Digital Burst Mode)
• Set Constant light (using dial or trigger)
• Set Burst power with trigger. Trigger signal will
cause the light to deliver Burst power.
• Set your exposure to -1 when link is set to ∝2. When
shutter opens Reex will deliver extra stop of light.

Battery Runtime
Continuous
Full Power: 30 minutes Low Power: 600 minutes
Digital Burst
15,000 full power Digital Bursts
Charge Time: 2 hours*
*With a minimum 45W USB-C Charger
(Chargers with lower wattage will
charge with variable charge times)
Fully charge battery before rst use
Charge your battery for 6 hours before rst use.
Periodically, check the charge of the battery during
storage. Fully charge your battery before use.
The battery has internal protections that ensure
the battery is safely maintained regardless of
charge state.
Temperature Warning:
While in full power continuous mode use the battery
may get noticeably warm. This is normal. Should the
temperature increase beyond safe levels the
overheat symbol will appear and operation will pause
until battery cools down.
Reex Battery Handle 60W
Continuous: 100-6000 lumens
Digital Burst: 1125-12000 lumens
External USB-C PD 100W**
Continuous: 100-9000 lumens
Digital Burst: 1125-18000 lumens
** Not Included
For Travel
Unplug battery from light.
Have at least 30% charge when putting
Battery in storage.

Direct Mount Accessories
Spot Optic 12º 800-0372
Medium Optic 24º 800-0373
Medium Wide Optic 36º 800-0406
Wide Optic 56º 800-0408
Flat Port Cover 800-0340
Dome Diffuser 800-0335
50º Optic 800-0337
Speedring Adapters
Chimera Speedring 800-0382
Profoto 800-0400
Bowens 800-0371
Mounts
Pro Light Stand Mount 800-0381
Bar Mount 800-0401
Other Accessories
Barn Door/Gel holder 800-0383
3 CTO Set (Full, 1/2, 1/4) 800-0385
-82mm Glass
RGB Color Set 800-0410
-82mm Glass
Remote Control 800-0325
1/4-20 Mount Base Reciever 800-0402
Cold Shoe Mount Kit 800-0403
Power Supplies
100W USB-C AC Power Supply 552-9614

Transmitters
Menu options allow you to choose between Elinchrom,
Godox and Profoto wireless protocols.
Plug in any 3.5mm receiver to the sync port to operate
with external receivers.
OPERATIONS SPECIFICATIONS
Reex auto fan operation
Integrated variable speed fan
automatically turns on when light output
exceeds 4000 lumens.
Low Speed (4100-6000), High Speed
(6100-9000).
Operating from external power
Reex will deliver 9000 lumens (18,000 lumens
in burst) when connected to 100W or greater
external power source.

Warranty
StellaPro products are covered against defects in work-
manship and materials under normal use and service
for 2 years from the date of purchase. Please register
your device (Reex only) to activate warranty coverage.
Batteries, by nature of their use, are covered for 1 year.
Warranty is non-transferable and does not cover fail-
ures from misuse. We will repair or replace, at our dis-
cretion, any product that is found to be defective under
our warranty policy. Verication of purchase date must
be provided with any claim.
Storage & Travel
Never store the batteries fully discharged as this may
cause permanent damage. Unplug from battery when
traveling.
Regulatory Information
Registering for a StellaPro Account
Register for a StellaPro account to get access to the
latest rmware updates along with tips and tricks from
our Ambassadors and community members.
Firmware update
Please make sure to update your Reex to the latest
rmware to ensure the Reex is operating to it’s full
capabilities. Update performed from the StellaPro
Imaging Control app.
Download StellaPro Imaging Control
(iOS & Android)
Light & Motion Industries,
711 Neeson Road, Marina, CA, USA
IP65
.
GET IT ON

USB-C
Power
Supply
<= 15W 25W 45W 65W 100W
Reex
Lighthead
Not
Recom-
mended
Not
Recom-
mended
4,000 Lu-
mens,
Burst 8000
Lumens
6,000 Lu-
mens, Burst
12,000 Lu-
mens
9,000 Lu-
mens,
Burst
18,000 Lu-
mens
Reex
38Wh Bat-
tery
6-10Hr
charge
time
4Hr
charege
time
2Hr
charge
time
2Hr
charge
time
2Hr
charge
time
General Performance with given
USB-C Supply Power Rating
Find our Recommended Power Supplies at
lightandmotion.com/pages/reex-recommended-power-supplies
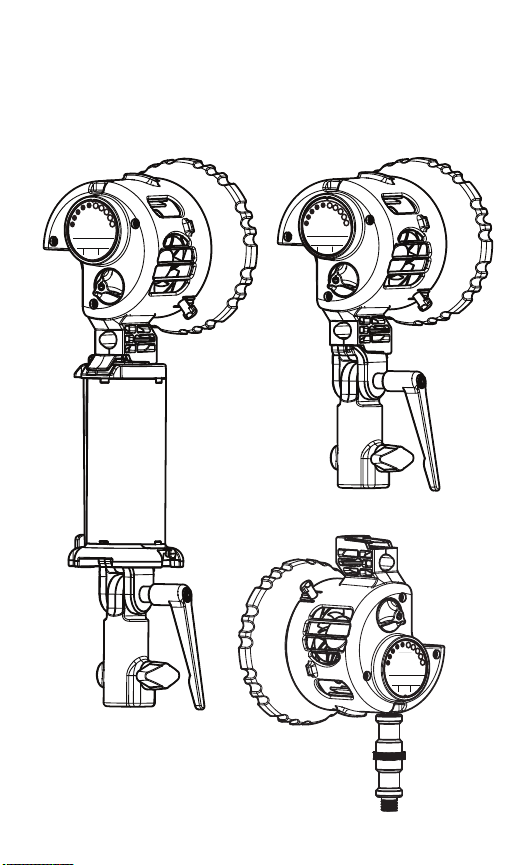
Reex Mounting Options
Professional Light Stand
800-0381
1/4”-20 Mounting
(Screen Rotated)
3.0Stops
3.0Stops
3.0Stops
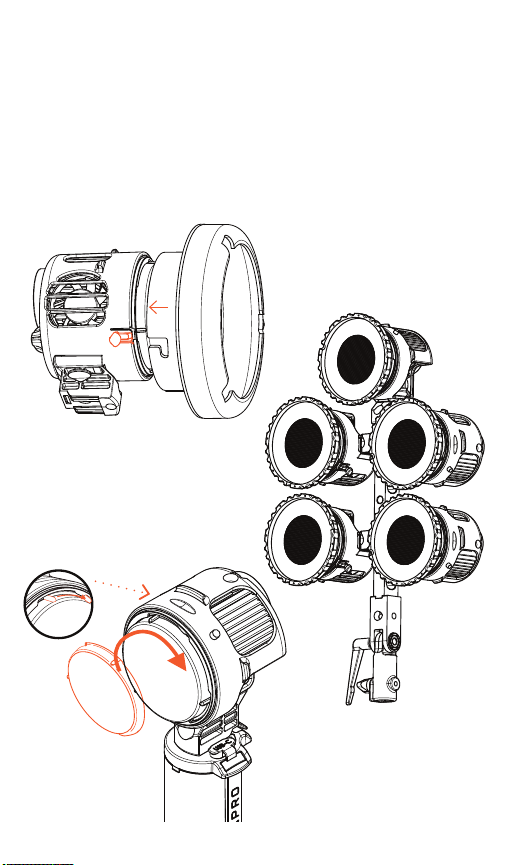
Reex Bar
(Mount 1 to 5 lights)
800-0401
Speedring Mount
Direct Mount
Mount softboxes for
Chimera, Profoto,
Bowens using a
StellaPro Speedring
Direct Mount modiers re-
quire a press-in and clock-
wise turn to lock. Always op-
erate the Reex with a Direct
Mount modier installed.


Other manuals for reflex
2
Table of contents
Other STELLAPRO Lighting Equipment manuals

Popular Lighting Equipment manuals by other brands


Feit Electric
Feit Electric TAPE192/RGBW/AG Quick install guide

LUXIONA
LUXIONA UPDOOR manual

Ibiza
Ibiza LS58W-BLUE instruction manual

Chroma
Chroma Cascade user manual

Commercial Electric
Commercial Electric CFL65-PC-GR Use and care guide

olympia electronics
olympia electronics GR-423/12L/MAR quick start guide


