Steren CCTV-200 User manual


Before using your new IP Color Camera read this instruction
manual to prevent any damage. Put it away in a safe place
for future references.
IMPORTANT
Do not try to open the equipment, may cause malfunction
Warranty is void if you open the case.
Do not use or store the equipment near wet places. May cause
malfunction or shock hazard.
Clean with a soft, dry cloth.
PACKAGE CONTENT
IP camera
AC power adaptor
CD-ROM with utilities
Ethernet cable
Metal base
User’s manual
SYSTEM REQUIREMENTS
Local area network: 10Base-T Ethernet or 100Base TX Fast
Ethernet
ActiveX & JAVA
Microsoft Internet Explorer 5.0 or better
Pentium III, 450MHz or higher
Memory size: 128MB recommended
VGA card resolution: 800x600 or better
Windows 2000, XP
CD-ROM drive
CONTROLS
1.- AC power adaptor
Allows you to plug the camera to an AC outlet
2.- RJ45 connector
Allows you to connect the camera to an available Ethernet port in
the computer
3.- In-use indicators
Light on when the camera is receiving or transmitting data
information
•
•
•
•
•
•
•
•
•
•
•
•
•
•
ENGLISH
ENGLISH-2
Before usin
g
y
our new IP Color Camera read this instruction
m
anual to prevent an
y
dama
g
e. Put it awa
y
in a safe place
f
or future references
.

4.- Extended connector
Allows you to connect a PIR or a relay
5.- Focus
Move this control to the left or right in order to get a sharper
image
6.- Base
1
2
3
4
5
6
ENGLISH
ENGLISH-3

EXTENDED CONNECTOR
1.- GND
2.- TX RS-232TX
3.- +5V (100mA) Power output
4.- GND
5.- ALM1 Alarm Input
6.- RLY RLY control
7.- RX RS-232 RX
8.- ALM1_G Alarm input GND
+5V Power output: it can supply power for relay or PIR,
maximum current is 100mA
Outer alarm input is a Closed Single RS232 only use for testing
HARDWARE INSTALLATION
1.- Plug the Ethernet cable into RJ-45 jack in the camera.
2.- Plug the extreme end of Ethernet cable into an available LAN
port.
3.- Plug the AC power adaptor in the corresponding input jack.
Then plug into an AC household outlet.
HOW TO INSTALL AND USE THE IP SOFTWARE
1.- Place the installation CD into the CD-ROM drive.
2.- Click over theIPCamSetup.exe icon, twice.
3.- In the followed windows, click Next to continue.
4.- Once the system installed the required files, you must restart
the PC.
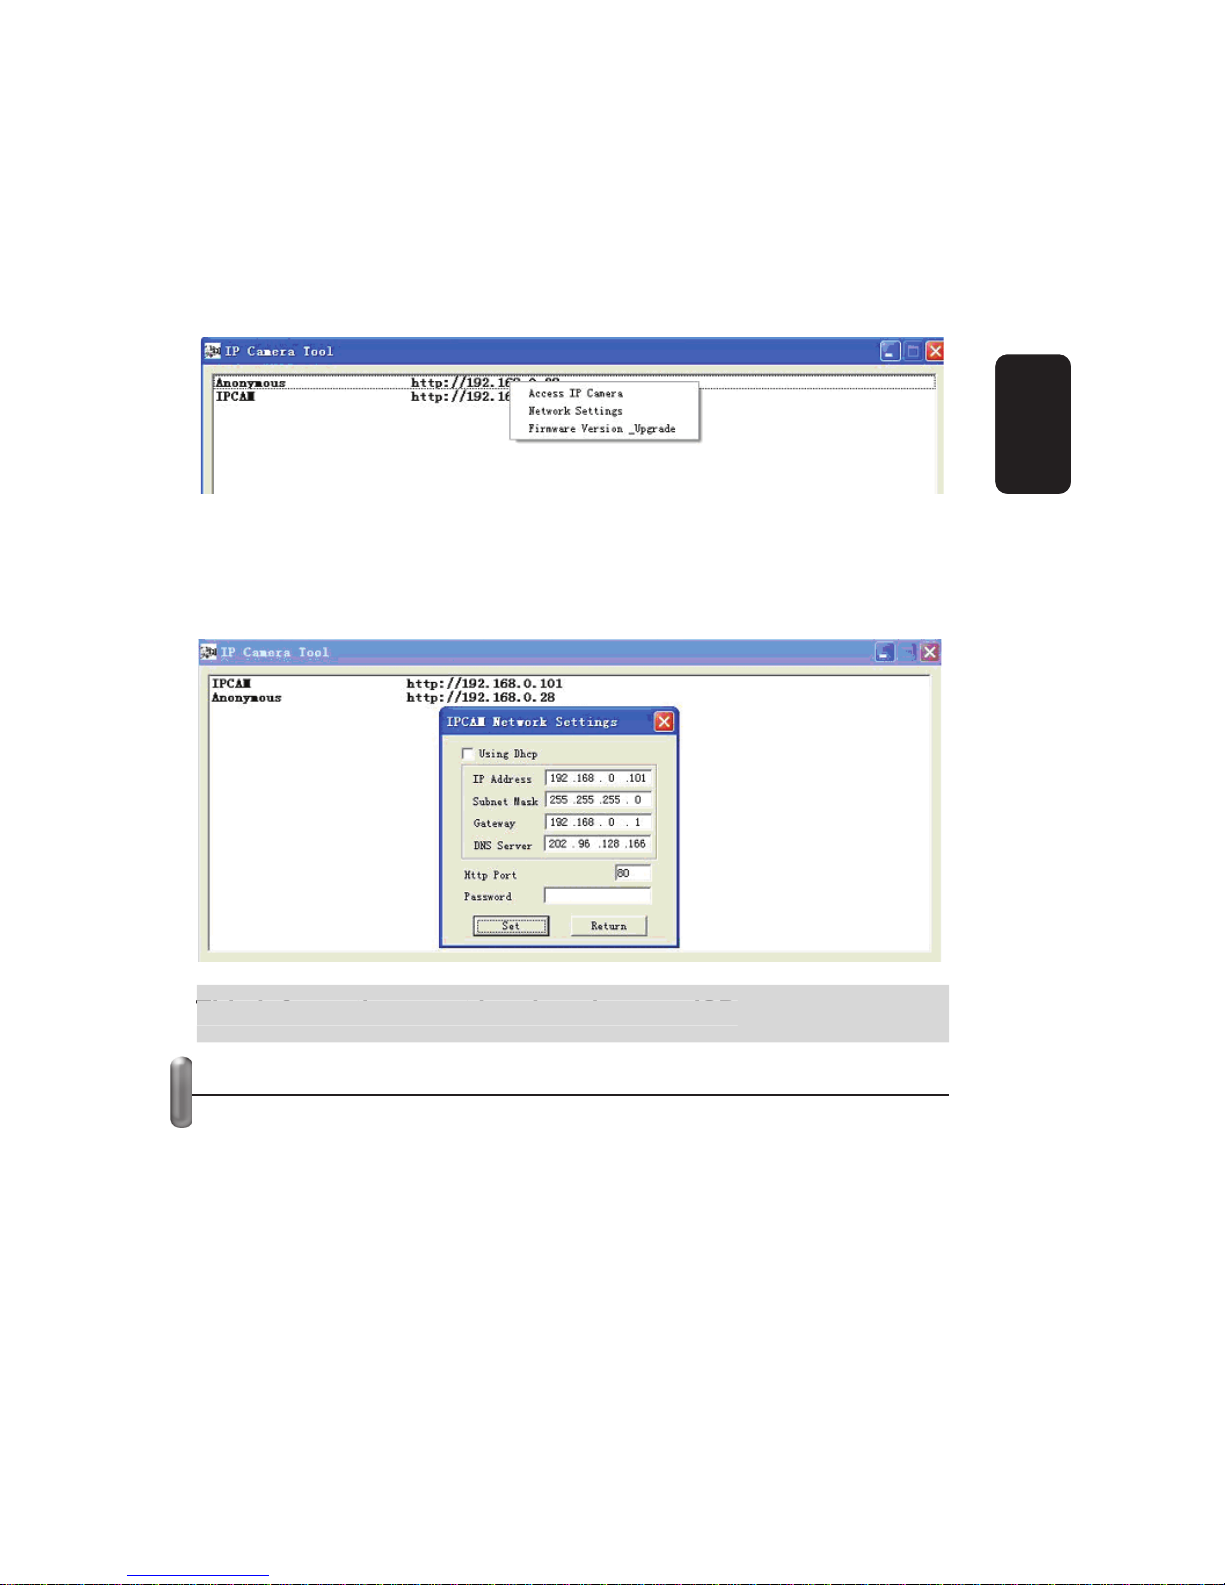
5.- When the computer rebooted, a new icon will display in the
Windows desktop (IP camera tool). Click twice over the icon, a
new window pop-up where you can see the camera IP address
(in case of you have more than one connected camera, you will
see all the IP address).
ENGLISH
ENGLISH-4

6.- Click twice over the camera IP address.
7.- Then, Windows Explorer will run automatically.
8.- Type the password (this software do not includes a
predetermined password, just click Enter) then you can obtain
access to the camera.
The IP address is given automatically by the software,
however, you can configure the parameters manually, to do
it, refers to Manual Configuration.
IP ADDRESS MANUAL CONFIGURATION
Once you have connected and configured the camera, you can
change the parameters of the IP address.
1.- Run Up Camera Tool, in the screen you can see a window
with the IP address assigned by the software.
T
he IP address is
g
iven automaticall
y
b
y
the software,
however,
y
ou can confi
g
ure the parameters manuall
y
, to do
i
t, refers to Manual Confi
g
uration
.
ENGLISH
ENGLISH-5

2.- Click over the address, then use the right button of the
mouse, and you will see the next options:
Access IP Camera
Network settings
Firmware Version Upgrade
3.- To configure the IP address manually, select the option
Network Settings. A new window will display, on it you can type
the IP address, Subnet Mask. Gateway and DNS Server.
This information must be given by your ISP.
VIDEO WINDOW
1.- Run Up Camera Tool, in the screen you can see a window
with the IP address assigned by the software.
2.- Click twice over the IP address, Internet Explorer will run
automatically.
3.- Type the password (there is not a password assigned, by
default) then press Sign In to obtain access to the camera.
4.- Now you can visualize video images.
T
his information must be
g
iven b
y
y
our ISP
.
ENGLISH
ENGLISH-6

If you want to get remote access to the camera, type the IP
address showed in the IP camera tool window, into the
Internet Explorer address bar.
Up to 20 users can be glancing simultaneously.
If the first time you cannot see video, open the Internet
Explorer tools >>> Internet Options >>> Security, and then
enable the option: Download Unsigned ActiveX Controls.
I
f
y
ou want to
g
et remote access to the camera, t
y
pe the IP
add
ress s
h
owe
d
i
n t
h
e
IP
camera too
l
w
i
n
d
ow,
i
nto t
h
e
I
nternet Ex
p
lorer address bar
.
U
p to 20 users can be
g
lancin
g
simultaneousl
y.
I
f the first time
y
ou cannot see video, open the Internet
E
xplorer tools >>> Internet Options >>> Securit
y
, and then
e
nable the option: Download Unsi
g
ned ActiveX Controls
.
ENGLISH
ENGLISH-7

CONTROL AREA
Resolution
VGA (640x480) / QVGA (320x240)
Mode
50Hz / 60Hz / Outdoors
Parameters
Use this option to set Brightness, Contrast, Sharpness and bit
rate. To modify this parameters, type the value that you want to
use, or use + / - buttons.
If you want to use the predetermined values, click Default option.
ENGLISH
ENGLISH-8

Window Configuration
With this option you can visualize a full screen image, or a
multi-picture window ( a window divided in four, one per each
connected camera).
When a camera is in-use, a green button will be visualized.
ENGLISH
ENGLISH-9

Configuration
Click this option to obtain access the camera configuration,
where you can assign a camera alias, password, network
parameters, among other functions.
Basic setting
This window allows you to visualize the camera clock time,
camera alias, password, and confirm the new password.
Alarm setting
Use this menu to activate or deactivate the Image Motion Detect,
External Sensor Detect, and Alarm Notify by Mail options.
You can select more than one option.
DDNS Setting
Allows you to set DDNS parameters, we recommend leave the
predetermined options.
Network setting
With this option you can set the IP address manually.
Recommended only for advanced users.
SMTP Setting
Choose this option if you want to activate the predetermined
email or enter your email information, where you want to receive
the notifying alarms (only if you enabled this option). The
required information for this option must be given by your ISP.
ENGLISH
ENGLISH-10

Refresh
Click to update the information.
Set
Press this button to store the changes in memory.
Adjust camera clock
Synchronize the computer clock with the camera clock.
Reset to factory setting
Press to back to factory settings.
Reboot camera
Restart DynDNS service
This option can be used only by DynDns Service Provider.
Monitor Camera
Backs to camera visualization.
TROUBLESHOOTING
Trouble Solution
Cannot find the camera Please
,
check the connections
Make sure the device is plugged to an
outlet
Cannot open the camera Web
p
a
g
e
Make sure that have not conflicts in the
IP subnet mask and the Ex
p
lorer
Check the Security Configuration in
Internet Ex
p
lorer
Check the IP address
Check the Firewall status
Web page opens but I cannot
see ima
g
es
Check the securirty configuration in
Internet Ex
p
lorer
Check the brightness and contrast levels
Check the Firewall status
ENGLISH
ENGLISH-11

SPECIFICATIONS
Input: 5V 1000mA
Image compression: M-JPEG
Sensor: CMOS ¼”
Image resolution: VGA (640x480),
QVGA (320x240)
Network connection: RJ-45 / 10-100 Base T
Network protocol: TCP / IP, DHCP, SMTP, HTTP,
DDNS, UPNP
Image transmission rate: 1-25Hz/s
Security: Password
Minimum illumination: 2,0Lux at 500nm
White balance: Automatic
Lens: CS
Operating temperature: 0-50°C, 20% 80% RH
Power consumption (camera): 3W
Dimensions: 130x73x60mm
Weight: 298g (with AC adapter)
AC power adapter
Input: 100-240V ~ 50/60Hz
Output: 5V 1000mA
Product design and specifications are subject to change,
without notice.
P
roduct desi
g
n and specifications are sub
j
ect to chan
g
e,
w
ithout notice
.
ENGLISH
ENGLISH-12

WARRANTY
This Steren product is warranted under normal usage against defects in workmanship and materials
to the original purchaser for one year from the date of purchase.
CONDITIONS
1.- This warranty card with all the required information, invoice or purchase ticket, product box or
package, and product, must be presented when warranty service is required.
2.- If the product stills on the warranty time, the company will repair it free of charge.
3.- The repairing time will not exceed 30 natural days, from the day the claim was received.
4.- Steren sell parts, components, consumables and accesories to costumer, as well as warranty
service, at any of the addresses mentioned later.
THIS WARRANTY IS VOID IN THE NEXT CASES:
If the product has been damaged by an accident, acts of God, mishandling, leaky batteries, failure
to follow enclosed instructions, improper repair by unauthorized personnel, improper safe keeping,
among others.
a) The consumer can also claim the warranty service in the purchase establishment.
b) If you lose the warranty card, we can reissue it, if you show the invoice or purchase ticket.
RETAILER INFORMATION
Name of the retailer
Address
Product
Brand
Part number
Serial number
Date of delivery
In case your product fails or have any doubt, please contact your nearest retailer. If you are in
Mexico, please give a call to our Call Center.
Call Center
Mexico City: 53 54 22 90
Province: 01 800 500 9000
Product: IP Color Camera
Part number: CCTV-200
Brand: Steren


Antes de utilizar su nueva Cámara IP a color lea este
instructivo para evitar cualquier mal funcionamiento.
Guárdelo para futuras referencias.
IMPORTANTE
No intente abrir el equipo, puede ocasionar malfuncionamiento y
anulación de la garantía.
No use ni almacene este equipo en lugares donde existan
goteras o salpicaduras de agua.
Siempre utilice un paño suave, limpio y seco para limpiar el
equipo.
CONTENIDO DEL PAQUETE
Cámara IP
Adaptador de corriente
CD-ROM con utilidades
Cable Ethernet
Base de metal
Manual de instrucciones
REQUERIMIENTOS DE SISTEMA
Red de área local: 10Base-T Ethernet o 100Base TX Fast
Ethernet
ActiveX y JAVA
Microsoft Internet Explorer 5.0 o superior
Pentium III a 450MHz o superior
128MB de memoria
Tarjeta VGA con una resolución de 800 x 600 o superior
Windows 2000, XP
Lector CD-ROM
CONTROLES
1.- Adaptador de corriente
Permite conectar el adaptador de corriente suministrado
2.- Conector RJ45
Permite conectar la cámara a un puerto Ethernet disponible en
la computadora
3.- Indicadores de uso
Encienden cuando el equipo está en uso, recibiendo y
transmitiendo datos
•
•
•
•
•
•
•
•
•
•
•
•
•
•
ESPAÑOL
ESPAÑOL-2
A
ntes de utilizar su nueva Cámara IP a color lea este
i
nstructivo para evitar cualquier mal funcionamiento.
G
uárdelo
p
ara futuras referencias
.

4.- Conector extendido
Permite conectar un PIR o relevador
5.- Enfoque
Mueva hacia la derecha o la izquierda para enfocar la imagen
de la cámara
6.- Base
1
2
3
4
5
6
ESPAÑOL
ESPAÑOL-3

CONECTOR COM
1.- Tierra
2.- Transmisión RS-2832 TX
3.- +5V (100mA) Salida de poder
4.- Tierra
5.- Entrada de alarma
6.- Relevador Control de relevador
7.- Recepción RS-232 RX
8.- Tierra (entrada de alarma)
La salida de +5V puede proporcionar energía para el relay o el
PIR, la corriente máxima es de 100mA
La entrada de la alarma externa es normalmente cerrada
RS-232, únicamente se utiliza para pruebas
INSTALACIÓN DE HARDWARE
1.- Inserte el cable Ethernet dentro del conector RJ-45 de la
cámara.
2.- Inserte la terminal opuesta del cable Ethernet en un puerto
LAN.
3.- Conecte el adaptador de corriente en la entrada
correspondiente. El extremo contrario conéctelo a un
tomacorriente casero.
INSTALACIÓN Y USO DEL SOFTWARE IP
1.- Inserte el disco de instalación suministrado.
2.- Presione dos veces el icono del programa IPCamSetup.exe.
3.- En las ventanas siguientes, seleccione Siguiente.
4.- Una vez que el sistema instaló los archivos requeridos, será
necesario reiniciar la computadora.
5.- Cuando el equipo reinició, un ícono se mostrará en el
escritorio de Windows (IP camera tool). Presione dos veces
sobre él, se abrirá una nueva ventana donde se muestra la
dirección IP de la cámara (en caso de que tuviera más cámaras
conectadas, aparecerán las direcciones IP de cada una de
ellas).
ESPAÑOL
ESPAÑOL-4

6.- Presione dos veces sobre la dirección IP de la cámara.
7.- Automáticamente se ejecutará el explorador de Internet.
8.- Introduzca la contraseña (el software no trae ninguna
contraseña predeterminada, solo presione Enter) y podrá
acceder a la cámara.
La dirección IP se asigna de forma automática, sin
embargo, se puede configurar los parámetros
manualmente, consulte la sección de Configuración Manual.
L
a dirección IP se asi
g
na de forma automática, sin
e
mbar
g
o, se puede confi
g
urar los parámetros
m
anualmente, consulte la sección de Confi
g
uración Manual
.
ESPAÑOL
ESPAÑOL-5

CONFIGURACIÓN MANUAL DE LA DIRECCIÓN IP
Una vez que haya configurado su cámara correctamente,
podrá cambiar los parámetros de la dirección IP asignada por el
equipo.
1.- Ejecute el archivo IP Camera Tool, en pantalla se mostrará la
dirección IP asignada por el software.
2.- Seleccione la dirección, y presione el botón derecho del
ratón sobre ella, se mostrarán las siguientes opciones:
Access IP Camera
Network settings
Firmware Version Upgrade
3.- Para configurar manualmente la dirección IP, seleccione la
opción Network Settings. Una ventana aparecerá en pantalla,
allí podrá introducir los datos para dirección IP (IP Address),
Máscara de Subred (Subset Mask), Gateway y Servidor DNS
(DNS Server).
Esta información debe ser proporcionada por su proveedor
de Internet.
E
sta información debe ser
p
ro
p
orcionada
p
or su
p
roveedor
d
e Internet
.
ESPAÑOL
ESPAÑOL-6

VENTANA DE VÍDEO
1.- Ejecute el archivo IP Camera Tool, en pantalla se mostrará la
dirección IP asignada a la cámara.
2.- Presione dos veces el botón izquierdo del ratón sobre la
dirección IP, se abrirá una nueva ventana del Explorador de
Internet.
3.- Introduzca la contraseña correspondiente (de forma
predeterminada, no existe contraseña alguna), y presione Sign
In para poder acceder a la cámara.
4.- Ahora tendrá la visualización del vídeo.
En caso de que quiera acceder a la cámara desde una
posición remota, introduzca la dirección IP mostrada en
el programa IP Camera Tool, en la barra de dirección del
Explorador de Internet.
El número máximo de usuarios conectados al mismo
tiempo es de 20.
Si la primera vez no puede ver ninguna imagen, abra la
opción de Herramientas del Explorador de Internet,
Opciones de Internet >> Seguridad >> Niveles y active
(Enable) la opción Download Unsigned ActiveX Controls.
E
n caso de
q
ue
q
uiera acceder a la cámara desde una
p
osición remota, introduzca la dirección IP mostrada en
e
l pro
g
rama IP Camera Tool, en la barra de dirección del
E
x
p
lorador de Internet
.
E
l número máximo de usuarios conectados al mismo
t
iem
p
o es de 20
.
S
i la primera vez no puede ver nin
g
una ima
g
en, abra la
op
ción de Herramientas del Ex
p
lorador de Internet,
O
pciones de Internet >> Se
g
uridad >> Niveles
y
active
(
Enable
)
la opción Download Unsi
g
ned ActiveX Controls
.
ESPAÑOL
ESPAÑOL-7
Table of contents
Languages: