Steren Fasthome 550-080 User manual

R
Manufactured by:
Steren Electronics International, LLC
8675 Miralani Drive, San Diego, CA 92126
1-800-266-3333
www.steren.com
Fast Media
Home Network
Systems
Fast Media
Home Network
Systems
Installation
Guide
Installation
Guide
550-080
Fast Media
Modulator Module
61/2˝ (W) x 3˝ (H) x 23/8˝ (D)
550-080Manual.qxd 7/6/04 3:57 PM Page 1

R
Fast Media Home Network Systems Revised 06/04
—2—
FastHome™
550-080 Modulator Module Installation Guide
Welcome to the FastHome™Series
Thank you for purchasing this product, part of the FastHome™Series of Fast Media Home
Network Systems by Steren. You have made an excellent choice for the homeowner. The
FastHome™Series of enclosures and modules provide a quality control center for the wiring
of cable TV, phone/fax/modem, Ethernet, security, sound system and other voice, video, data
and audio devices. Installation is easy and requires only basic tools. By following the instruc-
tions in this guide, you will ensure the proper installation of the FastHome™module.
Product Description
From a centralized location, the Fast Media Modulator Module inserts RF
modulated video and audio signals from security cameras or media players into
the home cable TV system. The module also includes a 12VDC, 500mA power
supply. All FastHome™modules feature 18-gauge cold rolled steel construction
for excellent RFI shielding.
Contents of Package
1. Fast Media Telephone/TV Hub Module
2. 9VDC power supply
3. Installation manual
Tools for Module Installation and Wiring
1. Wire stripper
2. Personal protective equipment
Introduction
About Steren Electronics
Based in San Diego, Steren
has been a leading component
manufacturer for nearly 50 years.
With more than 2,000 items
in our catalog, we supply inter-
connect products and electronics
accessories for home and
commercial use.
The FastHome™Series
of Fast Media Home Network
Systems are produced with
superior design and engineering,
high-quality materials and excep-
tional manufacturing processes,
attributes that are synonymous
with the Steren name.
Safety Instructions
Read these safety instructions before installing this module and follow them carefully.
Keep these instructions handy and refer to them when working on the module.
•Always wear the necessary personal protective gear and follow all
basic precautions and safety procedures when working with wires
and electrical equipment, using power tools or working in unfinished
construction areas.
•Use caution when handling this module. Be careful not to drop the
module because this could affect the performance and/or damage
the module.
•Take extra precautions when working with cables, wires and tools.
Do not install cables and wires that appear to be damaged. Avoid
kinking cables and wires during installation.
•Be careful when using tools that might touch exposed wires or live
electrical contacts.
•To prevent electric shock: 1) do not touch uninsulated wires and terminals that
may still be connected to a live circuit; 2) do not install wires or electrical equipment
during a lightning storm; 3) do not install wires or electrical equipment or their
enclosures near water or locations where water is used (in the kitchen, bathroom,
laundry room, swimming pool, etc.); 4) do not install electrical components or equip-
ment in wet areas, unless specifically rated for moisture.
•Make sure all wires in the modules are properly connected or terminated.
1 2 3 4 5 6 7 8
AC/DCADAPTOR
CLASS2 POWER SUPPLY
MODEL :ZIA41003U-9
Cat.No. : ILA41-120500
INPUT : AC110V60Hz
OUTPUT: AC12V 500mA
E
550-080 Digital Modulator
POWER
Video
Level Adjust
RF OUTPUT
INPUT
Video Audio L Audio R
Channel Select
Specifications:
•Output Channels: 14~128
•Video Carrier: 15±3dB
•Video/Audio Amplitude
Frequency Characteristics:
±3dB
•Differential Phase and Gain:
10%
•Video Input Impedance:
75Ohm
•Audio Carrier Frequency:
4.5±0.005MHz
•Audio Distortion: 2% max
•Audio S/N: 40dB min
550-080Manual.qxd 7/6/04 3:57 PM Page 2

Fast Media Home Network Systems Revised 06/04
—3—
FastHome™
550-080 Modulator Module Installation Guide
R
Pre-Installation Instructions
1. After the enclosure has been mounted, determine which modules will be inserted. On a
sheet of paper, diagram the location where each module will be placed. An expansion
module should be placed close to the module with which it interfaces.
2. On the diagram, identify the origin and destination of each cable. Make sure the module
serving each device is safely within a 100ft/30m distance.
Installation Instructions
Note: Do not connect the DC power supply to a power outlet until all wiring has been completed.
1. Identify the enclosure location on which the module will be mounted.
2. Mount the module by inserting the nylon pins into the holes in back of the enclosure and
pressing the pins in. Make sure that the pins are firmly seated and the module is secure.
Wiring Instructions
Note: Module wiring should only be performed by a experienced, licensed electrician. Make
sure all power has been shut off to the equipment and there is no live circuit. Route all cables
through the knock-out holes and bundle with tie wraps or cable straps to ensure safe and
long-lasting connections.
1. Connect an “F”-terminated coaxial jumper cable between the module’s RF output port and
an input of either the Fast Media Telephone/TV Hub Module (550-010) or Fast Media TV
Splitter Module (550-040).
2. Connect RCA plugs from the audio/video source to the module’s video and audio (left and
right) input ports, matching the color codes on the RCA jacks.
3. Using one of the charts below, set the security video output channel using the DIP switch.
4. Route the cable to the location of the security camera.
5. Connect the 12VDC power supply cord to the power input jack.
Installation
Sample configuration for telephone,
audio/video, security and Ethernet.
For More Information
about FastHome™and
Fast Media Home Network
Systems, contact:
Steren Electronics International, LLC
8675 Miralani Drive
San Diego, CA 92126
1-800-266-3333
www.steren.com
Copyright ©2004
Steren Electronics International, LLC
Printed in China
550-080 DIP Switch Settings – TV Channel NTSC
CH CH Frequency 8 Pin Switch Status / ON = 1, OFF = 0
12345678
14 471.25 1 0 0 0 0 0 0 0
15 477.25 1 0 0 0 0 0 0 1
16 483.25 1 0 0 0 0 0 1 0
17 489.25 1 0 0 0 0 0 1 1
18 495.25 1 0 0 0 0 1 0 0
19 501.25 1 0 0 0 0 1 0 1
20 507.25 1 0 0 0 0 1 1 0
21 513.25 1 0 0 0 0 1 1 1
22 519.25 1 0 0 0 1 0 0 0
23 525.25 1 0 0 0 1 0 0 1
24 531.25 1 0 0 0 1 0 1 0
25 537.25 1 0 0 0 1 0 1 1
26 543.25 1 0 0 0 1 1 0 0
27 549.25 1 0 0 0 1 1 0 1
28 555.25 1 0 0 0 1 1 1 0
29 561.25 1 0 0 0 1 1 1 1
30 567.25 1 0 0 1 0 0 0 0
31 573.25 1 0 0 1 0 0 0 1
32 579.25 1 0 0 1 0 0 1 0
33 585.25 1 0 0 1 0 0 1 1
34 591.25 1 0 0 1 0 1 0 0
35 597.25 1 0 0 1 0 1 0 1
36 603.25 1 0 0 1 0 1 1 0
37 609.25 1 0 0 1 0 1 1 1
38 615.25 1 0 0 1 1 0 0 0
39 621.25 1 0 0 1 1 0 0 1
40 627.25 1 0 0 1 1 0 1 0
41 633.25 1 0 0 1 1 0 1 1
Continued on next page
550-080Manual.qxd 7/6/04 3:57 PM Page 3

42 639.25 1 0 0 1 1 1 0 0
43 645.25 1 0 0 1 1 1 0 1
44 651.25 1 0 0 1 1 1 1 0
45 657.25 1 0 0 1 1 1 1 1
46 663.25 1 0 1 0 0 0 0 0
47 669.25 1 0 1 0 0 0 0 1
48 675.25 1 0 1 0 0 0 1 0
49 681.25 1 0 1 0 0 0 1 1
50 687.25 1 0 1 0 0 1 0 0
51 693.25 1 0 1 0 0 1 0 1
52 699.25 1 0 1 0 0 1 1 0
53 705.25 1 0 1 0 0 1 1 1
54 711.25 1 0 1 0 1 0 0 0
55 717.25 1 0 1 0 1 0 0 1
56 723.25 1 0 1 0 1 0 1 0
57 729.25 1 0 1 0 1 0 1 1
58 735.25 1 0 1 0 1 1 0 0
59 741.25 1 0 1 0 1 1 0 1
60 747.25 1 0 1 0 1 1 1 0
61 753.25 1 0 1 0 1 1 1 1
62 759.25 1 0 1 1 0 0 0 0
63 765.25 1 0 1 1 0 0 0 1
64 771.25 1 0 1 1 0 0 1 0
65 777.25 1 0 1 1 0 0 1 1
66 783.25 1 0 1 1 0 1 0 0
67 789.25 1 0 1 1 0 1 0 1
68 795.25 1 0 1 1 0 1 1 0
69 801.25 1 0 1 1 0 1 1 1
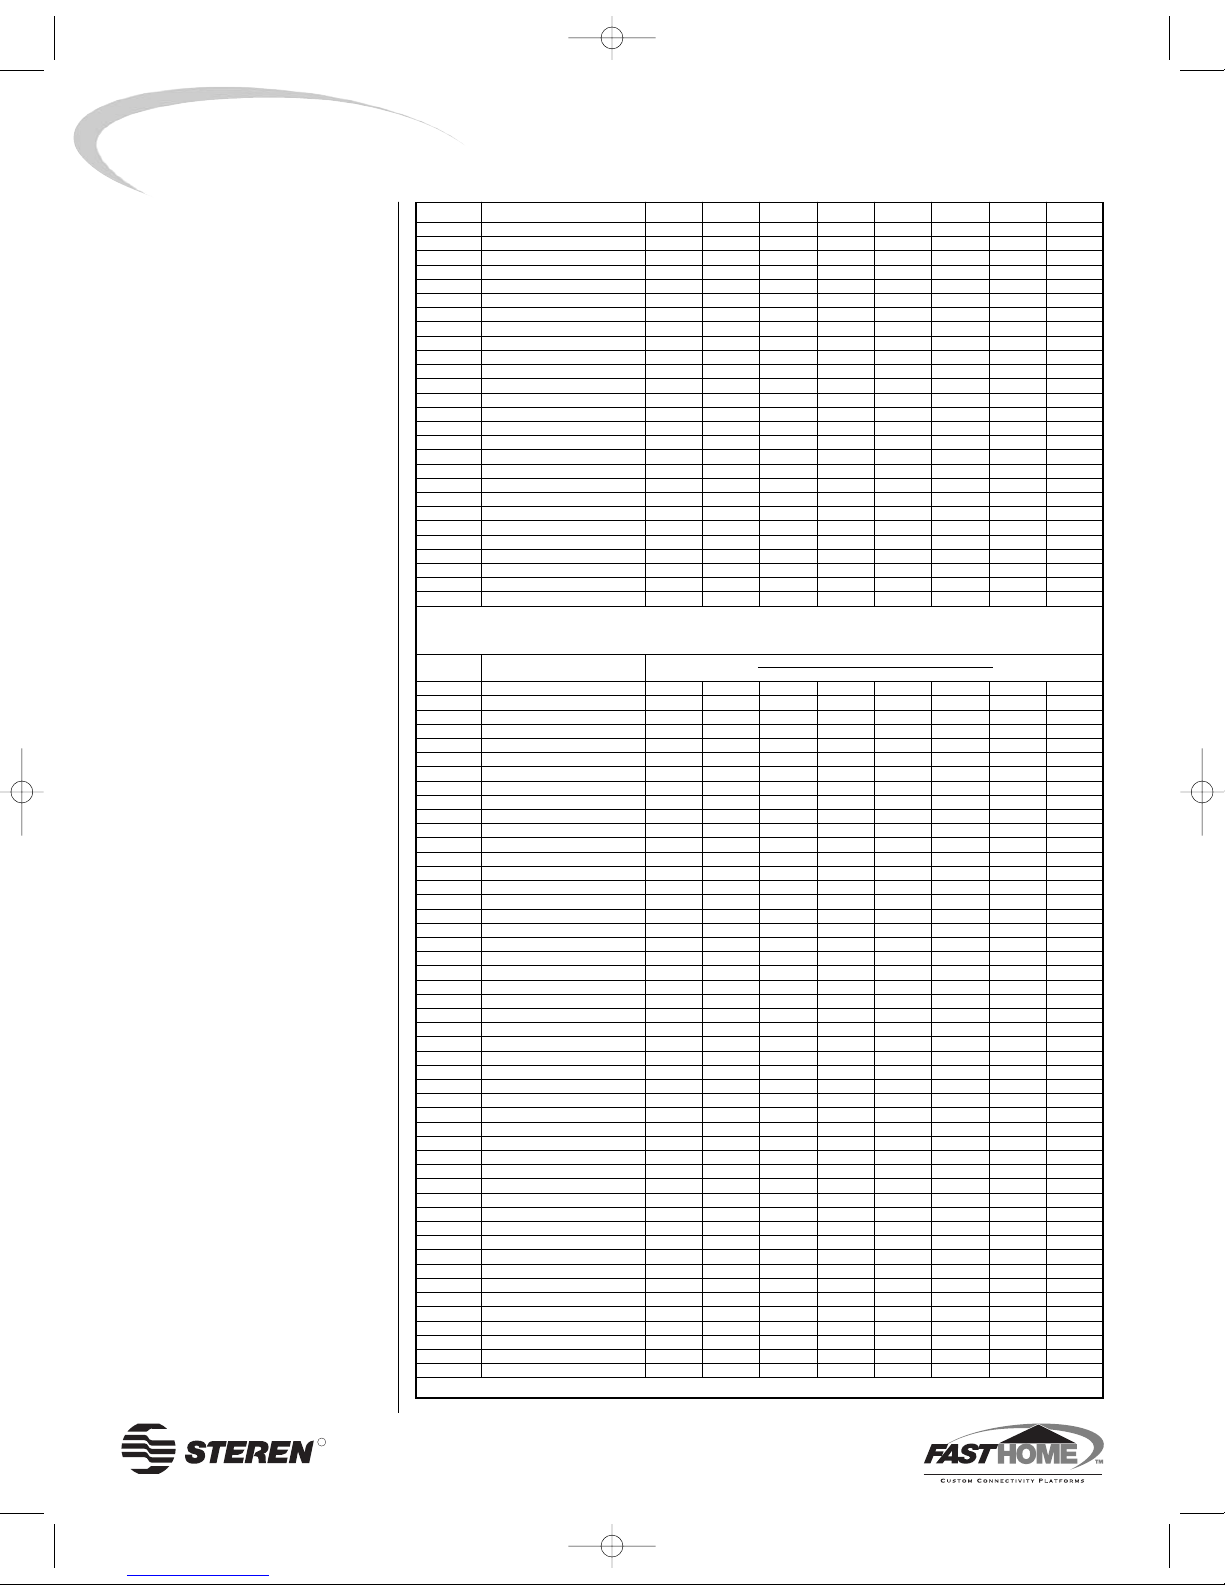
550-080 DIP Switch Settings – CATV Channel NTSC
CH CH Frequency 8 Pin Switch Status / ON = 1, OFF = 0
12345678
65 469.25 0 1 0 0 0 0 0 0
66 475.25 0 1 0 0 0 0 0 1
67 481.25 0 1 0 0 0 0 1 0
68 487.25 0 1 0 0 0 0 1 1
69 493.25 0 1 0 0 0 1 0 0
70 499.25 0 1 0 0 0 1 0 1
71 505.25 0 1 0 0 0 1 1 0
72 511.25 0 1 0 0 0 1 1 1
73 517.25 0 1 0 0 1 0 0 0
74 523.25 0 1 0 0 1 0 0 1
75 529.25 0 1 0 0 1 0 1 0
76 535.25 0 1 0 0 1 0 1 1
77 541.25 0 1 0 0 1 1 0 0
78 547.25 0 1 0 0 1 1 0 1
79 553.25 0 1 0 0 1 1 1 0
80 559.25 0 1 0 0 1 1 1 1
81 565.25 0 1 0 1 0 0 0 0
82 571.25 0 1 0 1 0 0 0 1
83 577.25 0 1 0 1 0 0 1 0
84 583.25 0 1 0 1 0 0 1 1
85 589.25 0 1 0 1 0 1 0 0
86 595.25 0 1 0 1 0 1 0 1
87 601.25 0 1 0 1 0 1 1 0
88 607.25 0 1 0 1 0 1 1 1
89 613.25 0 1 0 1 1 0 0 0
90 619.25 0 1 0 1 1 0 0 1
91 625.25 0 1 0 1 1 0 1 0
92 631.25 0 1 0 1 1 0 1 1
93 637.25 0 1 0 1 1 1 0 0
94 643.25 0 1 0 1 1 1 0 1
95 649.25 0 1 0 1 1 1 1 0
96 655.25 0 1 0 1 1 1 1 1
97 661.25 0 1 1 0 0 0 0 0
98 667.25 0 1 1 0 0 0 0 1
99 673.25 0 1 1 0 0 0 1 0
100 679.25 0 1 1 0 0 0 1 1
101 685.25 0 1 1 0 0 1 0 0
102 691.25 0 1 1 0 0 1 0 1
103 697.25 0 1 1 0 0 1 1 0
104 703.25 0 1 1 0 0 1 1 1
105 709.25 0 1 1 0 1 0 0 0
106 715.25 0 1 1 0 1 0 0 1
107 721.25 0 1 1 0 1 0 1 0
108 727.25 0 1 1 0 1 0 1 1
109 733.25 0 1 1 0 1 1 0 0
110 739.25 0 1 1 0 1 1 0 1
111 745.25 0 1 1 0 1 1 1 0
112 751.25 0 1 1 0 1 1 1 1
113 757.25 0 1 1 1 0 0 0 0
R
Fast Media Home Network Systems Revised 06/04
—4—
FastHome™
550-080 Modulator Module Installation Guide
DIP Switch
Settings
Continued on next page
550-080Manual.qxd 7/6/04 3:57 PM Page 4

114 763.25 0 1 1 1 0 0 0 1
115 769.25 0 1 1 1 0 0 1 0
116 775.25 0 1 1 1 0 0 1 1
117 781.25 0 1 1 1 0 1 0 0
118 787.25 0 1 1 1 0 1 0 1
119 793.25 0 1 1 1 0 1 1 0
120 799.25 0 1 1 1 0 1 1 1
121 805.25 0 1 1 1 1 0 0 0
122 811.25 0 1 1 1 1 0 0 1
123 817.25 0 1 1 1 1 0 1 0
124 823.25 0 1 1 1 1 0 1 1
125 829.25 0 1 1 1 1 1 0 0
550-080 DIP Switch Settings – HRC Channel NTSC
CH CH Frequency 8 Pin Switch Status / ON = 1, OFF = 0
12345678
65 468 1 1 0 0 0 0 0 0
66 474 1 1 0 0 0 0 0 1
67 480 1 1 0 0 0 0 1 0
68 486 1 1 0 0 0 0 1 1
69 492 1 1 0 0 0 1 0 0
70 498 1 1 0 0 0 1 0 1
71 504 1 1 0 0 0 1 1 0
72 510 1 1 0 0 0 1 1 1
73 516 1 1 0 0 1 0 0 0
74 522 1 1 0 0 1 0 0 1
75 528 1 1 0 0 1 0 1 0
76 534 1 1 0 0 1 0 1 1
77 540 1 1 0 0 1 1 0 0
78 546 1 1 0 0 1 1 0 1
79 552 1 1 0 0 1 1 1 0
80 558 1 1 0 0 1 1 1 1
81 564 1 1 0 1 0 0 0 0
82 570 1 1 0 1 0 0 0 1
83 576 1 1 0 1 0 0 1 0
84 582 1 1 0 1 0 0 1 1
85 588 1 1 0 1 0 1 0 0
86 594 1 1 0 1 0 1 0 1
87 600 1 1 0 1 0 1 1 0
88 606 1 1 0 1 0 1 1 1
89 612 1 1 0 1 1 0 0 0
90 618 1 1 0 1 1 0 0 1
91 624 1 1 0 1 1 0 1 0
92 630 1 1 0 1 1 0 1 1
93 636 1 1 0 1 1 1 0 0
94 642 1 1 0 1 1 1 0 1
95 648 1 1 0 1 1 1 1 0
96 654 1 1 0 1 1 1 1 1
97 660 1 1 1 0 0 0 0 0
98 666 1 1 1 0 0 0 0 1
99 672 1 1 1 0 0 0 1 0
100 678 1 1 1 0 0 0 1 1
101 684 1 1 1 0 0 1 0 0
102 690 1 1 1 0 0 1 0 1
103 696 1 1 1 0 0 1 1 0
104 702 1 1 1 0 0 1 1 1
105 708 1 1 1 0 1 0 0 0
106 714 1 1 1 0 1 0 0 1
107 720 1 1 1 0 1 0 1 0
108 726 1 1 1 0 1 0 1 1
109 732 1 1 1 0 1 1 0 0
110 738 1 1 1 0 1 1 0 1
111 744 1 1 1 0 1 1 1 0
112 750 1 1 1 0 1 1 1 1
113 756 1 1 1 1 0 0 0 0
114 762 1 1 1 1 0 0 0 1
115 768 1 1 1 1 0 0 1 0
116 774 1 1 1 1 0 0 1 1
117 780 1 1 1 1 0 1 0 0
118 786 1 1 1 1 0 1 0 1
119 792 1 1 1 1 0 1 1 0
120 798 1 1 1 1 0 1 1 1
121 804 1 1 1 1 1 0 0 0
122 810 1 1 1 1 1 0 0 1
123 816 1 1 1 1 1 0 1 0
124 822 1 1 1 1 1 0 1 1
125 828 1 1 1 1 1 1 0 0
126 834 1 1 1 1 1 1 0 1
127 840 1 1 1 1 1 1 1 0
128 846 1 1 1 1 1 1 1 1
DIP1/DIP2 = 0/0 TEST 4.5MHz
Fast Media Home Network Systems Revised 06/04
—5—
FastHome™
550-080 Modulator Module Installation Guide
R
DIP Switch
Settings
550-080Manual.qxd 7/6/04 3:57 PM Page 5

R
Manufactured by:
Steren Electronics International, LLC
8675 Miralani Drive, San Diego, CA 92126
1-800-266-3333
www.steren.com
Made in China
Fast Media
Home Network
Systems
Fast Media
Home Network
Systems
For your future construction needs, consider the
entire series of FastHome™ Enclosures and Modules.
FastHome™Enclosures
From a centralized location,
Fast Media Home Network
Systems enclosures fully inte-
grate, manage and distribute
broadband and multimedia serv-
ices on a flexible, customizable
and upgradeable platform.
Constructed of 18-gauge cold
rolled steel for strength and
protection against interference,
FastHome™enclosures mount
on a wall (surface mount) or
between 16˝ center wall studs
(flush mount).
FastHome™Modules
High-quality FastHome™modules
by Steren provide secure, reliable
connections for voice, video,
data and audio applications.
Each module is housed in a
sturdy 18-gauge cold rolled steel
construction for excellent RFI
shielding. The system is expand-
able by adding multiple modules.
550-100
Small Surface Mount Enclosure
7˝(W) x 11˝(H) x 35/16˝(D)
550-105
Large Surface Mount Enclosure
149/16˝(W) x 19˝(H) x 4 5/16˝(D)
550-200
Small Flush Mount Enclosure
143/8˝(W) x 19˝(H) x 31/2˝(D)
550-205
Medium Flush Mount Enclosure
143/8˝(W) x 32˝(H) x 3 1/2˝(D)
550-210
Large Flush Mount Enclosure
14 3/8˝(W) x 44˝(H) x 3 1/2˝(D)
550-010
Fast Media Telephone/TV Hub Module
61/2˝(W) x 43/4˝(H) x 1˝(D)
550-020
Fast Media Telephone Hub Module
61/2˝(W) x 27/8˝(H) x 1˝(D)
550-030
Fast Media Data Hub Module
61/2˝(W) x 27/8˝(H) x 1˝(D)
550-040
Fast Media TV
Combiner/Splitter Module
61/2˝(W) x 27/8˝(H) x 1˝(D)
550-050
Fast Media Audio Splitter Module
61/2˝(W) x 27/8˝(H) x 1˝(D)
550-060
Fast Media Ethernet Switch Module
61/2˝(W) x 23/4˝(H) x 1˝(D)
550-070
Fast Media Power Module
61/2˝(W) x 25/8˝(H) x 1˝(D)
550-080
Fast Media RF Modulator Module
61/2˝(W) x 3˝(H) x 23/8˝(D)
550-080Manual.qxd 7/6/04 3:57 PM Page 6
Table of contents
Popular Modulator manuals by other brands

BENDIX
BENDIX M-12-M-12R ANTILOCK MODULATOR manual

axing
axing Basic-line AVM 6-00 Operation instructions

Channel Vision
Channel Vision MAV-3 installation instructions

Pico Macom
Pico Macom VSM-3/4S Installation and operation manual

Kathrein
Kathrein UFO 372/TP instructions

GBS Elettronica
GBS Elettronica 41980 Instructions for use