IKUSI MAC-HOME HD User manual

MAC-HOME HD
REF. 4482
High Definition Standalone Modulator
DVB-T / DVB-C Outputs
CVBS . HDMI Inputs
User manual

MAC HOME HD modulator guide
2

MAC HOME HD modulator guide
3
4 General safety instructions
4 Types of notices
6 Introduction
6 General description
6 Main features
8 General use of the unit
9 Unit installation and configuration
9 Module assembly and connectorising
10 Cascade installation
10 Power supply connection
11 Display Menus Quick-guide
12 Initial configuration
12 Advanced mode
12 General
12 Block LCD and joystick/control button
13 Restoring factory settings
13 Fimware Update
13 Settings
13 Configuration of INPUT signals
14 Configuration of carrier services
14 Configuration of OUTPUT signals
14 Network configuration
16 Unit status
16 Unit information
16 Unblocking the unit
17 USB PLAYBACK Function
17 Video playback
18 Technical Specifications
21 Unit Maintenance, Warranty and Recycling
21 Characters table
21 CE Certificate
22 Safety Instructions
Contents

MAC HOME HD modulator guide
4
General safety instructions
JRead this entire user manual carefully before plugging in the unit.
JKeep these instructions to hand during unit installation.
JFollow all the instructions and safety notices when handling the unit.
Types of notices
The safety notices used in this manual and their meanings are described below:
DANGER OF DEATH OR INJURY
This safety notice indicates a potential hazard to people’s lives and/or health. Failure to
follow these instructions can lead to severe health consequences and may even cause
fatal injuries.
JDo not install the unit during electrical storms. This could lead to electro-static
discharge from lightning.
JDo not open the unit. You may suffer an electric shock.
RISK OF DAMAGE TO THE UNIT
This safety notice indicates a potentially hazardous situation. Failure to follow these
instructions may cause material damage to the unit.
JKeep the unit well-ventilated at all times. Install the unit in an area free of dust. Do
not place the unit in a place where the ventilation slots may become blocked or
obstructed.
Leave a distance of at least 20 cm all around the unit’s sides. We recommend insta-
lling the unit in the VERTICAL position.
JDo not expose the unit to rain or moisture. Install in a dry location where potential
leaks or condensation will not occur. In the event that liquid gets into the device,
disconnect it immediately from the alternating current.
JKeep ammable objects, candles and anything that may cause a re away from the
unit.
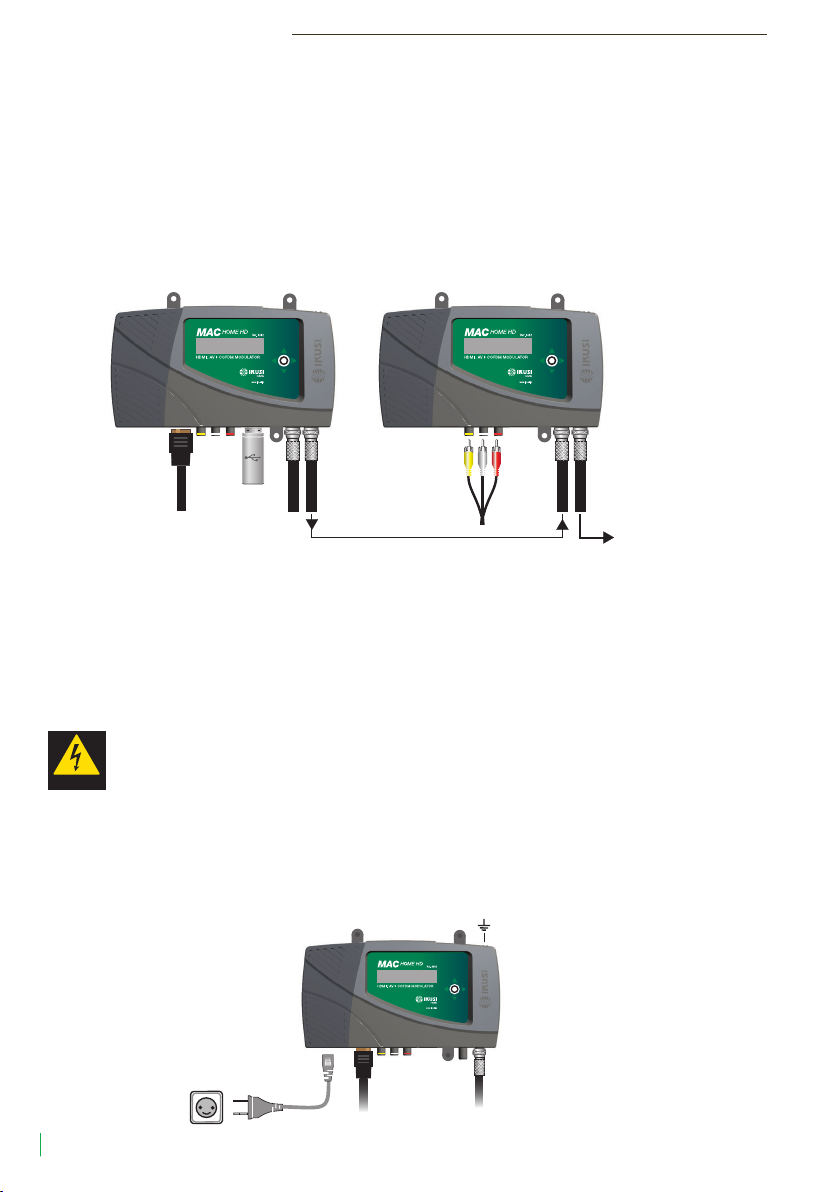
JConnect the unit to an easily-accessible mains outlet, so that the unit can be quickly
disconnected from the outlet in case of emergency.
JDo not expose the unit to sources of heat (sunlight, radiators, etc).
NOTE. Do not expose the unit to sources of heat (sunlight, radiators, etc).
DANGER
ATTENTION

MAC HOME HD modulator guide
5
DO NOT HANDLE ANY OF THE UNIT’S INTERNAL PARTS
This notice indicates that users should not handle any internal parts that could affect its
working order or warranty.
DO NOT DISPOSE OF UNIT AS NORMAL DOMESTIC URBAN WASTE
This type of notice indicates that the unit should not be disposed of as unselected
domestic urban waste.

MAC HOME HD modulator guide
6
Introduction
General description
Main characteristics
The MAC HOME HD model is a standalone modulator unit which can handle different Audio and
Video formats to make up a high-denition COFDM/QAM channel.
The unit has two types of input:
• An analogue audio and video channel through 3 RCA jacks.
• A digital audio and video channel in HDMI format through HDMI connector.
The multiplex signals allow the following operation modes:
• Ch1 HDMI SD/HD + USB
• Ch1 CVBS SD + USB
This product aims to meet video signal distribution requirements in residential facilities, hotels and
landmark buildings, along with video surveillance installations with COFDM/QAM digital TV modu-
lation, through a standalone unit.
LEGEND
1 Removable power source
2 Screen (LCD)
3 Control button for conguration
4 Network connector
5 HDMI input connector
6 CVBS video input connector
7 L and R audio analogue inputs
8 USB input for video playback and r-
mware upgrade
9 Loop-through for combination of exter-
nal RF TV signals.
10 DVB-T/C RF output
1 2 3
4 65 7 8 9 10

MAC HOME HD modulator guide
7
Programming:
• User interface with LCD screen and control button for basic conguration.
• All adjustments are stored automatically.
• Reprogrammable as often as necessary.
• Easily congurable.
Signal processing:
• CVBS video and mono/stereo audio input.
• HDMI input.
• SD and HD standard signal quality.
• Video resolution (480i, 576i, 480p, 576p, 720p50, 720p60, 1080i50, 1080i60).
• Video compression MPEG2 and H.264.
• Audio compression MPEG2 L1/L2, LC-AAAC, HE-AAC.
• PAL/SECAM/NTSC/B&W colour standards supported.
• DVB-T/C RF output throughout the CATV band (45MHz-858MHz).
• Loop-trough for combination of external RF TV signals.
• User interface with LCD and joystick.
• USB interface to upgrade rmware or electronic signage applications.
• Removable power source.
1 HD/SD HDMI
1 SD CVBS

MAC HOME HD modulator guide
8
General use of the unit
The following sections describe how to operate the unit using the control button and how to in-
terpret the visual prompts displayed on the LCD screen. The programme comprises a main menu
made up of submenus that can be selected to modify the unit’s basic operation settings.
Visual prompts on LCD screen
This symbol indicates that you can scroll vertically.
Vertical button movement
In the menus and submenus, you can move the button up or down to scroll
upwards or downwards, one step at a time.
In the settings, move the button up or down to change the values, one step at a
time.
NOTE. To browse or modify the values faster, keep the
button pressed up or down.
Horizontal button movement
In the menus, you can move the button to the left or right to select or go back,
one step at a time.
In the settings, move the button to the left or to the right to browse, select or go
back, step by step.
NOTE. Too browse faster, keep the button pressed to the left
or to the right.
Press button
In the menus, this selects the submenu.
In the submenus, this selects the settings.
In the settings, this selects the parameter value.

MAC HOME HD modulator guide
9
Unit installation and configuration
The unit can be adjusted with just the LCD screen and control button. Follow the steps indicated
below to install the unit and congure the different parameters accessible from the user interface
in the LCD screen.
Module assembly and connectorising
RISK OF DAMAGE TO THE UNIT
Handling the unit mechanically may result in damage. Do not connect the unit to the
power supply before or during assembly.
1 Assemble the mounts (*) and tighten the screws and plugs to secure the unit to the wall.
2 Connect the inputs (HDMI or CVBS) in the corresponding connectors.
3 Optionally, connect the loop-through TV input coaxial cable (F connector).
4 Connect the output cable to the DVB-T/C unit.
(*) The 3 wall attachments are supplied disassembled in order
to install the unit horizontally. Their straightforward assembly
consists of positioning the fastenings in the corresponding
holes and pushing as far as possible (be sure to take your
time doing this).
NOTE. It is recommended to assemble the equipment in
upright position.
ATTENTION
1
1
HDMI
CVBS
USB
DVB-T/C
TV
2 3 4
Signal sources
DVD
IRD
CAMERA
PC
USB
4000
USB
4000
USB
4000
USB
4000
USB
4000
USB
Blu-Ray
4000
USB
USB

MAC HOME HD modulator guide
10
Cascade installation
Several MAC HOME HD units can be cascaded in order to increase services capacity. To do this,
connect the RF output of the preceding unit to the TV input (loop-through) of the next unit (see
assembly example). The number of modules depends on the available channels and the output
level.
To enable an assembly with 2 or more units, it is necessary to identify each service with a
different SID and TSID value. The MAC HOME HD unit automatically adjusts these values when
programming the channel of each modulator.
Two input modes:
1 SD/HD channel (HDMI) + 1 USB channel (through inserted ash-memory)
1 SD channel (CVBS) + 1 USB channel (through inserted ash-memory)
Electricity supply connection
RISK OF DEATH OR INJURY
Connecting the power supply incorrectly can cause electrical shock. Follow these steps
for the unit’s electrical installation.
1 Connect the earth cable.
2 Connect the base of the network cable to the unit’s network connector.
3 Connect the network cable input to the electricity supply input.
USB
DANGER
TV + AV + HDMI + USB
HDMI USB AVTV
2
3
230-240 VAC
1

MAC HOME HD modulator guide
11
Fast menu guide
IKUSI
MAC Starting ...
MAC-HOME HD V2.25
CH 21 SYSTEM OK
>INPUT
DVB-T/C OUTPUT
INPUT
>DVB-T/C OUTPUT
>OUTUPT TYPE
1 HD/SD HDMI 1 SD CVBS
1 SD CVBS
ATTENUATION
0.0 dB
OUTPUT CHANNEL
21
COUNTRY
LANGUAGE
SPAIN
ESPANOL
ADVANCED MODE >GENERAL
SETTINGS
GENERAL
>SETTINGS
>STATUS
MODULE INFO
STATUS
>MODULE INFO
MODEL
MAC-HOME HD
SERIAL NUMBER
0123456789
MAC
0009E3FFFFFF
V.SW V.HW V.BS
2.25 1.00 1.00
OUTPUT BITRATE
31.670 Mbits/s
1 480i V:0 A:x
2 480i V:0 A:x
NULL MIN ACT MED
XX% XX% XX%
STATUS : OK
ALARM : OK
>INPUT
DVB-T/C OUTPUT
INPUT
>DVB-T/C OUTPUT
ASPECT RATIO 1
16/9
VIDEO BITRATE 1
1900 Kbits/s
CODIFICATION
MPEG2
AUDIO BITRATE 1
384 Kbits/s
LOW LATENCY 1
OFF
AUDIO FORMAT
HE-AAC
OUTPUT TYPE
1 HD/SD HDMI
CONFIGURE RF
NETWORK
NAME
Standard
ONID
08442
CH2 VIDEO AUDIO
ON ON
CH1 VIDEO AUDIO
ON ON
PROVIDER
IKUSI
CHANNEL
21
BANDWIDTH
8 MHz
CH2 LCN
001
CH1 LCN
001
NID
00001
MODE NIT LCN
Mode Europa
FREQUENCY
474.000 MHz
GUARD INTERVAL
1/32
CH2 SID
00001
CH1 SID
00042
TSID
00004
ATTENUATION
00
CONSTELLATION
64 QAM
COFDM MODE
2K
CODE RATE
7/8
RF OUTPUT
ON
CH2 NAME
MAC SERV2
CH1 NAME
MAC SERV1
SERVICE 1
SERVICE 2
LCD BLOCK
FACTORY RESET
UPDATE
CODE BLOCK
OFF 0000
** CAUTION **
CANCEL ACEP
** CAUTION **
CANCEL UPDATE
BRIGHT
128
CONTRAST
066
SATURATION
063
SHARPNESS
NONE

MAC HOME HD modulator guide
12
Initial configuration
NOTE. To enter a digit or character sequence on screen, use the vertical control button
to change the value of the current digit or character, and the horizontal control button to
move between digits or characters.
Position the cursor to the right of the current value and use the vertical control button to
increase or decrease the current value. Keep the control button pressed up or down to
increase or decrease the current value more quickly.
1) When the unit starts up, the start screen is displayed and
prompts to enter COUNTRY. Move the button to the right and
the cursor will ash next to the rst country, then move the
button down until you nd the reference country. OK to save.
* The unit automatically adjusts to the technical particularities of
this country (see parameters table).
2) Move to the left and place the arrow in LANGUAGE, then move
the button to the right and locate the required language by mo-
ving the button vertically. OK to save.
3) Move to the left through to the start screen, which shows the
model, rmware version, channel and status..
Status:
SYSTEM OK = correct status.
NO input = input signal not detected
SYSTEM NOK = no video, CVBS mode without video at input
(black video is generated)
Change of output channel
1) From the start screen, move the button to the right through to the
OUTPUT CHANNEL; the cursor will blink next to the channel.
2) Use horizontal scrolling to move between the digits and vertical
scrolling to change the value. OK to save.
Advanced mode
From the start menu, move a step to the right and down to locate
the ADVANCED MODE screen.
General
From the GENERAL screen, move the button to the right to access
the following menus:
Block LCD and Joystick
1) Locate and select the LCD BLOCK to lock access to the con-
guration of the unit from the LCD display and using the control
button.
a) Enable (ON) or disable (OFF) the locking option.
b) Set a code to unlock the unit whenever this option is enabled.
INPUT
>OUTPUT
OUTPUT CHANNEL
21
ATTENUATION
0.0 dB
COUNTRY
>LANGUAGE
>AVANCED MODE
CODE BLOCK
OFF 0000
>COUNTRY
SPAIN
MAC HOME HD 1.00
CH 21 SYSTEM OK
MAC HOME HD 1.00
CH 21 SYSTEM OK
>LCD BLOCK
RESET FACTORY

MAC HOME HD modulator guide
13
TYPE OF INPUT
1 HD/SD HDMI
TYPE OF INPUT
1 SD CVBS
GENERAL
>SETTINGS
** CAUTION **
CANCEL ACEPT
>UPDATE
** CAUTION **
CANCEL UPDATE
Restoring factory settings
1) Locate and select the RESET FACTORY option to restore the
default settings.
a) Select the ACCEPT option to remove all the changes made
to the settings by the installer or operator of the unit. OK to
save. After a few seconds the unit restarts with the default
settings.
Firmware upgrade
1) Locate and select the UPDATE option.
a) Download the FIRMWARE from the website (www.ikusi.tv)
b) Decompress and enter it in the root directory of a
ash-memory.
c) Insert the
ash-memory
in the USB port.
Settings
From the SETTINGS screen, move the button to the right to access
the following menus:
Input signal configuration.
1) Locate and select the INPUT option
NOTE. Press the control button to the right to access one
of the possible input types. Press “down” to access the
settings for the following types of input signal.
a) Locate and select the CH1 option to check the type of input
signal, video detection (X) and audio detection (X). Only video
values will be indicated in CVBS mode, there is no audio
detection.
b) Locate and select one of the two types of input, HDMI digital
audio and video channel (SD/HD) or CVBS analogue audio and
video channel (SD).
c) Locate and select the option ASPECT RATIO (CVBS, HDMI).
The image ratio values possible are 4:3 and 16:9.
d) Locate and select the CODIFICATION option. Can be used to
select the encoding standard of the audio and video digitalised
signal from the options: MPEG2, MPEG4 and DEFAULT (if the
input signal is SD, the default encoding will be MPEG2; if the
signal is HD, encoding will be H.264) (1080p resolution only
supports MPEG4).
e) Locate and select the VIDEO BITRATE option. The unit can
be congured for an input data encoding speed from 4000 to
19000 Kbits/s.
g) Locate and select the AUDIO FORMAT option. Can be used to
select audio encoding from three types: MPEG2 L1/L2,
LC-AAC or HE-AAC.
LCD BLOCK
>RESET FACTORY
>INPUT
DVB-T OUTPUT
ASPEC RATIO
16/9
CODIFICATION
MPEG2
VIDEO BITRATE
19000 Kbits/s
AUDIO FORMAT
HE-AAC

MAC HOME HD modulator guide
14
f) Locate and select the option AUDIO BITRATE (CVBS, HDMI).
The unit can be congured for an input data encoding speed
of 96; 128; 160; 192; 224; 256; 320 and 384 Kbits/s.
h) Locate and select the LOW LATENCY option. This reduces
encoding time for those applications where reaction time is
important (e.g. cameras), offset by a reduction in encoding
efciency and the quality of images with a lot of movement.
i) Locate and select the option BRIGHT to congure the bright-
ness of the video signal (1 to 255).
j) Locate and select the option CONTRAST to congure the
contrast of the video signal (1 to 255).
k) Locate and select the option SATURATION to congure the
conguration of the video signal (1 to 255).
l) Locate and select the option SHARPNESS to congure the
sharpness of video signal (High, Medium soft or None).
Configuration of carrier services
1) Locate and select the SERVICE 1 and 2 option.
a) Locate and select the CH1 VIDEO AUDIO option. Enable
(ON) or disable (OFF) the audio and/or video signals of the
input (audio and video cannot be locked in the 2nd service).
b) Locate and select CH LCN. Congure the signal LCN value.
c) Locate and select CH SID (use the output channel value).
Congure the Service Identier.
d) Locate and select CH NAME. Assign a name to the signal in
CH (see characters table at the end of the manual).
DVB-T/C Output signal configuration
1) Locate and select CONFIGURE RF.
a) Locate and select the OUTPUT CHANNEL. This option auto-
matically modies the frequency, adapting it to the centre of
the channel frequency.
b) Locate and select the FREQUENCY option. This option modi-
es the channel value, adapting it to the frequency. Congure
the output frequency value between 474MHz and 862MHz in
125 kHz steps.
c) Locate and select the ATTENUATION option. Select output
attenuation between 0 and 25dB.
d) Locate and select the COFDM MODE option. Select COFDM/
QAM mode between 2K and 8K subcarriers.
e) Locate and select the BANDWIDTH option. Select the band-
width between 6, 7 and 8Mhz.
f) Locate and select the GUARD INTERVAL option. Select the
save interval between symbols 1/32, 1/16, 1/8 and 1/4.
>SERVICE 1
SERVICE 2
CH1 VIDEO AUDIO
ON ON
CH1 LCN
001
CH1 SID
00021
CH1 NAME
MAC SERV1
INPUT
>DVB-T/C OUTPUT
>CONFIGURE RF
NETWORK
FREQUENCY
474.000 MHz
ATTENUATION
0.0 dB
COFDM MODE
8K
BANDWIDTH
8 MHz
GUARD INTERVAL
1/4
OUTPUT CHANNEL
21
LOW LATENCY
OFF
AUDIO BITRATE
384 Kbits/s
BRIGHT
128
CONTRAST
066
SATURATION
063
SHARPNESS
NINGUNO

MAC HOME HD modulator guide
15
g) Locate and select the CONSTELLATION option. Select modu-
lation constellation between 16QAM and 64QAM.
h) Locate and select the CODE RATE option. Select encoding
rate between 1/2, 2/3, 3/4, 5/6 and 7/8.
i) Locate and select the RF OUTPUT option. Allows the RF
signal to be enabled/disabled..
Network configuration
1) Locate and select the NETWORK option.
a) Locate and select the NAME option. Congure the network
name.
b) Locate and select the PROVIDER option. Congure the name
of the network service provider.
c) Locate and select the NID option. Congure the network
identier value.
d) Locate and select the TSID option. Congure the TS or trans-
port current identier value.
e) Locate and select the ONID option. Congure the original
network identier.
f) Locate and select the NIT LCN MODE option. Can be used to
select NIT LCN mode:
OFF: LCN descriptor not inserted in the NIT.
EUROPE MODE: Descriptor for Europe is inserted.
INDEPENDENT TELEVISION COMMISSION: Descriptor for
UK is inserted.
NORDIG MODE V1: Descriptor is inserted in accordance
with the Nordig V1 specication.
NORDIG MODE V2: Descriptor is inserted in accordance
with the Nordig V2 specication.
GENERIC MODE: Generic LCN descriptor.
CONFIGURE RF
>NETWORK
NAME
Standard
PROVIDER
IKUSI
NID
00001
TSID
00021
ONID
00100
CONSTELLATION
64 QAM
NIT LCN MODE
OFF
CODE RATE
1/4
RF OUTPUT
ON
DEFAULT PARAMETERS TABLE IN ACCORDANCE WITH THE COUNTRY SELECTED
Country AUSTRALIA FRANCE GREAT BRITAIN ITALY PORTUGAL SPAIN
Ch LCN 100 45 400 0 10 1
Ch SID 38 21 21 21 21 21
Channel 38 21 21 21 21 21
COFDM Mode 8k 8k 2k 8k 8k 8k
Bandwidth 7 MHz 8 MHz 8 MHz 8 MHz 8 MHz 8 MHz
NID 111111
TSID 38 21 21 21 21 21
ONID 100 8442 9018 1 8904 100
NIT MODE ON ON ON ON ON ON
Note: When configuring the country, the equipment is always configured with the first channel allowed, with the frequency of the centre
of this channel.

MAC HOME HD modulator guide
16
Status of the unit
NOTE. The unit shows its status in detail, along with the
existence of active alarms in the module.
1) Locate and select the STATUS option.
a) Locate and show STATUS. The unit reports its status and
alarms: OK / Error.
b) Locate and indicate OUTPUT BITRATE. The unit reports the
output data speed as Mbits/s.
c) Locate and indicate MIN ACT MAX NULL. The unit reports the
volume of null data packages in the output, minimum, current
and maximum as a percentage of the total.
Information of the unit
1) Locate and select the MODULE INFO option.
a) Locate and indicate the MODEL option. The unit reports the
model and version of the unit.
b) Locate and indicate the SERIAL NUMBER option. The unit
reports its serial number.
c) Locate MAC. Shows the number which identies the unit for
the network connection.
d) Locate and indicate the option V.SW V.HW V.BS. The unit
reports the software version (V.SW), hardware version (V.HW)
and system start-up version (V.BS).
Equipment unlocking
The unit can be locked, thus preventing anybody from using the
display and control button to modify the settings.
To unlock the unit:
1) Locate and select LOCK CODE.
2) Enter the unlock code assigned by the unit operator.
3) The unit reports the code validity.
NOTE. Once the code has been entered, restart the unit
in order to lock. This will remain until disabled by the
operator.
STATUS
>MODULE INFO
MODEL
MAC HOME HD
SERIAL NUMBER
0123456789
MAC
0009E1234567
>BLOCK CODE
INFORMATION
BLOCK CODE
0001
MAC HOME HD 1.00
0009E1234567
V. HW V. SW V. BS
1.00 1.00 1.00
>STATUS
MODULE INFO
CH1: V: 0 A: x
STATUS: OK
ALARM: OK
OUTPUT BITRATE
19.216 MBits/s
NULL MIN ACT MAX
00% 000% 000%

MAC HOME HD modulator guide
17
To unlock the unit without lock code:
1) Locate and select INFORMATION.
2) Contact the supplier of the unit and report the serial number.
The unit supplier provides an unlock code for the indicated
SERIAL NUMBER.
3) The unit reports the code validity.
USB Player
The unit can be used to play back videos through the USB port. Using the software, the user can
draw up a personalised list of images and videos in order to create the end le (“video-nal.ts”),
which can then be played back by the modulator through a pendrive (adding a new channel to the
existing one in the input).
Software to create videos for playback through the MAC HOME HD.
Users should install the “conversor-mac-installer.exe” on their PC, after down-
loading it from the website www.ikusi.tv.
Video playback
Once the pendrive is inserted in the USB connector of the MAC-HOME HD modulator, playback
will start automatically after a few seconds without having to access the menu; if the le is not
correct, the system will continue as a modulator (the application manual can be found at www.
ikusi.tv).
NOTE. The modulator sends the “USB” service signal for tuning by TVs, even when the
pendrive is not connected, thus avoiding having to retune the TVs when connecting the
USB pendrive.
NOTE
In case of connecting only the USB ash drive, the input mode must be “CVBS”.
BLOCK CODE
>INFORMATION
SERIAL NUMBER
4488SA123456
Input channel + “video-final.ts channel“video-final.ts channel
INPUT
CHANNEL

MAC HOME HD modulator guide
18
Technical specifications
MAC HOME HD model (4482)
Input CVBS, HDMI
Video standard PAL/NTSC/SECAM/B&W
Audio input 1 (mono and stereo)
Video MPEG2 MP@ML, H.264/MPEG4 AVC MP L4.1
Video quality SD, HD (480i, 576i, 480P, 576P, 720p50,
720p, 1080i50, 1080i60, 1080p50, 1080p60)
Maximum resolution 1080p60
Audio MPEG2 L1/L2, LC-AAC, HE-AAC
Analogue audio Yes
Digital audio Yes (HDMI)
Audio output level (analogue) 0.5 - 2.5
DVB-T / DVB-C Output DVB-T accordance with ETSI EN 300 744
DVB-C accordance with ETSI EN 300 429
Bandwidith MHz 6/7/8
Number of carriers 2K (UK) / 8K (FR)
MER dB ≥ 40
Frequency range MHz 45 - 858
Outupt level dBµV ≥ 80
Output attenuation dB 1
Lever adjustment dB -25
Frequency stability ppm ≤±30
Noise figure (∆B = 8MHz) ≤-60
Loopthrough frequency 45 MHz to 2.5 GHz
DVB-C symbol rate Kbps 3000 - 8000
Constellation DVB-T: 16QAM , 64QAM
DVB-C: 16QAM , 32QAM , 64QAM , 128QAM , 256QAM
NIT adaptation Yes (generated autimatically)
SDT adaptation Yes (entering configurable name)
TS Monitoring Yes
PSI/SI adaptation Generation and insertion of tables
PAT, PMT, SDT, NIT
Network configuration NID, ONID, TSID, Network name, Provide
SID configuration Yes

MAC HOME HD modulator guide
19
LCN processing Yes
LCN modes OFF,Europe,Independent Television Comision (UK),
Nordig mode V1, Nordig mode V2, Generic Mode
Mains voltage VAC 230 - 240
Firmware upgrade Yes, web or USB interface
Flujo de salida IP CBR / VBR
Direccionamiento IP Unicast / Multicast
Protocolos UDP / RTP
Formato encapsulado IP SPTS
Diserv QoS, TTL, VLAN Sí
Anuncio SAP de servicios Sí
Teclado Joystick 5 posiciones
Web Ethernet
Consumption 14W
Operating temperature 0 to 45ºC
Firmware updates Yes, via USB
Video playback through USB port Yes
LCD diaplay 16x2 characters
Programming button Joystick 5 positions

MAC HOME HD modulator guide
20
Maintenance
Unit care
HANDLING THE INSIDE OF THE UNIT IS FORBIDDEN
Do not dismantle or try to repair the unit, its accessories or its components. This will render the
warranty null and void.
JDo not use the power cable if it is damaged.
JTo disconnect the power cable, pull carefully on the plug and not the cable.
JTo clean the panel and unit connections:
FUnplug the unit.
FClean with a slightly damp, soft cloth.
FAllow to dry completely before use.
JDo not spill liquid onto the unit.
JKeep ventilation slots free of dust and any foreign bodies.
Troubleshooting
The most frequent problems arising during unit installation are indicated below. If you encounter any other type
of problem, please contact the unit sales team.
Problem Possible cause What to do
Forgotten unlock code ------ Contact your supplier
Nothing appears on LCD display The power cable is not connected
properly
Check the power cable
Warranty
Notwithstanding any complaints made to the direct vendor of the product, IKUSI offers unit users a two-year
warranty as of the invoice date, which shall become valid on presenting the receipt of purchase.
During the warranty period, IKUSI is responsible for any faults arising due to material or manufacturing defects
and shall repair the receiver or replace it for another corresponding to the state of technology at that time. The
warranty does not cover any faults or defects due to misuse or non-fullment of the information given in this
installation manual.
All complaints other than those indicated are not included in the warranty. More specically, the warranty does
not cover services provided by the authorised vendor (e.g. installation, conguration or programme updates) or
the repair of any damages or injuries caused to the client or others as a result of the installation or of receiver
operations.
Unit recycling
RECYCLING OF ELECTRICAL AND ELECTRONIC EQUIPMENT
(Applicable in the European Union and in European countries with selective waste collection sys-
tems.)
This symbol on your unit or its packaging indicates that this product cannot be treated as general
domestic waste and must be handed in at the corresponding point of collection for electric and
electronic equipment. By ensuring this product is disposed of correctly you will help prevent negative
consequences for the environment and human health, which could otherwise be caused by inappro-
priate waste handling of this product. Recycling of materials helps preserve natural resources. For
more detailed information on the recycling of this product, please contact your local council, your
nearest collection point or the distributor from whom you purchased the product.
Table of contents
Other IKUSI Modulator manuals

IKUSI
IKUSI MAW-200 User manual

IKUSI
IKUSI MAW-300 User manual

IKUSI
IKUSI 3854 User manual

IKUSI
IKUSI MAC-HD User manual

IKUSI
IKUSI MCP-800 User manual

IKUSI
IKUSI MAC 201 User manual

IKUSI
IKUSI MHD-201 User manual

IKUSI
IKUSI MHD-201 Operating instructions

IKUSI
IKUSI MAC HOME User manual

IKUSI
IKUSI MAW-201 User manual