Stirling TR0305 User manual
INSTRUCTION MANUAL
N13275
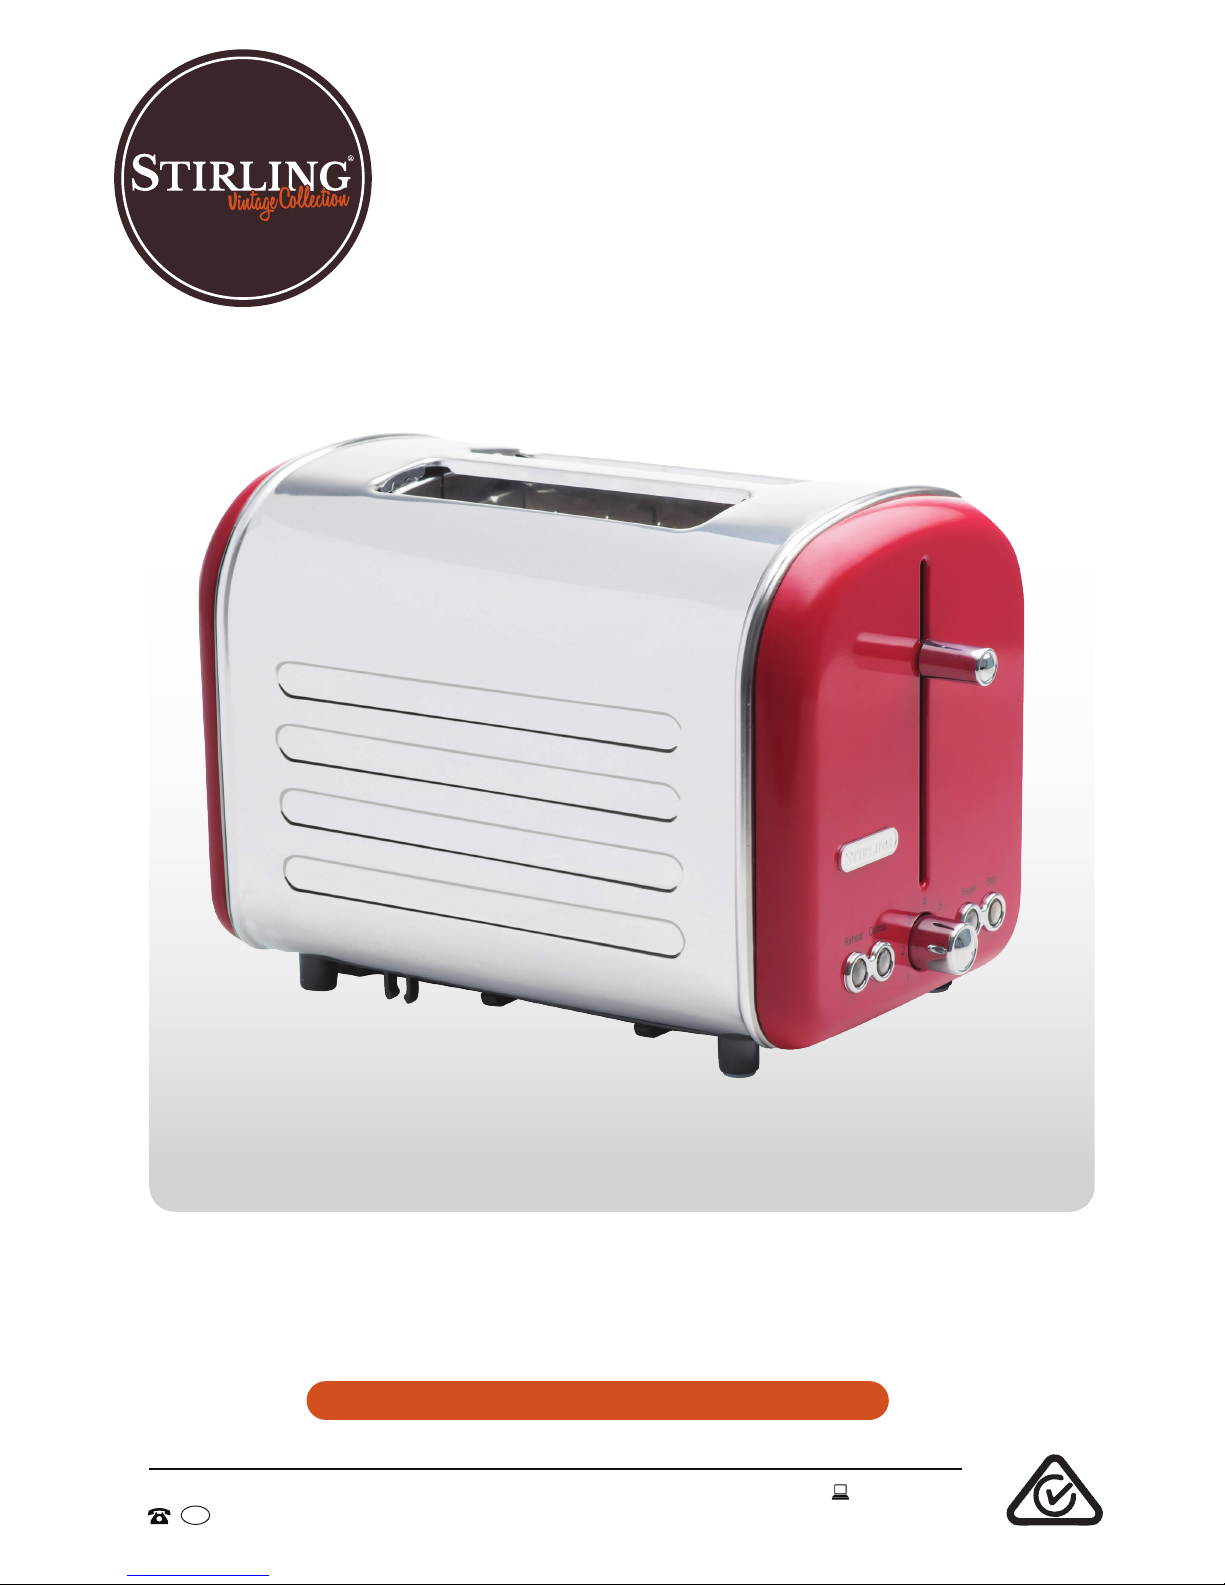
Model Number TR0305
2 Slice Toaster
AFTER SALES SUPPORT
1300 886 649
AUS MODEL: TR0305 PRODUCT CODE: 55002 09/2016

2
Welcome
Congratulations on choosing to buy a STIRLING®product.
All products brought to you by STIRLING®are manufactured to the highest
standards of performance and safety and, as part of our philosophy of
customer service and satisfaction, are backed by our comprehensive
3Year Warranty.
We hope you will enjoy using your purchase for many years to come.

3
Contents
02 Welcome
04 Warranty Details
05 General Safety Instructions
08 Product Overview
09 Getting Started
10 Instructions
12 FAQs and Troubleshooting Guide
13 Other Useful Information
15 Repair and Refurbished Goods or Parts Notice
4
2 Slice Toaster
Warranty Details
The product is guaranteed to be free from defects in workmanship and parts for
a period of 36 months from the date of purchase. Defects that occur within this
warranty period, under normal use and care, will be repaired, replaced or refunded
at our discretion, solely at our option with no charge for parts and labour. The
benefits conferred by this warranty are in addition to all rights and remedies
in respect of the product that the consumer has under the Competition and
Consumer Act 2010 and similar state and territory laws.
Our goods come with guarantees that cannot be excluded under the Australian
Consumer Law. You are entitled to a replacement or refund for a major failure
and to compensation for any other reasonably foreseeable loss or damage. You
are also entitled to have the goods repaired or replaced if the goods fail to be of
acceptable quality and the failure does not amount to a major failure.
YEAR WARRANTY
3

5
General Safety Instructions
IMPORTANT SAFETY INSTRUCTIONS
READ CAREFULLY AND KEEP FOR FUTURE REFERENCE
Read this manual thoroughly before first use, even if you are familiar with this
type of product. The safety precautions enclosed herein reduce the risk of fire,
electric shock and injury when correctly adhered to. Keep the manual in a safe
place for future reference, along with the completed warranty card, purchase
receipt and carton. If applicable, pass these instructions on to the next owner of
the appliance.
Always follow basic safety precautions and accident prevention measures
when using an electrical appliance, including the following:
Electrical safety and cord handling
• Voltage: Make sure your outlet voltage and circuit frequency correspond
to the voltage stated on the appliance rating label and your outlet socket is
properly earthed. If this is not the case, do not use the toaster.
• Water: To protect against fire and electric shock, do not immerse the cord,
plug or any non-removable parts of this toaster in water or other liquid, or
expose the electrical connections to water. Ensure your hands are dry before
handling the plug or switching on the appliance.
WARNING: If the toaster falls or accidentally becomes immersed in water,
unplug it from the wall outlet immediately. Do not reach into the water!
• Damage: Check the power cord regularly for visible damage. If the cord is
damaged, it must be replaced by the manufacturer, its authorised service
centres or appropriately qualified personnel in order to avoid any hazards.
WARNING: Do not pick up or operate the appliance if the cord, plug or housing
is damaged, or after it malfunctions or has been dropped or damaged in any way.
In case of damage, contact the after sales support line for advice.
• Power cord: Do not kink, bend, strain or damage the power cord and protect it
from sharp edges and heat. Do not let it touch hot surfaces. Do not let the cord
hang over the edge of a table or benchtop.
• No extension cord, no timer: Do not use this toaster with an extension cord,
plug adaptor, external timer or separate remote control system.
• Disconnect: Unplug the toaster from the outlet when it is not in use and
before cleaning. Grip the plug when disconnecting, do not pull the cord.
• RCD: Unless your home is already fitted with a residual current device (safety
switch), we recommend installing an RCD with a rated residual operating
current not exceeding 30mA to provide additional safety protection when
using electrical appliances. See your electrician for professional advice.

6
General Safety Instructions (Cont.)
Usage conditions and restrictions
• Domestic use only: This appliance is intended for indoor domestic use only.
It is NOT suitable for commercial, industrial or outdoor use.
• No outdoor use: Do not use the appliance outdoors.
• Intended use: The appliance is only suitable for toasting bread products.
Do not use it for anything other than its intended purpose, and only use it as
described in this manual.
WARNING: Do not put anything else (such as oversized food, metal foil
packages or utensils) into the toasting slots. Doing so may create a fire or
electric shock hazard.
• Attachments: The use of accessory attachments not recommended in this
manual may cause injuries.
• Usage restriction: The appliance may be used by children aged 8 years and
older, and by persons with reduced physical, sensory or mental capabilities,
or lack of experience and knowledge, if they have been given supervision or
instruction concerning use of the appliance in a safe way and understand
the hazards involved. Cleaning and user maintenance shall not be made by
children unless they are older than 8 years and supervised.
• Children: Supervise children to ensure they do not play with the appliance.
Close supervision is necessary when any appliance is used by or near
children.
• Liability: We accept no liability for any eventual damages or personal injury
caused by misuse of the product and/or failure to follow these instructions.
Safe usage
• Before first use: Make sure you know how to use the toaster before first use.
• Clearances: When using the toaster, make sure there is adequate air space
above and on all sides for air circulation.
• Work surface: Place the toaster on a dry, stable, flat, heat-resistant surface.
• WARNING: DO NOT use the toaster under the following conditions:
* On or near a gas or electric hob, in a heated oven or near an open flame.
* On a soft surface (such as carpet) or where it may tip over during use.
* Outdoors or in areas of high humidity.
* Near or below materials that can ignite easily (such as curtains, drapes, wall
hangings, tea towels) or underneath wall cabinets, as bread may burn and
cause a fire if it is toasted for too long.
7
• Do not cover: Do not cover the toaster or place anything on top during use.
• Do not insert any objects into the appliance.
• Smoke or fire: Immediately unplug the appliance if fire or smoke is emitted.
• Unattended: Do not leave the toaster unattended when it is switched on.
Disconnect it from the power supply when you are finished with it or when
leaving the room.
• Malfunction: If this appliance begins to malfunction during use, or if fire or
smoke is emitted, immediately press the "Stop" button and unplug the cord.
Do not use or attempt to repair a malfunctioning appliance. Contact our after
sales support line for advice.
• Cleaning: Maintain the toaster in accordance with the instructions to ensure
it functions properly. Disconnect the appliance before moving and cleaning it.
Allow it to cool completely before cleaning and storing.
• Crumb tray: To avoid the risk of fire, remove crumbs from the crumb tray after
each use. Make sure the crumb tray is dry and properly in place before reuse.
• Storage: When not in use, store your appliance and its instruction manual in a
safe and dry place.
General Safety Instructions (Cont.)
CAUTION: HOT SURFACE!
• The toaster heats up and can cause burns. The temperature of accessible
surfaces, especially the toaster's metal parts, can become very hot when the
appliance is operating. Do not touch hot surfaces during or immediately after
use. Use handles or knobs.
• Always use oven mitts when handling hot material and allow metal parts to
cool before cleaning.
• Take care when taking out hot bread slices after toasting to avoid injuries.
WARNING: ELECTRIC SHOCK HAZARD!
• Never attempt to dislodge food from inside the toaster when it is
plugged into an electrical outlet. Always unplug it and let it cool first.
• Never use a knife or any other sharp metal tool to remove the bread,
and do not touch the metal parts inside the toaster.

8
Product Overview
Scope of Delivery
A Toaster
1 Toasting slots
2 Lever
3 Browning control
4 Skid-resistant feet (4)
5 Power cord guide
(cord storage underneath)
6 Crumb tray (not visible here)
7 Reheat button
8 Defrost button
9 Bagel button
10 Stop button
B Documentation (not shown):
Instruction manual
Quick start guide
Warranty certicate
1
2
3
4
5
78910
6
Note
You may notice a slight burning smell or smoke when first using the toaster.
This is no cause for concern. Ensure good ventilation and let the toaster
complete a few toasting cycles until no more odour or smoke is present.
Fig. 1
9
Getting Started
Before first use
• Unpack: This product has been packaged to protect it against transportation
damage. Unpack the appliance and keep the original packaging carton and
materials in a safe place. It will help prevent any damage if the product needs
to be transported in the future, and you can use it to store the appliance when
it is not in use. In the event the carton is to be disposed of, please recycle all
packaging materials where possible. Plastic wrapping can be a suffocation
hazard for babies and young children, so ensure all packaging materials are
out of their reach. Dispose of any plastic wrapping safely.
• Documentation: Make sure you have read and understood all instructions
and warnings in this manual. Refer to the Product Overview, opposite, to
familiarise yourself with the product and identify all parts. Pay particular
attention to the safety instructions on the previous pages.
• Cord: Unwind the power supply cord to its full length and inspect the cord
and plug for damage. Inspect all other parts of the appliance for visual
damage. Do not use the appliance if anything appears to be damaged or not
working properly. In case of damage, contact our after sales support centre
using the details at the bottom of the page.
• Clean: Remove any adhesive labels and wipe the outside of the toaster with a
damp cloth. Make sure there is no packaging material remaining in the slots.
• Preliminary use: Keeping the safety instructions from the previous pages in
mind, place the toaster on an appropriate surface and plug it into an easily
accessible wall outlet.
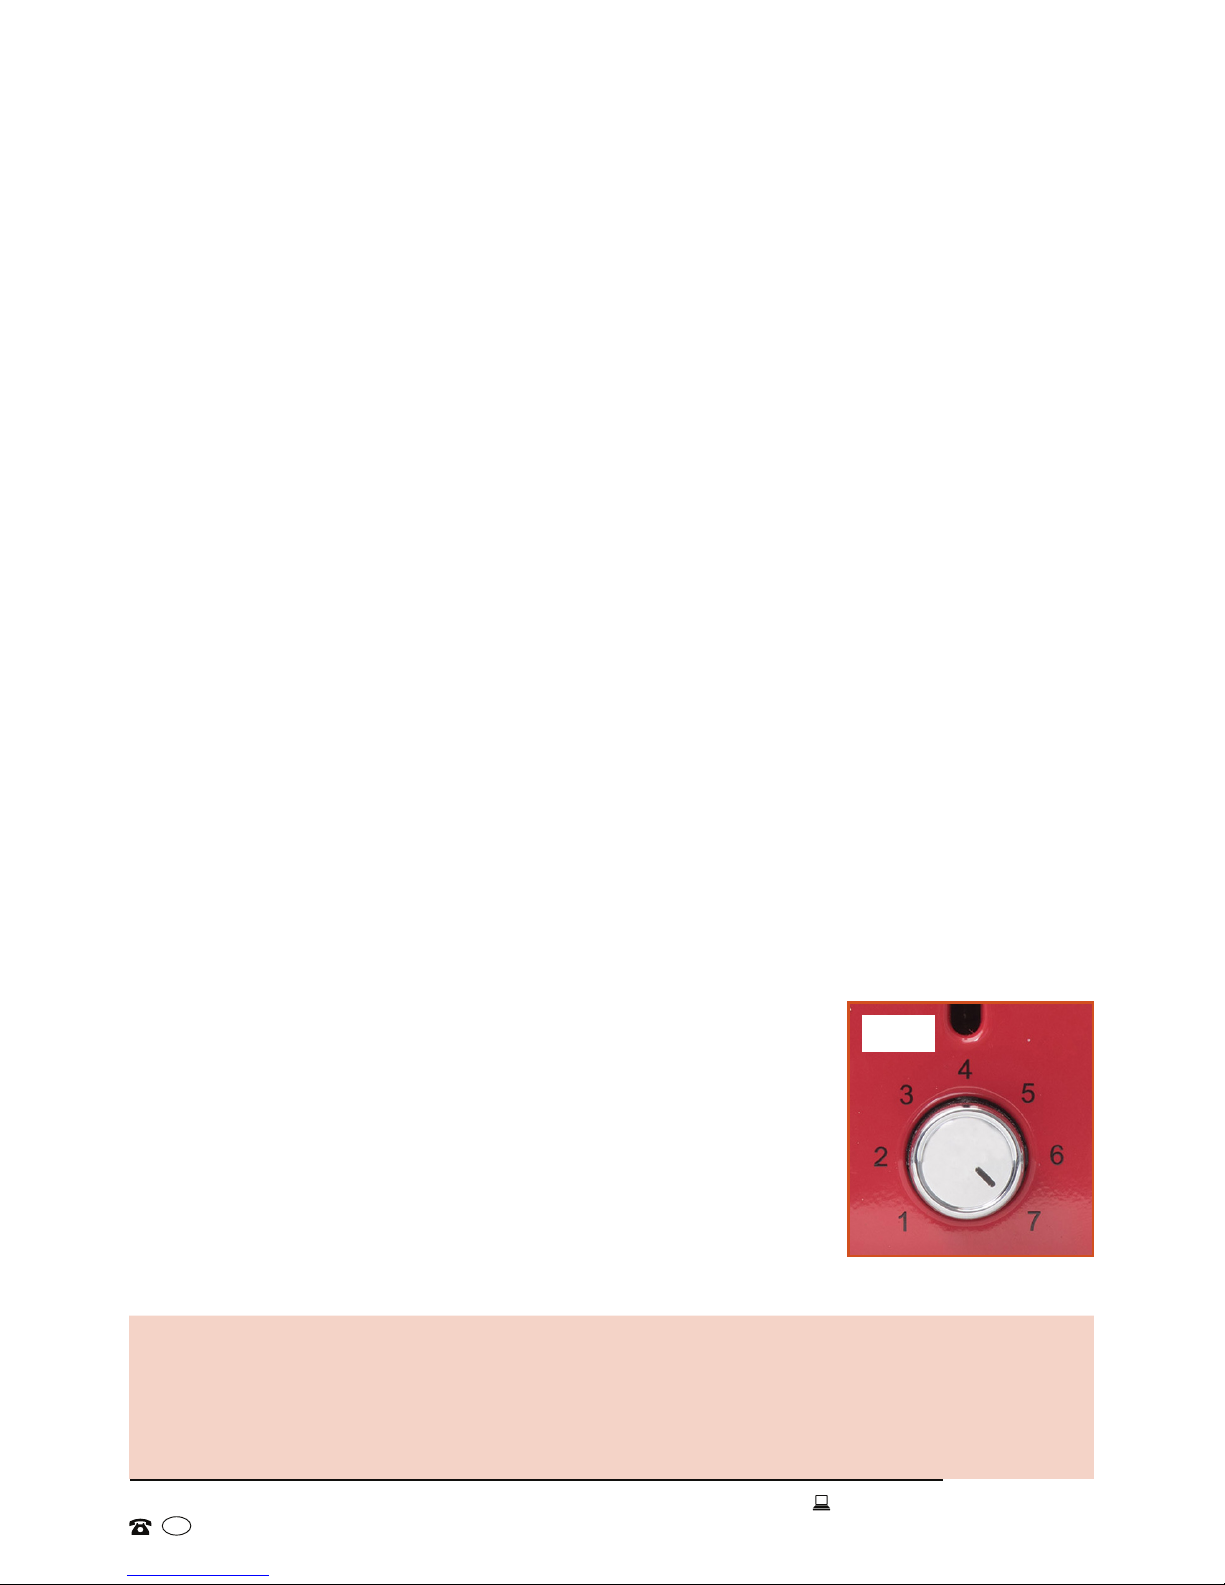
• Set the browning control to the maximum level (Fig. 1).
• Push down the lever and let your toaster heat up
without any bread to burn off any remnants from
transport and the manufacturing process.
• After a short cooling down period, your toaster is now
ready for use.

Fig. 3
Lever
Browning control
Fig. 3
Fig. 2
10
Instructions
• Push down the lever gently until it locks into place to start the toasting cycle (Fig.
3). The "Stop" button indicator will illuminate; press it any time to stop toasting.
Knob position Browning level
1 - 3 For thinly sliced, or slightly dry bread
3 - 5 For fresh, medium thick slices of white or wholemeal bread
5 - 7 For very thick slices, crumpets or muffins
Toasting bread
• Make sure the crumb tray is properly in place before using the toaster. It is
located underneath the heating elements and can be accessed from the side
of the toaster opposite the controls (Fig. 2).
• Place the toaster on an even and heat-resistant surface, connect it to a
properly installed wall socket and switch on power to the outlet.
• Place two slices of bread into the bread slots. (If toasting one slice only,
choose any slot and use a lower browning level.)
• Set the browning level with the browning control knob (Fig. 3). The higher the
number, the longer the toasting time and the darker the toast. (See page 12 for
additional toasting tips.)
NOTE
• This toaster automatically adjusts the slot width when the toasting lever is
pushed down to accommodate slices of different thickness.
• The lever will only stay down when the toaster is connected to the power
outlet and the power is switched on.
• Press the "Stop" button at any time to stop the toasting process.
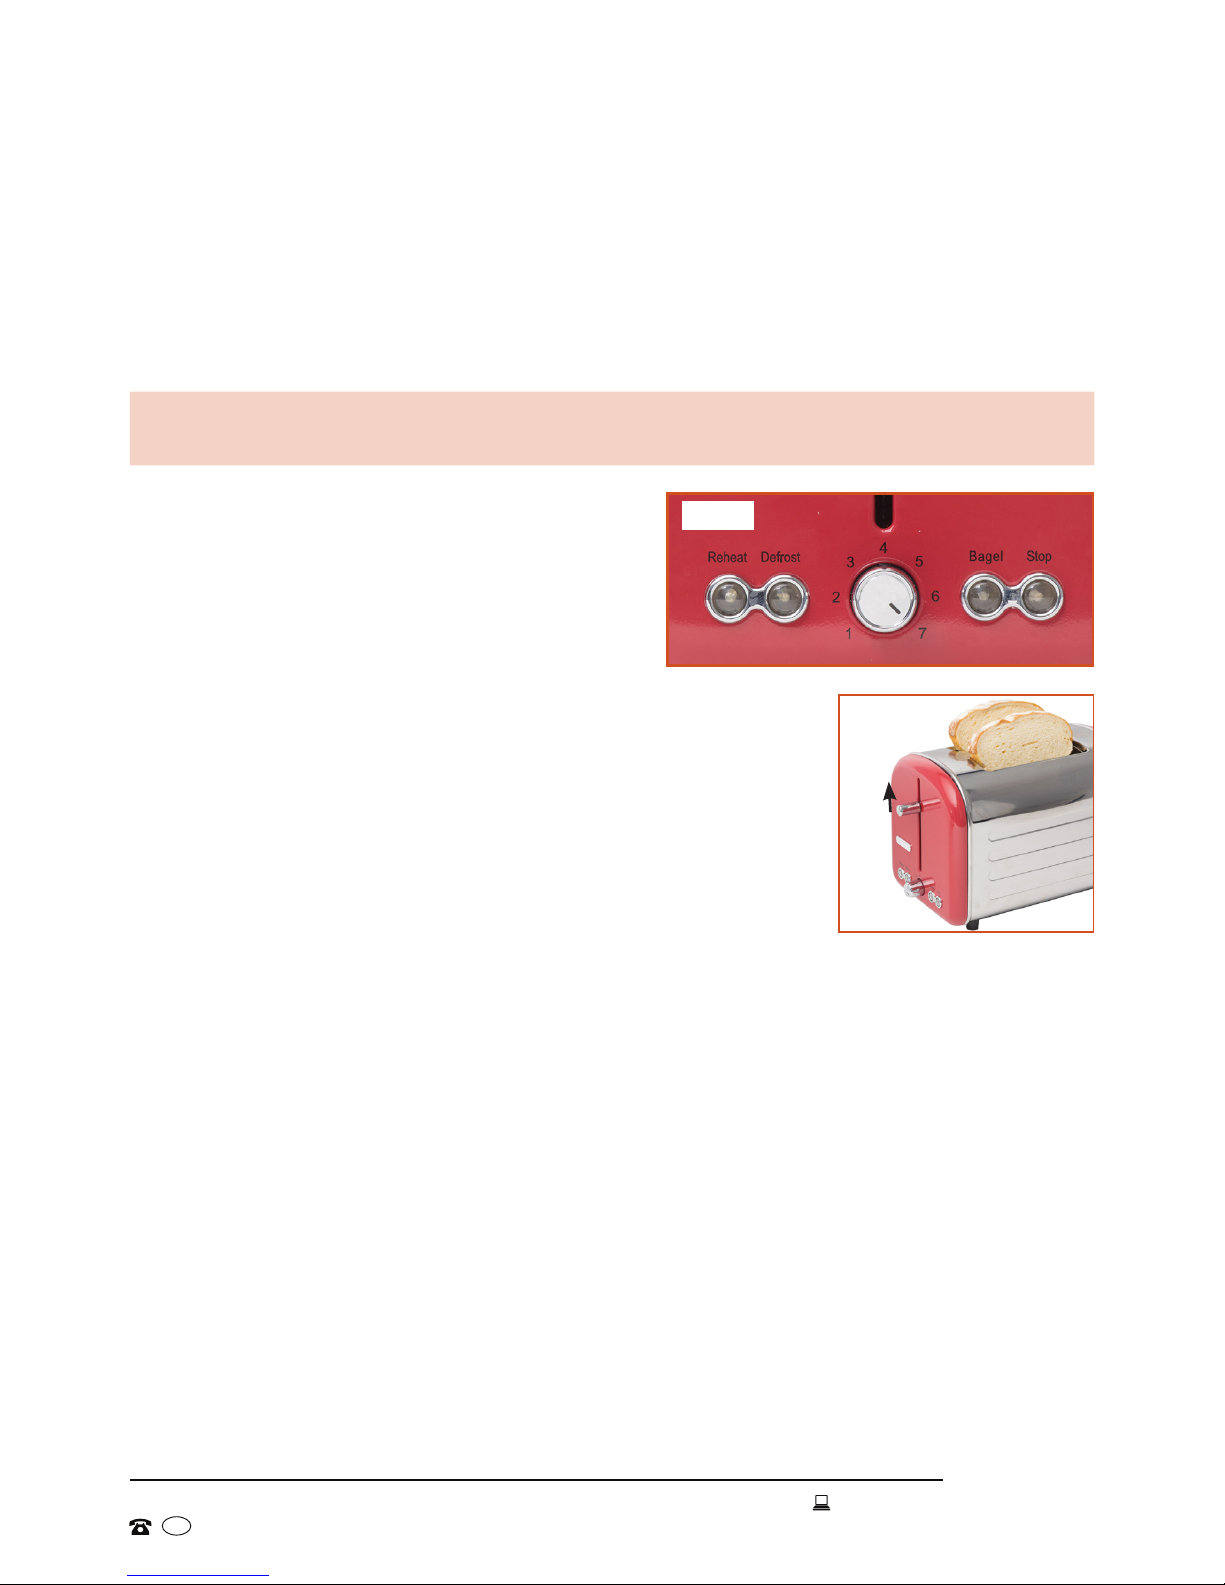
Fig. 4
Fig. 5
11
Instructions (Cont.)
• When the toast is ready, the lever moves up and the toaster switches off
automatically. You can now remove the bread from the toaster.
• If toasting more bread, allow the toaster 15 to 20 seconds to cool down
before beginning the next toasting cycle so the electronically controlled
thermostat can reset.
• When you have finished with the toaster, pull out the crumb tray and clean it.
CAUTION!
Do not touch the metal parts of the toaster as they become hot during toasting.
Extra functions
The toaster has extra buttons (Fig. 4) for
reheating toast, toasting frozen bread and
toasting bagels (or thinner bread rolls),
and a Stop button which you can press to
stop the toasting process at any time.
There is also an extra lift function to help you access the
bread after toasting. Gently lift the lever upwards (Fig. 5).
Reheat: Use this function to reheat bread that was
toasted earlier.
• Put the toasted bread back into the bread slots.
• Select browning level "1" and push down the lever until
it locks in place.
• Press the "Reheat" button. The reheat indicator light
comes on and stays illuminated during the process.
Defrost: Use this function to toast frozen bread slices.
• Put one or two slices of frozen bread into the bread slots.
• Select the browning level and push down the lever until it locks in place.
• Press the "Defrost" button. The defrost indicator light comes on and stays
illuminated during the process.
Bagel: Use this function to toast bagels or thinner bread rolls. On this setting
higher heat will be delivered to the outside elements, cooking one side of the
bread product more than the other side.
• Put a bagel (or other suitable bread product) into the bread slots with the side
to be toasted facing outwards.
• Select the browning level and push down the lever until it locks in place.
• Press the "Bagel" button. The bagel indicator light comes on and stays
illuminated during the process.

12
FAQs and Troubleshooting Guide
Problem Solution
The toaster is not
working.
Check the power connection and ensure the plug is
properly inserted in the outlet.
Bread is stuck in the
toaster.
Unplug the toaster and let it cool down. Then carefully
remove the slice or slices from the toaster. You may
need to hold the toaster over a sink and shake it gently
to help loosen stuck bread. Do not use a knife or other
sharp metal tool to remove the bread. Do not touch
the metal parts inside the toaster.
If the bread became stuck because it was too thick,
slice it a little thinner in future.
The toast is too
dark, or too light.
The selected browning level is too high or too low.
Select a different setting.
The toaster emits
smoke.
The set browning level is too high for the type of bread
toasted. Press the "Stop" button to stop the cycle.
Ensure the crumb tray is clean.
Check to make sure no large crumbs are caught in the
slot. Turn the unplugged unit upside down over the sink
and shake gently to remove any crumbs.
Bread ejects very
quickly.
Push down the toasting lever completely.
Make sure power is switched on at the outlet.
Make sure to select an appropriate browning level.
Smaller pieces do
not pop up enough.
Gently lift the lever upwards to help you remove smaller
pieces of toast once the toasting cycle is complete.
Some tips for perfect toasting
• Bread products with a very uneven surface (such as English muffins) will
require a higher setting.
• Thickly cut pieces of bread will take longer to toast since more moisture must
be evaporated from the bread before toasting can occur.
• When toasting raisin or other fruit bread, remove loose raisins from the surface
of the bread before placing the slices into the toaster. This will help prevent
pieces from falling into the toaster or sticking on the guard wire in the slot.
• If you are toasting a single slice of bread, select a lighter browning setting than
usual. The toaster is designed to heat the whole toasting chamber for two slices.
By reducing the time for toasting a single slice, it will not be over-toasted.
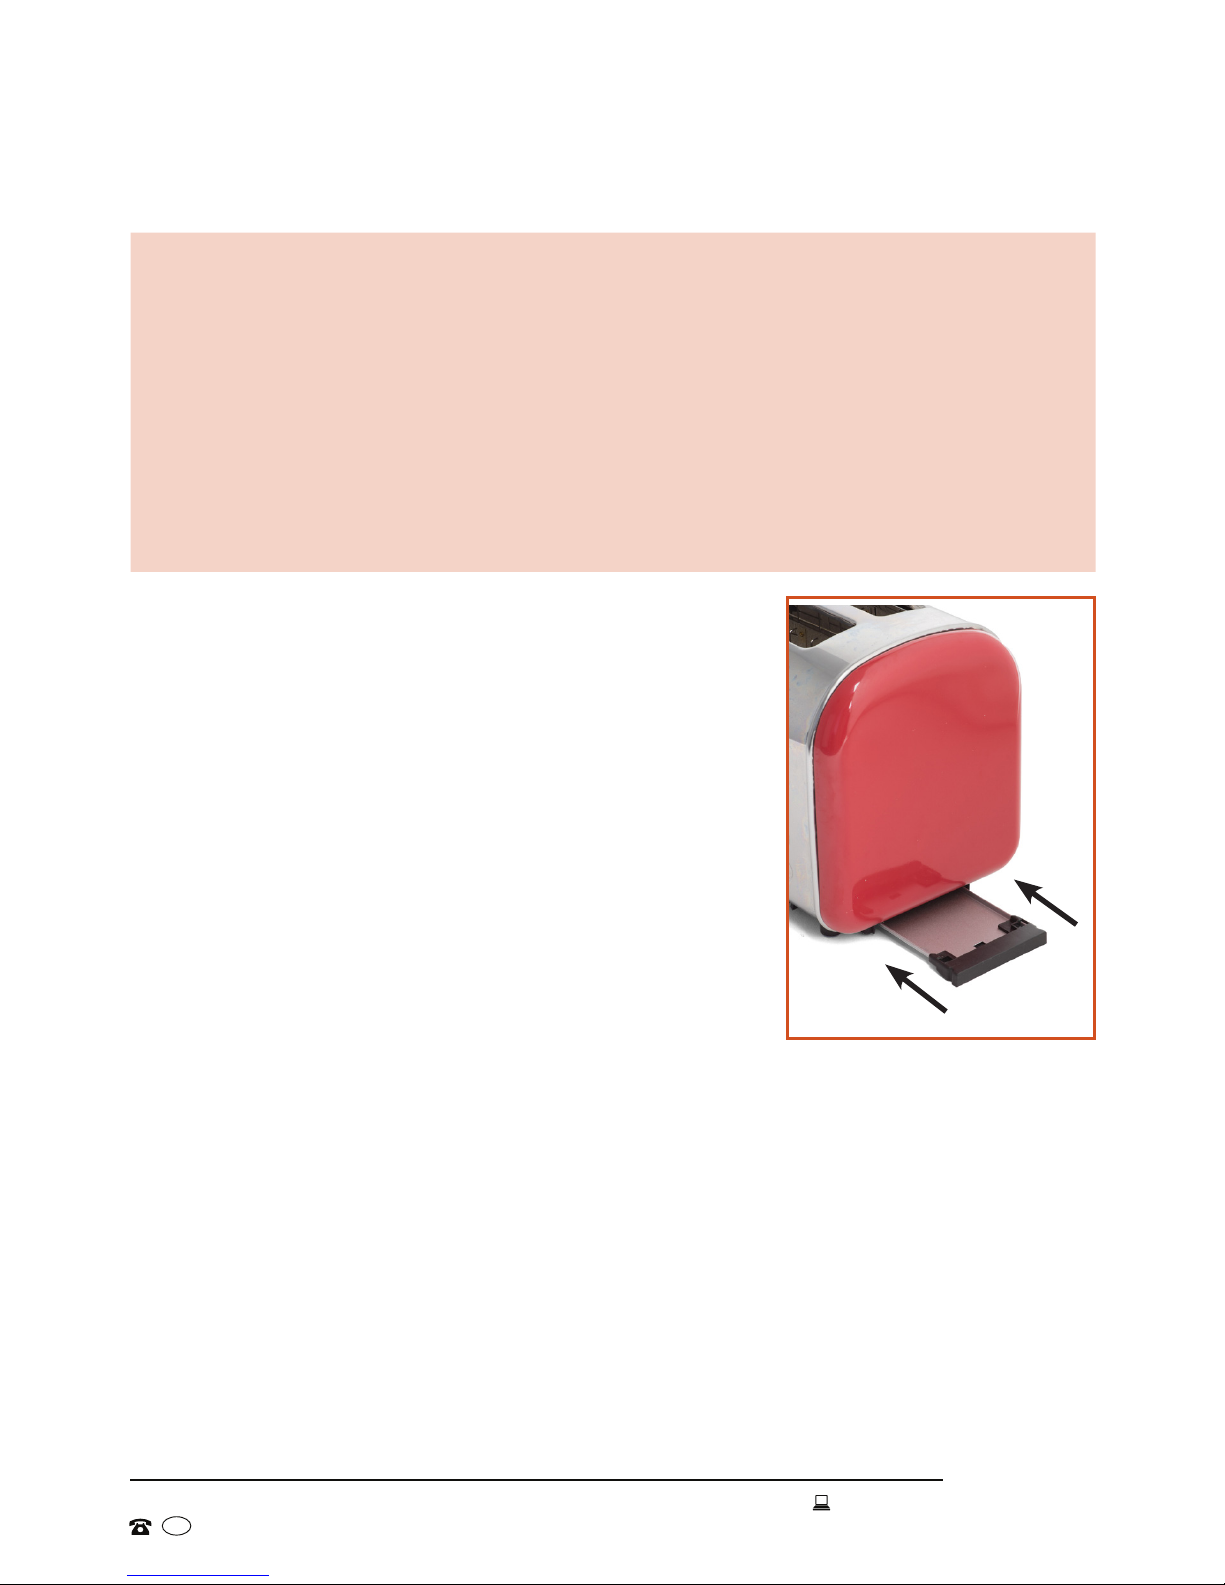
Fig. 6
13
Other Useful Information
Care and cleaning
CAUTION!
• Always disconnect the toaster from the power outlet and allow it to cool
before cleaning the toaster.
• Never immerse the toaster in water or any other liquid for cleaning. Water
and liquids must never enter the toaster.
• Never clean the inside of the toaster, as this may damage the heating
elements.
• Never use a metal scouring pad, abrasive materials, metal polish, harsh
chemical cleaners or hard objects for cleaning any surface of the toaster.
• Remove crumbs after each use.
• To clean the crumb tray, pull it out completely
(Fig. 6), discard the crumbs and wipe the tray
clean with a dry or damp cloth.
• To remove stubborn spots, use a nylon or plastic
scouring pad dampened in soapy water and
squeezed almost dry. Make sure the tray is
completely dry before inserting it back into the
toaster.
• Do not wash the crumb tray in the dishwasher.
• Wipe the outside surfaces and the cord with a
soft, dry or slightly dampened cloth or sponge
and a mild detergent.
• Always let your toaster cool down completely prior to storing, especially if it is
stored in a tightly enclosed space.
Storage
When in storage or not in use, the power cord may be wound around the cord
storage underneath the appliance. Before storing the appliance, make sure it is
dry and unplugged. Store it in the original carton, which will protect it from dust, in
a clean and dry place, out of children's reach.

Compliance
This appliance has been fully tested and meets all requirements as set out by
standards AS/NZS 60335.1 and AS/NZS 60335.2.9.
14
Responsible disposal
At the end of its working life, do not throw this appliance out with your household
rubbish. Electrical and electronic products contain substances that can have
a detrimental effect on the environment and human health if disposed of
inappropriately. Observe any local regulations regarding the disposal of electrical
consumer goods and dispose of it appropriately for recycling. Contact your local
authorities for advice on recycling facilities in your area.
Technical data
Rated voltage: 220-240VAC 50-60Hz
Rated power input: 1150W
Bread slots: 2 extra wide (36mm) slots
Browning control: 7 levels
Extra functions: Reheat, Defrost, Bagel, Stop
Dimensions: 285mm (H) x 165mm (D) x 190mm (L)
Weight: approx. 1.480kg
Other Useful Information (Cont.)
Service, repair and spare parts
If the toaster is damaged, do not attempt to repair, disassemble or modify the
toaster yourself. The unit contains no user-serviceable parts inside, and there are
no spare parts available for purchase. If you have any problems with the toaster,
contact our after sales support centre to arrange for examination or repair of the
product.

15
Unfortunately, from time to time, faulty products are manufactured which need to
be returned to the supplier for repair.
Please be aware that if your product is capable of retaining user-generated data
(such as files stored on a computer hard drive, telephone numbers stored on
a mobile telephone, songs stored on a portable media player, games saved on
a games console or files stored on a USB memory stick) during the process of
repair, some or all of your stored data may be lost. We recommend you save this
data elsewhere prior to sending the product for repair.
You should also be aware that rather than repairing goods, we may replace them
with refurbished goods of the same type or use refurbished parts in the repair
process.
Please be assured though, refurbished parts or replacements are only used
where they meet ALDI’s stringent quality specifications.
If at any time you feel your repair is being handled unsatisfactorily, you may
escalate your complaint. Please telephone us on 1300 886 649 or write to us at:
Tempo (Aust) Pty Ltd ABN 70 106 100 252
PO BOX 6056 Frenchs Forest, Sydney, Australia NSW 2086
Tempo Help Desk: 1300 886 649 (AUS)
(Operating Hours: Mon-Fri 08:30AM to 06:00PM EST)
Email: [email protected]g
Repair and Refurbished
Goods or Parts Notice
2 Slice Toaster
YEAR WARRANTY
3
Warranty returns
Should you for any reason need to return this product for
a warranty claim, make sure to include all accessories with
the product.
Product does not work?
If you encounter problems with this product, or if it fails to
perform to your expectations, make sure to contact our
After Sales Support Centre on 1300 886 649 before
returning it to the store for a refund.
For an electronic copy of this manual, go to www.stirlingappliances.com.au and download
a copy.
Instruction Manual Revision Index
Version No Issue Date Description
V1.0 01 June 2016 Original release
16
Other manuals for TR0305
1
Table of contents
Other Stirling Toaster manuals


Popular Toaster manuals by other brands


Coopers
Coopers 9284 quick start guide

APRIL X STONE
APRIL X STONE AP301-PT10 quick start guide

Russell Hobbs
Russell Hobbs Groove RHT722 Series Instructions and warranty

Dualit
Dualit AWS Instruction manual & guarantee

Dualit
Dualit DPP2 Instruction manual & guarantee

Sunbeam
Sunbeam Quantum Thick & Thin TA4200 Instruction booklet