StoneAge Big Pig User manual

1
Installation and Operation Instructions
Stone Age Big Pig™ and Little Pig™ Smoker Ovens
1.0 Introduction
The following provides instructions for the installa-
tion and operation care of Stone Age Big Pig™ and
Little Pig™ (SA-SM-BP8 and SA-SM-LP6)
Smoker Ovens, manufactured by Stone Age Manu-
facturing, Collinsville, Oklahoma.
Three generations of wood-burning masonry con-
struction experience have gone into the design and
construction of these smoker oven kits. A com-
pleted Little Pig oven, finished in natural stone, is
shown in Figure 1.
Stone Age smokers are unique in that they are the
only masonry/metal smoker units which can be
covered in the same masonry finish material as the
rest of your outdoor kitchen.
Figure 1. Little Pig™ Smoker Oven
The key differences between the Big Pig™ and
Little Pig™ ovens are their size and weight. Table
1 shows the weights of the two Smokers.
Table 1. Smoker Weights (lbs)
Big Pig™ Little Pig™
Refractory Kit
Weight 2,850 2,600
Metal Smoker
Insert 700 500
Complete Kit 3,550 3,100
Note: Weights do not include footing platform or
exterior finish
2.0 Installation
Smokers are offered as kits or assembled with
stone or brick veneer finishes. Kit weights are
listed in Table 1.
If your smoker is received in kit form, it will arrive
on two pallets, one containing the metal frame and
the other containing the outer wall components,
shown in Figure 2.
Metal Frame Outer Wall Components
Figure 2. Smoker Kit
Smoker assembly and installation is not specifical-
ly designed as a “do-it-yourself” project. This is
2
primarily because of component weight (see Table
1) and the care required when applying mortar.
However, it can be done if one has the necessary
weight lifting equipment, and can use a mortaring
trowel. We recommend that you contract with a
professional rock/brick mason to install and finish
your installation.
2.1 Site Selection and Preparation
Consult local building codes before selecting a site,
as local code may prescribe specific minimum
clearances to a combustible structure. In such case,
follow local code if it is more stringent than the
factory recommendations.
Select a location at least 8 feet away horizontally
from any combustible materials, i.e., outside wall,
trellis, etc. If the smoker will be built under a
combustible covered area or structure, ensure the
area is open enough to allow smoke to dissipate
when the unit is in operation, and that the struc-
ture is open on at least 3 sides, with a minimum of
6’ clearance to combustibles overhead.
Site preparation should include pouring a rein-
forced concrete footing for placement of the unit.
Depth of the footing and specific reinforcement
requirements, such as piering, should be deter-
mined based on size and weight of the unit, finish
material to be applied, soil stability and building
customs. Table 2 provides minimum guidelines.
Table 2. Minimum Footing Requirements (in.)
Finish Front
(in.) Side
(in.) Depth
(in.)
Thin: Fabricated
stone, stucco, stain or
tile 43 37 8-10
Thicker: Full veneer,
natural stone or brick 48 43 18-24
2.2 Smoker Assembly
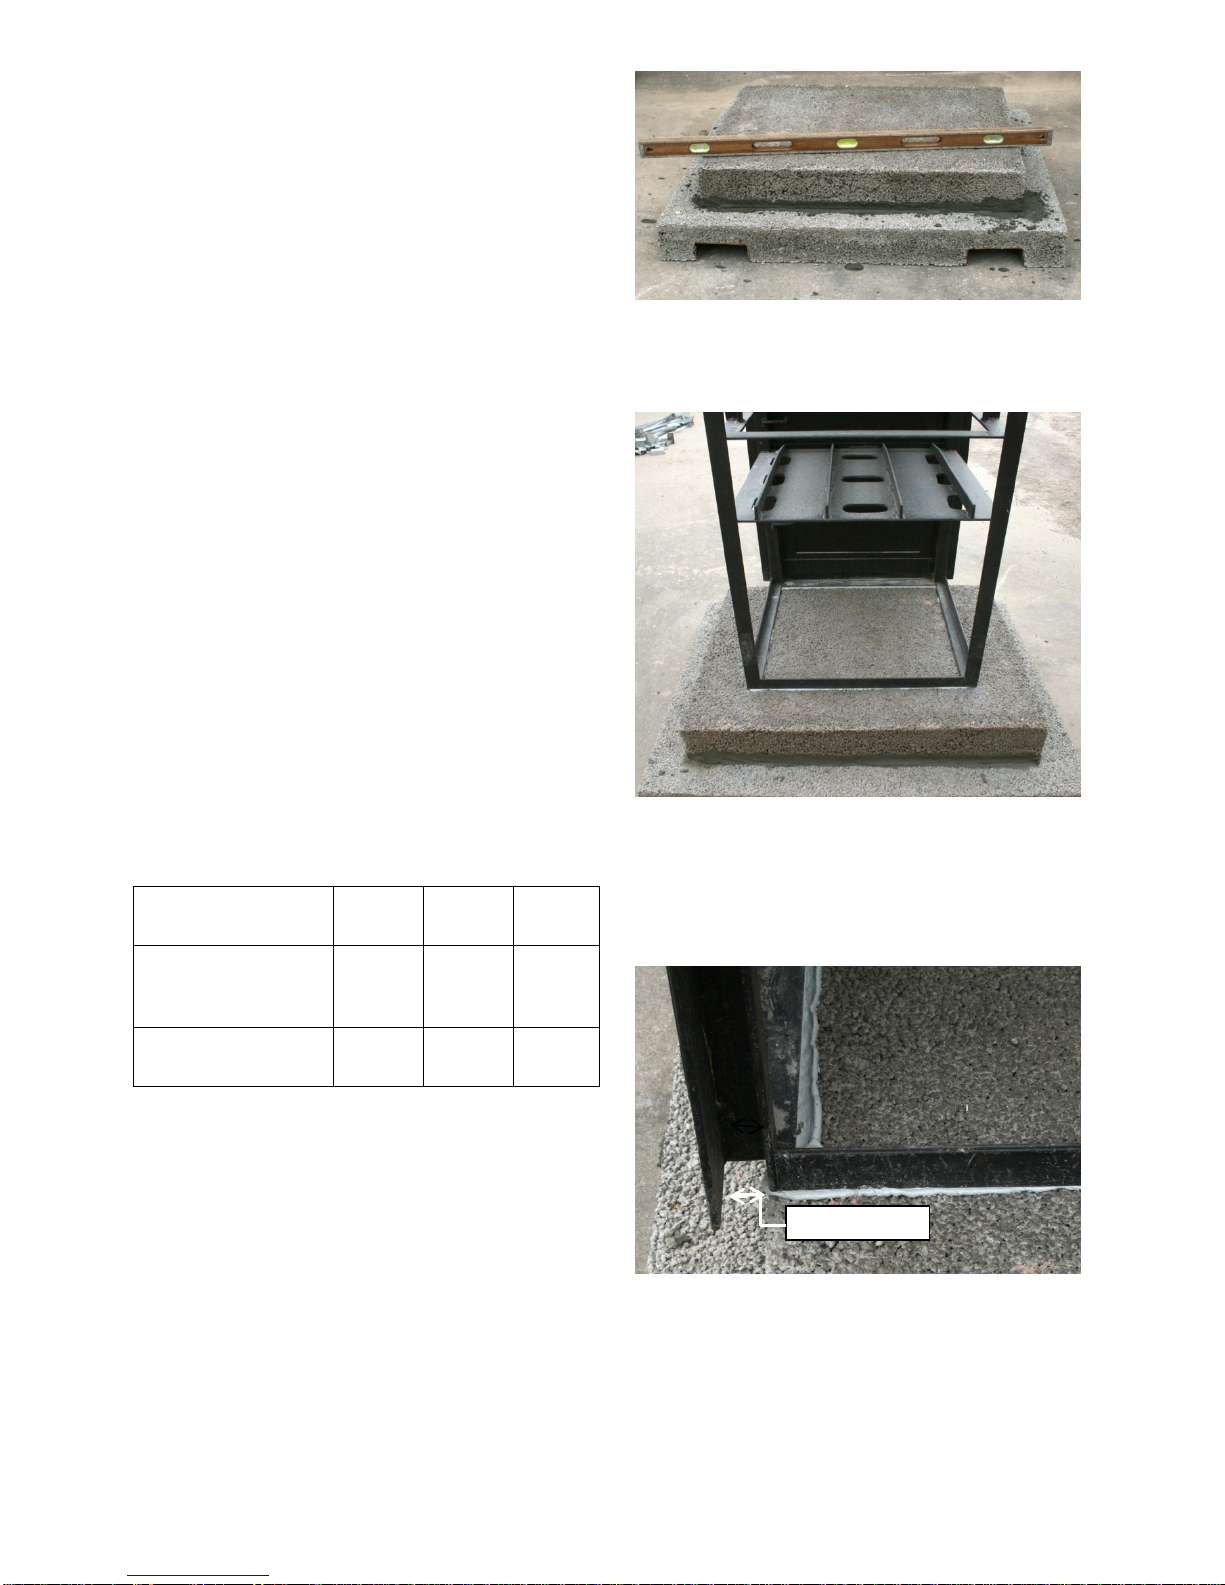
A. After the footing has cured, set the base plate,
checking for level, and square it with the footing,
shown in Figure 3. Use high quality refractory
cement such as Stone Age Multi-Purpose Ready-
Mix for construction of the smoker kit.
Figure 3. Set the Base Plate
B. Align the metal framework, centering it from
side to side as shown in Figure 4.
Figure 4. Center Framework Side to Side
C. Position the front of the frame with a 1 ½-inch
overhang from the base plate to expose the
expansion channel for stone/brick finish, as
shown in Figure 5.
Figure 5. Provide Overhang at the Front
D. Install firebrick floor inside of the metal
framework. Start at the front edge and cover the
entire floor. Use refractory cement to adhere the
1 ½” Overhan
g

3
bricks to each other and to the base plate. See
Figure 6. Use level to make sure floor is even.
Figure 6. Lay Floor
E. After the floor is completed, brick the side and
back walls to the bottom of the moisture chamber
by laying the bricks on their side, as shown in
Figure 7. Four layers of brick are required.
Figure 7. Install Brick Walls
F. When this part (firebox) is completed, it will
look like Figure 8, looking from the back.
Figure 8. Firebox Completed
G. Begin outer wall construction. Start with the
larger, 2-piece L-shaped sections to create the
first layer, and then alternate with the smaller, 3-
piece sections, as shown in Figure 9. Install on
3/8”- inch bed of mortar with the components
mortared together.
Figure 9. Outer Wall Components
H. Installed, the components will look like Figure
10. Alternate layers until all pieces are used.
Note that mortar is not applied between the lower
layers and the firebrick in the firebox area, and
there will be a small gap, creating an airspace be-
tween the firebrick and the outer walls.
First Layer
Second La
y
er

4
Figure 10. Outer Wall Components Installed
I. Add the roof section as shown in Figure 11.
Note that the opening for the chimney flue will be
to the rear of the oven.
Figure 11. Add Roof Section
J. Add the chimney kit assembly, as shown in
Figure 12.
Figure 12. Add Chimney Section
You are now ready for exterior finishing. Note that
the channel around the metal front allows the finish
material, stone or thin brick, to run behind the main
frame edge, permitting a clean finish. If using stuc-
co, fill in the channel with mortar and finish. Refer
to Figure 5 on page 2.
In order to reduce the possibility of moisture
saturation, it is recommended that the oven be
treated with a water sealer after completion of the
exterior. Always finish the smoker with a chim-
ney cap.
3.0 Safety
Working around an oven that can operate at tem-
peratures up to 500°F can be dangerous if proper
tools and clothing are not used. Also, combustible
materials in the vicinity of the oven may be at risk
of fire.
WARNING: When working around a smoker
oven, make sure that proper
clothing is worn and proper tools
are used. Make sure that com-
bustible materials not necessary
for operation of the oven are
kept away from the oven.
3.1 Clothing
A. It is advisable that long-sleeved shirts be
worn when inserting and removing items in-
to/from the oven.
B. Use a non-combustible oven mitt when stok-
ing and adding wood to the fire.

5
C. Use the non-combustible mitt when inserting
and removing items from the oven.
4.0 Building a Fire
Familiarize yourself with the main sections of the
Stone Age smoker before operation, as shown in
Figure 13. Each section has a separate door, with
the firebox at the bottom, the drip shelf in the mid-
dle area, and the smoking chamber in the upper
area of the unit.
The owner should wait a minimum of 28 days after
construction is completed to build the first fire. It is
important that all moisture be gone from the smok-
er oven before the first fire is laid. After that, the
first three fires should be small to gently season
and break in the smoker.
WARNING: Do not start a fire in a unit that
has been exposed to excessive
moisture.
To protect from moisture, keep the smoker doors
closed when the oven is not in use.
4.1 Selection of Wood
Any cured wood that is suitable for smoking meats
can be used in the Little Pig and Big Pig Smokers.
Hickory, pecan and mesquite wood are good. Oak
is good for heating ovens and generating a bed of
coals. Flavored wood such as apple and cherry
fruitwoods, soaked in water, can be used for smok-
ing when the cooking starts.
Charcoal and natural lump charcoal are also an
option for smoking along with fruitwood chips for
flavor.
Avoid use of green uncured wood as it will have a
much stronger smoke flavor which can be over-
bearing, and will produce more soot and oils.
Caution: Do not use paper, trash, synthetic logs,
or wood treated with petroleum or other
chemicals. Do not use accelerants such
as charcoal lighter fluid or other fuels
with the smoker.
4.2 Starting and Keeping a Fire
It takes time and experience to learn the nature of a
wood-fired smoker oven. There are a lot of varia-
bles affecting cooking such as type and quantity of
wood, ambient temperature, size of oven and the
dish.
5.0 Smoking
Little Pig and Big Pig Smokers have a large ca-
pacity for smoking. The Big Pig has five shelves
and the Little Pig three. Figure 14 shows the large
amount and variety of meats that can be smoked at
the same time, even with two of the shelves re-
moved.
Figure 13. Main Section Layout
(Outer Walls omitted for clarity)
Figure 14. Multiple Cooking Shelves Showing
Sunday Afternoon Dinner
Firebox
Drip Shelf
Smoking
Chamber
Rear View Front View
This manual suits for next models
1
Table of contents
Other StoneAge Oven manuals

Popular Oven manuals by other brands

Brandt
Brandt FC 222 user manual

aumate
aumate TOA20M04N-1E instruction manual

Maytag
Maytag CWE4100AC - 24" Single Electric Wall Oven Dimension Guide

Kernau
Kernau KBO 1076 S PT B instruction manual

Bosch
Bosch HB 37 N Series User manual and installation instructions

Electrolux
Electrolux EOD5420AA user manual


