STONEFLY DR365V User manual

DR365V™ Getting Started Guide
July 2018

StoneFly DR365V-1204L Getting Started Guide
ENG-114 V 1.1 Copyright StoneFly, Inc. 2018 Page 2
This Page is intentionally left blank.

StoneFly DR365V-1204L Getting Started Guide
ENG-114 V 1.1 Copyright StoneFly, Inc. 2018 Page 3
Copyright 2006, 2007, 2008, 2009, 2010, 2011, 2012, 2013, 2014, 2015, 2016, 2017, 2018
StoneFly, Inc.
All rights are reserved. No part of this document may be photocopied or reproduced without
the prior written consent of StoneFly.
The information contained in this document is subject to change without notice. StoneFly shall
not be liable for errors contained herein or for consequential damages in connection with the
furnishing, performance, or use of this material.
StoneFly, the StoneFly logo, Storage Concentrator, Integrated Storage Concentrator, ISC,
Modular Storage Concentrator, StoneFly Backup Advantage, StoneFusion, StoneFly Replicator
CDP, ValueSAN, Unified Scale Out, USO, Twin Scale Out, TSO, Unified Storage & Server, USS,
Unified Deduplicated Storage, UDS, Unified Encrypted Storage, UES, OptiSAN, StoneFly
Voyager, StoneFly Mirroring, Storage Concentrator Virtual Machine, SCVM, Software-Defined
Unified Storage and SDUS are property of StoneFly, Inc., a wholly owned subsidiary of
Dynamic Network Factory, Inc.
Other brands and their products are trademarks or registered trademarks of their respective
holders.

StoneFly DR365V-1204L Getting Started Guide
ENG-114 V 1.1 Copyright StoneFly, Inc. 2018 Page 4
Table of Contents
1. Introdcution ...................................................................................................... 5
2. Product Overview............................................................................................... 5
3. Rack Installation Instructions............................................................................... 8
4. Power Up & Initial Access .................................................................................. 12
5. Steps to use the Pre-Installed SCVM ................................................................... 15

StoneFly DR365V-1204L Getting Started Guide
ENG-114 V 1.1 Copyright StoneFly, Inc. 2018 Page 5
1. Introdcution
This document is aimed for system administrators who would like to know how to get
started with StoneFly DR365V Appliance. It describes initial steps for launching the DR365V
Appliance.
DR365V is the ideal purpose-built hyper-converged infrastructure solution to consolidate all
of your server and backup systems into one easy to manage appliance.
This guide gives an overview of the product, rack mounting instructions and initial
installation procedure. Information for using the features of the StoneFusion software is
found in the Storage Concentrator User Guide.
StoneFly Resource Library:
https://stonefly.com/resources
The StoneFly SCVM™ Webpage:
https://stonefly.com/hyper-converged/scvm-virtual-storage-appliance
2. Product Overview
The StoneFly DR365V provides you with a total backup solution for all of your physical and
virtual servers and workstations in a single box. Manage all of your backup operations for
your datacenter or office with a single central management console.
DR365V appliances are available in integrated, high-availability modular, or scale out high-
availability modular configurations. An embedded hypervisor allows backed up VMs, migrated
VMs and new user-created VMs to be spun up directly on the DR365V appliance. An included
Backup Agent License used exclusively for the DR365V allows for agentless backups of all
Virtual Machines including Exchange, SQL, SharePoint and Active Directory servers running
directly on the DR365V appliance at no extra cost.
The storage controller and backup controller provide a wide range of features and functionality
for backup, data management, high-availability, and mobility.
The backup engine automatically creates backup images of physical servers based on flexible
user-defined policy. These images can be restored (bare metal recovery) to the same
hardware, to dissimilar hardware to build a new server, or can be mounted as a drive to
retrieve an earlier copy of a specific file, folder, etc.
Every backup can be automatically converted into a Virtual Machine. These Virtual Machines
can then be quickly spun up and hosted on the DR365V appliance. This feature is quite useful
for business continuity for your production environment if a physical server or workstation
goes down and needs to be repaired. Replica Virtual Machines can also be used for any testing
the user might choose including non-invasive compliance testing.

StoneFly DR365V-1204L Getting Started Guide
ENG-114 V 1.1 Copyright StoneFly, Inc. 2018 Page 6
DR365V supports P2P, P2V, V2P, and V2V operations (Physical-to-Physical, Physical-to-
Virtual, Virtual-to-Physical, Virtual-to-Virtual) including restoring physical machines to
completely different hardware and restoring Virtual Machines to a completely different
Hypervisor.
The backup engine also includes snapshot, one-pane management, SSL-encryption, level-1
data deduplication at the source, compression, and much more.
The DR365V appliance includes a Virtual SAN Appliance (StoneFly Storage Controller Virtual
Machine SCVM™), a Virtual Enterprise Backup Engine, and the ability to create additional
Virtual Storage or Servers as needed. DR365V flexibility replaces the "fixed hardware model"
of the past with software-defined on-demand resource allocation (such as CPU, memory,
storage, etc.) based on your application needs.
StoneFly DR365V appliance's built-in advanced features include delta-based snapshots with
read-write snapshot volumes, Virtual Machine and volume backups, thin provisioning with
space reclamation as needed for the vault, optimized block-level parallel hardware-assisted
level-2 data deduplication with high-performance index engine and real-time synchronous
replication (campus mirroring).
Optional features include asynchronous replication, hardware-enabled block level AES 256
volume encryption, Fibre Channel SAN target, scale out NAS support for CIFS/SMB and NFS
protocols, and VSS database agent support. If you did not purchase one of these options
with your appliance and are interested in adding it, then please contact your StoneFly sales
representative for details.
In addition to serving as a backup appliance, you can migrate your existing Windows and
Linux physical servers into Virtual Machines running directly on the StoneFly DR365V
appliance and greatly reduce your hardware footprint and run many more applications on
much less hardware. Use of virtualized operating systems allows for complete hardware
utilization and considerable reduction in power and cooling costs. DR365V can reduce the
CapEx and OpEx of your datacenter by as much as one-third when the DR365V appliance and
its capabilities are fully implemented in an operation.
DR365V appliances can also be used for independent back-end enterprise storage (iSCSI,
optional Fibre Channel, optional NAS) for your physical and Virtual Machines. This back-end
storage provisioned by the DR365V employs all of the same advanced StoneFly features such
as snapshots, read-write snapshot volumes, thin provisioning, hardware-assisted data
deduplication, synchronous replication and more.
The DR365V can easily be configured to replicate to a second DR365V appliance on campus
and a DR365V appliance at a remote site or in the cloud for the ultimate disaster recovery
solution for your entire enterprise.
With the StoneFly DR365V, you can:
Back up all of your virtual and physical machines with disk-level snapshots including
operating system, applications, and data.
Manage the backup operations of all of your physical and virtual machines from a
single centralized backup management console.
Granular and file-level backups allow you to selectively back up specific files and
folders, or even network shares.

StoneFly DR365V-1204L Getting Started Guide
ENG-114 V 1.1 Copyright StoneFly, Inc. 2018 Page 7
Perform agentless backups on all Virtual Machines running on DR365V, VMware, and
Hyper-V appliances.
Easily restore a backup from any point in time as a Virtual Machine (P2V). Spin up that
VM on the DR365V and use it while the failed system is being repaired.
Restore individual files, folders, volumes, or an entire system from any point in time.
Mount snapshots, backup images or spin up replica Virtual Machines at the remote site
for non-invasive compliance or development testing at the system level, point in time,
or real-time.
With Bare Metal Recovery an entire system can be completely restored to the same
hardware, or even to a brand new system with dissimilar hardware by injecting drivers
to support the new hardware (Physical to Physical - P2P).
Easily migrate a server between any physical and virtual platform (P2P, P2V, V2V,
V2P). Any backup can be recovered to any server in any location.
Replace your datacenter by migrating existing Windows and Linux physical servers into
Virtual Machines hosted on the StoneFly DR365V.
Quickly spin up new Virtual Machines on the StoneFly DR365V.
Use the StoneFly DR365V appliance's iSCSI (and/or optional Scale Out NAS) storage
for your:
oPhysical machines
oVirtual Machines hosted on the StoneFly DR365V
oVirtual Machines hosted on third-party appliances running VMware, Hyper-V,
KVM, or Citrix XenServer
oGlobal shared back-end object/block/image storage for OpenStack
Create numerous delta-based snapshots to back up the iSCSI volumes containing your
VMs and storage. Then use mountable read-write snapshot volumes for recovery.
Synchronously replicate (campus mirror) all of your VMs and storage to a second on
premises DR365V appliance for business continuity.
Asynchronously replicate all of your VMs and storage to the cloud or a StoneFly
DR365V at a remote site for disaster recovery.
Protect your data and increase system uptime with high performance hardware RAID.
Optimize your data with StoneFly's optional enterprise-level features including data
deduplication, encryption, thin provisioning, and more.
Scale out storage and VMs across multiple DR365V nodes.
Each StoneFly DR365V comes preconfigured with VMware vSphere, a StoneFly SCVM™ Virtual
Storage Controller, and an Enterprise Backup Engine running on a second VM. Additional
Virtual Machines can be installed on the DR365V as needed as long as adequate processing
cores and system memory are available to support those VMs. Contact your StoneFly sales
representative for details.
StoneFly DR365V-1204L Getting Started Guide
ENG-114 V 1.1 Copyright StoneFly, Inc. 2018 Page 8
3. Rack Installation Instructions
This section provides information on installing the StoneFly DR365V into a rack or cabinet
with the rails provided. There are a variety of rack/cabinet units on the market, which may
mean that the assembly procedure will differ slightly. You should also refer to the
installation instructions that came with the rack unit you are using.
NOTE: This rail will fit a rack/cabinet between 26" and 33.5" deep.
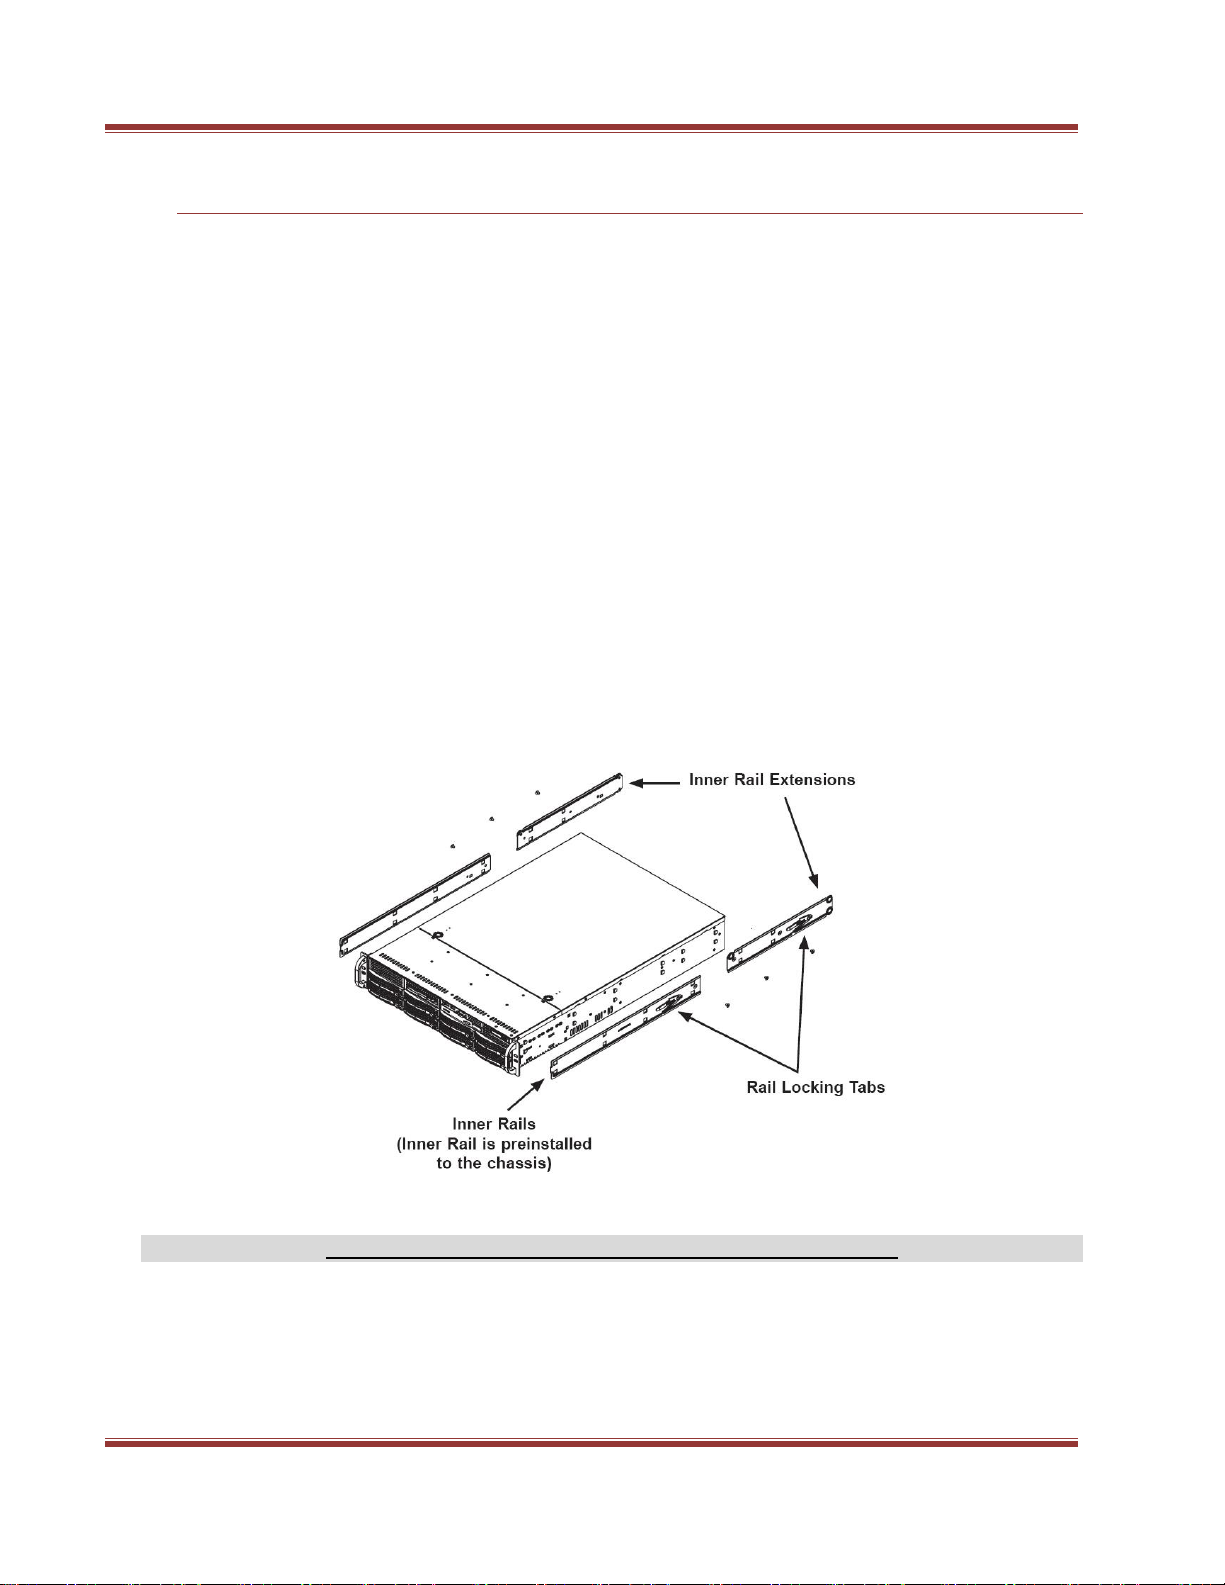
1. Identifying the Sections of the Rack Rails
The StoneFly DR365V chassis package includes two rack rail assemblies in the rack
mounting kit. Each assembly consists of two sections: an inner fixed chassis rail that
secures directly to the StoneFly DR365V chassis and an outer fixed rack rail that secures
directly to the rack itself.
Figure 1. Identifying the Sections of the Rack Rails
2. Locking Tabs
Both chassis rails have a locking tab. The tabs lock the server into place when installed and
pushed fully into the rack. These tabs also lock the server in place when fully extended from

StoneFly DR365V-1204L Getting Started Guide
ENG-114 V 1.1 Copyright StoneFly, Inc. 2018 Page 9
the rack. This prevents the server from coming completely out of the rack when you pull it
out for servicing.
Figure 2. Identifying the Sections of the Rack Rails (right side rail is shown)
3. Installing the Inner Rail Extension
The StoneFly DR365V chassis includes a set of inner rails in two sections: inner rails and
inner rail extensions. The inner rails are pre-attached and do not interfere with normal use
of the chassis if you decide not to use a server rack. Attach the inner rail extension to
stabilize the StoneFly DR365V chassis within the rack.
4. Installing the Inner Rails
Place the inner rack extensions on the side of the StoneFly DR365V chassis aligning the
hooks of the chassis with the rail extension holes. Make sure the extension faces "outward"
just like the pre-attached inner rail. Slide the extension toward the front of the chassis.
Secure the chassis with 2 screws as illustrated. Repeat steps for the other inner rail
extension.
StoneFly DR365V-1204L Getting Started Guide
ENG-114 V 1.1 Copyright StoneFly, Inc. 2018 Page 10
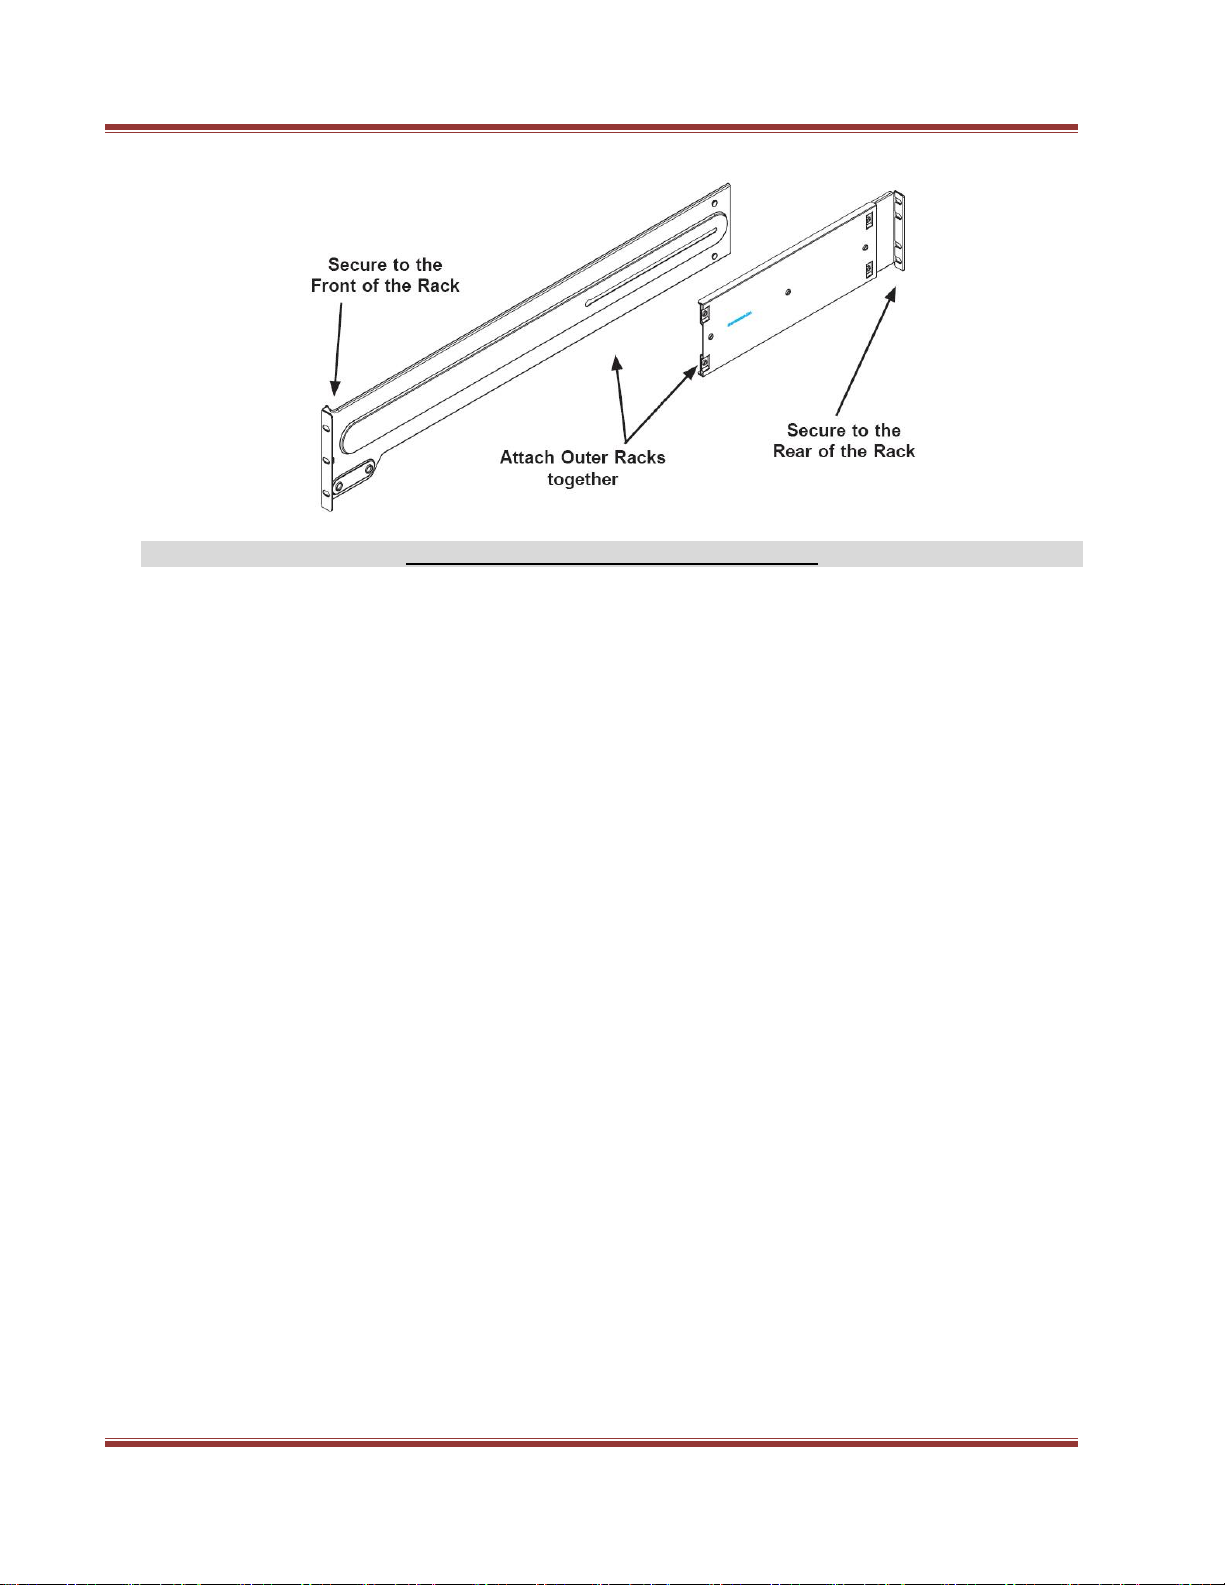
Figure 3. Assembling the Outer Rails
5. Outer Rack Rails
Outer rails attach to the server rack and hold the StoneFly DR365V in place. The outer rails
for the StoneFly DR365V chassis extend between 30 inches and 33 inches.
6. Installing the Outer Rails to the Rack
Attach the short bracket to the outside of the long bracket. You must align the pins with the
slides. Also, both bracket ends must face the same direction. Adjust both the short and
long brackets to the proper distance so that the rail fits snugly into the rack. Secure the
long bracket to the front side of the outer rail with two M5 screws and the short bracket to
the rear side of the outer rail with three M5 screws. Repeat steps 1-4 for the left outer rail.

StoneFly DR365V-1204L Getting Started Guide
ENG-114 V 1.1 Copyright StoneFly, Inc. 2018 Page 11
Figure 4: Installing the Rack Rails
7. Installing the Chassis into a Rack
Confirm that the StoneFly DR365V chassis includes the inner rails (A) and rail extensions
(B). Also, confirm that the outer rails (C) are installed on the rack. Line the StoneFly
DR365V chassis rails (A and B) with the front of the rack rails (C). Slide the StoneFly
DR365V chassis rails into the rack rails, keeping the pressure even on both sides (you may
have to depress the locking tabs when inserting). When the StoneFly DR365V has been
pushed completely into the rack, you should hear the locking tabs "click".
(Optional) Insert and tighten the thumbscrews that hold the front of the server to the rack.
The StoneFly DR365V should now be securely mounted into the rack/cabinet in which it was
installed.
StoneFly DR365V-1204L Getting Started Guide
ENG-114 V 1.1 Copyright StoneFly, Inc. 2018 Page 12
4. Power Up & Initial Access
These are the steps a user needs to follow in order to start using the StoneFly DR365V
Hyper-Converged Appliance:
1- Connect both power supply modules to a power outlet using the included power
cords.
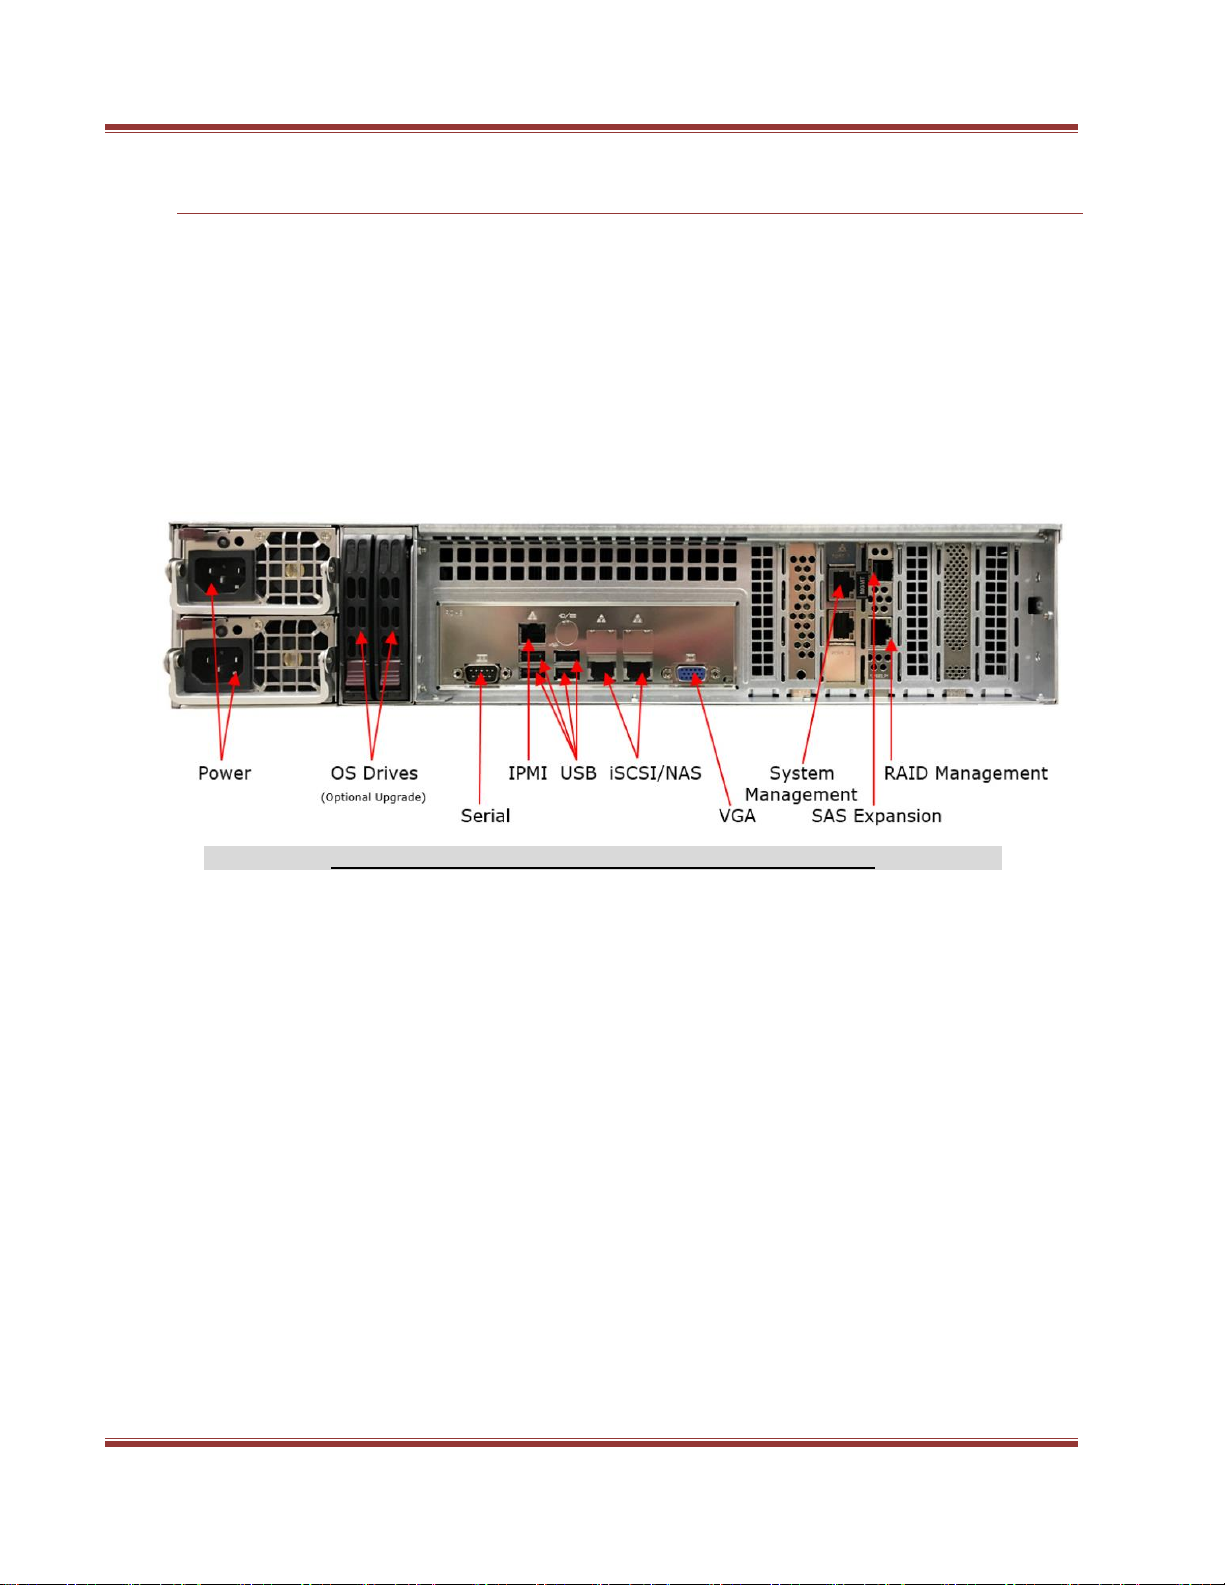
2- Connect Ethernet cables to the System Management, Network, RAID Management
and IPMI ports as shown in the diagram below:
Figure 5: Back Panel Connections of the DR365V
3- If you purchased the appliance with additional network ports, then please connect
those as well.
4- Connect a monitor to the VGA port.
5- Connect a keyboard and a mouse to the USB ports.
NOTE:
Serial port is not used by the DR365V appliance.
SAS Expansion port is only used when connecting DR365V Expansion Units to the
DR365V Appliance for additional storage capacity.
6- Turn on the power switch in front of the box.
StoneFly DR365V-1204L Getting Started Guide
ENG-114 V 1.1 Copyright StoneFly, Inc. 2018 Page 13
7- Once the system is powered on, you will need to configure the network settings (the
default IP address for the StoneFly DR365V appliance is set to DHCP). Press the F2
key and login to the system with the following credentials:
Username: root
Password: stonefly
8- Navigate to the Configure Management Network option. Go to the IPv4 Configuration
and scroll to Set Static IPv4 Address and Network Configuration. Enter the IPv4 IP
address, subnet mask, and default gateway. Press Enter to submit. Then press the
“Escape key”to exit and press Yto confirm the changes.
9- Next, you will need to configure a computer located on the same subnet as the
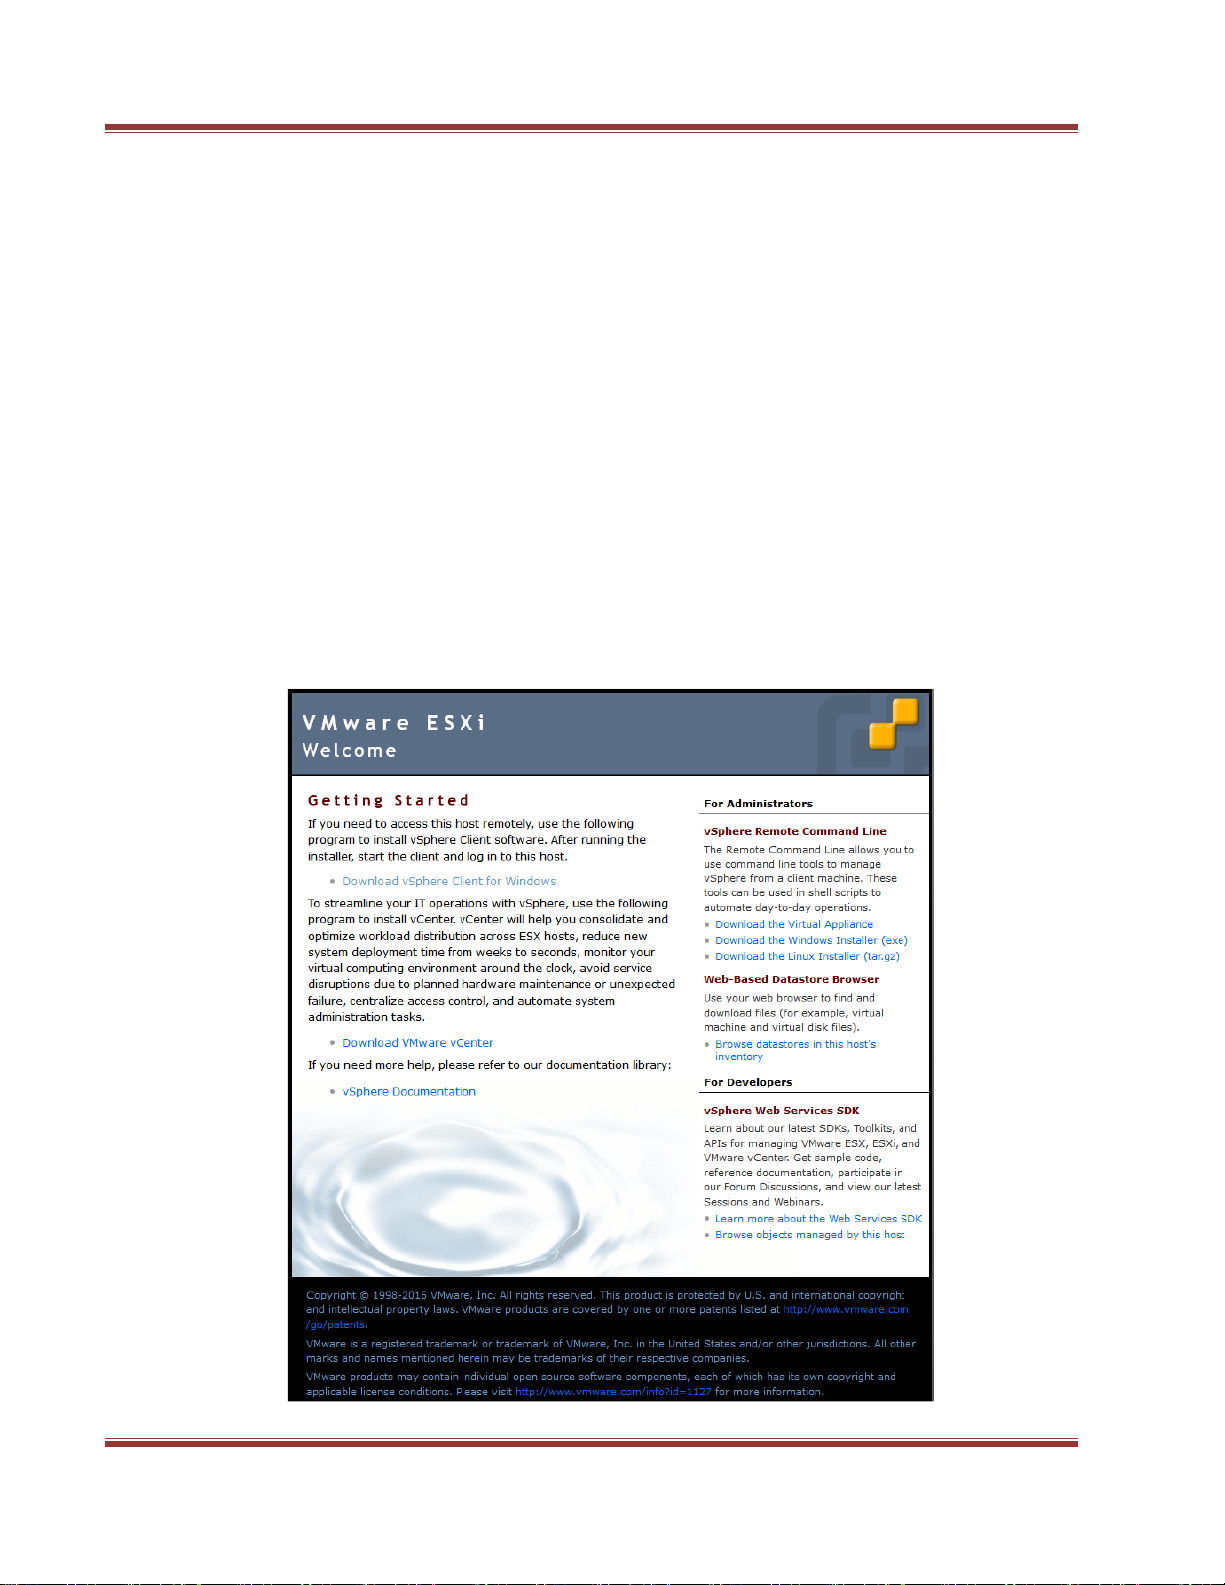
StoneFly DR365V appliance to allow it to remotely manage the StoneFly DR365V.
Open a web browser on the remote system and in the address bar type in the IP
address set in the previous step “http://DR365V_IP_ADDRESS”and press the Enter
key. You will see a screen like the one shown below:
StoneFly DR365V-1204L Getting Started Guide
ENG-114 V 1.1 Copyright StoneFly, Inc. 2018 Page 14
10-Click on the Download vSphere Client link. This will guide you to download and
install the vSphere Client which will allow you to access your StoneFly DR365V via its
VMware ESXi hypervisor.
11-After the VMware vSphere Client is installed, it will create an icon on your desktop.
Double-click on the “vSphere Client icon”to launch the Client. Use the same
credentials to log in to the system:
IP address / Name: <IP address you configured for the DR365V in step 7>
Username: root
Password: stonefly
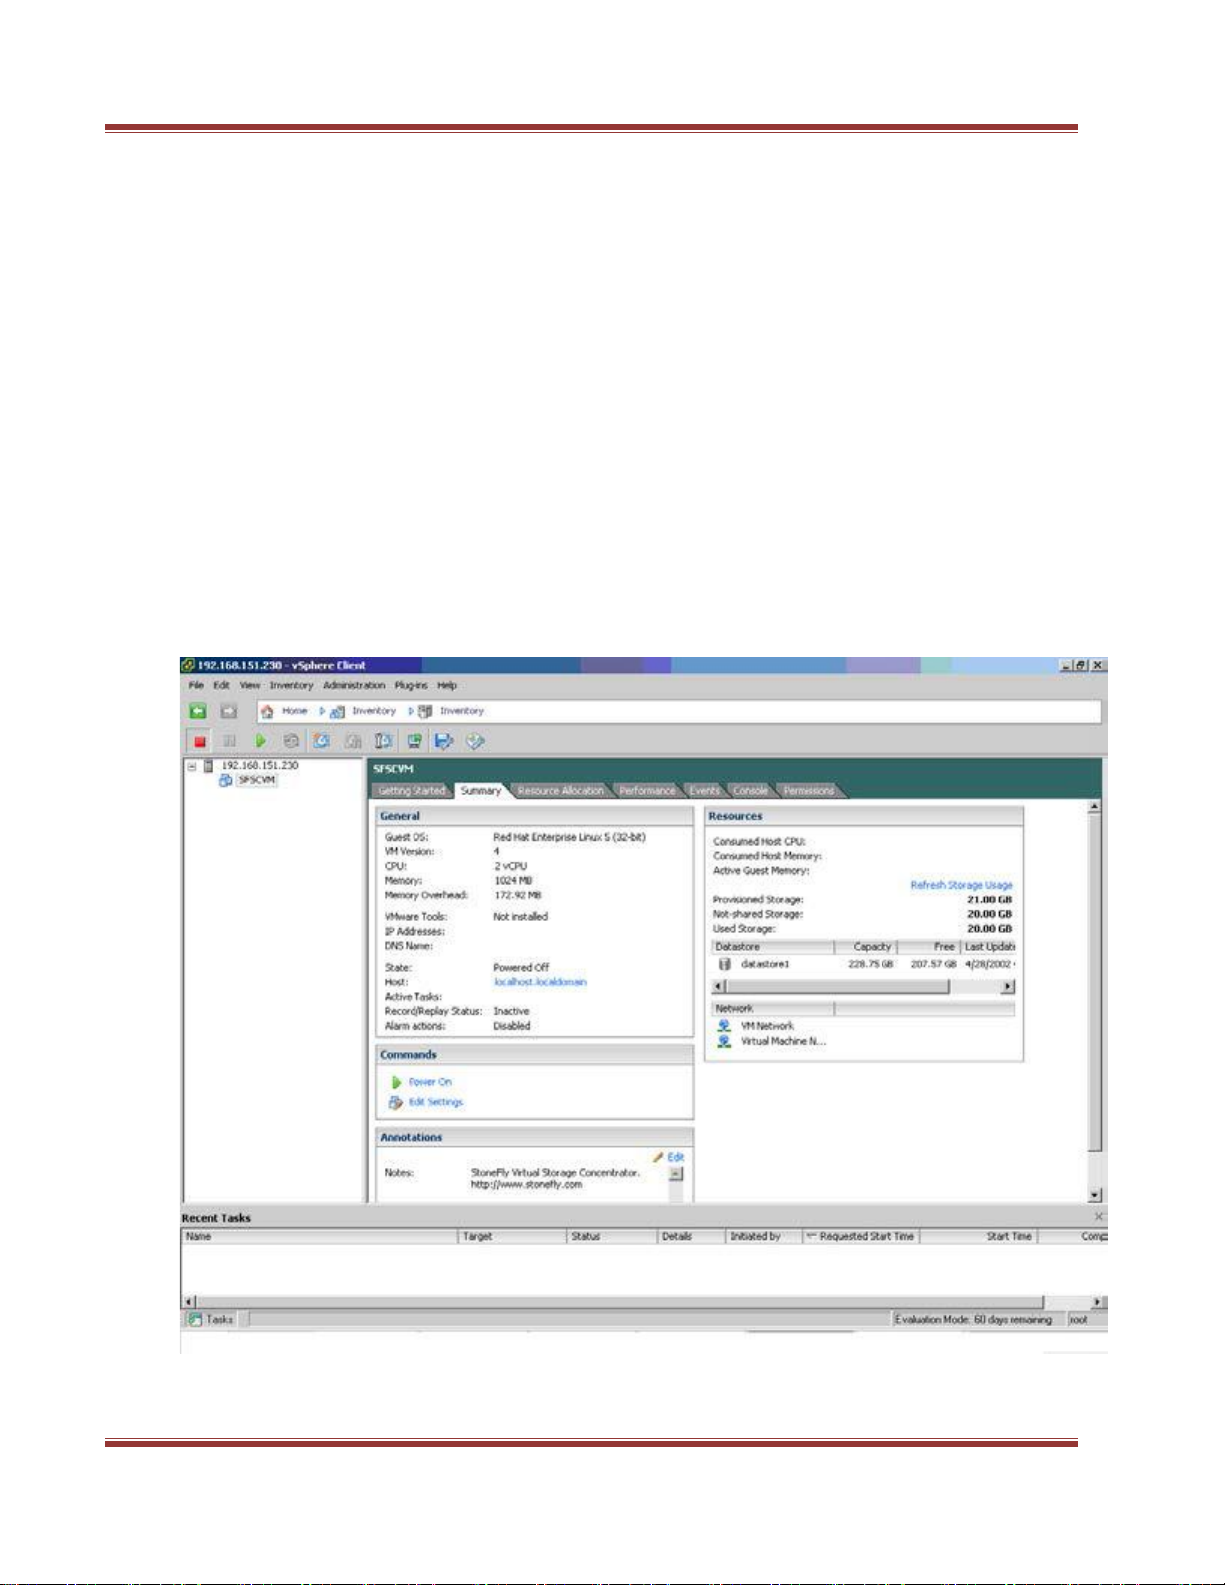
12-You will see a screen like the one shown below:

StoneFly DR365V-1204L Getting Started Guide
ENG-114 V 1.1 Copyright StoneFly, Inc. 2018 Page 15
5. Steps to use the Pre-Installed SCVM
The screenshot above shows one SCVM is already installed. If you want to access the user
interface for that particular SCVM, click on that SCVM first and then click on the Console
Tab. You will see a screen like the one shown below:
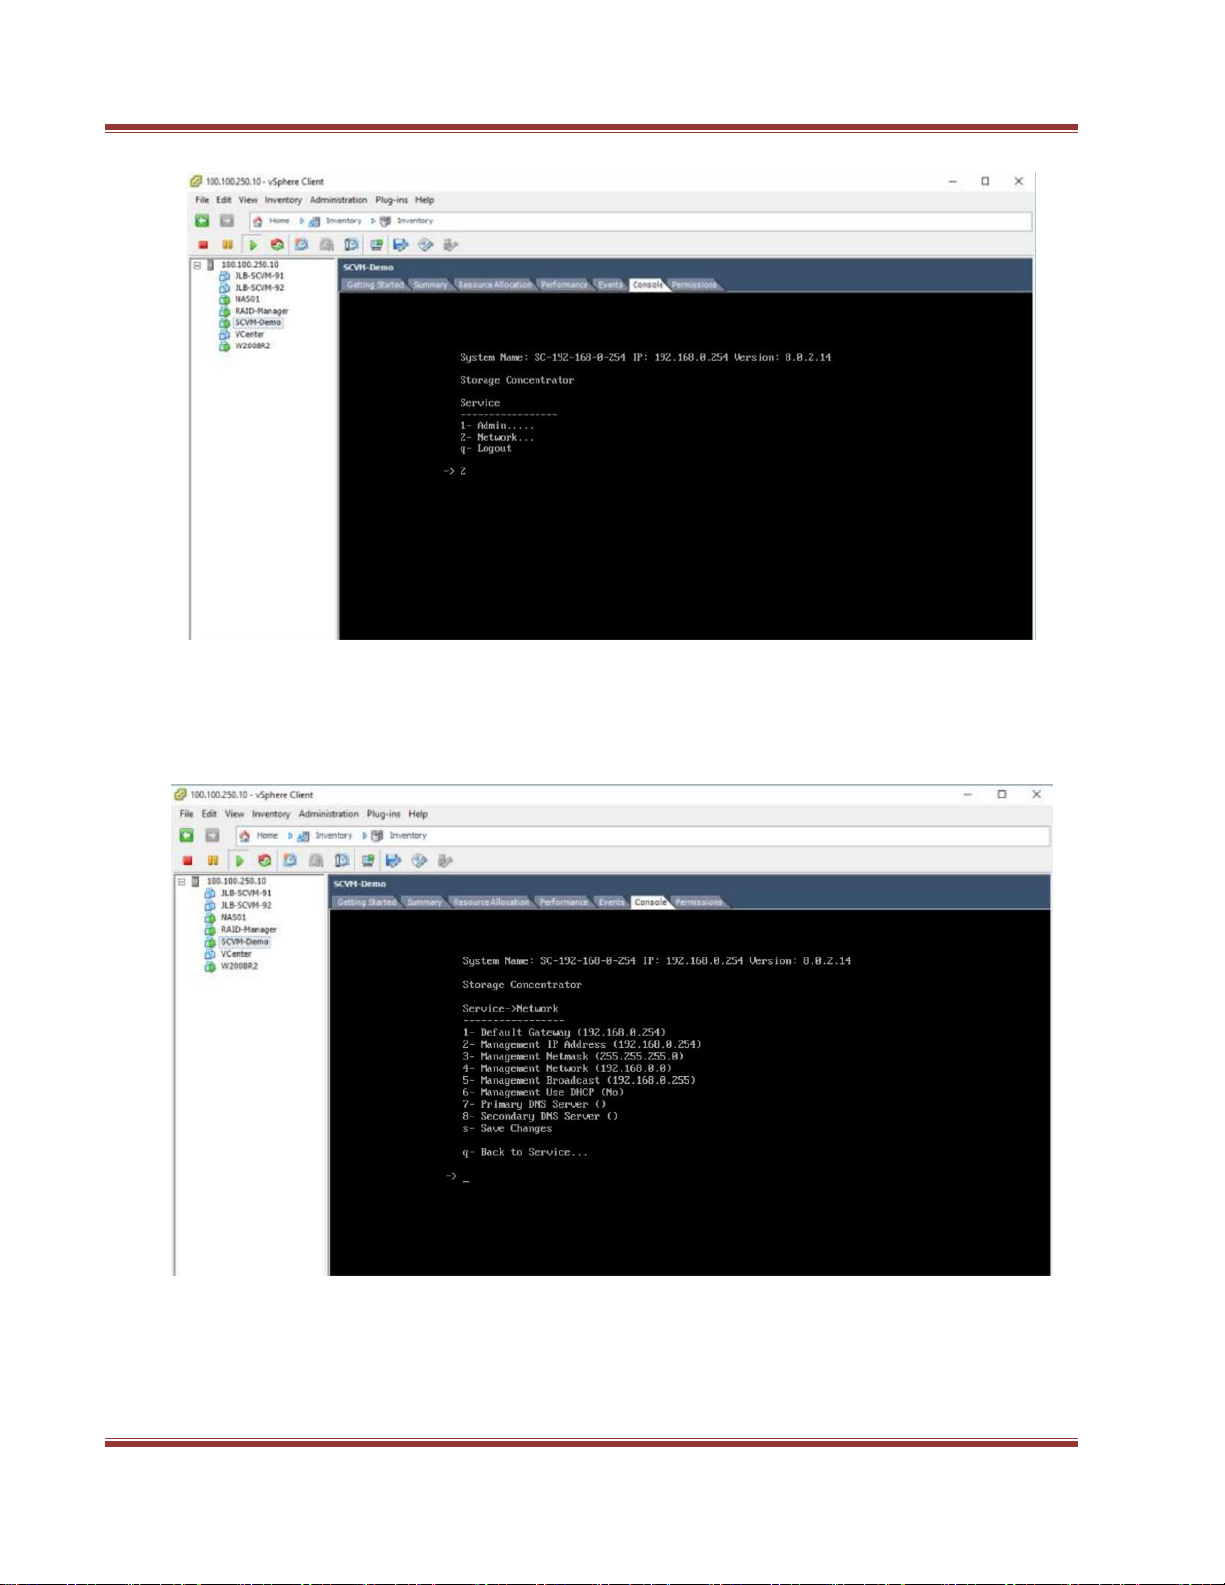
Steps to use the pre-installed SCVM:
1. The Storage Concentrator management network interface is preconfigured with the
default IP address of 192.168.0.254. This must be changed to a valid address for your LAN
network. Login to the “SC Service” console using the VMware “Virtual Console” for the SCVM
by doing the following:
a. Press Enter to display the login prompt.
b. At the User ID prompt type console and hit Enter.
c. At the password prompt type coni100o and hit Enter. Note that the User ID
and password are case sensitive.
2- Using the SC Service menu, configure the management network by selecting option
2, for 2 –Network.
StoneFly DR365V-1204L Getting Started Guide
ENG-114 V 1.1 Copyright StoneFly, Inc. 2018 Page 16
The default settings are shown below. Adjust settings as needed then save the changes.

StoneFly DR365V-1204L Getting Started Guide
ENG-114 V 1.1 Copyright StoneFly, Inc. 2018 Page 17
Adjusted settings are shown below. Enter qat the command prompt to exit back to the
service menu. Enter qagain to exit out of the user console service.
Note: the browser access to the Storage Concentrator Management GUI is blocked
while the “SC Service” menu is active. Also note that there can be a short delay before
the Storage Concentrator GUI becomes available.
3- At this point, it should be possible to log into the Storage Concentrator Management
GUI by browsing to the management IP address that you have configured. The
default administrative login is as follows:
User ID: stonefly
Password: stonefly
Once logged in, you should configure the SAN data network settings.
Refer to the StoneFly "Storage Concentrator User Guide" for more information about the
configuration and use of the Storage Concentrator.

StoneFly DR365V-1204L Getting Started Guide
ENG-114 V 1.1 Copyright StoneFly, Inc. 2018 Page 18
Additional Configuration and System Management
For additional information regarding the configuration and use of the StoneFly Storage
Concentrator Virtual Machine, please consult the StoneFly Storage Concentrator User Guide
from the included documents CD.
For additional information regarding the configuration and use of the Veeam Backup &
Replication software, please consult the Backup, Replication and Data Recovery User Guide
from the included documents CD or follow the link below:
http://support.stonefly.com/manuals/Veeam%20Backup%20and%20Replication_Getting%2
0started%20guide.pdf
For additional information regarding the configuration and use of the VMware vSphere
Hypervisor, please consult the VMware website.
Technical Support
For further support, please call technical support at 1-510-265-1616 option 3. Or send email

Other manuals for DR365V
1
Table of contents
Popular UPS manuals by other brands

Emerson
Emerson Liebert eXM user manual

Eaton
Eaton Powerware 9390 Installation and operation manual

Vesta
Vesta VT525P user manual

FSP Technology
FSP Technology EP 1500 Series quick guide

Powerware
Powerware Prestige 6000 Installation and operator's manual

Eaton
Eaton Tripp Lite Series SmartPro Series Advanced user's guide


