Stortford 8714 User manual
MODEL: 8714
INSTRUCTION MANUAL
910-294700-0020-100
WARNING:
TO PREVENT FIRE OR SHOCK HAZARD, DO NOT EXPOSE THIS
APPLIANCE TO RAIN OR MOISTURE. DO NOT REMOVE COVER.
PILOT LAMPS SOLDERED IN PLACE. NO USER SERVICEABLE PARTS
INSIDE. REFER SERVICING TO QUALIFIED SERVICE PERSONNEL.
CAUTION: TO REDUCE THE RISK OF
ELECTRIC SHOCK, DO NOT REMOVE
COVER (OR BACK). NO USER –
SERVICEABLE PARTS INSIDE. REFER
SERVICING TO QUALIFIED SERVICE
PERSONNEL.
The lighting flash with arrowhead
symbol, within an equilateral triangle,
is intended to alert user to the
presence of uninsulated "dangerous
voltage" within the product's
enclosure that may be of sufficient
magnitude to constitute risk of electric
shock to persons.
The exclamation point within an
equilateral triangle is intended to alert
user to the presence of important
operating and maintenance (servicing)
instruction in the literature
accompanying the appliance.
CAUTION
RISK OF ELECTRIC
SHOCK DO NOT OPEN
Specifications
FREQUENCY : FM 88 -108 MHz
AM 530 - 1600 KHz
USB 2.0 PORT : Full Speed 512MB - 4GB
(Support FAT16, FAT32)
SD CARD SLOT : 512MB – 4GB
POWER SOURCE : AC 230V-50Hz
ANTENNA : External antenna for FM
Built-in ferrite bar for AM
POWER CONSUMPTION : 18W
SPEAKER SIZE : 2 x 4" x 4" 8 ohm Dynamic type
REMOTE CONTROL : A Cell battery is fitted -
Replacement Lithium Battery required : 1 x 3V CR2025
*DESIGN AND SPECIFICATIONS SUBJECT TO CHANGE WITHOUT NOTICE.
Coopers of Stortford, 11 Bridge Street, Bishop's Stortford,
Hertfordshire, CM232JU. Tel 0844 482 4400.
IMPORTANT SAFEGUARDS FOR AUDIO PRODUCTS
* The appliance is not intended to be operated by means of an external timer or separate remote-
control system.
* This appliance can be used by children aged from 8 years and above and persons with reduced
physical, sensory or mental capabilities or lack of experience and knowledge if they have been given
supervision or instruction concerning use of the appliance. Cleaning and user maintenance shall
not be made by children unless they are older than 8 and supervised.
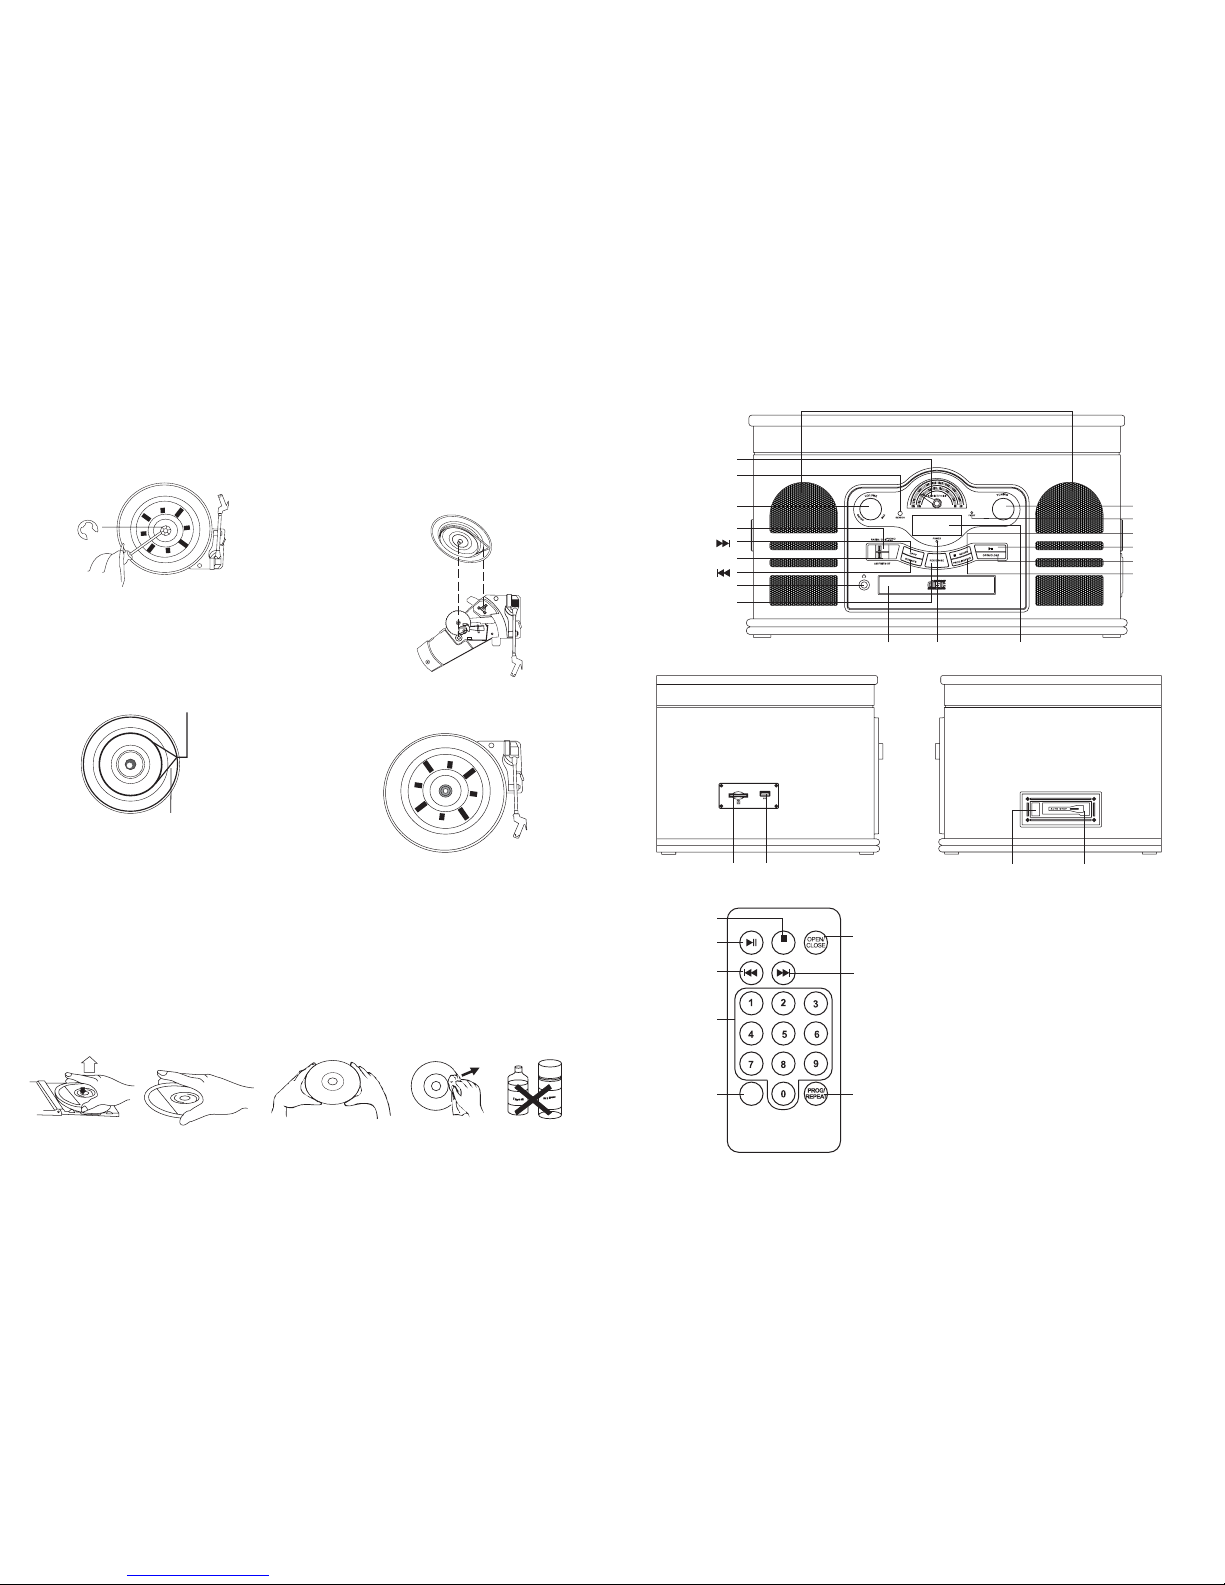
CONTROL LOCATORS
REC/
ERASE
SD/USB
STOP/SD/USB
PLAY/PAUSE
BACKWARD SKIP
0-9
REC/ERASE PROG/REPEAT
FORWARD SKIP
OPEN/CLOSE
29
COMPACT DISC CARE
To remove a disc from its storage case, press down on the centre of the case and lift the disc out, holding it carefully by
the edges. Fingerprints and dust should be carefully wiped off the disc’s recorded surface with a soft cloth. Unlike conventional
vinyl or Shellac records, compact discs have no grooves to collect dust and microscopic debris, so a gentle wipe with a
soft clean cloth should remove most particles. Wipe in a straight line from the inside to the outside of the disc. Small dust
particles and light stains will have absolutely no effect on sound reproduction quality. Clean the disc periodically with a
soft, lint-free, dry cloth. Never use detergents or abrasive cleaners to clean the disc. If necessary, use a CD cleaning kit.
Never affix labels to the surface of compact discs or write on them, except very gently with specialist CD-R Pens.
lron binder
RE-ATTACHING THE TURNTABLE DRIVE-BELT
The turntable drive belt is factory fitted - use these instructions only if the turntable fails to revolve.
STEP 1
Use a screwdriver to remove the black iron
C-clipand lift the turntable off the
phonograph mechanism.
STEP 2
Retrieve the dropped black rubberband and
replace it around the column on the bottom
of the turntable, then pull it out gently without
overstretching and hook the band around the
small column point at the edge of the turntable,
as shown in the diagram. STEP 4
Gently turn the turntable until a ‘plop’-sound is heard,
which indicates the repositioning of the rubber band.
Replace the C-clip to secure the turntable.
STEP 3
To fix the turntable back onto the phonograph mechanism,
make sure the column point is positioned over the correct
place on the phonograph mechanism, while placing the
axis of the turntable in the hole on the phonograph
mechanism, as shown in the diagram.
Small column point
Rubber band
SD CARD USB PORT
NOTE - FORWARD SKIP / or BACKWARD SKIP / buttons on the remote control look like this (|<< and >>|) and on the music
centre look like this (UP/FF, DOWN/FB). Throughout these instructions we will show the symbol as per the remote control.
CASSETTE DOORCASSETTE EJECT/
FAST FORWARD
DIAL SCALE PLATE
FORWARD SKIP
BACKWARD SKIP
STOP/SD/USB
TUNING KNOB
REC/ERASE
PLAY/PAUSE
OPEN/CLOSE
ON-OFF SWITCH /
VOLUME CONTROL
LCD DISPLAY
RADIO\CD\
PHONO SWITCH
AM\FM\FM.ST SWITCH
CD DRAWER
POWER INDICATOR
EARPHONE JACK
SENSOR
Speakers
FM.ST LED
PROG/REPEAT

47
UNPACKING
1. Remove packing materials from unit.
NOTE: Save all packing materials until you are completely satisfied all parts of the unit are operating satisfactorily.
2. Make sure you have located the Remote Control before storing the packaging.
3. Remove the plastic bag covering the unit.
4. Remove the tie from the AC cord and untie the Wire Antenna on the back of the unit.
5. Lift up the Record Player Lid and remove the Polystyrene shipping material from the turntable.
6. Remove the black tie-wire from the Tone arm.
7. Remove the white protective needle cover by gently pulling it towards the front of the unit.
STYLUS
A universal Sapphire Stylus is supplied and fitted to the Tone Arm,
this is suitable for playing records of all 3 speeds (33/45/78rpm).
Removing/Refitting the Stylus
To remove the Stylus from the Tone Arm, hold the Tone Arm head steady while
grabbing the plastic Stylus Holder with two fingers - then gently pull the complete red
stylus holder straight towards you and off the silver cartridge, as shown in the diagram.To
re-fit the Stylus, hold the sides of the red plastic stylus holder, ensuring the Needle is
facing downwards. Gently push the back of the stylus holder at a slight angle against
the silver cartridge at the end of the TONE ARM until you are sure it is securely fitted.
Refit the white protective needle cover, if so required.
NOTES:
· Always handle the Stylus with care as the Sapphire needle tip is easily damaged.
· When transporting the turntable it is advisable to re-fit the white protective needle
cover and the Tone Arm Hold-down Clip until the unit is going to be used again.
· When removing or re-fitting the Stylus, always be careful not to put too much pressure on the Stylus Holder and the
Tone Arm silver cartridge to avoid any possible damage to them.
POWER SOURCE
This unit is operated by 220 to 240V AC Mains.
SET UP
Unwind the AC Power Cord at the back of the unit and insert the 3-pin plug into a mains power socket.
RADIO OPERATION
1. Untie the FM WIRE ANTENNA and allow it to hang down in a straight line for optimum FM reception. Do not connect
the FM antenna to an outside antenna.
2. Switch the unit on by turning the power ON-OFF SWITCH/VOLUME CONTROL to the ON position and turn the Sound
Volume to mid-range position.
3. Set the Function switch to RADIO mode.
4. Slide the Band switch to the desired band – AM (= MW) or FM or FM.ST*.
5. Select the desired radio station by rotating the TUNING KNOB.
6. Adjust the Volume again if necessary.
NOTE: *If FM Stereo reception is not good, it may be better to switch to FM Mono.
ANTENNA
For FM reception, the unit has an FM WIRE ANTENNA on the rear of the unit.
Move the wire until Radio reception is clear and with no interference. If you have trouble tuning in an FM station, re-position
the wire FM antenna for best reception.
CAUTION: The external FM ANTENNA must not be connected to an outside antenna.
For AM (= MW) reception, the unit is provided with a directional built-in ferrite antenna.
Rotate the set to find the position in which the best reception is obtained.
TURNTABLE OPERATION
Preparing to use the Turntable
1. Lift up the Record Player Lid, untwist and remove the black tie-wrap securing the TONE ARM.
2. Remove any packing materials.
3. Remove the white protective NEEDLE COVER by gently pulling it off the red stylus holder towards the front of the unit.
Keep this safe and re-fit to the stylus in case the unit needs transporting to a different location.
4. Release the TONE ARM HOLD-DOWN CLIP by gently pushing this to the right. This will unlock the tone arm from its
ARM REST. Re-lock the hold-down clip when moving the unit to another location.
PROGRAMMING TRACKS
Up to 20 tracks can be programmed to play tracks on an Audio or MP3-CD, USB Device or SD Card in the desired sequence.
1. In " STOP " position, press PROGRAM / to start programming - “P” and P0-01 will start flashing on the display.
2. Press the
FORWARD SKIP
/ or
BACKWARD SKIP /
buttons once or repeatedly until the desired track number
appears on the display.
3. For MP3 Programming: press and hold the PLAY/PAUSE key / to select the desired album.
4. Press PROGRAM / to confirm, the display shows the stored track number and the next store position.
5. Repeat steps 2-3 to select and store all desired tracks. “ FULL “ is displayed if you attempt to program more than 20
tracks.
6. Press PLAY/PAUSE / to play the programmed tracks.
Erasing the Program – by Remote Control or on the Main Unit
You can erase the contents of the memory as follows:
- In Stop position: Press “ STOP “ once, or
- During Playback: Press “ STOP “ twice, or
- Turn the ON-OFF Switch/Volume Control to OFF, or
- Select another sound source/function, or
- Press the CD OPEN/CLOSE button to open the CD door.(at CD mode)
PLAY MODE
Repeat Play Mode for CD-DA or MP3 Playback
1. Press REPEAT / on the Remote Control while in Play mode.
2. The default Play Mode function is OFF.
3. For CD-DA playback there is a choice of 2 Play Modes: “REPEAT 1” / “REPEAT ALL”
4. For MP3 Playback there is a choice of 3 Play Modes: “REPEAT 1” / “REPEAT FOLDER” / “REPEAT ALL”.
MP3 RECORDING
Recording from CD to USB / SD
The system is capable of converting (encoding) a whole Audio CD into MP3 format and copy/record this to a USB mass
storage device (e.g. a Flash Drive) or SD card (not supplied). It can also copy a single MP3 track to/from a USB device or
SD card.
1. In CD playback mode, press REC / to start ripping (recording) to USB/SD card (the default is USB if both devices
are detected), playback will stop and skip back to the beginning of the current track, the system will scan the contents
of the USB/SD Card and create a folder to store the MP3 Tracks in. Resume CD playback and recording will start from
that moment. “ USB ” or “ CARD “ will start flashing, depending on the device selected.
2. Press STOP / to exit CD ripping.
MP3 CD/USB/SD Copying
1. In MP3-CD, USB or SD Card playback mode, press REC / to start MP3 copying from MP3-CD to USB or SD card,
and SD Card to USB. Playback will stop and the system will scan the contents of the USB or SD card and create a
folder to store the MP3 tracks in.
2. “ REC “ will show on the display.
3. “ COPY ” will be displayed.
4. Either “USB” or “CARD” will start flashing, MP3 copying starts, the process will stop when copying has finished.
5. The current MP3 track will play back from the beginning.

IMPORTANT SAFEGUARDS FOR AUDIO PRODUCTS
PLEASE READ CAREFULLY THE FOLLOWING IMPORTANT SAFEGUARDS THAT ARE
APPLICABLE TO YOUR EQUIPMENT.
1. Read Instructions - All the safety and operating instructions should be read before the
appliance is operated.
2. Retain Instructions - The safety and operating instructions should be retained for future
reference.
3. Heed Warnings - All warnings on the appliance and in the operating instructions should
be adhered to.
4. Follow Instructions - All operating and use instructions should be
followed.
5. Water and Moisture - The appliance should not be used
near water-for example, near a bathtub,washbowl,kitcken
sink,laundry tub, in a wet basement, or near a swimming
pool and the like.
6. Stands - The appliance should be used only with a
stand that is recommended by the manufacturer.
7. An appliance and stand combination should be moved with care. Quick stops,
excessive force, and uneven surfaces may cause the appliance and stand combination to
overturn. Move the stand first and then move the music centre separately into position.
8. Ventilation - The appliance should be situated so that its location or position does not
interfere with-its proper ventilation.For example, the appliance should not be situated on a
bed, sofa, rug,or similar surface that may block the ventilation openings;or, placed in a built-
in installation, such as a bookcase or cabinet that may impede the flow of air through the
ventilation openings.
9. Heat - The appliance should be situated away from heat sources such as radiators,heaters,
stoves,or other appliances (including amplifiers) that produce heat.
10. Power Sources - The appliance should be connected to a power supply only of the type
described in the operating instructions or as marked on the appliance.
11. Grounding or Polarization - Precautions should be taken so that the grounding or polarization
means of an appliance is not impeded.
12. Power - Cord Protection - Power-supply cords should be routed so that they are not likely
to be walked on or pinched by items placed upon or against them, paying particular attention
to cords at plugs, and the point where they exit from the appliance.
13. Cleaning - The appliance should be cleaned only as recommended by the manufacturer.
14. Antenna-This product is designed for use with the antenna attached and should not be
connected to any other external antennas.
15. Non-use Periods - The power cord of the appliance should be unplugged from the outlet
when left unused for a long period of time.
16. Object and Liquid Entry - Care should be taken so objects do not fall and liquids are not
spilled into the enclosure through openings
17. Damage Requiring Service - The appliance should be serviced by qualified service
personnel only.
TROUBLESHOOTING
There is no power
• Make sure the unit is plugged in correctly.
• Make sure the unit is switched on by the ON/OFF POWER SWITCH.
There is no sound
• Check to make sure the power is turned on.
• Check the volume level by turning the On/Off Power Switch/Volume Control.
• Check the Line In Switch on the back of the unit to make sure it is in the OFF position.
• Check you did not leave any Headphones plugged in – this will cut all sound form the speakers.
• Make sure the INT./EXT. switch on the back of the radio is switched to INT. (Unless you are using external speakers,
in which case it should be on EXT.)
The Turntable will not work
• Make sure the unit is set to Phono mode by sliding the Function switch.
• Try moving the Tone arm to the right until you hear a click - the turntable should start rotating.
• Make sure the Turntable Drive Belt has not come off. To replace the belt, see separate Instructions and diagrams.
The Tone Arm will not move
• The black tie-wrap has not been removed from the Tone Arm.
• The Tone Arm hold down clip has not been released.
• Make sure you lift the Tone Arm with the Cue Lever and then move it manually over the edge of the record – then lower it with the Cue Lever.
Caution: Do not force it down onto the record without using the Cue Lever.
The Tone Arm slides across the Record
• Make sure the protective needle cover is removed.
• Make sure the Stylus has not been damaged – replace if necessary.
• Your record may be one of the newer types with micro grooves and may need a different stylus to play successfully. Any of the older style records
should not have this problem.
Turntable – the sound is low when playing a record
• Try removing and refitting the stylus.
• Turn up the volume.
I have recorded a Record but it does not display any Folder/Artist/Title or Song Information
· Vinyl records have no digital information, so no MP3 song information will be stored on the USB device or card. However, if required, MP3 tracks
can be transferred to, viewed and named on a computer.
I have recorded a CD but it does not display any Folder/Artist/Title or Song Information
• If this information was not already on the original Disc, this will not show on the recorded disc either.
The CD does not play
• Check to make sure the CD is inserted correctly (label side facing up).
• Make sure the Function switch is set to CD and a CD is in the tray.
• Make sure the CD is not blank.
• Check that the surface of the CD is clean. See separate Instructions on CD Care.
USB /SD Card - no music is playing when PLAY/PAUSE is pressed
• Make sure there are MP3 music files stored on the USB Device/Flash Drive / SD Card.
• Check the USB Device/Flash Drive / SD Card is not larger than 4GB as the limit of this unit is up to 4GB max.
• Try resetting the USB by powering off.
• Check if the files on the device/card are perhaps in WMA format. This unit does not play WMA format, only MP3 format.
• Not all makes of USB device/SD Card are compatible with this unit – this is not a malfunction of the unit.
Cannot Record Music on the USB /SD Card
• Make sure the USB/SD Card is not full.
• Make sure the lock switch on the SD card is in the unlocked position.
• It may be the device/card is not compatible or of the correct size (up to 4GB max.) – not all available USB/SD devices are guaranteed to work with
this unit due to the way they are manufactured.
The recorded MP3 Music does not have the same sound quality as the original CD
• The sound quality of an MP3 disc varies from that of a pre-recorded Audio Compact Disc, due to the quality and method of recording and the difference
in format.
The Remote is not working
• Replace the battery. See Specifications for type of battery required.
• Remove any obstacles in the path of the Infra Red Remote and the Remote Sensor next to the LCD Display,
so the remote signal has a straight path to it.
Cassette will not work
• Make sure the FUNCTION SWITCH is set to phono.
• Make sure the cassette tape is not tangled in the mechanism.
• Make sure the cassette tape is not at the end.
PACKAGING:
• Dispose of the packaging at your local recycling centre.
• Dispose of paper and carton separately from plastic bags at your local recycling centre.
• Dispose of the item at the end of its lifespan at your local authorised household waste recycling centre.
This item is supplied by:
Coopers of Stortford
11 Bridge Street,
Bishop’s Stortford.
Hertfordshire.
Cm23 2JU.
Telephone 0844 482 4400
Fax 01279 756595.
1 10

The sound from all speakers is cut off.
CONTROL LOCATORS
3 8
RED
BLACK
RED
BLACK
METAL CONDUCTOR
Speaker jack
TONE ARM
TURNTABLE
SPINDLE
SPINDLE ADAPTOR FOR 45 RPM RECORDS
CUE LEVER
SPEED
CONTROL
SWITCH
TONE ARM
REST
INTERNAL/EXTERNAL
SPEAKER SWITCH(INT./EXT.)
AC POWER PLUG
EXTERNAL
SPEAKER JACK
EXTERNAL
FM ANTENNA
LINE IN JACK
LINE IN SWITCH
INT.EXT.
LINE IN LINE IN
ON OFF
R SP+ L
R SP- L
SPEAKER
Note the opening at the back of the music centre is to allow 33 or 78 rpm records space to play.
Recording from Phono to SD / USB
The system is capable of converting an audio signal from PHONO input (record player) into MP3 format and store it on a
USB mass storage device or SD card (the default is USB if both devices are detected). Prepare for playing a record, as
described previously.
1. Slide the FUNCTION button to PHONO mode, place a record on the turntable and start playing it.
2. Press REC / to start ripping(recording), the system will scan the contents of the USB or SD card and create a folder
to store the MP3 tracks.
3. “ REC ” and “ TO” are displayed on the LCD for about 15 seconds, “ USB “ starts flashing.
4. Either “ USB ” or “ CARD ” starts flashing as Recording begins.
5. Press STOP / to exit PHONO Recording mode.
DELETING MP3 TRACKS
The system can delete previously recorded MP3 or existing files on either USB device or SD Card.
1. In USB or SD card playback mode, press and hold REC / for 2 seconds, the currently playing track is stopped and
will be deleted.
2. “ DELETE “ is displayed.
FITTING OPTIONAL EXTERNAL SPEAKERS
1. There is the option of connecting external speakers to this unit (not supplied).
2. The speaker jacks to connect external speakers to are located on the
back of the unit. Along with the speaker jacks there is a switch marked
“ INT./EXT.” When using external speakers, this switch must be switched
to the “ EXT.” position. This turns off the internal speakers in the unit
and redirects the power to the External Speakers.
3. If you decide not to use External Speakers, make sure the switch is
set to “ INT.”
CASSETTE OPERATION
1. Switch the unit ON by turning the power ON-OFF SWITCH/VOLUME CONTROL switch to the ON position.
2. Turn the VOLUME control to mid-range position.
3. Slide the FUNCTION Switch to PHONO mode.
4. Insert a prerecorded tape through the CASSETTE DOOR. The tape will slide into the cassette mechanism and start
playing.
5. For fast forwarding, press the CASSETTE EJECT/F.F half way in. Pressing again, will stop the fast forwarding and return
the cassette to the playing mode.
6. To stop and eject the cassette, press the CASSETTE EJECT/F.F in completely.
7. When one side of the tape finishes playing, the cassette will automatically stop.
NOTE: Remove the tape from the unit when it is not in use or stopped.
LINE IN INPUT
1 You can connect external components to your unit by using the Line In Jack.
2 Plug Auxiliary cable (supplied) into the LINE IN JACK on the near panel of your unit.
3 Switch the LINE IN SWITCH to the ON position.(the SW on the Back Panel)
4 Plug the other end of the Auxiliary cable into the output jack on your
desired external component.
5 Check the volume level of your external component.
6 See operator manual for correct operation of the external component.
NOTE: When not using the Auxiliary Input, make sure the LINE IN SWITCH is in the OFF position.
EARPHONE JACK OPERATION
Insert the earphones (not supplied) into the 3.5mm diameter EARPHONE JACK on the front panel.
Please note that when listening through earphones, the sound from the built-in speakers is cut off.
331/3
45
78
Auxiliary cable

PLAYING A RECORD
1. Place record on turntable. Switch the unit ON by turning the power ON-OFF SWITCH/VOLUME CONTROL switch to
the ON position. Note there is a gap at the rear of the wooden casing to allow for larger 33 or 78rpm records to fit the
turntable.
2. Turn the VOLUME control to mid-range position.
3. Slide the FUNCTION Switch to PHONO mode.
4. Set the SPEED CONTROL SWITCH to the correct speed (33, 45 or 78 rpm) required for the selected record.
5. Use the CUE LEVER to raise the tone arm off its rest. Move the tone arm gently to the right until a ‘click’ is heard, the
turntable should start rotating.
6. Move the Tone Arm left towards the record and use the cue lever to lower it onto the point where you want the record
to start playing.
7. At the end of the record, the TONE ARM will stop automatically. Lift the Tone Arm and return it manually to the TONE
ARM REST.
8. Please be very gentle when handling the tone arm. Do not lift it up except by using the Cue lever. This is very important
to ensure there is no damage to the delicate tone arm.
ACCESSORY SUPPLIED - Spindle Adaptor for 45 rpm records
To play a 45rpm record with the centre clip missing, remove the adaptor from the record player
deck by placing thumb & forefinger in the recesses and pulling it upwards, then place it on the
Turntable Spindle. The record can then be placed on the turntable.
USB & SD CARD OPERATION
SD Card Operation:
1. Switch the unit ON by turning the power ON-OFF SWITCH/VOLUME CONTROL switch to the ON position.
2. Turn the VOLUME control to mid-range position.
3. Slide the FUNCTION Switch to “ CD “ mode.
4. In “ STOP “ mode Press and hold STOP / for over half a second – this will switch from CD>SD .If no Card has been
detected, “ NO CARD “ will show on the Display.
5. Insert an SD Card with pre-recorded MP3 music (not supplied) into the card slot. “READ” is then displayed as the system
scans the contents of the SD Card.
6. Track no. 1 of the Root folder (Folder 1) will play back automatically after reading the SD card contents.
7. Press the
FORWARD SKIP
/ or
BACKWARD SKIP /
once or repeatedly until the desired track number appears
on the display. Release the button – the track will start playing automatically.
8. Press STOP / to stop playback and press PLAY/PAUSE to resume play.
9. To pause the music, press PLAY/PAUSE / , press it again to resume play.
USB Operation:
1. Switch the unit ON by turning the power ON-OFF SWITCH/VOLUME CONTROL switch to the ON position.
2. Turn the VOLUME control to mid-range position.
3. Slide the FUNCTION Switch to CD mode.
4. In “ STOP “ mode Press and hold STOP / for over half a second – this will switch from CD>SD .
5. Again press STOP / and hold the key for over half a second - this will switch from SD>USB. If no USB has been
detected, “NO USB” will show on the Display.
6. Plug-in a USB mass storage device. " READ " is displayed as the system scans the contents of the USB device.
7. Track no. 1 of root folder will be played back automatically after the USB device contents has been read.
8. Press the
FORWARD SKIP
/ or
BACKWARD SKIP /
once or repeatedly until the desired track number appears
on the display. Release the button - the track will start playing automatically.
9. Press STOP / to stop playback and press PLAY/PAUSE/ to resume play.
10.To pause the music, press PLAY/PAUSE / , press it again to resume play.
NOTES:
· The USB Port does not support connection with a USB Extension Cable.
· It is not designed for direct communication with a computer.
· It is not guaranteed that all USB memory devices (or SD cards) will work on this audio system
IMPORTANT:
Do not disconnect the USB device during USB mode, as this may damage the external device or its files. Please power
off first or select another Mode before safely disconnecting the USB device.
USB Specification
Interface:
- USB 2.0 Full speed, HOST (USB HUB is not supported) Corresponding Flash memory
- Compatible with MPEG Audio 1, 2, 2.5
- Compatible with Layer 1, 2, 3
- Compatible with Bit rate: 128 – 320 Kbps
- Subfolder nest : 8 levels
- Number of track / titles max 999
- Support ID3 tag V2.0
5 6
CD PLAYER OPERATION
Playing a CD
1. Switch the unit ON by turning the power ON-OFF SWITCH/VOLUME CONTROL switch to the ON position and turn
the Sound Volume to mid-range position.
2. Slide the FUNCTION Switch to CD mode.
3. Press CD OPEN / CLOSE / to open the CD Compartment.
4. Insert a pre-recorded compact disc with the printed side facing up. Press CD OPEN / CLOSE / again to close the
compartment. “ READ “ is displayed as the CD player scans the contents of the disc.
5. Track no. 1 will start playing back automatically after the CD Player has finished reading the contents of the disc.
6. Press
FO
RWARD SKIP / or
BACKWARD SKIP /
once or repeatedly until the desired track number appears on
the display.
7. Press or the “ STOP/SD/USB “ key to stop playback.
8. Press or the “ PLAY/PAUSE “ key to resume play or pause the music.
MP3-CD Disc Playback – by Remote Control
1. Insert an MP3-CD format disc. Press CD OPEN / CLOSE / again to close the compartment. “ READ “ is displayed
as the CD Player scans the contents of the disc.
2. Track no. 1 in the Root Folder (Folder 1) will start playing back automatically after the MP3-CD disc contents has been
read.
3. Press
FO
RWARD SKIP / or
BACKWARD SKIP /
once or repeatedly until the desired track number appears on
the display.
4. Press STOP / to stop playback.
5. In Stop mode, press and hold the PLAY/PAUSE key / to select the MP3 folder.
NOTE: In Stop Mode: For faster skipping forward or backward of 10 tracks at a time, press and hold the
FO
RWARD
SKIP /or
BACKWARD SKIP /
button. This stops when the button is released.
Table of contents


 Service manual")


