Strata Home 40372 User manual

400W Pro Cordless Stick Vacuum Cleaner
P/N 40372
User's Manual

2
CONTENTS
SAFETY WARNINGS AND GUIDELINES.......................................................................................................................................3
CUSTOMER SERVICE....................................................................................................................................................................................4
PACKAGE CONTENTS.................................................................................................................................................................................4
PRODUCT OVERVIEW.................................................................................................................................................................................5
ASSEMBLY............................................................................................................................................................................................................6
USING THE WALL HANGAR................................................................................................................................................................... 7
CHARGING............................................................................................................................................................................................................ 7
OPERATION..........................................................................................................................................................................................................8
CLEANING THE DUSTBIN.........................................................................................................................................................................8
CLEANING THE HEPA FILTER................................................................................................................................................................9
TROUBLESHOOTING ....................................................................................................................................................................................9
TECHNICAL SUPPORT...............................................................................................................................................................................10
SPECIFICATIONS.............................................................................................................................................................................................11
REGULATORY COMPLIANCE...............................................................................................................................................................11
Notice for FCC ...........................................................................................................................................................................................11
Notice for Industry Canada...........................................................................................................................................................12

3
SAFETY WARNINGS AND GUIDELINES
Please read this entire manual before using this device, paying extra attention to these
safety warnings and guidelines. Please keep this manual in a safe place for future reference.
•This device is intended for indoor use only. It should be stored in a cool, dry place.
•Do not expose this device to water or moisture of any kind.
•This appliance is intended for domestic, dry vacuum cleaning only. Do not use it to
pick up liquids or on wet surfaces.
•Do not use on concrete, asphalt, or other rough surfaces.
•Do not touch the appliance, charger, or the charger cord with wet hands.
•This appliance is not intended for use by children aged 10 years and younger. Older
children should be closely supervised during use.
•Use only the accessories and attachments that are included with this appliance. Use
of other accessories or attachments may present a risk of personal injury.
•Keep the appliance and accessories away from hot surfaces.
•Take care to prevent damage to the charger cord. Inspect the charger, cord, and
appliance for damage before use. Do not use if damaged.
•This device contains a Lithium-ion battery. Dispose of this device only in accordance
with local, state, or federal regulations for electronic waste.
•Charge the battery before first use and at least once every three months to keep it
fresh and capable of holding a full charge. Do not allow the battery to become fully
discharged.
•Do not use this appliance to vacuum flammable materials.
•Clean using a soft, dry cloth only. Do not use chemical cleaners, solvents, or
detergents. For stubborn deposits, moisten the cloth with warm water.
•This device has no user serviceable parts. Do not attempt to open, service, or
modify this device, the battery, or the charger.

4
CUSTOMER SERVICE
The Monoprice Customer Service department is dedicated to ensuring that your ordering,
purchasing, and delivery experience is second to none. If you have any problem with your
order, please give us an opportunity to make it right. You can contact a Monoprice
Customer Service representative through the Live Chat link on our website
support times and links.
PACKAGE CONTENTS
Please take an inventory of the package contents to ensure you have all the items listed
below. If anything is missing or damaged, please contact Monoprice Customer Service for a
replacement.

5
PRODUCT OVERVIEW
6
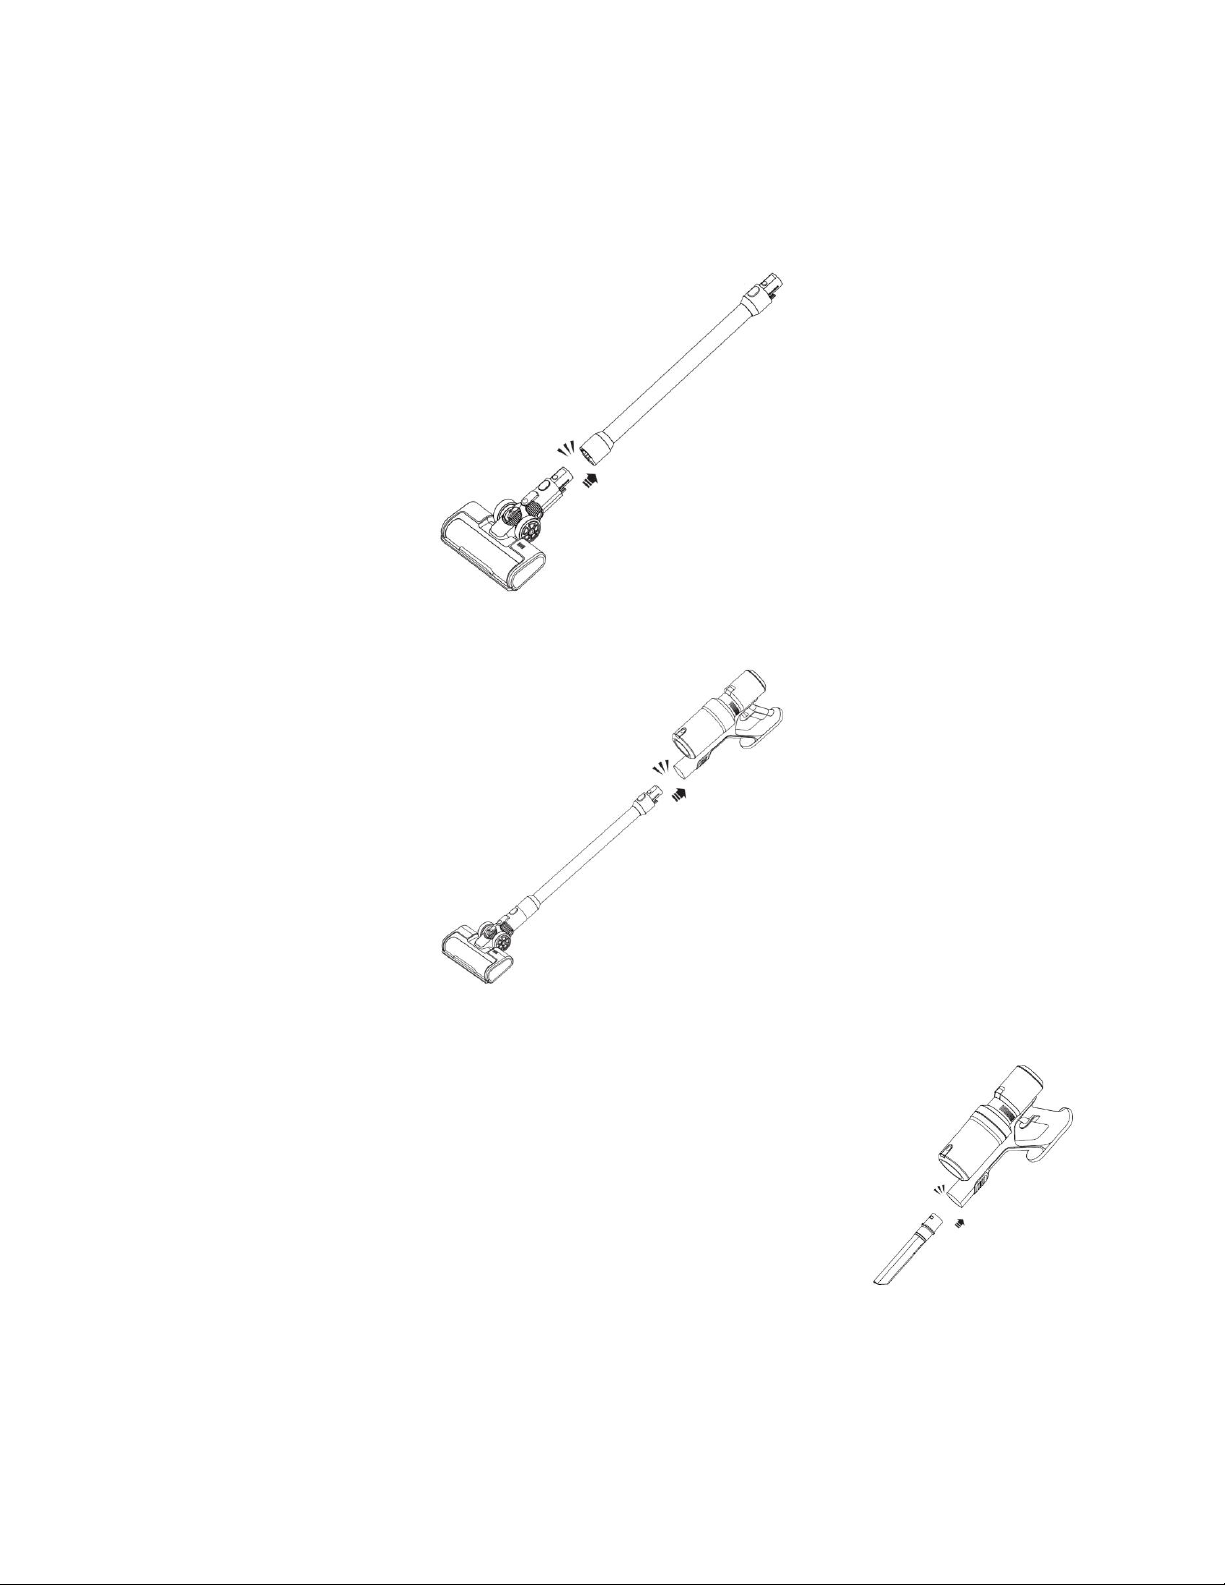
ASSEMBLY
1. Insert the Main Power Brush into the Metal Pole until the lock clicks into place.
2. Insert the Metal Pole into the Host Header until the lock clicks into place.
Notes:
•In addition to using the Main Power Brush, you can use the
Mini Power Brush, Bristle Brush, or the Long Crevice at the
end of the Metal Pole.
•Rather than using the Metal Pole, you can attach the Main
Power Brush, Mini Power Brush, Bristle Brush, or Long
Crevice directly to the Host Header to use the vacuum as a
hand vacuum.

7
USING THE WALL HANGAR
This vacuum includes a wall bracket for convenient storage when not in use. Perform the
following steps to install the wall bracket.
1. Locate a section of wall with a nearby AC power outlet for convenient charging.
Ensure that this location is not near heat sources and not in direct sunlight.
2. Using two screws and anchors or the included 3M® double-sided adhesive tape,
secure the Wall Hangar to the wall. Ensure that the height is sufficient to keep the
fully assembled appliance off the floor.
3. Hang the vacuum on the Wall Hanger by the Host Header.
CHARGING
This device uses a Lithium-ion battery. The battery should be charged before first use and
at least once every three months to keep the battery fresh and capable of holding a full
charge. Do not allow the battery to fully discharge.
1. When the vacuum is powered on, the three LED indicators
on the Battery Pack indicate the battery charge level. When
only one indicator is present and is flashing, stop using the
vacuum and charge the battery.
2. Plug the DC barrel connector on the Charger into the power
receptacle on the Battery Pack, then plug the charger into a
nearby AC power outlet.
3. When the three LED indicators are fully illuminated, the Battery
Pack is fully charged. A full charge takes about 2~3 hours.
4. Unplug the Charger from the wall outlet, then unplug it from the
Battery Pack.
Notes:
•The Battery Pack can be charged without detaching it from the Host
Header.
8
OPERATION
•Press and hold the Switch Button on the Host
Header for several seconds to turn the vacuum
on. The vacuum will initially start in Low Speed
mode.
•With the vacuum powered on, momentarily
press the Switch Button on the Host Header to
turn it off.
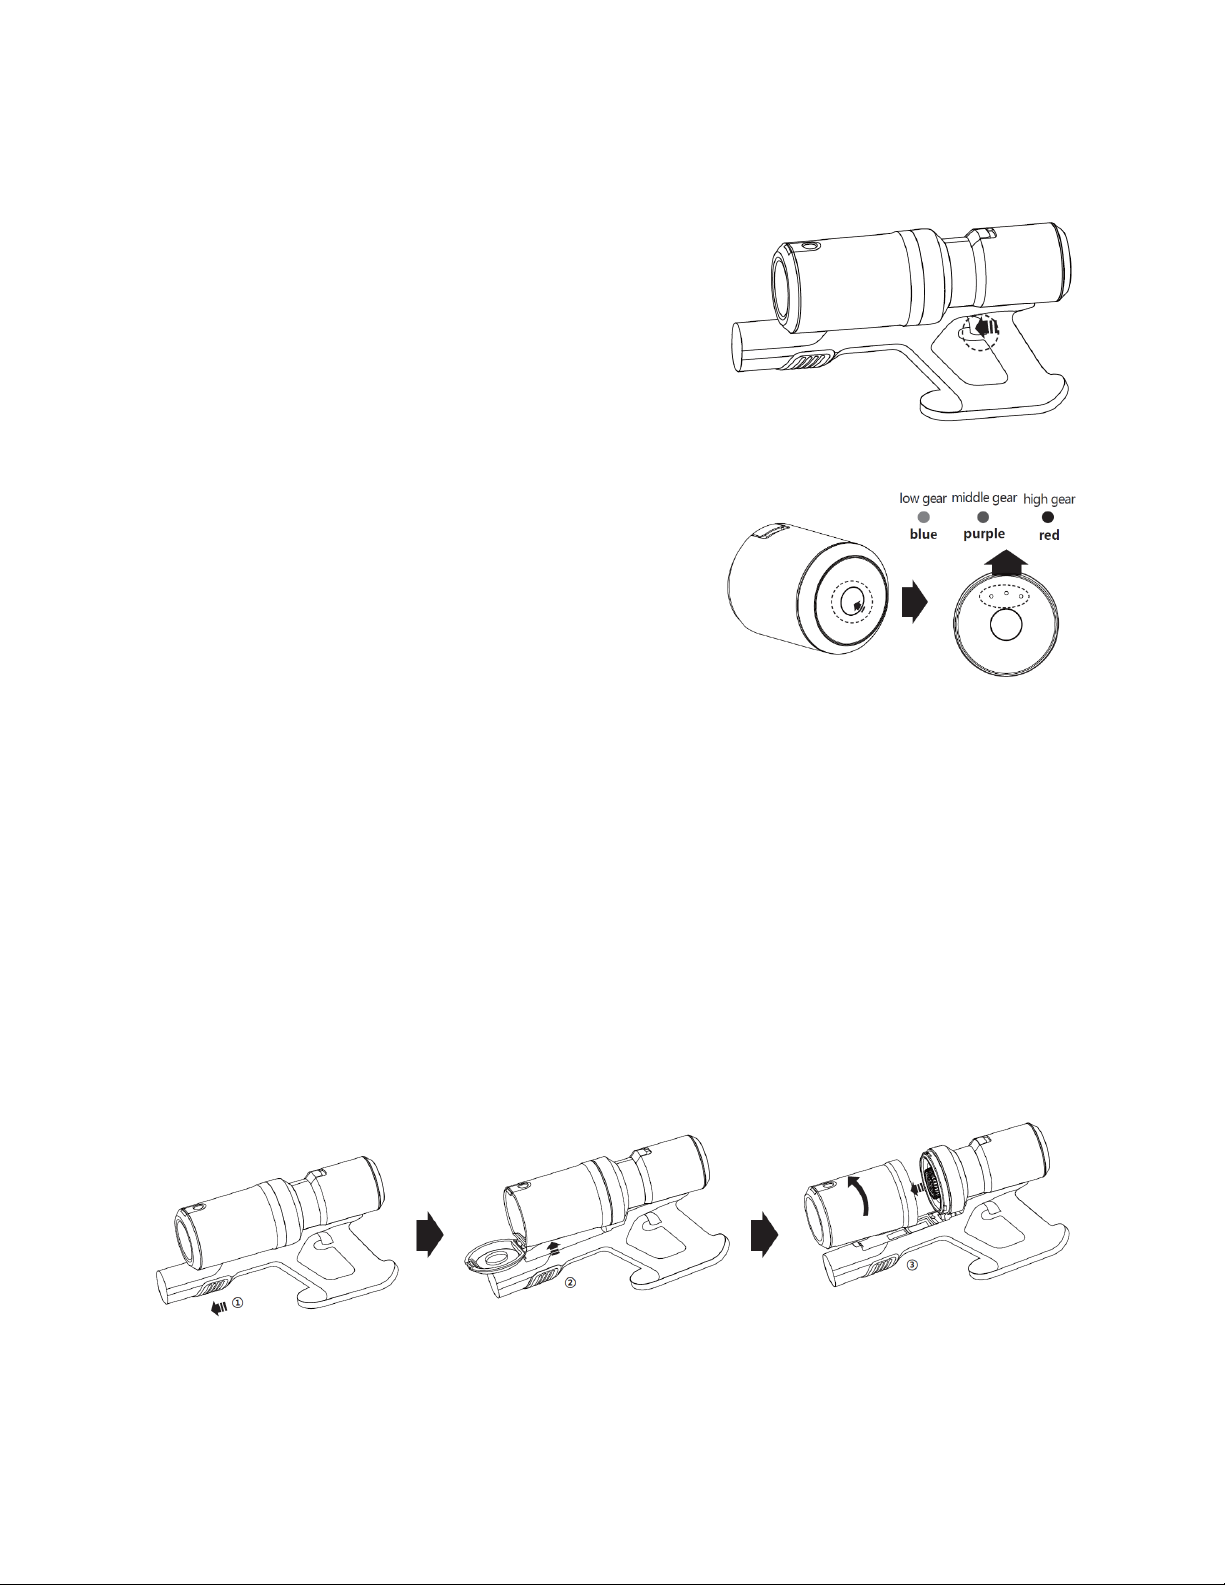
•Momentarily press the Speed-Adjustment
Button on the Battery Pack to cycle through
the Low Speed, Medium Speed, and High
Speed cleaning modes. The LEDs on the
battery pack illuminate Blue, Purple, and Red
to indicated the cleaning speed.
CLEANING THE DUSTBIN
Perform the following steps to remove, clean, and reinstall the Dustbin.
1. Slide the Dustbin Release Button forward until the front of the latch locking the
Dustbin to the Host Header releases.
2. Lift the Dustbin up slightly.
3. Twist the Dustbin counterclockwise to remove it from the Host Header.
4. Press the Dustbin Lock to open the cap on the Dustbiin.
5. Empty the Dustbin into a waste bin.

9
6. Close the Dustbin cap until the Dustbin Lock snaps into place.
7. Align the Dustbin until it seats onto the Host Header, then twist clockwise to lock it
into place.
8. Press the Dustbin down onto the Host Header until the Dustbin Release locks into
place.
CLEANING THE HEPA FILTER
Perform the following steps to clean the HEPA filter in the Dustbin.
1. Perform the first three steps in the
CLEANING THE DUST CUP
section above to remove the Dustbin from the Host Header.
2. The HEPA filter is located in the back of the Dustbin. Pull the filter
out of the Dustbin to remove it.
3. Clean the filter using a soft hair brush. Alternatively, you can
immerse it in warm water for washing.
4. Ensure that the filter is fully dried, then reinsert it back into the Dustbin.
TROUBLESHOOTING
Q1: The suction is weak.
A1: Empty the Dustbin. Ensure that the Dustbin is installed correctly. Clean the HEPA Filter.
Ensure the Battery Pack is fully charged.
Q2: The vacuum won't power on.
A2: Ensure that the Battery Pack is charged.

10
Q3: The Battery Pack won't charge.
A3: Ensure that the plug is fully inserted. Ensure that the wall outlet provides power by
testing with a lamp or other device.
Q4: After turning on the vacuum, it shuts off automatically and the three LED indicators on
the Battery Pack flash red.
A4: Check the vacuum for the following conditions:
•Ensure that the floor brush is not blocked by foreign matter. If it is, remove the
foreign matter and turn the vacuum on again.
•Check to see if the vacuum body is hot. If so, allow it to cool, then turn the vacuum
on again.
•If liquid is vacuumed, the machine will short circuit and will shut down
automatically. Remove the Battery Pack from the Host Header and recharge it. Wait
for the liquid to dry completely, then reinstall the Battery Pack and turn the vacuum
on again.
TECHNICAL SUPPORT
Monoprice is pleased to provide free, live, online technical support to assist you with any
questions you may have about installation, setup, troubleshooting, or product
recommendations. If you ever need assistance with your new product, please come online
to talk to one of our friendly and knowledgeable Tech Support Associates. Technical
support is available through the online chat button on our website www.monoprice.com
support times and links.

11
SPECIFICATIONS
Model
40372
Dust Cup Capacity
16.9 fl. oz. (500ml)
Battery Type
Lithium-ion
Battery Voltage
29.6V
Battery Capacity
2000mAh
Charging Time
About 2-3 hours
Noise Level
75dB
Dimensions
46.1" x 10.1" x 8.5" (1172 x 256 x 217 mm)
Weight
5.5 lbs. (2.5 kg)
REGULATORY COMPLIANCE
Notice for FCC
This device complies with Part 15 of the FCC rules. Operation is subject to the following two conditions: (1)
this device may not cause harmful interference, and (2) this device must accept any interference received,
including interference that may cause undesired operation.
Modifying the equipment without Monoprice's authorization may result in the equipment no longer
complying with FCC requirements for Class B digital devices. In that event, your right to use the equipment
may be limited by FCC regulations, and you may be required to correct any interference to radio or television
communications at your own expense.
This equipment has been tested and found to comply with the limits for a Class B digital device, pursuant to
Part 15 of the FCC Rules. These limits are designed to provide reasonable protection against harmful
interference in a residential installation. This equipment generates, uses and can radiate radio frequency
energy and, if not installed and used in accordance with the instructions, may cause harmful interference to
radio communications. However, there is no guarantee that interference will not occur in a particular
installation. If this equipment does cause harmful interference to radio or television reception, which can be

12
determined by turning the equipment off and on, the user is encouraged to try to correct the interference by
one or more of the following measures:
•Reorient or relocate the receiving antenna.
•Increase the separation between the equipment and receiver.
•Connect the equipment into an outlet on a circuit different from that to which the receiver is
connected.
•Consult the dealer or an experienced radio/TV technician for help.
Notice for Industry Canada
This Class B digital apparatus complies with Canadian ICES-003.
Cet appareil numérique de la classe B est conforme à la norme NMB-003 du Canada.
Monoprice™, Strata Home™, the Strata Home logo, and all Monoprice logos are trademarks
of Monoprice Inc.
3M® and the 3M logo are registered trademarks of 3M Company.
Table of contents


