Streetwize SWPW5 Specification sheet
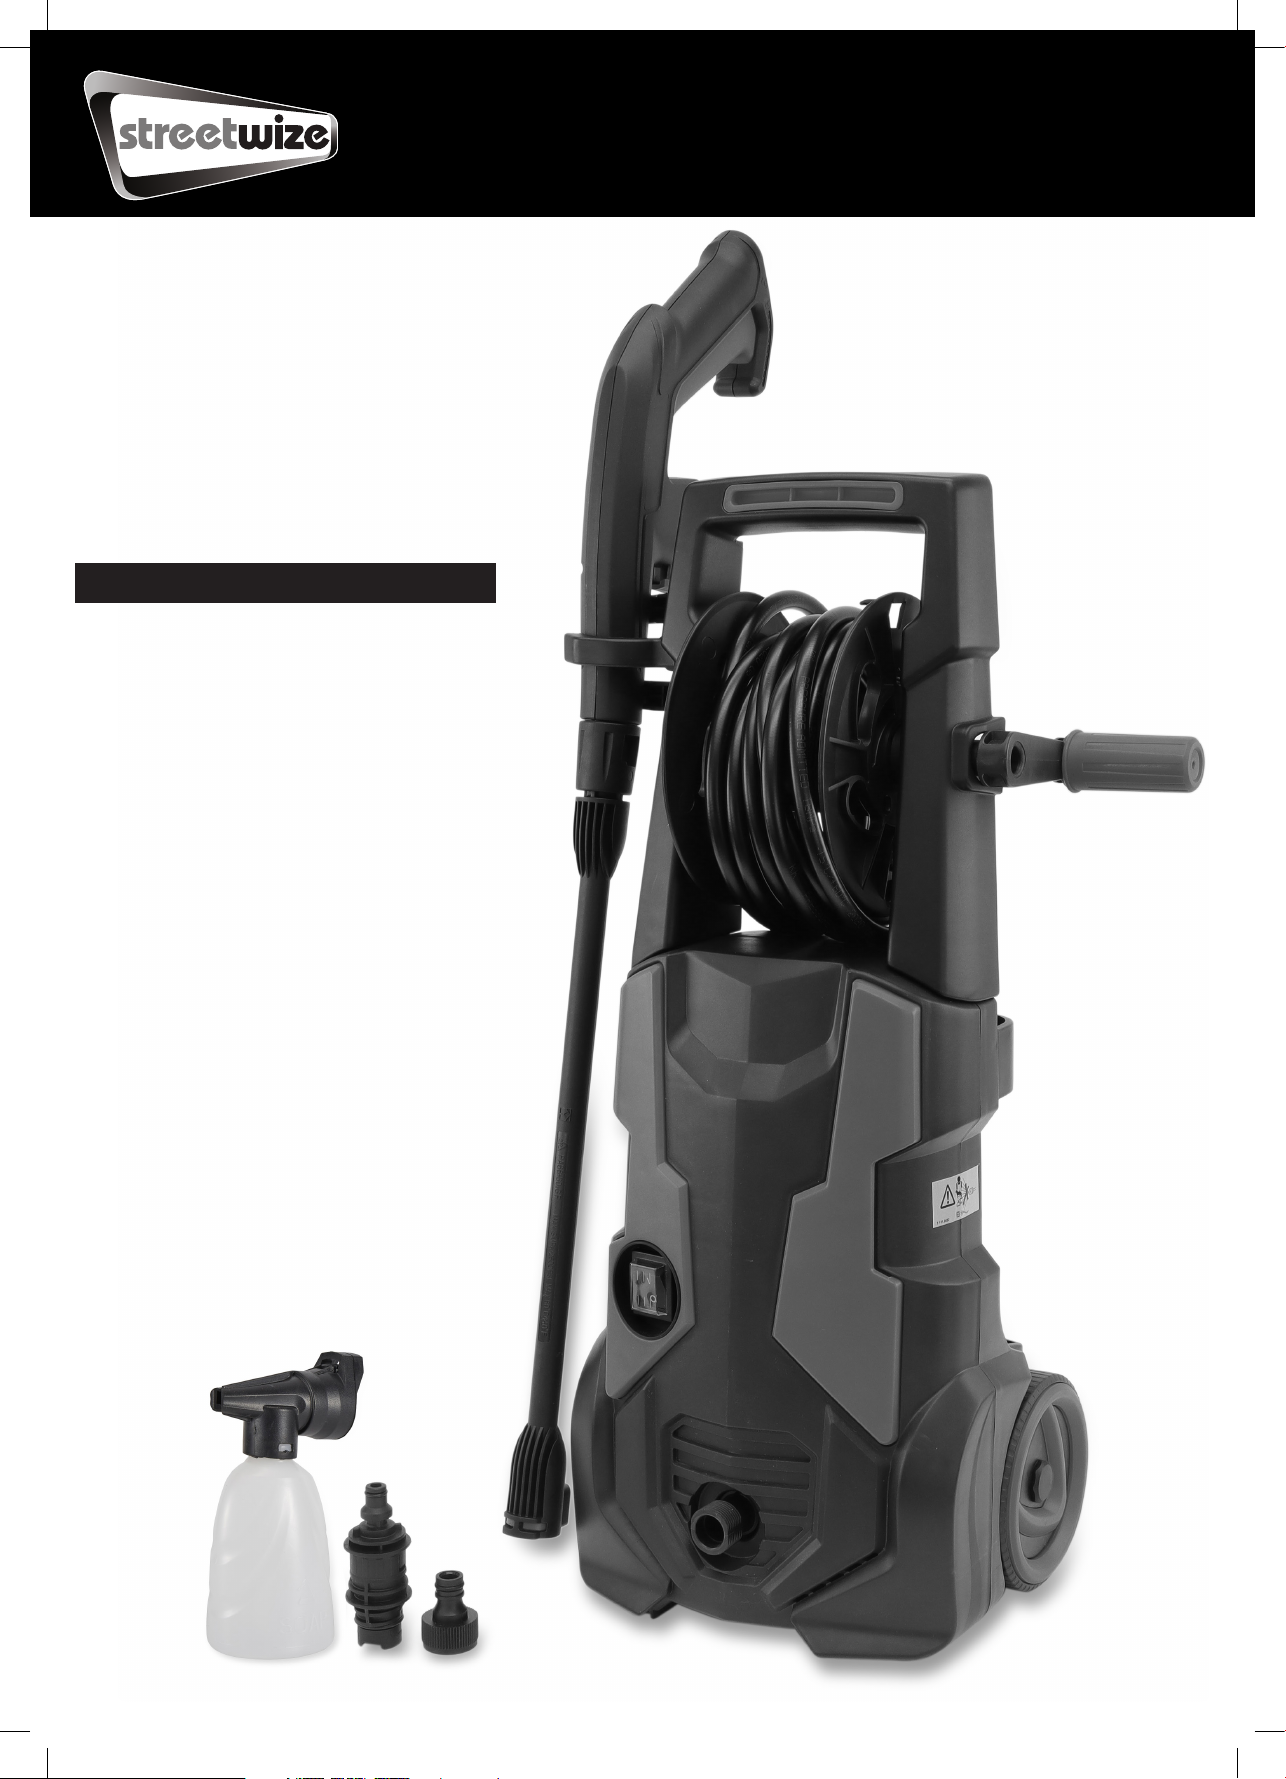
1900W
Pressure
Washer
(SWPW5) Information For Use

2
Contents
Intention for Use
Product Elements
Health & Safety
Wear Protective Equipment
General Safety Warnings
Accident/Injury Hazard
Electrical Hazard
Assembly Instructions
Directions for Use
Before use
Using The Pressure Gun
Using the Soap Bottle Attachment
Spare parts
Technical Support
Technical Specifications
Intention For Use
Thank you for purchasing this 1900W Pressure Washer from Streetwize. This pressure washer is intended for use for
washing vehicles (exterior body and wheels), driveways, concrete tiles & patios, wooden decking patios, barbeque
grills & home exteriors (vinyl/bricks).
When using this pressure washer, we recommend that you wear protective safety equipment as outlined in this docu-
ment. This pressure washer should be kept away from children, and should never be used by children.
WE HIGHLY ADVISE THAT YOU READ ALL THE SAFETY GUIDELINES AND INFORMATION IN THIS DOCUMENT.
s
2
3
4
4
4
4
4
5-6
6-7
6
6
7
8
8
8
3
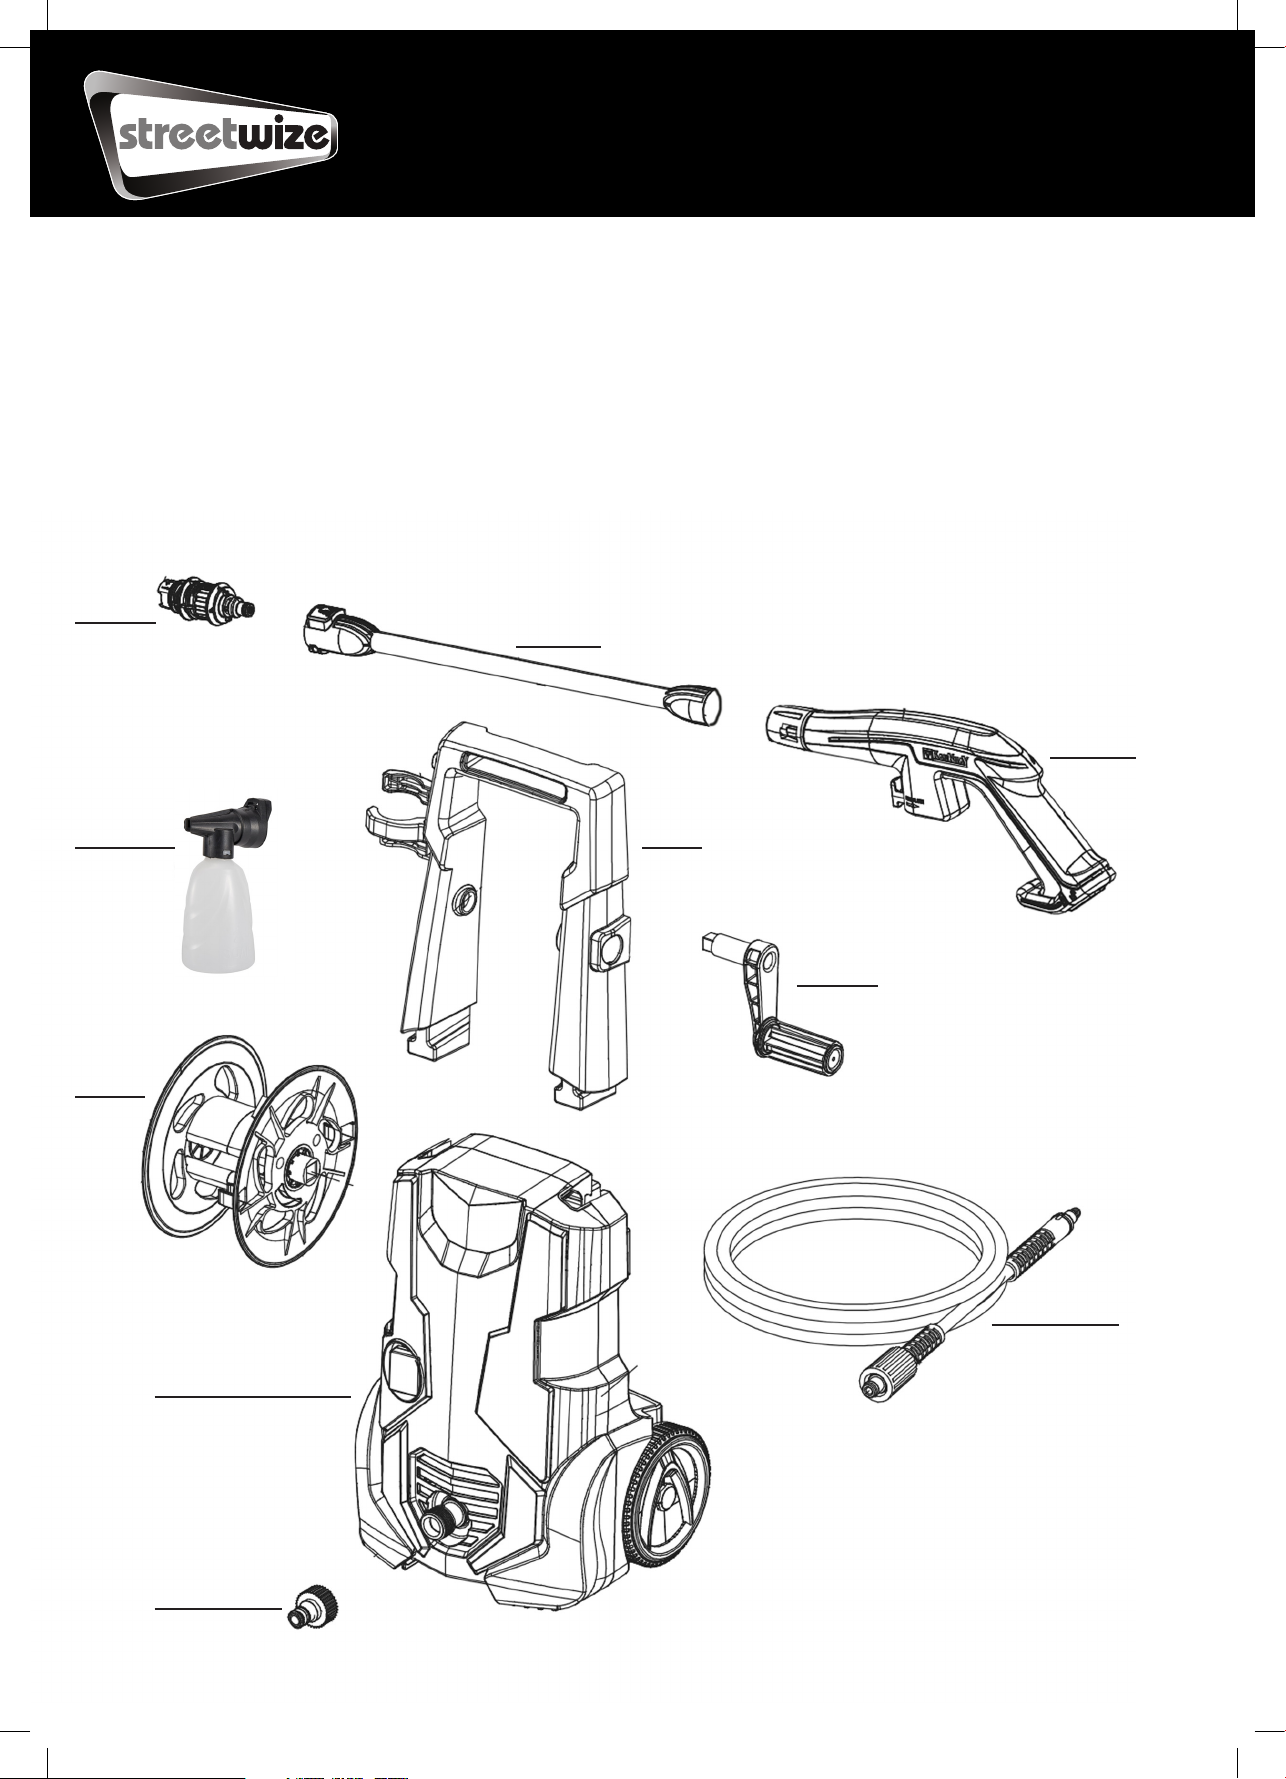
1. Main pressure washer unit
2. Water Inlet Connector
3. Pressure hose
4. Handle
5. Hose Reel
6. Hose Reel Handle
7. Pressure Washer Gun
8. Lance
9. Adjustable Line Nozzle
10. Soap Bottle
11. Screws/fixings
Product Elements
1.
5.
6.
7.
8.
9.
10.
3.
4.
2.

4
Health & Safety
PLEASE ENSURE THAT YOU READ THROUGH THE HEALTH & SAFETY INFORMATION PROVIDED BELOW BEFORE USING THE PRESSURE WASHER UNIT.
Wear Protective Equipment
When using the pressure washer, please wear the following protective equipment:
• Safety goggles/eye protection
• Protective Gloves
• Ear protection
• Overalls
• Boots with strong grip
General Safety Warnings
When using the pressure washer, please wear the following protective equipment:
• When cleaning cars, do not drive over the pressure hose.
• Never move the unit using the pressure hose. Explosion hazard and risk of damage to the hose.
• When cleaning tyres, tyre valves or other pressurised components, the pressure water jet that comes out of
this unit can potentially damage (even cause explosion) the component. Please keep at least a distance of
30cm during cleaning these components.
• Do NOT leave the appliance unattended.
• Do NOT alter the original diameter of the spray head nozzle.
Accident/Injury Hazard
• Do NOT use this pressure washer with inflammables or toxic liquids/chemicals. Risk of explosion and
personal harm.
• Do NOT direct the pressurised water jet towards people and/or animals. Injury hazard.
• Do NOT allow children and/or people who are not fully competent to use this appliance. Injury hazard.
• Do NOT use the appliance if the pressure hose is damaged. Explosion hazard.
• Do NOT intentionally jam the trigger in the operating position. Accident hazard.
• Do NOT tamper or adjust the setting of the safety valve.
• Before setting up or making adjustments (i.e. replacing the nozzle), ensure the unit is unplugged. This
prevents accidental start-up.
• Before pulling the trigger, use both hands to ensure that you have a firm grip on the pressure washer gun to
prevent/minimise recoil.
• For maintenance or repairs, please seek assistance from a qualified professional.
• Discharge residual pressure before disconnecting the hose from the inlet.
Electrical Hazard
• Do NOT touch the plug or unplug the unit from the socket using wet hands. Electrical Hazard.
• Do NOT direct the pressurised water jet towards the pressure washer unit. This will damage/affect the
electrical components. Electric shock hazard.
• Do NOT use the pressure washer outdoors when it is raining. Electrical & short circuit hazard.
• All electrical conductors must be protected against the water jet. Short circuit hazard.
• Only use detergents that will not corrode the pressure hose or electrical cable.

5
Fig. 4
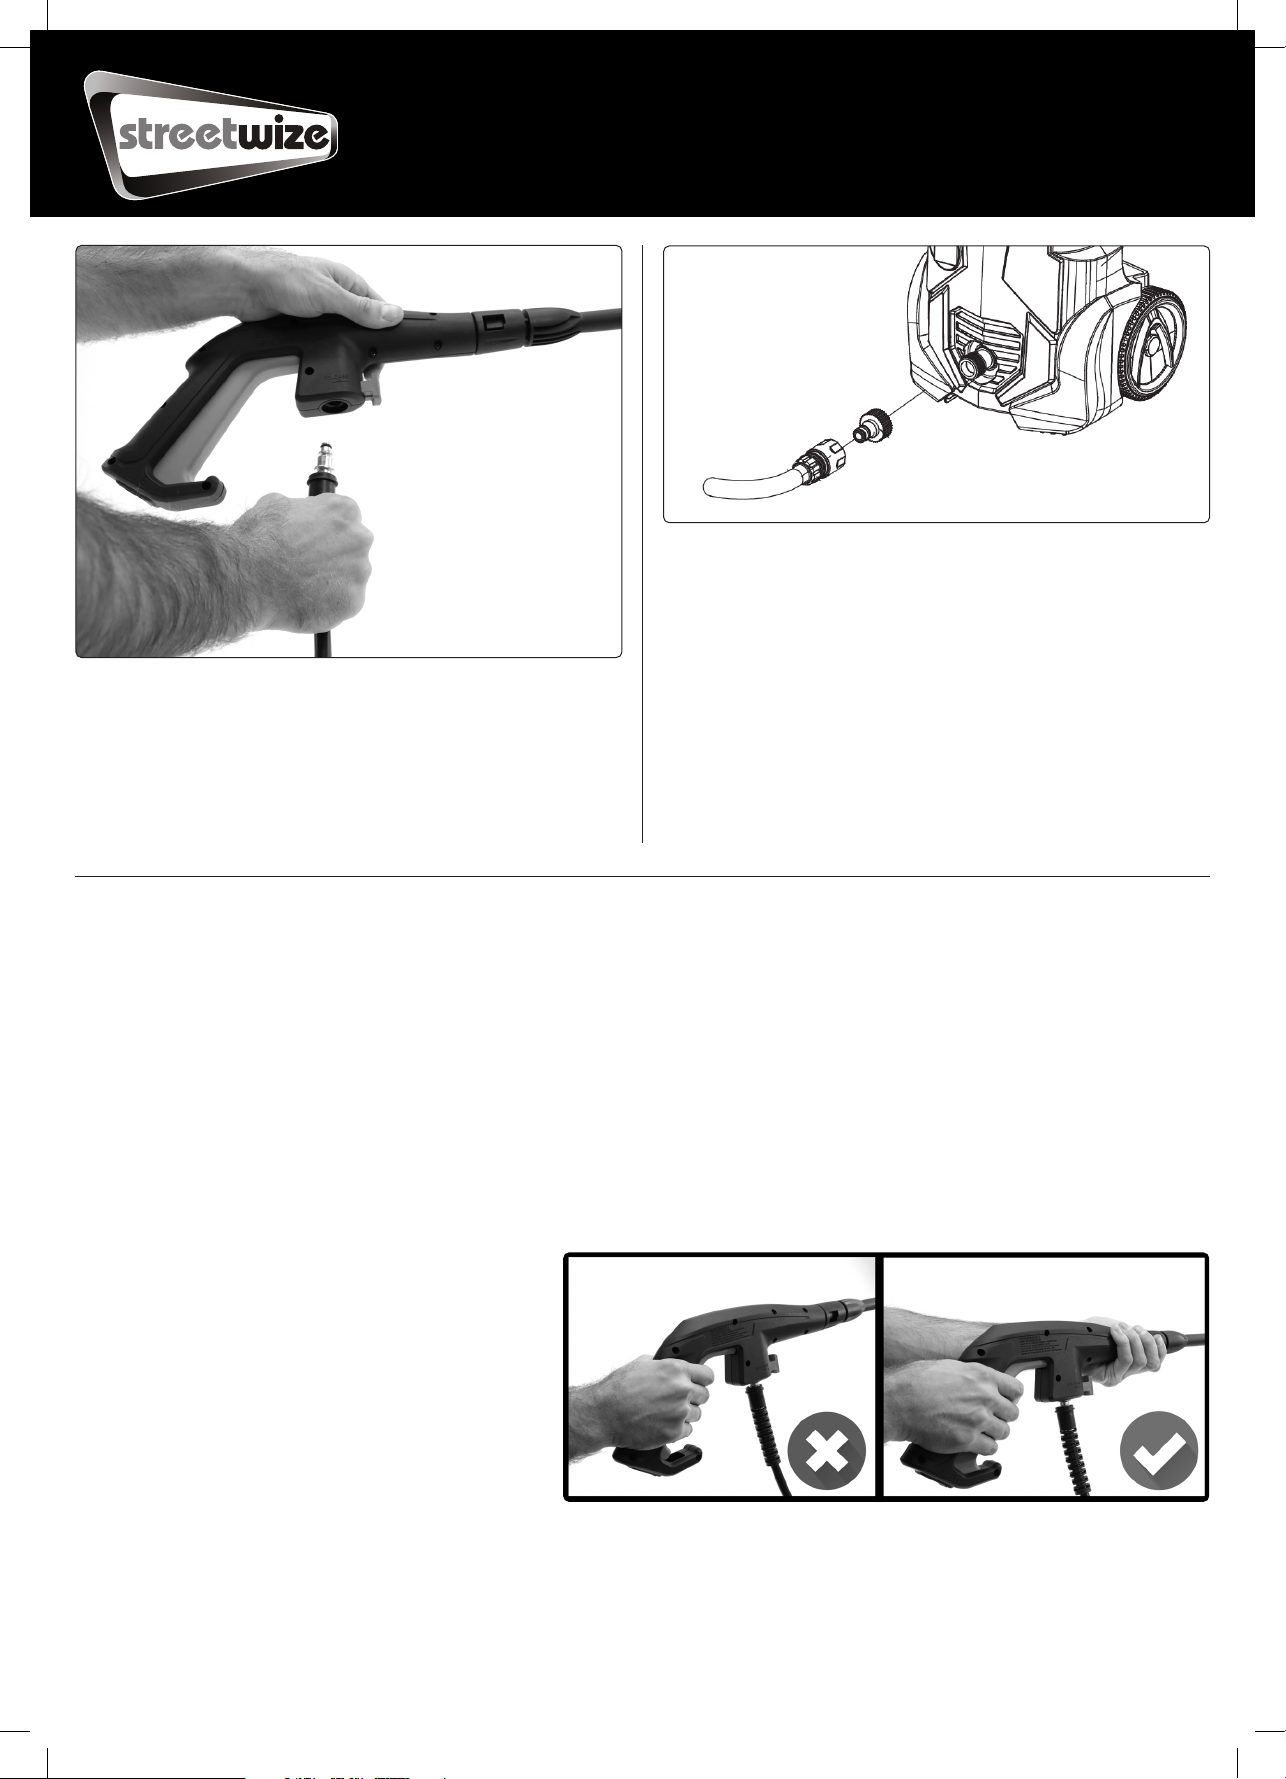
Assembly Instructions
1. First, assemble the pressure washer’s handle as
shown in Figure 1.
2. Attach the handle to the top of the main pressure
washer unit (see figure 2).
3. Once the handle has been attached, connect the
pressure hose to the outlet found behind the main
pressure washer unit. Push hose into inlet and then
screw to secure. See Figure 3A and 3B. Then wind
the pressure hose onto the reel.
4. Assemble the pressure gun as shown in Figure 4,
with the provided line nozzle.
Fig. 1
Fig. 3a
Fig. 3b
Fig. 2
6
Fig. 5
Fig. 6
5. Connect the pressure hose to the pressure gun.
The hose should easily click into place. Ensure the
release trigger is not pushed in when connecting
the pressure hose. To remove the hose push in the
release button and pull the hose out.
6. Connect the pressure washer to your hose pipe via
the ½ inch inlet connector (Figure 6).
Once the product is assembled, your pressure
washer is ready to use. You do not need to
disassemble the product after using the
pressure washer. Just store in a dry place at
room temperature.
(If you want to dissasemble the pressure
washer, simply reverse the steps outlined in
Assembly Instructions).
Directions For Use
Before use
Before using the pressure washer, ensure the adjustable line nozzle is firmly in place. Never use the pressure washer
without the line nozzle being firmly in place.
The line nozzle can be adjusted to change the width of the pressurised water output for more coverage. Simply rotate
the nozzle to adjust the width of the jet spray.
Once both the water supply and power supply are on, the pressure washer will start as soon as you pull the trigger on
the pressure gun.
IMPORTANT: When using the pressure washer, please wear protective eyewear, protective gloves and boots with strong grip.
Using The Pressure Gun
When using the pressure gun, ALWAYS ensure
that you use both hands to provide a firm grip.
Never use only one hand.
Before pulling the trigger, turn the safety lock off
first, (located at the base of the handle) then
point the pressure washer gun to where you
want to clean. Then press the trigger.
IMPORTANT: After 1 minute of continuous use, release the trigger to allow the unit to cool down. Let it cool
down for a few seconds, and repeat.
Fig. 7

7
Using The Soap Bottle Attachment
The soap bottle provided is ideal for cleaning cars with a suitable car shampoo.
To use the soap bottle, simply follow the instructions below:
1. Open up the soap bottle attachment. Fill it with a suitable cleaning solu-
tion. And then close the bottle. (Figure 8)
2. Ensure the adjustable line nozzle is set to maximum width. Never use the
soap bottle to the minimum width of the line nozzle.
3. Attach the filled soap bottle to the attachment. Then proceed using the
pressure washer (see Figure 9)
Fig. 8
Fig. 9
Technical Specifications
Product Streetwize 1900W Pressure Washer
Supplier code SWPW5
Motor Power 1900W
Voltage/Frequency 220-240V/50-60Hz
Working Pressure 100 Bar
Max Pressure 150 Bar
Working Flow Rate 5.5 L/min
Max Flow Rate 7.5 L/min
Pump RPM 3000 RPM
Hose Length 5 metre
Product Dimensions* Max Height 63cm x Max Depth 24.5cm x Max Width 36cm
8
For product support:
T: +44 (0)161 447 8597
For trade enquiries:
T: +44 (0)161 447 8580
Streetwize: Ashburton Road West,
Trafford Park, Manchester M17 1RY
www.streetwizeaccessories.com
Technical Support
If you require any technical support for your product, please contact us on:
and provide the product name and supplier code (see Technical Specifications) along with the technical query and
proof of purchase.
To find out more visit our website:
Or follow us on social media
We have over 1000 car and
leisure products in our range
RoHS
COMPLIANT
M17 1RY
EU Registered address: Ace Supply Co (Europe) Ltd. 25 Herbert Place, Dublin 2, D02 A098 Republic of Ireland.
Table of contents


