Challenge 1500W High Pressure Washer User manual

Instruction Manual - Please keep for future reference
1500W High Pressure Washer
04-07
Please read this instruction manual carefully before operating your pressure washer.

SAFETY INSTRUCTIONSSAFETY INSTRUCTIONS
- If you are using an extension cable it must be completely unwound from the cable
drum and be the correct diameter and electical rating:
10 meter length of cable should have a minimum cross section of 1.5mm2
30 meter length of cable should have a minimum cross section of 2.5mm2
It must be rated at a minimum of 13 amps.
- The plug and socket of the extension cable must be waterproof.
- WARNING: Inadequate extension cords can be dangerous.
- The pressure washer should only be connected to an electrical connection that
was made by a qualified electrician and comply with IEC60364.
- Disconnect from mains before carrying out user maintenance.
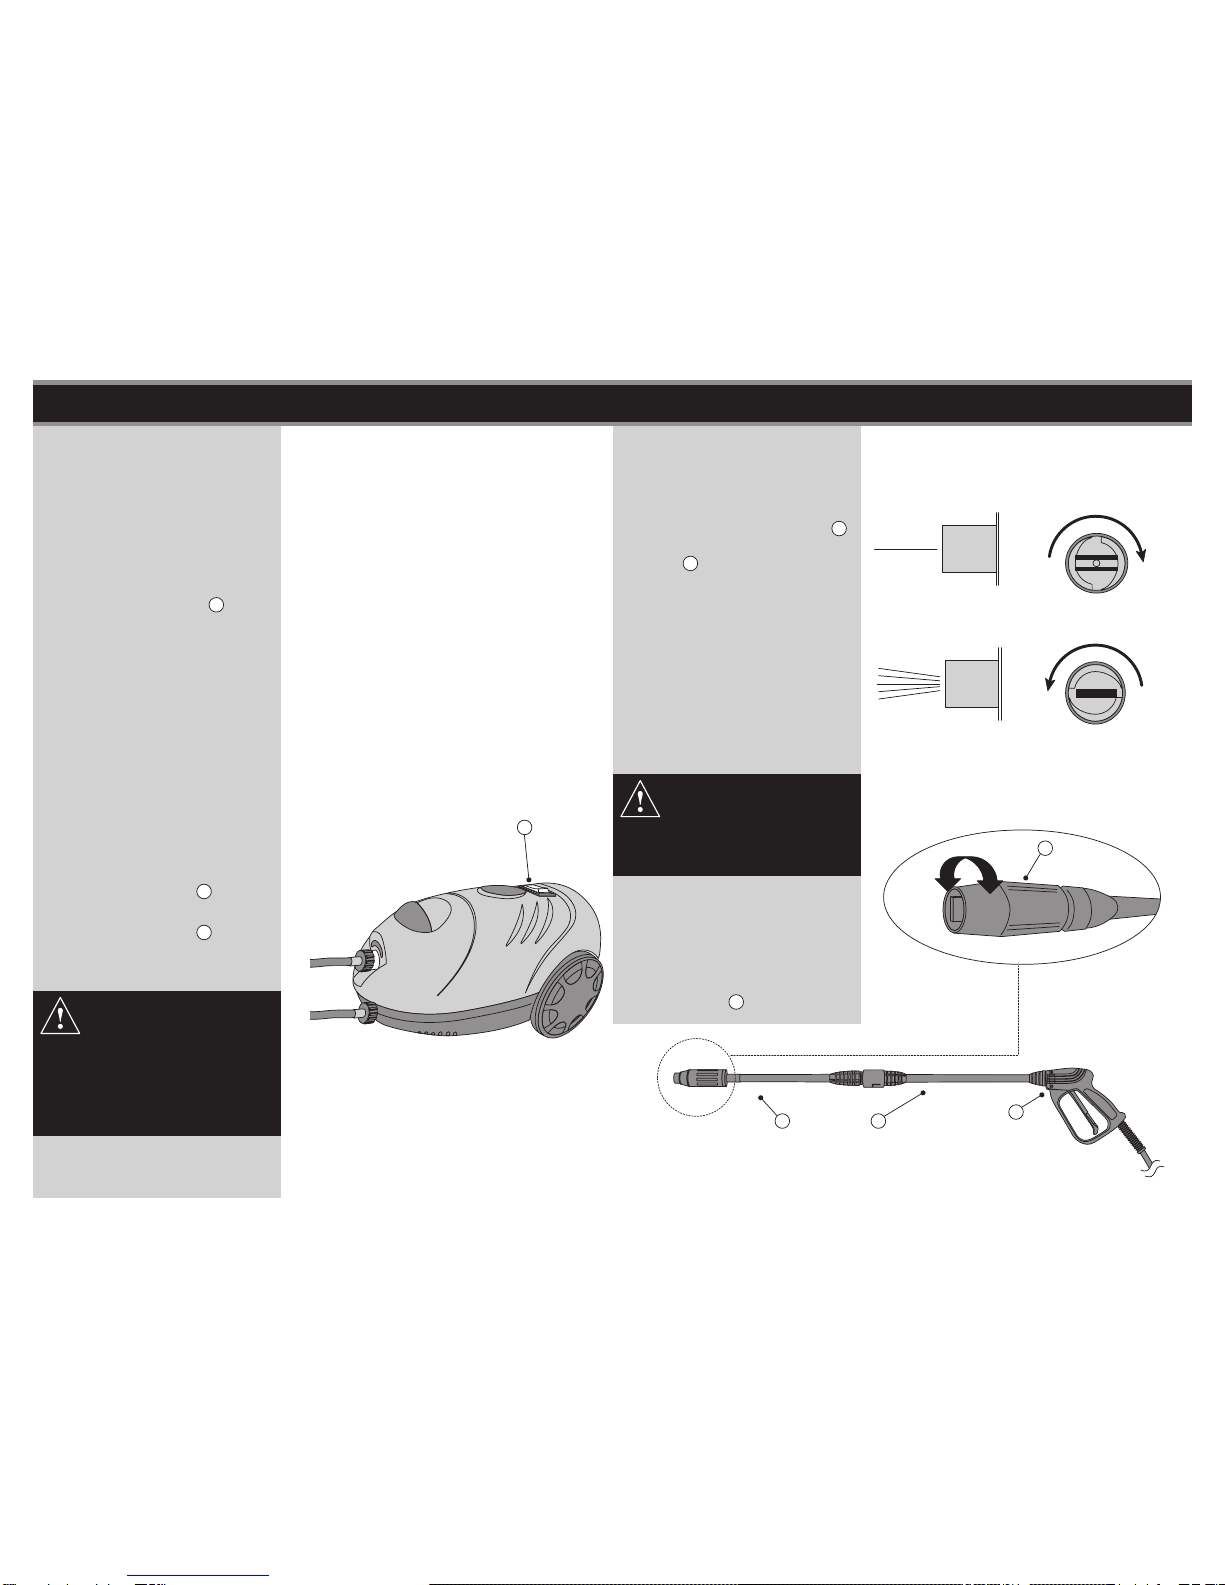
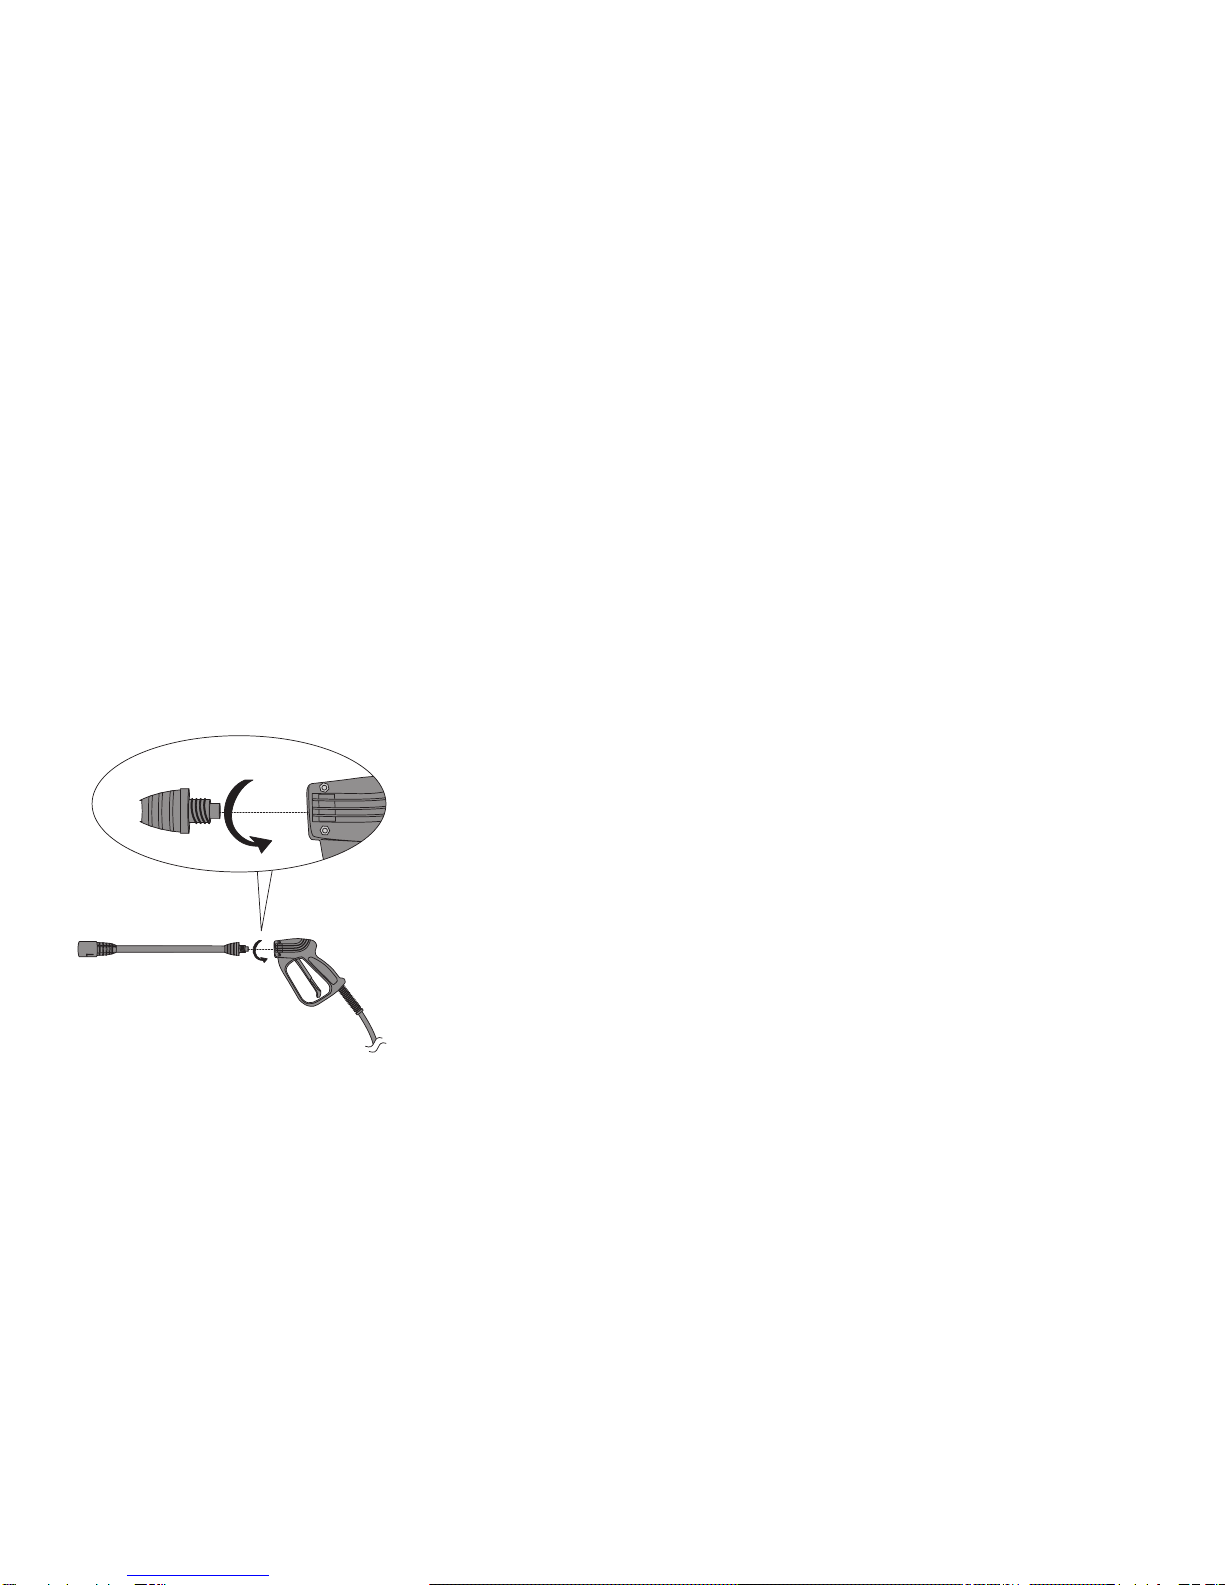
- WARNING: High pressure hoses, fittings and couplings are important for the safety
of the pressure washer. Use only hoses, fitting and couplings recommended by
the manufacturer.
- WARNING: This pressure washer has been designed for use with the cleaning
agent recommended. The use of other cleaning agents or chemicals may adversely
affect the safety of the machine.
- WARNING: Vehicle tyres and tyre valves may be damaged by the high pressure
jet. Damaged vehicle tyres and tyre valves are hazardous. Always perform the
cleaning with a minimum distance of 30cm.
- Never spray surfaces containing hazardous substances or objects (e.g. asbestos,
chipped chrom plating etc...)
- Never leave the pressure washer unattended when it is turned on.
Application
•The pressure washer is applicable to DOMESTIC cleaning works e.g. Cars,
Bicycles, Motorbikes, Caravans, Fences, Garden Walls, Pathways, Driveways
and House facades, Removal of moss and algae, Brickwork and Guttering etc... ELECTRICAL SAFETY: Always check that the power supply corresponds
to the voltage on the rating plate. Preferably connect the machine to an electric
group which is protected with an earth leakage switch of max. 30 mA.
32
When using the Pressure Washer, always observe the detailed safety instructions
enclosed.
WARNING : DO NOT use your Pressure Washer without reading the safety
instruction manual.
We recommend the user wear safety equipment during use.
Please read all instructions before use.
- This unit must not be used by children or untrained personnel.
- When activating the high pressure of the water coming out of the lance may cause
kick back. Therefore when activating, ensure that you grip the lance firmly. When
using this unit ensure that other people are at least 10m away from the working
area unless they are wearing protective clothing.
- WARNING: High-pressure jets can be dangerous if misused. The jet MUST NOT
be directed at other people, animals, live electrical equipment or the pressure
washer itself.
- WARNING: DO NOT point the jet towards yourself or other people to clean clothes
or footwear.
- To ensure safe operation of the Pressure Washer use only original spare parts or
parts recommended by the manufacturer.
- DO NOT use the Pressure Washer if the supply cord or other important parts are
damaged (e.g. high pressure hoses or the lance).
- Keep the high-pressure hose connected to the Pressure Washer as long as it is
under pressure. Disconnecting the high-pressure hose whilst the system is under
pressure is dangerous.
- DO NOT use acids or flammable liquids in the machine.
It is highly recommended that this product be used with an RCD (Residual Current
Device).
- When using a Pressure Washer always ensure that your water connection is
protected by a "Backflow Preventer" (as per Water Byelaws). This will avoid any
possible contamination of your water supply. "Backflow Preventer" can be purchased
in any good DIY shop.

KNOW YOUR MACHINEKNOW YOUR MACHINE
F
G
H
B
C
D
A
E
N
L
54
NOTE : Your Pressure
Washer has been designed
for outdoor use only for the
cleaning of stone, wood, metal
and plastic materials.
O
PI
J
K
M
Description
A On/off switch.
B High-pressure hose outlet.
C Water supply inlet (garden hose
and connectors not included).
D Handle.
E Power Cord
F Trigger Gun.
G Trigger Switch.
H Trigger Safety "lock off".
I High-pressure hose.
J Spray Lance.
K Spray Lance Extension.
L Wheel
M Detergent dispenser.
N Power Washer
O Nozzle Cleaning Needle.
P Hose Adaptor.

fig. 4
OPERATING INSTRUCTION - ASSEMBLY OPERATING INSTRUCTION - ASSEMBLY
fig. 2 JK
fig. 1
JF
fig. 3
Connecting the High Pressure Hose
1.Screw the fitting on High-Pressure
Hose I onto the High Pressure
Hose Outlet B. Ensure that the
connector is firmly fastened (but do
not over tighten).
See fig. 3.
NOTE : The minimum
length of supply hose (not
included) advised is 6 metres with
a diameter of 12.5mm (1/2") to
avoid back pressure and any
associated potential damage to
your Pressure Washer.
76
CAUTION : Ensure that
both parts are firmly
connected together otherwise it
could be hazardous if the nozzle
flew off.
1.Screw the Spray Lance J into the
Trigger Gun F .
See fig. 1. B
I
C
P
Connecting to the Water Supply
1.Connect the Hose Adaptor P to
the Water Supply Inlet C. Then
connect your garden hose to Hose
Adaptor P. Ensure that the
connector is firmly fastened (but do
not over tighten).
See fig. 4.
Before carrying out any
assembly/disassembly of
the unit please ensure that
the unit is unplugged from the
electrical supply.
3.Always remove or replace parts
whilst the Pressure Washer is
switched off.
Assembling the Lance
2.Connect the Spray Lance Extension
Kto Spray Lance J by pushing
the bayonet on the Lance into the
socket of the Spray Lance J until
it clicks into position. Then rotate
clockwise until it locks in place. This
assembly must be carried out prior
to using the Pressure Washer.
See fig. 2.

fig. 5
fig. 7
fig. 6
fig. 8
OPERATING INSTRUCTION OPERATING INSTRUCTION
When using your Pressure
Washer, the recommended
working distance between
the nozzle and the object or
surface to be cleaned is 30cm.
Instructions for Use
1. Fully open the water mains tap -
Do not at this point switch on
your pressure washer.
2. Never operate your pressure
washer without the water supply
switched on.
3.Hold the Trigger Switch G until all
the air has been expelled from the
Pressure Washer and the water
starts to flow. As soon as the water
starts flowing out of the nozzle,
release the trigger. You have now
primed your Pressure Washer with
water.
4.The Pressure Washer can now be
switched on.
Switching On and Off
1. Ensure that the mains switch is in
the "On" position.
2.To switch the Pressure Washer on,
set the On/Off Switch A to "On".
3.To switch the Pressure Washer off,
set the On/Off Switch A to "Off".
See fig. 5.
Operating your Pressure Washer
1.Your spray lance has two main
settings. These settings can be
varied by turning the fitting on the
end of Spray Lance Extension K
fitted to the end of the Spray Lance
Socket J.
2.Turn the Fitting clockwise for a
pointed jet (marked STREAM) or
turn the nozzle anti-clockwise for
a flat jet (marked FAN).
See fig. 6 and 7.
3.Always ensure that the trigger is
closed and the Pressure Washer
is switched off before changing the
nozzle settings.
98
Turn the unit off between
use. It should not be left on
and unused for more than 5
minutes. If left longer than this
time the water in the system will
heat up and could cause severe
damage to the pump.
AK
KF
J
4.Aim the lance towards the object
to be cleaned - working within the
recommended distance. Squeeze
the lance trigger until the water
starts flowing, then switch on the
Pressure Washer by activating the
On/Off Switch A.
Front view of the NozzleSpray Effect
Pointed Jet
Flat Jet

fig. 9
fig. 10
J
M
M
J
fig. 11
fig. 12
CARE & MAINTENANCEOPERATING INSTRUCTION
CAUTION : Ensure that
both parts are firmly
connected together otherwise it
could be hazardous if the nozzle
flew off.
NOTE : Only use mild
diluted household
detergent, use with any other
chemicals or undiluted detergent
can damage this product and
cause serious injury. No Detergent
will be dispensed in High Pressure
Mode.
NOTE: When cleaning the Nozzle
1. Ensure that the appliance is
switched off and the mains
supply is disconnected.
2. Ensure that the water supply
has also been turned off fully
from the tap.
3. Clean dirt from the nozzle hole
with enclosed needle and
rinse from the front.
2.Water Connection: After use,
carefully remove the Inlet Filter from
the Water Supply Inlet C with flat
nosed pliers and check that there
are no obstructions - if there are
then rinse and clean the filter.
See fig. 12.
WARNING : Always
disconnect from Mains
before carrying out any
maintenance task
Using the Detergent Dispenser
1.Ensure that the Pressure Washer
is switched off.
2.You can onlyfix the Spray Lance
Jonto the Detergent Dispenser M
(i.e. not the Spray Lance Extension
K). Push fit then rotate clockwise
until it locks into place.
See fig. 9.
3.Unscrew the detergent container
and fill with the required detergent
(ensure that you follow the
manufacturer's instructions for use).
See fig. 10.
4.Switch on the Pressure Washer
and the low pressure water supply
will begin to fill the container and
produce a soapy spray.
5.To rinse the detergent off, re-attach
the nozzle attachment and use the
water spray.
Care and Maintenance
We strongly recommend routine
maintenance of the following:
1.Nozzle: Visually check to see if
the nozzle is free of grit or dirt.
Carefully remove any dirt using the
Nozzle Cleaning Needle O. Then
rinse from the outside with clean
water.
See fig. 11.
10 11
K
O
C
Inlet Filter

Recommendation of cleaning method
1. Wash away any loose dirt by high pressure jet.
2. Spray on the detergent and leave it for a few minutes for easy removal of fine
dirt and greasy adhesions.
3. Spray off the loosened dirt with the high pressure spray.
NOTE: For any surface intended to be cleaned with rotary brush or standard
brush, always spray off any loose dirt and solid particles using a high
pressure jet.
End of Operation
- After cleaning-using the detergent, remember to empty the detergent container
and rinse your pressure washer by running the pump for one minute on the low
pressure setting.
1. Switch off the pressure washer and disconnect from the mains.
2. Close the water inlet (tap) and disconnect the hosepipe.
3. Squeeze the trigger switch to release all pressure from the machine and secure
the trigger with the safety locking device to prevent accidental opening during
the next time of operation.
4. Completely empty the water from the machine.
CARE & MAINTENANCE TECHNICAL DATA
1312
IMPORTANT :
Remember frost will damage your Pressure Washer if it has not
been completely emptied of water after use. Always store in a frost free
area, frost damage is not covered by the warranty.
WARNING : If the supply cord is damaged, it must be replaced
by the manufacturer, its service agent or similarly qualified persons
in order to avoid a hazard.
Voltage 230-240V~
Power input 1500W
Operating pressure 5.5 Mpa
Permissible Pressure 10 Mpa
Water consumption 5.5 L/min
IMPORTANT
The wires in this mains lead are coloured as follows:
Blue-Neutral
Brown-Live
As the colours of the wires in the mains lead of this
apparatus may not correspond with the coloured
markings identifying the terminals in your plug,
proceed as follows:
The wire which is coloured blue must be connected
to the terminal, which is marked with N or coloured blue. The wire which is coloured
brown must be connected to the terminal which is marked L or coloured brown.
Always ensure that the plug cord grip is fastened correctly. If a 13A (BS1363)
fused plug is used it must be fitted with a 13A fuse conforming to BS1362 and
be ASTA approved. If in doubt contact a qualified electrician.
Technical Data
If you need to replace the fitted plug.
Plug Replacement
WARNING :
Never connect live or neutral wires to the earth terminal of the plug.
Only fit an approved 13 Amp BS1363/A plug and the correct rated fuse.
If in doubt, consult a qualified electrician.
BROWN
(LIVE)
CABLE
GRIP
BLUE
(NEUTRAL)
Check that the voltage marked on the product corresponds with your supply voltage.
This product is fitted with a 13A plug complying with BS1363. If this plug is unsuitable
or needs to be replaced, please note the following :
Connecting to Power
Measured sound pressure level: Lp=94dB
Guaranteed sound power level according to 2000/14/EC : Lw=98dB(A)
Vibration : < 3.0 m/s2
Noise and Vibration Data
Max. pressure water supply 0.3 Mpa
Water temperature 40ºC
Degree of protection IPX5
Insulation Class

ADDENDUM
PROBLEM SOLVING
WASTE ELECTRICAL PRODUCTS SHOULD NOT BE
DISPOSED OF WITH HOUSEHOLD WASTE. PLEASE
RECYCLE WHERE FACILITIES EXIST. CHECK WITH
YOUR LOCAL AUTHORITY FOR RECYCLING ADVICE.
Cleaning the Nozzle
- If the flow rate of water decreases, stops or the jet pressure fluctuates, the nozzle
may be blocked and it needs to be cleaned.
1.Ensure that the appliance is switched off and the mains supply is disconnected.
2.Ensure that the water supply has also been turned off fully from the tap.
3.Clean dirt from the nozzle hole with enclosed needle and rinse from the front.
1514
PROBLEM CORRECTION
Machine does not start
Pump stops
Strong pressure fluctuations
Machine does not reach
operating pressure
Lance trigger will not operate
POSSIBLE CAUSE
•Plug not connected.
•Defective socket.
•Fuse blown.
•Defective extension cable.
•Wrong mains voltage.
•Not switched on.
•RCD (if used) tripped.
•Fuse blown.
•Overheating due to poor
water supply.
•Nozzle partly blocked.
•Nozzle blocked/worn out.
•Inadequate mains water.
•Inlet hose squeezed.
•Water filter clogged.
•Inlet hose blocked.
•Safety catch on.
•Connect plug.
•Try another socket.
•Change the fuse.
•Try without extension cable.
•Check that the mains voltage
corresponds to the specification
of the machine.
•Switch on.
•Reset RCD.
•Change the fuse and check the
length of extension cable.
•Check the inlet water flow rate
hose should fill a 10 litre bucket in
1 minute.
•Clean dirt from nozzle hole with
needle and rinse from the front.
•Clean/replace nozzle.
•Check inlet water flow rate.
•Straighten out hose.
•Clean filter.
•Check hose for leaks or blockages.
•Release safety catch.

PRODUCT GUARANTEE
This product is guaranteed against manufacturing defects for a period of
This product is guaranteed for twelve months from the date of original purchase. Any
defect that arises due to faulty materials or workmanship will either be replaced,
refunded or repaired free of charge where possible during this period by the dealer
from whom you purchased the unit.
The guarantee is subject to the following provisions:
- The guarantee does not cover accidental damage, misuse, cabinet parts, knobs
or consumable items.
- The product must be correctly installed and operated in accordance with the
instructions contained in this manual.
- It must be used solely for domestic purpose.
- The guarantee will be rendered invalided if the product is re-sold or has been
damaged by inexpert repair.
- Specifications are subject to change without notice.
- The manufacturer disclaims any liability for the incidental or consequential damages.
- The guarantee is in addition to, and does not diminish your statutory or legal rights.
Guarantor: Argos Ltd
489 - 499 Avebury Boulevard
Central Milton Keynes
MK9 2NW
Year

CAUTION :
Table of contents
Popular Pressure Washer manuals by other brands

Simoniz
Simoniz Platinum 039-8569-0 Use and care guide

Simpson
Simpson PS60842-S instruction manual

Nilfisk-ALTO
Nilfisk-ALTO Multi-User Pressure Washer System Specification sheet

Kärcher
Kärcher K 2.19 Operator's manual

Craftsman
Craftsman C950.679620 Operator's manual

Craftsman
Craftsman CMXGWAS021024 Operator's manual