Streetwize SWCV7 Specification sheet

230V - 1200W
Wet & Dry
Vacuum
Cleaner
(SWCV7) Information For Use

2
Contents
Intention for Use 2
Product Elements 3
Accessories 4
Assembly/Operating Instructions 4
Dry Vacuuming (Assembly) 4
Wet Vacuuming 5
Blower Functionality 5
Dust Shaking 5
Cleaning & Maintenance 6
Cleaning the Cloth Filter 6
Cloth Filter Maintenance Guidelines 6
Health & Safety Guidelines 6
Troubleshooting 7
Technical Support 7
Spare parts 7
Technical Specifications 8
Intention For Use
Thank you for purchasing this 1200W Wet/Dry Vacuum Cleaner With Blower from Streetwize. This product is
intended for both wet and dry vacuuming. It is supplied with two interchangeable filters, one specifically designed
for dry vacuuming and the other for wet vacuuming for absorbing water spillages.
It also has a blower functionality for helping you funnel dust, dirt and other materials into a pile so that you can
vacuum later.
We advise that you read all the information and health & safety guidelines in this document before using this
product. Please keep this document for future reference.
PLEASE READ ALL THE SAFETY GUIDELINES AND INFORMATION IN THIS DOCUMENT AND RETAIN FOR FUTURE
REFERENCE.

3
Product Elements
Handle Dust
shaking
button
Hose
Slot
Head
cover
Cylinder
buckle
Cylinder
Power
switch
Cylinder
Cover
Suction
Inlet
Base
Caster
4
Assembly/Operating Instructions
Important: When changing between each operating function, ALWAYS ensure that the vacuum unit is
fully disconnected & unplugged from your mains power socket.
Dry Vacuuming (Assembly)
The following initial assembly steps & operating instructions are for dry vacuuming:
1. Remove the product along with all of its components and accessories from its
packaging.
2. Loosen the buckles and remove the head cover, and carefully place the head
cover to one side.
3. Empty out all the contents inside the barrel, and turn the barrel upside down and
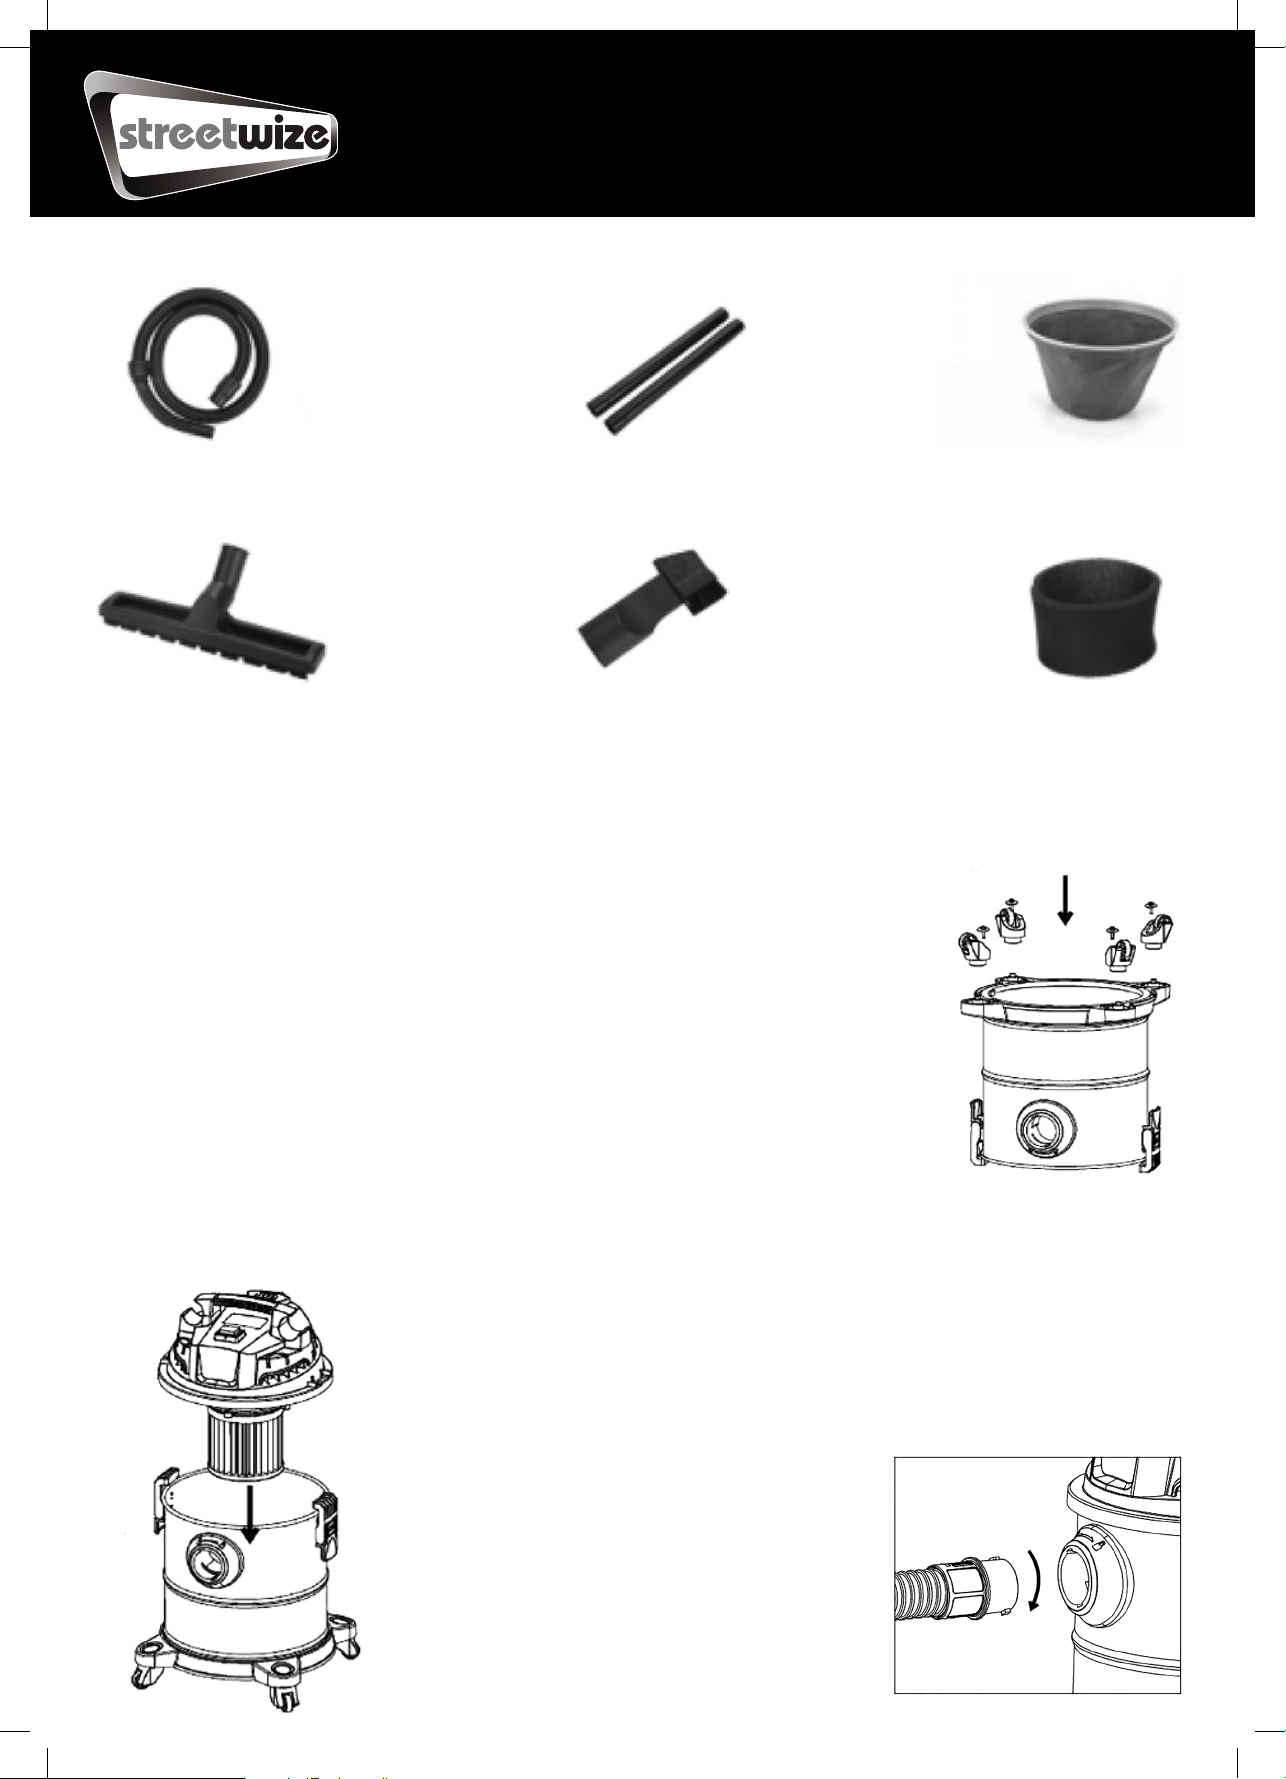
screw on the caster wheels as shown on Figure 1. Once the caster wheels are
attached, stand the barrel back up to its upright position.
4. Correctly position the cloth filter inside the barrel.
5. Then replace the head cover on the vacuum and secure using the barrel buckles as shown in Figure 2.
6. Then assemble the vaccuum’s hose shaft tubes by joining both tubes
together and then connect the assembled hose shaft to the vacuum’s
flexible air hose. Once assembled, connect the flexible air hose end to
the suction inlet (see Figure 3).
7. Attach one of two the nozzle heads (see Table 1 for attachment uses).
8. To use the vacuum, simply the
connect power cable to your
230V AC mains power socket
and then turn the vacuum on
via the power switch.
Accessories
Flexible Air Hose
Floor Brush
Hose Shaft
2-in-1 Nozzle
Cloth Filter
Sponge
Fig. 1
Fig. 2
Fig. 3

5
Wet Vacuuming
Important: The wet vacuum functionality should only be used for absorbing water-based liquids. It is
perfect for cleaning wet floors and aquariums. It should NEVER be used for absorbing oil, solvents,
alcohol or other non-water-based liquids.
To use the wet vacuum function, follow the instructions below:
1. Loosen the buckles and remove the head cover.
2. Remove the cloth filter and empty out the barrel of any waste collected.
3. Place the sponge filter as shown in Figure 4.
4. Place the head cover with a sponge filter now in place back on to the vacuum
and secure in place using the barrel buckles.
5. Before wet vacuuming, ensure the vacuum is connected to a mains power supply.
6. To start wet vacuuming, switch on the vacuum via the power switch.
Blower Functionality
The blower functionality is ideal for funnelling dirt, dust and even leaves.
To use the blower functionality, simply take out the hose from the
suction inlet and place it into the blower outlet as shown in figure 5.
Once the hose is securely attached to the blower outlet, connect
the unit to your mains power and turn the vacuum on via the power
switch to start blowing.
Dust Shaking
This feature is designed to loosen dust that is built up inside the barrel
that happens after frequent dry vacuuming. This can lead to abnormal
vacuum suction.
1. First ensure your vacuum is connected to your mains power.
2. Then, block the suction inlet using a card or something similar
(see Figure 6) then switch on the vacuum via the power switch.
3. When the vacuum is switched on and you are blocking the suction
inlet, press the dust shaking button for 1 second then release.
Repeat this process 10 times.
4. Once done, turn off the vacuum, open the head cover via the barrel buckles and empty out the barrel.
Attachment Suitable For
Floor Brush For vacuuming carpet floors (dry) and wet floors (wet)
Small Attachment For cleaning vehicle interior, stairs and furniture.
Fig. 4
Fig. 5
Fig. 6

6
Cleaning & Maintenance
To get the best use out of this vacuum and get a long lasting performance, we highly advise that you
properly clean and maintain this vacuum.
Important: Before cleaning this product, please fully disconnect the vacuum from the mains power supply.
Cleaning the Cloth Filter
The cloth filter will need to be rinsed regularly to remove any dust trapped within the filter to maintain the
vacuum’s performance.
To clean this filter, simply remove the filter from the barrel and rinse it under fresh water until all the dust
has been removed.
Then, shake off any excess moisture and leave to dry in a well-ventilated area.
Cloth Filter Maintenance Guidelines
• Never dry the filter using a hair dryer or any other appliance that generates hot air as this may damage
or deform the filter.
• Never use detergent, bleaching agent, alcohol or any other chemical-based cleaning products to avoid
damaging the vacuum or its filters.
Health & Safety Guidelines
• Do not use the machine near combustible or explosive substances as the heat generated from the
motor can cause a fire.
• Do not intentionally block/jam the blower outlet as this will damage the motor.
• Do not collect combustible and explosive objects such as glowing cigarettes, gasoline and non-water-
based liquids such as alcohol and solvents.
• Do not collect sharp objects.
• Turn off the machine and remove the plug each time after using or when being repaired.
• Keep the machine away from strong sunlight and high temperature places in case its plastic is
distorted.
• This product is not a toy.

7
Issue Cause Solution
Machine not
turning on
1. No power supply to the machine.
2. The power socket may be faulty.
1. Ensure the machine is properly
connected to a 230V AC power supply.
2. Use an alternative power socket. Or
replace the power socket (professional
assistance may be required).
Abnormal
suction
1. There may be a blockage in either
the hose, floor brush or suction inlet.
2. Poor assembly of the vacuum
(i.e. the barrel buckles are not
securely in place).
3. Filter may be blocked.
1. Remove the blockage in time.
2. Reassemble the unit following the
instructions written in this document.
3. Clean the filter (see Cleaning &
Maintenance).
Abnormal noise 1. Check whether the filter is blocked. 1. Remove waste from the filter and
clean the filter (see Cleaning &
Maintenance).
Spare parts
Should you require any replacement parts and/or spare parts for your product, please contact us on:
and provide the product name, supplier code (see Technical Specifications) and model along with the
name of the part that needs replacing.
Technical Support
If you require any technical support for your product, please contact us on:
and provide the product name and supplier code (see Technical Specifications) along with the technical
query and proof of purchase.
Troubleshooting

8
For product support:
T: +44 (0)161 447 8597
For trade enquiries:
T: +44 (0)161 447 8580
For spare parts:
Streetwize: Ashburton Road West,
Trafford Park, Manchester M17 1RY
www.streetwizeaccessories.com
To find out more visit our website:
Or follow us on social media
We have over 1000 car and
leisure products in our range
Technical Specifications
Product Name Streetwize 1200W Wet/Dry Vacuum With Blower
Supplier Code SWCV7
Power Wattage 1200W
Input Voltage 230V AC 50Hz
Dry Vacuum Capacity 15 litres
Wet Vacuum Capacity 15 litres
Vacuum Body Dimensions 49cm x 32cm (diameter)
Flexible Hose 182cm (length) x 5.5cm (diameter)
Hose Shaft 84cm x 3.5cm (diameter)
Vacuum Weight (Body) 3.52kg
Power Cable 3.2m
EU Registered address: The Ace Supply Co (Europe) Ltd, 25 Herbert Place, Dublin 2, D02 A098 Republic of Ireland.
RoHS
COMPLIANT
M17 1RY IPX4
Table of contents
Other Streetwize Vacuum Cleaner manuals


