studiobricks One User manual

One, One Plus
& One Plus XXL
One, One Plus
& One Plus XXL
Assembling guide
Last update | May 2020
The Booth

INDEX
1. INTRODUCTION ...................................................................................................................... 3
2. WARNINGS .............................................................................................................................. 4
3. BEFORE ASSEMBLY ............................................................................................................... 6
3.1. Correct delivery ............................................................................................... 6
3.2. Correct unpacking ......................................................................................... 6
3.3. Material ............................................................................................................. 7
3.4. Tools you need ................................................................................................ 9
4. ORGANIZATION OF ASSEMBLY .......................................................................................... 10
5. ASSEMBLY OF THE STRUCTURE OF YOUR CABIN ......................................................... 12
5.1. Setting up the platform .............................................................................. 12
5.2. Level A & B ........................................................................................................... 14
5.3. Door installation .............................................................................................. 17
5.4. Level C & D ........................................................................................................... 19
5.5. Roof ........................................................................................................................ 21
6. INSTALLATION OF ACCESSORIES ...................................................................................... 23
6.1. Doorhandle ........................................................................................................ 23
6.2. Cable ports ......................................................................................................... 25
6.3. Ventilation installation ................................................................................ 28
6.4. Absorbers ........................................................................................................... 29
6.5. LED light ............................................................................................................... 30
6.6. Lacquer ................................................................................................................ 32
2

On the following pages, we want to
explain to you how you canassemble
your STUDIOBRICKS cabin on your
own. Each cabin is assembled and
proofed carefully before leavingour
factory. If there is any imperfection or
any part is missingagainst expectation
we endeavour to provide a solution as
soonas possible.
Please consider adequate health and
safety measures like sturdyshoes and
carefulness.
Do everything calmly. Be careful
withyour finges. The STUDIOBRICKS pieces
do not cut but they arevery heavy.
You will probably need about two to
three hours for the assembly.
The warranty for the STUDIOBRICKS
cabins is two years, fromdelivery date.
Accessories like ventilator, LED light or
triple socket have a warrantyof one year,
except in case of vandalism.
Thank you for choosing
STUDIOBRICKS.
Youbought a high-quality
product which you will be
enjoying during years.
3

2. WARNINGS
The frame and the floor come
together, make sure to separate them
before you start assembling.
Floor and ceiling
packed together
inside the box
Frame and floor
ready to start the
assembling
4
2. WARNINGS
Your Studiobricks booth will
arrive in a box.
NOTE! If you detect any damages
on the box during delivery please
record these damages on the
shipping documents.
If you don´t report this on the
shipping documents upon delivery,
the insurance company will not
refund damages.
The delivery company will not
be responsible for the removal of the
empty box. It must be disposed by the
receiver.
Please note that the crate must
be on a flat ground. If the ground is
not flat, the crate can collapse while
unloading.
You need two people to unload
the box. Wear safety shoes and
gloves.
Open the box by unscrewing the
lid on the marked side labeled “Open”.
Caution, if you open the box from
the incorrect side parts may fall out.
Please remove the staples from
the box to avoid getting hurt during
the unpacking process.
Make sure there are no children
nearby during the unpacking of the
booth as pieces are heavy.
While unpacking, remove the
elements on top first.
Alternate taking out pieces from
both sides to ensure the stability of
the package.
Any heavy element that moves
during unboxing can cause the entire
package to overturn.
5

3. BEFORE THE ASSEMBLY
3.1. Correct delivery
Your Studiobricks booth will arrive in a box.
If you detect any damages on the box during
delivery please record these damages on the
shipping documents. If you don´t report this
on the shipping documents upon delivery, the
insurance company will not refund damages.
The delivery company will not be respon-
sible for the removal of the empty box. It
must be disposed by the receiver.
3.2. Correct unpacking
For the assembling, it is the best to have 2
people or more. Make sure you are opening
it by the correct side, and carefully handle
the pieces because they may have moved
in the shipping process.
Take out all the pieces carefully and check
if they have arrived safely and if the mate-
rial is complete. It is convenient to prepare
the material in the order described in «Or-
ganization of assembly».
The frame and the floor come together,
make sure to separate them before you
start assembling.
The frame and the floor
come together, make sure
to separate them before
you start assembling.
6

3. BEFORE THE ASSEMBLY
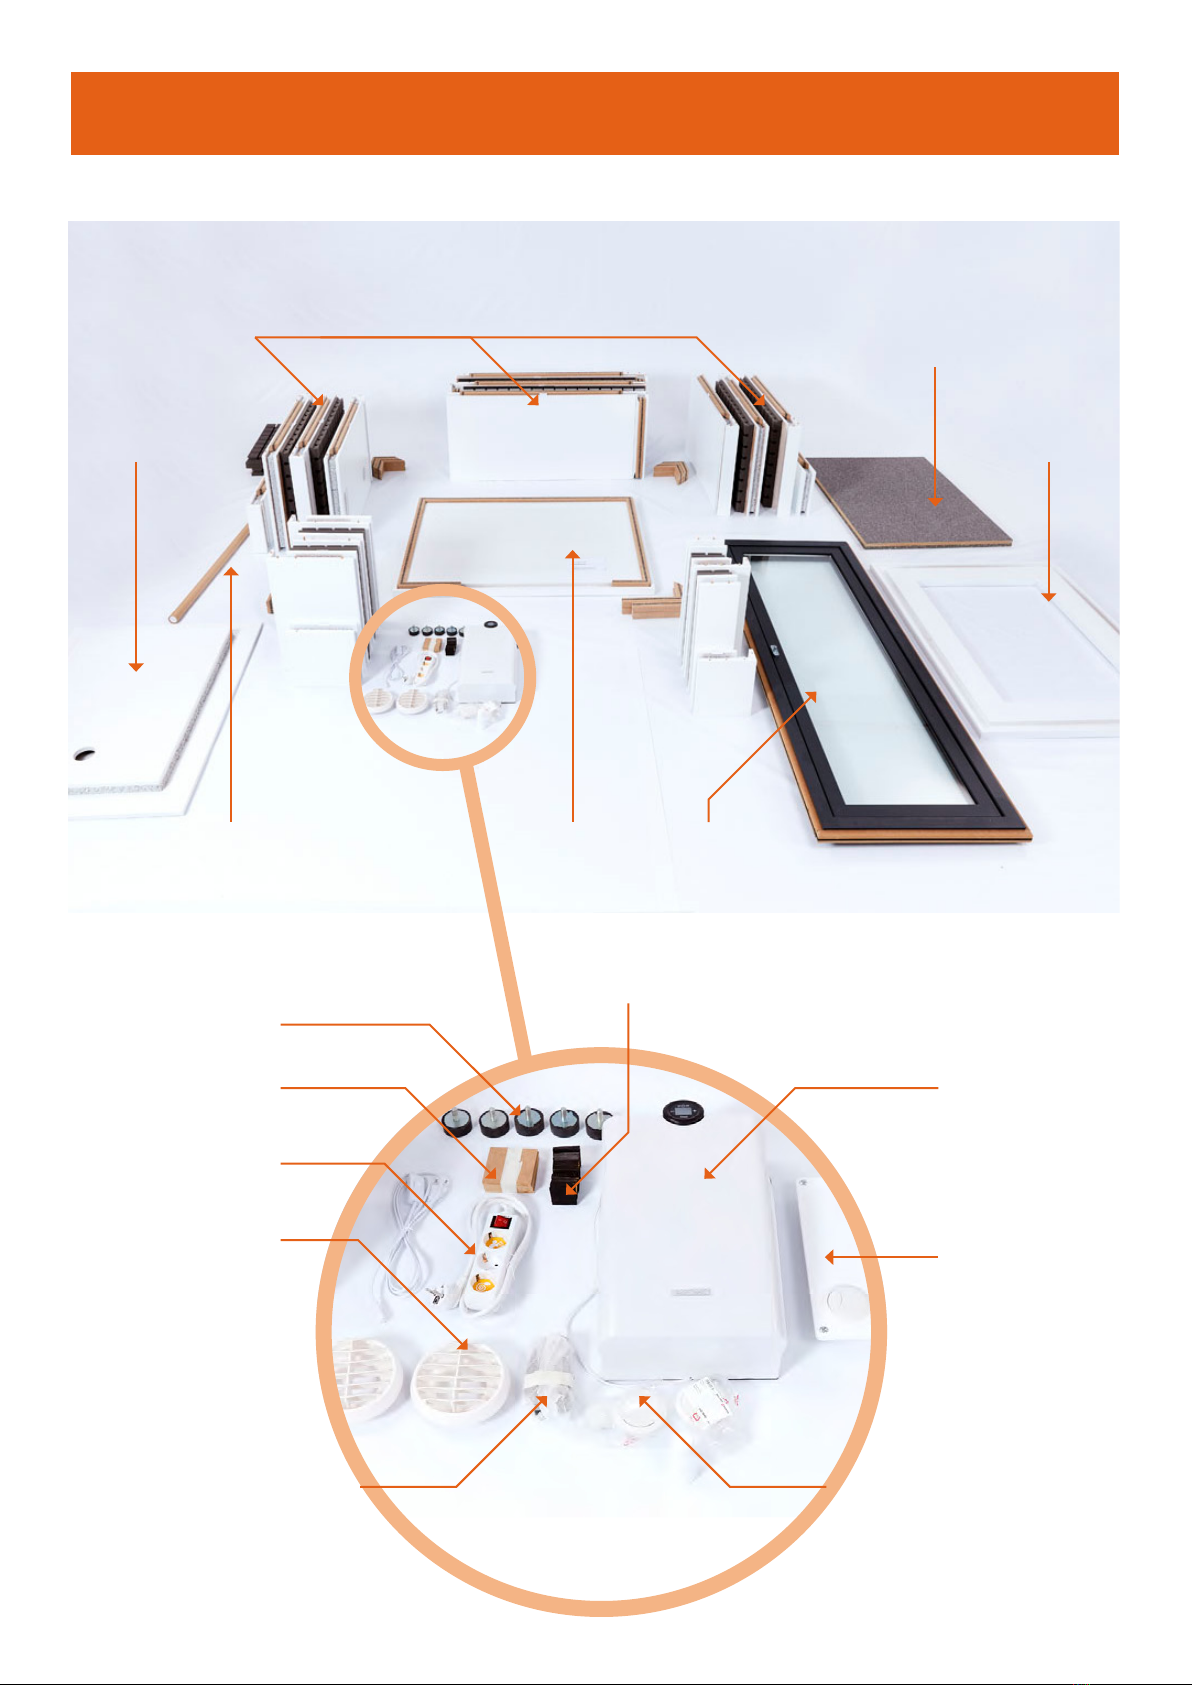
3.3. Material
Here’s an overview of all materials delivered in the box.
• Door1
•Bricks20
• RoofElements 2
• Floorelements 2
• Roofabsorbers 1
• Additionalwallabsorbers 2
• Ventilator 1
• CablePort1
• LEDlight1
• LEDlightcable1
• Doorhandle1
• SilentBlocks7(ONE)
7(ONEPlus)
9(ONEPlusXXL)
• Ventpanel2
• Woodenplates5(ONE)
7(ONEPlus)
9(ONEPlusXXL)
• Triplesocket1
• Rubberpads16
• VerticalBattens 12(Longbattens)
4(Shortbattens)
• Threetypesofcornerbattens 10(Short)
5(Middle)
5(Long)
• Littlebottleofwhitelacquer 1
7
3. BEFORE THE ASSEMBLY
Bricks Floor
RoofRoof
Silent Blocks
Ventilator
Cable port
Rubber pads
Wood Plates
Triple socket
Vent panel
LED light cable White lacquer
DoorLED light Floor
8

3. BEFORE THE ASSEMBLY
3.4. Tools you need
TobuildtheStudiobricksONEyouwillneed
the following tools: a rubber mallet, a cut-
ter, a screwdriver, a spirit level and a step-
ladder.
Absorbers Battens
9
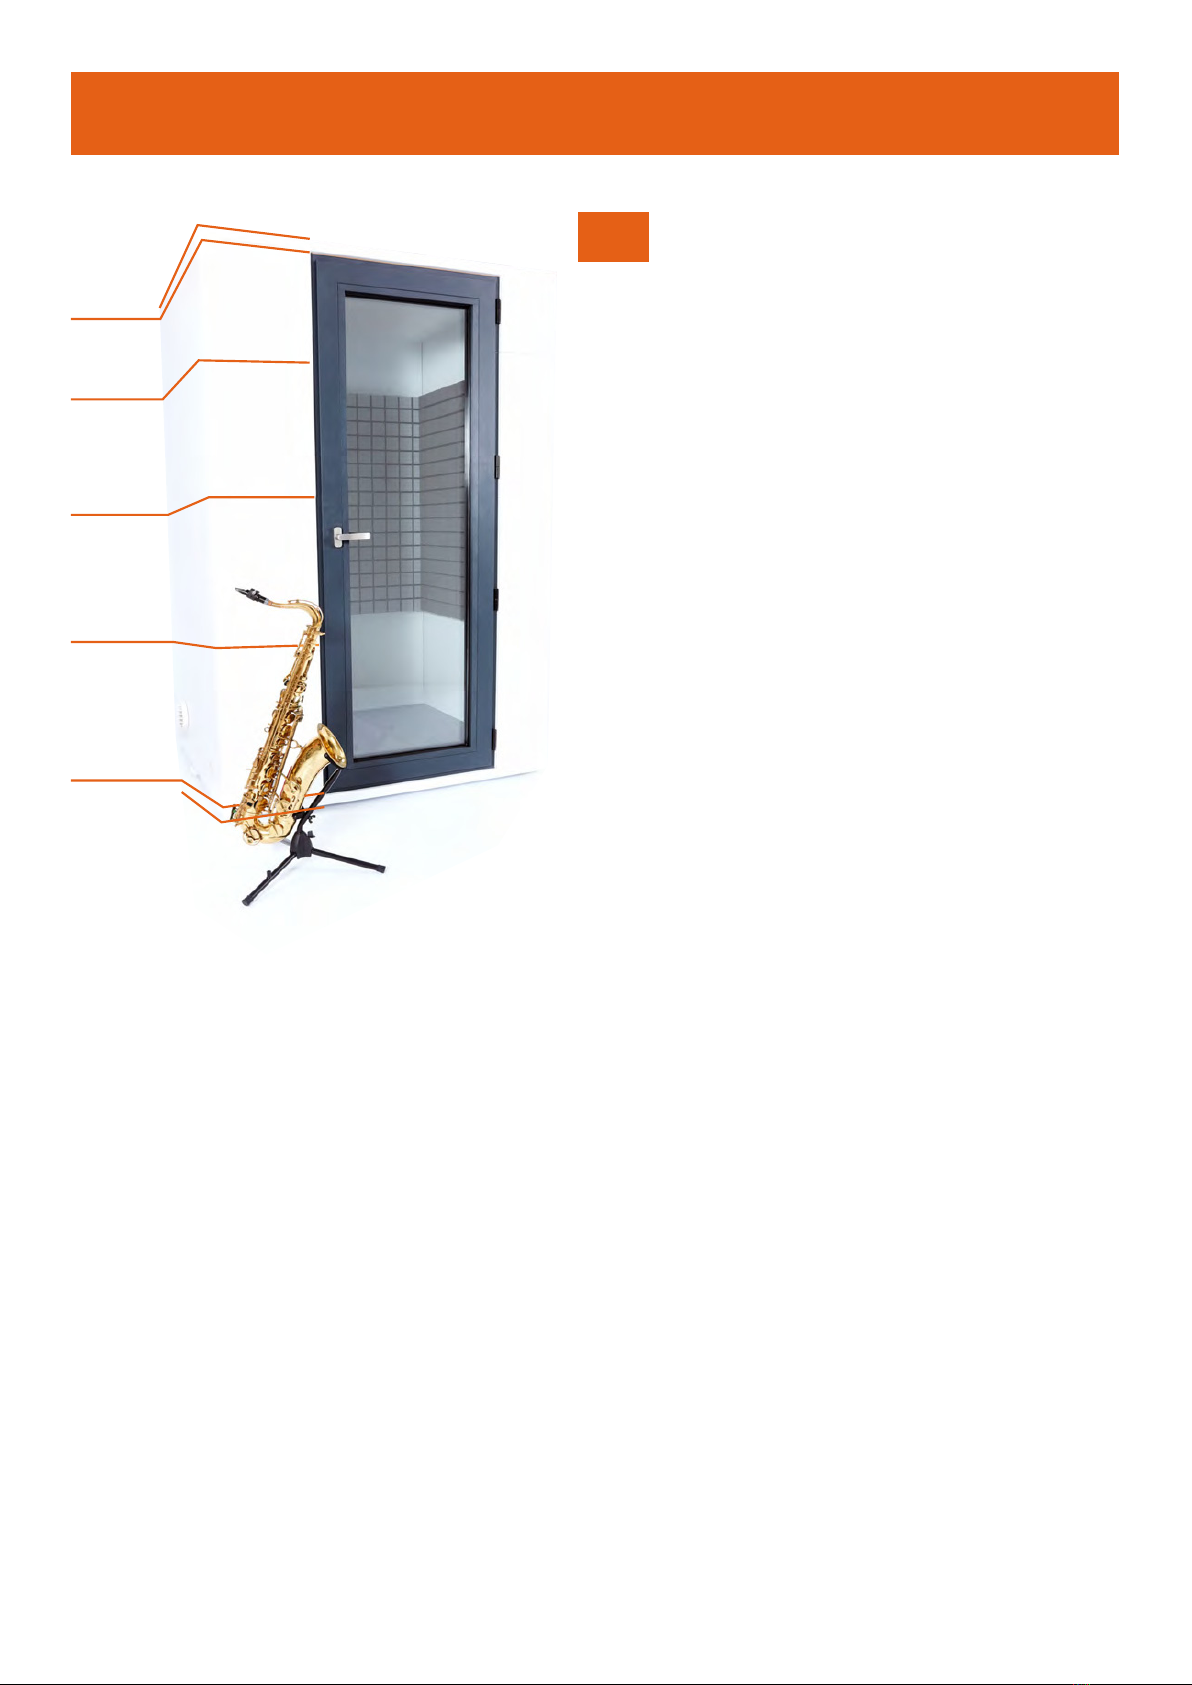
4. ORGANIZATION OF ASSEMBLY
4.1. Organization of assembly
Please follow the instructions carefully to
avoid mistakes, like for example to build
thecabinwithoutthefeet(silentblocks).
To organize the assembly: the cabin rests
on the floor board and on feet called “si-
lent blocks” which are put into the floor
board.
Afterwards you put on the wall bricks. The
first wall level is marked as A, next is B, C
and D.
Afterwards you put on the ceiling. It is
convenient to prepare the material in this
order to gain time and security.
Do everything calmly. Be careful with your
fingers. The Studiobricks pieces do not cut
buttheyareheavy.Whileslottingthepieces
be careful. The door is the heaviest part.
Know that absolutely no part of the cabin
should touch the building except for the
feet to avoid vibrations and assure the ex-
cellent sound isolation properties.
Leave at least 5cm space between the
booth and the wall.
A level
B level
C level
D level
Roof
Floor
10
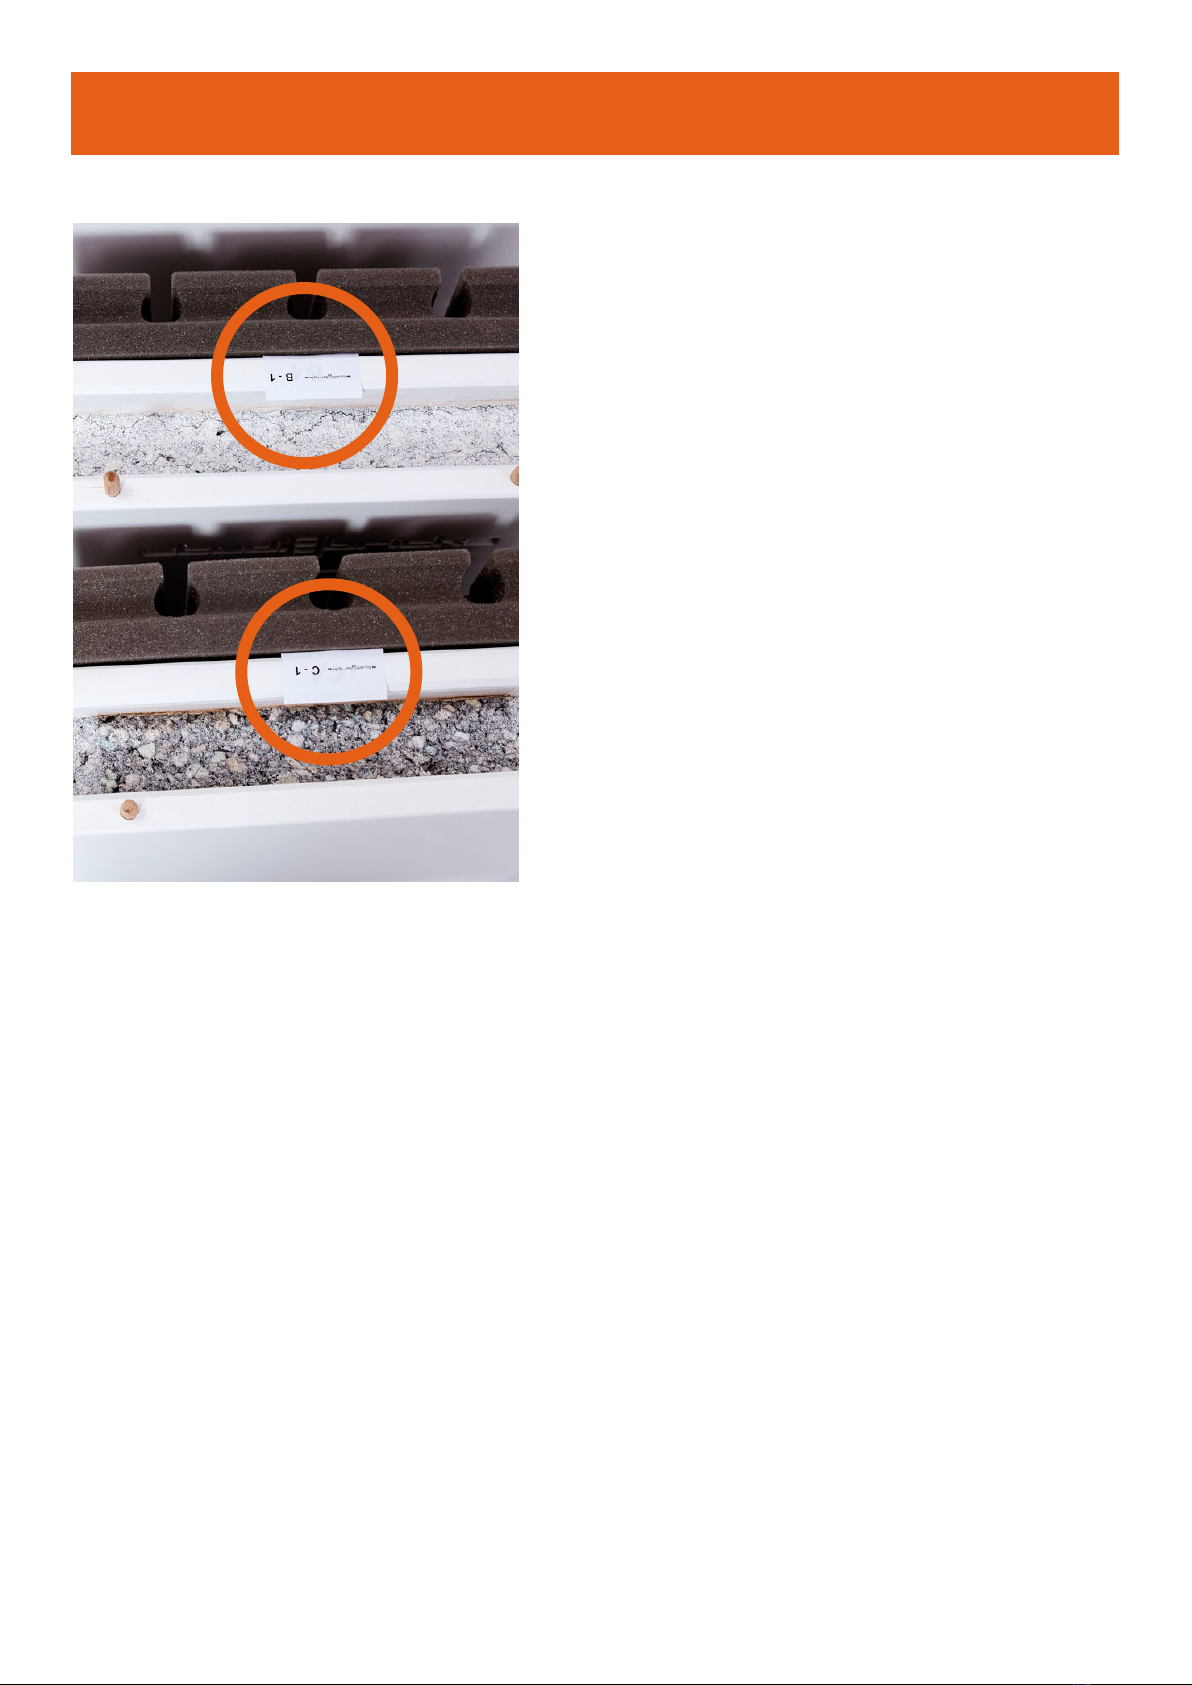
4. ORGANIZATION OF ASSEMBLY
The cabin is built of small panels which are
slopped together. The panels are built of
special sound isolation materials.
Every panel is labelled with a position
number. You will find the number on
top of each panel.
11

5. ASSEMBLY OF THE STRUCTURE OF YOUR CABIN
5.1. Setting up the floor
platform
First, put in the silent blocks into the
holes underneath the floor level. Then you
need to level the floor panel by adjusting
the feet. Put one of the provided wood
plate underneath each silent block to pre-
vent them form staining the floor over the
years.
Start by adjusting the foot in the centre
of the panel, then balance the whole panel
usingaspiritleveltoensureitislevel.Next
adjust the corner feet so that they touch
the floor. Again, use a spirit level to ensure
the floor is completely level.
12

5. ASSEMBLY OF THE STRUCTURE OF YOUR CABIN
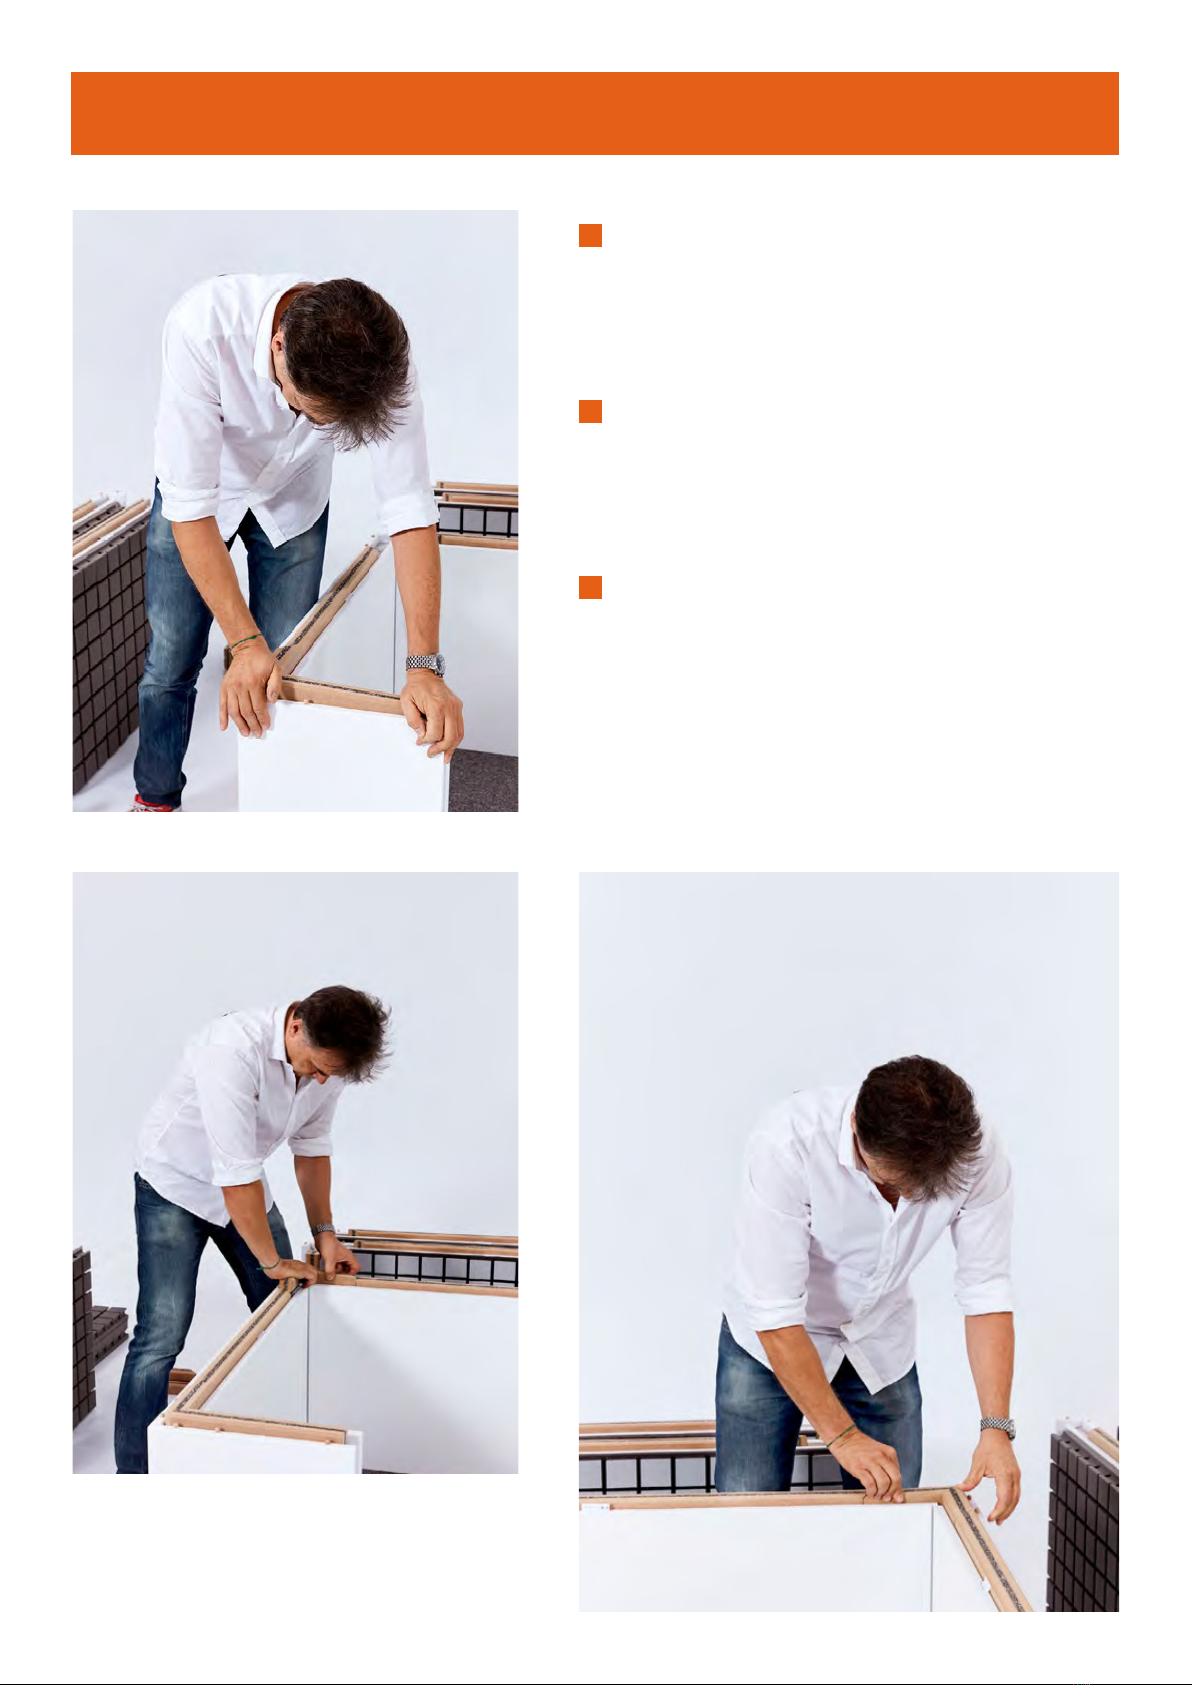
5.2. Level A & B
You can now start building the walls.
Start with panel number A1. “A” stands for
the level. “1” indicates the panel number.
Panel A1 is located left to where the door
will be.
You will now go on slotting all the pan-
els in numerical order and clockwise. It´s
easier if you slot in panel A5 a bit later.
Please note that you can change the A2
Brick with the A4 Brick in case you want
the wire shaft and ventilator in the oppo-
site side.
Insert the vertical battens between the
panels like this. The battens should be in-
serted with the middle line pointing in the
same directions as the wall.
13

5. ASSEMBLY OF THE STRUCTURE OF YOUR CABIN
Once you´ve completed level A except
for panels A4 and A5, you put in the floor
panel with the carpet on it. Like the wall
panels the floor panel is made of sound
isolating materials to prevent sound from
escaping downwards.
Then insert first the self-adhesive rub-
ber pad below and then the corner battens
above it.
14
5. ASSEMBLY OF THE STRUCTURE OF YOUR CABIN
There are 3 types of corner batten. The
longest corner batten goes to the left of
where the door will be.
The second longest goes to the right of
the door. The shorter ones go to the back
of the booth.
Keep sliding in the panel’s vertical bat-
tens and corner battens in thisway.
15

5. ASSEMBLY OF THE STRUCTURE OF YOUR CABIN
You can now add the A4, B1, B2 and B3
panels.
As for the A level, insert the vertical bat-
tens and the battens on the B level.
16

5. ASSEMBLY OF THE STRUCTURE OF YOUR CABIN
5.3. Door installation
You are now ready to put the door in
position. The door is the heaviest part of
the room.
Try to get an extra pair of hands to help
you. Follow the arrow sticker on the door
to ensure you are installing the door in the
rightdirection).
Lift the door into place. Install the door at
an angle like on the picture. Be very care-
ful not to open the door while the cabin is
unfinished.
If there is no other option than to open
the door during assembling because you
install the cabin between the walls, open
it very carefully and balance the weight
with some books or similar underneath
once the door is completely open, so that it
doesn´t fall over or otherwise your installa-
tion goes out of shape.
17

5. ASSEMBLY OF THE STRUCTURE OF YOUR CABIN
Once you´ve put the door in place you
can insert panel number A5 and the corner
batten.NextinsertpanelsB4andB5.
18

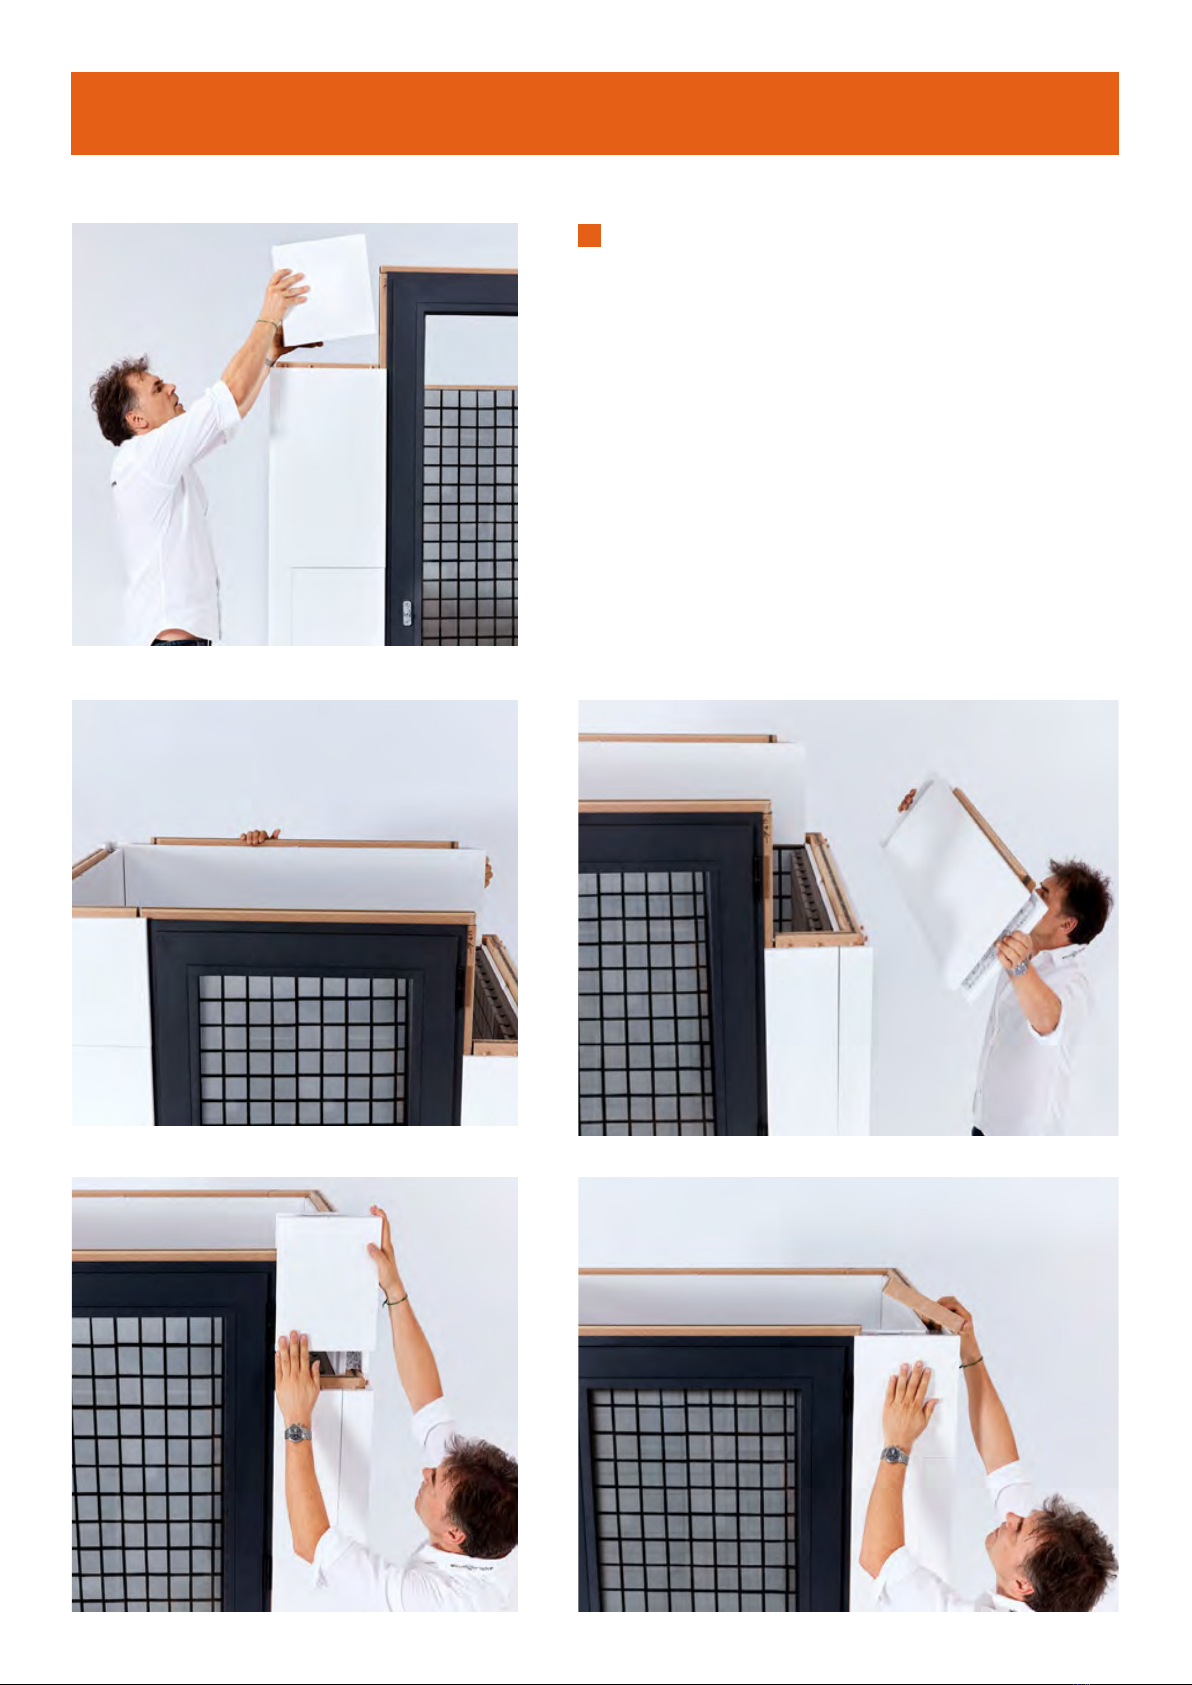
5. ASSEMBLY OF THE STRUCTURE OF YOUR CABIN
5.4. Level C & D
You can now go on and complete levels
C and D. D is the top level. It´s easiest if you
do level C in an anti-clockwise direction.
19
5. ASSEMBLY OF THE STRUCTURE OF YOUR CABIN
Then do level D in a clockwise direction.
You might need a small step-ladder for
this.
20
Other manuals for One
1
This manual suits for next models
2
Table of contents
Popular Indoor Furnishing manuals by other brands

Regency
Regency LWMS3015 Assembly instructions

Furniture of America
Furniture of America CM7751C Assembly instructions

Safavieh Furniture
Safavieh Furniture Estella CNS5731 manual

PLACES OF STYLE
PLACES OF STYLE Ovalfuss Assembly instruction

Trasman
Trasman 1138 Bo1 Assembly manual

Costway
Costway JV10856 manual


