Stylies PAVO User manual
PAVO - DEHUMIDIFIER
PAVO - LUFTENTFEUCHTER
DEHUMIDIFIER
www.stylies.ch
V01-0315
www.addix.info/product/gcpe8s
Coplax / Stylies / Pavo
▶SCAN ME ◀
«QR-Scanner»
@iTunes & GooglePlay
ID: gcpe8s
INFORMATION
Gebrauchsanweisung Deutsch 2
Instruction Manual English 12
Mode d’emploi Français 22
Istruzioni d’uso Italiano 32
Instrucciones de uso Español 42
Gebruiksaanwijzing Dutch 52
Använderhandbok Svenska 62
Návod k obsluze Český 72
Návod na obsluhu Slovenčina 82
Instrukcja obsługi Polski 92
Downloaded from www.vandenborre.be
2 3
Deutsch
4
5
6
7
1
2
3
8
9
11
10
12
16
17
18
20
22
19
14
15
21
23
24
25
13
13
Herzlichen Glückwunsch! Sie sind soeben Besitzer des aussergewöhnlichen und technisch
hochmodernen Stylies Luftentfeuchters «PAVO» geworden. Dieser Luftentfeuchter wird Ihnen
bei Gebrauchviel Freude machen und die Luftfeuchtigkeit in Ihren Räumen verbessern.
Wie bei allen elektrischen Haushaltgeräten sind bei der Bedienung des Luftentfeuchters beson-
dere Vorsichtsmassnahmen zur Vermeidung von Verletzungen, sowie Brand oder Schäden am
Gerät erforderlich. Vor dem ersten Gebrauch lesen Sie bitte diese Betriebsanleitung sorgfältig
durch und beachten Sie die Sicherheitsrichtlinien sowie die Sicherheitshinweise am Gerät.
WICHTIGE SICHERHEITSHINWEISE
Bitte lesen Sie die Gebrauchsanweisung genau durch, bevor Sie den Luftentfeuchter Stylies PAVO das erste Mal
in Betrieb nehmen und bewahren Sie diese zum späteren Nachschlagen gut auf, übergeben Sie diese ggf. an den
Nachbesitzer weiter.
Für Schäden, die durch Nichtbeachten dieser Gebrauchsanweisung entstehen, lehnt die Coplax AG jegliche Haftung ab.
Das Gerät kann von Kindern ab 8 Jahren benutzt werden, wenn sie beaufsichtigt oder bezüglich
des sicheren Gebrauchs des Gerätes unterwiesen wurden und die daraus resultierenden
Gefahren verstanden haben. Reinigung und Benutzer-Wartung dürfen nicht durch Kinder
durchgeführt werden, es sei denn, sie sind ab 8 Jahren und beaufsichtigt. Halten Sie das Gerät
und seine Kabel ausserhalb der Reichweite von Kindern jünger als 8 Jahre.
Kinder unter 3 Jahren sind vom Gerät fernzuhalten; es sei denn sie werden ständig überwacht.
Kinder ab 3 Jahren und jünger als 8 Jahre dürfen das Gerät nur ein- und ausschalten, wenn
sie beaufsichtigt werden oder bezüglich des sicheren Gebrauchs des Gerätes unterwiesen
wurden und die daraus resultierenden Gefahren verstanden haben, vorausgesetzt, dass das
Gerät in seiner normalen Gebrauchslage platziert oder installiert ist. Kinder ab 3 Jahren und
jünger als 8 Jahre dürfen das Gerät nicht an das Stromnetz anschliessen, es nicht regulieren
oder reinigen und keine Wartung durchführen.
Wenn das Netzkabel beschädigt ist, muss es vom Hersteller oder in einer vom Hersteller
zugelassenen Werkstatt oder von ähnlich qualifizierten Personen ersetzt werden, um Gefahren
zu vermeiden.
Das Gerät ist nur zur Verwendung in Innenräumen geeignet.
Das Gerät nicht im Freien aufbewahren.
Stellen Sie den Luftentfeuchter auf eine ebene, feste, wasserunempfindliche Fläche. Achten Sie auf einen sicheren
Stand, so dass der Luftentfeuchter weder umfallen noch herunterfallen kann. Sollte der Luftentfeuchter umkippen,
ziehen Sie umgehend den Stecker aus der Steckdose. Wasser kann Möbel und Fussbodenbeläge beschädigen.
Wickeln Sie das Netzkabel vollständig ab. Ein nicht vollständig abgewickeltes Kabel kann zu Überhitzung führen und einen
Brand verursachen.
Verwenden Sie kein Verlängerungskabel, Steckerleiste, geschaltete Steckdose, oder stufenlosen Geschwindigkeitsregler.
Dies kann zu einer Überhitzung, Brand, Stromschlag oder Ausfall des Kompressors führen.
Schliessen Sie den Luftentfeuchter nur an eine einphasige, geerdete Steckdose mit der auf dem Typenschild
angegebenen Netzspannung an.
Schalten Sie den Luftentfeuchter stets mit der Betriebstaste aus und ziehen Sie stets den Netzstecker aus der
Steckdose, wenn der Luftentfeuchter nicht gebraucht, oder wenn er bewegt, angefasst oder gereinigt wird. Zum
Herausziehen des Netzsteckers nicht am Kabel zerren.
Ziehen Sie nicht den Netzstecker aus der Steckdose, während der Luftentfeuchter in Betrieb ist, sondern schalten Sie
immer zuerst den Luftentfeuchter mit der Betriebstaste aus.
Der Luftentfeuchter arbeitet optimal bei einer Raumtemperatur von 13 °C bis 35 °C. Eine optimale Entfeuchtungsleistung
ist nur im höheren Temperaturbereich (ab 22 °C) und bei hoher Luftfeuchtigkeit (ab 70%) erreichbar. (Die niedrigste
Betriebstemperatur beträgt 5°C, die niedrigste relative Luftfeuchtigkeit 30%. Die höchste Betriebstemperatur beträgt
40°C, die höchste relative Luftfeuchtigkeit 90%.)
Verwenden Sie den Luftentfeuchter nicht in der Nähe von leicht entflammbaren Gasen oder Stoffen, in der Nähe von
offenem Feuer oder an einer Stelle, wo Öl oder Wasser spritzen können. Sprühen Sie keine Insektizide oder ähnliche
Substanzen auf den Luftentfeuchter. Stellen Sie sicher, dass der Luftentfeuchter nicht direkter Sonneneinstrahlung
ausgesetzt wird. Verwenden Sie den Luftentfeuchter nicht in einem Treibhaus oder in der Nähe eines Bades, einer
Dusche oder eines Schwimmbeckens. Stellen Sie keine heissen oder schweren Gegenstände auf den Luftentfeuchter.
Die Luftein- und -austrittsöffnungen müssen während des Entfeuchtungsbetriebes immer geöffnet sein. Achten Sie
darauf, dass keine Gegenstände in die Luftein- oder –austrittsöffnungen geraten können. Dies kann zu einer Überhitzung,
Brand oder Stromschlag führen. Der Luftentfeuchter darf nicht hinter Vorhängen oder anderen Gegenständen oder
Hindernissen, die die Luftzirkulation störend beeinflussen können, aufgestellt werden. Ein Sicherheitsabstand von
mindestens 50 cm von anderen Gegenständen ist einzuhalten. Zudem ist ein Sicherheitsabstand von mindestens 60 cm
zu Nasszellen wie Duschen, Waschbecken, Spülbecken, Badewannen etc. einzuhalten. Von festen Wasseraustrittsstellen
ist zudem ein Abstand von 120 cm erforderlich.
Beim Einsatz zur Trocknung von Textilien muss ein Mindestabstand von 50 cm zwischen Textilien und Luftentfeuchter
eingehalten werden. Es darf kein Wasser auf das Gerät tropfen.
Entfernen Sie nicht den Wassertank, wenn der Luftentfeuchter in Betrieb ist. Restwasser könnte Möbel und
Fussbodenbeläge beschädigen.
Warten Sie 3 - 5 Minuten, nachdem Sie den Luftentfeuchter ausgeschaltet haben, bevor Sie ihn wieder in Betrieb
nehmen.
Tauchen Sie den Luftentfeuchter nicht in Wasser oder andere Flüssigkeiten ein und schütten Sie nicht Wasser oder
andere Flüssigkeiten über das Gerät oder in die Luftein- und -austrittsöffnungen.
Reinigen Sie regelmässig den Luftentfeuchter und beachten Sie dazu die Reinigungsanleitung.
Transportieren Sie den Luftentfeuchter stets aufrecht. Vor der ersten Inbetriebnahme lassen Sie den Luftentfeuchter
24 Stunden aufrecht stehen. Stellen Sie den Luftentfeuchter nach jedem Transport sofort aufrecht hin und warten
Sie mindestens 60 Minuten, bevor Sie den Luftentfeuchter in Betrieb nehmen. Leeren Sie vor jedem Transport den
Wassertank.
Der Luftentfeuchter darf nur entsprechend den Anweisungen dieser Gebrauchsanweisung verwendet werden.
Bei Nichtbeachtung dieser Anweisungen kann es zu Verletzungen, zu einem Brand, zu einem Stromschlag oder zu
Gerätedefekten kommen.
Der Luftentfeuchter ist ausschliesslich für den privaten Gebrauch in Innenräumen und nicht für den gewerblichen
Gebrauch bestimmt.
Nehmen Sie diesen Luftentfeuchter nicht in Betrieb, wenn er beschädigt ist oder Beschädigungen aufweisen könnte
oder nicht richtig funktioniert. Ziehen Sie den Netzstecker aus der Steckdose.
Das Gerät darf nur in Übereinstimmung mit den nationalen Vorschriften für elektrische Anschlüsse verwendet werden.
Downloaded from www.vandenborre.be
4 5
5.
6.
6.
6.
6.
5.
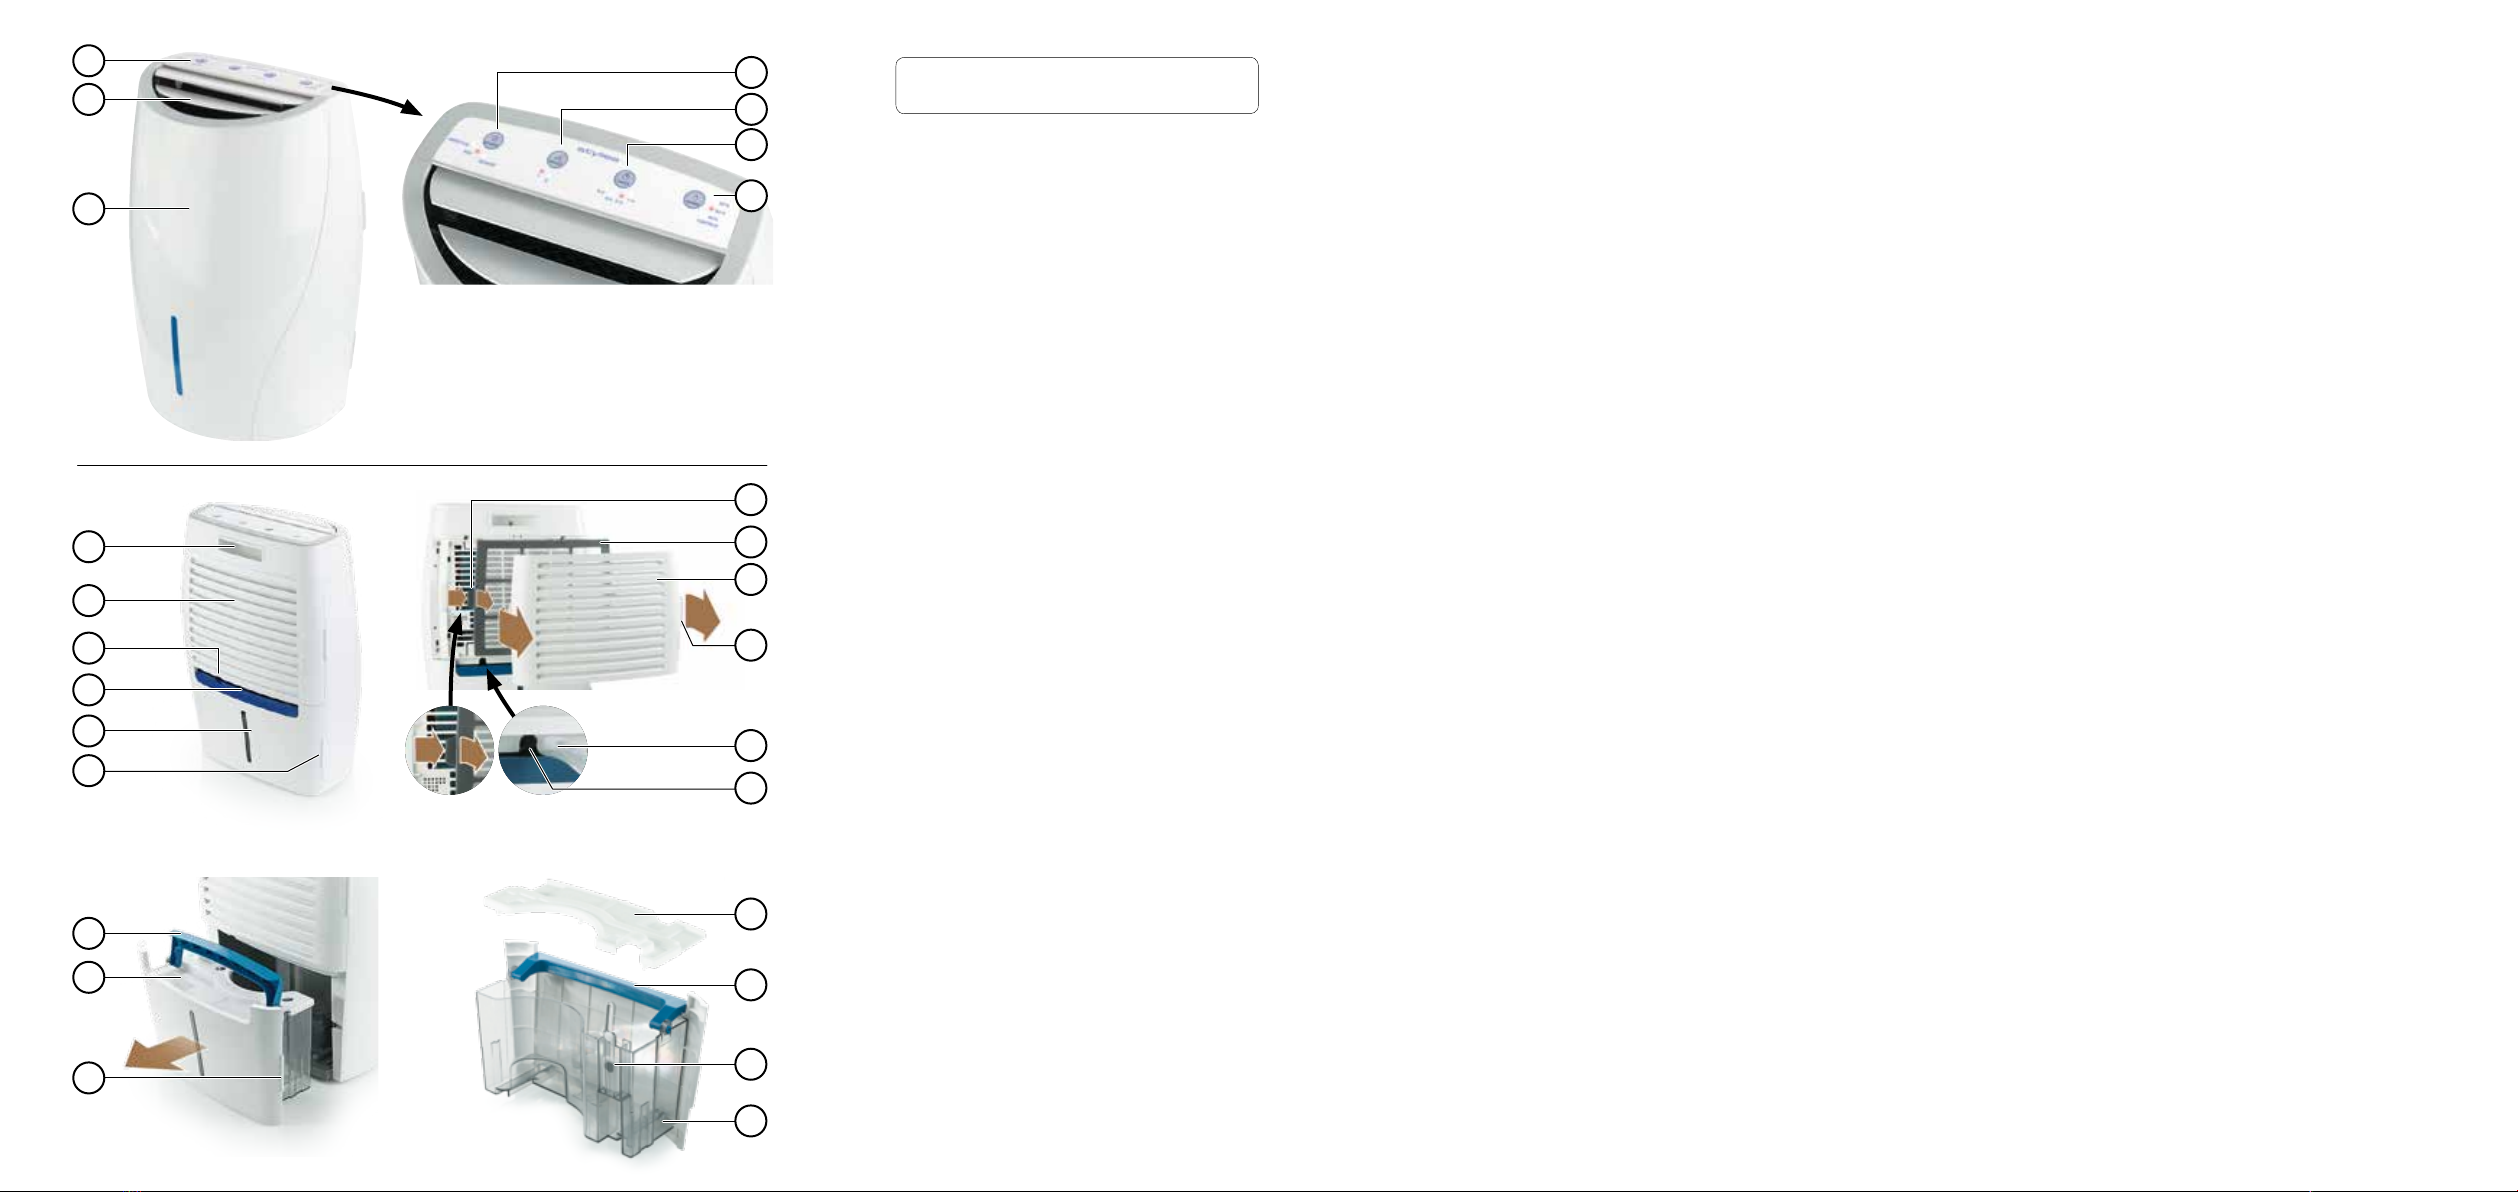
GERÄTEBESCHREIBUNG
Das Gerät besteht aus den folgenden Hauptkomponenten:
1.
Bedienfeld
2.
Luftauslass (nicht abdecken)
3.
Luftentfeuchter
4.
– «POWER» Ein-/Ausschalten
und Kontrollanzeigen:
– «WATER FULL»: Wassertank voll
– «RUN»: Gerät in Betrieb
– «DEFROST»: Abtaufunktion für
Verdunster
5.
– «SPEED»: Luftmenge (1-2)
6.
– «TIMER»: Autom. Ein-/Ausschalten
(1, 2, 4 oder 8 h)
7.
– «HUMID» Luftfeuchtigkeit (40, 50,
60 % rel. und Dauerbetrieb)
8.
Griff
9.
Lufteinlass (nicht abdecken)
10.
Anschluss Abflussleitung
11.
Griff Wassertank
12.
Wasserstandsanzeige
13.
Öffnungslaschen Wassertank
14.
Griff Wassertank (ausgeklappt)
15.
Deckel Wassertank
16.
Befestigungslasche von Filter
17.
Filter Lufteinlass
18.
Abdeckung Lufteinlass
19.
Öffnungslaschen
20.
Abflussschlauch ø 8/10 mm (Innen-/Aus-
sendurchmesser; nicht im Lieferumfang)
21.
Anschluss für Abflussschlauch
22.
Deckel Wassertank (abgenommen)
23.
Griff Wassertank
24.
Schwimmer für Wasserstand
25.
Transparenter Wassertank
INBETRIEBNAHME / Kurzanleitung
Diese Kurzanleitung hilft geübten Anwendern das Gerät in wenigen Schritten in Betrieb zu
nehmen. Die detaillierte Inbetriebnahme ist im nächsten Kapitel beschrieben.
2.
2.
1. Gerät auf stabile und wasserfeste Unterlage und nicht direkt
auf Teppich- oder Holzboden stellen.
Wichtig: Damit der Kompressor nach einem Gerä-
tetransport keinen Schaden nimmt, mindestens ei-
ne Stunde warten, bevor das Gerät in Betrieb genommen
wird (keine Garantie!). Das Gerät immer senkrecht transpor-
tieren und nie legen.
2. Auf der Rückseite Öffnungslaschen (13) nach Aussen ziehen
und Wassertank entnehmen. Kontrollieren, ob sich darin kein
Verpackungsmaterial befindet. Falls nicht, Tank wieder einset-
zen, bis er einrastet.
3. Netzstecker einstecken (alle LED's leuchten kurz rot auf). Ge-
rät nicht an Schaltuhren oder geschaltete Steckleisten an-
schliessen.
1 Stunde
Öffnungslaschen
Öffnungslaschen
4. Für optimale Funktion Fenster und Türen
schliessen.
5. Einschalten:
«POWER» drücken
(«RUN» leuchtet, Luftauslassklappen öffnen
sich, Gebläse und Kompressor starten).
Ausschalten:
«POWER» erneut
drücken.
Gut zu wissen:
–
Wurde der Entfeuchter kurz vorher ausgeschaltet, startet
der Kompressor mit bis zu 3 Minuten Verzögerung (= Schutz-
schaltung).
– «WATER FULL» àWassertank voll àentleeren àS. 6.
– «DEFROST» àAbtauvorgang gestartet àS . 7.
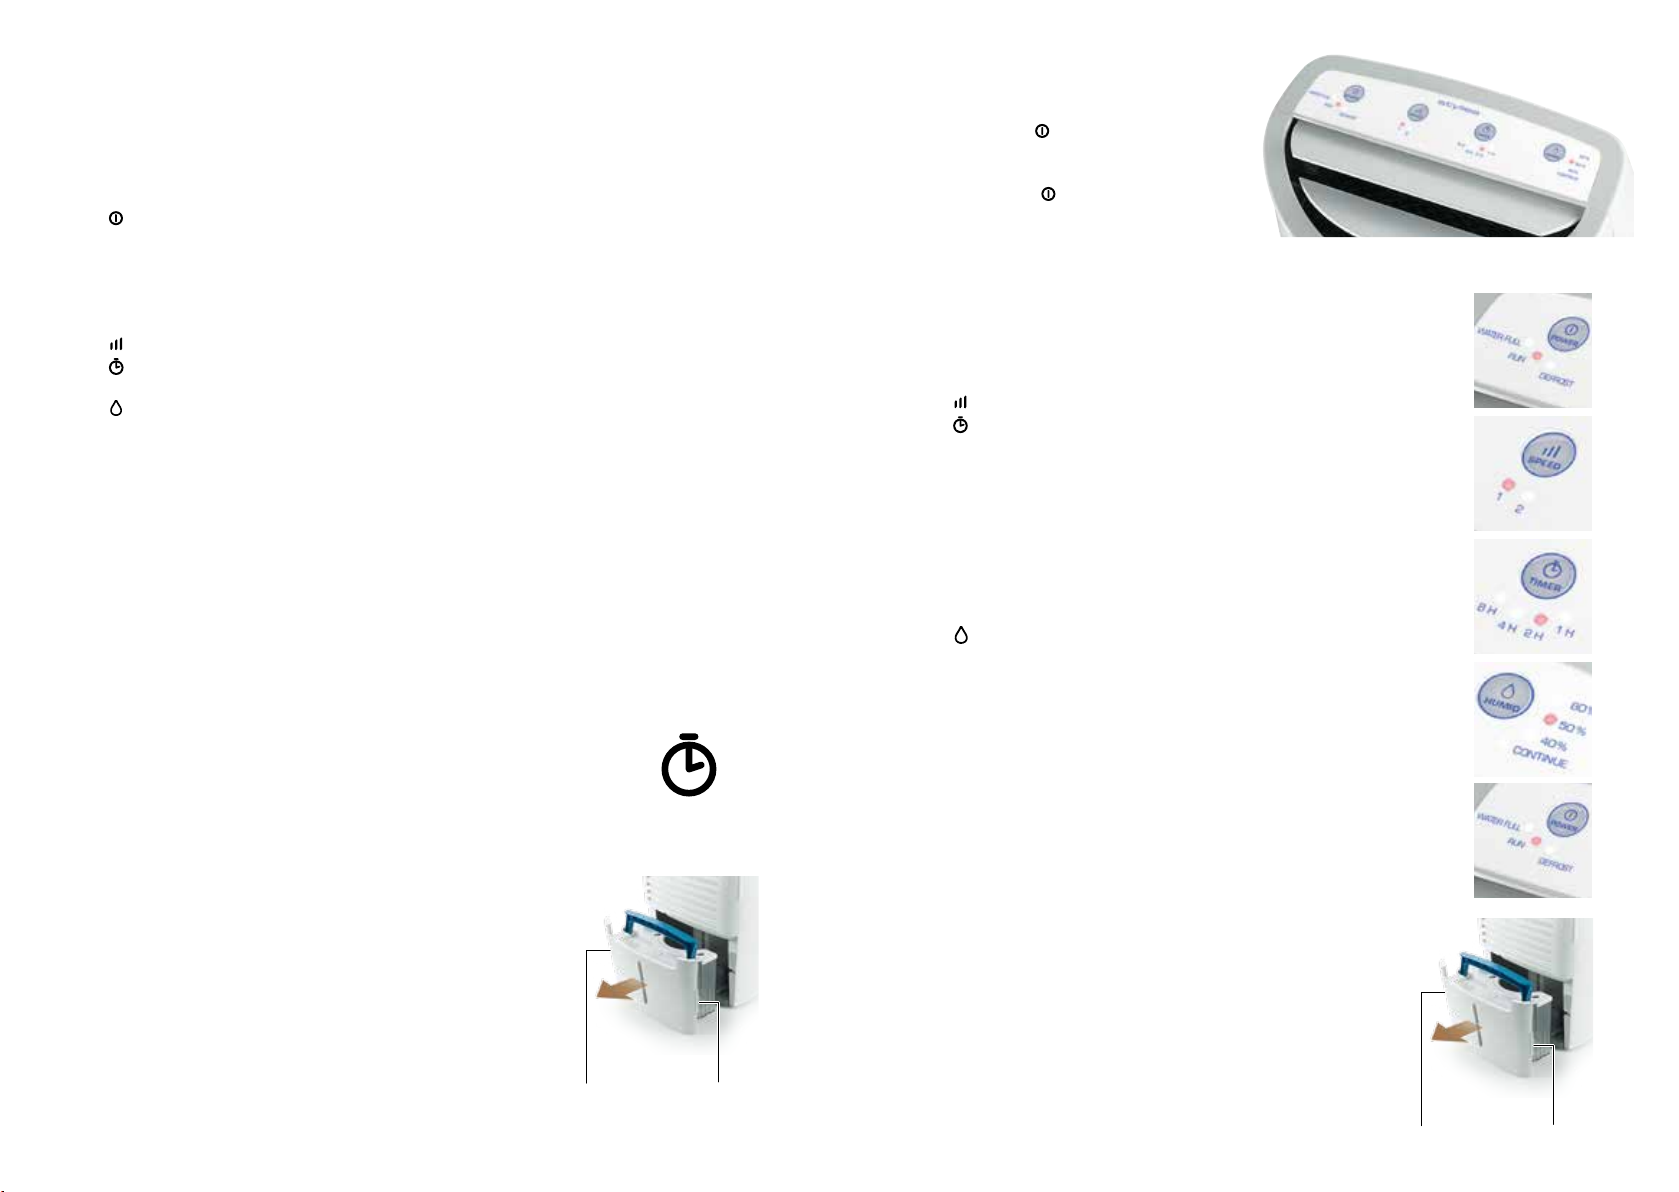
6.
Anzeigen/Einstellungen:
– «SPEED» àUmschaltung Luftmenge tief «1»/hoch «2».
– «TIMER» àGerät lässt sich nach 1, 2, 4 oder 8 Stunden
automatisch ein- oder ausschalten.
– Automatisch einschalten: Zuerst Gerät ausschalten, dann
Taste «TIMER» so oft drücken, bis gewünschte Zeit angezeigt
wird. Leuchtet keine LED, ist die Timerfunktion ausgeschaltet.
– Automatisch ausschalten: Wie «Automatisch einschalten», je-
doch Gerät zuerst einschalten, dann Taste «TIMER» so oft drü-
cken, bis gewünschte Zeit angezeigt wird. Leuchtet keine LED,
ist die Timerfunktion ausgeschaltet.
– «HUMID»àLuftfeuchtigkeit einstellen.
«CONTINUE» àDauerbetrieb für möglichst schnelle Entfeuch-
tung. «40, 50, 60 %» àgewünschte Luftfeuchtigkeit in % rel.
(40 % = trockener, 60 %= feuchter)
7. «WATER FULL»
= Wassertank voll:
– WATER FULL» àWassertank voll; Kompressor schaltet ab
àTank entleeren.
– Es kann auch ein Schlauch angeschlossen werden (nicht ent-
halten) àS . 7.
– Wassertank entnehmen àAuf der Rückseite Tank an den zwei
Öffnungslaschen (13) nach Aussen ziehen. Tank an blauem Trag-
griff halten und in Waschbecken leeren (der
weisse Deckel muss zum Entleeren nicht entnommen werden).
Gut zu wissen:
Wasser nicht für andere Zwecke verwenden (enthält Schmutz-
partikel aus der Luft). Tankinnenseite monatlich reinigen à
Hygiene.
– Wassertank einsetzen àTraggriff nach unten klappen à
Wassertank einschieben, bis er einrastet («WATER FULL»
erlischt und Kompressor startet verzögert).
Downloaded from www.vandenborre.be

6 7
INBETRIEBNAHME / BEDIENUNG
1. Gerät auf stabile und wasserfeste Unterlage und nicht direkt auf Teppich- oder Holzboden
stellen. Nicht direkt in die Sonne stellen.
Wichtig: wurde das Gerät transportiert, vor der Inbetriebnahme mindestens eine
Stunde warten. Das Kühl-/Schmiermittel kann sich so wieder «setzen» und der Kompres-
sor nimmt keinen Schaden (keine Garantie!).
2. Kontrollieren, ob sich kein Verpackungsmaterial im Wassertank befindet.
Dazu den Wassertank an den beiden Öffnungslaschen (13) nach Aussen ziehen (ist eingeras-
tet). Ist kein Verpackungsmaterial im Tank, diesen wieder ganz einschieben (muss einrasten).
3. Netzstecker einstecken (alle LED's leuchten kurz rot auf).
4. Für optimale Funktion Fenster und Türen schliessen.
5. Gerät mit Taste
«POWER» einschalten. Es leuchtet die rote «RUN»-Kontrollanzeige, die
Luftauslassklappen öffnen sich, das Gebläse und der Kompressor starten.
Durch erneutes Drücken der Taste Gerät wieder ausschalten.
Gut zu wissen:
–
Wurde der Entfeuchter kurz vorher ausgeschaltet, startet der Kompressor mit bis zu
3 Minuten Verzögerung (= Kompressor-Schutzfunktion).
– Leuchtet «WATER FULL», ist der Wassertank voll und muss entleert werden àsiehe Sei-
te 7. Der Kompressor bleibt so lange abgeschaltet, bis der entleerte Tank wieder ganz ein-
gesetzt ist.
– Das Gerät darf nicht an Schaltuhren oder geschaltete Steckdosen/-leisten angeschlossen
werden (Gefahr von Kompressorschäden).
– «DEFROST» Abtauvorgang gestartet àsiehe Seite 7.
6.
Weitere Anzeigen / mögliche Einstellungen:
– «SPEED»: Umschaltung Luftmenge tief «1»/hoch «2». Nach dem Einschalten arbeitet
das Gerät mit hoher Leistung («2» leuchtet).
– «TIMER»: Gerät lässt sich nach 1, 2, 4 oder 8 Stunden automatisch ein- oder
ausschalten.
– «HUMID»: Luftfeuchtigkeit einstellen. Nach dem Einschalten schaltet das Gerät auf
Dauerbetrieb («CONTINUE»). Dies ist sinnvoll bei sehr hoher Luftfeuchtigkeit oder um
einen Raum möglichst schnell zu entfeuchten. Befinden sich im zu entfeuchtenden Raum
oft Personen, wird die Einstellung «50 %» relative Luftfeuchtigkeit empfohlen. Beim Errei-
chen der eingestellten Luftfeuchtigkeit, schaltet sich der Kompressor solange aus, bis die
Luftfeuchtigkeit wieder steigt. Das Gebläse läuft weiter, damit die Luftfeuchtigkeit gemes-
sen werden kann.
7. «WATER FULL»
= Wassertank voll:
– Bei vollem Wassertank schaltet der Kompressor ab und die Anzeige «WATER FULL» leuch-
tet auf.
– Wassertank entnehmen: Auf der Rückseite des Tankes befinden sich zwei Öffnungsla-
schen (13). Diese festhalten und den Tank nach Aussen ziehen. Blauen Tragegriff nach
oben klappen, um den Tank bequem tragen zu können. Tank im Waschbecken leeren. Der
weisse Deckel auf der Oberseite muss zum Entleeren nicht entnommen werden.
– Wassertank einsetzen: Tragegriff nach unten klappen und leeren Tank ganz einschieben
bis er einrastet. Die Anzeige «WATER FULL» erlischt und der Kompressor kann wieder
starten.
Gut zu wissen:
– Verwenden Sie das Wasser nicht für andere Zwecke, da es auch Schmutzpartikel aus der
Luft enthält.
– Tankinnenseite aus hygienischen Gründen mindestens monatlich mit warmem Wasser
und einem normalen Abwaschmittel reinigen. Vorher den weissen Tankdeckel (22) abneh-
men (Deckel an der Vorderkante festhalten, leicht nach oben schwenken und dann gegen
sich ziehen). Tank oder Deckel nicht in Geschirrspüler geben oder mit scheuernden Mittel
reinigen; die Teile nehmen sonst Schaden.
8. Wasserabflussschlauch:
– Wenn sich das Gerät in einem Raum mit Abwasserabfluss im Boden befindet, kann das
Wasser direkt dorthin geleitet werden. Der Tank wird dann nicht mehr gefüllt und muss
dadurch auch nicht mehr geleert werden. Dazu wird ein Schlauch benötigt (nicht im Liefer-
umfang). Dieser muss einen Innen- /Aussendurchmesser von 8/10 mm aufweisen.
– Gummiabdeckung auf dem Anschlussrohr (10) entfernen und dann den Schlauch auf das
Rohr stülpen.
–Gut zu wissen:
Der Schlauch muss so verlegt werden, dass er ein gleichmässiges Gefälle hat. Er darf
nicht nach oben geführt werden, da das Wasser sonst nicht mehr abfliessen kann.
9. Automatische Defrostung:
– Die «DEFROST»-Anzeige leuchtet, wenn die Temperatur am Verdampfer ca. –1 °C beträgt
und sich eine Eisschicht gebildet hat. Dies kann z.B. nach 20 Minuten Dauerbetrieb oder
bei tieferen Raumtemperaturen der Fall sein. Der Kompressor schaltet dann aus und der
Abtauvorgang startet. Das Gebläse läuft dabei weiter und das Abtauwasser läuft direkt
in den Wassertank. Kann der Eisansatz am Verdunster innert 5 Minuten wegschmelzen,
startet der Kompressor wieder automatisch und «DEFROST» erlischt. Ist dies nicht der
Fall schaltet sich das Gerät nach 20 Minuten aus (= Kompressor-Schutzfunktion).
10. Schutzschaltungen:
– Ihr Luftentfeuchter wird laufend durch eine Schutzschaltung überwacht. Diese schaltet
bei Störungen den Kompressor automatisch aus. Sie verhindert auch, dass der Kompres-
sor nach dem Ausschalten direkt wieder eingeschaltet werden kann und sich dadurch
überlastet. Er wird daher erst nach 1-3 Minuten wieder eingeschaltet.
– Die Schutzschaltung überwacht auch die Temperatur am Gerät; ist diese unter 0 °C oder
über 40 °C, wird es ausgeschaltet oder kann nicht in Betrieb genommen werden. Das Gerät
kann erst wieder in Betrieb genommen werden, wenn sich die Temperatur im erwähnten Be-
reich befindet und der Netzstecker gezogen und erneut eingesteckt wurde (= «Reset»).
– Nach einem Stromunterbruch schaltet sich das Gerät wieder mit den vorhergehenden
Einstellungen ein. Wichtig: Das Gerät darf aus Sicherheitsgründen nicht mit Schaltuhren,
geschalteten Dosen etc. ein- oder ausgeschaltet werden (Kompressor kann Schaden neh-
men)!
11. Hygrostat:
– Der integrierte Hygrostat misst laufend die Luftfeuchtigkeit und steuert den Entfeuch-
tungsvorgang.
–Gut zu wissen:
Die Standard-Toleranzen eines integrierten Hygrostaten betragen +/- 5%. Das bedeutet,
dass die effektive relative Luftfeuchtigkeit dementsprechend abweichen kann.
Downloaded from www.vandenborre.be

8 9
REINIGUNG
Vor jeder Wartung und nach jedem Gebrauch das Gerät ausschalten und das Netzkabel aus
der Steckdose ziehen.
Gerät nie ins Wasser tauchen (Kurzschluss-/Stromschlaggefahr). Zur Reinigung nur mit einem
feuchten Lappen abreiben und danach gut trocknen. Zuvor unbedingt Netzstecker ziehen.
Die Abdeckung (18) und der Luftfilter (17) auf der Rückseite können zur einfacheren Reinigung
entfernt werden.
Abdeckung abnehmen: dazu eine der seitlichen Öffnungslaschen (19) nach hinten ziehen und
die Abdeckung (18) abnehmen.
Luftfilter abnehmen: eine der beiden seitlichen Befestigungslaschen (16) aushängen, indem
sie leicht nach innen gedrückt wird. Dann Filter nach hinten abnehmen.
Fusseln mit einem Pinsel oder einem Staubsauger mit Pinselaufsatz entfernen. Nicht auf Filter
drücken (kann einreissen). Kunststoffteile mit einem feuchten Tuch reinigen.
Teile in umgekehrter Reihenfolge wieder einsetzen: Filter mit einer Befestigungslasche in
Gehäuse einhängen. Die Lasche auf der anderen Seite leicht gegen die Mitte drücken, damit
sie auch im Gehäuse eingehängt werden kann (schnappt ein). Abdeckung von hinten auf das
Gerät stecken, bis alle vier Befestigungsnasen einschnappen (keine Gewalt anwenden; evtl.
steht die Abdeckung auf dem Kopf und passt daher nicht). Gerät nie ohne Filter und Abdeckung
verwenden!
Wassertank täglich entleeren.
Tankinnenseite aus hygienischen Gründen mindestens monatlich mit warmem Wasser und
einem normalen Abwaschmittel reinigen. Vorher den weissen Tankdeckel (22) abnehmen
(Deckel an der Vorderkante festhalten, leicht nach oben schwenken und dann gegen sich
ziehen).
Tank, Deckel, Abdeckung oder Filter nicht in Geschirrspüler geben oder mit scheuernden Mittel
reinigen; die Teile nehmen sonst Schaden.
AUFBEWAHRUNG
Bei längerem Nichtgebrauch (z.B. während den Ferien) Netzstecker ziehen. Wassertank leeren
und zusammen mit dem Gerät 1-2 Tage trocknen lassen (damit Kondenswasser im Inneren
verdunsten kann und das Gerät völlig trocken ist), dann Gerät an einem trockenen, staubfreien
Ort lagern.
Tipp: Verpackung zur Aufbewahrung des Gerätes verwenden.
TECHNISCHE DATEN
Dimensionen 347 x 495 x 247 mm (Breite x Höhe x Tiefe)
Nettogewicht 10.2 kg
Netzspannung 220-240 V / 50/60 Hz
Leistungsaufnahme 255 W
Geeignet für Raumgrösse 40m² oder 100m³
Temperturbereich (max.) 0 °C – 40 °C
Entfeuchtungsleistung max. 12 l / Tag
Automatische Ein-/Abschaltung ja/ja
Tankvolumen 2 l / 0.528 US Gallonen
Entspricht den EU-Richtlinien CE/WEEE/RoHS
Technische Änderungen und Irrtümer vorbehalten.
STÖRUNGEN
«Water Full» leuchtet
Wassertank voll; Tank entleeren àSeite 7
«Water Full» erlischt nicht
Wassertank nicht ganz eingeschoben àTank ganz einschieben (muss einrasten und bündig mit
Gehäuse schliessen).
Kompressor-Schutzschaltung ist noch aktiv. Es kann bis zu 3 Minuten dauern, bis der
Kompressor wieder einschaltet (und die Anzeige erlischt).
Gerät ist ausgeschaltet und keine Taste reagiert
Die Raumtemperatur ist zu tief (unter 0 °C) oder zu hoch (über 40 °C) àSeite 7. Wenn Gerät
nach Aufwärmen oder Abkühlen nicht reagiert, Netzstecker einige Sekunden ziehen und dann
wieder einstecken (= «Reset»).
«DEFROST» leuchtet und Kompressor läuft nicht
Gerät muss sich abtauen àSeite 7
Wassertank rinnt
Beim Einsetzen/Entnehmen können Wassertropfen austreten. Rinnt der Tank jedoch, muss er
ersetzt werden. Tank niemals in Geschirrspüler geben oder fallen lassen, da er sonst Schaden
nimmt.
Downloaded from www.vandenborre.be

10 11
REPARATUREN/ENTSORGUNG
Reparaturen an Elektrogeräten (Wechseln des Netzkabels) dürfen nur von instruierten
Fachkräften durchgeführt werden. Bei unsachgemässen Reparaturen erlischt die Garantie
und jegliche Haftung wird abgelehnt.
Wenn das Netzkabel beschädigt wird, muss es vom Hersteller, seinem offiziellen Service-
Partner oder einer qualifizierten Person ersetzt werden, um Schäden zu vermeiden.
Nehmen Sie das Gerät nie in Betrieb, wenn ein Kabel oder Stecker beschädigt ist, nach
Fehlfunktionen des Gerätes, wenn dieses heruntergefallen ist oder auf eine andere Art
beschädigt wurde (Risse/Brüche am Gehäuse/Tank).
Keine scharfen, kratzenden Gegenstände oder ätzende Chemikalien verwenden.
Ausgedientes Gerät sofort unbrauchbar machen (Netzkabel durchtrennen) und bei der dafür
vorgesehenen Sammelstelle abgeben.
Dieses Gerät darf nicht mit dem Hausmüll entsorgt werden! Bitte geben sie dieses
Gerät an den dafür vorgesehenen Sammelstellen ab! Das Sammeln und Recyceln
elektrischen und elektronischen Abfalls schont wertvolle Ressourcen!
Das Verpackungsmaterial ist wiederverwertbar. Entsorgen Sie die Verpackung
umweltgerecht und führen Sie sie der Wertstoffsammlung zu.
Wenn elektrische Geräte unkontrolliert entsorgt werden, können während der Verwitterung
gefährliche Stoffe ins Grundwasser und damit in die Nahrungskette gelangen sowie die Flora
und Fauna auf Jahre belastet werden.
2 JAHRE GEWÄHRLEISTUNG
Während der Gewährleistungsfrist von zwei Jahren ab dem Kauf des Geräts übernehmen wir
die Reparatur eines Geräts oder Teils, bei welchem ein Material- oder Verarbeitungsfehler
festgestellt wurde, oder (nach unserem Ermessen) dessen Ersatz durch ein in Stand gesetztes
Produkt, ohne dass Ihnen Kosten für die Teile oder den Arbeitsaufwand entstehen.
ABGESEHEN VON DER OBEN STEHENDEN GEWÄHRLEISTUNG ÜBERNIMMT Coplax FÜR DIE
ZEIT NACH ABLAUF DER GEWÄHRLEISTUNGSFRIST KEINERLEI ANDERE STILLSCHWEIGENDE
GARANTIE ODER ZUSAGE DER MARKTGÄNGIGKEIT ODER EIGNUNG FÜR EINEN BESTIMMTEN
ZWECK IM HINBLICK AUF DAS PRODUKT. Coplax repariert oder ersetzt ein Produkt im
Rahmen der Gewährleistung nach eigenem Ermessen. Es erfolgt KEINE Gutschrift. Die
vorgenannten Rechtsmittel stellen ihre einzigen Rechtsmittel bei Verletzung der oben genannten
Gewährleistung dar.
Wer hat Anspruch auf Gewährleistung?
Anspruch auf Gewährleistung hat der Ersteigentümer eines Coplax-Geräts im Privateigentum,
der einen datierten Kaufbeleg in Form einer Rechnung oder Quittung vorlegen kann. Die
Gewährleistung ist nicht übertragbar.Vor der Rückgabe der Einheit ist eine Kopie des datierten
Original-Kaufbelegs per Fax, E-Mail oder Post zu übersenden. Bitte fügen Sie dem Artikel die
Modellnummer Ihres Geräts und eine detaillierte Beschreibung des Problems (vorzugsweise in
Maschinenschrift) bei. Legen Sie die Beschreibung in einen Umschlag, den Sie vor Versiegelung
des Kartons mit Klebeband direkt am Gerät befestigen.Bitte beschreiben oder modifizieren Sie
den Original-Karton in keiner Weise.
Nicht im Gewährleistungsumfang enthalten:
Teile, die üblicherweise ausgetauscht werden müssen,
Schäden, Ausfälle, Verluste oder Verschlechterungen aufgrund von gewöhnlicher Abnutzung,
unsachgemässem Gebrauch, nicht bestimmungsgemässer Nutzung, Fahrlässigkeit, Unfall,
Mängeln bei Installation, Aufstellung und Betrieb, unsachgemässer Wartung, unbefugter
Reparatur, Belastung durchunangemessene Temperaturen oder Bedingungen.Dies umfasst
unter anderem Schäden aufgrundder unsachgemässen Verwendung von ätherischen Ölen
oder Wasseraufbereitungs- undReinigungsmitteln.
Schäden aufgrund von unzureichender Verpackung oder falscher Handhabung durch
Spediteure beiProduktretouren.
Falscher Einbau oder Verlust von Zubehör, etwa Wassertank usw.
Kosten für VersandundTransport zum Reparaturort undzurück.
Direkte, indirekte, besondere oder Folgeschäden jeder Art, unter anderem entgangene
Gewinne oder andere wirtschaftliche Verluste.
Transportschäden an einer Einheit, die von einem unserer Einzelhändler ausgeliefert
wurde. Bitte wenden Sie sichdirekt an den Einzelhändler.
Diese Gewährleistung erstreckt sich nicht auf Schäden oder Mängel, die darauf zurückzuführen
sind, dass die Spezifikationen von Coplax AG in Bezug auf Installation, Betrieb, Nutzung, Wartung,
oder Reparatur des Coplax-Geräts nicht strikt befolgt wurden.
Downloaded from www.vandenborre.be

12 13
English
Congratulations! You have just become the owner of the exceptional and high-tech Stylies
«PAVO»dehumidifier. This dehumidifier will bring you a lot of pleasure when using it and will
improve the air quality of your rooms.
As with all electrical household devices, special caution is required when using this dehumidifier
in order to avoid injuries, fire and damage to the device itself. Before you use it for the first
time, please read through this instruction manual carefully and pay attention to the safety
guidelines and indications printed on the device.
IMPORTANT SAFETY INSTRUCTIONS
Please read through the instruction manual carefully before using the Stylies PAVO dehumidifier
for the first time and store it in a safe place for future reference. If you ever give the dehumidifier
to a new owner, make sure you also pass on this instruction manual.
Coplax AG accepts no liability for any damage caused by non-compliance with this instruction
manual.
This appliance can be used by children aged 8 years and above if
they are supervised or else have been instructed in how to use the
appliance safely and understand the hazards involved. Cleaning
and user maintenance should not be undertaken by children unless
they are older than 8 years old and supervised. Keep the appliance
and its cord out of the reach of children aged below 8 years old.
Children below 3 years old should be kept away from the device
unless continuously supervised.
Children aged between 3 and 8 years old should only switch on/off
the appliance when supervised or else if they have been instructed
in how to use the appliance safely and understand the hazards
involved and provided that the device has been placed or installed
in its intended normal operating position. Children aged between
3 and 8 years old should not plug in, adjust or clean the appliance
or perform user maintenance.
If the supply cord is damaged, it must be replaced by the
manufacturer, an authorised representative or a qualified person
in order to avoid a hazard.
The device is for indoor use only.
Do not store the appliance outdoors.
Place the dehumidifier on a firm, even, waterproof surface. Make sure it is standing securely so
that the dehumidifier cannot tip or fall over. If it tipped over, please pull out the plug immediately.
Water can damage furniture and floor coverings.
Unwind the cord completely. If not completely unwound, the cord can lead to overheating and
cause a fire.
Do not use an extension cord, connector strip, switched socket or a continuously adjustable speed
controller. This can cause overheating, fire, an electric shock or failure of the compressor.
Only connect the dehumidifier to a single-phase, earthed socket with the supply voltage as stated
on the type plate.
Always switch the dehumidifier off with the power button and always disconnect the plug from the
power socket when the dehumidifier is not in use or when it is being moved, handled or cleaned. Do
not tug at the cord to disconnect the plug.
Do not disconnect the plug when the dehumidifier is running. Always switch the dehumidifier off
first with the power button.
The dehumidifier functions at its best at a room temperature of between 13 °C and 35 °C.
Optimal dehumidifying performance is only achievable in the higher temperature range (from
22 °C) and with a higher room humidity (from 70%). (The lowest working temperature is
5 °C and relative humidity is 30%. The highest working temperature is 40 °C and the relative
humidity is 90%.)
Do not use the dehumidifier anywhere near easily inflammable gases or substances, near an
open fire or at a location where oil and water could splash. Do not spray insecticides or similar
substances onto the dehumidifier. Make sure that the dehumidifier is not exposed to direct
sunlight. Do not use the dehumidifier in a greenhouse or near a bathtub, shower or swimming pool.
Do not put any hot or heavy objects on the dehumidifier.
The air intake and air outflow vents must always be kept open during dehumidification. Make sure
that no objects can get into the air intake or air outflow vents. This can lead to overheating, fire
or electric shock. The dehumidifier must not be installed behind curtains, drapes or other objects
and obstacles that could impair the air circulation. A safety distance of at least 50 cm from other
objects must be maintained. In addition, a safety distance of at least 60 cm from wet areas such
as showers, washbasins, sinks, bathtubs etc. must be maintained. A safety distance of 120 cm
from water supplies, e.g. a water tap, is necessary.
When operating to dry clothes, keep the clothing at least 50 cm away from the unit and do not
allow water to drip onto the unit.
Do not remove the water tank while the dehumidifier is running. Drops of remaining water could
damage the furniture and floor coverings
Wait for 3 - 5 minutes after switching the dehumidifier off before you switch it back on again.
Do not immerse the dehumidifier into water or any other liquids and do not pour water or any other
liquids onto the appliance or into the air intake and outflow vents.
Clean the dehumidifier regularly, following the cleaning instructions.
Always transport the dehumidifier in an upright position. Before using the dehumidifier for the
first time, leave it standing in an upright position for 24 hours. Always stand the dehumidifier in
an upright position immediately after transporting the appliance and wait for at least 60 minutes
before switching it back on. The water tank must be emptied every time before transportation.
The dehumidifier must always be operated according to this instruction manual. Non-observance
of these instructions can lead to injuries, a fire, electric shock or faults in the appliance.
The dehumidifier is designed for private use indoors and is not intended for commercial use.
Do not use the dehumidifier if it is faulty or showing signs of damage or if it is not functioning
correctly. Disconnect the plug from the power socket.
The appliance should be installed in accordance with the National Electrical Code.
Downloaded from www.vandenborre.be

14 15
DESCRIPTION OF THE DEVICE
The device consists of the following main components:
STARTING UP / QUICK GUIDE
This quick guide helps practised users set up the device in a few steps. For detailed start-up
instructions, please consult the next chapter.
1.
Control panel
2.
Air outlet (do not cover)
3.
Dehumidifier
4.
– «POWER» On/off switch and control
displays:
– «WATER FULL»: Water tank is full
– «RUN»: Device operating
– «DEFROST»: Defrost function for the
evaporator
5.
– «Speed»: Air volume (1-2)
6.
– «TIMER»: Autom. power on/off
(1, 2, 4 or 8 h)
7.
– «HUMID» Humidity (40, 50,
60 % rel. and continuous operation)
8.
Handle
9.
Air intake (do not dover)
10.
Outlet pipe connector
11.
Handle for water tank
12.
Water level gauge
13.
Opening flaps for water tank
14.
Handle for water tank (opened out)
15.
Cover for water tank
16.
Filter mounting bracket
17.
Air intake filter
18.
Air intake cover
19.
Opening flaps
20.
Outlet pipe ø 8/10 mm (internal/external
diameter; not included)
21.
Connector for outlet pipe
22.
Water tank cover (removed)
23.
Water tank handle
24.
Water level float
25.
Transparent water tank
2.
1 hour
Opening flaps
5.
6.
6.
6.
6.
5.
2.
Opening flaps
1. Place the device on a stable and water-proof surface. Do not
place directly on a carpeted or wooden floor.
Important: to ensure that the compressor has not sustained
any damage after transportation of the device, wait at least an
hour before operation (no warranty). Ensure the device is up-
right when transported and never lay flat.
2. Pull out the opening flaps (13) on the reverse and remove the
water tank. Ensure that there is no packaging material inside.
If there is not, return the water tank to its position and ensure
it snaps into place.
3. Plug in the power plug (all LEDs will light up red briefly). Do not
connect to a timer or switched cable connector.
4. For optimal functioning, close the windows
and doors.
5. Switch on
: Press «POWER»
(«RUN» will light up, the air outlet flaps will
open and the fan and compressors will
start).
Switch off
: Press «POWER» again.
Good to know:
– If the dehumidifier has been turned off shortly beforehand, the
compressor will start with up to 3 minutes’ delay (= protective
circuit)
.
– «Water Full» àWater tank is full àempty tank àp. 16.
– «Defrost» àDefrost process started àp. 17.
6.
Displays/settings:
– «SPEED» àChanging of air volume - low «1»/high «2».
– «TIMER» àDevice switches on or off automatically after 1,
2, 4 or 8 hours .
– Automatic switch-on: First switch the device off and then
press the «TIMER» button until the required time is displayed.
If no LED lights up, the timer function is switched off.
– Automatic switch-off: Just as with the «Automatic switch-on»
function, turn on the device first and then press the «TIMER»
button until the required time is displayed. If no LED lights up,
the timer function is switched off.
– «HUMID»àSet humidity.
«Continue» àContinuous operation to ensure dehumidifi-
cation process is as fast as possible. «40, 50, 60 %» àRe-
quired humidity in % rel. (40 % = dryer, 60 %= damper)
7. «WATER FULL»
= Water tank full:
– WATER FULL» àWater tank full; compressor will switch off
àEmpty tank
– A pipe can also be attached (not included) àp. 17.
– Remove water tank àPull out the two opening flaps (13) on
the reverse of the tank. Hold the tank with the blue carry han-
dle and empty down the sink (the white lid does not need to be
removed when emptying the tank).
Good to now:
Do not use the water for other purposes (contains dirt parti-
cles from the air). Clean the inside of the tank on a monthly ba-
sis àHygiene.
– Reset water tank àFold down carrier handle àReposition
water tank until it snaps into place («WATER FULL» will disap-
pear and compressor will start, after a short delay).
Downloaded from www.vandenborre.be

16 17
FIRST USE / OPERATION
1. Place the device on a stable and water-proof surface. Do not place directly on a carpeted or
wooden floor. Important: to ensure that the compressor has not sustained any damage after
transportation of the device, wait at least an hour before operation. This allows the coolant/
lubricant to settle again and avoids damage to the compressor (no warranty).
2. Check whether there is any packing material in the water tank. Pull out both of the opening
flaps (13) on the water tank (snap into place). If there is no packaging material in the tank,
slide the tank back into place (it should snap into position).
3. Plug in the power plug (all LEDs will light up red briefly).
4. For optimal functioning, close the windows and doors.
5. Turn on the device using the «POWER» button . The red «RUN» control display will light up,
the air outlet flaps will open and the fan and compressors will start. Press the button again
to switch off the device.
Good to know:
– If the dehumidifier has been turned off shortly beforehand, the compressor will start with up
to 3 minutes’ delay (= protective function
).
– If «WATER FULL» is lit up, the water tank is full and needs to be emptied àsee page «17».
The compressor will remain switched off until the emptied tank is reinserted.
– The device must not be connected to a timer or switched socket/cable connector (dan-
ger of damage to compressor).
– «DEFROST» Defros process started àsee page «17».
6.
Other displays / available settings:
– «SPEED»: Changing of air volume - low «1»/high «2». After switching on, the device will
operate with a high output («2» will light up).
– «TIMER»: Device switches on or off automatically after 1, 2, 4 or 8 hours.
– «HUMID»: Set humidity. After switching on, the device will operate on continuous opera-
tion («CONTINUE»). This is useful with a very high humidity level or to dehumidify the room
as quickly as possible. If the room in question is in frequent use, the «50 %» relative hu-
midity setting is recommended. Once the required level of humidity has been reached, the
compressor will switch off until the humidity level increases again. The fan will continue to
operate so that the humidity can be measured.
7.
«WATER FULL» = Water tank is full:
– Bei When the water tank is full, the compressor will switch off and «WATER FULL» will
light up.
– Remove water tank: Pull out the two opening flaps (13) on the reverse of the tank. Hold
these and pull the tank out. Pull up the blue carry handle to carry the tank comfortably
then empty down the sink. The white lid on top does not need to be removed to empty the
tank.
– Reset water tank: Reposition water tank until it snaps into place. «WATER FULL» will dis-
appear and the compressor will start again.
– Good to know:
Do not use the water for other purposes because it also contains dirt particles from the air.
Wash the inside of the tank with warm water and a normal detergent at least once a
month for hygiene reasons. First, remove the white tank lid (22) (hold the front edge of
the lid, swivel up slightly and then pull away from yourself). Do not place the tank or lid in a
dishwasher or clean with an abrasive agent otherwise the parts may become damaged.
8. Water outlet pipe:
– When the device is situated in a room with a wastewater drainage system in the ground,
the water can be channelled here directly. The tank will then not be filled and will no longer
need to be emptied. A tube will be required for this (not included). This should have an in-
ternal/external diameter of 8/10 mm.
– Remove the rubber cover from the connector pipe (10) and then place the tube over the
pipe.
–Good to know:
The tube must be positioned such that it lies level. It should not be angled upwards be-
cause this will stop the water from draining away.
9. Automatische Automatic defrosting:
– The «DEFROST» display will light up when the temperature of the evaporator reaches ap-
prox. –1 °C and has formed a layer of ice. This may be the case after approx. 20 minutes
of continuous operation or at lower room temperatures. The compressor will then switch
off and the defrosting process begins. The fan will continue to operate and the water from
defrosting will be channelled directly into the water tank. If the ice on the evaporator is
melted within 5 minutes, the compressor will start again automatically and «DEFROST»
will light up. If not, the device will switch off after 20 minutes (= compressor protective
function).
10. Protective circuits:
– Your dehumidifier will be monitored constantly by a protective circuit. This will automatical-
ly switch off the compressor in the event of any malfunction. This prevents the compres-
sor from being directly switched on again and overloaded after being switched off. It will
only be switched back on after 1-3 minutes.
– The protective circuit also monitors the temperature of the device; if this falls below 0 °C
or rises above 40 °C, the device will switch off or will be unable to operate. The device can
only start to operate again when the temperature falls within the specified range and the
power plug is removed and re-inserted (= «Re-set»).
– After a power cut, the device will switch back on using the previous settings. Important:
For safety reasons, the device cannot be switched on or off with a timer, switched socket
etc. (compressor may become damaged)!
11. Hygrostat:
– The integrated hygrostat constantly measures the humidity and manages the dehumidifi-
cation process.
–Good to know:
The standard tolerances of an integrated hygrostat are +/- 5%. This means that the ef-
fective relative humidity will fluctuate accordingly.
Downloaded from www.vandenborre.be

18 19
TECHNICAL DATA
Dimensions 347 x 495 x 247 mm (width x height x depth)
Weight 10.2 kg
Voltage 220-240 V / 50/60 Hz
Output 255 W
Suitable for room size 40m² or 100m³
Dehumidification capacity max. 12 l / day
Automatic switch-on/off yes/yes
Tank capacity 2 l / 0.528 US gallons
Fulfils EU regulations CE/WEEE/RoHS
Subject to technical changes and errors without notice.
TROUBLE-SHOOTING
«Water Full» lit up
Water tank is full; empty tank àpage 17.
«Water Full» light on
Water tank is not properly in place à slide tank in fully (must snap into place and sit flush with the
sides).
Compressor protective circuit is still active. It can take 3 minutes for the compressor to switch
back on (and for the display to turn off).
Device off and none of the buttons working
The room temperature is too low (below 0 °C) or too high (over 40 °C) à page 17. If the device
does not react after warming or cooling of the room, remove the plug for a few seconds and then
re-insert (= «Reset»).
«DEFROST» lit up and compressor not working
Device needs to be defrosted àpage 17.
Water tank leaking
Water droplets can escape when the tank is inserted/removed. However if the tank actually is
leaking, it will need to be replaced. Never drop the tank or place it in a dishwasher because it may
become damaged.
CLEANING PROCEDURE
Switch off the device and unplug the power cable from the socket before all maintenance
work and after each use.
Never submerge the device in water (this can result in short-circuiting/ electric shock). To
clean the device, simply wipe it with a damp cloth and then dry it thoroughly. Always ensure
the power cable has been unplugged beforehand.
The cover (18) and air filter (17) on the reverse can be removed to enable easier cleaning:
Remove cover: pull down one of the side opening flaps (19) and remove the cover (18).
Remove air filter: unhook one of the two side mounting brackets (16) by pressing it in gently.
Then remove the filter by pulling backwards.
Remove fluff with a brush or vacuum with a brush attachment. Do not press on the filter (it may
tear). Clean any plastic components with a damp cloth.
Re-insert the components in reverse order: re-attach the filter to the case using the mounting
bracket. Gently press the flap on the other side in the middle so that it can be attached to
the case (should snap into place). Attach the cover to the device from the back until all four
fastening tabs have snapped into place (do not use force; cover may be upside down and
therefore may not fit). Never use the device without a filter or cover!
Empty the water tank daily.
Wash the inside of the tank with warm water and a normal detergent at least once a month for
hygiene reasons. First, remove the white tank lid (22) (hold the front edge of the lid, swivel up
slightly and then pull away from yourself).
Do not place the tank or lid in a dishwasher or clean with an abrasive agent otherwise the parts
may become damaged.
STORAGE
Unplug when not using the device for a long period of time (e.g. while on holiday). Empty the
water tank and leave to dry along with the device for 1-2 days (to enable condensation inside
to evaporate and ensure that the device is completely dry). Then store the device in a dry and
dust-free location.
Tip: Retain the packaging to store the device.
Downloaded from www.vandenborre.be

20 21
What this warranty does not cover:
Parts that normally require replacement.
•Damage, failure, loss or deterioration due to ordinary wear and tear, abuse, misuse, improper
use, negligence, accident, faulty installation, placement and operation, improper maintenance,
unauthorised repair and exposure to unreasonable temperatures or conditions. This includes
damage caused by misusing essential oils or water treatments and cleaning solutions.
•Damage resulting from inadequate packaging or carrier mishandling of returned products.
•Incorrect installation or loss of accessories such water tank etc.
•Shipping and transportation costs to and from any place of repair.
•Direct, indirect, special or consequential damages of any kind, including loss of profits or
other economic losses.
•Transportation damage of a unit shipped from one of our retailers. Please contact them
directly.
This warranty does not cover damages or defects caused by or resulting from failure to conform
strictly to Coplax’s specifications in connection with the installation, operation, use, maintenance
or repair of the Coplax device.
REPAIRS / DISPOSAL
• Repairs to all electric devices (including replacement of the power cable) may only be
performed by authorised experts. Carrying out inappropriate repairs voids the warranty and
no liability shall be accepted.
•If the power cable has become damaged, it must be replaced by the manufacturer, an official
service partner or a qualified person in order for further damage to be avoided.
•Never operate the device if the cable or the plug is damaged, if the device has malfunctioned
or if the device has been dropped or damaged in any other way (i.e. with cracks or breakages
to the casing).
•Do not use any sharp, abrasive objects or corrosive chemicals.
•Any old devices must be immediately rendered unusable (unplug power cable) and taken to
the appropriate waste collection point.
•This device must not be disposed of with household refuse. Please dispose of this device
at the appropriate waste collection centre. Collecting and recycling electrical and elec-
tronic waste saves valuable resources.
The packaging material is recyclable. Dispose of the packaging in an environmentally friendly
way and ensure that it is taken to a collection centre for recyclable materials.
•If electrical devices are disposed of in an unregulated way, the effects of weathering can cause
hazardous substances to contaminate the groundwater and the food-chain or can result in a
burden on flora and fauna for years to come.
TWO YEAR WARRANTY
During the warranty period of 2 years after the purchase of the appliance, we will repair or
replace (at our discretion) any device or part of a device shown to be defective in terms of
materials or workmanship without you incurring any cost for the replacement parts or work
undertaken.
WITH THE EXCEPTION OF THE WARRANTY PROVIDED ABOVE, Coplax DOES NOT OFFER ANY
IMPLICIT GUARANTEE, WARRANTY OF MERCHANTABILITY OR FITNESS FOR A PARTICULAR
PURPOSE WITH RESPECT TO THE PRODUCT FOR ANY PERIOD AFTER EXPIRY OF THE
WARRANTY. Coplax will, at its sole discretion, repair or exchange a product under warranty. NO
credit will be issued. The remedies described above are your sole remedies in the event of any
breach of the warranty provided above.
Who is covered by the warranty?
Any original owner of a privately-owned Coplax appliance, who can provide a dated proof of
purchase in the form of an invoice or receipt, is covered. The warranty is not transferable. The
original dated proof of purchase (a copy needs to be faxed, e-mailed, mailed) prior to returning
the unit. Please provide the model number of your appliance and a detailed description (preferably
typed) of the problem with the item. Enclose your description in an envelope and tape it directly
to the appliance before the box is sealed. Do not write anything on or alter the original box in any
way.
Downloaded from www.vandenborre.be

22 23
Français
Félicitations! Vous venez d’acquérir le déshumidificateur d’air Stylies PAVO, un modèle exceptionnel doté des
toutes dernières innovations technologiques. Il vous offrira un confort d’utilisation inégalable et améliorera
la qualité de l’air chez vous. Comme avec tous les appareils électroménagers, il convient de prendre des pré-
cautions particulières en utilisant ce déshumidificateur, afin d’éviter tout risque de blessure, d’incendie ou
de dommages sur l'appareil. Avant d’utiliser le déshumidificateur pour la première fois, lisez attentivement
ce mode d’emploi et tenez compte des consignes de sécurité et des instructions présentes sur l’appareil.
CONSIGNES DE SÉCURITÉ IMPORTANTES
Merci de lire attentivement l’intégralité du mode d’emploi avant de mettre en service le déshumidificateur
d’air Stylies PAVO pour la première fois et de le conserver en bon état pour toute référence ultérieure.
Veuillez le transmettre au propriétaire suivant, le cas échéant.
La société Coplax AG décline toute responsabilité pour tout dommage causé par le non-respect de ce mode
d’emploi.
Les enfants de plus de 8 ans peuvent utiliser cet appareil, mais uniquement
sous surveillance, ou s’ils ont appris à s’en servir et ont parfaitement
conscience des risques et dangers inhérents à son utilisation. Le nettoyage
et l’entretien de l’appareil ne doivent pas être effectués par des enfants,
à moins qu’ils n’aient plus de 8 ans et soient de toute façon surveillés par
un adulte. L’appareil et le cordon d’alimentation doivent toujours être hors
de portée des enfants de moins de 8 ans.
Les enfants de moins de 3 ans doivent être tenus à l‘écart, sauf s‘ils sont
surveillés de façon continue.
Les enfants entre 3 et 8 ans ne sont autorisés à allumer/éteindre
l‘appareil que sous surveillance, à condition qu'ils aient appris à utiliser
cet appareil en toute sécurité, et qu'ils soient conscients des risques
liés à son utilisation. En outre, l'appareil doit être placé ou installé sur
son emplacement d‘utilisation ordinaire. Les enfants entre 3 et 8 ans ne
sont pas autorisés à brancher l‘appareil, faire des réglages ni effectuer le
nettoyage et l‘entretien de l‘appareil.
Pour éviter tout danger, faire remplacer le cordon d‘alimentation
endommagé par le fabricant, un agent agréé ou une personne qualifiée.
L'appareil est conçu pour un usage intérieur uniquement.
Ne pas conserver l'appareil en extérieur.
Placer le déshumidificateur d’air sur une surface plane, solide et résistante à l’eau. Veiller à une bonne stabilité
afin que l'appareil ne puisse ni se renverser, ni tomber. Débrancher immédiatement le déshumdificateur si
celui-ci venait à tomber. L’eau qu'il contient peut endommager les meubles et les revêtements de sol.
Dérouler entièrement le cordon d’alimentation. Si le cordon n’est pas déroulé entièrement, cela peut entraîner
une surchauffe, qui peut elle-même déclencher un incendie.
Ne pas utiliser de rallonge, de bandeau de prises, de prise commandée ni de régulateur de vitesse en continu:
cela peut déclencher une surchauffe, un incendie, une décharge électrique ou un arrêt du compresseur.
Brancher le déshumidificateur d’air uniquement à une prise de courant monophasée, avec broche de terre,
et veiller à ce que la tension du réseau corresponde bien à celle qui est indiquée sur la plaque signalétique
de l'appareil.
Toujours éteindre le déshumidificateur à l'aide de son interrupteur. Le débrancher en cas de non utilisation,
et quand il se trouve déplacé, manipulé ou nettoyé. Ne jamais tirer sur le cordon pour débrancher l'appareil,
et ne jamais le débrancher durant son fonctionnement: toujours l'éteindre préalablement à l'aide de son
interrupteur.
Le déshumidificateur fonctionne de façon optimale à une température ambiante comprise entre 13°C et
35°C. Une déshumidification optimale ne sera atteinte qu’à des températures élevées (à partir de 22°C), et
avec un degré d’humidité de l’air élevé (à partir de 70%). (La température de fonctionnement le plus basse
est de 5°C, et l’humidité relative minimale de 30%; la température de fonctionnement la plus élevée est de
40°C, et l’humidité relative maximale de 90%.)
Ne pas utiliser le déshumidificateur à proximité de substances ou de gaz facilement inflammables, à proximité
d’une flamme ouverte, ou dans un endroit où de l’huile ou de l’eau peuvent jaillir. Ne pas pulvériser d’insecticide
ou tout autre substance similaire sur l'appareil. Veiller à ce que le déshumidificateur d’air ne soit pas exposé
directement aux rayons du soleil; ne pas l'utiliser dans une serre ou à proximité d’une salle de bain, d’une
douche ou d’une piscine. Ne jamais poser d’objets lourds ou chauds sur l'appareil.
Durant le processus de déshumidification, les volets d’entrée et de sortie d’air doivent toujours être libres.
Veiller à ce qu’aucun objet ne puisse pénétrer dans ces ouvertures, car il pourrait en résulter une surchauffe,
un incendie ou une décharge électrique. Le déshumidificateur d’air ne doit pas être placé derrière un rideau
ni tout autre objet ou obstacle susceptible de gêner la circulation de l’air. Toujours respecter une distance
de sécurité d’au moins 50 cm entre l'appareil et tout autre objet. Et toujours respecter une distance de
sécurité d’au moins 60 cm par rapport aux blocs sanitaires tels que douche, lavabo, évier, baignoire, etc.
Enfin, respecter une distance de 120 cm par rapport aux sorties d’eau fixes.
En cas d'utilisation pour sécher des vêtements, maintenir ces derniers à une distance d’au moins 50 cm de
l’appareil, et éviter que l’eau ne goutte dessus.
Ne pas retirer le réservoir d’eau du déshumidificateur durant son fonctionnement. L’eau peut endommager
les meubles et les revêtements de sol, ou bien provoquer une électrocution.
Après extinction du déshumidificateur, attendre 3 à 5 minutes avant de le remettre en marche.
Ne jamais plonger le déshumidificateur d’air dans l’eau ni tout autre liquide. Ne pas verser d’eau ou autre
liquide ni sur l’appareil, ni dans les volets d’entrée et de sortie d’air.
Nettoyer régulièrement le déshumidificateur d’air en suivant les consignes de nettoyage.
Toujours transporter le déshumidificateur en position verticale. Avant la première mise en route, laisser le
déshumidificateur debout pendant 24 heures. Après chaque transport, placer immédiatement le s d’air en
position verticale et attendre au moins 60 minutes avant de le mettre en marche. Avant chaque transport,
vider le réservoir d’eau.
Utiliser le déshumidificateur conformément aux instructions du présent mode d’emploi. Le non respect de
ces instructions peut provoquer des blessures, un incendie ou une électrocution. En outre, l’appareil peut
s'en trouver endommagé.
Le déshumidificateur d’air est conçu exclusivement pour un usage privé dans des espaces intérieurs, et non
pour un usage commercial.
Ne pas mettre en marche le déshumidificateur d’air s’il est endommagé ou susceptible de l’être, ou s’il ne
fonctionne pas correctement. Dans l'un de ces cas, le débrancher impérativement.
L’appareil doit être installé conformément aux règles nationales en matière de raccordement.
Downloaded from www.vandenborre.be

Languettes d'ouverture
24 25
DESCRIPTION DE L’APPAREIL
Principaux composants de l’appareil:
MISE EN ROUTE / BREF MODE D’EMPLOI
Ce bref mode d’emploi aidera l'utilisateur expérimenté à mettre en route l’appareil en quelques
opérations. La mise en route détaillée est décrite au chapitre suivant.
1.
Panneau de commandes
2.
Sortie d'air (ne pas obstruer)
3.
Déshumidificateur
4.
– touche «POWER» marche/arrêt et
voyants lumineux:
– «WATER FULL»: réservoir plein
– «RUN» appareil en fonctionnement
– «DEFROST»: fonction dégivrage pour
évaporateur
5.
– «SPEED»: quantité d'air (1-2)
6.
– «TIMER»: arrêt automatique (1, 2, 4 ou
8 h)
7.
– «HUMID» humidité de l'air (40, 50,
60 % relative et permanente)
8.
Poignée
9.
Entrée d'air (ne pas obstruer)
10.
Raccord tuyau d'évacuation
11.
Poignée du réservoir d'eau
12.
Indicateur de niveau d'eau
13.
Languette d'ouverture du réservoir
14.
Poignée du réservoir (ouverte)
15.
Couvercle du réservoir
16.
Languette de fixation du filtre
17.
Filtre entrée d'air
18.
Cache du filtre entrée d'air
19.
Languettes d'ouverture
20.
Tuyan d'évacuation ø 8/10 mm (diamètre
intérieur/extérieur; non fourni)
21.
Raccord pour tuyau d'évacuation
22.
Couvercle du réservoir d'eau (ôté)
23.
Poignée du réservoir d'eau
24.
Flotteur pour niveau d'eau
25.
Réservoir d'eau transparent
2.
1. Placer l'appareil sur une surface bien stable et résistante à
l'eau. Ne pas le placer directement sur un tapis ou sur un sol
en bois.
Important: pour que le compresseur ne se trouve
pas endommagé après le transport, attendre au
moins une heure avant de mettre l'appareil en route (ga-
rantie caduque!). Toujours transporter l'appareil en position
verticale.
2. Tirer les languettes d'ouverture (13) vers l'extérieur et ôter le
réservoir d'eau. Contrôler qu'il n'y ait pas de résidu d'emballage
à l'intérieur, puis replacer le réservoir et le pousser jusqu'à ce
qu'il s'encastre dans son logement.
3. Brancher la fiche de l'appareil à une prise électrique (tous
les voyants s'allument brièvement, de couleur rouge). Ne pas
brancher l'appareil à une minuterie ou à une prise comman-
dée.
1 heure
Languettes d'ouverture
5.
6.
6.
6.
6.
5.
2.
4. Pour un fonctionnement optimal, fermer
portes et fenêtres.
5. Allumage: appuyer sur la touche
«POWER» («RUN» s'allume, les volets de
sortie d'air s'ouvrent, la ventilation et le
compresseur se mettent en route).
Extinction: appuyer de nouveau sur la
touche
«POWER».
Bon à savoir:
– si le déshumidificateur a été éteint récemment, le compresseur
démarre avec un retard pouvant aller jusqu'à 3 minutes) (=cir-
cuit de protection
).
– «WATER FULL» àle réservoir est plein àle vider àp. 26.
– «DEFROST» àdégivrage lancé àp. 27.
6.
Voyants lumineux/Réglages:
– «SPEED» àcommutation débit d'air faible «1»/élevé «2».
– «TIMER» àl'appareil s'allume/s'éteint automatiquement
au bout de 1, 2, 4 ou 8 heures.
– Allumage automatique: d'abord éteindre l'appareil, puis ap-
puyer de façon répétée sur la touche «TIMER» jusqu'à ce que
l'horaire désiré apparaisse. Si aucun voyant n'est allumé, la
fonction de minuterie n'est pas activée.
– Extinction automatique: comme pour «Allumage automa-
tique», sauf qu'il faut d'abord allumer l'appareil, puis appuyer
de façon répétée sur la touche «TIMER» jusqu'à ce que l'ho-
raire désiré apparaisse. Si aucun voyant n'est allumé, la fonc-
tion de minuterie n'est pas activée.
– «HUMID»àréglage du degré d'humidité.
«Continue» àfonctionnement permanent pour une déshumi-
dification rapide. «40, 50, 60 %» àdegré d'humidité relative
en % (40 % = plus sec, 60 %= plus humide)
7. «WATER FULL»
= réservoir d'eau plein:
– WATER FULL» àle réservoir est plein; le compresseur
s'éteint àvider le réservoir.
– Possibilité de brancher un tuyau (non fourni) àpage 27.
– Oter le réservoir d'eau àtirer vers l'extérieur les deux lan-
guettes (13) situées à l'arrière de l'appareil. Saisir le réservoir
par sa poignée bleue et vider l'eau dans l'évier (il n'est pas né-
cessaire d'enlever le couvercle blanc).
Bon à savoir:
Ne pas utiliser l'eau du réservoir (elle contient des particules
de saleté provenant de l'air ambiant). Nettoyer l'intérieur du
réservoir d'eau une fois par mois àhygiène.
– Replacer le réservoir d'eau àrabattre la poignée vers le
bas àinsérer le réservoir dans son logement et le pousser
jusqu'à ce qu'il s'encastre («WATER FULL» s'éteint et le com-
presseur démarre de façon retardée).
Downloaded from www.vandenborre.be

26 27
EN ROUTE/UTILISATION
1. Placer l'appareil sur une surface bien stable et résistante à l'eau. Ne pas le placer directe-
ment sur un tapis ou un sol en bois. Ne pas l'exposer directement aux rayons du soleil.
Important: après avoir transporté l'appareil, attendre au moins une heure avant de le
mettre en route. Le liquide de refroidissement et de lubrification pourra ainsi reprendre sa
place et n'endommagera pas le compresseur (garantie caduque!).
2. Vérifier qu'il n'y a aucun résidu d'emballage à l'intérieur du réservoir d'eau. Pour cela, saisir
les languettes d'ouverture (13) et les tirer vers l'extérieur, puis ôter le réservoir d'eau (il est
encastré). S'il ne contient aucun résidu d'emballage, le réservoir peut être remis en place (il
doit s'encastrer dans son logement).
3. Brancher l'appareil à une prise de courant (tous les voyants deviennent brièvement rouges).
4. Pour un fonctionnement optimal, fermer portes et fenêtres.
5. Allumer l'appareil à l'aide de la touche
«POWER» . Le voyant rouge de contrôle «RUN» s'al-
lume, les volets de sortie d'air s'ouvrent, la ventilation et le compresseur se mettent en route.
Appuyer de nouveau sur la touche pour éteindre l'appareil.
Bon à savoir:
– Si le déshumidificateur a été éteint récemment, le compresseur démarrera avec un retard
pouvant aller jusqu'à 3 minutes
(= circuit de protection du compresseur).
– Si le voyant «WATER FULL» s'allume, cela signifie que le réservoir est plein et qu'il doit être
vidé àvoir page 27. Le compresseur reste éteint tant que le réservoir n'est pas en place.
– L'appareil ne doit pas être branché sur un dispositif de minuterie ou une prise commandée
(cela risque d'endommager le compresseur)
– «DEFROST» dégivrage lancé àvoir page 27.
6.
Autres voyants de contrôle / réglages possibles:
– «SPEED»: commutation débit d'air faible «1»/élevé «2». Après allumage, l'appareil fonc-
tionne à la puissance maximale («2» s'allume).
– «TIMER»: l'appareil s'allume/s'éteint automatiquement au bout de 1, 2, 4 ou 8 heures.
– «HUMID»: réglage du degré d'humidité de l'air. Après allumage, l'appareil passe à un
fonctionnement permanent («CONTINUE»). Cette modalité est justifiée en cas d'humidi-
té de l'air très élevée, ou bien pour déshumidifier rapidement une pièce. Si des personnes
sont souvent présentes dans la pièce à déshumidifier, il est conseillé de régler l'appareil
sur une humidité relative de «50 %». Le compresseur s'éteint une fois l'humidité relative
atteinte, et il reste éteint tant que l'humidité de l'air n'augmente pas. Le ventilateur conti-
nue de fonctionner, afin que l'appareil puisse mesurer le degré d'humidité.
7. «WATER FULL»
= réservoir d'eau plein:
– Lorsque le réservoir d'eau est plein, le compresseur s'éteint et le voyant «WATER FULL»
s'allume.
– Retirer le réservoir: tirer vers l'extérieur les deux languettes (13) situées à l'arrière. Sai-
sir les languette et extraire le réservoir. Relever la poignée vers le haut pour transporter
facilement le réservoir. Vider l'eau dans l'évier. Pour vider le réservoir, il n'est pas néces-
saire d'ôter le couvercle blanc.
– Replacer le réservoir: rabattre la poignée vers le bas et insérer le réservoir dans son lo-
gement, jusqu'à ce qu'il s'encastre. Le voyant «WATER FULL» s'éteint et le compresseur
redémarre.
Bon à savoir:
– Ne pas utiliser l'eau contenue dans le réservoir, car elle contient des particules de saleté
provenant de l'air ambiant.
– Pour des raisons d'hygiène, laver l'intérieur du réservoir au moins une fois par mois avec
de l'eau chaude et un détergent ordinaire. Pour cela, ôter le couvercle blanc du réservoir
(22) (=saisir le couvercle par le bord avant, le soulever légèrement, puis le tirer vers soi
jusqu'à ce qu'il s'enlève). Afin de ne pas les abimer, ne pas laver le réservoir et son cou-
vercle en lave-vaisselle, et ne pas utiliser non plus de produit abrasif.
8. Tuyau d'évacuation:
– Si l'appareil se trouve dans une pièce avec évacuation des eaux dans le sol, l'évacuation
de l'eau par le déshumidificateur peut se faire directement. Dans ce cas, le réservoir ne
se remplit plus, et ne doit donc plus être vidé. Pour cela, il vous faut un tuyau flexible (non
fourni) d'un diamètre intérieur/extérieur de 8/10 mm.
– Ouvrir l'embouchure (10) en ôtant le capuchon de caoutchouc et enfiler le tuyau dans l'em-
bout prévu.
–Bon à savoir:
Le tuyau doit être placé de telle sorte qu'il ait une inclinaison régulière. Il ne doit pas être
orienté vers le haut, sinon l'eau ne pourrait pas s'écouler.
9. Dégivrage automatique:
– Le voyant «DEFROST» s'allume quand la température de l'évaporateur est d'environ –1°C
et qu'une couche de glace se forme. Cela arrive par exemple après un fonctionnement
continu de 20 minutes, ou bien quand la température de la pièce est très basse. Dans ce
cas, le compresseur s'éteint et le processus de dégivrage se met en route. Le ventilateur
continue de fonctionner et l'eau résiduelle du dégivrage s'écoule directement dans le ré-
servoir d'eau. Si la couche de glace recouvrant l'évaporateur fond en 5 minutes, le com-
presseur redémarre automatiquement et le voyant «DEFROST» s'éteint. Si ce n'est pas le
cas, l'appareil s'éteint au bout de 20 minutes (= circuit de protection du compresseur).
10. Circuit de protection:
– Le déshumidificateur d'air est contrôlé en permanence par un circuit de protection. Ce cir-
cuit de protection éteint automatiquement le compresseur en cas de dysfonctionnement,
et il empêche le redémarrage immédiat du compresseur, afin d'éviter toute surcharge.
C'est pourquoi le compresseur ne redémarre qu'au bout de 1 à 3 minutes.
– Le circuit de protection contrôle également la température de l'appareil; si la tempéra-
ture descend en dessous de 0 °C ou dépasse 40 °C, l'appareil s'éteint et ne peut plus être
remis en route. L'appareil ne peut être mis en route qu'à une température comprise dans
l'intervalle susmentionné, et uniquement s'il a été débranché, puis rebranché (= «Reset»).
– Après une coupure de courant, l'appareil redémarre avec les réglages précédemment
établis. Important: pour des raisons de sécurité, ne pas allumer/éteindre le déshumidifi-
cateur à l'aide d'une prise avec minuterie, ni d'une prise commandée, etc. (cela risque d'en-
dommager le compresseur)!
11. Hygrostat:
– L'hygrostat intégré régule en permanence le taux d'humidité et contrôle le processus de
déshumidification.
–Bon à savoir:
La marge de tolérance standard d'un hygrostat intégré est de +/- 5%. Cela signifie que
l'humidité relative de l'air effective peut varier dans cette fourchette.
Downloaded from www.vandenborre.be

28 29
NETTOYAGE
Avant toute maintenance et après chaque utilisation, arrêter l’appareil et débrancher le câble
d’alimentation.
Ne jamais plonger l’appareil dans l’eau (risque de court-circuit/décharge électrique). Pour
le nettoyage, utiliser uniquement un chiffon humide, puis sécher minutieusement. Avant tout
nettoyage, débrancher impérativement l'appareil.
Le cache (18) et le filtre d'entrée d'air (17) situés à l'arrière de l'appareil peuvent être enlevés
pour faciliter l'opération de nettoyage:
Ôter le cache de l'entrée d'air: pour ce faire, pousser vers l'extérieur une des deux
languettes (19) et retirer le cache (18).
Ôter le filtre: décrocher l'une des deux languettes de fixation du filtre (16) en la poussant
légèrement vers l'intérieur. Retirer ensuitre le filtre en tirant vers l'arrière.
Ôter les peluches à l'aide d'un pinceau ou d'un aspirateur muni d'une brosse pour peluches.
Ne pas appuyer sur le filtre (il peut se déchirer). Nettoyer les parties en plastique à l'aide d'un
chiffon humide.
Replacer les différents éléments en procédant dans l'ordre inverse: accrocher le filtre au corps
de l'appareil avec la languette de fixation. Pousser l'autre languette vers le centre en appuyant
légèrement dessus, de façon à pouvoir aussi l'accrocher au corps de l'appareil (elle s'encastre).
Placer le cache à l'arrière de l'appareil et appuyer dessus jusqu'à ce que les quatre pattes
de fixation s'encastrent dans le boîtier (ne pas trop forcer; il est possible que le cache soit
positionné à l'envers, auquel cas il ne pourra pas être inséré correctement). Ne jamais utiliser
l'appareil sans le filtre ou le cache d'entrée d'air!
Vider quotidiennement le réservoir d'eau.
Pour des raisons d'hygiène, laver l'intérieur du réservoir au moins une fois par mois, à l'eau
chaude additionnée d'un peu de détergent ordinaire. Pour ce faire, ôter le couvercle blanc du
réservoir (22) (=saisir le couvercle par le bord avant, le soulever légèrement, puis le tirer
vers soi jusqu'à ce qu'il s'enlève).
Le réservoir, le couvercle, le cache et le filtre ne doivent pas être lavés au lave-vaisselle, ni avec
des produits abrasifs: cela pourrait les endommager.
RANGEMENT
En cas de non utilisation prolongée (par ex. durant les vacances), débrancher l'appareil de la
prise de courant. Vider le réservoir d'eau, et laisser sécher le réservoir et l'appareil pendant
1 à 2 jours (afin que l'eau de condensation qui se trouve à l'intérieur puisse s'évaporer, et
que l'appareil soit parfaitement sec). Enfin, ranger l'appareil dans un endroit sec, à l'abri de la
poussière.
Conseil: ranger l'appareil dans son emballage d'origine.
DONNÉES TECHNIQUES
Dimensions
347 x 495 x 247 mm (largeur x hauteur x profondeur)
Poids 10.2 kg
Tension du réseau 220-240 V / 50/60 Hz
Convient pour des pièces de 40m² ou 100m³
Plage de température 0 °C – 40 °C
Déshumidification max. 12 l / jour
Arrêt/extinction automatique oui / oui
Capacité du réservoir 2 l / 0.528 gallons US
Niveau sonore 35 dBA
Conformité aux normes européennes CE/WEEE/RoHS
Sous réserve de modifications techniques et d'erreurs.
DÉFAILLANCES
«Water Full» est allumé
Le réservoir d'eau est plein; vider le réservoir àpage 27.
«Water Full» ne s'éteint pas
Le réservoir d'eau n'est pas inséré correctement àbien remettre en place le réservoir (il doit
s'encastrer dans son logement, au ras du corps de l'appareil).
Le circuit de protection du compresseur est encore activé. Le compresseur peut mettre jusqu'à
3 minutes avant de redémarrer (et le voyant s'éteint à ce moment-là).
L'appareil est éteint et aucune touche ne réagit
La température de la pièce est trop basse (en dessous de 0 °C) ou trop élevée (plus de 40 °C) à
page 27. Si l'appareil ne réagit plus après avoir eu trop chaud ou trop froid, il faut le débrancher
pour le réinitialiser (= «Reset»).
«DEFROST» est allumé et le compresseur ne fonctionne pas
L'appareil doit être dégivré àpage 27.
Le réservoir perd de l'eau
Il peut arriver que le réservoir goutte quand on le retire/remet en place. Si le réservoir continue à
perdre de l'eau, il doit être remplacé. Ne jamais mettre le réservoir au lave-vaisselle, et ne pas le
faire tomber: cela l'endommagerait.
Downloaded from www.vandenborre.be

30 31
RÉPARATIONS/ÉLIMINATION
Les réparations des appareils électriques (remplacement du câble d’alimentation) doivent
uniquement être effectuées par du personnel qualifié et formé. En cas de réparation non
conforme, la garantie s'annule et toute responsabilité sera déclinée.
Si le câble d’alimentation est endommagé, il doit être remplacé par le fabricant, son
prestataire de service officiel ou bien une personne qualifiée, afin d’éviter tout dommage.
Ne jamais mettre l’appareil en route: si un câble ou une fiche est endommagé; après un
dysfonctionnement de l’appareil; si l'appareil est tombé ou a été endommagé de toute autre
manière (fissure/rupture du boîtier ou du réservoir).
Ne pas utiliser d'objet tranchant ou abrasif, ni de produit chimique corrosif.
Mettre immédiatement hors d’usage tout appareil usagé (sectionner le câble d’alimentation
et le déposer au point de collecte prévu à cet effet).
Cet appareil ne doit pas être éliminé avec les ordures ménagères! Merci de déposer cet
appareil dans un point de collecte prévu à cet effet! La collecte et le recyclage des
déchets électriques et électroniques préservent des ressources précieuses!
Le matériel d’emballage est recyclable. Éliminer l’emballage dans le respect de
l’environnement et le jeter dans un centre de tri sélectif.
Si l’élimination des appareils électriques n’est pas contrôlée, des substances dangereuses
peuvent pénétrer dans la nappe phréatique, et par conséquent dans la chaîne alimentaire,
polluant ainsi la faune et la flore pendant de nombreuses années.
GARANTIE DE DEUXANS
Durant la période de garantie de 2 ans suivant l'achat de cet appareil, nous réparons ou
remplaçons gratuitement toute machine ou pièce présentant un défaut matériel ou de fabrication
par un produit remis à neuf (à notre discrétion), sans vous imposer de frais pour les pièces ou
la main-d’œuvre. HORMIS LA GARANTIE SUSMENTIONNÉE, Coplax EXCLUT TOUTE GARANTIE
IMPLICITE OU CONDITION IMPLICITE DE QUALITÉ MARCHANDE OU D'ADAPTATION DU
PRÉSENT MATÉRIEL À UN USAGE PARTICULIER, POUR LA PÉRIODE SUIVANT LA DATE
D’EXPIRATION.Coplax réparera ou échangera, à son entière discrétion, tout produit couvert par
sa garantie.AUCUN crédit ne sera accordé.Les droits spécifiques décrits ci-dessus sont votre
seuls recours en cas de manquement à la garantie précédemment stipulée.
Qui est couvert par la garantie:
Est couvert par la garantie tout propriétaire initial d’un appareil Coplax acheté à titre privé, et
pouvant fournir une preuve d’achat datée sous forme de facture ou de reçu. La garantie n’est
pas transmissible.Avant de renvoyer l'appareil, envoyez d'abord une copie de la preuve
d’achat originale datée, par fax, e-mail ou courrier. Indiquez le numéro du modèle de l’appareil
et fournissez une description détaillée (de préférence dactylographiée) du problème présenté
par l'article.Mettez cette description dans une enveloppe, que vous scotcherez directement sur
l’appareil avant de fermer la boîte. N'écrivez rien sur la boîte d’origine, et ne la modifiez pas de
quelque manière que ce soit.
Qu‘est-ce qui n‘est pas couvert par la garantie:
Les pièces ayant vocation à être remplacées.
•Les dommages, défauts, pertes et détériorations dus à l'usure normale, à un usage impropre
ou incorrect, une négligence, un accident, une mauvaise installation, un placement ou un
fonctionnement erronés, une maintenance inappropriée, une réparation non autorisée ou une
exposition de l'appareil à des températures ou conditions excessives.Cela concerne également
tout dommage dû à une utilisation incorrecte des huiles essentielles ou des produits de
traitement de l’eau et de nettoyage.
•Les dommages causés par un emballage inapproprié ou une manipulation incorrecte par le
transporteur lors du retour de l'article.
•Le mauvais positionnement ou la perte d’accessoires tels que le réservoir d'eau, etc.
•Les frais d’expédition et de transport à destination et au départ de tout lieu de réparation.
• Les dommages particuliers ou consécutifs de tout type, directs ou indirects, y compris la
perte de profit ou toute autre perte économique.
•Les dommages causés par le transport d’un article expédié par l’un de nos revendeurs.
Mercide le contacter directement.
Cette garantie ne couvre pas les dommages ou dysfonctionnements dus au non respect, total ou
partiel, des spécifications de Coplax AG concernant l’installation, le fonctionnement, l’utilisation, la
maintenance ou la réparation de l’appareil Coplax AG.
Downloaded from www.vandenborre.be

32 33
Congratulazioni! Avete appena acquistato il deumidificatore d’aria Stylies «PAVO», un modello
eccezionale dotato di tutte le ultime innvoazioni tecnologiche. Questo deumidificatore vi offrirà un
comfort d’utilizzo incomparabile e migliorerà l'umidità dell’aria nei vostri locali.
Come con tutte le apparecchiature elettriche domestiche, è necessario prestare particolare at-
tenzione nell’utilizzo di questo deumidificatore al fine di evitare infortuni, incendio o danni all’appa-
recchio stesso. Leggete con attenzione le presenti istruzioni per l’uso prima di utilizzare l’apprec-
chio per la prima volta e seguite attentamente le istruzioni qui riportate.
AVVERTENZE DI SICUREZZA
Leggere attentamente le presenti istruzioni prima di utilizzare per la prima volta il deumidificatore
d’aria Stylies PAVO e custodirle per utilizzi futuri e consegnarle ad un eventuale futuro utente.
La Coplax AG respinge ogni responsabilità per danni causati dal mancato rispetto delle presenti
istruzioni d’uso.
Questo apparecchio può essere utilizzato da bambini di età
superiore agli 8 anni, solo se sorvegliati o se sono stati istruiti
in merito all’uso sicuro dell’apparecchio e hanno capito i rischi
che ne possono derivare. Ai bambini non deve essere consentito
effettuare operazioni di pulizia o di manutenzione sull’apparecchio
a meno che non siano sorvegliati da un adulto e abbiano comunque
più di 8 anni di età. L’apparecchio e il cavo di alimentazione devono
sempre essere tenuti lontano dalla portata di bambini di età
inferiore agli 8 anni.
Bambini di età inferiore a 3 anni devono essere tenuti lontani
dall'apparecchio, a meno che non siano sempre controllati.
Bambinidietàtrai3egli8annipossonofarfunzionarel‘apparecchio
solo se sorvegliati o se sono stati istruiti in merito all'uso sicuro
dell'apparecchio e hanno capito i rischi che ne possono derivare,
ammesso che l'apparecchio sia stato posto o installato nella
posizione di funzionamento prevista. I bambini di età tra i 3 e gli
8 anni non possono collegare l'apparecchio alla rete elettrica,
regolare e pulire l‘apparecchio o effettuare la manutenzione.
Se il cavo è danneggiato, farlo sostituire da un produttore, dal suo
agente di assistenza tecnica o da persone con simili qualifiche per
evitare pericoli.
L'apparecchio è adatto solo per l'uso all'interno di locali.
Non conservare questo apparecchio all’esterno.
Sistemare il deumidificatore su una superficie piana, stabile e impermeabile all’acqua. Assicurarsi
che il deumidificatore sia ben posizionato, in modo tale che non possa cadere. Se il deumidificatore
Italiano
dovesse rovesciarsi , staccare immediatamente la spina dalla presa di corrente. L’acqua può
danneggiare i mobili e i rivestimenti dei pavimenti.
Srotolare completamente il cavo di alimentazione. Un cavo non completamente srotolato si può
surriscaldare e provocare incendi.
Non usare prolunghe, strisce di prese a innesto, presa comandata o regolatori continui di velocità.
Ciò potrebbe causare surriscaldamento, incendi o scosse o arresto del compressore.
Collegare il deumidificatore esclusivamente a una presa di corrente monofase, con messa a terra,
accertandosi che la tensione di alimentazione coincida con quella riportata sulla targhetta.
Spegnere sempre il deumidificatore con il tasto di alimentazione e togliere sempre la spina dalla
presa di corrente nei periodi in cui non viene utilizzato o tutte le volte che viene spostato, preso in
mano o pulito. Si raccomanda di eseguire quest’operazione senza tirare il cavo di alimentazione.
Non estrarre la spina dalla presa quando il deumidificatore è in funzione, ma spegnere sempre
prima il deumidificatore con il tasto di avvio del funzionamento.
Il deumidificatore lavora in modo ottimale a una temperatura ambiente compresa tra i 13°C e i
35°C. Una potenza di deumidificazione ottimale si raggiunge soltanto con temperature più elevate
(da 22°C) e con un’umidità elevata (da 70%). (La temperatura di esercizio più bassa è 5°Ce l’umidità
relativa è 30%, la temperatura di esercizio più alta è 40°C e l’umidità relativa più alta è 90%.)
Non utilizzare il deumidificatore in prossimità di gas o sostanze facilmente infiammabili, vicino a
fiamme libere o in un luogo in cui possa essere colpito da spruzzi d’olio o acqua. Non spruzzare
insetticidi o sostanze simili sul deumidificatore. Assicurarsi che non sia esposto ai raggi diretti
del sole. Non utilizzare il deumidificatore in serre o nelle vicinanze di una vasca da bagno, doccia o
piscina. Non appoggiare oggetti caldi o pesanti sul deumidificatore.
Le bocchette d'ingresso e di uscita dell’aria devono essere sempre aperte durante la
deumidificazione. Assicurarsi che non vi sia alcun oggetto all’interno delle bocchette d'ingresso
o di uscita dell’aria. Ciò potrebbe causare surriscaldamento, incendio o scossa. Il deumidificatore
non deve essere posizionato dietro tende o altri oggetti od ostacoli che potrebbero pregiudicare
la circolazione dell’aria. Mantenere una distanza di sicurezza di almeno 50 cm da altri oggetti.
Mantenere inoltre una distanza di sicurezza di almeno 60 cm da zone umide quali docce, lavandini,
lavelli, vasche da bagno ecc. È indispensabile mantenere una distanza di 120 cm dai punti di
fuoriuscita dell’acqua.
Quando utilizzato per asciugare gli abiti, tenere l’abbigliamento ad almeno 50 cm dall’unità e non
consentire all’acqua di penetrare nell’unità.
Non rimuovere il serbatoio dell’acqua quando il deumidificatore è in funzione. L’acqua può
danneggiare i mobili e i rivestimenti dei pavimenti.
Dopo lo spegnimento, attendere 3 - 5 minuti prima di rimettere in funzione il deumidificatore.
Non immergere il deumidificatore in acqua o in altri liquidi. Non versare tali sostanze sull’apparecchio
o nelle bocchette d'ingresso e di uscita dell’aria.
Pulire regolarmente il deumidificatore seguendo le relative istruzioni per la pulizia.
Trasportare il deumidificatore sempre in pos izione verticale. Prima della messa in funzione iniziale
lasciare il deumidificatore in posizione verticale per 24 ore. Una volta a destinazione, sistemare
subito il deumidificatore in posizione verticale e attendere almeno 60 minuti prima di metterlo in
funzione. Prima di ogni trasporto svuotare il serbatoio dell’acqua.
Il deumidificatore deve essere utilizzato soltanto secondo le indicazioni delle presenti istruzioni
per l’uso. Il mancato rispetto di tali indicazioni può causare lesioni, incendi, scosse o difetti
dell’apparecchio.
Il deumidificatore è destinato esclusivamente ad uso privato in ambienti chiusi e non ad uso
commerciale.
Non accendere il deumidificatore nel caso in cui esso sia danneggiato o non funzioni correttamente.
Estrarre la spina dalla presa di corrente.
L’apparecchio deve essere utilizzato esclusivamente in conformità alle normative impiantistiche
nazionali.
Downloaded from www.vandenborre.be
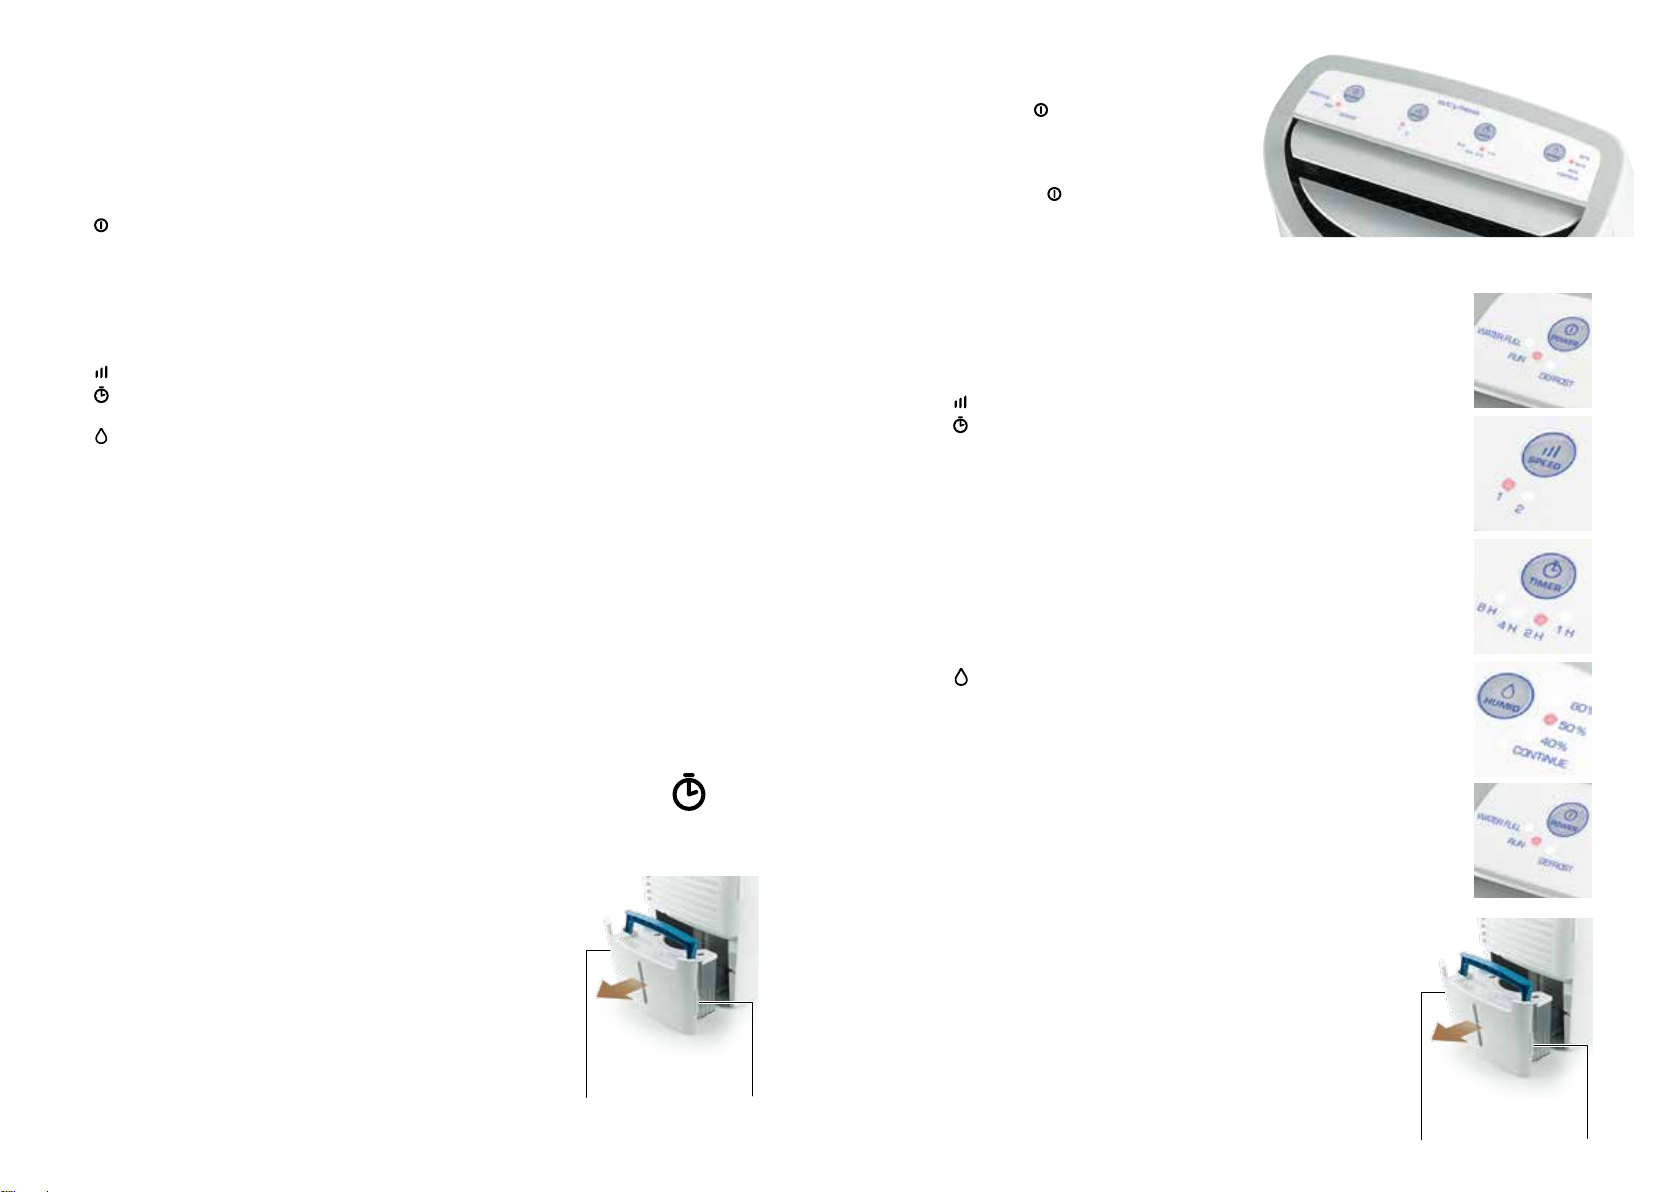
34 35
DESCRIZIONE DELL’APPARECCHIO
L’apparecchio è composto dai seguenti componenti principali:
MESSA IN FUNZIONE / ISTRUZIONI BREVI
Questa guida rapida aiuta gli utenti esperti a mettere in funzione l’apparecchio con poche
operazioni. La messa in funzione dettagliata è descritta nel capitolo successivo.
1.
Pannello di comando
2.
Uscita dell'aria (non coprire)
3.
Deumidificatore
4.
«POWER» interruttore acceso/spento
e spie di controllo:
– «WATER FULL»: serbatoio dell'acqua
pieno
– «RUN» apparecchio in funzione
– «DEFROST»: Funzione sbrinamento
dell'evaporatore
5.
«SPEED»: quantità d'aria (1-2)
6.
«TIMER»: arresto automatico (1, 2, 4 o
8 ore)
7.
«HUMID» umidità dell'aria (40, 50, 60 %
relativa e permanente)
8.
Maniglia
9.
Ingresso dell'aria (non coprire)
10.
Raccordo tubo di scarico
11.
Maniglia del serbatoio
12.
Indicatore livello dell'acqua
13.
Linguette di apertura del serbatoio
14.
Maniglia del serbatoio (aperta)
15.
Coperchio serbatoio
16.
Linguetta di fissaggio del filtro
17.
Filtro ingresso aria
18.
Copertura ingresso aria
19.
Linguette di apertura
20.
Tubo flessibile di scarico ø 8/10 mm (dia-
metro interno/esterno; non in dotazione)
21.
Raccordo per tubo flessibile di scarico
22.
Coperchio serbatoio dell'acqua (tolto)
23.
Maniglia serbatoio dell'acqua
24.
Galleggiante per livello dell'acqua
25.
Serbaoio dell'acqua trasparente
2.
1. Collocare l'apparecchio su un supporto ben stabile e resisten-
te all'acqua e non direttamente su un tappeto o un pavimento
in legno.
Importante: perché dopo un trasporto il compres-
sore non si danneggi, attendere almeno un'ora
prima di mettere in funzione l'apparecchio (nessu-
na garanzia!). Trasportare l'apparecchio sempre in posizione
eretta.
2. Tirare le linguette di apertura (13) verso l'esterno e togliere il
serbatoio dell'acqua. Controllare che all'interno non ci sia del
materiale d'imballaggio, quindi reintrodurre il serbatoio finché
non scatta in posizione.
3. Collegare la spina alla presa elettrica (tutte le spie si illumina-
no brevemente di rosso). Non collegare l'apparecchio a tempo-
rizzatori o a prese comandate.
1 ora
Linguette di apertura
5.
6.
6.
6.
6.
5.
2.
Linguette di apertura
4. Per un funzionamento ottimale chiudere
porte e finestre.
5. Accensione:
premere il tasto «POWER»
(«RUN» si illumina, le aperture dell'uscita
dell'aria si aprono, la ventilazione e il com-
pressore si avviano).
Spegnimento:
premere nuovamente il
tasto «POWER».
Buono a sapersi:
– Se il deumidificatore è stato spento poco tempo prima, il com-
pressore si avvia con un ritardo fino a 3 minuti (= circuito di pro-
tezione
).
– «Water Full» àserbatoio pieno àsvuotare àp. 36.
– «Defrost» àsbrinamento avviato àpagina 37.
6.
Spie di controllo/Impostazioni:
– «SPEED» àcommutazione quantità bassa «1»/alta «2».
– «TIMER» àl'apparecchio si accende/spegne automatica-
mente dopo 1, 2, 4 o 8 ore.
– Accensione automatica: spegnere prima l'apparecchio, quin-
di premere ripetutamente il tasto «TIMER» finché non viene
visualizzato l'orario desiderato. Se nessuna spia si accende, la
funzione di Timer non è attiva.
– Spegnimento automatico: come «accensione automatica»,
tuttavia accendere prima l'apparecchio, quindi premere ripetu-
tamente il tasto «TIMER» finché non viene visualizzato l'orario
desiderato. Se nessuna spia si accende, la funzione di Timer
non è attiva.
– «HUMID»àimpostazione del grado di umidità dell'aria.
«Continue» àfunzionamento permanente per una deumidi-
ficazione rapida. «40, 50, 60 %» àgrado di umidità rel. in %
(40 % = più asciutto, 60 %= più umido)
7. «WATER FULL»
= serbatoio dell'acqua pieno:
– «WATER FULL» àserbatoio dell'acqua pieno; il compressore
si spegne àsvuotare il serbatoio.
– Un tubo flessibile può essere collegato (non in dotazione)
àpagina 37.
– Togliere il serbatoio dell'acqua àtirare verso l'esterno le
due linguette (13) situate sul lato posteriore. Afferrare il ser-
batoio dalla maniglia blu e svuotare l'acqua nel lavandino (non
è necessario asportare il coperchio bianco).
Buono a sapersi:
Non usare l'acqua per altri scopi (contiene particelle di sporco
provenienti dall'aria). Pulire il serbatoio dell'acqua (all'interno)
una volta al mese àigiene.
– Posizionare il serbatoio dell'acqua àRibaltare la maniglia
verso il basso àInserire il serbatoio finché non scatta in po-
sizione («WATER FULL» si spegne e il compressore si avvia in
modo ritardato).
Downloaded from www.vandenborre.be

36 37
MESSA IN FUNZIONE / UTILIZZO
1. Collocare l'apparecchio su un supporto ben stabile e resistente all'acqua e non direttamente
su un tappeto o un pavimento in legno. Non esporre ai raggi diretti del sole.
Importante: dopo un trasporto, attendere almeno un'ora prima di mettere in funzione l'ap-
parecchio. Il liquido di raffreddamento e lubrificazione si può così assestare; in questo modo
non si danneggia il compressore (nessuna garanzia!).
2. Controllare che all'interno del serbatoio dell'acqua non ci sia del materiale d'imballaggio.
Per fare ciò, tirare le linguette di apertura (13) verso l'esterno e togliere il serbatoio dell'ac-
qua (è scattato in posizione). Se non vi è alcun materiale d'imballaggio, reinsere il serbatoio
(deve scattare in posizione).
3. Collegare la spina alla presa elettrica e tutte le spie si illuminano brevemente di rosso).
4. Per un funzionamento ottimale chiudere porte e finestre.
5. Accendere l'apparecchio con il tasto
«POWER». La spia rossa di controllo «RUN» si illumina,
le aperture dell'uscita dell'aria si aprono, la ventilazione e il compressore si avviano.
Premere nuovamente sul tasto per spegnere l'apparecchio.
Buono a sapersi:
– Se il deumidificatore è stato spento poco tempo prima, il compressore si avvia con un ritardo
fino a 3 minuti
(= circuito di protezione del compressore).
– Se l'indicatore «WATER FULL» si accende, il serbatoio dell'acqua è pieno e deve essere
svuotato àvedi pagina 37. Il compressore si spegne finché non viene riposizionato com-
pletamente il serbatoio vuoto.
– L'apparecchio non può essere collegato a temporizzatori o a prese comandate (pericolo di
danni al compressore)
– «DEFROST» sbrinamento avviato àvedi pagina 37.
6.
Altre spie di controllo / impostazioni possibili:
– «SPEED»: commutazione quantità aria bassa «1»/alta «2». Dopo l'accensione l'apparec-
chio funziona alla massima potenza («2» si accende).
– «TIMER»: l'apparecchio si accende/spegne automaticamente dopo 1, 2, 4 o 8 ore.
– «HUMID»: Impostazione del grado di umidità dell'aria. Dopo l'accensione, l'apparecchio
si commuta su funzionamento permanente («CONTINUE»). Questa modalità è giustificata
in caso di umidità dell'aria molto elevata o per deumidificare rapidamente un locale. Se nel
locale da deumidificare ci sono spesso delle persone, è consigliata l'impostazione di umidi-
tà relativa «50 %». Una volta raggiunta l'umidità relativa, il compressore si spegne finché
l'umidità dell'aria non torna ad aumentare. Il ventilatore continua a funzionare, affinché l'u-
midità possa essere misurata.
7. «WATER FULL»
= serbatoio dell'acqua pieno:
– Se il serbatoio dell'acqua è pieno il compressore si spegne e l'indicatore «WATER FULL» si
accende.
– Togliere il serbatoio:tirare verso l'esterno le due linguette (13) situate sul lato posterio-
re. Afferrare le due linguette e tirare il serbatoio verso l'esterno. Far ribaltare la maniglia
verso l'alto per trasportare comodamente il serbatoio. Svuotare l'acqua nel lavandino. Per
svuotare l'acqua non è necessario togliere il coperchio bianco.
– Posizionare il serbatoio: ribaltare la maniglia verso il basso e inserire il serbatoio finché
non scatta in posizione. L'indicatore «WATER FULL» si spegne e il compressore si riavvia.
– Buono a sapersi:
Non usare l'acqua per altri scopi, poiché contiene particelle di sporco provenienti dall'aria.
Per questioni d'igiene, pulire il serbatoio (all'interno) almeno una volta al mese con acqua
calda e un normale detersivo. Togliere prima il coperchio bianco del serbatoio (22) (affer-
rare il coperchio dal bordo anteriore, ribaltare leggermente verso l'alto, quindi tirare verso
di sé fino a rimuoverlo). Non lavare il serbatoio o il coperchio nella lavastoviglie o con pro-
dotti abrasivi per evitare di danneggiare i pezzi.
8. Tubo flessibile di scarico:
– Se l'apparecchio viene collocato in un locale con lo scarico a pavimento, è possibile farvi
defluire l'acqua direttamente. In questo caso il serbatoio non viene più riempito e non do-
vrà quindi più essere svuotato. Per fare ciò occore un tubo flessibile (non in dotazione). Il
diametro interno/esterno del tubo flessibile deve essere di 8/10 mm.
– Togliere il capuccio di gomma sull'attacco del tubo (10) e infilare il flessibile sul tubo.
–Buono a sapersi:
Il flessibile deve essere posato in modo tale che abbia una pendenza regolare. Il tubo non
può essere diretto verso l'alto per evitare che l'acqua non possa più defluire.
9. Sbrinamento automatico:
– L'indicatore «DEFROST» si accende quando la temperatura dell'evaporatore è di ca.
-1° C e si è formato uno strato di ghiaccio. Cio può accadere per es. dopo un funzionamen-
to continuo di 20 minuti o quando la temperatura del locale è molto bassa. In questo caso
il compressore si spegne e il processo di sbrinamento inizia. Il ventilatore continua a fun-
zionare e l'acqua di sbrinamento giunge direttamente nel serbatoio dell'acqua. Se lo strato
di ghiaccio sull'evaporatore si scioglie entro 5 minuti, il compressore si riavvia automatica-
mente e l'indicatore «DEFROST» si spegne. Se ciò non è il caso, l'apparecchio si spegne do-
po 20 minuti (= circuito di protezione del compressore).
10. Circuito di protezione:
– Il suo deumidificatore viene costantemente sorvegliato tramite un circuito di protezione. Il
circuito di protezione spegne automaticamente il compressore in caso di gausti e impedi-
sce che esso si riavvii immediatamente e che quindi si sovraccarichi. Il compressore si ri-
avvia perciò solo dopo 1-3 minuti.
– Il circuito di protezione sorveglia anche la temperatura dell'apparecchio; se la temperatu-
ra è inferiore a 0 °C o superiore a 40 °C, l'apparecchio si spegne o non può essere messo
in funzione. L'apparecchio può essere messo in funzione solo quando la temperatura si si-
tua nell'intervallo citato ed è stata staccata la spina dalla presa di corrente e poi riattaca-
ta (= «Reset»).
– Dopo un'interruzione di corrente, l'apparecchio si riavvia con le impostazioni precedenti.
Importante: per questioni di sicureza, l'apparecchio non può essere acceso/spento trami-
te prese azionate da temporizzatori o prese comandate, ecc. (possibili danni al compres-
sore)!
11. Igrostato:
– L'igrostato integrato regola costantemente il tenore d'umidità e controlla il processo di
deumidificazione.
–Buono a sapersi:
La tolleranza standard di un igrostato integrato è di +/- 5%. Ciò significa che l'umidità re-
lativa dell'aria effettiva può variare di conseguenza.
Downloaded from www.vandenborre.be

38 39
PULIZIA
Prima di ogni operazione di manutenzione e dopo ogni uso, spegnere l’apparecchio e staccare
la spina dalla presa di corrente.
Non immergere mai l’apparecchio in acqua (pericolo di corto circuito/scossa elettrica). Per la
pulizia, passare un panno umido sull’apparecchio e poi asciugare. Prima della pulizia scollegare
assolutamente la spina dalla presa di corrente.
La copertura (18) e il filtro dell'ingresso dell'aria (17) sul lato posteriore dell'apparecchio
possono essere rimossi per facilitare la pulizia:
Togliere la copertura dell'ingresso dell'aria: per fare ciò spingere all'indietro una delle due
linguette (19) e rimuovere la copertura (18).
Togliere il filtro: sganciare una delle due linguette di fissaggio del filtro (16) spingendola
leggermente all'indietro. Quindi togliere il filtro spingendo all'indietro.
Rimuovere i peluzzi con un pennello o un'aspirapolvere con spazzola per peluzzi. Non premere
sul filtro (può strapparsi). Pulire le parti in plastica con un panno umido.
Rimontare le parti procedendo in ordine inverso: agganciare il filtro al corpo dell'apparecchio
con una linguetta di fissaggio. Spingere leggermente l'altra linguetta verso il centro affinché
anch'essa possa agganciarsi al corpo dell'apparecchio (scatta in posizione). Fissare la
copertura sul lato posteriore dell'apparecchio finché tutte e quattro le alette scattano nella
sede di bloccaggio (non usare troppa forza; la copertura è posizionata eventualmente al
contrario e quindi con combacia). Non utilizzare mai l'apparecchio senza il filtro e senza la
copertura d'ingresso dell'aria!
Svuotare giornalmente il serbatoio.
Per questioni d'igiene, pulire il serbatoio (all'interno) almeno una volta al mese con acqua calda
e un normale detersivo. Per fare ciò togliere il coperchio bianco del serbatoio (22) (afferrare il
coperchio dal bordo anteriore, ribaltare leggermente verso l'alto, quindi tirare verso di sé fino a
rimuoverlo).
Non lavare il serbatoio, il coperchio, la copertura e il filtro nella lavastoviglie o con prodotti
abrasivi per evitare di danneggiare i pezzi.
CUSTODIA
In caso di mancato uso prolungato (p.es. vacanze), staccare la spina dalla presa di corrente.
Svuotare il serbatoio dell'acqua e farlo asciugare con l'apparecchio per 1-2 giorni (affinché
l'acqua di condesa all'interno possa evaporare e che l'apparecchio sia perfettamente asciutto),
quindi riporre l'apparecchio in un luogo asciutto e privo di polvere.
Consiglio: utilizzare l'imballaggio per la custodia dell'apparecchio.
DATI TECNICI
Dimensioni 347 x 495 x 247 mm (L x A x P)
Peso netto 10.2 kg
Tensione di alimentazione 220-240 V / 50/60 Hz
Potenza 255 W
Adatto per dimensione locali 40m² o 100m³
Intervallo di temperatura (max.) 0 °C – 40 °C
Capacità di deumidificazione max. 12 l / giorno
Accensione/spegnimento automatico sì/sì
Volume serbatoio 2 l / 0.528 galloni americani
Conforme alle direttive UE CE/WEEE/RoHS
Con riserva di modifiche tecniche e salvo errori.
GUASTI
«Water Full» è acceso
Serbatoio dell'acqua pieno; svuotare il serbatoio àpagina 37.
«Water Full» non si spegne
Il serbatio dell'acqua non è inserito correttamente àInserire completamente il serbatoio (deve
scattare in posizione ed essere chiuso a filo con il corpo dell'apparecchio).
Il circuito di protezione del compressore è ancora attivo. Può durare fino a 3 minuti finché il
compressore non si riavvi (e l'indicatore si spenga).
L'apparecchio è spento e nessun tasto reagisce
La temperatura del locale è troppo bassa (inferiore a 0 °C) o troppo alta (superiore a 40 °C)
àpagina 37. Se l'apparecchio dopo aver riscaldato o raffreddato non reagisce, staccare la spina
dalla presa di corrente, quindi riattaccarla (= «Reset»).
«DEFROST» è acceso e il compressore non funziona
L'apparecchio deve sbrinarsi àpagina 37.
Il serbatoio perde acqua
Nel rimuovere/inserire il serbatoio possono fuoriuscire delle gocce d'acqua. Se il serbatoio perde
ancora acqua deve essere sostituito. Non mettere mai il serbatoio in lavastoviglie e non farlo mai
cadere, potrebbe danneggiarsi.
Downloaded from www.vandenborre.be
Table of contents
Languages:


