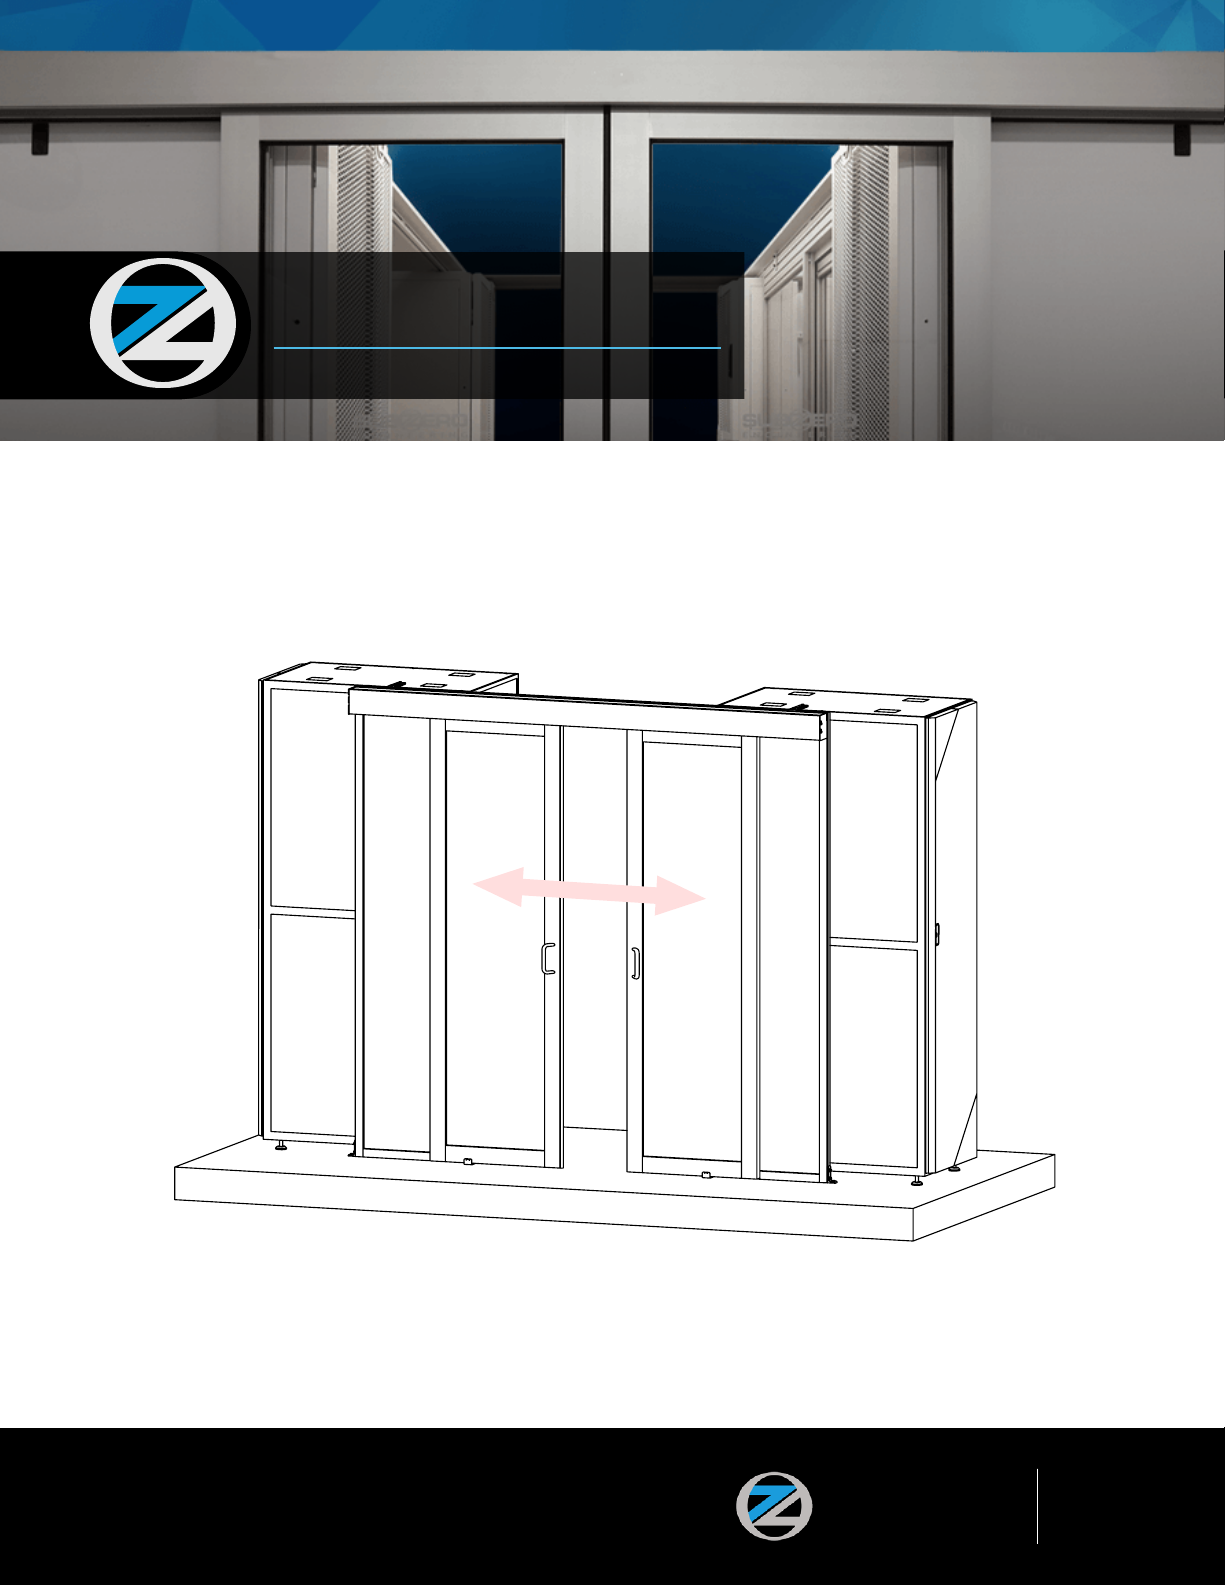
Subzero ELITE Series User manual

ELITE SERIES
Bi-Parting
Feature
Install/User Guide
www. eng.com 1
Design and specifications are subject to change without notice.
Proprietary Notice: The information contained in this user guide is the sole
property of Subzero Engineering. Any reproduction in part, or as a whole
without the written permission of Subzero Engineering is prohibited.
V 1-0_06/14/2017 © 2017 Subzero Engineering. All rights reserved.
World Headquarters
228 West 12300 South
Denali Bldg. Suite 108
Draper, UT 84020
p
f
e
w
801.810.3500
866.810.3509
www.subzeroeng.com
ELITE SERIES
Bi-Parting Feature
Install/User Guide

ELITE SERIES
Bi-Parting
Feature
Install/User Guide
www. eng.com 2
Table of Contents
Safety Information . . . . . . . . . . . . . . . . . . . . . . . . . . . . . . . . . . . . . . . . . . . . . . . . . . . . . . . . . . . . . . . . . . . . . . . . . . . . . . . 3
Warranty . . . . . . . . . . . . . . . . . . . . . . . . . . . . . . . . . . . . . . . . . . . . . . . . . . . . . . . . . . . . . . . . . . . . . . . . . . . . . . . . . . . . . . 3
Pre-Assembly . . . . . . . . . . . . . . . . . . . . . . . . . . . . . . . . . . . . . . . . . . . . . . . . . . . . . . . . . . . . . . . . . . . . . . . . . . . . . . . . . 4
Planning Assembly . . . . . . . . . . . . . . . . . . . . . . . . . . . . . . . . . . . . . . . . . . . . . . . . . . . . . . . . . . . . . . . . . . . . . . . . . . . . 4
Tools Required . . . . . . . . . . . . . . . . . . . . . . . . . . . . . . . . . . . . . . . . . . . . . . . . . . . . . . . . . . . . . . . . . . . . . . . . . . . . . . 4
Components Included . . . . . . . . . . . . . . . . . . . . . . . . . . . . . . . . . . . . . . . . . . . . . . . . . . . . . . . . . . . . . . . . . . . . . . . . . . . . 4
Assembly . . . . . . . . . . . . . . . . . . . . . . . . . . . . . . . . . . . . . . . . . . . . . . . . . . . . . . . . . . . . . . . . . . . . . . . . . . . . . . . . . . . . . 5
Operation . . . . . . . . . . . . . . . . . . . . . . . . . . . . . . . . . . . . . . . . . . . . . . . . . . . . . . . . . . . . . . . . . . . . . . . . . . . . . . . . . . . . . 10
Cleaning . . . . . . . . . . . . . . . . . . . . . . . . . . . . . . . . . . . . . . . . . . . . . . . . . . . . . . . . . . . . . . . . . . . . . . . . . . . . . . . . . . . . . 10

ELITE SERIES
Bi-Parting
Feature
Install/User Guide
www. eng.com 3
• While unpacking use caution with sharp objects such as razors to avoid damaging the product.
• A minimum of two people should be available to install this product.
• While drilling or using power tools safety glasses and gloves should be worn to avoid injury.
Safety Information
Subzero Engineering warrants to the original purchaser that it will, as its sole option, repair or replace this product or any part of this
product, if it confirms that the product is defective in materials or workmanship under normal use and maintenance for one year after
the purchase date of the product.
This limited 1 (one) year warranty DOES NOT COVER the following:
1. Defects or damage arising from shipping, installation, alterations, accidents, abuse, misuse, lack of proper maintenance and use
of other than genuine Subzero replacement parts, in all cases whether caused by a contractor, service company, the owner or
any other person.
2. Deterioration through normal wear and tear.
3. Damages resulting from abuse or misuse from failure to install or maintain this product in accordance with the written instructions
furnished by Subzero Engineering.
4. Use of Cleaning Products Containing Calcium Hypo Chlorite (Chlorine), Scouring Powders or pads shall not be covered.
5. Expense of normal maintenance.
6. All costs of removal, transportation, labor, reinstallation or other costs including postage and/or shipping costs to obtain warranty
service shall be paid by the customer.
7. Any liability for consequential or incidental damages, all of which are hereby expressly disclaimed, and implied warranties,
including those of merchantability or fitness for purpose intended are specifically excluded. (Some jurisdictions do not allow
limitations on how long an implied warranty lasts, or the exclusion or limitation of incidental or consequential damages, so these
limitations and exclusions may not apply to you.)
8. Responsibility for compliance with local code requirements are excluded from this warranty. (Since local code requirements vary
greatly, distributors, dealers, installation contractors, and users should determine whether there are any code restrictions on the
installation or use of a specific product.)
This limited warranty gives you specific legal rights. You may have other statutory rights that vary from state to state or from province to
province, in which case this limited warranty does not affect such statutory rights.
Limited Warranty Contact Information
For service under these limited warranties, it is suggested that a claim be made through the contractor or dealer from or through whom
the product was purchased, or that a service request (including a description of the product model and of the defect) be sent to the
following address:
United States:
Subzero Engineering
228 W 12300 S
Suite 108
Draper, UT 84020
Attention: Director of Consumer Affairs
For residents of the United States, warranty information may also be obtained by calling: (801) 810-3500
1 Year Limited Warranty

ELITE SERIES
Bi-Parting
Feature
Install/User Guide
www. eng.com 4
Pre-Assembly
Planning Assembly
Unpack all items and compare them to the Components Included list. Lay all parts on a flat non-abrasive surface such as
cardboard. If any item appears damaged or is missing, do not assemble and contact Subzero Engineering.
It is recommended that at least two
people assemble this product.
TOOLS PROVIDED
3mm Hex Key
ADDITIONAL TOOLS REQUIRED
Cable Snips / Side-Cutters
Phillips Head Screwdriver
Tools Needed
Components Included
NOTE
Hardware is not shown to scale.
Threads on hardware may be
shown as removed.
NOTE
Item 3001
x2 Rolls
Item 3002
x1
Item 3003
x1
Item 3006
x4
Item 3005
x2
Item 3009
x4
Item 3008
x2
Item 3007
x2
Item 3004
x4

ELITE SERIES
Bi-Parting
Feature
Install/User Guide
www. eng.com 5
Assembly
(1.1) Loosen the 4 Valance Screws with a 4mm hex key. (Do not remove the screws.)
(1.2) Remove the Valance by lifting up and sliding the screws out of their slots.
1 – Remove the Header
2 – Attach the Tensioners
(2.1) Attach the Left Hand Tensioner (Item 3002) to the Hold Open Latch Mounting Bracket with two M4x10mm screws
(Item 3004).
(2.2) Attach the Right Hand Tensioner (Item 3003) as in the above step.
(1.1)
(1.2)
Left Hand Tensioner Right Hand Tensioner
(2.1)
(2.2)
Leave screws loose until
further directions.
NOTE

ELITE SERIES
Bi-Parting
Feature
Install/User Guide
www. eng.com 6
(3.1) Screw in the Tensioning Screws (Item 3008) on each Tensioning Bracket.
3 – Add the Tensioning Screws
4 – Attach the Cable Clamps
(4.1) Attach the cable clamps (Item 3005) to the inner wheel brackets as shown. Remove and use the auto closer cable
mount screw to attach to the top hole. Use (Item 3007) to attach to the bottom hole.
(3.1)
(4.1)
(4.1)
Proper installation shown below.
Do not install the cable clamps in
an alternative position.
NOTE

ELITE SERIES
Bi-Parting
Feature
Install/User Guide
www. eng.com 7
(RC)
(RC)(LC)
(LC)
(5.2)
(5.3)
(5.1)
(5.2)
(RC)(LC)
(RC)(LC)
(5.1) Push the cable through the hole in the cable clamp block. (Item 3005)
(5.2) Tighten with 3mm hex key.
(5.3) Snip any excess cable.
(5.4) Wrap cable around pulley.
(5.5) Attach the cable ends to match the image, and pull the slack through.
(5.6) Loosen the Adjustment Bracket.
(5.7) Twist the tensioner until the cables are tight, and tighten the Adjustment Bracket to set the tension.
5 – Attach the Bi-Parting Cables
(Components removed for clarity)
The Bi-Parting system functions by
connecting the two sliding door panels
together. These panels are connected
together using two cables, two clamp
blocks, and two pulleys. The RC must
connect to the left side panel, the right
side panel, and the right side pulley.
The LC must connect to the right side
panel, the left side panel, and the
left side pulley. This in-turn creates a
continuous loop where opening one
door opens the other.
“RC” = Right Side Cable End
“LC” = Left Side Cable End
NOTE

ELITE SERIES
Bi-Parting
Feature
Install/User Guide
www. eng.com 8
(6.1) Remove the Anti-jump Clips on each side of the door panels if they were installed.
(6.2) Attach the Anti-jump Rollers (Item 3006) to the inside hole of each wheel bracket on both door panels.
(Use the screws from 6.1)
6 – Replace the Anti-Jump Clips
7 – Add the Roller Set Screws
Adjust the roller so that it barely touches
the bottom of the extrusion. The door
will not function properly if the roller is
pressed against the extrusion too tight.
NOTE
(5.1)
(5.1)
Save these screws for (6.2).
NOTE
(7.1) Screw in the Set Screws (Item 3009) on all four Anti-Jump Rollers.
(7.2) Use the Set Screws to adjust the roller up to the bottom of the extrusion.
(7.1)
(7.2)

ELITE SERIES
Bi-Parting
Feature
Install/User Guide
www. eng.com 9
8 – Re-Attach the Auto Closers & Mount the Valance

ELITE SERIES
Bi-Parting
Feature
Install/User Guide
www. eng.com 10
Cleaning the Panel Insert
• Do not slam the door shut.
•Do not open the door using excessive force.
• Do not pry or try to open the door in a hinged fashion.
• Use a soft cloth, mild detergent, and water.
• Do not use any abrasive pads or materials.
• Do not use harsh solvents or thinners.
Operation

ELITE SERIES
Bi-Parting
Feature
Install/User Guide
www. eng.com 11
World Headquarters
228 West 12300 South
Denali Bldg. Suite 108
Draper, UT 84020
p
f
e
w
801.810.3500
866.810.3509
www.subzeroeng.com
Design and specifications are subject to change without notice.
Proprietary Notice: The information contained in this user guide is the sole
property of Subzero Engineering. Any reproduction in part, or as a whole
without the written permission of Subzero Engineering is prohibited.
V 1-0_06/17/2017 © 2017 Subzero Engineering. All rights reserved.
Table of contents
Popular Indoor Furnishing manuals by other brands

Allen + Roth
Allen + Roth 78649 quick start guide

OFYR
OFYR Wood Storage 300 manual

OfficeSource
OfficeSource PLTECAB6078ECOWF Assembly instructions

CAI
CAI MEZZANINE GATE Installation and operation instructions

World Market
World Market Segovia 606728 Assembly instructions

BROSA
BROSA Edgar Dresser Assembly guide

NOA & NANI
NOA & NANI Hemming HM-DC-W Assembly instructions

Next
Next FABRIC 294747 Assembly instructions

Tennsco
Tennsco 3018 Assembly Instructions/Parts Manual

BIG FURNITURE WAREHOUSE
BIG FURNITURE WAREHOUSE DALLAS TV UNIT DL912 Assembly instructions

VISIONARY DESIGNS
VISIONARY DESIGNS MOD-1143 quick start guide

Christie
Christie Modular Series Product and Assembly Manual