Foreword
We are the a manufacturer and exporter of air
tools since established. We have devote all our
efforts in improving quality and tools’ life. As
well as the noise and vibration of tools. Bring all
of you working efficiences, profits, and enjoy
using the tool is our principle.
Features
This tool with a reversible spindle driving a
hammer which periodically strikes an anvil
which includes a drive adapter for the purpose of
tightening or loosening nuts and bolts without
roducing any major torque reaction on the
ower tool.
Operator’s instruction
1. Main Applications
This assembly tool is the perfect one to which
the work of heavy truck, boat, construction
machine, steel belt for excavator, etc.
2. Cautions for Use
2-1 Air pressure
Maximum performance is displayed at the proper
sanding speed, obtainable at a gauge pressure of
6.2 bar. Range-wise, this is an air pressure from
5 to 7 bar (70 to 100 psi)
57
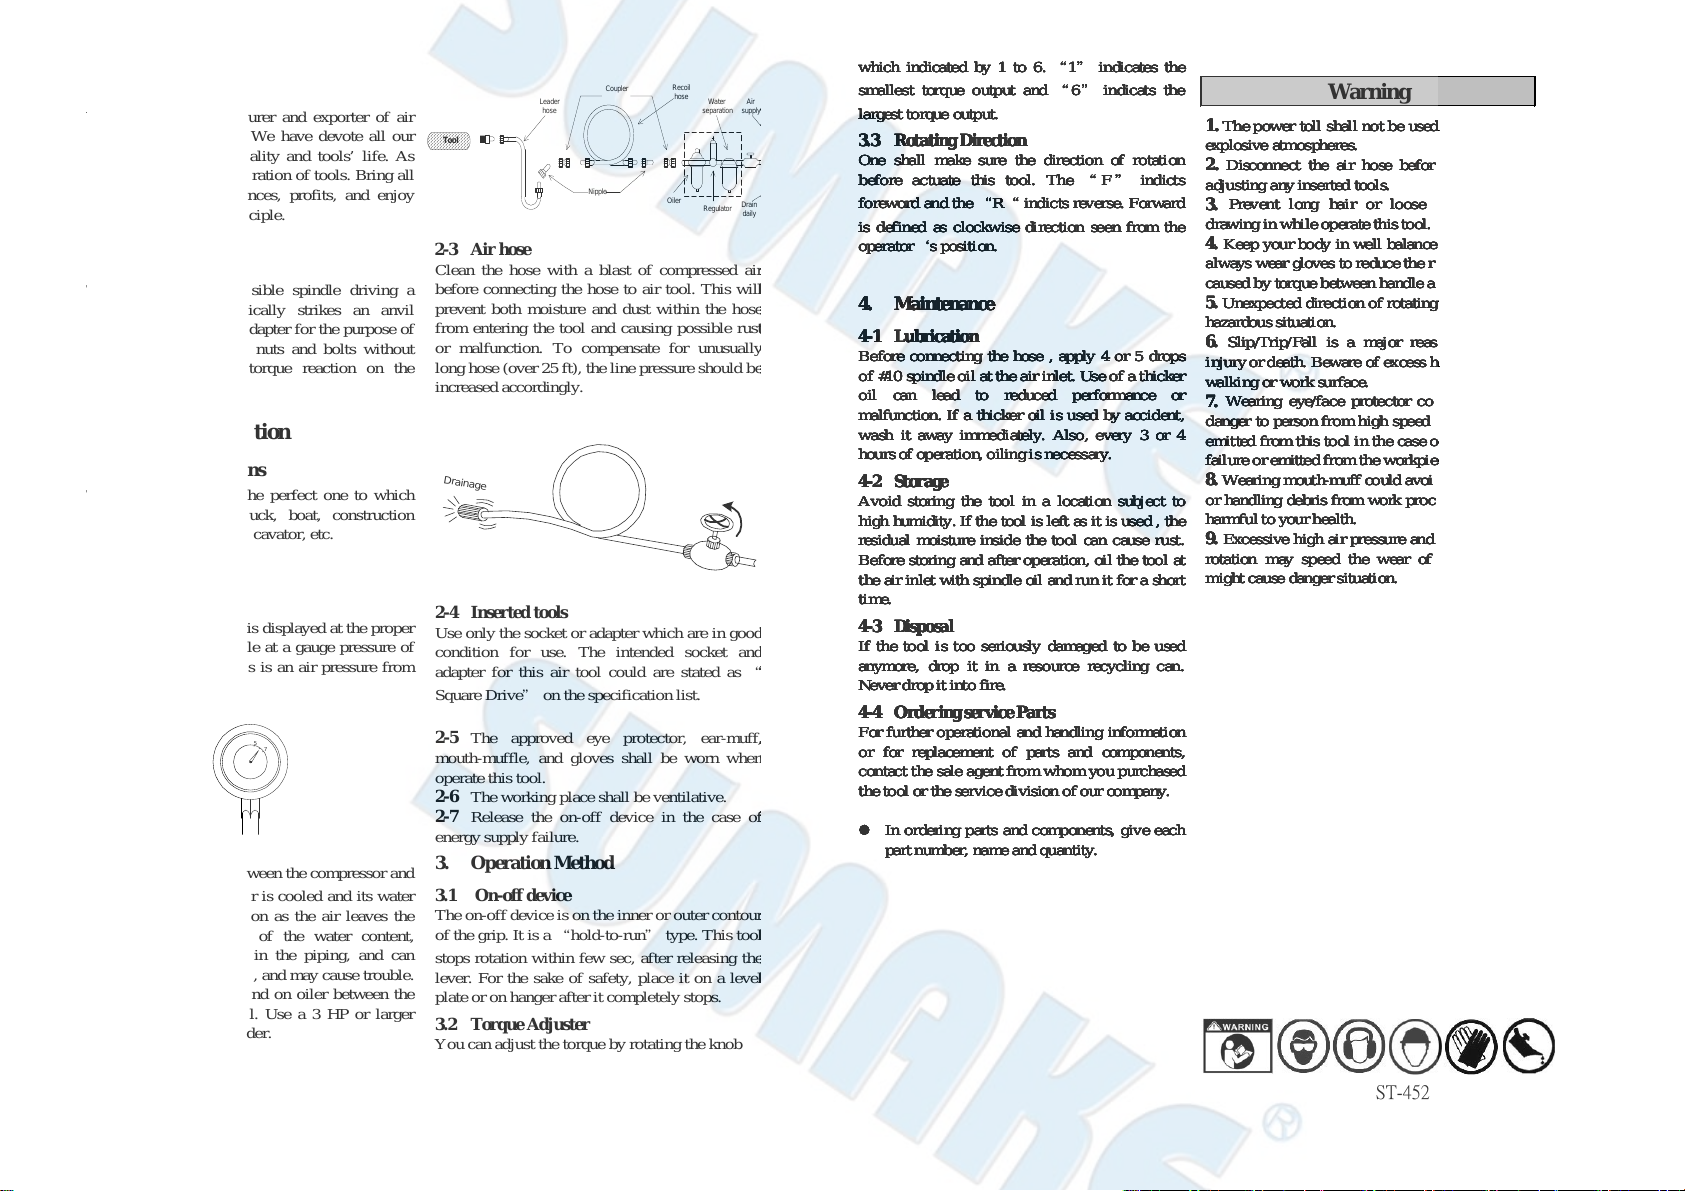
2-2 Air line
Use a 3/4“air hose between the compressor and
the tool . Compressed air is cooled and its water
content separated, as soon as the air leaves the
compressor. A portion of the water content,
however, is condensed in the piping, and can
enter the tool mechanism, and may cause trouble.
So, install an air filter and on oiler between the
compressor and the tool. Use a 3 HP or larger
compressor for each sander.
Tool
Nipple
Coupler Recoil
hose
Leader
hose
Oiler Regulator
Water
separation Air
supply
Drain
daily
2-3 Air hose
Clean the hose with a blast of compressed ai
before connecting the hose to air tool. This wil
prevent both moisture and dust within the hos
from entering the tool and causing possible rus
or malfunction. To compensate for unusuall
long hose (over 25 ft), the line pressure should b
increased accordingly.
Drainage
2-4 Inserted tools
Use only the socket or adapter which are in goo
condition for use. The intended socket an
adapter for this air tool could are stated as
Square Drive”on the specification list.
2-5 The approved eye protector, ear-muff
mouth-muffle, and gloves shall be worn whe
operate this tool.
2-6 The working place shall be ventilative.
2-7 Release the on-off device in the case o
energy supply failure.
3. Operation Method
3.1 On-off device
The on-off device is on the inner or outer contou
of the grip. It is a “hold-to-run”type. This too
stops rotation within few sec, after releasing th
lever. For the sake of safety, place it on a leve
plate or on hanger after it completely stops.
3.2 Torque Adjuster
You can adjust the torque by rotating the knob
which indicated by 1 to 6.
“1”indicates the
smallest torque output and“6”indicats the
largest torque output.
3.3 Rotating Direction
One shall make sure the direction of rotation
before actuate this tool. The “F”indicts
foreword and the “R“indicts reverse. Forward
is defined as clockwise direction seen from the
operator‘s position.
4. Maintenance
4-1 Lubrication
Before connecting the hose , apply 4 or 5 drops
of #10 spindle oil at the air inlet. Use of a thicker
oil can lead to reduced performance or
malfunction. If a thicker oil is used by accident,
wash it away immediately. Also, every 3 or 4
hours of operation, oiling is necessary.
4-2 Storage
Avoid storing the tool in a location subject to
high humidity. If the tool is left as it is used , the
residual moisture inside the tool can cause rust.
Before storing and after operation, oil the tool at
the air inlet with spindle oil and run it for a short
time.
4-3 Disposal
If the tool is too seriously damaged to be used
anymore, drop it in a resource recycling can.
ever drop it into fire.
4-4 Ordering service Parts
For further operational and handling information
or for replacement of parts and components,
contact the sale agent from whom you purchased
the tool or the service division of our company.
In ordering parts and components, give each
part number, name and quantity.
Warning
1. The power toll shall not be used in potentially
explosive atmospheres.
2. Disconnect the air hose before changing or
adjusting any inserted tools.
3. Prevent long hair or loose clothing from
drawing in while operate this tool.
4. Keep your body in well balanced position and
always wear gloves to reduce the risk of crushing
caused by torque between handle and workpiece.
5. Unexpected direction of rotating could cause a
hazardous situation.
6. Slip/Trip/Fall is a major reason of serious
injuryor death. Beware of excess hose left on the
walking or work surface.
7. Wearing eye/face protector could reduce the
danger to person from high speed splinters being
emitted from this tool in the case of inserted tool
failure or emitted from the workpiece.
8. Wearing mouth-muff could avoid inhaling dust
or handling debris from work process that can be
harmful to your health.
9. Excessive high air pressure and too much free
rotation may speed the wear of this tool and
might cause danger situation.
Foreword
We are the a manufacturer and exporter of air
tools since established. We have devote all our
efforts in improving quality and tools’ life. As
well as the noise and vibration of tools. Bring all
of you working efficiences, profits, and enjoy
using the tool is our principle.
Features
This tool with a reversible spindle driving a
hammer which periodically strikes an anvil
which includes a drive adapter for the purpose of
tightening or loosening nuts and bolts without
roducing any major torque reaction on the
ower tool.
Operator’s instruction
1. Main Applications
This assembly tool is the perfect one to which
the work of heavy truck, boat, construction
machine, steel belt for excavator, etc.
2. Cautions for Use
2-1 Air pressure
Maximum performance is displayed at the proper
sanding speed, obtainable at a gauge pressure of
6.2 bar. Range-wise, this is an air pressure from
5 to 7 bar (70 to 100 psi)
57
2-2 Air line
Use a 3/4“air hose between the compressor and
the tool . Compressed air is cooled and its water
content separated, as soon as the air leaves the
compressor. A portion of the water content,
however, is condensed in the piping, and can
enter the tool mechanism, and may cause trouble.
So, install an air filter and on oiler between the
compressor and the tool. Use a 3 HP or larger
compressor for each sander.
Tool
Nipple
Coupler Recoil
hose
Leader
hose
Oiler Regulator
Water
separation Air
supply
Drain
daily
2-3 Air hose
Clean the hose with a blast of compressed ai
before connecting the hose to air tool. This wil
prevent both moisture and dust within the hos
from entering the tool and causing possible rus
or malfunction. To compensate for unusuall
long hose (over 25 ft), the line pressure should b
increased accordingly.
Drainage
2-4 Inserted tools
Use only the socket or adapter which are in goo
condition for use. The intended socket an
adapter for this air tool could are stated as
Square Drive”on the specification list.
2-5 The approved eye protector, ear-muff
mouth-muffle, and gloves shall be worn whe
operate this tool.
2-6 The working place shall be ventilative.
2-7 Release the on-off device in the case o
energy supply failure.
3. Operation Method
3.1 On-off device
The on-off device is on the inner or outer contou
of the grip. It is a “hold-to-run”type. This too
stops rotation within few sec, after releasing th
lever. For the sake of safety, place it on a leve
plate or on hanger after it completely stops.
3.2 Torque Adjuster
You can adjust the torque by rotating the knob
which indicated by 1 to 6.
“1”indicates the
smallest torque output and“6”indicats the
largest torque output.
3.3 Rotating Direction
One shall make sure the direction of rotation
before actuate this tool. The “F”indicts
foreword and the “R“indicts reverse. Forward
is defined as clockwise direction seen from the
operator‘s position.
4. Maintenance
4-1 Lubrication
Before connecting the hose , apply 4 or 5 drops
of #10 spindle oil at the air inlet. Use of a thicker
oil can lead to reduced performance or
malfunction. If a thicker oil is used by accident,
wash it away immediately. Also, every 3 or 4
hours of operation, oiling is necessary.
4-2 Storage
Avoid storing the tool in a location subject to
high humidity. If the tool is left as it is used , the
residual moisture inside the tool can cause rust.
Before storing and after operation, oil the tool at
the air inlet with spindle oil and run it for a short
time.
4-3 Disposal
If the tool is too seriously damaged to be used
anymore, drop it in a resource recycling can.
ever drop it into fire.
4-4 Ordering service Parts
For further operational and handling information
or for replacement of parts and components,
contact the sale agent from whom you purchased
the tool or the service division of our company.
In ordering parts and components, give each
part number, name and quantity.
Warning
1. The power toll shall not be used in potentially
explosive atmospheres.
2. Disconnect the air hose before changing or
adjusting any inserted tools.
3. Prevent long hair or loose clothing from
drawing in while operate this tool.
4. Keep your body in well balanced position and
always wear gloves to reduce the risk of crushing
caused by torque between handle and workpiece.
5. Unexpected direction of rotating could cause a
hazardous situation.
6. Slip/Trip/Fall is a major reason of serious
injuryor death. Beware of excess hose left on the
walking or work surface.
7. Wearing eye/face protector could reduce the
danger to person from high speed splinters being
emitted from this tool in the case of inserted tool
failure or emitted from the workpiece.
8. Wearing mouth-muff could avoid inhaling dust
or handling debris from work process that can be
harmful to your health.
9. Excessive high air pressure and too much free
rotation may speed the wear of this tool and
might cause danger situation.
ST-4528A-I-1803A-OP
Foreword
We are the a manufacturer and exporter of air
tools since established. We have devote all our
efforts in improving quality and tools’ life. As
well as the noise and vibration of tools. Bring all
of you working efficiences, profits, and enjoy
using the tool is our principle.
Features
This tool with a reversible spindle driving a
hammer which periodically strikes an anvil
which includes a drive adapter for the purpose of
tightening or loosening nuts and bolts without
roducing any major torque reaction on the
ower tool.
Operator’s instruction
1. Main Applications
This assembly tool is the perfect one to which
the work of heavy truck, boat, construction
machine, steel belt for excavator, etc.
2. Cautions for Use
2-1 Air pressure
Maximum performance is displayed at the proper
sanding speed, obtainable at a gauge pressure of
6.2 bar. Range-wise, this is an air pressure from
5 to 7 bar (70 to 100 psi)
57
2-2 Air line
Use a 3/4“air hose between the compressor and
the tool . Compressed air is cooled and its water
content separated, as soon as the air leaves the
compressor. A portion of the water content,
however, is condensed in the piping, and can
enter the tool mechanism, and may cause trouble.
So, install an air filter and on oiler between the
compressor and the tool. Use a 3 HP or larger
compressor for each sander.
Tool
Nipple
Coupler Recoil
hose
Leader
hose
Oiler Regulator
Water
separation Air
supply
Drain
daily
2-3 Air hose
Clean the hose with a blast of compressed ai
before connecting the hose to air tool. This wil
prevent both moisture and dust within the hos
from entering the tool and causing possible rus
or malfunction. To compensate for unusuall
long hose (over 25 ft), the line pressure should b
increased accordingly.
Drainage
2-4 Inserted tools
Use only the socket or adapter which are in goo
condition for use. The intended socket an
adapter for this air tool could are stated as
Square Drive”on the specification list.
2-5 The approved eye protector, ear-muff
mouth-muffle, and gloves shall be worn whe
operate this tool.
2-6 The working place shall be ventilative.
2-7 Release the on-off device in the case o
energy supply failure.
3. Operation Method
3.1 On-off device
The on-off device is on the inner or outer contou
of the grip. It is a “hold-to-run”type. This too
stops rotation within few sec, after releasing th
lever. For the sake of safety, place it on a leve
plate or on hanger after it completely stops.
3.2 Torque Adjuster
You can adjust the torque by rotating the knob
which indicated by 1 to 6.
“1”indicates the
smallest torque output and“6”indicats the
largest torque output.
3.3 Rotating Direction
One shall make sure the direction of rotation
before actuate this tool. The “F”indicts
foreword and the “R“indicts reverse. Forward
is defined as clockwise direction seen from the
operator‘s position.
4. Maintenance
4-1 Lubrication
Before connecting the hose , apply 4 or 5 drops
of #10 spindle oil at the air inlet. Use of a thicker
oil can lead to reduced performance or
malfunction. If a thicker oil is used by accident,
wash it away immediately. Also, every 3 or 4
hours of operation, oiling is necessary.
4-2 Storage
Avoid storing the tool in a location subject to
high humidity. If the tool is left as it is used , the
residual moisture inside the tool can cause rust.
Before storing and after operation, oil the tool at
the air inlet with spindle oil and run it for a short
time.
4-3 Disposal
If the tool is too seriously damaged to be used
anymore, drop it in a resource recycling can.
ever drop it into fire.
4-4 Ordering service Parts
For further operational and handling information
or for replacement of parts and components,
contact the sale agent from whom you purchased
the tool or the service division of our company.
In ordering parts and components, give each
part number, name and quantity.
Warning
1. The power toll shall not be used in potentially
explosive atmospheres.
2. Disconnect the air hose before changing or
adjusting any inserted tools.
3. Prevent long hair or loose clothing from
drawing in while operate this tool.
4. Keep your body in well balanced position and
always wear gloves to reduce the risk of crushing
caused by torque between handle and workpiece.
5. Unexpected direction of rotating could cause a
hazardous situation.
6. Slip/Trip/Fall is a major reason of serious
injuryor death. Beware of excess hose left on the
walking or work surface.
7. Wearing eye/face protector could reduce the
danger to person from high speed splinters being
emitted from this tool in the case of inserted tool
failure or emitted from the workpiece.
8. Wearing mouth-muff could avoid inhaling dust
or handling debris from work process that can be
harmful to your health.
9. Excessive high air pressure and too much free
rotation may speed the wear of this tool and
might cause danger situation.


